Crossbeats ROAD EYE DC01 User manual

USER MANUAL
R ADEYE
O
DC01
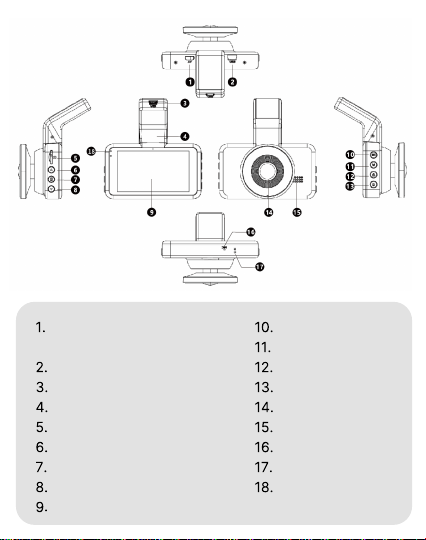
Micro AV IN (For Rear View
Camera)
USB Charging Port 1
USB Charging Port 2
Bracket
TF Card Slot
Up Button
Menu Button
Down Button
Screen
OK/Record Button
Mode Button
Lock Button
Power Button
Lens
Speaker
Microphone
Reset Button
Charging/Working
Indicator
Over view
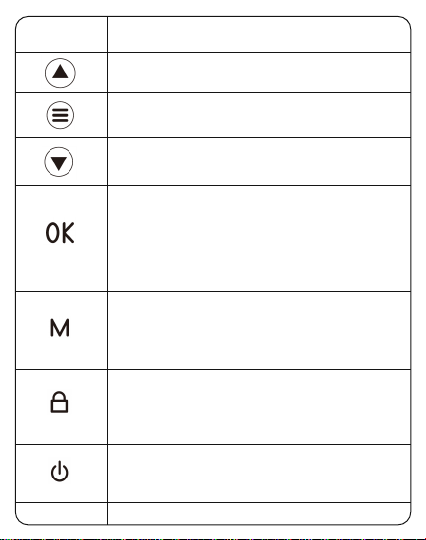
1. Select function options in setup mode
2. Select previous video in playback mode
1. Select function options in setup mode
2. Select next video in playback mode
1. In recording mode, press once to start
recording, press one more time to stop recording.
2. Long press once to shoot photos when
recording.
3. Press once to confirm your setting in settings
mode.
1. Press once to shift between Video/Photo/Lock
Video playback mode.
2. Press once to return to previous page in
playback mode
1. Press once to shift between Video/Photo/Lock
Video playback mode.
2. Press once to return to previous page in
playback mode
1. Press once to turn on the device.
2. Press once to lock the screen.
3. Press and hold to turn off the device.
Reboot the device and default settings.
Press once to enter menu setting.
(Disabled in recording mode)
Button
Reset
Operation and Function

Install the Memory Card
Note: The TF Card is not included in the package.
Get Started
Note:
Do not insert or remove the TF card when the dash cam is
powered on to avoid breakage of the card.
Please use a class 10 micro-SD card from 16 GB to 128 GB
but 64 GB is suggested.
Format the memory card before use.
1.
2.
3.
Insert a card with the golden contacts facing the LCD
display side of the dash cam.
To remove the card, gently push it until it clicks and
pull it out of the slot.

1.
2.
3.
Press to enter setting interface.
Press / to locate Micro SD card set up, press to
enter Micro SD card format.
Press / to locate , press to confirm formatting.
Format the Memory Card.
Dash Cam Installation:
Slide the mount into the mount installation slot.
Turn off the car engine.
Stick the car mount together with the camera onto your
windshield.
Connect the USB charging cable to the mini-USB port of the
dash cam. Run the cable along the edge of the windshield.
Tuck away in the seams and extend it all the way to the USB
port of the car charger. Be sure to keep it away from the
airbag area.
1.
2.
3.
4.

Connect the car charger and Dash Cam by using
the charging cable.
Plug the other end of the car charger to your
vehicle’s cigarette lighter socket.
When the car engine is on, dash cam will turn ON
and start recording automatically. When the car
key is turned to LOCK position, Dash Cam
automatically saves the recording and turns OFF
within few seconds.
Usage:
Adjust the dash cam to keep the lens level with the ground.
Start the engine to check if the dash cam works properly.
5.
6.
Note:
Only use the supplied Car Charger, otherwise the camera may
frequently reboot or flicker LCD due to insufficient power.
Make sure to remove the Plastic Lens Screen Protector from
the lens before recording videos. Otherwise, your videos will
look blurry and blocked.
200mAh battery is mainly used to save files in emergency.
Please always connect the Dash Cam to external power
while using.
1.
1.
2.
3.
Auto Power ON/OFF:

Press / to select files.
Press to delete selected file.
Press to play/pause the selected file. Press and
hold / to fast-forward/rewind.
Press one more time to exit video playback.
To Manually Turn ON: Press the power button once.
To Manually Turn OFF: Press and hold the power
button for at least 2 seconds.
2. Manual Power ON/OFF
Press to shift between Video/Photo/Lock Video
playback mode.
4. Playback Mode
4.1 Video Playback
Press to enter Menu Setting.
Press / to locate the item you want to set.
Press to confirm your setting.
Press again to exit Menu Setting.
3. Menu Setting
Note: Please set the right time before using the dash cam.

Press / to select files.
Press to delete selected file.
Press to view the selected file.
Press one more time to exit photo playback.
4.2 Photo Playback
Press / to select files.
Press to play/pause the selected file. Press
and hold / to fast-forward/rewind.
Press one more time to exit video playback.
4.3 Lock Video Playback
Note: Cannot delete protected files on the dash cam.
Download KACAM App on Phone:

Scan the QR code to download the KACAM app from the
AppStore or Google PlayStore.
Download and install the app
Now go to your phone’s WiFi Setting > then select the
“Crossbeats_RoadEye DC01_******”.
(WiFi Name SSID: “Crossbeats_RoadEye DC01_******”,
Password: “12345678”)
Now your phone is connected to dash camera via WiFi.
Now you just open the KACAM app on your phone and the
camera will connect automatically.
You can Click <<Check Real-time Video>>
In the App, you can view videos directly from dash cam
to your phone, even download them and change
setting etc.
For Android Phones:
There is one extra step you will have to take for the first time.
Once you connect to Crossbeats_RoadEye DC01_******
WiFi, it will say “No Internet”, which is fine. Wait for 10-15
seconds until you see the pop-up or notification. You just
have to tap on the pop-up notification that will show up in
few seconds to select that you still want to stay connected
even though there is NO Internet. Once you select this OK,
you are set to go.

For iPhone:
If you get the pop-up for you iPhone while using WiFi feature,
make sure to tap on “Keep Trying WiFi”. Otherwise, the
camera will get disconnected from the WiFi and then you will
have to reset the device and pair again for it to work.
Function Description
Movie Mode – FHD 30fps (Default)/ HD 30 fps
Allow to choose the desired video resolution and fps (frames
per second). Higher resolution and fps videos result in
smoother videos, but also take more storage space.
Movie Chip Time – Off/1 min (Default)/3 mins / 5 mins
Allow the dash-cam to continuously record.
Please notice: The Dash Cam will keep deleting the oldest
files automatically when memory card gets full so that it can
keep recording over and over.
Sound Record – On (Default)/Off
On: The video file will have sound.
Off: The video file will not have any sound.
Exposure:
To adjust video exposure setting for either brighter or darker
video according to your preference.

Video Time Lapse – Off (Default)/On
On: The Dash cam can sustain longer operational period
while reducing video file size. Video files will be played at
high-speed when playback.
Protect Level-Off (Default)/Low/Middle/High
ADAS – On / Off (Default)
To use ADAS function:
Turn on ADAS in the Menu Setting, enter the ADAS mode.
On a straight road, gently adjust the front lens so that
the two green lines coincide with the road. The cross
icon is placed in the middle of the road. When the blue
lines coincide with the road and the green lines
disappear, the calibration is successful.
G-sensor is a 3-axis impact gravitational accelerometer,
designed to detect physical and gravitational forces on the
dash-cam.
Note: ADAS is only an auxiliary function, the accuracy rate can
only reach 90% at most, and the accuracy will decrease at rainy
days, evenings, or on complex road scenes. It is recommended
to calibrate once every other time or when the accuracy of
ADAS broadcast is low.
1.
2.

Once G-sensor has triggered due to physical or gravitational
impact force on the camera, the current video file will be
locked as an emergency file so it won’t be deleted by
loop cycle function.
Parking Monitoring
The Parking monitoring should be work with KACAM 3-wires
hardware kit, after the hardwire kit is connected, there
are 3 options:
Language – Multilingual, default English
Allow to choose your desired language for dash cam system.
Volume – Off / High (Default) / Middle / Low
To switch on / off or adjust the beep sound.
Time Lapse Parking Mode: After the car is shut down, the
dash cam will enter the time lapse recording, 1S/1FPS
Impact Detection Parking Mode: After the car is shutdown,
dashcam turns off, it will wake up the video when there is
vibration in 30 S and lock the file, save it in the Event folder,
and then shut it down again.
Off
Time Lapse Parking Mode
Impact Detection Parking Mode.
1.
2.
3.

LCD Power Save – Off (Default) / 1 min / 2 mins / 3 mins
Power Save – Off (Default) / 1 min / 2 mins / 3 mins
Once chose a time duration and turn on this function, the
dash cam will automatically show a black background
after the set time, while the camera still stays ON.
Please notice that this function only turns Off the LCD
screen, to prevent from distracting the driver.
Frequency – 50 Hz (Default) / 60 Hz
According to the power supply specification used in your country.
Clock Settings
Set your local date and time.
Stamp – On (Default) / Off
On: The recording time will be shown on the video or photo.
Fitigue Warning – Off (Default) / 1 hour / 2 hours / 4 hours
1/2/4 Hour(s): The dashcam will make sound when dashcam is
working for 1/2/4 hours. To alert that please keep awake.
Format SD Warning – Off / 15 days / 30 days (Default) /
60 days
15/30/60 day(s): The dashcam will alert that please format SD
Frequency – 60 Hz – Used in USA, North America.
Frequency – 50 Hz – Used in Europe, most Asian Countries.

card, if too much emergency lock file to use loop recording
function.
Format SD Card – Ok / Cancel
Allow to format the inserted memory card, all data will be deleted.
Reset setup
Allow to restore all settings to factory default settings.
Firmware Version
To check the current firmware in the dashcam. You’ll need this
necessary information to check if newer version firmware is
available to update.

Table of contents


