Crosstour CR600 User manual
Contents
(I) Product Instructions
(II) Button and interface description
(III) Startup
(IV) Basic operation instructions for video recording /photographing / playback
(V) Instructions for menu setting
(VI) Product specifications
(IX) Frequently asked questions and solutions
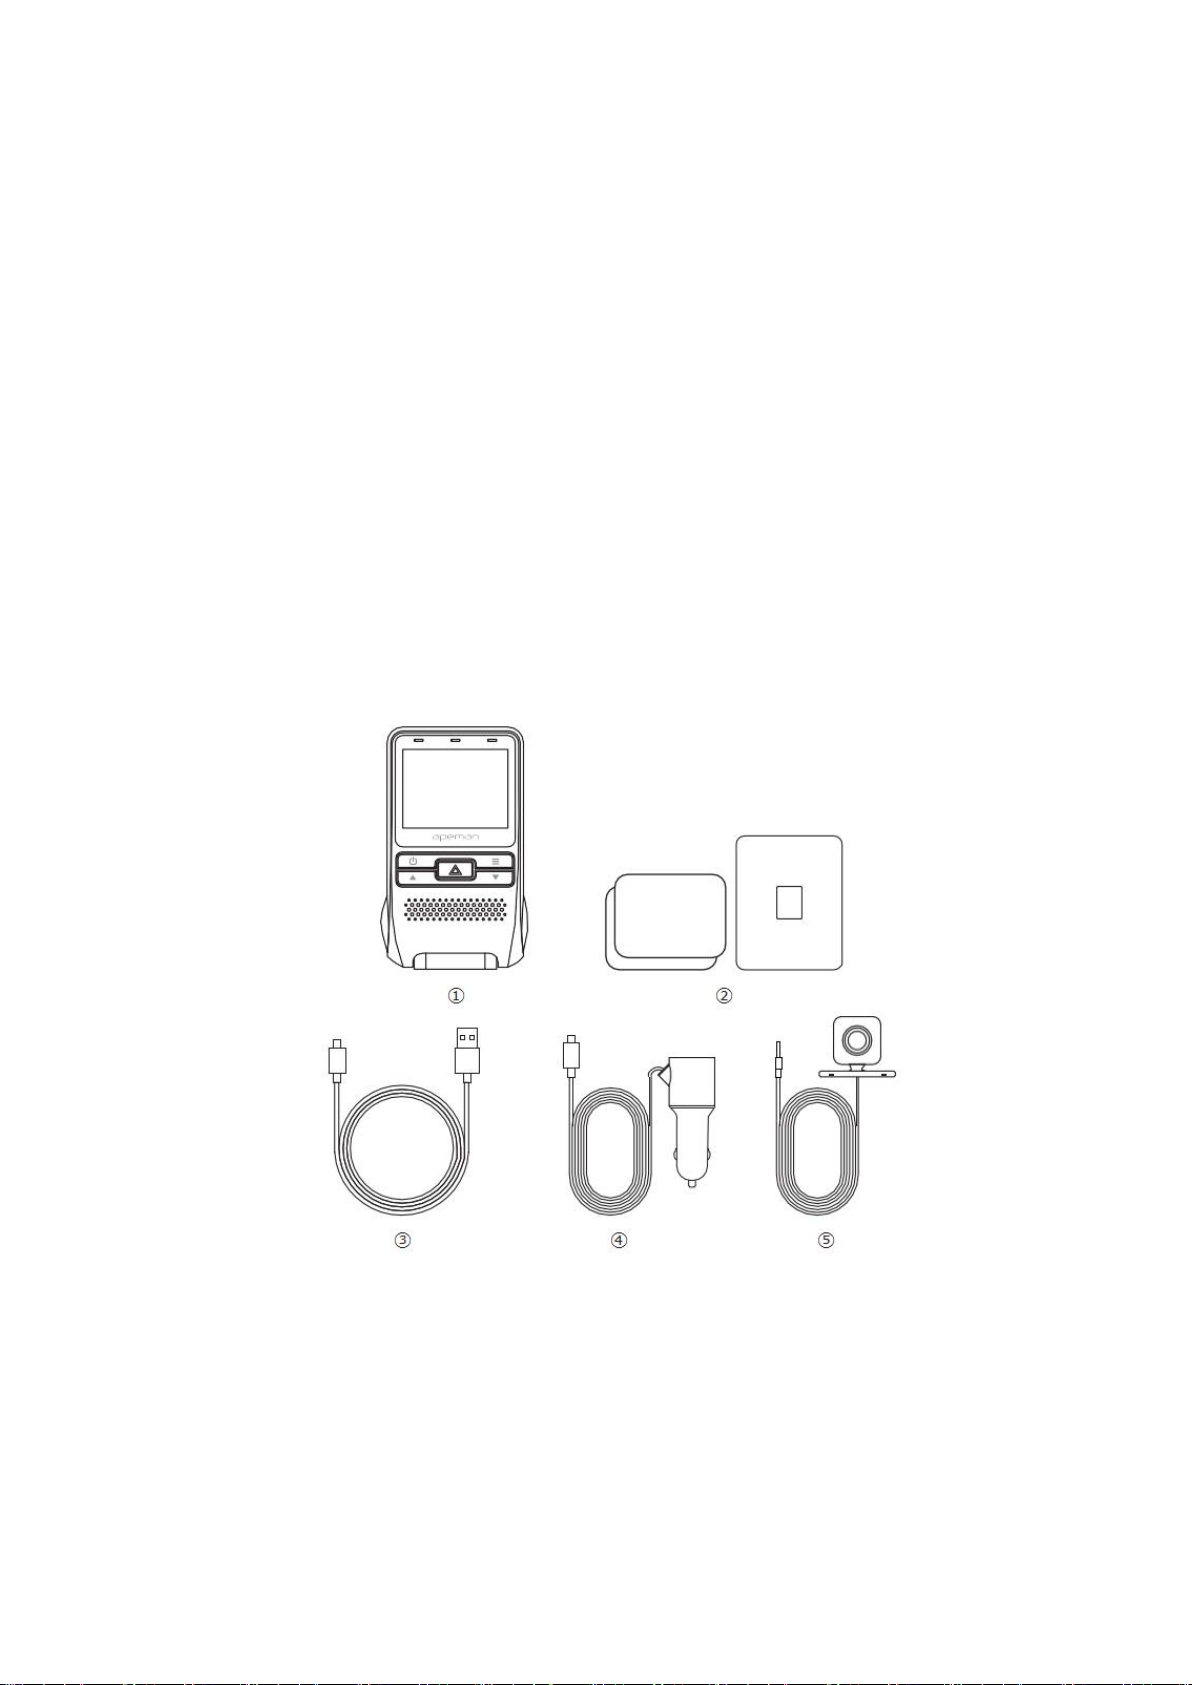
Structure diagram
Package Contents
①Main Body ②2×Adhesive ,1×Mount ③Mini USB Cable
④Car charger ⑤Rear Cam
Button Instructions

①TF Card Slot ⑥Menu ⑪Slide Slot
②Reset ⑦Down ⑫USB/Power Interface
③Power On/Off ⑧Screen ⑬Rear Cam Interface
④Up ⑨Indicator ⑭. Lens
⑤Record/OK ⑩MIC
二:机器按键及接口说明
(II) Button and interface description
按键名称
Button name
按键功能
Button function
使用说明
Instructions
电源
Power
开机/关机
Power on;
Power off;
Turn on/off screen.
1.开机:短按电源键开机指示灯亮起
2.关机:长按电源键关机此时指示灯熄灭;开机
状态下,短按开/关显示屏
1. Power on: Short press Power Button until Power
indicator light goes on.
2. Power off: Long press Power Button until
Power indicator light goes off.

3. Short press power button to turn on/off the
screen in standby mode.
复位键
Reset
复位功能
Reset function
不正常状态下,短按此键,机台可以重新启动
Short press this button to restart the machine under
abnormal conditions.
OK 键
Ok Button
录像开始/停止功能
菜单确认功能
拍照/回放
Confirm;
Playback;
Photographing;
Start/stop video Recording.
1.摄像模式下:短按开始录像,再次短按停止录
像
2.菜单模式下:设置确认键
3. 在拍照模式下:短按拍照
4.在回放模式下,短按回放文件;
1. Under video mode: Short press OK button to
start video recording. Short press OK button again
to stop video recording.
2. Under menu mode: Confirm settings.
3. Under photo mode: Short press OK button to
start photographing.
4. Under playback mode: Short press OK button to
play back files.
菜单键
模式键
Menu Button
Mode Button
长按:功能切换
短按:菜单切换
各功能设置
Long press it to switch
between different modes.
Short press it to switch
between different functions
settings.
摄像模式下:短按一下,切换到拍照设置;
2.拍照模式下:短按一下,切换到回放设置;
3.视频/照片/回放模式下:短按一下,切换到摄
像设置;
1. Long press it to switch between
video/photo/palyback mode.
2. Under video mode: short press it to switch to
video recording settings;
3. Under photo mode: Short press it to switch to
photographing settings;
4. Under playback mode: Short press it to switch
to playback settings.
上键
Up Button
向上选择/
前后路切换 Select upward/
Switch between front and
rear lens display.
1.菜单模式下:短按向上选择
2.回放模式向上选择文件
1. Under menu mode: Short press it to select
upward.
2. Under playback mode: Select a file upward.
3. Short press it to switch between front and rear
lens display under video and photo mode.
下键
Down Button
向下选择/打开关闭录音功
能
Select downward;
1.菜单模式下:向下选择
2.回放模式向下选择文件
3.摄像模式下:短按打开/关闭录音

Turn on/off audio record.
1. Under menu mode: Select downward;
2. Under playback mode: Select a file downward;
3. Under video mode: Short press it to turn on /off
audio record.
TF 卡插槽
TF card slot
存储卡插槽
Storage card slot.
按机上 TF 的卡图示插入卡槽即可
Insert TF card as shown on the machine
支架安装口
Slide Slot
安装支架用
For installing the holder.
可以把支架安装到机台上
Used to install the holder
USB/Power
Interface
Car charging interface;
Storage interface.
1.用USB 线连接电脑进入本机存储器,可查看
视频/照片
2.用车充线连接可以自动开机。
1. Connect a computer with USB cable to enter the
storage. You can view video and photo or use it as
a PC camera.
2. Connect with the car charging cable for auto
power on.
后拉录像口
Rear camera
interface
接后拉高清接口
Connect the rear camera
用于连接后拉录像的接口
Connect the rear camera.
指示灯
Indicator
开关机指示灯
Power on/off indicator
L'indicatore si accende / spegne quando la camma
si accende / spegne.
三:开机说明
(III) Startup
1.Instructions of the recorder installed on the car:
Auto power on/ off: It automatically powers on and starts recording when the car is
on. And it automatically powers off, stops recording and saves the video when the car
is off.
2.Instructions for manual operation when no car charger is inserted:
①Manually switching on/off:
Long press Power Button, the Power indicator light goes on and the cam enters video
mode;
Long press Power Button again, the Power indicator light goes off and the cam shuts
off.
②Connect car cigarette lighter with the car charging cable.

(IV) Basic operation instructions for video recording/
photographing/ playback
Video mode:
After being powered on, it enters video mode and automatically starts recording. The
video recording icon is displayed in the upper left corner of the screen. The red
dot at the top of the screen flashes, indicating that a video is being recorded. Short
press OK button to stop recording. (Premise: TF card is inserted.)
Photo mode: After being powered on, it enters video mode and automatically starts
recording. Short press OK button to stop recording. Long press menu button to switch
to photo mode. The photographing icon is displayed in the upper left corner of the
screen. Short press OK button to take a photo.
Video / photo playback
After being powered on, it enters video mode and automatically starts recording.
Short press OK Button to stop recording. Long press menu button twice to switch to
playback mode and the playback icon is displayed in the upper left corner of the
screen.
1.In playback mode, press Up/ Down Button to switch photo / video;
2.In playback mode, short press Menu Button to select operation on current file
(delete / protect / slide show);
3. In playback mode, short press OK Button to play current video file.
Note: If in video mode, please stop video recording first and then press Mode Button
twice to switch to playback mode.
(V) Instructions for menu setup
Video recording settings:
After being powered on, it enters video mode and automatically starts recording.
Short press OK Button to stop recording. Short press Menu Button to switch to video
recording settings. The screen displays the settings such as: Resolution, Loop
Recording, Display Mode, WDR, Exposure, Motion Detection, Record Audio, Date
Stamp, G-sensor, Parking Monitoring. Short press Up/Down Button to switch to a
setting option. Short press OK Button to enter the option. Short press Up/Down
Button to modify the option. Short press OK Button to confirm the option.
Resolution: Dual video: front: 1080P FHD, rear: 720P,
Single video: 1080P FHD, 720P, VGA. Default value: 1080P FHD.

Loop Recording: The cam will cyclically record new videos under the time interval
you set. Off / three minutes / five minutes / ten minutes. Default value: three minutes
Display Mode: Picture in picture/ front camera/ back camera/ split-screen. Default
value: Picture in picture.
After rear camera is connected, this function is used to switch between different
screen display of front and rear cameras.
WDR: off/on. Default value: off.
Used to adjust the brightness of the video clips. Suitable for situations like low light
or back light.
Exposure: +3, +2, +1, 0, -1, -2, 3. Default value: 0.
Motion detection: on/off. Default value: off.
It starts recording once it detects moving subjects within 3 meters in front of the lens,
otherwise it stops recording. It automatically starts recording 10s video and stops
recording after no dynamic motion appears.
Record audio: Choose to record audio or not in the video. On/off. Default value: on.
Date stamp: on/off. Default value: on. Date and time will be displayed on recorded
video.
G-sensor: Off/ Low / Medium / High. Default value: Medium.
The cam automatically locks video that is being recorded once it detects shaking or
collision. Files that are locked won’t be overwritten/ covered.
Parking Monitoring: off/on. Default value:off.
After turning on Parking Monitoring, the cam will automatically starts recording
about 30 seconds video once it detects external force and then turn itself off if there is
no external force. The premise is that you need to hardwire it with car battery.
System Settings:
After being powered on, it enters video mode and automatically starts recording.
Short press OK Button to stop recording. Short press Menu Button to switch to video
recording settings. Short press Menu Button again to switch to system settings. The
screen displays the settings such as: Date/time, Auto Power Off, Beep Sound,
Language, Frequency, Screensaver, License Plate Number, Screen Rotation, Format,
Default Setting, Version.
Operation:

1. Short press Up/ Down Button to switch to setting option.
2. Short press OK Button to enter and short press Up /Down Button to select.
3. After modification, press OK Button to save.
Date and time: Press OK to enter it. Press Up or Down to change. After changing
each time, press OK button to switch to the next item. After all items are changed,
press Menu Button to save and exit. (After restoring the factory settings, the date
becomes the factory date).
Auto Power Off: off/ 1 minute/ 3 minutes. Default value: 1 minute. After the function
is enabled, the cam automatically turns off within the set time interval.
Note: this function only works when there is no operation on it or when the cam is not
recording.
Beep sound: Turn on/off sound of operation on the camera. On/off. Default value: on.
Language: English / simplified Chinese/ French / Spanish, etc.
Format: “Cancel” or “OK” may be selected. Select “OK” to delete all files on the
card, otherwise please select “cancel”.
Frequency: 50Hz/60Hz. Default value: 50Hz
Please choose the proper one according to local situation. Video recorded may have
horizontal stripes on it if wrong frequency is chosen.
Screensaver: off/1 minute/3 minutes. Default value: 1 minute. After the function is
enabled, the screen automatically goes black within the set time while it does not
affect normal recording.
License Plate Number: on/off. Default value:off.
After you set the license plate number of your car, it will be be displayed on recorded
video.
Press OK Button to enter it. Press Up/ Down Button to change number or letter. After
changing each time, press OK Button to switch to the next item. After all items are
changed, press Menu Button to save and exit.
Screen rotation: off/on. Default value: off.
The screen will rotate up and down after this function is enabled.
Format: “Cancel” or “OK”may be selected. Select “OK”to delete all files on
the card, otherwise please select “cancel”.
Default setting: “Cancel”or “OK”may be selected. Select “OK”to restore
factory settings, otherwise please select “cancel”.

Version: You can view version information.
Photo settings
After being powered on, it enters the video mode and automatically starts recording.
Short press OK Button to stop recording. Press Mode Button once to switch to photo
mode. The photographing icon is displayed in the upper left corner of the screen.
Short press Menu Button to switch to photo settings. The screen displays the settings
such as: Capture Mode, Resolution, Burst Photo, Quality, Anti-shaking, Date Stamp.
Short press Up / Down Button to switch to setting option. Short press OK Button to
enter. Short press Up /Down Button to change settings. Short press OK Button to
confirm.
Capture mode: single shot / 2s delay/ 5s delay/ 10s delay. Default value: single shot.
Resolution: 12MP/ 10MP/ 8MP/ 5MP Default Value: 12MP
Burst photo: on/off. Default value: off.
After turning on this function, you are able to take 3 pictures continuously by pressing
OK button once.
Quality: Fine / Normal / Economy. Default value: Fine.
Anti-shaking: off / on. Default value: on.
After this function is enabled, the cam can improve its performance even your hand is
shaking during photographing.
Date stamp: off / on. Default value: on.
You can choose to turn on/off date stamp on photos.
Playback settings
After being powered on, it enters the video mode and automatically starts recording.
Short press OK Button to stop recording. Press Mode Button twice to switch to
playback mode. The playback icon is displayed in the upper left corner of the screen.
Short press Menu Button again to go to settings. The screen displays the settings such
as: delete, protect, slide show.
Delete: Delete current/ all files. Default value: delete current file.
Protect: Lock current file / unlock current file / lock all files / unlock all files
Slide Show: 2 Seconds/ 5 Seconds/ 8 Seconds.

产品特点
Product features
单机双路,
Dual video
G-sensor
内置(车子意外情况下紧急保存,不被删除)
Built-in (emergently save files in case of an
accident. Files saved will not be overwritten)
液晶显示屏尺寸
Size of LCD
2英寸 LCD 屏幕
2 inch LCD
镜头
Lens
前170 度高解析超广角镜头/后120 度广角镜
头
Front: 170 degree A+ HD bugeye lens/ Rear:
120 degree wide-angle lens
拍照像素
Pixel of photo
5MP / 8MP / 10MP / 12MP
Pixel of video
Front: 1080P/ Rear: 720P
镜头光圈
Aperture
前F=1.8/后F=2.4
Front: F=1.8/ Rear: F=2.4
语言
Language
英、中文(简)等
English, Deutsch, Italiano, Français,日本語 etc
录像分辨率
Resolution of video
Auflösung von Video
双路时:前 1080P 后:720P
单前路时:1080 FHD 1920x1080/720P
1280x720/ / VGA 640x480
Dual video: Front: 1080P 1920X1080 Rear:
720P 1280x720
Single video: 1080 FHD 1920x1080/720P
1280x720/ / VGA 640x480
视频压缩格式
Video compression format
H.264 编码
H.264 encoding
运动检测功能
Motion detection
支持
Support
照片格式
Image format
JPG

存储卡
Storage card
TF 卡(Class 10 或者以上,最大支持 32G)
TF card (Class 10 or above, up to 32G)
麦克风
Microphone
支持
Support
内置喇叭
Built-in speaker
支持
Support
电源接口
Power interface
5V 1.5A
正常使用温度范围
Normal working temperature
range
-20 度到 60 度
-20 to 60 °C
VIII. Troubleshooting
Please refer to the following to solve the problems occurred during normal operation:
The screen prompts “mass storage”while being connected to computer.
This is normal situation. The cam is now equal to a card reader which means that you
can now transfer the files from the machine to the computer.To avoid this situation,
you can use a phone plug to charge the cam.
Why does the cam automatically turns itself off after being disconnected to
power source? But this dash cam has built-in battery.
Some dash cams in the market do not have battery. Some have built-in battery which
however can only last several minutes. To use it to record long enough, the battery has
to be of large capacity which is impossible. So all dash cams have to be connected to
power source all the time to ensure normal use. This is why the battery of this dash
cam can only last several minutes.
The reason that the cam automatically turns itself off after being disconnected to
power source is due to system setting. Some drivers may forget to turn off the cam
after they leave the car. If there is no such setting that the cam turns itself off when the
car is off, the cam will soon run out of power. Some important files may be damaged
due to sudden Power failure.
Fail to record a photo or video
1. Check whether the space of TF card is enough or whether TF card is locked.
2. Format TF card on the machine.
It automatically stops during recording

Due to the huge data of HD video, please use high-speed Class10 TF card supported
by the machine. High-speed TF card has a C10 mark.
A message “file error” occurs during playback of photo and video.
The file is incomplete when an error occurs during data storage in TF card, please use
the “formatting”function to format TF card.
The images are blurry.
Please check whether there is dirt, fingerprint at the lens; please wipe the lens with
lens paper before shooting
There are cross stripes in the image
When a wrong“frequency”is set, it may occur. Please set it as“50Hz”or“60Hz”
based on local power frequency.
Important note: A file can only be saved by the machine under normal recording
condition.
However, the file may be damaged or lost in the following situations
1. TF card is pulled out during recording. In this case, the last video may be damaged
or lost.
2. It is power off abnormally during recording. In this case, the last video may be
damaged or lost.
3. It suffers a destructive collision during recording. In this case, the last video may be
damaged or lost.
Other Crosstour Dashcam manuals


Popular Dashcam manuals by other brands

Dometic
Dometic CAM 30C Installation and operating manual

Prestigio
Prestigio Roadrunner 500 quick start guide

Dashmate
Dashmate DSH-882 user manual

Soundstream
Soundstream VCCD-4XS instruction manual

Rear view safety
Rear view safety RVS-950C Product manual installation & instructions

ausdom
ausdom ad118 user manual


