Crosswater SW928116 User manual

Installation and User
Manual
Electric Dual Fuel Heang Element

2
Installaon and User Manual — Electric Dual Fuel Heang Element
Please read these instrucons
carefully before starng installa-
on and keep in a safe place for
future reference.
Check the contents of the pack carefully be-
fore installaon. Responsibility will not be
held for any de-t / re-t costs where faulty
product has been ed. If any fault is found
with materials or workmanship, it must be
reported immediately to the manufactur-
er. Remedial acon will be taken, based on
informaon received, on condion that:
1. Full details are supplied to the
manufacturer;
2. The product has not been modied or
tampered with;
3. The manufacturer is informed of any
damage/shortages prior to installaon.
4. The product has not been installed, or
aempts have been made to install.
We do not accept responsibility for any prob-
lems that may occur through incorrect in-
stallaon. ENSURE the room is well heated
and venlated.
Any modicaon to the supplied product
will negate all product guarantees. Before
drilling ensure there are no hidden cables or
pipes (water, gas or electrical) behind hang-
ing points. Always wear suitable eye protec-
on when drilling. Ensure the wall surface
is able to take the weight of the complete
product. Please use the supplied wall x-
ing bracket and follow the correct installa-
on method. If the instrucons are not fol-
lowed appropriately there is an increased
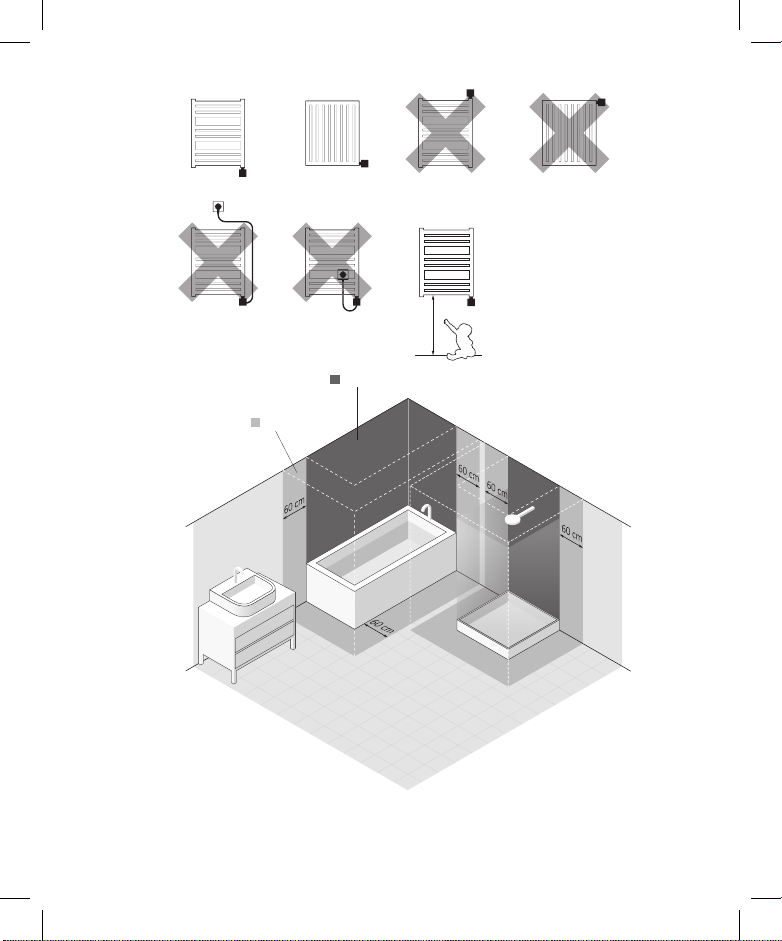
safety risk to the user. It is important to in-
stall light ngs in the correct bathroom
zone i.e. the zone referred to in the IP rat-
ing of the element. This is not an installa-
on guide and reference should be made to
the latest edion of the IET Wiring
Regulaons or a qualied electrician mem-
ber of NICEIC or IET.
All electrical bathroom products should only
be ed by a suitably qualied, Part P reg-
istered electrician in accordance with cur-
rent IEE regulaons. Failure to have elec-
trical products installed and cercated by
a qualied electrical engineer will invalidate
any product guarantee. For full details ref-
erence should be made to the latest copy
of the IET wiring regulaons and all appli-
cable Brish Standard and European norm
specicaons.
WARNING
THIS PRODUCT MUST ONLY BE INSTALLED
IN A BATHROOM VIA A 5 AMP FUSED SPUR.
3 - PIN PLUG/SOCKET CANNT BE USED.
ONLY USE THE ELECTRIC ELEMENT
INDEPENDANTLY OF HEATING THROUGH
THE CENTRAL HEATING SYSTEM. NEVER
USE BOTH TOGETHER.

3
User Manual
Our products have been designed and manufactured in such a way to ensure
that all quality, functionality and aesthetic requirements are met.
Electric radiator
Guide to safe installation anduse.
1. Do not install the heater under an electrical socket point.
2. The towel warmer should be lled with a carefully measured amount of
liquid. In the case of loss of heating medium, or in any other case which
demands its supplementation, contact your installer.
3. The device is not equipped with an external temperature controller.
4. Electric heater is not a toy. Children under the age of 3 should not be al-
lowed within close proximity of the device without the supervision of an
adult.

4
Installaon and User Manual — Electric Dual Fuel Heang Element
Children aged 3 to 8 should only be allowed to operate the heater when
it has been properly installed and connected. The child must be under
adult supervision or have been trained to safely operate the device while
understanding the risks. To ensure the safety of very small children, in-
stall the electric dryer so that the lowest tube is at least 600 mm above
the oor.
5. Note: Some parts of the radiator can be very hot and can cause burns. Pay
special attention to the presence of children or people with disabilities.
6. If the towel warmer is used as a clothes and towel dryer, ensure that the
fabrics drying on it have only been washed in water, fully rinsed of any
acidic or alkali chemicals.
7. To ensure the safety of very small children, install the electric dryer so
that the lowest tube is at least 600 mm above the oor.
8. The device should only be installed by a qualied installer in accordance
with the applicable regulations regarding safety and all other regulations.
9. Extension leads or electric plug adapters should not be used in order to
supply power to the heater.
10. While connecting the radiator to electric installation ensure that the
curcuit has a 30 mA residual-current circuit breaker and an appropriate
overcurrent circuit breaker. With the permanent installation (cable con-
nection without plug) it is also mandatory to provide an omnipolar cut-
o switch with a minimum contact opening of 3 mm for disconnecting
the device on all poles.

5
11. The device version labelled PB can be installed in bathrooms in zone 1,
as dened by applicable law, subject to any additional regulations con-
cerning electrical installations in wet areas. Other versions of the device
can be installed in Zone 2 or beyond.
12. The device is recommended for use solely as described in the manual.
13. Ensure that the heater has been installed on a wall in accordance with
its installation manual.
14. Please forward this instruction manual to the end user for future reference.

6
Installaon and User Manual — Electric Dual Fuel Heang Element
Zone 1
Zone 2
600 mm

7
Electric Heating Element
Safety requirements — installation
1. Fitting and connection of the heating element should only be perform-
er by a qualied installer.
2. Only connect the element to a suitably rated electrical mains supply (see
the ratings on the element).
3. Switching on the heating element in the open air to test the device is per-
mitted for a maximum of 3 seconds.
4. Never test a heating element that is already installed. Do not turn the
heating element on in an empty radiator!
5. Ensure that the electrical cord does not touch the hot parts of the heat-
ing element or radiator.
6. Before installing or removing the device, make sure it is disconnected-
from the mains electrical supply.
7. Do not open the device — any interference with internal components
will invalidate the warranty.
8. The heating element’s power output must not exceed the radiators pow-
er output for the parameters 75/65/20° C.

8
Installaon and User Manual — Electric Dual Fuel Heang Element
9. The pressure in the radiator should not exceed 10 atm. Ensure that an
air cushion is preserved in electric radiators. In central heating systems,
leave one valve open to prevent pressure build up due to the thermal
expansion of the liquid.
10. The device is intended for home use only.
11. Fitting and Installation of the device must be carried out in accordance
with all local regulations for electrical safety, including installation within
permissible locations only. Observe bathroom electrical zone regulations.
Safety requirements — use
1. The heating element must be fully submerged in the heating liquid dur-
ing its operation. A radiator connected to the central heating system and
equipped with an electric heating element must be airvented regularly.
2. Regularly check the device for damage to ensure it is safe to use.
3. If the power cord is damaged the device should not be used. Unplug the
device and contact the manufacturer or distributor.
4. Do not allow ooding into the heating element casing.

9
5. Do not use the heating element in heating systems where the water tem-
perature exceeds 82° C.
6. The heating element and radiator can heat up to high temperatures.
Please be cautious — avoid direct contact with the hot parts of the
equipment.
7. Do not open the heating element casing.
8. In the central heating system, always make sure that one valve of the ra-
diator remains open.
9. Ensure that minors aged 8 and above or those with a physical or men-
tal disability are supervised if operating the device.
10. The device is not a toy. Keep it out of the reach of children.
11. The device must be disconnected from the mains during cleaning and
maintenance.
12. Cleaning of the equipment by children under 8 years of age is only per-
mitted under appropriate supervision.

10
Installaon and User Manual — Electric Dual Fuel Heang Element
Intended use of device
The heang element is an electric device
intended solely for installaon in radiators
(standalone or connected to the central
heang system).
Heang element power output should be
matched with radiator output for parame-
ters of 75/65/20° C
Technical informaon
Model markings
(power cable type):
PB (Straight cable without plug) *
Power supply: 230 V / 50 Hz
Insulaon class: Class I
Towel rail connecon thread: G 1/2"
Casing protecon class [IP]: IPx5
Powers available
Length of heang element:
400 600
335 365
* Device intended to be connected permanently to the system

11
Installaon or removal
Detailed informaon demonstrang the dif-
ferent ways of installing or removing a radi-
ator heang element is available from the
manufacturer or importer (see footnotes at
the end of the manual). Below we list some
basic requirements and principles which
must be followed to ensure long term, re-
liable operaon of the product.
150°
When installing the heang element hor-
izontally, the single tube (capillary) where
the temperature sensor is located, should
be posioned to be as close to the boom
of the radiator as possible.
Before installaon or rst use:
1. Read the chapter Safety requirements
— Installaon.
2. Fit the heang element using the cor-
rect spanner (size 22).
3. The heang element must be installed
at the boom of the radiator, perpen-
dicular to the radiator pipes, while pre-
serving space for the proper circulaon
of the heang medium.
4. Use a suitable heang medium for ll-
ing the electric radiator, i.e. (water, spe-
cial products based on water and glycol
for use in central heang systems, or oil
which complies with the requirements
of the manufacturer of the radiator and
heang element).
5. Check the distances between the indi-
vidual heang element tubes and bend
if necessary.
5 mm
2-3 mm
8% (20°C)

12
Installaon and User Manual — Electric Dual Fuel Heang Element
6. Do not switch the heang element on if
it is not fully immersed in radiator heat-
ing medium.
7. Make sure an adequate air cushion is pre-
sent to protect against excessive pressure
build up within the heater (always leave
one of the radiator valves open).
8. When lling the radiator with hot liquid
insure that the liquid temperature does
not exceed 65° C.
9. Follow the subsequent guidelines when
connecng the electrical installaon:
a. Brown wire — live connecon to the
circuit (L).
b. Blue wire — connect to neutral (N)
c. Yellow & green wire — earth con-
necon (PE).
10. Before lling the radiator with heang me-
dium, ensure that the heang element is
ed properly and that it is water ght.
11. In central heang installaon radiator
must be ed with the valves enabling
disconnecon of the radiator from the
rest of the system.
12. The temperature of the heang agent
in the central heang system must not
exceed 82° C!
13. For detailed installaon hints — see the
last pages of this manual.
Notes prior to removal:
1. Before dismantling permanently, discon-
nect the heang element from the mains
and ensure that the radiator is not hot.
2. Be aware. A radiator lled with liquid can
be very heavy. When moving the radia-
tor, ensure that you take the necessary
safety precauons.
3. Before disassembly, close the appropri-
ate valves and drain the radiator com-
pletely to avoid causing any damage.
Product disposal
This product should not be disposed of as
general waste but should be brought to the
appropriate collecon point for re- cycling of
electric and electronic devices. This informa-
on is provided by the sign on the product,
user manual and packaging. Informaon on
the appropriate point for used devices can be
provided by your local authority, product dis-
tributor or the store from where the product
was purchased. Thank you for your eort to-
wards protecng the environment.

13
Maintenance
• Before performing any maintenance,
always switch o the mains electrical
supply.
• Periodically check the uid level in the
radiator and ensure the heang element
is completely submerged.
• Clean the product with a dry or damp
cloth. If necessary, use a very small
amount of detergent, ensuring that it
contains no solvents or abrasives.

14
Installaon and User Manual — Electric Dual Fuel Heang Element
Turning the device on with the buon will
result in the radiator heang up to the set
temperature. Aer reaching the set temper-
ature the device will turn o and on regular-
ly in order to maintain the set temperature.
The construcon of the device as well as
the physical characteriscs of the heang
agent inside the radiator, inuence the way
in which the heat is distributed — the tem-
perature of the boom pipes on the radiator
(especially the two located at the very bot-
tom of the radiator), may be lower than the
temperature of the remaining parts of the
radiator — this is a normal phenomenon.
Temperature increase
In order to increase the temperature of the
radiator, press once or several mes as re-
quired; the correct number of diodes will
start blinking. The last blinking diode indi-
cates the set temperature, whilst the last di-
ode which shines constantly, indicates the
current temperature. The remaining diodes
will start shining constantly on reaching sub-
sequent temperature levels.
Temperature decrease
In order to decrease the temperature of the
radiator, press once or several mes as re-
quired; the corre ct number of diodes will
start blinking. The last diode, which shines
connuously, indicates the set temperature
whilst the last blinking diode indicates the
current temperature. The remaining diodes
will start fading on reaching subsequent tem-
perature levels.
An-freeze funcon
When the device is o and the temperature
surrounding the temperature sensor drops
turn on/o buon
temperature regulaon

15
to below 6° C, the device will switch on au-
tomacally. This is to prevent the heang
agent inside the radiator from freezing. The
acvaon of An-freeze mode is indicated
by the blinking of the middle diode.
Dryer funcon
The Dryer turns the device on for 2 hours,
e.g. in order to dry a towel. Aer this peri-
od of me the device automacally switch-
es to the mode to which it was set before
the dryer mode.
Dryer funcon can be acvated during heat-
er operaon by pressing buon. You can
now freely adjust desired temperature lev-
el (buons and ). Aer 2 hrs heater will
revert to the previous seng (before dryer
funcon acvaon). To use 2 hrs mer heat-
ing element must be switched o. Switch it
on by pressing buon. Aer 2 hrs heater
will switch o automacally.
Press buon at any me to interrupt the
dryer mode.
Calibrang the temperature span
The standard temperature span of the heat-
ing element is 30-60° C. It is possible to in-
crease or decrease that span by setting
a maximum temperature of between 45° C
and 65° C, (minimum temperature of 30° C
stays unchanged). This allows the user to
achieve a maximum temperature which is
higher than the standard or to eecvely
heat a space with the device during lower
surrounding temperatures.
Example: for the temperature regulaon
span of up to 45° C (30-45° C) modicaon
by one step (one diode), means increase/
decrease of temperature by 3.75° C, while
for the temperature regulaon span of up
to 65° C (30-65° C) modicaon by one step
means increase/decrease by 8.75° C.
In order to modify the temperature span,
unplug the device and plug it back in, while
pressing buon. A single diode will start
blinking on the display panel. Use and
buons to set one of the 5 possible maxi-
mum temperatures. The rst diode stands
for 45° C. The following diodes refer to the
following maximum temperatures: 50° C,
55° C, 60° C and 65° C.
Aer selecng the new temperature span
press on/o buon to store the new sengs.

16
Installaon and User Manual — Electric Dual Fuel Heang Element
Problem solving
Problem Possible cause Soluon
The device is connected to
electrical supply in, no di-
odes are on.
Problem with the
power supply connecon.
Check the connecon of
the electrical supply to the
element.
Heang element is not
heang, outside diodes
are blinking alternately.
Temperature sensor has
been damaged.
Disconnect the device
completely, wait unl the
radiator cools down and
re-connect it again.
Overheang of device.
Check and conrm that
the heang element's out-
put does not exceed the
recommended output of
your radiator. Check and
reduce the water tem-
perature in the central
heang system-must not
exceed 82°. In electric-only
version check, if the radi-
ator is properly lled with
the heang agent.
The device is heang de-
spite turning it o with the
buon.
Damaged electronics.
Disconnect the device
completely, wait unl the
radiator cools down and
re-connect it.
If the problem connues please contact your installer or retailer where you pur-
chased the product.

17
Warranty terms & condions
1. The subject of this warranty is an elec-
tric heang element with control head.
The product name and characteriscs
are specied on the packaging.
2. By accepng the device on purchase, the
Client conrms that the product is of full
value. The Client should immediately in-
form the Seller of any discovered faults —
otherwise it will be understood that the
Product was faultless at the me of pur-
chase. This refers especially to any faults
or damages of the control panel case.
3. The Warranty for period for the Product
is 24 months from the date of purchase,
but no longer than 36 months from the
date of producon.
4. The proof of purchase (receipt, invoice,
etc.) constutes the basis for warranty
claims. Lack of the proof of purchase al-
lows the manufacturer to reject a war-
ranty claim.
5. This warranty does not cover any faults
and/or damages caused by:
— incorrect (not in accordance with
the manual) installation, use or
disassembly,
— incorrect use of the heating ele-
ment (i.e. for any purpose that is not
specied by the Manufacturer as in-
tended for this type of product),
— unqualied persons tampering with
the product,
— customers aer the purchase.
6. The Central Heang installaon should
be ed with lock-shield valves, ena-
bling disassembly of the radiator or the
heang element and its control head
without the necessity of emptying the
whole system of the heang agent. Any
problems or expenses arising from the
absence of lock-shield valves in your in-
stallaon cannot be used as grounds for
any claims against distributor.
7. The aached Product Manual is an in-
tegral element of the Warranty. Please
read it carefully prior to the installaon
and use of the Product.
8. The Manufacturer is obliged to remove
any producon fault within 14 working
days of receipt of the faulty device at
the Manufacturer’s premises.
9. Should the repair be impossible, then
the manufacturer is obliged to replace
the faulty Product with a new, full-val-
ue unit of idencal parameters.

Installaon
Dual Fuel Radiator
EN NEVER OPERATE THE HEATING ELEMENT WITH BOTH VALVES CLOSED.
HINT: Do not turn on the heang element and your central heang at the same me.
?
1
3 4
22
230 V
50 Hz
OPEN
OTWÓRZ
AUF
OPEN
OTWÓRZ
AUF
CLOSE
ZAMKNIJ
ZU
OPEN
OTWÓRZ
AUF
2
5

Installaon
Electric only Radiator
?
90%
0,5 h
MAX
1/2
1/2
MAX
?
60
1
3
5
7
2
4
6
22
230 V
50 Hz

Crosswater Limited
Lake View House, Rennie Drive, Darord, Kent DA1 5FU
Tel: +44 345 873 8840
technical@crosswater.co.uk MGKE-657 20230403 CIBTO
This manual suits for next models
5
Table of contents
Other Crosswater Heater manuals
Popular Heater manuals by other brands

MILL
MILL HT500 Assembly and instruction manual

Jaga
Jaga MINI FREESTANDING HYBRID Installation and operation manual

Black & Decker
Black & Decker BXRA43006GB manual

AZ Patio Heaters
AZ Patio Heaters PH08 Series Assembly and operation instructions

Sime
Sime UNIQA REVOLUTION 25 User, installation and servicing instructions

Timberk
Timberk T-CH1.2-A11 instruction manual