Crown SASS User guide

127018-1
6/00
Crown International, Inc
P.O. Box 1000, Elkhart, Indiana 46515-1000
(219) 294-8200 Fax (219) 294-8329
www.crownaudio.com
© 2000 Crown International, All rights
reserved PZM®, PCC®, SASS®and
DIFFEROID®,areregisteredtrademarksof
CrownInternational,Inc.Alsoexported
as Amcron®

SECTIONONE
MicrophoneTechniqueBasics3
Howto:
Reducefeedbackand reverberation 3
Reducebackgroundnoiseand leakage 4
Pickupsoundata distance 4
Reducephasecancellationsbetween twomics 5
Reducephasecancellationsfrom surface reflections 5
Reducehandlingnoise 5
Reduceproximity effect 5
Reducepop 5
Achieve a natural tone quality 6
Achieveabrighttonequality 6
Achieveagoodbalance 6
SECTIONTWO
NotesonCrownMicModels
CM-200A 6
CM-310A 6
CM-311A 6
CM-312A 6
CM-30/CM-31 6
CM-7006
CM-150 7
GLM-1007
GLM-2007
LM-201,LM-300A,LM-300AL,LM-301A7
SECTIONTHREE
SpecificApplications7
SECTIONFOUR
ChoosingtheRightCrownMicrophone14
Condenserordynamic 14
Boundaryorfree-field 14
Polarpattern 14
Frequency response 14
Applicationchart 15
15

CHOOSINGTHERIGHT
CROWNMICROPHONE
There’s a wide variety of Crown microphonesto
choose from.This guide willhelp you select the
microphones best-suited for your applications.
TransducerType
Condenser or Dynamic
In adynamic microphone,a coil of wire attached to a
diaphragm is suspended in a magnetic field and
generatesan electrical signal similarto the incoming
sound wave.
In acondenser microphone,a diaphragm and an
adjacent metallic disk(backplate) are charged to form
two plates of a capacitor.Sound wavesstrikingthe
diaphragm vary the spacing between the plates; this
varies the capacitance and generates an electrical
signal similar to the incomingsound wave.
The diaphragm and backplate can be charged either
byan externallyapplied voltage,or bya permanently
charged electretmaterial in the diaphragm or on the
backplate.
Because of its lower diaphragm mass and higher
damping,a condenser microphone responds faster
than a dynamic microphone to rapidly changing
soundwaves(transients).
Dynamic microphones offer good sound quality,are
especially rugged,and require no powersupply.
Condenser microphones require a powersupply to
operate internal electronics,but generally provide a
clear,detailed sound quality witha wider,smoother
response than dynamics.
BoundaryorFreeField
Boundary microphones are meantto be used on large
surfaces such as stage floors,piano lids,hard-surfaced
panels,or walls.Boundary mics are speciallydesigned
to prevent phase interference between direct and
reflected soundwaves,and have little or no off-axis
coloration.Free-field microphones are meant to be
used away from surfaces,say for up-close miking.
Crown Pressure Zone Microphones (PZMs) and
Phase Coherent Cardioids (PCCs)are boundary
microphones;Crown GLMs,CMsand LMsare
free-field microphones.
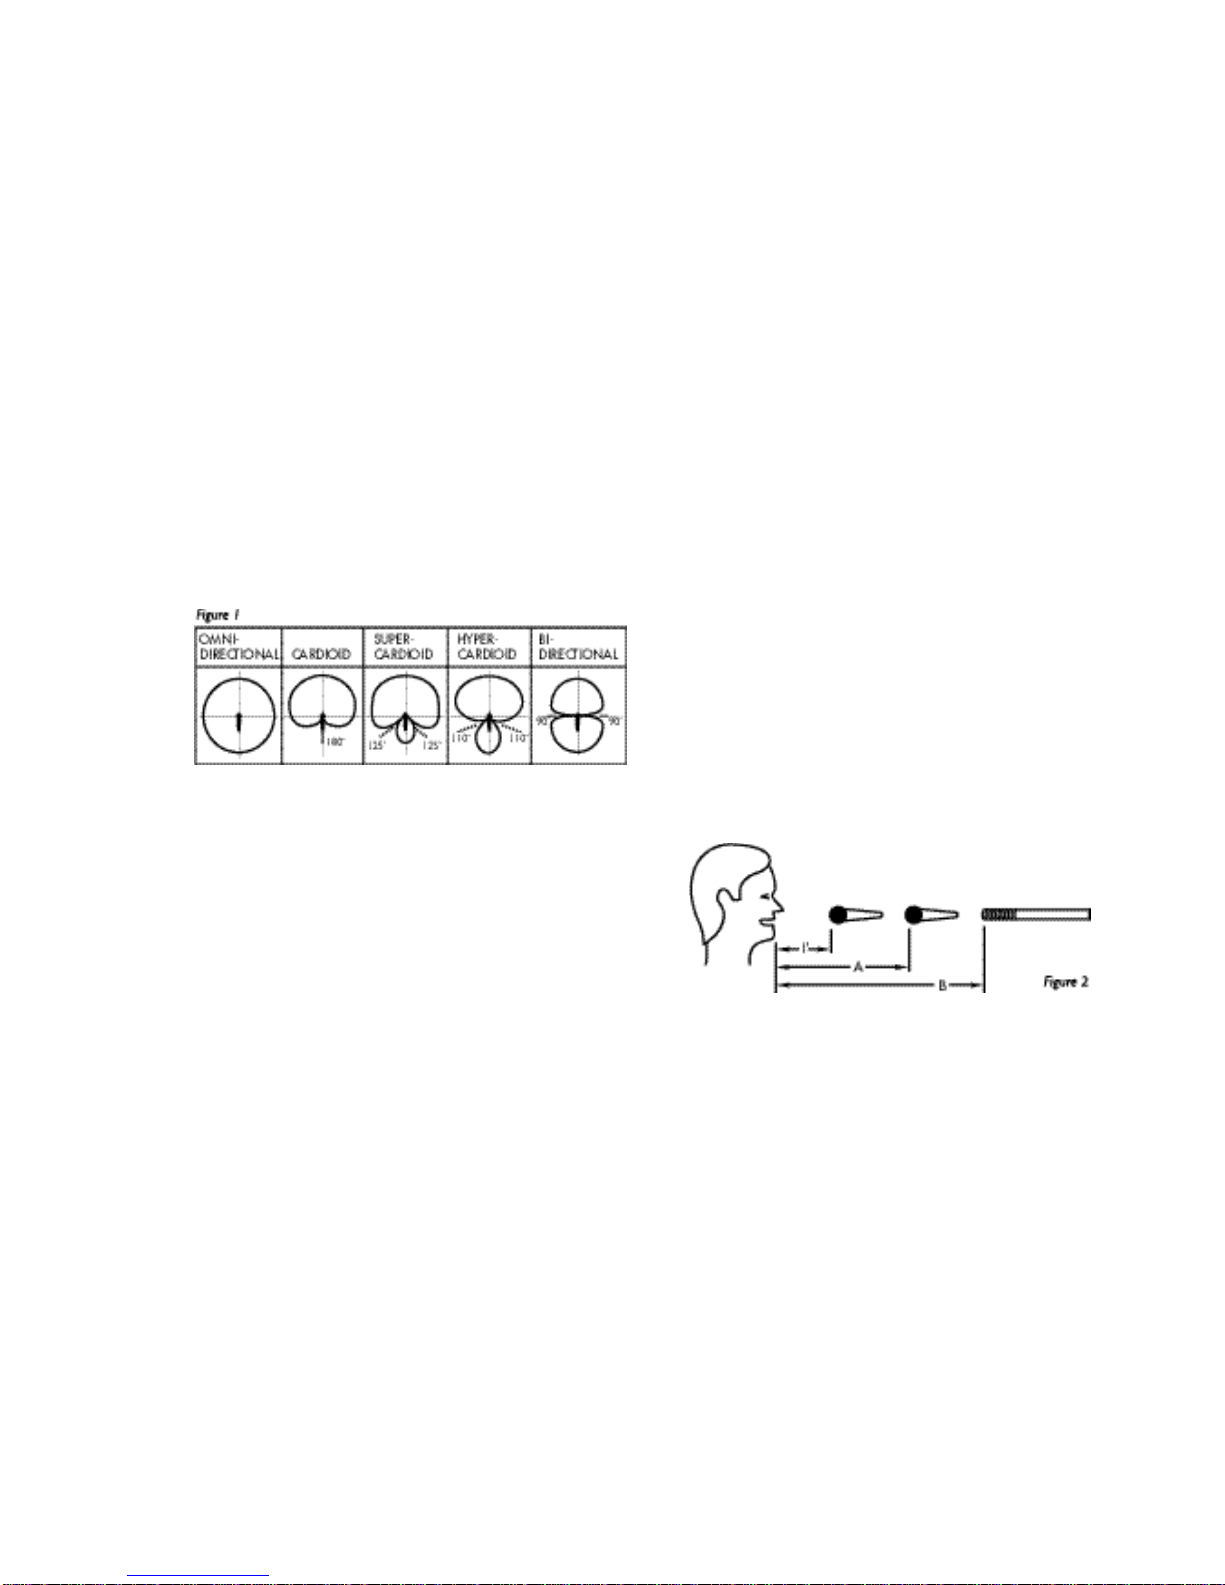
PolarPatterns
Omnidirectional or Unidirectional
Omnidirectional microphones(alsocalledpressure
microphones) are equallysensitive to sounds coming
from all directions.Unidirectionalmicrophones(also
called pressure gradientmicrophones) are most
sensitive to soundscoming from one direction - in
front of the microphone.
Three types of unidirectional patterns are the car-
dioid,supercardioid,and hypercardioid pattern.The
cardioidpattern has a broad pickup area in front of
the microphone.Sounds approaching the side of the
mic are rejected by6 dB; sounds from the rear (180˚
off-axis) are rejected 20 to 30 dB.The supercardioid
rejects theside sounds by8.7 dB,and rejects sound
best at two“nulls”behindthe microphone,125˚ off-
axis.
The hypercardioidpattern is the tightestpattern of the
three (12 dB down at the sides),and rejects sound
best at two nulls 110˚ off-axis.This pattern has the
best rejection of room acoustics,and providesthe
most gain-before-feedback from the main sound
reinforcementspeakers.
Choose omnidirectional mics when you need:
All-around pickup.
Pickup of room acoustics.
Extended low-frequencyresponse.
Lowhandlingnoise.
Lowwind noise.
No up-close bass boost.
Choose unidirectional mics when you need:
Selective pickup.
Rejection of sounds behind the microphone.
Rejection of room acoustics and leakage.
More gain-before-feedback.
Up-close bass boost (proximity effect).
An omnidirectional boundary microphone (such as
PZM) has ahalf-omni or hemispherical polar pattern.
A unidirectional boundary microphone (such as a
PCC-160)has a half-supercardioid polar pattern.The
boundary mounting increases the directionality of the
microphone,thus reducing pickup of room acoustics.
FrequencyResponse
Bright or Flat
A brightfrequency response tends to have an empha-
sized or rising high-frequency response,which adds
clarity, brilliance,and articulation.A flatfrequency
response tends to sound natural.Microphone place-
ment also has amajor effect on the recorded tonal
balance.With loud guitars,amps and drums,a mic
with rising highs or presence peak tendsto sound
natural; aflat-response mic tendsto sound dull.
14
INTRODUCTION
In this guide you’ll findsuggestions on using
Crown microphones effectively.The CM,GLM,and
LM microphone lines are covered in this booklet.For
application notes on the PZM®,PCC®and SASS®,
please see the CrownBoundaryMicApplication Guide.
Youwill find that Crown microphones can solve many
of youraudioproblems.
MICROPHONE
TECHNIQUEBASICS
Howtoreducefeedback
Feedback is a squealing sound from sound-reinforce-
ment speakers that occurs when volume is too high.
To reduce feedback:
• Turn down the volume onthe offending
microphone until feedback stops.
• Use as fewmicrophones as possible.Gain-before-
feedback decreases 3 dB each time the number of
open mics doubles.
• Place the mic close to the sound source.The closer
the mic,the higher the gain-before-feedback.If close
mikingcauses an unnatural tone quality, try using
EQtocompensate.
• Equalize the sound system with a1/3 octave graphic
equalizer.Notchout frequencies that feedback.
• Place speakers as far from the mic as possible.
• Place the mics behind or to the outside of the house
P.A.speakers.The house speakers should notaim at
the microphones.
• Use directional mics.Hypercardioid and supercar-
dioid patternsreject feedback better than cardioids,
and cardioidsrejectfeedback better than omnidirec-
tional patterns.
• Use differential (noise-cancelling) mics,such as the
Crown CM-310A or CM-311A.Theyhave the
highestgain before feedback of any mic youcan buy.
The following table tells how manydB of feedback
rejection you can expectfrom various polarpatterns,
in a reverberant sound field,compared toan omnidi-
rectional pattern at the same distance:
Omnidirectional 0.0dB
Cardioid -4.8dB
Bidirectional -4.8 dB
Supercardioid -5.7 dB
Hypercardioid -6.0 dB
For example,a cardioid mic provides 4.8 dB more
gain-before-feedback than an omni mic at the same
distance from the sound source.
Youcan place a directional mic farther from its source
than an omnidirectional mic in a reverberant sound
field and have the same gain-before-feedback. The
table belowshows the distance multiplier for each
pattern:
Omnidirectional 1.0
Cardioid 1.7
Bidirectional 1.7
Supercardioid 1.9
Hypercardioid 2.0
For example,if an omni mic is one footfrom a sound
source,a supercardioid mic can be placed 1.9 feet and
have the same gain-before-feedbackas the omni.
The figures above apply only when the mics are in a
reverberant sound field -say,when the P.A.speakers
are distant from the mics and the sound system is set
upindoors.
Howtoreducereverberation
Reverberation issometimesloosely called“room
acoustics”or“ambience.”Itis apattern of sound
reflection off the walls,ceiling,and floor.For example,
reverberation is the sound you hear just after you
shout in an empty gymnasium.Too much
reverberation in a recording can make the recorded
instrument sound distant or muddy.To reduce
reverberation:
• Place the mic closer to the sound source.
• Pickup electric instruments with adirect box or
cable.
• Use a room or studio with dead acoustics.The walls,
ceiling,and floor should be covered with a sound-
absorbingmaterial.
• Use directionalmicrophones.Hypercardioid and
supercardioid patterns reject reverb more than
cardioid.Cardioid and bidirectional patterns
reject reverb equally well.Cardioid rejects reverb
more than an omnidirectional pattern at the
same distance:
Omnidirectional 0.0dB
Cardioid -4.8dB
Bidirectional -4.8 dB
Supercardioid -5.7 dB
Hypercardioid -6.0 dB
3

Howtoreducebackgroundnoise
• Stopthe noise at its source: turn off appliances and
air conditioning;waitfor airplanes to pass;close and
seal doors and windows; use a quietroom.
• Mike close withdirectional mics.
• Pickup electric instruments with direct boxes or
cables.
• Aim the null of the polar pattern at the offending
noise source.The null is the angle off-axiswhere the
mic isleast sensitive.Differentpolar patterns have
nulls at different angles.Shown below (Figure 1) are
the null angles for various polar patterns:
Cardioid 180degrees
Supercardioid 125degrees
Hypercardioid 110 degrees
Bidirectional 90 degrees
Howtoreduceleakage
Leakage(also called bleed or spill) is the overlap of
sound from an instrument into another instrument’s
microphone.For example,if you’re mikingdrums and
pianoeachwithit’s ownmicrophone,anydrum
sound picked upby the piano mic is leakage.To
reduce leakage:
• Mike close withdirectional microphones.
•When recording,overdub instruments one at a time
oneach track of a multitrack recorder.
• Pickup electric instruments with direct boxes or
cables.
• Use a room or studio with dead acoustics.The walls,
ceiling,and floor should be covered withsound
absorbingmaterial.
• Aim the null of the polar pattern at the undesired
sound source.For example,suppose you’re miking
twoadjacenttom-tomswith twohypercardioid
mics.The null of the hypercardioid is110 degrees
off-axis.Angleeach mic so that its null aimsatthe
adjacenttom-tom.
• Use a Differioid mic on vocals such as the Crown
CM-310A or CM-311A.
Howtopickupsoundatadistance
The fartheryouplace a microphone from a sound
source,the more reverberation,leakage,and back-
ground noise you pickup. Also,you hear more mixer
noise compared to the signal because the mixergain
mustbe higher with distant miking.
To clearly pick up sound ata distance:
• Use a microphone with low self-noise (say, less
than 22 dB SPL),such as the CM-200A,CM-700,
CM-150,anyPCC,or anyPZM® (see the Crown
BoundaryMicApplication Guide).
• Boost the presence range on your mixer’s EQ
(around 5 kHz).
• If necessary,compensate forair losses at high
frequencies byboosting EQ around 15 kHz.
• Use directionalmicrophones.You can place a
directionalmic fartherfrom its source than an
omnidirectional mic and pick up the same amount
of reverberation.The table below shows the distance
multiplier for each pattern (Figure 2):
Omnidirectional 1.0dB
Cardioid 1.7dB
Bidirectional 1.7 dB
Supercardioid 1.9 dB
Hypercardioid 2.0 dB
Cardioid A = 1.7
Supercardoid A = 1.9
Hypercardoid A = 2
Shotgun B = 3 to 10
dependingonlength
For example,if an omni mic is 1 footfrom a sound
source,you can place asupercardioid mic at 1.9 feet
and pick up the same amount of reverb as the omni.
4
Field:
• To reduce ambient noise,use a CM-200A cardioid
handheld mic with a foam windscreen.Roll off any
excessbass atyour mixer.
• If the ambientnoise level is very high and you
want to reject it,use a CM-310A handheld mic or
CM-311A headworn mic withlips touching the
grille.Rolloff excessbassatyour mixer.
• Clip a CM-10 miniature omni microphone to the
shirtabout 8 inches underthe chin.Place the foam
windscreen on the mic.
• Use a CM-312A hypercardioid headworn mic.Model
CM-312A HS mounts on a SonyMDR-7506 head-
phone.
Speeches
Speaker that Wanders,
Recording/Reinforcement:
• Clip a CM-10 lavalier mic about 8 inches under the
chin.
Speaker that Stays Behind the Lectern,
Recording/Reinforcement:
• For permanent inconspicuousmiking,use an LM-
type microphone on the lectern.The LM-201 has a
silent,rugged swivel mount; the LM-300A has a
quiet,economical gooseneck.The LM-300AL is 5
inches longer than the LM-300A.The LM-301A
mounts onto an Atlas flange or a mic stand.
• For temporary miking,place a CM-700 on the end of
a mic-stand boom.Position it about 8 inches from
the person speaking.Place the included foam pop
filter onthe mic to prevent breath pops.Set the bass
tilt switchto rolloff.
• Place a PCC-160,PCC-130,or PCC-170 surface mic
on top of the lectern,outof cavities.See the Crown
BoundaryMicApplication Guidefordetails.
Narration recording:
• Place a CM-700 on aboom about 8 inches from the
mouthat eye height.Ask the announcer to maintain
a constant distance to the microphone.
Group discussion
Recording/Reinforcement:
• Hang aCM-30 orCM-31straight down over the
centerof the group.Group members should be no
more than 45˚ off-axis.
• Use PCC-170s,PCC-130s,or PZMs on the table.See
theCrownBoundary MicApplication Guideformore
suggestions.
Theatre, Drama, Opera,
or Musicals (Figure 17):
Recording/Reinforcement:
• Use PCC-160s on the stage floor or suspend CM-30s
orCM-31s overhead.See the Crown Boundary Mic
Application Guidefor suggestions.
Film or video:
• Hide a GLM-100 or CM-10 mini mic under clothing.
•Attach a GLM-100 to the back of props close to the
action.
• In an automobile,clip aGLM-100 to the sun visor
near the center-line of the automobile.
• To reduce clothing noise when the GLM is used on
an actor,spray clothing with Static Guard® or water
(spray leather with silicone spray orWD-40®).Tape
the cable to clothing,using band-aids on skin.Make
a loop in the cable to act as a strain relief.Place the
connector near the actor’s foot for unplugging
between takes.
• For video documentaries,see the tips on news and
sports reportingand narration recording.
• For audience miking,use two PZMs 3 feet aparton
the stage front,or place two CM-700s over the
audience frontrow,aimingatthe back row.
• For more tips,see the CrownMicrophoneApplication
GuideforVideo.
• To convertthe GLM for wirelessuse,please order
Technical Bulletin#3.
We hope this application guide hasprovided some
insight into the operation and use of Crown micro-
phones.For applicationnotesonPZMs,PCCs,SASS,
and boundaries,order theCrownBoundaryMic
Application Guide- free from Crown.For more
information,contacttheTechnicalSupportGroupat
CrownInternational,1718WestMishawakaRoad,P.O.
Box1000,Elkhart,IN46515orphone(219)294-8200or
visitusontheworldwidewebatwww.crownaudio.com.
13

Orchestra, Band, Choir, or Organ
Recording (Figure 15):
• Hangor place two GLM-100,CM-700 or CM-150
mics about 10 feet apart,about14 feet above the
floor,and 5 to 15 feet in front of the front-row
musicians.
• Using a stereo mic adapter,hang or place two
CM-700 mics in acoincident or near coincident
arrangement.Place the pair about 14 feetabove the
floor,and 5 to 15 feet in front of the front-row
musicians.
• See the CrownBoundary MicApplication Guidefor
more suggestions.The SASS is especially useful for
thisapplication.
Reinforcement:
• Forsound reinforcementof an orchestraor band,
mike eachsection separately a few feet away with a
GLM-100,CM-30,or CM-31.Keep in mind the 3:1
rule to prevent phase interference:The distance
between microphones should be at least three times
the distance from eachmicrophone to its sound
source.
Choir(Figure16):
Reinforcement:
• To reinforce a choir,use two CM-30or CM-31
microphones,spaced todivide the choir inthirds.
Hangthem 18 inches in the front row,18 inches over
the head height of the back row.Anglethem down to
aim at the back row.
• To keep each microphone from rotating,you might
want to thread some fishing line throughthe tiny
pipe orcrossbar on the hanger.Attach the line to the
side walls,about a foot below the heightof the
microphone in order to provide adownward pull.
• Use two CM-700s on stands.
Newsandsportsreporting
Studio:
• Clip a CM-10 miniature omni microphone to the
shirtabout 8 inches underthe chin.Since the
camera sees it on-edge,it looks like a tie bar,nota
microphone.
• Use a CM-10E forwireless applications.
12
How to reduce the phase
cancellations between two mics
If two microphones pickup the same sound source
at different distances,and their signals are fed to the
same channel,this might cause phase cancellations.
These are peaks and dips in the frequency response
caused byvarious frequencies combining out-of-
phase.The result is a colored,filtered tone quality.
To reduce phase cancellations between two micro-
phones:
• Mike close.
• Spread instruments farther apart.
• Follow the 3 to 1 rule (Figure 3): The distance
between mics should be at leastthree times the mic-
to-source distance.Forexample,if two microphones
are each1 foot from their sound sources, the mics
should be at least 3 feet apart to preventphase
cancellations.
•Don’tusetwomicswhenonewilldothejob.For
example,usejustonemiconalectern.Ifthetalker
wanders,usealavaliermicinstead.
Howtoreducephasecancellations
fromsurfacereflections
Sometimes you must place a microphone neara hard
reflective surface.Situationswhere this might occur
are reinforcingdrama,musicals,or opera with the
microphones near the stage floor,recordinga piano
with the mic near the raised lid,or recordingan
instrument surrounded byreflective baffles.
Asdescribed in the Crown Boundary MicApplication
Guide,these situations can cause phase cancellations
which give a strange tone quality.Solve the problem
byusingCrown PZM or PCC microphones mounted
to the piano lid,wall, floor,or other large flat surface.
How to reduce handling noise
and stand thumps
• Use an omnidirectional microphone such as a
PZM.
• Use a directional microphone with low sensitivity to
handlingnoise and thumps,suchasthe CM-200A,
CM-310A,orany PCC.
• Use a directional microphone with an internal shock
mount.
• Use a shock-mount stand adapteron a mic stand.
• Place the mic stand on foam or sponges.
How to reduce proximity effect
Proximityeffect is the bass boost you hear when you
mikeclose with a single-D directional microphone.
“Single-D”meansthat the microphone hasa single
distance from its frontsound entry to the rear sound
entry.The closer the mic is to the sound source,the
more bass you hear.To reduce proximity effect:
• Use an omni directional microphone.
• Turn down the excess bass with your mixer’s EQ.
Howtoreducepop
Popis an explosive breath sound produced by the
letters“p”,“b”, or“t”.When apersonsays words
containing these sounds,a turbulent puff of air is
forced from the mouth.This air puff hits the micro-
phone and makes a thump orlittle explosion called a
“pop”.
To reduce pop:
• Use an omnidirectional microphone.
• Use a microphone with a built-in pop filter orball
shaped grille,such as the Crown CM-200A or
CM-310A.
• Place an external foam pop filter on the microphone.
• Place the microphone out of the path of pop travel -
above,below,or to the side of the mouth.
• Rolloff low frequencies below100 Hz.
5

• Formaximum isolation and gain-before-feedback,
use a GLM-100 close tothe drum head afew inches
in from the rim.
• Place a CM-700 12 inchesfrom the drum head for
recording,closer for sound reinforcement.
Violin
Recording:
• Place a CM-700 or CM-1501 to 2 feet away over the
top.
•Attach a GLM-UM Universal Mount to the tailpiece
and place aGLM-100 over an f-hole.Experiment
with miking distance to get agood compromise
between tone quality and isolation.
Reinforcement:
• For more gain-before-feedback,put the GLM inside
the violin through the f-hole or clip itto the bridge.
Mandolin, Bouzouki, or Dobra
Recording/Reinforcement:
• Place a CM-700 12 inchesaway for recording,closer
for sound reinforcement.
• Mounta GLM-100 on the sound board near
anf-hole.
Acoustic Bass
Recording/Reinforcement:
• For a natural sound,place a GLM-100or CM-700
on aboom a few inches out front,above the bridge.
• Tape a GLM-100 cable to the bridge.
• For a full,deep tone,tape a GLM-100 near an f-hole.
• For isolation,place a CM-200A nearthe f-hole and
rolloff excessbass.
Brass
Recording/Reinforcement:
• Place a CM-700 or CM-200A afew feetout front.
Mic on-axis to the bell for abright,edgy tone; mic
off-axis to the bell fora mellower tone (Figure 13).
•Attach a GLM-UM Universal Mount to the bell,and
position a GLM-100 about 4”from the bell,off-
center.
Woodwinds
Recording/Reinforcement:
•Attach a GLM-UM Universal Mount to the bell,and
position a GLM-100 or GLM-200 topick up both
the bell and the tone holes.
• Place a CM-700 about 12 inches from the tone holes.
Flute
Recording/Reinforcement:
• Place a CM-700 halfway between the mouthpiece
and the tone holes about6 inches away.
• Forrecordingor low-levelsound reinforcement,use
tape,a rubber band,or apadded broom holder to
mount a GLM-100 on the flute.Attachthe GLM
cable 4 inches tothe left of the lip plate (looking at
the player),with the mic capsule 11
⁄2inchesabove
the flute (see figure 14).
• For extragain-before-feedback,tape the cable to the
end of the flute nearest the lip plate,so that the mic
can“see”the lips.Roll off the excess highs on your
mixer.
Dulcimer
Recording/Reinforcement:
• Tape a GLM-100 on the center of the top edge,1
⁄2-
inch above it.
• Place a CM-700 about 8 inches above and in front of
the center of the top edge.
Harmonica
Recording/Reinforcement:
• Place a CM-200A afew inches to1 foot away.Hand
hold the mic forsound reinforcement.Fora bluesy,
dirty sound,pick up the harmonica with a mic
plugged into a guitar amp,and mike the amp.
Harp
Recording:
•Aim a CM-700,CM-150,or GLM at the sound board
about18 inches away.
• Tape a GLM-100 to the sound board.
11
How to achieve a natural
tone quality
• Use a microphone with a flat frequencyresponse,
suchas:CM-700,CM-150,GLM-100,PCC-170,
PCC-130,anyLM mic,or a PZM-30D or PZM-6D
setto“flat”response.
• Place the microphones as farfrom the sound source
as the source is big.For example,the sound board of
a guitar is about18 inches long.Place the mic at least
18 inches awayto pick up all the partsof the guitar
aboutequally.
• If you must mike close to reduce feedbackor leak-
age,use your mixer’s EQ to restore anatural tonal
balance.
How to achieve a bright
tone quality
A“bright”sound iscrisp,clear,trebly,and articulate.
To achieve a bright sound,use a microphone with a
rising high-frequency response,such as aCrown
GLM-200ora PZM-30D/ PZM-6Dset to“rising”
response.
How to achieve a good balance
A good balance is a good loudness relationship
amonginstrumentsand voice in a mix.When the
balance is good,no instrumentis too loud or too soft.
To achieve a good balance when recording a large
ensemble with one or two microphones:
• Move instruments that are too quiet closer to the
mics,and vice versa.
• Place the mic(s) far enough away so thatyou don’t
over emphasize the instrumentsin the center of
the ensemble.
• If you’re usingtwo mics torecord stereo,increase the
microphone angling or spacing.If youhear a hole in
the middle when using widelyspaced mics,add a
third mic in the center,panned to the center.
• If asoloist isperformingin frontof an orchestra,
raise or lower the mic stand to vary the balance
between the soloist and the orchestra.
NOTES ON CROWN
MICROPHONE MODELS
CM-200A
The CM-200A is a handheld condenser microphone
with a smooth,articulate sound quality.It will not
overload nomatter how loudlyyou scream into it.
Because of its cardioid pickup pattern the CM-200A
rejects sounds approaching the rear of the micro-
phone,so aim the rear of the mic at your floormoni-
torspeakers.Use the foam pop filter to reduce breath
pops.
CM-310A
The CM-310A is a handheld cardioid microphone
thatis noise-cancellingordifferential.“Differential”
means itcancels sound at adistance,and“cardioid”
means it cancelssound from the rear.Because of these
abilities,the CM-310A permits extremely highgain-
before-feedback and isolation.To keep from cancel-
ling your voice,you must use the microphone with
lips touching the grille.Singdirectly into the front of
the microphone,not the side,or else your voice may
get cancelled and sound thin.
CM-311A
The CM-311A is a headworn cardioid microphone
thatis noise-cancellingor differential.The mic’s
capsule is directly in front of yourlips.Like the
CM-310A,the CM-311A hasoutstanding gain-
before-feedback and isolation.Lightweight and
comfortable,itadjusts to fit any head.The CM-311A
comeswith anAdapta-Pak belt pack that works with a
9V batteryor phantom power.Model CM-311AE is
the headworn mic alone,meant for connectingto a
wireless mic transmitter of yourchoice.
CM-312A
The CM-312A is a headworn hypercardioid mic that
is meant for lesscritical situations than the CM-311A.
The mic capsule in the CM-312A is at the side of the
mouth,and isvery small and light.Model CM-312AE
is the headworn mic alone,meant for connecting to a
9V-powered wirelessmic transmitter of your choice.
CM-30/CM-31
The CM-30 is a miniature supercardioid condenser
mic designed for overhead miking,such asover a
choir.It is slightly biggerthan the GLM microphones
described below,but has lower noise.The CM-30
power module mounts in an electrical box in the
ceiling; the CM-31 power module is a cylinder with
an XLR-type connector.Both mics come in black or
white.CM-30L and CM-31Lhave 60’cables.
CM-700
The CM-700 is a superb,cardioid condenser mic
for pro or semipro recordingand high-quality sound
reinforcement.Rugged enoughfor the road,the
CM-700 works equally well for popular music (multi-
miking) or classical music (stereo and spot-miking).
It’s also a good choice for miking alectern on aboom
stand.
6

Percussion
Recording/Reinforcement:
• Place a CM-700 about 1 foot away.
• Tape a PZM on the musician’s shirt (see the Crown
BoundaryMicApplication Guide).
Ambience
Recording:
• Place one or two PZMs on a distantwall,or on the
control-room window.
Grand piano (Figure 10):
Recording:
• Raise the lid.Tape a GLM-100 to the underside of
the lid in the middle.Forstereo,use two over the
bass and treble strings.If you need more isolation,
close the lid.Boost a fewdB at 10 kHz for clarity.
• Remove the lid.Place two CM-700sor CM-150s8
inches over the bass and treble strings,8 inches
horizontally from the hammers.Boost a few dB at
10kHz for clarity.
• Remove the lid.Place two GLM-100s about 12
inches apart,angled 90˚ apart,18 inchesover the
sound board and 10 inches horizontally from the
hammers.Boost afew dB at10 kHz forclarity.
Reinforcement:
• Use GLMs inside with the lid closed.Boost at 10 kHz
for extra clarity.
Upright Piano (Figure 11):
Recording:
• Remove the panel in front of the player to expose
the strings.Place two mics(CM-200A,CM-700,
CM-150,GLM-100,orGLM-200) overthe bass and
treble strings.
• Mike the soundboard afew inches from the bassand
treble strings.
Reinforcement:
• For more isolation and gain-before-feedback,tape a
GLM-100 or two onto the sound board.Experiment
with position for bestsound.
Xylophone and Marimba
Recording/Reinforcement:
• Place two CM-700s 18 inches above the instrument
and 2 feet apart.
Banjo (Figure12):
Recording/Reinforcement:
• Clipa GLM-UM Universal Mount to a banjo tension
rod,and position a GLM-100 1 inch from the head,
2 inches from the rim.
10
The CM-700 has a clear,natural sound.Self-noise
is very low, and the mic can handle extremely loud
sounds without distortion. A bass-tilt switch,pop
filter and windscreen are included.
CM-150
The CM-150 is a stand-mounted omnidirectional
condensermic for measurements or studio recording.
Its ultra-flat response from 20 Hz to 20 kHzlets it
record any instrument – oran orchestra – with full
fidelity.
CM-10 Now Discontinued
The CM-10 is amini omni lavalier mic.Youclip it to
the users shirtor tie about 8 inches under the chin.
GLM-100, GLM-200
The Crown GLM offers all the quality and wide-range
response of larger studio microphones,yet is nearly
invisible in use.It can be attached to instruments or
performers,orhungovermusicalensembles.Nomic
stands are needed,which makes setupfast and easy.
Since the GLM issmall,it can be mounted very close
to instruments to improve isolation and reject off-mic
sound.
Unlike larger microphones,GLMs pick up all sur-
roundinginstrumentswith the same tone quality or
frequency response.That’s because the microphones
are very small and maintain theirpolar pattern up to
high frequencies.
Two main models of GLMs are available: The
GLM-100 andthe GLM-200.The GLM-100 has an
omnidirectional orall around pickuppattern.When
placedin the center of a groupof instruments(say,a
drum set),it picks up all the instruments surrounding
it.The GLM-200 has a hypercardioid pickup pattern.
It picks upmainly what it’s aimedat,and provides
excellent isolation and gain-before-feedback.
The GLM-100 has a deeper low-frequency response
and a higher overload point than the GLM-200.For
these reasons,the GLM-100 omni is the best choice
for lowpitched instruments (bass,kickdrum) and for
loud instruments.Also,the GLM-100 hasless han-
dlingnoise and windnoise than the GLM-200.
General tips:For outdoor or vocal use,place the
included windscreen on the microphone to reduce
wind noise and breath popping.Although the cable is
rugged,excessive abuse such as tugging and twisting
will shorten its life.It should last indefinitely if treated
with care.The cable is short (8 feet) toallow easy
wrappingand to reduce the amount of thin cable on
stage.
LM-201, LM-300A, LM-300AL,
LM-301A
These four models are meant to be used on lecterns,
pulpits,or conference tables.The LM-201 has anoise-
free swivel mount.Designed for installation bysound
contractors,this model has a separate circuit module.
The microphone is shock mounted,and is meantto be
permanently screwed to the lectern top.
The LM-300Ais a gooseneck microphone thatplugs
intoan XLR-type connector mountedin your lectern.
If shock mounting is necessary,orderthe LM-300SM
ShockMount.
The LM-300AL is 5 inches longer than the LM-300A,
and has dual goosenecksfor more-flexible position-
ing.The LM-301A has a collar which screws onto an
Atlas flange ormic stand.Its cable can exit inside or
outside the mounting device.
SPECIFIC APPLICATIONS
This section suggestssome ways to place Crown
microphones to record or reinforce various musical
instruments.These are just startingpoints to reduce
the time spent experimenting.Theyworkwell in
manycases,butif you don’t like the results,feel free
to change the microphone or its placement.
If pick upof roomreverbation,leakage,orfeedback
is excessive,place the mic closer than recommended
below,and roll off thebass if necessaryatyour mixer
toobtain anaturaltimbre.
For example,suppose you’re mikinga folksinger
playing a guitar.If youwant to control the balance
between voice and guitar with mixer volume controls,
you must mike the singer and guitarseparately and
up close to isolate their sounds.This placement often
results in bassy tone quality,so you’ll have to roll off
some bass at yourmixer until the sound is natural.
Many of the techniques suggested here apply when
the instrument or voice is recorded alone,as for an
overdub.
Vocal
Recording:
Place a CM-700 or CM-150 8inches away at eye
height to avoid breath pops.Use the foam pop filter.
Sound Reinforcement:
• For best sound quality,use a CM-200A notmore
than 3 inches from the mouth.Place the included
foam popfilter on the mic.The closer the mic is to
your mouth the greater the gain-before-feedback,
and the greater the bass. Aim the mic at the nose to
avoid a“closed nose”effect.
7

• For maximum gain-before-feedback andisolation,
use a CM-310A with your lips touching the metal
grille.The CM-310A Differoid® has more gain-
before-feedback than any mic you can buy,so it
really helps vocals stand outover a loud instrumen-
talbackground.
•Vocalists who move around while playing often
prefer a headworn mic. An excellent choice for this
is the Crown CM-311A.It is worn with lips touching
the microphone,and offers extremelyhighgain-
before-feedback and isolation.For less critical
situations,use a CM-312A.Itis smaller and lighter
than the CM-311A,and the mic is at the side of the
mouth.
Sax (Figure 5):
Recording:
• Place a CM-700 or CM-15018 inches away,a few
inches above the bell,toward the player’s right side.
• Clip a GLM-UM to the bell,and attach a GLM-100
to the clip about 4 inches from the bell so that it can
see the tone holes.
Sound Reinforcement:
• Place a CM-200A or CM-700 just above the bell,
aimingat the tone holes.
• Clip a GLM-UM to the bell,and attach a GLM-100
to the clip justabove the ball,aimingat the tone
holes.
Electric guitar or bass
Recorded Direct:
• For a cleansound,plugdirectly intoan unbalanced
line input or use a direct box.For a distorted sound,
plug into aguitarsignal processor(such as the
Rockman™),then intoamixerinput.
Electric guitar amp(Figure 6):
Recording/Reinforcement:
• Place a CM-200A 1 to 12 inchesfrom the center of
one of the speakercones.For more bass,place the
mic close.For the brightest tone,place the mic near
the center of the speaker cone.For amellowertone,
place the mic near the edge of the speakercone.
Drum set (Figure 7):
Toms and Snare, Recording/Reinforcement:
• Place a CM-700 about 1 inch above the head,1 to 2
inches in from the rim,angled down about 45˚.If
the drum rings too much,tape some gauze or a
folded handkerchief to the head.
• Clip aGLM-UM Universal Mount to each drum rim.
Use GLM-200s.
• For more isolation,tape a GLM-100 inside each tom-
tom on the shell,or place a CM-700 inside eachtom-
tom afew inchesfrom the head,off center.
Cymbals, Recording/Reinforcement:
• Use oneor two boom stands with CM-700,
GLM-100,orGLM-200mics1 to 3 feetover the
cymbal edges.
High-Hat, Recording/Reinforcement:
• Place a CM-700 with low-end roll off or GLM-200
8 inches above the edge aiming down.
Kick Drum, Recording/Reinforcement:
• Remove the front head and damp the kick-drum
head with a pillow or blanket.Drop a GLM-100
through the vent hole so that it hangs inside the
drum afew inchesin front of the beater.Tape the
GLM cable to the kick-drum shell.Use a wood
beater or boost 2 kHz - 5 kHz for more attack or
click.Cuta few dB around 400 Hz to remove the
“papery”sound.
Three Microphones (Figure 8):
• Tape or clip one GLM-100 near the right side of the
snare drum.This GLM picks up the hi-hat,snare,left
rack tom, and cymbals.Tape or clip another GLM
near the right rack tom and the floortoms.This
GLM picksup the rightrack tom,floor tom,and
cymbals.Experiment with placementto achieve a
good balance.Youmaywant toboost the bass and
treble slightly.Put another GLM in the kick drum.
Two Microphones (Figure 9):
• Clip one GLM-100 to the snare drum rim,and
position the mic in the center of the set,about 4”
above the snare drum.With a little bass and treble
boost,the sound is surprisinglygood for such a
simple setup.Putanother GLM in the kick drum.
Acoustic guitar
Recordings (Figure 4):
•Attach a GLM-100 to the guitarsound board,
halfwaybetween the bridge and the sound hole,
near the low E string.
• Place a CM-700 or CM-1506 to 12 inches from
where the finger board joins the body.For stereo,
add another mic the same distance from the bridge.
Sound Reinforcement:
• Tape a GLM-100 inside the guitar onto the surface
nearestthe performer,so that the mic can see the
sound hole.Equalize for the desired tone quality.
• Place a CM-700 afew inchesfrom the sound hole
and rolloff the excess bass atyour mixer.
• Tape the cable of a GLM-100 to the grille cloth in
front of a speaker cone.A mic placementatthe
centerof the cone sounds bright;a placementnear
the edge of the cone soundsmore mellow.
8 9

• For maximum gain-before-feedback andisolation,
use a CM-310A with your lips touching the metal
grille.The CM-310A Differoid® has more gain-
before-feedback than any mic you can buy,so it
really helps vocals stand outover a loud instrumen-
talbackground.
•Vocalists who move around while playing often
prefer a headworn mic. An excellent choice for this
is the Crown CM-311A.It is worn with lips touching
the microphone,and offers extremelyhighgain-
before-feedback and isolation.For less critical
situations,use a CM-312A.Itis smaller and lighter
than the CM-311A,and the mic is at the side of the
mouth.
Sax (Figure 5):
Recording:
• Place a CM-700 or CM-15018 inches away,a few
inches above the bell,toward the player’s right side.
• Clip a GLM-UM to the bell,and attach a GLM-100
to the clip about 4 inches from the bell so that it can
see the tone holes.
Sound Reinforcement:
• Place a CM-200A or CM-700 just above the bell,
aimingat the tone holes.
• Clip a GLM-UM to the bell,and attach a GLM-100
to the clip justabove the ball,aimingat the tone
holes.
Electric guitar or bass
Recorded Direct:
• For a cleansound,plugdirectly intoan unbalanced
line input or use a direct box.For a distorted sound,
plug into aguitarsignal processor(such as the
Rockman™),then intoamixerinput.
Electric guitar amp (Figure 6):
Recording/Reinforcement:
• Place a CM-200A 1 to 12 inchesfrom the center of
one of the speakercones.For more bass,place the
mic close.For the brightest tone,place the mic near
the center of the speaker cone.For amellowertone,
place the mic near the edge of the speakercone.
Drum set (Figure 7):
Toms and Snare, Recording/Reinforcement:
• Place a CM-700 about 1 inch above the head,1 to 2
inches in from the rim,angled down about 45˚.If
the drum rings too much,tape some gauze or a
folded handkerchief to the head.
• Clip aGLM-UM Universal Mount to each drum rim.
Use GLM-200s.
• For more isolation,tape a GLM-100 inside each tom-
tom on the shell,or place a CM-700 inside eachtom-
tom afew inchesfrom the head,off center.
Cymbals, Recording/Reinforcement:
• Use oneor two boom stands with CM-700,
GLM-100,orGLM-200mics1 to 3 feetover the
cymbal edges.
High-Hat, Recording/Reinforcement:
• Place a CM-700 with low-end roll off or GLM-200
8 inches above the edge aiming down.
Kick Drum, Recording/Reinforcement:
• Remove the front head and damp the kick-drum
head with a pillow or blanket.Drop a GLM-100
through the vent hole so that it hangs inside the
drum afew inchesin front of the beater.Tape the
GLM cable to the kick-drum shell.Use a wood
beater or boost 2 kHz - 5 kHz for more attack or
click.Cuta few dB around 400 Hz to remove the
“papery”sound.
Three Microphones (Figure 8):
• Tape or clip one GLM-100 near the right side of the
snare drum.This GLM picks up the hi-hat,snare,left
rack tom, and cymbals.Tape or clip another GLM
near the right rack tom and the floortoms.This
GLM picksup the rightrack tom,floor tom,and
cymbals.Experiment with placementto achieve a
good balance.Youmaywant toboost the bass and
treble slightly.Put another GLM in the kick drum.
Two Microphones (Figure 9):
• Clip one GLM-100 to the snare drum rim,and
position the mic in the center of the set,about 4”
above the snare drum.With a little bass and treble
boost,the sound is surprisinglygood for such a
simple setup.Putanother GLM in the kick drum.
Acoustic guitar
Recordings (Figure 4):
•Attach a GLM-100 to the guitarsound board,
halfwaybetween the bridge and the sound hole,
near the low E string.
• Place a CM-700 or CM-1506 to 12 inches from
where the finger board joins the body.For stereo,
add another mic the same distance from the bridge.
Sound Reinforcement:
• Tape a GLM-100 inside the guitar onto the surface
nearestthe performer,so that the mic can see the
sound hole.Equalize for the desired tone quality.
• Place a CM-700 afew inchesfrom the sound hole
and rolloff the excess bass atyour mixer.
• Tape the cable of a GLM-100 to the grille cloth in
front of a speaker cone.A mic placementatthe
centerof the cone sounds bright;a placementnear
the edge of the cone soundsmore mellow.
8 9

Percussion
Recording/Reinforcement:
• Place a CM-700 about 1 foot away.
• Tape a PZM on the musician’s shirt (see the Crown
BoundaryMicApplication Guide).
Ambience
Recording:
• Place one or two PZMs on a distantwall,or on the
control-room window.
Grand piano(Figure 10):
Recording:
• Raise the lid.Tape a GLM-100 to the underside of
the lid in the middle.Forstereo,use two over the
bass and treble strings.If you need more isolation,
close the lid.Boost a fewdB at 10 kHz for clarity.
• Remove the lid.Place two CM-700sor CM-150s8
inches over the bass and treble strings,8 inches
horizontally from the hammers.Boost a few dB at
10kHz for clarity.
• Remove the lid.Place two GLM-100s about 12
inches apart,angled 90˚ apart,18 inchesover the
sound board and 10 inches horizontally from the
hammers.Boost afew dB at10 kHz forclarity.
Reinforcement:
• Use GLMs inside with the lid closed.Boost at 10 kHz
for extra clarity.
Upright Piano(Figure 11):
Recording:
• Remove the panel in front of the player to expose
the strings.Place two mics(CM-200A,CM-700,
CM-150,GLM-100,orGLM-200) overthe bass and
treble strings.
• Mike the soundboard afew inches from the bassand
treble strings.
Reinforcement:
• For more isolation and gain-before-feedback,tape a
GLM-100 or two onto the sound board.Experiment
with position for bestsound.
Xylophone and Marimba
Recording/Reinforcement:
• Place two CM-700s 18 inches above the instrument
and 2 feet apart.
Banjo (Figure12):
Recording/Reinforcement:
• Clipa GLM-UM Universal Mount to a banjo tension
rod,and position a GLM-100 1 inch from the head,
2 inches from the rim.
10
The CM-700 has a clear,natural sound.Self-noise
is very low, and the mic can handle extremely loud
sounds without distortion. A bass-tilt switch,pop
filter and windscreen are included.
CM-150
The CM-150 is a stand-mounted omnidirectional
condensermic for measurements or studio recording.
Its ultra-flat response from 20 Hz to 20 kHzlets it
record any instrument – oran orchestra – with full
fidelity.
CM-10
The CM-10 is amini omni lavalier mic.Youclip it to
the users shirtor tie about 8 inches under the chin.
GLM-100, GLM-200
The Crown GLM offers all the quality and wide-range
response of larger studio microphones,yet is nearly
invisible in use.It can be attached to instruments or
performers,orhungovermusicalensembles.Nomic
stands are needed,which makes setupfast and easy.
Since the GLM issmall,it can be mounted very close
to instruments to improve isolation and reject off-mic
sound.
Unlike larger microphones,GLMs pick up all sur-
roundinginstrumentswith the same tone quality or
frequency response.That’s because the microphones
are very small and maintain theirpolar pattern up to
high frequencies.
Two main models of GLMs are available: The
GLM-100 andthe GLM-200.The GLM-100 has an
omnidirectional orall around pickuppattern.When
placedin the center of a groupof instruments(say,a
drum set),it picks up all the instruments surrounding
it.The GLM-200 has a hypercardioid pickup pattern.
It picks upmainly what it’s aimedat,and provides
excellent isolation and gain-before-feedback.
The GLM-100 has a deeper low-frequency response
and a higher overload point than the GLM-200.For
these reasons,the GLM-100 omni is the best choice
for lowpitched instruments (bass,kickdrum) and for
loud instruments.Also,the GLM-100 hasless han-
dlingnoise and windnoise than the GLM-200.
General tips:For outdoor or vocal use,place the
included windscreen on the microphone to reduce
wind noise and breath popping.Although the cable is
rugged,excessive abuse such as tugging and twisting
will shorten its life.It should last indefinitely if treated
with care.The cable is short (8 feet) toallow easy
wrappingand to reduce the amount of thin cable on
stage.
LM-201, LM-300A, LM-300AL,
LM-301A
These four models are meant to be used on lecterns,
pulpits,or conference tables.The LM-201 has anoise-
free swivel mount.Designed for installation bysound
contractors,this model has a separate circuit module.
The microphone is shock mounted,and is meantto be
permanently screwed to the lectern top.
The LM-300Ais a gooseneck microphone thatplugs
intoan XLR-type connector mountedin your lectern.
If shock mounting is necessary,orderthe LM-300SM
ShockMount.
The LM-300AL is 5 inches longer than the LM-300A,
and has dual goosenecksfor more-flexible position-
ing.The LM-301A has a collar which screws onto an
Atlas flange ormic stand.Its cable can exit inside or
outside the mounting device.
SPECIFIC APPLICATIONS
This section suggestssome ways to place Crown
microphones to record or reinforce various musical
instruments.These are just startingpoints to reduce
the time spent experimenting.Theyworkwell in
manycases,butif you don’t like the results,feel free
to change the microphone or its placement.
If pick upof roomreverbation,leakage,orfeedback
is excessive,place the mic closer than recommended
below,and roll off thebass if necessaryatyour mixer
toobtain anaturaltimbre.
For example,suppose you’re mikinga folksinger
playing a guitar.If youwant to control the balance
between voice and guitar with mixer volume controls,
you must mike the singer and guitarseparately and
up close to isolate their sounds.This placement often
results in bassy tone quality,so you’ll have to roll off
some bass at yourmixer until the sound is natural.
Many of the techniques suggested here apply when
the instrument or voice is recorded alone,as for an
overdub.
Vocal
Recording:
Place a CM-700 or CM-150 8inches away at eye
height to avoid breath pops.Use the foam pop filter.
Sound Reinforcement:
• For best sound quality,use a CM-200A notmore
than 3 inches from the mouth.Place the included
foam popfilter on the mic.The closer the mic is to
your mouth the greater the gain-before-feedback,
and the greater the bass. Aim the mic at the nose to
avoid a“closed nose”effect.
7

• Formaximum isolation and gain-before-feedback,
use a GLM-100 close tothe drum head afew inches
in from the rim.
• Place a CM-700 12 inchesfrom the drum head for
recording,closer for sound reinforcement.
Violin
Recording:
• Place a CM-700 or CM-1501 to 2 feet away over the
top.
•Attach a GLM-UM Universal Mount to the tailpiece
and place aGLM-100 over an f-hole.Experiment
with miking distance to get agood compromise
between tone quality and isolation.
Reinforcement:
• For more gain-before-feedback,put the GLM inside
the violin through the f-hole or clip itto the bridge.
Mandolin, Bouzouki, or Dobra
Recording/Reinforcement:
• Place a CM-700 12 inchesaway for recording,closer
for sound reinforcement.
• Mounta GLM-100 on the sound board near
anf-hole.
Acoustic Bass
Recording/Reinforcement:
• For a natural sound,place a GLM-100or CM-700
on aboom a few inches out front,above the bridge.
• Tape a GLM-100 cable to the bridge.
• For a full,deep tone,tape a GLM-100 near an f-hole.
• For isolation,place a CM-200A nearthe f-hole and
rolloff excessbass.
Brass
Recording/Reinforcement:
• Place a CM-700 or CM-200A afew feetout front.
Mic on-axis to the bell for abright,edgy tone; mic
off-axis to the bell fora mellower tone (Figure 13).
•Attach a GLM-UM Universal Mount to the bell,and
position a GLM-100 about 4”from the bell,off-
center.
Woodwinds
Recording/Reinforcement:
•Attach a GLM-UM Universal Mount to the bell,and
position a GLM-100 or GLM-200 topick up both
the bell and the tone holes.
• Place a CM-700 about 12 inches from the tone holes.
Flute
Recording/Reinforcement:
• Place a CM-700 halfway between the mouthpiece
and the tone holes about6 inches away.
• Forrecordingor low-levelsound reinforcement,use
tape,a rubber band,or apadded broom holder to
mount a GLM-100 on the flute.Attachthe GLM
cable 4 inches tothe left of the lip plate (looking at
the player),with the mic capsule 11
⁄2inchesabove
the flute (see figure 14).
• For extragain-before-feedback,tape the cable to the
end of the flute nearest the lip plate,so that the mic
can“see”the lips.Roll off the excess highs on your
mixer.
Dulcimer
Recording/Reinforcement:
• Tape a GLM-100 on the center of the top edge,1
⁄2-
inch above it.
• Place a CM-700 about 8 inches above and in front of
the center of the top edge.
Harmonica
Recording/Reinforcement:
• Place a CM-200A afew inches to1 foot away.Hand
hold the mic forsound reinforcement.Fora bluesy,
dirty sound,pick up the harmonica with a mic
plugged into a guitar amp,and mike the amp.
Harp
Recording:
•Aim a CM-700,CM-150,or GLM at the sound board
about18 inches away.
• Tape a GLM-100 to the sound board.
11
How to achieve a natural
tone quality
• Use a microphone with a flat frequencyresponse,
suchas:CM-700,CM-150,GLM-100,PCC-170,
PCC-130,anyLM mic,or a PZM-30D or PZM-6D
setto“flat”response.
• Place the microphones as farfrom the sound source
as the source is big.For example,the sound board of
a guitar is about18 inches long.Place the mic at least
18 inches awayto pick up all the partsof the guitar
aboutequally.
• If you must mike close to reduce feedbackor leak-
age,use your mixer’s EQ to restore anatural tonal
balance.
How to achieve a bright
tone quality
A“bright”sound iscrisp,clear,trebly,and articulate.
To achieve a bright sound,use a microphone with a
rising high-frequency response,such as aCrown
GLM-200ora PZM-30D/ PZM-6Dset to“rising”
response.
How to achieve a good balance
A good balance is a good loudness relationship
amonginstrumentsand voice in a mix.When the
balance is good,no instrumentis too loud or too soft.
To achieve a good balance when recording a large
ensemble with one or two microphones:
• Move instruments that are too quiet closer to the
mics,and vice versa.
• Place the mic(s) far enough away so thatyou don’t
over emphasize the instrumentsin the center of
the ensemble.
• If you’re usingtwo mics torecord stereo,increase the
microphone angling or spacing.If youhear a hole in
the middle when using widelyspaced mics,add a
third mic in the center,panned to the center.
• If asoloist isperformingin frontof an orchestra,
raise or lower the mic stand to vary the balance
between the soloist and the orchestra.
NOTES ON CROWN
MICROPHONE MODELS
CM-200A
The CM-200A is a handheld condenser microphone
with a smooth,articulate sound quality.It will not
overload nomatter how loudlyyou scream into it.
Because of its cardioid pickup pattern the CM-200A
rejects sounds approaching the rear of the micro-
phone,so aim the rear of the mic at your floormoni-
torspeakers.Use the foam pop filter to reduce breath
pops.
CM-310A
The CM-310A is a handheld cardioid microphone
thatis noise-cancellingordifferential.“Differential”
means itcancels sound at adistance,and“cardioid”
means it cancelssound from the rear.Because of these
abilities,the CM-310A permits extremely highgain-
before-feedback and isolation.To keep from cancel-
ling your voice,you must use the microphone with
lips touching the grille.Singdirectly into the front of
the microphone,not the side,or else your voice may
get cancelled and sound thin.
CM-311A
The CM-311A is a headworn cardioid microphone
thatis noise-cancellingor differential.The mic’s
capsule is directly in front of yourlips.Like the
CM-310A,the CM-311A hasoutstanding gain-
before-feedback and isolation.Lightweight and
comfortable,itadjusts to fit any head.The CM-311A
comeswith anAdapta-Pak belt pack that works with a
9V batteryor phantom power.Model CM-311AE is
the headworn mic alone,meant for connectingto a
wireless mic transmitter of yourchoice.
CM-312A
The CM-312A is a headworn hypercardioid mic that
is meant for lesscritical situations than the CM-311A.
The mic capsule in the CM-312A is at the side of the
mouth,and isvery small and light.Model CM-312AE
is the headworn mic alone,meant for connecting to a
9V-powered wirelessmic transmitter of your choice.
CM-30/CM-31
The CM-30 is a miniature supercardioid condenser
mic designed for overhead miking,such asover a
choir.It is slightly biggerthan the GLM microphones
described below,but has lower noise.The CM-30
power module mounts in an electrical box in the
ceiling; the CM-31 power module is a cylinder with
an XLR-type connector.Both mics come in black or
white.CM-30L and CM-31Lhave 60’cables.
CM-700
The CM-700 is a superb,cardioid condenser mic
for pro or semipro recordingand high-quality sound
reinforcement.Rugged enoughfor the road,the
CM-700 works equally well for popular music (multi-
miking) or classical music (stereo and spot-miking).
It’s also a good choice for miking alectern on aboom
stand.
6

Orchestra, Band, Choir, or Organ
Recording (Figure 15):
• Hangor place two GLM-100,CM-700 or CM-150
mics about 10 feet apart,about14 feet above the
floor,and 5 to 15 feet in front of the front-row
musicians.
• Using a stereo mic adapter,hang or place two
CM-700 mics in acoincident or near coincident
arrangement.Place the pair about 14 feet above the
floor,and 5 to 15 feet in front of the front-row
musicians.
• See the CrownBoundary MicApplication Guidefor
more suggestions.The SASS is especially useful for
thisapplication.
Reinforcement:
• Forsound reinforcementof an orchestraor band,
mike eachsection separately a few feet away with a
GLM-100,CM-30,or CM-31.Keep in mind the 3:1
rule to prevent phase interference:The distance
between microphones should be atleast three times
the distance from eachmicrophone to its sound
source.
Choir(Figure16):
Reinforcement:
• To reinforce a choir,use two CM-30or CM-31
microphones,spaced todivide the choir inthirds.
Hangthem 18 inches in the front row,18 inches over
the head height of the back row.Anglethem down to
aim at the back row.
• To keepeach microphone from rotating,you might
want to thread some fishingline throughthe tiny
pipe orcrossbar on the hanger.Attach the line to the
side walls,about a foot below the heightof the
microphone in order to provide adownward pull.
• Use two CM-700s on stands.
Newsandsportsreporting
Studio:
•Clipaminiatureomnimicrophonetothe
shirtabout 8 inches underthe chin.Since the
camera sees it on-edge,it looks like a tie bar,nota
microphone.
12
How to reduce the phase
cancellations between two mics
If two microphones pickup the same sound source
at different distances,and their signals are fed to the
same channel,this might cause phase cancellations.
These are peaks and dips in the frequency response
caused byvarious frequencies combining out-of-
phase.The result is a colored,filtered tone quality.
To reduce phase cancellations between two micro-
phones:
• Mike close.
• Spread instruments farther apart.
• Follow the 3 to 1 rule (Figure 3): The distance
between mics should be at leastthree times the mic-
to-source distance.Forexample,if two microphones
are each1 foot from their sound sources, the mics
should be at least 3 feetapart to prevent phase
cancellations.
• Don’t use two micswhen one willdo the job.For
example,usejustonemiconalectern.Ifthetalker
wanders,use a lavalier mic instead,such as the
CM-10.
Howtoreducephasecancellations
fromsurfacereflections
Sometimes you must place a microphone neara hard
reflective surface.Situationswhere this might occur
are reinforcingdrama,musicals,or opera with the
microphones near the stage floor,recordinga piano
with the mic near the raised lid,or recordingan
instrument surrounded byreflective baffles.
Asdescribed in the Crown Boundary MicApplication
Guide,these situations can cause phase cancellations
which give a strange tone quality.Solve the problem
byusingCrown PZM or PCC microphones mounted
to the piano lid,wall, floor,or other large flat surface.
How to reduce handling noise
and stand thumps
• Use an omnidirectional microphone such as a
CM-10 orany PZM.
• Use a directional microphone with low sensitivity to
handlingnoise and thumps,suchasthe CM-200A,
CM-310A,orany PCC.
• Use a directional microphone with an internal shock
mount.
• Use a shock-mount stand adapteron a mic stand.
• Place the mic stand on foam or sponges.
How to reduce proximity effect
Proximityeffect is the bass boost you hear when you
mikeclose with a single-D directional microphone.
“Single-D”meansthat the microphone hasa single
distance from its frontsound entry to the rear sound
entry.The closer the mic is to the sound source,the
more bass you hear.To reduce proximity effect:
• Use an omni directional microphone.
• Turn down the excess bass with your mixer’s EQ.
Howtoreducepop
Popis an explosive breath sound produced by the
letters“p”,“b”, or“t”.When apersonsays words
containing these sounds,a turbulent puff of air is
forced from the mouth.This air puff hits the micro-
phone and makes a thump orlittle explosion called a
“pop”.
To reduce pop:
• Use an omnidirectional microphone.
• Use a microphone with a built-in pop filter orball
shaped grille,such as the Crown CM-200A or
CM-310A.
• Place an external foam pop filter on the microphone.
• Place the microphone out of the path of pop travel -
above,below,or to the side of the mouth.
• Rolloff low frequencies below100 Hz.
5

How to reduce background noise
• Stopthe noise at its source: turn off appliances and
air conditioning;waitfor airplanes to pass;close and
seal doors and windows; use a quiet room.
• Mike close withdirectional mics.
• Pickup electric instruments with directboxes or
cables.
• Aim the null of the polarpattern at the offending
noise source.The null is the angle off-axiswhere the
mic isleast sensitive.Differentpolar patterns have
nulls at different angles.Shown below (Figure 1) are
the null angles for various polar patterns:
Cardioid 180degrees
Supercardioid 125degrees
Hypercardioid 110 degrees
Bidirectional 90 degrees
How to reduce leakage
Leakage(also called bleed or spill) is the overlap of
sound from an instrument into another instrument’s
microphone.For example,if you’re mikingdrums and
pianoeachwithit’s ownmicrophone,anydrum
sound picked upby the piano mic is leakage.To
reduce leakage:
• Mike close withdirectional microphones.
•When recording,overdub instruments one at a time
oneach track of a multitrack recorder.
• Pickup electric instruments with directboxes or
cables.
• Use a room or studio with dead acoustics.The walls,
ceiling,and floor should be covered withsound
absorbingmaterial.
• Aim the null of the polarpattern at the undesired
sound source.For example,suppose you’re miking
twoadjacenttom-tomswith twohypercardioid
mics.The null of the hypercardioid is110 degrees
off-axis.Angleeach mic so that its null aimsatthe
adjacenttom-tom.
• Use a Differioid mic on vocals such as the Crown
CM-310A or CM-311A.
How to pick up sound at a distance
The fartheryouplace a microphone from a sound
source,the more reverberation,leakage,and back-
ground noise you pickup. Also,you hear more mixer
noise compared to the signal because the mixergain
mustbe higher with distant miking.
To clearly pick up sound ata distance:
• Use a microphone with low self-noise (say, less
than 22 dB SPL),such as the CM-200A,CM-700,
CM-150,anyPCC,or anyPZM® (see the Crown
BoundaryMicApplication Guide).
• Boost the presence range on your mixer’s EQ
(around 5 kHz).
• If necessary,compensate forair losses at high
frequencies byboosting EQ around 15 kHz.
• Use directionalmicrophones.You can place a
directionalmic fartherfrom its source than an
omnidirectional mic and pick up the same amount
of reverberation.The table below shows the distance
multiplier for each pattern (Figure 2):
Omnidirectional 1.0dB
Cardioid 1.7dB
Bidirectional 1.7 dB
Supercardioid 1.9 dB
Hypercardioid 2.0 dB
Cardioid A = 1.7
Supercardoid A = 1.9
Hypercardoid A = 2
Shotgun B = 3 to 10
dependingonlength
For example,if an omni mic is 1 footfrom a sound
source,you can place a supercardioid mic at 1.9 feet
and pick up the same amount of reverb as the omni.
4
Field:
• To reduce ambient noise,use a CM-200A cardioid
handheld mic with a foam windscreen.Roll off any
excessbass atyour mixer.
• If the ambientnoise level is very high and you
want to reject it,use a CM-310A handheld mic or
CM-311A headworn mic withlips touching the
grille.Rolloff excessbassatyour mixer.
• Clip a CM-10 miniature omni microphone to the
shirtabout 8 inches underthe chin.Place the foam
windscreen on the mic.
• Use a CM-312A hypercardioid headworn mic.Model
CM-312A HS mounts on a SonyMDR-7506 head-
phone.
Speeches
Speaker that Wanders,
Recording/Reinforcement:
•Clipalavaliermicabout8inchesunderthe
chin.
Speaker that Stays Behind the Lectern,
Recording/Reinforcement:
• For permanent inconspicuousmiking,use an LM-
type microphone on the lectern.The LM-201 has a
silent,rugged swivel mount; the LM-300A has a
quiet,economical gooseneck.The LM-300AL is 5
inches longer than the LM-300A.The LM-301A
mounts onto an Atlas flange or a mic stand.
• For temporary miking,place a CM-700 on the end of
a mic-stand boom.Position it about 8 inches from
the person speaking.Place the included foam pop
filter onthe mic to prevent breath pops.Set the bass
tilt switchto rolloff.
• Place a PCC-160,PCC-130,or PCC-170 surface mic
on top of the lectern,outof cavities.See the Crown
BoundaryMicApplication Guidefordetails.
Narration recording:
• Place a CM-700 on a boom about 8 inches from the
mouthat eye height.Ask the announcer to maintain
a constant distance to the microphone.
Group discussion
Recording/Reinforcement:
• Hang aCM-30 orCM-31straight down over the
centerof the group.Group members should be no
more than 45˚ off-axis.
• Use PCC-170s,PCC-130s,or PZMs on the table.See
theCrownBoundary MicApplication Guideformore
suggestions.
Theatre, Drama, Opera,
or Musicals(Figure 17):
Recording/Reinforcement:
• Use PCC-160s on the stage floor or suspend CM-30s
orCM-31s overhead.See the Crown Boundary Mic
Application Guidefor suggestions.
Film or video:
• Hide a GLM-100 or CM-10 mini mic under clothing.
•Attach a GLM-100 to the back of props close to the
action.
• In an automobile,clip aGLM-100 to the sun visor
near the center-line of the automobile.
• To reduce clothing noise when the GLM is used on
an actor,spray clothing with Static Guard® or water
(spray leather with silicone spray orWD-40®).Tape
the cable to clothing,using band-aids on skin.Make
a loop in the cable to act as a strain relief.Place the
connector near the actor’s foot for unplugging
between takes.
• For video documentaries,see the tips on news and
sports reportingand narration recording.
• For audience miking,use two PZMs 3 feet aparton
the stage front,or place two CM-700s over the
audience frontrow,aimingatthe back row.
• For more tips,see the CrownMicrophoneApplication
GuideforVideo.
• To convertthe GLM for wireless use,please order
Technical Bulletin#3.
We hope this application guide hasprovided some
insight into the operation and use of Crown micro-
phones.For applicationnotesonPZMs,PCCs,SASS,
and boundaries,order theCrownBoundaryMic
Application Guide- free from Crown.For more
information,contacttheTechnicalSupportGroupat
CrownInternational,1718WestMishawakaRoad,P.O.
Box1000,Elkhart,IN46515orphone(219)294-8200or
visitusontheworldwidewebatwww.crownaudio.com.
13

CHOOSINGTHERIGHT
CROWNMICROPHONE
There’sawidevarietyofCrownmicrophonesto
choosefrom.Thisguidewillhelpyouselectthe
microphonesbest-suitedforyourapplications.
TransducerType
CondenserorDynamic
Inadynamicmicrophone,acoilofwireattachedtoa
diaphragmissuspendedinamagneticfieldand
generatesanelectricalsignalsimilartotheincoming
soundwave.
Inacondensermicrophone,adiaphragmandan
adjacentmetallicdisk(backplate)are chargedtoform
twoplatesofacapacitor.Soundwavesstrikingthe
diaphragmvarythespacingbetweentheplates;this
variesthecapacitanceandgeneratesanelectrical
signalsimilartotheincomingsoundwave.
Thediaphragmandbackplatecanbechargedeither
byanexternallyappliedvoltage,orbyapermanently
chargedelectretmaterialinthediaphragmoronthe
backplate.
Becauseofitslowerdiaphragmmassandhigher
damping,acondensermicrophonerespondsfaster
thanadynamicmicrophonetorapidlychanging
soundwaves(transients).
Dynamicmicrophonesoffergoodsoundquality,are
especiallyrugged,andrequirenopowersupply.
Condensermicrophonesrequireapowersupplyto
operateinternalelectronics,butgenerallyprovidea
clear,detailedsoundqualitywithawider,smoother
responsethandynamics.
BoundaryorFreeField
Boundarymicrophonesare meanttobeusedonlarge
surfacessuchasstagefloors,pianolids,hard-surfaced
panels,orwalls.Boundarymicsare speciallydesigned
topreventphaseinterferencebetweendirectand
reflectedsoundwaves,andhavelittleornooff-axis
coloration.Free-field microphonesaremeanttobe
usedawayfromsurfaces,sayforup-closemiking.
CrownPressureZoneMicrophones(PZMs)and
PhaseCoherentCardioids(PCCs)areboundary
microphones;CrownGLMs,CMsandLMsare
free-fieldmicrophones.
PolarPatterns
OmnidirectionalorUnidirectional
Omnidirectionalmicrophones(alsocalledpressure
microphones)areequallysensitivetosoundscoming
fromalldirections.Unidirectionalmicrophones(also
calledpressuregradientmicrophones)are most
sensitivetosoundscomingfromonedirection-in
frontofthemicrophone.
Threetypesofunidirectionalpatternsarethecar-
dioid,supercardioid,andhypercardioidpattern.The
cardioidpatternhasabroadpickupareainfrontof
themicrophone.Soundsapproachingthesideofthe
micarerejectedby6dB;soundsfromtherear(180˚
off-axis)are rejected20to30dB.Thesupercardioid
rejectsthesidesoundsby8.7dB,andrejectssound
bestattwo“nulls”behindthemicrophone,125˚off-
axis.
Thehypercardioidpatternisthetightestpatternofthe
three(12dBdownatthesides),andrejectssound
bestattwonulls110˚off-axis.Thispatternhasthe
bestrejectionofroomacoustics,andprovidesthe
mostgain-before-feedbackfromthemainsound
reinforcementspeakers.
Chooseomnidirectionalmicswhenyouneed:
All-aroundpickup.
Pickupofroomacoustics.
Extendedlow-frequencyresponse.
Lowhandlingnoise.
Lowwindnoise.
Noup-closebassboost.
Chooseunidirectionalmicswhenyouneed:
Selectivepickup.
Rejectionofsoundsbehindthemicrophone.
Rejectionofroomacousticsandleakage.
More gain-before-feedback.
Up-closebassboost(proximityeffect).
Anomnidirectionalboundarymicrophone(suchas
PZM)hasahalf-omniorhemisphericalpolarpattern.
Aunidirectionalboundarymicrophone(suchasa
PCC-160)hasahalf-supercardioidpolarpattern.The
boundarymountingincreasesthedirectionalityofthe
microphone,thusreducingpickupofroomacoustics.
FrequencyResponse
BrightorFlat
Abrightfrequencyresponsetendstohaveanempha-
sizedorrisinghigh-frequencyresponse,whichadds
clarity,brilliance,andarticulation.Aflatfrequency
response tends to sound natural.Microphone place-
ment also has amajor effect on the recorded tonal
balance.With loud guitars,amps and drums,a mic
with rising highs or presence peak tendsto sound
natural; aflat-response mic tendsto sound dull.
14
INTRODUCTION
In this guide you’ll findsuggestions on using
Crown microphones effectively.The CM,GLM,and
LM microphone lines are covered in this booklet.For
application notes on the PZM®,PCC®and SASS®,
please see the CrownBoundaryMicApplication Guide.
Youwill find that Crown microphones can solve many
of youraudioproblems.
MICROPHONE
TECHNIQUEBASICS
Howtoreducefeedback
Feedback is a squealing sound from sound-reinforce-
ment speakers that occurs when volume is too high.
To reduce feedback:
• Turn down the volume onthe offending
microphone until feedback stops.
• Use as fewmicrophones as possible.Gain-before-
feedback decreases 3 dB each time the number of
open mics doubles.
• Place the mic close to the sound source.The closer
the mic,the higher the gain-before-feedback.If close
mikingcauses an unnatural tone quality, try using
EQtocompensate.
• Equalize the sound system with a1/3 octave graphic
equalizer.Notchout frequencies that feedback.
• Place speakers as far from the mic as possible.
• Place the mics behind or to the outside of the house
P.A.speakers.The house speakers should notaim at
the microphones.
• Use directional mics.Hypercardioid and supercar-
dioid patternsreject feedback better than cardioids,
and cardioidsrejectfeedback better than omnidirec-
tional patterns.
• Use differential (noise-cancelling) mics,such as the
Crown CM-310A or CM-311A.Theyhave the
highestgain before feedback of any mic you can buy.
The following table tells how manydB of feedback
rejection you can expectfrom various polarpatterns,
in a reverberant sound field,compared toan omnidi-
rectional pattern at the same distance:
Omnidirectional 0.0dB
Cardioid -4.8dB
Bidirectional -4.8 dB
Supercardioid -5.7 dB
Hypercardioid -6.0 dB
For example,a cardioid mic provides 4.8 dB more
gain-before-feedback than an omni mic at the same
distance from the sound source.
Youcan place a directional mic farther from its source
than an omnidirectional mic in a reverberant sound
field and have the same gain-before-feedback. The
table belowshows the distance multiplierfor each
pattern:
Omnidirectional 1.0
Cardioid 1.7
Bidirectional 1.7
Supercardioid 1.9
Hypercardioid 2.0
For example,if an omni mic is one footfrom a sound
source,a supercardioid mic can be placed 1.9 feet and
have the same gain-before-feedbackas the omni.
The figures above apply only when the mics are in a
reverberant sound field -say,when the P.A.speakers
are distant from the mics and the sound system is set
upindoors.
Howtoreducereverberation
Reverberation issometimesloosely called“room
acoustics”or“ambience.”Itis apattern of sound
reflection off the walls,ceiling,and floor.For example,
reverberation is the sound you hear just after you
shout in an empty gymnasium.Too much
reverberation in a recording can make the recorded
instrument sound distant or muddy.To reduce
reverberation:
• Place the mic closer to the sound source.
• Pickup electric instruments with a direct box or
cable.
• Use a room or studio with dead acoustics.The walls,
ceiling,and floor should be covered with a sound-
absorbingmaterial.
• Use directionalmicrophones.Hypercardioid and
supercardioid patterns reject reverb more than
cardioid.Cardioid and bidirectional patterns
reject reverb equally well.Cardioid rejects reverb
more than an omnidirectional pattern at the
same distance:
Omnidirectional 0.0dB
Cardioid -4.8dB
Bidirectional -4.8 dB
Supercardioid -5.7 dB
Hypercardioid -6.0 dB
3
This manual suits for next models
14
Table of contents
Other Crown Microphone manuals

Crown
Crown PZM-185 User manual

Crown
Crown PZM-6D User manual

Crown
Crown MINI-BOUNDARY MB-3 User manual

Crown
Crown MINI-BOUNDARY MB-1 User manual

Crown
Crown PCC-130 User manual

Crown
Crown PZM-11 User manual

Crown
Crown PCC-170 User manual

Crown
Crown PCC-170SW User manual

Crown
Crown 35246 User guide

Crown
Crown PZM-20R User manual

Crown
Crown CM-30 User manual

Crown
Crown PCC-170 User manual

Crown
Crown SASS-P User manual

Crown
Crown CM-150 User manual

Crown
Crown PZM-20R User manual

Crown
Crown MINI-BOUNDARY MB-2 User manual

Crown
Crown DIFFEROID CM-311A User manual

Crown
Crown PZM-11 User manual

Crown
Crown CM-312A User manual

Crown
Crown CM-312AE User manual