CSS AssistX Mobil User manual

AssistX
Assist
Assist
Assist
Assist
Assist
Assist
Assist
Assist
Assist
Assist
X
Mobil
INSTRUCTIONS
FOR USE
US/CA/AU

Instructions for Use V2.2 US/CA/AU
from Firmware V1.39
from Device V1.13
Art #20540, #20534, #20535,
#20523, #20389
Patent: DE 102015013572
CSS Microsystems GmbH
In den Hofäckern 16
74189 Weinsberg
Germany
www.csslabs.de
© 2022 CSS MicroSystems GmbH
Please always use the latest version of the Instructions for Use!
www.csslabs.de/downloads
Instructions for use also available in other languages.
*PRELIMINARY VERSION*

Instructions for Use AssistX Mobil | 3
EN
CSS Microsystems GmbH
In den Hofäckern 16
74189 Weinsberg
Germany
www.csslabs.de
© 2022 CSS MicroSystems GmbH
Table of Contents
1. Introduction . . . . . . . . . . . . . . . . . . . . . . . . . . . . . . . . . . . . . . . . . . . . . . . . . 4
2. Intended use . . . . . . . . . . . . . . . . . . . . . . . . . . . . . . . . . . . . . . . . . . . . . . . . 4
3. Explanation of symbols . . . . . . . . . . . . . . . . . . . . . . . . . . . . . . . . . . . . . . . . 5
3. Explanation of symbols . . . . . . . . . . . . . . . . . . . . . . . . . . . . . . . . . . . . . . . . 6
4. Safety instructions . . . . . . . . . . . . . . . . . . . . . . . . . . . . . . . . . . . . . . . . . . . . 7
5. Cleaning and disinfection . . . . . . . . . . . . . . . . . . . . . . . . . . . . . . . . . . . . . . 8
6. Scope of delivery . . . . . . . . . . . . . . . . . . . . . . . . . . . . . . . . . . . . . . . . . . . . . 9
7. Device Buttons, Ports, Display . . . . . . . . . . . . . . . . . . . . . . . . . . . . . . . . . 10
8. Use of the device . . . . . . . . . . . . . . . . . . . . . . . . . . . . . . . . . . . . . . . . . . . . 12
Call triggering: . . . . . . . . . . . . . . . . . . . . . . . . . . . . . . . . . . . . . . . . . . . . . . 12
Conrmation and acknowledge: . . . . . . . . . . . . . . . . . . . . . . . . . . . . . . . . . 12
Call Queue: . . . . . . . . . . . . . . . . . . . . . . . . . . . . . . . . . . . . . . . . . . . . . . . . . 12
Call repeat: . . . . . . . . . . . . . . . . . . . . . . . . . . . . . . . . . . . . . . . . . . . . . . . . . 13
Out of Range Monitoring: . . . . . . . . . . . . . . . . . . . . . . . . . . . . . . . . . . . . . . 13
Charging:. . . . . . . . . . . . . . . . . . . . . . . . . . . . . . . . . . . . . . . . . . . . . . . . . . . 13
Battery condition: . . . . . . . . . . . . . . . . . . . . . . . . . . . . . . . . . . . . . . . . . . . . 14
9. Settings . . . . . . . . . . . . . . . . . . . . . . . . . . . . . . . . . . . . . . . . . . . . . . . . . . . 15
Menu . . . . . . . . . . . . . . . . . . . . . . . . . . . . . . . . . . . . . . . . . . . . . . . . . . . . . . 15
Info menu . . . . . . . . . . . . . . . . . . . . . . . . . . . . . . . . . . . . . . . . . . . . . . . . . . 15
Languages . . . . . . . . . . . . . . . . . . . . . . . . . . . . . . . . . . . . . . . . . . . . . . . . . . 15
Subscribers (teach in new transmitters to the receiver). . . . . . . . . . . . . . . . 15
Set the Alarm signals of the receiver. . . . . . . . . . . . . . . . . . . . . . . . . . . . . . 16
Call repeat. . . . . . . . . . . . . . . . . . . . . . . . . . . . . . . . . . . . . . . . . . . . . . . . . . 16
Date & Time . . . . . . . . . . . . . . . . . . . . . . . . . . . . . . . . . . . . . . . . . . . . . . . . 17
Saving power (Power save mode) . . . . . . . . . . . . . . . . . . . . . . . . . . . . . . . . 17
Infrared receiver of the transmitter . . . . . . . . . . . . . . . . . . . . . . . . . . . . . . . 17
Congurator Software . . . . . . . . . . . . . . . . . . . . . . . . . . . . . . . . . . . . . . . . . 18

4|Instructions for Use AssistX Mobil
10. Maintenance / Review . . . . . . . . . . . . . . . . . . . . . . . . . . . . . . . . . . . . . . . 19
11. Support . . . . . . . . . . . . . . . . . . . . . . . . . . . . . . . . . . . . . . . . . . . . . . . . . . 19
12. Technical specications . . . . . . . . . . . . . . . . . . . . . . . . . . . . . . . . . . . . . . 20
13. Conformity/Standards . . . . . . . . . . . . . . . . . . . . . . . . . . . . . . . . . . . . . . . 20
14. Environmental protection and disposal. . . . . . . . . . . . . . . . . . . . . . . . . . 20
1. Introduction
Thank you for choosing a high quality CSS product. Please read these instruc-
tions for use carefully and take care of these instructions when using the device.
Please keep the instructions for use at hand when you use the device.
2. Intended use
AssistX Mobil is a secure call system that allows people with disabilities or
illnesses, e. g. being unable to make themselves known by speaking or ot-
herwise due to paralysis, being able to call nursing and assistant caregivers or
relatives. AssistX Mobil can be used regardless of the underlying disease or
disability. There are basically two types of application.
AssistX Mobil can be supplemented with a wide variety of control ele-
ments for individual adjustment to the respective structural or functional
disorders and restrictions of the activity. These include, for example, a
wide variety of adaptation aids such as buttons, proximity sensors, sip
and puff sensors, acoustic sensors. For this purpose, the transmitter
has a patented AssistX port to which all common adaptations and
controls are connected and automatically recognized. The system con-
sists of at least one transmitter and one receiver. Several transmitters
and receivers can be combined, for example, to reach nursing staff and
relatives on different oors or to be able to call from different places
such as beds and wheelchairs. If the restrictions are too severe, depen-
ding on the sensor used, the call can be triggered not only actively

Instructions for Use AssistX Mobil | 5
EN
Device alarms from aids such as pulse oximeters and ventilators can
also be forwarded via special interface cables. In this system, the inter-
face cables replace the handicap-friendly adaptations (sensors) as in-
put elements. With the device-specic interface cables, AssistX Mobil
forms a system for forwarding device alarms from aids and thus facili-
tates patient care, since e. g. routine patrols can be omitted. However,
AssistX Mobil is not used to monitor medical values or to make a dia-
gnosis, but only as a supplementary call activation to the basic functions
of aids such as a pulse oximeter, medication pump, nutrition pump
or ventilator, which is always necessary when context factors - such as
the spatial situation in the home or sensory disorders of the caregiver -
make it difcult for caregivers to perceive device alarms.
through directed movements, but also passively through the remaining
physical activities. For example, a strong cough can be detected via the
AssistX AS one acoustic sensor. With the individually selectable ad-
aptation aid ‚Sensor‘, AssistX Mobil forms a system for triggering care
calls. Various sensors and accessories for call triggering are offered in
order to be able to map the different context-dependent and everyday-
relevant factors lying in the person or in the environment. The aim of
supplying AssistX Mobil as a supplement to adaptation aids is to make
it easier to lead a more independent life by being able to call for nursing
help at any time in situations where care is required. In addition, nursing
staff are relieved because, for example, routine inspection rounds can
be omitted. However, AssistX Mobil does not serve as a substitute for
a home emergency call system.
b)
3. Explanation of symbols
Safety instructions!
Important instructions!

6|Instructions for Use AssistX Mobil
3. Explanation of symbols
Safety instructions!
Important instructions!

Instructions for Use AssistX Mobil | 7
EN
Handling
Please handle the device carefully. The device contains sensitive elect-
ronic components. It is not allowed to do any modication.
The device is not life-sustaining or life-supporting. The device consists
of several components. Small items may be detached from the device,
which may result in suffocation or other danger to children. Small chil-
dren or people with intellectual disabilities should not reach or use the
device without supervision.
Do not use the device in damp, wet, very cold or very hot environments
(see temperature information in technical data).
Never replace the built-in batteries by yourself! The battery can be da-
maged, which can lead to overheating and can lead to injuries. The
integrated rechargeable lithium polymer battery may only be replaced
by authorized personal.
Mounting
The device must be mounted in a way that it cannot fall down. Only
recommended mounting components from the manufacturer are to be
used. The user bears the sole risk of mounting. The manufacturer is not
liable for personal injury or property damage caused by the device or its
components falling down.
4. Safety instructions
Repair
Under no circumstances you should open the device and repair it by
yourself. Disassembling the device can permanently damage the device
and cause injury. Contact your reseller or the manufacturer if the device
is damaged or does not work properly. If the device or its accessories
are mechanically damaged, they may no longer be used.

8|Instructions for Use AssistX Mobil
Interaction with medical devices
The device and its components can emit electromagnetic radiation and
have integrated magnets. The device must therefore not be placed on
a person or brought closer than 15 cm to people using other active me-
dical devices use. The device must also not be placed directly on active
medical devices. Please pay special attention to people with implanted
pacemakers. If necessary, please contact the device manufacturer of the
other active medical device.
5. Cleaning and disinfection
Before cleaning the device, switch it off and disconnect all cables. The device
should be cleaned daily with a disinfectant and cleanser intended for use in
hospitals. Cleaning should only be done with a wipe. Wipe all surfaces and let
them dry or follow the wiping instructions.
Do not use sprays that may allow moisture to enter the device. Under no cir-
cumstances may any component of the device be subjected to steam or wet
sterilization.
Instructions for Use AssistX Mobil | 9
EN
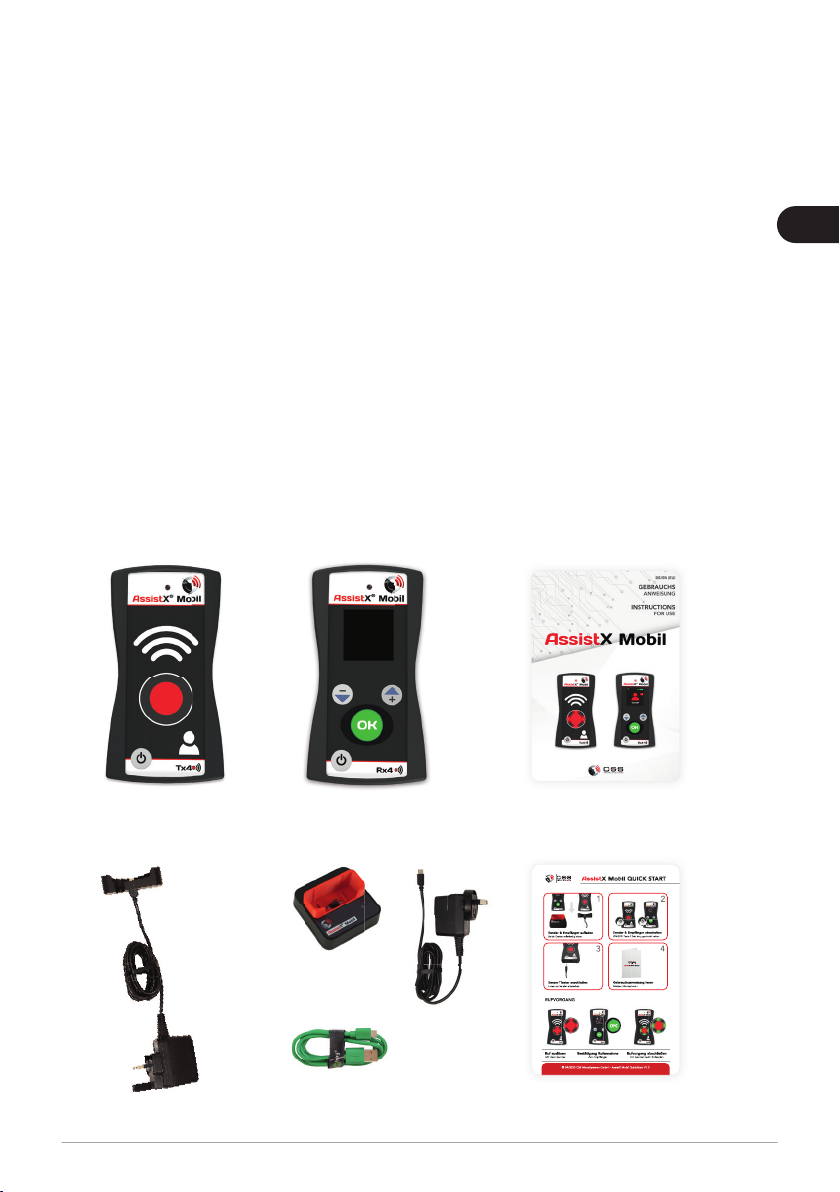
6. Scope of delivery
• AssistX Mobil TX (transmitter)
• AssistX Mobil RX (receiver)
• AssistX Mobil S-Charger for transmitter
• AssistX Mobil Dock for receiver
• Power supply for Dock
• USB cable
• Instructions for Use
• QuickStart Guide
10 |Instructions for Use AssistX Mobil
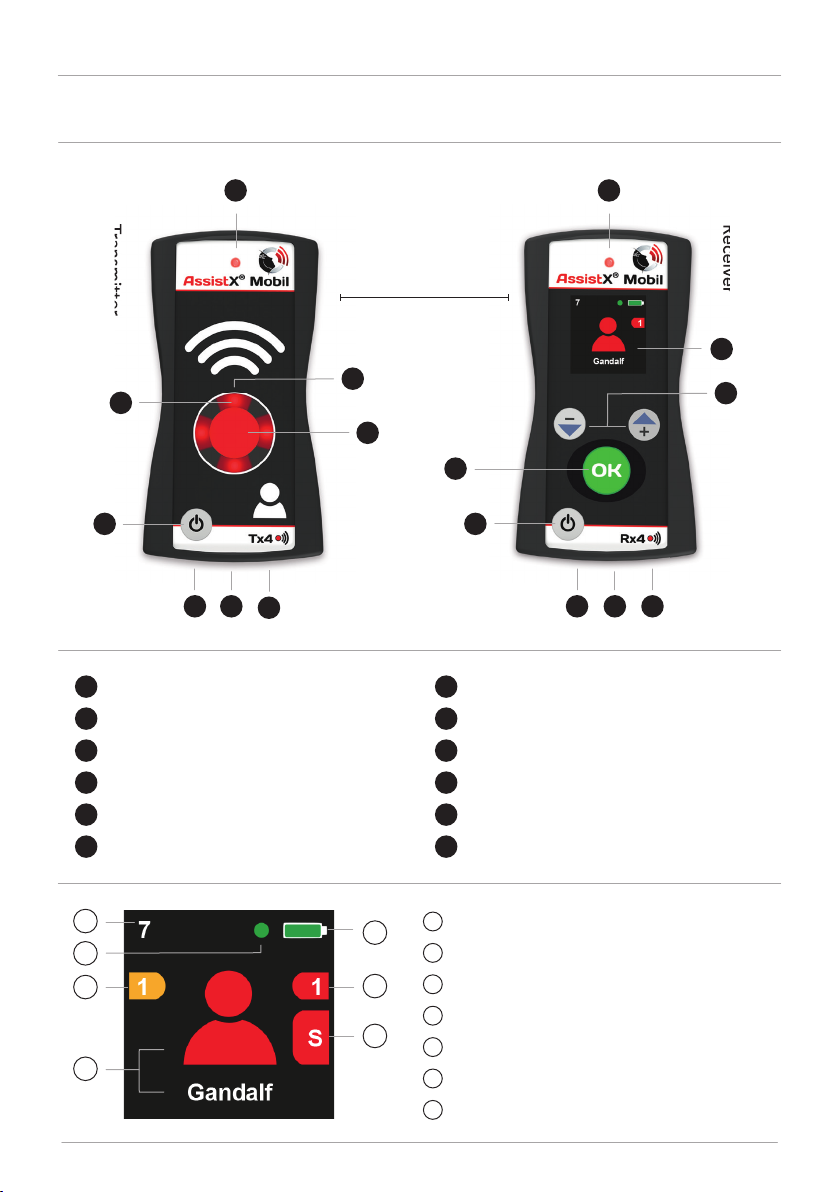
1 LED 7 Con rmation Light
2 ON/OFF Button 8 Infrared receiver
3 AssistX Port Sensor-/Switchport 9 Output socket (Jack Plug)
4 USB socket (power/con guration) 10 Con rm / OK Button
5 Reset (restart) 11 Menu / up-down Button
6 Call Button 12 AssistX Mobil RX Display
Transmitter
Receiver
7. Device Buttons, Ports, Display
1Connected transmitters
2Charge connected
3Battery status
4Out of range warning
5Call Queue
6Alarm type
7Caller Name
/
Time & Date
Min. distance 0,5 m
Min. distance 1,5 ft
Transmitter
Receiver
7
2 2
10
6
3 94 4
5 5
11
8
12
1 1
1
2
3
5
6
7
4
Instructions for Use AssistX Mobil | 11
EN
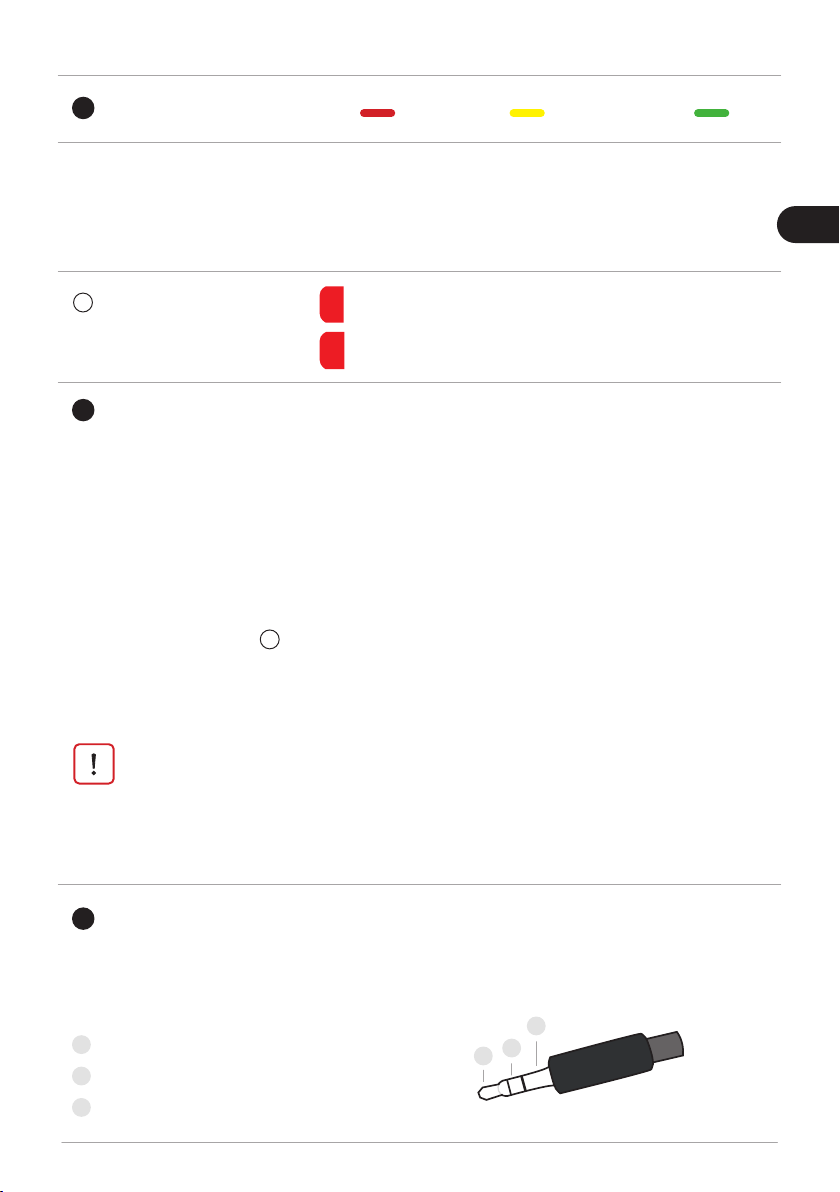
1 LED Battery empty charging full
LED ashes green, when 100% charged and connected to the power supply.
When switched off while power supply connected: By briey pressing the
ON/OFF button, the LED lights up for 5 sec and shows the current charge
status.
3 AssistX Port for many common sensors/switches (jack plug 3.5 mm pink)
Connect sensor/switch
Quickly insert the sensor/switch into the AssistX Port. If the plug is inserted
too slowly, the sensor/switch may not be identied or may be identied
incorrectly. The LED on the transmitter ashes red, do not press the switch or
sensor for about 2 sec until you hear a beep and the LED stops ashing.
Unplug sensor/switch
For safety reasons a
6call is triggered whenever the sensor is plugged off.
To avoid triggering a call, switch off the transmitter before disconnecting the
sensor.
9 Output socket (Alarm signal adjustable via Relay Mode)
With the Mono Jack Plug you can tap 1 & 2, with a
Stereo Jack Plug 1,2 & 3:
1Common contact
2Normally open contact (NO)
3Normally closed contact (NC)
If the sensor/switch is unplugged (safety-critical!) during a call has not
yet been completed (if it is not conrmed at the transmitter of the cal-
ler), the LEDs on the transmitter light up orange and a warning sounds.
If the call is completed by pressing the button on the transmitter, the
warning disappears.
6Alarm Display Disconnection alarm at the transmitter
Battery alarm at the transmitter
S
B
1
3
2

12 |Instructions for Use AssistX Mobil
8. Use of the device
Before using for the rst time, please charge the device according to these
instructions for use!
Call triggering:
The caller triggers the call signal on the transmitter via the 6Call Button or
connected sensor/switch or by an infrared signal. Unplugging the sensor also
triggers a call.
Con rmation and acknowledge:
When the call signal has reached the receiver (the transmitter lights up red to
con rm that the call is received), the 1LED on the receiver lights up green;
the caregiver has to acknowledge the call for the rst time now. The transmit-
ter‘s 7 Con rmation Light and 1LED then changes from red to green, indi-
cating that the call has been answered by the caregiver.
In order to end the call in the Call Queue on the receiver, the caregiver must
con rm the execution of the call to the caller and via the 6Call Button on the
transmitter within an adjustable time.
Call Queue:
If there is more than 1 alarm/call, the call will be put in the Call Queue so that
each caller can be served one after the other. The 7display of the transmitter
name tells you the currently used user name.
Activate Call
With the transmitter
Call acceptance
At the receiver
Complete call process
At the transmitter at the caller
Instructions for Use AssistX Mobil | 13
EN
Call repeat:
If a call is conrmed at the receiver, but not also conrmed at the transmitter
within an adjustable time, the transmitter repeats the call and the alarm starts
again at the receiver.
Out of Range Monitoring:
Is one or are more than one transmitters out of range for longer than 2 min, an
alarm, which is indicated by the
4out of range warning (including the number
of transmitters out of range) and the
7name of the transmitter:
An additional alarm sound will remind every 20 seconds of the lost subscribers.
If the transmitter is back in range, the warning will be deleted automatically.
The warning can be deleted by pressing [OK] but will be activated again auto-
matically after 1 min.
For security reasons (DIN VDE 0834) a call cannot be deleted. The call
must always be conrmed rst at the receiver, then at the transmitter.
If a transmitter or receiver fails while a call is in progress, the other side
waits until there is radio contact again and the call sequence can conti-
nue. A call cannot be lost. A current call can only be canceled by swit-
ching the device off and on.
Note: If the range is not sufcient, you can use the the AssistX Mobil
Repeater (Art #20531) to extend the range.
If a connected transmitter is switched off, the range warning is also
triggered. Please therefore always leave all connected transmitters
switched on!
Caller 1
Charging:
Two different chargers are available for easy handling in everyday use: Dock
(usually for the receiver) and S-Charger (usually for the transmitter), both are
included in the set.
To charge, plug the S-Charger into the socket and then plug the transmitter
rmly into the S-Charger. For the Dock, please plug the power adapter into the
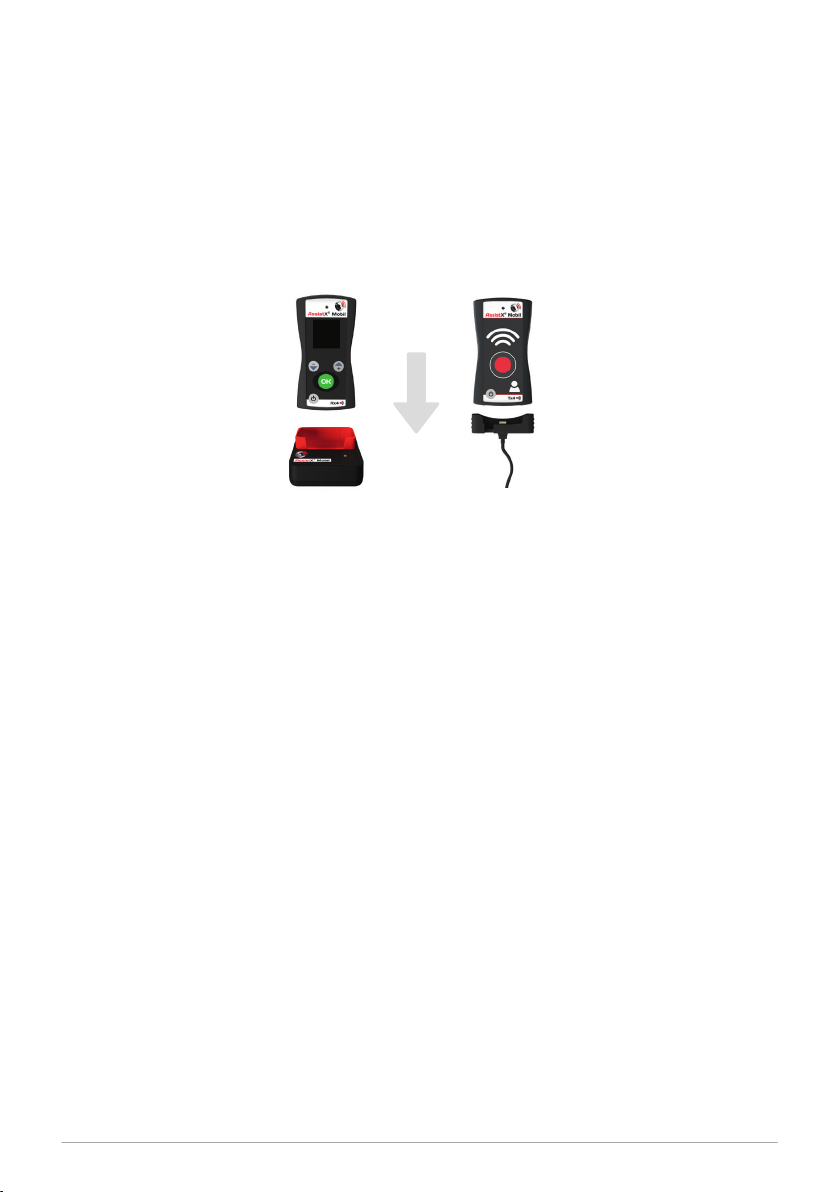
14 |Instructions for Use AssistX Mobil
Battery condition:
The charging condition of the battery will be showed by the color of the LED
(Green-Yellow-Red). In the lower red range there will be an acoustic warning
every two minutes. Beginning with the rst signal, the battery lifetime will be
approximately 1 hour.
If the condition of the battery is critical, the device will switch off and there will
be 3 acoustic signals. The device cannot switched on again and needs to be
charged. Before switching off there will be the following actions:
• Transmitter
The transmitter will activate a call/alarm and waits until the call is con r-
med. After that it will switch off.
• Receiver
Before switching off, all active calls have to be served and have to be
con rmed.
socket and connect the micro USB connector to the Dock. Then please plug
the receiver rmly into the Dock, the green LED on the dock will light brighter.
Please fully charge the devices (LED on the transmitter and receiver ashes
green). If necessary, the devices can remain permanently connected to the
chargers, there will be no battery damage.

Instructions for Use AssistX Mobil | 15
EN
9. Settings
Menu
If the Receiver is in the Setup Menu mode and is receiving a call, the Setup
menu will be exit automatically. Changes will not be saved in this situation. As
long as there are active calls, it is not possible to enter the Setup Menu.
• Enter/exit Menu
Press [OK] Button 5 Sec. Exit the setup menu with „Menu
>
Exit“ or the
[ON/OFF] Button.
• Navigate Menu
To navigate through the setup menu use the [+] and [
-
]buttons.
Info menu
Here you can see the main information of the device like rmware version and
frequency.
Languages
Call up the menu and choose your language for the menu texts and messanges
on the display: German / English / French.
Subscribers (teach in new transmitters to the receiver)
Up to 32 transmitters can be connected to any number of receivers.
• Adding subscribers (Quick)
Press the [+] Button at the receiver until the LED will light up purple.
Hold the key [+] for 1 sec until the display shows the message „Press Call
Button“. Switch to the transmitter you want to teach in and press the red
call button. The receiver will conrm the new transmitter with „Subscri-
ber added“ or „Subscriber already exists“.
• Adding subscribers (Setup Menu)
Go to „Menu
>
Subscribers
>
Add“.
16 |Instructions for Use AssistX Mobil
• Delete of subscribers
Go to „Menu
>
Subscribers
>
Delete“. You can now select subscriber to
be deleted from the subscribers list and delete them with the [OK] key.
If you delete a subscriber having a standard name like „Caller 4“, the re-
maining list will be shrinked. means: „Caller 3“ will be followed by „Caller
5“. A new transmitter will have the name „Caller 4“. To delete all trans-
mitters go to „Menu
>
Subscribers
>
Delete all“.
Set the Alarm signals of the receiver
The receiver is able to emit four different alarm signals: Sound / Flash / Vibra-
tion / Relay (switch, toggle)
The
9switch output can activate e.g. external call signals.
• Aktivate/deactivate Alarm signals
Go to „Menu
>
Settings
>
Alarm Signals“. Here the signals can be set
separately.
• Set the switch mode
Trough „Menu
>
Settings
>
Relay Mode“ the switch mode can be set up.
Relay Mode 1x 1 sec continious Interval
Call repeat
Here the time can be set when a call should be triggered again if the call has
not been nally conrmed at the caller. This function cannot be deactivated
(safety function!). We strongly recommend settings to 1 min.
Note: For safety reasons we recommend in larger facilities to use two
devices for each receiver used so that one is always charged and one is
used. This guarantees the battery life for one shift.
Do not deactivate all alarm signals! Always set the volume loud enough
so that the call can be safely heard.

Instructions for Use AssistX Mobil | 17
EN
Date & Time
Notice: the actual week day will be showed and automatically adjusted and
can‘t set manually.
• Call up time menu
Go to „Menu
>
Settings > Clock
>
Clock Set“.
• Set Clock
The navigation is controlled via [+] and [
-
].
• Daylight saving time
Here the automatic changeover to daylight
saving time can be switched on and off.
• Save and exit
Press the [OK] key 1 sec for „Next“.
Use [OK] to go back to menu.
Saving power (Power save mode)
If the Power save mode is switched on the display will switch off after 20 sec
after the last key press. By pressing the [OK] button the display will switch on
again.
If there is an
6alarm or
5an out of range warning the display will switch on
and will stay on as long as there is an alarm or warning.
• Activate/deactivate power save mode
Go to „Menu
>
Settings
>
Power Save“.
Infrared receiver of the transmitter
An infrared receiver is built into the transmitter. With a AAC or environment
control device, a call can be triggered via a built-in transmitter. This function
can be used in addition to a sensor/switch. The IR receiver is activated by de-
fault. It can be switched off (e.g. if there are several transmitters in the room)
by rst pressing the ON button (3), then the red button (6). After a short time,
the LED around the red button lights up red, then the IR receiver is deactiva-
ted. When the process is repeated, the LED turns green and the IR function is
activated again.
To teach the IR code into your AAC or environment control device, you need
(From Firmware V1.34 & Device Version V1.08)

18 |Instructions for Use AssistX Mobil
the IR one handset (Art #20164), the code for your device may also be available
for download (csslabs.de/download).
With the Congurator software, the IR channels can be switched (4 different
channels available) if several devices in a room want to use the IR function.
Congurator Software
The AssistX Mobile Congurator software is available at csslabs.de/download
(for Windows). You can use it to:
• Update the rmware of the transmitter, receiver and repeater
• Assign names (eg the caller) to the transmitters in the receivers
• Clone the receiver so that the conguration (transmitter names) is copied
to several receivers
• Save the receiver conguration
• Switch the IR channel at the transmitter or switch the IR function on/off
• Setting date and time
Instruction by specialist personnel is required to use the Congurator.
Please note: If you update a device, all other components of the system
(transmitters, receivers and repeaters) also need to be updated. Other-
wise, safety-critical system failures can occur!

Instructions for Use AssistX Mobil | 19
EN
10. Maintenance / Review
The device must be checked for safety and functionality at regular intervals of
3 months. The check must be done by trained specialist personnel only. The
following should be checked:
• Battery (replace every 3 years at the latest)
• Speaker function
• Range
• Connectors for damage and soiling
• Damage to the housing
• Update Firmware
11. Support
If you need any support or for technical questions about the product, please
contact the reseller where you purchased this product. If necessary, e. g. the re-
Please be sure to include a description of the problem and the serial number
of the device.
Please note: If you update a device, all other components of the system
(transmitters, receivers and repeaters) also need to be updated. Other-
wise, safety-critical system failures can occur!

20 |Instructions for Use AssistX Mobil
12. Technical speci cations
Dimensions: 65 x 119 x 26,5 mm (transmitter/receiver)
Weight: 110 g (transmitter), 130 g (receiver)
IP Rating: IP 54
Power supply: 5 V (USB)
Frequency: 922 MHz
Battery lifetime (depending on use): 24 - 72 h (transmitter), 10 - 24 h (receiver)
Range: 30 - 350 m, typical indoor: 80 m (100 - 1150 ft, typ. 250 ft.)
Temperature ranges
Use: 0 °C to 45 °C
Transportation and storage: -10 °C to 50 °C
13. Conformity/Standards
AssistX Mobil meets the requirements of DIN VDE 0834.
14. Environmental protection and disposal
All electrical and electronic devices must not be disposed with general house-
hold waste, but must be disposed at designated disposal points. This product
is subject to the European Directive 2002/96/EC and must therefore be pro-
perly disposed at the WEEE collection points. Please dispose used batteries
and rechargeable batteries in a recycling bin for used batteries or via special
resellers.
Table of contents
Other CSS Transmitter manuals

Popular Transmitter manuals by other brands

Yokis
Yokis E2BP quick start guide

Harris
Harris MW-1 Service bulletin

Viatran
Viatran 517 Installation data manual

Endress+Hauser
Endress+Hauser iTEMP TMT162 operating instructions

Critical Environment Technologies
Critical Environment Technologies CGAS-AP installation manual

NKE
NKE Gyropilot 90-60-247 user guide


