CT PRO25S User manual

EN • 1
EN
MANUAL
IMPORTANT SAFETY
INSTRUCTIONS
CALIFORNIA PROPOSITION 65
WARNING: This product contains chemical known to the state of California to
cause cancer or reproductive toxicity.
1. SAVE THESE INSTRUCTIONS
– This manual contains important safety and operating
instructions for battery charger model PRO25S/PRO25SE
(1094).
2. Do not expose charger to rain or snow.
3. Use of an attachment not recommended or sold by CTEK
may result in a risk of fire, electric shock or injury to
persons.
4. To reduce risk of damage to electric plug and cord, pull
by the plug rather than cord when disconnecting charger.
5. An extension cord should not be used unless absolutely
necessary. Use of improper extension cord could result
in a risk of fire and electric shock. If an extension cord
must be used, make sure that: a) Pins on plug of extension
cord are the same number, size and shape as those of
plug on charger; b) Extension cord is properly wired and
in good electrical condition; and c) Wire size is large
enough for AC ampere rating of charger as specified
in “RECOMMENDED MINIMUM AWG SIZE FOR AC
EXTENSION CORDS”.
6. Do not operate charger with damaged cord or plug –
return the charger to the retailer.
7. Do not operate charger if it has received a sharp blow,
been dropped or otherwise damaged in any way; take it
to the retailer.
8. Do not disassemble charger; take it to the retailer when
service or repair is required. Incorrect reassembly may
result in a risk of electrical shock or fire.
9. To reduce risk of electric shock, unplug charger from AC
outlet before attempting any maintenance or cleaning.
10. WARNING - RISK OF
EXPLOSIVE GASES
a) WORKING IN VICINITY OF
A LEAD-ACID BATTERY IS
DANGEROUS. BATTERIES
GENERATE EXPLOSIVE GASES
DURING NORMAL BATTERY

2 • EN
OPERATION. FOR THIS
REASON, IT IS OF OUTMOST
IMPORTANCE THAT YOU
FOLLOW THE INSTRUCTIONS
EACH TIME YOU USE THE
CHARGER.
b) To reduce risk of battery explosion, follow these instruc-
tions and those published by the battery manufacturer
and the manufacturer of any equipment you intend to use
in vicinity of battery. Review cautionary marking on these
products and on engine.
11. PERSONAL PRECAUTIONS
a) Consider having someone close enough by to come to
your aid when you work near a lead-acid battery.
b) Have plenty of fresh water and soap nearby in case
battery acid contacts skin, clothing or eyes.
c) Wear complete eye protection and clothing protection.
Avoid touching eyes while working near battery.
d) If battery acid contacts skin or clothing, wash immedi-
ately with soap and water. If acid enters eye, immediately
flood eye with running cold water for at least 10 minutes
and get medical attention immediately.
e) NEVER smoke or allow a spark or flame in vicinity of
battery or engine.
f) Be extra cautious to reduce risk of dropping a metal tool
onto battery. It might spark or short-circuit battery or
other electrical part that may cause explosion.
g) Remove personal metal items such as rings, bracelets,
necklaces, and watches when working with lead-acid
battery. A lead-acid battery can produce a short-circuit
current high enough to weld a ring or the like to metal,
causing a severe burn.
h) Use charger for charging a LEAD-ACID battery only. It is
not intended to supply power to a low voltage electrical
system other than in a starter-motor application. Do not
use battery charger for charging dry-cell batteries that
are commonly used with home appliances. These batter-
ies may burst and cause injury to persons and damage to
property.
i) NEVER charge a frozen battery.
12. PREPARING TO CHARGE
a) If necessary to remove battery from vehicle to charge,
always remove grounded terminal from battery first.
Make sure all accessories in the vehicle are off, so as not
to cause an arc.
b) Be sure area around battery is well ventilated while bat-
tery is being charged.
c) Clean battery terminals. Be careful to keep corrosion
from coming in contact with eyes.

EN • 3
EN
d) Add distilled water in each cell until battery acid reaches
level specified by battery manufacturer. Do not overfill.
For a battery without removable cell caps, such as valve
regulated lead acid batteries, carefully follow manufac-
turer’s recharging instruction.
e) Study all battery manufacturer’s specific precautions
while charging and recommended rates of charge.
f) Determine voltage of battery by referring to car owner’s
manual and make sure it matches output rating of battery
charger.
13. CHARGER LOCATION
a) Locate charger as far away from battery as DC cables
permit.
b) Never place charger directly above battery being
charged; gases from battery will corrode and damage
charger.
c) Never allow battery acid to drip on charger when read-
ing electrolyte specific gravity or filling battery.
d) Do not operate charger in a closed-in area or restrict
ventilation in any way.
e) Do not set a battery on top of charger.
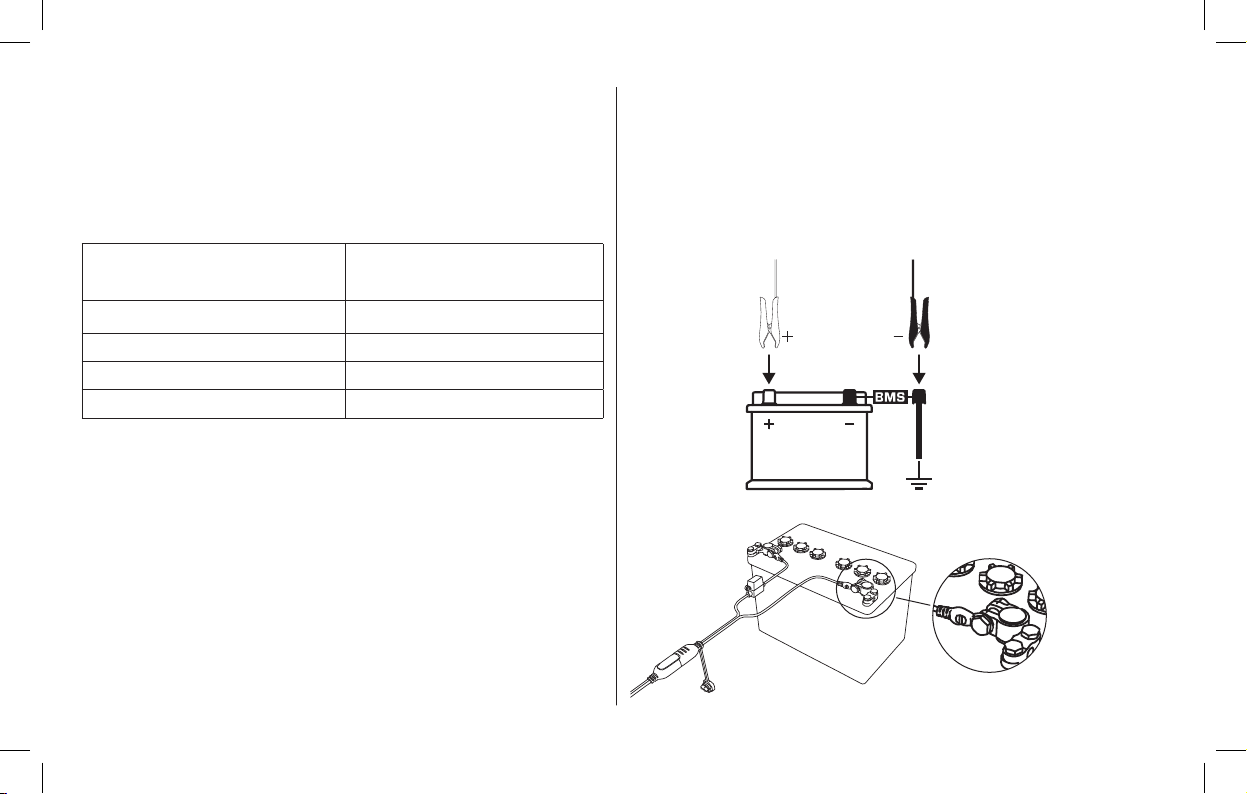
14. DC CONNECTION
PRECAUTIONS
a) Connect and disconnect dc output clips only after setting
any charger switches to “off” position and removing AC
cord from electric outlet. Never allow clips to touch each
other.
b) Attach clips to battery and chassis as indicated in 15(e),
15(f), 16(b) through 16(d).
15. FOLLOW THESE STEPS WHEN
BATTERY IS INSTALLED IN
VEHICLE. A SPARK NEAR
BATTERY MAY CAUSE BATTERY
EXPLOSION. TO REDUCE RISK
OF A SPARK NEAR BATTERY:
a) Position AC and DC cords to reduce risk of damage by
hood, door or moving engine part.
b) Stay clear of fan blades, belts, pulleys, and other parts
that can cause injury to persons.
c) Check polarity of battery posts. POSITIVE (POS, P, +)
battery post usually has larger diameter than NEGATIVE
(NEG, N, -) post.

4 • EN
d) Determine which post of battery is grounded (connected)
to the chassis. If negative post is grounded to the chassis
(as in most vehicles) see (e). If positive post is grounded to
the chassis, see (f).
e) For Negative-grounded vehicle, connect POSITIVE
(RED) clip from battery charger to POSITIVE
(POS, P, +) ungrounded post of battery. Connect
NEGATIVE (BLACK) clip to vehicle chassis or engine
block away from battery. Do not connect clip to carbu-
retor, fuel lines, or sheet-metal body parts. Connect to a
heavy gage metal part of the frame or engine block.
f) For Positive-grounded vehicle, connect NEGATIVE
(BLACK) clip from battery charger to NEGATIVE
(NEG, N, –) ungrounded post of battery. Connect
POSITIVE (RED) clip to vehicle chassis or engine block
away from battery. Do not connect clip to carburetor,
fuel lines, or sheet-metal body parts. Connect to a heavy
gage metal part of the frame or engine block.
g) When disconnecting charger, turn switches to off, discon-
nect AC cord, remove clip from vehicle chassis, and then
remove clip from battery terminal.
h) See operating instructions for length of charge
information.
16. FOLLOW THESE STEPS WHEN
BATTERY IS OUTSIDE VEHICLE.
A SPARK NEAR BATTERY MAY
CAUSE BATTERY EXPLOSION.
TO REDUCE RISK OF
A SPARK NEAR BATTERY:
a) Check polarity of battery terminals. POSITIVE (POS,
P, +) battery post usually has a larger diameter than
NEGATIVE (NEG, N, -) post.
b) Connect POSITIVE (RED) charger clip to POSITIVE (POS,
P, +) post of battery.
c) Position yourself and free end of cable as far away from
battery as possible – then connect NEGATIVE (BLACK)
charger clip to NEGATIVE (NEG, N, -) post of battery.
d) Do not face battery when making the final connection.
e) When disconnecting charger, always do so in reverse
sequence of connecting procedure and break first con-
nection while as far away from battery as practical.
f) A marine (boat) battery must be removed and charged
on shore. To charge it on board requires equipment spe-
cially designed for marine use.
IMPORTANT SAFETY
INFORMATION!
• Charge no other batteries than specified in TECHNICAL
INFORMATION.
• Check the charger cables prior to use. Ensure that no
cracks have occurred in the cables or in the bend protec-

EN • 5
EN
tion. A charger with damaged cables must be returned to
the retailer.
• Ensure that the cabling does not jam or comes into contact
with hot surfaces or sharp edges.
• Never charge a damaged battery.
• Never place the charger on top of the battery when
charging.
• Avoid covering the charger.
• All batteries fail sooner or later. A battery that fails dur-
ing charging is normally taken care of by the chargers
advanced control, but some rare errors in the battery could
still exist. Don’t leave any battery during charging unat-
tended for a longer period of time.
• If power consumers like fitted alarms and navigation com-
puters are connected to the battery, the charging process
takes longer and may drain the battery.
• Always check that the charger has switched to STEP 7
before leaving the charger unattended and connected for
long periods. If the charger has not switched to STEP 7
within 50 hours, this is an indication of an error. Disconnect
the charger.
• Batteries consume water during use and charging. For
batteries where water can be added, the water level should
be checked regularly. If the water level is low add distilled
water.
• This appliance is not designed for use by young children or
people who cannot read or understand the manual unless
they are under the supervision of a responsible person to
ensure that they can use the battery charger safely. Store
and use the battery charger out of the reach of children,
and ensure that children cannot play with the charger.
• Connection to the mains supply must be in accordance with
the national regulations for electrical installations.
• Do not extend the charge cable.
• For safe use place the charger with the bottom down when
installing and charging.
6 • EN
RECOMMENDED
MINIMUM AWG
SIZEFOR AC EXTENSION
CORDS
LENGTH OF CORD
FEET (M) AWG SIZE OF CORD
25 (7.6) 18
50 (15.2) 18
100 (30.5) 18
150 (45.6) 16
CONNECT AND
DISCONNECT
THE CHARGER TO A
BATTERY
Comfort
Connect
Comfort
Connect
FAQ
1 2
EN • 7
EN
OPERATING
INSTRUCTIONS
1. Connect the charger to the battery.
For batteries mounted inside
a vehicle
1. Connect the charger according to
the vehicles manual.
2. Connect the charger to the wall
socket.
3. Disconnect the charger from the
wall socket before disconnecting
the battery.
4. Disconnect the black clamp
before the red clamp.
1 2
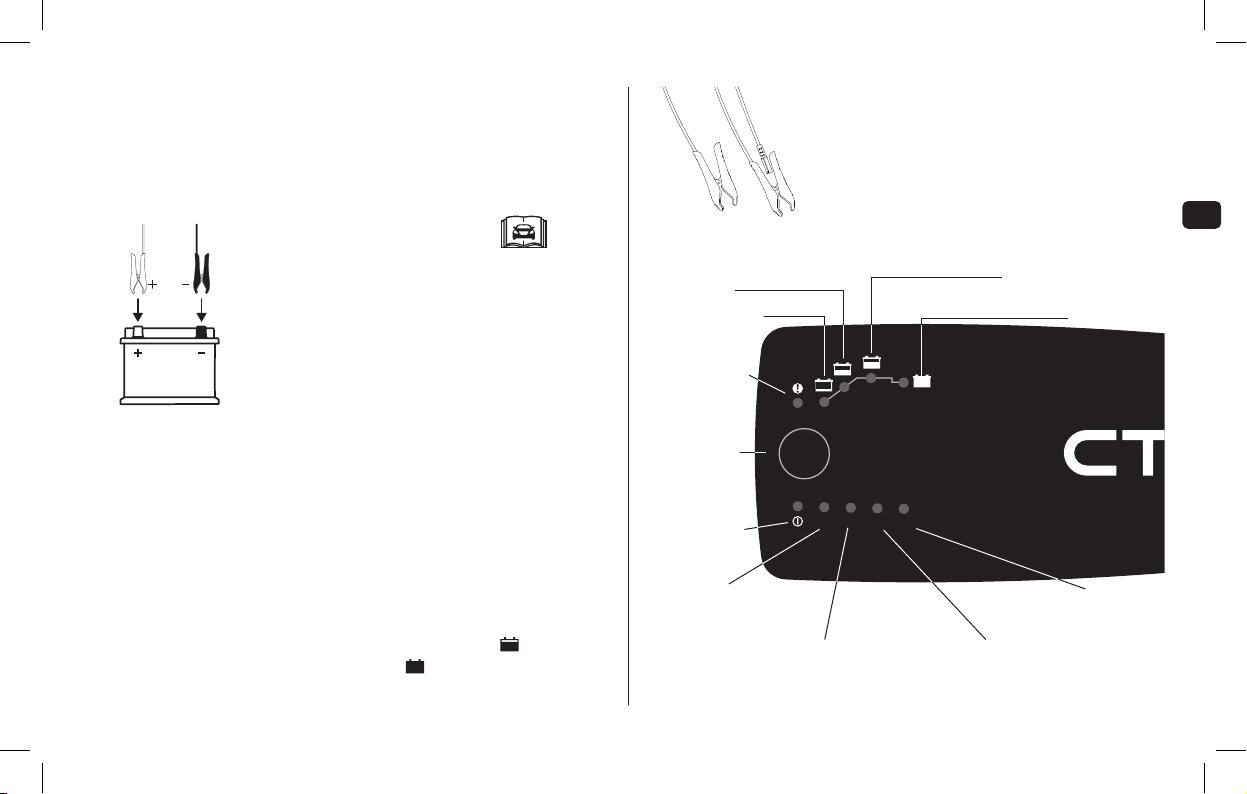
2. Connect the charger to the wall socket. The power lamp
will indicate that the mains cable is connected to the wall
socket. The error lamp will indicate if the battery clamps
are incorrectly connected. The reverse polarity protec-
tion will ensure that the battery or charger will not be
damaged.
3. Press the MODE-button to select charging program.
4. Follow the indication lamps through the charging process.
The battery is ready to start the engine when is lit.
The battery is fully charged when is lit.
5. Stop charging at any time by disconnecting the mains
cable from the wall socket.
+
–
Temperature sensor
The temperature sensor works automatically and
will adjust the voltage to the ambient temperature.
Place the temperature sensor in the positive clamp
or as the close to the battery as possible.
MODE
RECONDSUPPLYNORMAL LITHIUM
PRO25S
LITHIUM
PROGRAM
ERROR
LAMP
RECOND
PROGRAM
SUPPLY
PROGRAM
NORMAL BATTERY
PROGRAM
MODE-
BUTTON
POWER
LAMP
READY TO USE
EMPTY
CHARGING
FULLY CHARGED

8 • EN
CHARGING PROGRAMS
Settings are made by pressing the MODE-button. After about two seconds the charger activates the selected program. The
selected program will be restarted next time the charger is connected.
The table explains the different Charging Programs:
Program Explanation
NORMAL Normal battery program 14.4V/25A. Only for lead-acid batteries.
RECOND
Recond program 15.8V/1.5A
Use Recond to return energy to empty WET and Ca/Ca batteries. Recond your battery once per year and after
deep dischare to maximize lifetime and capacity. The Recond program adds the Recond step to the normal
battery program. Only for lead-acid batteries.
SUPPLY
Supply program 13.6V/25A
Use as a 12V power supply or use for float maintenance charging when 100% capacity of the battery is
required. The Supply program activates the Float step without time or voltage limitation. The spark protection
on the battery charger is disabled during the SUPPLY program.
LEAD-ACID

EN • 9
EN
READY TO USE
The table shows the estimated time to charge a battery from
empty to 80%
BATTERY SIZE (Ah) TIME TO 80% CHARGED
40Ah 1.5h
100Ah 3h
200Ah 6h
300Ah 16h
POWER LAMP
If the power lamp is lit with a:
MODE
RECONDSUPPLYNORMAL LITHIUM
PRO25S
1. STEADY LIGHT
The mains cable is connected to the wall socket.
2. FLASHING LIGHT:
The charger has entered the energy save mode.
This happens if the charger isn´t connected to the
battery within 2 minutes or the battery voltage is
below 2V.
ERROR LAMP
If the error lamp is lit, check the following:
MODE
RECONDSUPPLYNORMAL LITHIUM
PRO25S
1. Is the chargers red clamp connected
to the battery's positive pole? Connect
the charger according to the vehicles
manual.
2. Is the charger connected to a 12V
battery?
3. Are the clamps short circuited?
4. Has charging been interrupted in or
?
Restart the charger by pressing the MODE-
button. If charging is still being interrupted, the
battery...
...is seriosly sulphated and may need to be
replaced.
...can not accept charge and may need to be
replaced.
...can not keep charge and may need to be
replaced.
LEAD-ACID

10 • EN
STEP 1 DESULPHATION
Detects sulphated batteries. Pulsing current and voltage, removes
sulphate from the lead plates of the battery restoring the battery
capacity.
STEP 2 SOFT START
Tests if the battery can accept charge. This step prevents that
charging proceeds with a defect battery.
STEP 3 BULK
Charging with maximum current until approximately 80% battery
capacity.
STEP 4 ABSORPTION
Charging with declining current to maximize up to 100% battery
capacity.
STEP 5 ANALYZE
Tests if the battery can hold charge. Batteries that can not hold
charge may need to be replaced.
STEP 6 RECOND
Choose the Recond program to add the Recond step to the
charging process. During the Recond step voltage increases to
create controlled gassing in the battery. Gassing mixes the battery
acid and gives back energy to the battery.
STEP 7 FLOAT
Maintaining the battery voltage at maximum level by providing a
constant voltage charge.
STEP 8 PULSE
Maintaining the battery at 95–100% capacity. The charger
monitors the battery voltage and gives a pulse when necessary to
keep the battery fully charged.
LEAD-ACID
12345678
NORMAL 15.8V Max 25A until 12.6V Increasing voltage to
14.4V, max 25A Declining current
14.4V Checks if voltage
drops to 12V 13.0V*, 13.6V
max 25A 12.9V–14.4V
20–1.2 A
RECOND 15.8V Max 25A until 12.6V Increasing voltage to
14.4V, max 25A Declining current
14.4V Checks if voltage
drops to 12V Max 15.8V
Max 1.5A 13.0V*, 13.6V
max 25A 12.9V–14.4V
20–1.2 A
Time limit: 8h 20h 16h 3 minutes 2h or 6h 10 days (*first day)
charge cycle restarts
if voltage drops
Charge cycle
restarts if voltage
drops or 24h time
passed

EN • 11
EN
CHARGING PROGRAMS
Settings are made by pressing the MODE-button. After about two seconds the charger activates the selected program. The
selected program will be restarted next time the charger is connected.
The table explains the different Charging Programs:
Program Explanation
LITHIUM Lithium* program 13.8V/25A
Use for LITHIUM* batteries.
SUPPLY
Supply program 13.6V/25A
Use as a 12V power supply or use for float maintenance charging when 100% capacity of the battery
is required. The Supply program activates the Float step without time or voltage limitation. The spark
protection on the battery charger is disabled during the SUPPLY program.
LITHIUM*
*) 12V lithium batteries (LiFePO4, Li-Fe, Li-iron, LFP)

12 • EN
BATTERIES WITH "UNDER
VOLTAGE PROTECTION"
Some Lithium* batteries have an on-board UVP (under voltage
protection) that disconnects the battery to avoid it becoming
too deeply discharged. This prohibits the charger from
detecting that there’s a battery connected. To bypass this, the
battery charger needs to open the UVP. There are two options
available to “wake up” the battery - automatic and manual.
During the automatic “wake up” period the LED will flash
until the charge program is started and LED is lit with a
steady light. Automatic "wake up" will be active for maximum
5 minutes.
If the charger is in Standby mode after 10 minutes ( power
led is flashing) the automatic wake up did not succeed. Try the
manual wake up.
To use the manual “wake up”, press the Mode button for
approximately 10 seconds to bypass the UVP. During the
“wake up” period the LED will flash until the charge
program is started and the LED is lit with a steady light. If
the manual wake up is unsuccessful the power LED will start
to flash after latest 10 minutes. Disconnect any parallel loads
from the battery and try again. If the charging does not start
after that, the battery may need to be replaced.
POWER LAMP
If the power lamp is lit with a:
MODE
RECONDSUPPLYNORMAL LITHIUM
PRO25S
1. STEADY LIGHT
The mains cable is connected to the wall socket.
2. FLASHING LIGHT:
The charger has entered the energy save mode.
This happens if the charger isn´t connected to the
battery within 2 minutes.
LITHIUM*
*) 12V lithium batteries (LiFePO4, Li-Fe, Li-iron, LFP)

EN • 13
EN
ERROR LAMP
If the error lamp is lit, check the following:
MODE
RECONDSUPPLYNORMAL LITHIUM
PRO25S
1. Is the chargers red clamp connected
to the battery's positive pole? Connect
the charger according to the
vehicles manual.
2. Is the charger connected to a 12V
battery?
3. Are the clamps short circuited?
4. Has charging been interrupted in or
?
Restart the charger by pressing the MODE-
button. If charging is still being interrupted, the
battery...
...can not accept charge or paralell loads
may be connected to the battery. Remove the
paralell loads and restart the charging by
pressing the MODE-button.
...restart the charger maximum 3 times. If the
charger doesn´t continue to Bulk after that,
the battery may need to be replaced.
...can not keep charge and may need to be
replaced.
READY TO USE
The table shows the estimated time to charge a battery from
empty to 80%
BATTERY SIZE (Ah) TIME TO 80% CHARGED
40Ah 1.5h
100Ah 3h
200Ah 6h
300Ah 16h
LITHIUM*
*) 12V lithium batteries (LiFePO4, Li-Fe, Li-iron, LFP)

14 • EN
STEP 1-2 ACCEPT
Tests if the battery can accept charge. This step prevents that
charging proceeds with a defect battery.
STEP 3 BULK
Charging with maximum current until approximately 90%
battery capacity.
STEP 4 ABSORPTION
Charging with declining current to maximize up to 95%
battery capacity.
STEP 5 ANALYZE
Tests if the battery can hold charge. Batteries that can not
hold charge may need to be replaced.
STEP 6 COMPLETION
Final charge with reduced current.
STEP 7 FLOAT
Maintaining the battery voltage at maximum level by
providing a constant voltage charge.
STEP 8 PULSE
Maintaining the battery at 95–100% capacity. The charger
monitors the battery voltage and gives a pulse when
necessary to keep the battery fully charged.
LITHIUM*
Wake up 12345678
LITHIUM 13.0V Max 25A Max 25A
until 13.8V Declining current
13.8V Checks if voltage
drops to 12.0V 14.4V 13.3V
Max 25A 13.0V–13.8V
25A–3.0A
Time limit: Max 10 minutes Max 30h Max 4h 3 minutes If start charge
voltage less than
13.9V then max 2h
10 days
Charge cycle
restarts if voltage
drops
Max 1h pulse
Auto pulse
10 days
*) 12V lithium batteries (LiFePO4, Li-Fe, Li-iron, LFP)

EN • 15
EN
TECHNICAL SPECIFICATIONS
Model number 1094
INPUT 100–120VAC, 50–60Hz, 6.0A
OUTPUT 25A, 12V
Start voltage 2.0V Lead Acid batteries
8.0V Lithium batteries
Back current drain* Less than 2.3Ah/month
Ripple** Less than 4%
Ambient temperature -4°F to +122°F (-20°C to +50°C)
Battery types 12V: WET, EFB, MF, Ca/Ca, AGM, GEL, LiFePO4
Battery capacity 40–500Ah, Lead Acid battery types
30–450Ah, Lithium battery types
CEC-400 Battery capacity 150–400Ah
Warranty 2 years
*) Back current drain is the current that drains the battery if the charger is not connected to the mains. CTEK chargers have a
very low back current.
**) The quality of the charging voltage and charging current is very important. A high current ripple heats up the battery which
has an aging effect on the positive electrode. High voltage ripple could harm other equipment that is connected to the battery.
CTEK battery chargers produce very clean voltage and current with low ripple.

16 • EN
LIMITED WARRANTY
CTEK Power Inc., issues this limited warranty to the original
purchaser of this product. This limited warranty is not transfera-
ble. The warranty applies to manufacturing faults and material
defects. The customer must return the product for inspection
together with the receipt of purchase to the retailer. CTEK Power
Inc. will, in its sole discretion, either (i) return the product to cus-
tomer if it is not determined to be defective, or (ii) without regard
to whether or not the original product is determined to be defec-
tive, either (A) provide customer with a new replacement product
of the same or comparable model to customer, or (B) provide
customer with a full refund for the product purchase price. This
warranty is void if the battery charger has been opened, handled
carelessly or repaired by anyone other than CTEK Power Inc. or
its authorized representatives. THE FOREGOING WARRANTY,
RIGHTS AND REMEDIES ARE EXCLUSIVE AND IN LIEU OF
ALL OTHER WARRANTIES, RIGHTS OR REMEDIES, EXPRESS
OR IMPLIED, WHICH MAY OTHERWISE BE AVAILABLE; ALL
OTHER WARRANTIES, INCLUDING BUT NOT LIMITED TO,
ANY WARRANTY OF MERCHANTABILITY OR FITNESS FOR A
PARTICULAR PURPOSE, ARE HEREBY EXPRESSLY DISCLAIMED,
EXCLUDED AND WAIVED BY CUSTOMER TO THE FULLEST
EXTENT PERMITTED BY LAW. UNDER NO CIRCUMSTANCES
SHALL CTEK POWER INC. OR ANY AFFILIATED PARTY
THEREOF BE LIABLE FOR ANY INDIRECT, INCIDENTAL,
PUNITIVE OR CONSEQUENTIAL DAMAGES OF ANY KIND.
MAINTENANCE
INSTRUCTIONS
The PRO25S/PRO25SE (1094) is maintenance-free. The
charger must not be opened; doing so will invalidate the
warranty. If the power cable is damaged the charger must be
returned to the retailer. The charger casing can be cleaned
using a damp cloth and mild cleaning agent. Remove the plug
from the power socket before cleaning.
SUPPORT
For support, FAQ, latest revised manual and more information
about CTEK products: www.ctek.com
50020511B

FR • 17
FR
CONSIGNES DE
SÉCURITÉ IMPORTANTES
PROPOSITION 65 DE LA CALIFORNIE.
MISE EN GARDE: Ce produit contient des substances
chimiques reconnues par l’État de Californie comme étant
cancérigènes ou toxiques pour la reproduction.
1. CONSERVEZ CES
CONSIGNES – Ce mode d’emploi contient
des consignes de sécurité et des directives d’utilisation
importantes pour le chargeur de batteries PRO25S/
PRO25SE (1094).
2. Ne pas exposer le chargeur à la pluie ou à la neige.
3. Ne pas utiliser d’accessoires non recommandés ou
vendus par CTEK pour éviter tout risque d’incendie,
d’électrocution ou de blessure.
4. Pour éviter d’endommager les câbles, débrancher le
chargeur en retirant la fiche sans tirer sur le cordon
d’alimentation.
5. Ne pas utiliser de rallonge, sauf nécessité absolue.
L’utilisation d’une rallonge inappropriée pourrait
entraîner un risque d’incendie ou d’électrocution. Si
l’utilisation d’une rallonge est nécessaire, vérifier les
points suivants: a) les broches de la fiche de la rallonge
doivent être identiques en nombre, taille et format à
celles du chargeur; b) la rallonge doit être correctement
câblée et en bon état; c) le calibre des fils doit être
suffisant pour l’intensité nominale CA (ampères) du
chargeur, comme indiqué dans le tableau «CALIBRE
MINIMUM RECOMMANDÉ POUR LES CORDONS DE
RALLONGE».
6. Ne pas utiliser un chargeur dont le cordon ou la fiche
sont endommagés – retourner le chargeur au vendeur.
7. Ne jamais utiliser un chargeur s’il a reçu un coup violent,
s’il est tombé ou s’il a été endommagé de quelque façon
que ce soit; le retourner au vendeur.
8. Ne pas démonter le chargeur; le retourner au vendeur
si un entretien ou une réparation sont nécessaires. Le
remontage inadéquat du chargeur peut entraîner un
risque d’électrocution ou d’incendie.
9. Pour réduire le risque d’électrocution, débrancher le
chargeur de la prise avant tout entretien ou nettoyage.
10. MISE EN GARDE – RISQUE DE
GAZ EXPLOSIFS
MODE D’EMPLOI
50020511B

18 • FR
a) LE TRAVAIL À PROXIMITÉ
D’UNE BATTERIE AU PLOMB
EST DANGEREUX. EN
UTILISATION NORMALE, LES
BATTERIES PRODUISENT DES
GAZ EXPLOSIFS. IL EST DONC
ESSENTIEL DE RESPECTER
CES CONSIGNES CHAQUE
FOIS QUE VOUS UTILISEZ LE
CHARGEUR.
b) Pour réduire le risque d’explosion de la batterie, suivez
ces instructions et celles publiées par le fabricant de la
batterie et de tout équipement que vous avez l’intention
d’utiliser à proximité. Examinez les avertissements
indiqués sur ces produits et sur le moteur.
11. PRÉCAUTIONS
a) Veiller à ce qu’il y ait toujours quelqu’un dans les parages
pour vous venir en aide lorsque vous travaillez près d’une
batterie au plomb.
b) Veiller à ce que de l’eau et du savon soient disponibles
en quantité suffisante en cas de contact de l’acide avec la
peau, les vêtements ou les yeux.
c) Toujours porter des vêtements de protection et des
lunettes. Éviter de se toucher les yeux lorsque l’on se
trouve à proximité d’une batterie.
d) En cas de projections d’acide sur la peau ou les
vêtements, rincer immédiatement àl’eau savonneuse.
En cas de projection d’acide dans les yeux, rincer
immédiatement àl’eau courante froide pendant un
minimum de 10minutes et consulter immédiatement un
médecin.
e) Ne JAMAIS fumer et empêcher toute étincelle ou flamme
à proximité d’une batterie ou d’un moteur.
f) Redoubler de prudence pour éviter toute chute d’outil
métallique sur la batterie, ce qui pourrait produire une
étincelle ou provoquer un court-circuit pouvant être à
l’origine d’une explosion.
g) Retirer tous les objets personnels en métal tels bagues,
bracelets, colliers et montres lorsqu’on manipule des
batteries au plomb. Un court-circuit survenant dans une
batterie au plomb est suffisamment puissant pour souder
un bijou au métal et provoquer des brûlures sévères.
h) Utiliser le chargeur uniquement pour charger des
BATTERIES AU PLOMB. Il n’est pas conçu pour
l’alimentation d’un circuit électrique à basse tension autre
que celui utilisé pour le démarrage d’un moteur. Ne pas
utiliser le chargeur pour les batteries sèches généralement

FR • 19
FR
utilisées dans les appareils ménagers. Ce type de
batteries est susceptible d’exploser et de provoquer des
dégâts matériels et des blessures.
i) Ne JAMAIS charger une batterie gelée.
12. AVANT DE CHARGER UNE
BATTERIE
a) Si nécessaire, retirer la batterie à charger du véhicule en
détachant toujours dans un premier temps la borne de
terre. Vérifier que tous les accessoires du véhicule sont
débranchés afin de ne pas provoquer d’arc électrique.
b) Pendant la charge, assurer une bonne ventilation autour
de la batterie.
c) Nettoyer les bornes de la batterie. Nettoyer les bornes
de la batterie. Éviter toute projection de matière corrodée
dans les yeux.
d) Ajouter de l’eau distillée dans chaque cellule jusqu’à ce
que le niveau d’acide atteigne le niveau indiqué par le
fabricant de batteries. Ne pas remplir au-delà du niveau
recommandé. Pour les batteries sans bouchons comme
les batteries au plomb régulées par soupape, respecter
scrupuleusement les instructions de charge du fabricant.
e) Prendre connaissance des consignes de sécurité
particulières du fabricant et des tensions de charge
recommandées.
f) Déterminer la tension de la batterie en consultant le guide
du propriétaire du véhicule et s’assurer que la tension de
sortie du chargeur est correctement sélectionnée.
13. EMPLACEMENT DU
CHARGEUR
a) Installer le chargeur le plus loin possible de la batterie, en
fonction de la longueur des câbles.
b) Ne jamais placer le chargeur directement au-dessus
de la batterie en cours de charge. Les gaz produits par
la batterie sont corrosifs et risquent d’endommager le
chargeur.
c) Ne jamais laisser l’acide de la batterie goutter sur le
chargeur durant les mesures de densité ou durant le
remplissage des éléments.
d) Ne pas utiliser le chargeur dans un endroit confiné ou
mal ventilé.
e) Ne pas poser la batterie sur le dessus du chargeur.
14. PRÉCAUTIONS CONCERNANT
LE RACCORDEMENT C.C.
a) Avant de connecter ou déconnecter les pinces de
l’alimentation c.c., mettre tous les interrupteurs en position
OFF et débrancher le cordon d’alimentation. Éviter tout
contact entre les pinces. Éviter tout contact entre les
pinces.

20 • FR
b) Attacher les pinces à la batterie et au châssis – se
reporter à 15(e), 15(f) et 16(b) à 16(d).
15. SUIVRE CES ÉTAPES POUR
LA CHARGE D’UNE BATTERIE
INSTALLÉE DANS UN
VÉHICULE. UNE ÉTINCELLE
PRÈS DE LA BATTERIE
PEUT PROVOQUER UNE
EXPLOSION. POUR RÉDUIRE LE
RISQUE D’ÉTINCELLE PRÈS DE
LA BATTERIE:
a) Positionner les cordons c.a. et c.c. de manière à éviter
qu’ils ne soient endommagés par le capot, les portières
ou les pièces en mouvement.
b) Ne pas s’approcher des ventilateurs, des courroies, des
poulies et des autres pièces susceptibles de provoquer
des blessures.
c) Vérifier la polarité des bornes de la batterie. Le diamètre
de la borne POSITIVE (POS, P, +) est généralement
supérieur à celui de la borne NÉGATIVE (NEG, N, -).
d) Déterminer quelle borne est mise à la masse (connectée
au châssis). Si c’est la borne négative (comme dans
la plupart des véhicules), aller à (e). Si c’est la borne
positive, aller à (f).
e) Sur un véhicule à masse négative, connecter la pince
POSITIVE (ROUGE) du chargeur de batterie à la borne
POSITIVE ((POS, P, +) non reliée à la masse de la
batterie. Connecter la pince NÉGATIVE (NOIRE) au
châssis du véhicule ou au bloc-moteur, aussi loin que
possible de la batterie. Ne pas fixer la pince sur le
carburateur, les conduites d’essence ou les éléments en
tôle de la carrosserie. La fixer sur une partie épaisse du
châssis ou du bloc-moteur.
f) Sur un véhicule à masse positive, connecter la pince
NÉGATIVE (NOIRE) du chargeur de batterie à la borne
NÉGATIVE (NEG, N, –) non reliée à la masse de la
batterie. Connecter la pince POSITIVE (ROUGE) au
châssis du véhicule ou au bloc-moteur, aussi loin que
possible de la batterie. Ne pas fixer la pince sur le
carburateur, les conduites d’essence ou les éléments en
tôle de la carrosserie. La fixer sur une partie épaisse du
châssis ou du bloc-moteur.
g) Pour débrancher le chargeur, mettre tous les interrupteurs
en position «OFF», débrancher le cordon d’alimentation,
retirer la pince fixée au châssis du véhicule puis celle
fixée à la borne de la batterie.
h) Pour toute information relative au temps de charge,
consulter les directives d’utilisation.
This manual suits for next models
1
Table of contents


