Cuckoo CRP-HF06 Fuzzy Series User manual

CRP-HF06 Fuzzy Series
1.08L(2~6Persons) / 1.08L(2~6 )
Operating Instructions
NO.1 CUCKOO
Electric Pressure Rice cooker/warmer

Read all instructions before use.
Save these instructions for future reference.
Important safeguards
Limited warranty
Important safeguards ......................................................... 3
Specifications ...................................................................... 4
Caution for safety ................................................................ 5
Caution for use .................................................................... 8
Name of each part .............................................................. 9
Function operating part ...................................................... 10
Before cooking rice ............................................................. 11
Error Code and possible cause ......................................... 12
How to cook ........................................................................ 13
MY MODE (Cuckoo Customized Taste Function) ........... 15
How to use GABA (Brown rice) ..................................... 17
How to preset the time ....................................................... 20
To keep warm the cooked rice tasty .................................. 21
How to clean ....................................................................... 24
Check before asking for service ........................................ 22
Limited warranty .................................................................. 52

1. Read all instructions before using this appliance.
2. Do not touch hot surfaces. Use handles or knobs.
3. To protect against fire, electric shock and / or injury to persons do not immerse cord, plugs, or
Pressure Cooker Body in water or any other liquid.
4. Close supervision is necessary when this appliance is used by or near children.
This appliance is not intended for use by young children or infirm persons without supervision.
Young children should be supervised to ensure that they do not play with the appliance.
5. Unplug from outlet when not in use and before cleaning.
Allow to cool before putting on or taking off parts, and before cleaning the appliance.
6. Do not operate any appliance with a damaged cord or plug or after the appliance malfunctions, or
has been damaged in any manner. Return the appliance to the nearest authorized service facility
for examination, repair or adjustment.
7. The use of accessory attachments not recommended by the appliance manufacturer may result in
fire, electric shock, and / or injury to persons.
8. If the supply cord is damaged, it must be replaced by a special cord or assembly available from the
manufacturer or its service agent.
9. Do not use outdoors.
10. Do not let the cord hang over the edge of the table or counter, or touch hot surfaces.
11. Do not place on or near a hot gas or electric burner, or in a heated oven.
12. Always attach plug to appliance first, then plug cord into the wall outlet. To disconnect, turn any
control to off , then remove plug from wall outlet.
13. Do not use this appliance for other than its intended use.
14. Extreme caution must be used when moving an appliance containing hot oil or any hot liquids.
15. Oversized foods, metal foil packages, or utensils must not be inserted in the appliance as they
may involve a risk of fire or electric shock.
16. A fire may occur if the appliance is covered or touching flammable material, including curtains,
draperies, walls, and the like while in operation.
17. To reduce the risk of electric shock, cook only in removable container.
18. This appliance cooks under pressure. Improper use may result in scalding injury.
Make certain unit is properly closed before operating. See “Operating Instructions.”
19. Do not cook foods such as applesauce, cranberries, or other cereals macaroni or spaghetti.
These foods tend to foam, froth, and sputter, and may block the pressure release device.
20. Always check the pressure release device for clogging before use.
21. Do not open the pressure cooker until the unit has cooled and internal pressure has been
reduced. See “Operating Instructions.”
22. Do not use this pressure cooker for pressure frying with oil.
WARNING : This appliance generates heat and escaping steam during use. Use proper precaution to
prevent risk of burns, fires, or other injury to persons or damage to property.
1. Keep hands and face away from Pressure Release Valve when releasing pressure.
2. Take extreme caution when opening the Lid after cooking. Serious burns can result from steam inside.
3. Never open the Lid while the unit is in operation.
4. Do not use without the inner Pot in place.
5. Do not cover the Pressure Valve with anything as an explosion may occur.
6. Do not touch the inner pot and any heating parts, immediately after using.
Let the unit cool down completely first.

Note:
A. A short power-supply cord (or cord set) is to be provided to reduce the hazards resulting from
becoming entangled in or tripping over a longer cord.
B. Longer cord set or extension cords are available and may be used if care is exercised in their use.
C. If a long cord set or extension cord is used.
(1) the marked electrical rating of the cord set or extension cord should be at least as great as the
electrical rating of the appliance.
(2) if the appliance is of the grounded type, the extension cord should be a grounding-type three-wire
cord, and
(3) the longer cord should be arranged so that it will not drape over the counter top or tabletop where
it can be pulled on by children or tripped over accidentally.
This appliance has a polarized plug : (one blade is wider than the other).
As a safety feature, this plug will fit in a polarized outlet only only one way.
If the plug does not fit fully in the outlet, reverse the plug.
If it still does not fit, contact a qualified electrician.
Do not attempt to defeat this safety feature.
CRP-HF06 Fuzzy Series
AC 120V, 60Hz
1040W
0.36~1.08L (2~6cups)
1.0m
78.4KPa(0.8kgf/cm
2
)
5.4kg
26.0cm
34.8cm
26.8cm
0.36~0.72L (2~4cups)
The East and the Central Districts
Tel. No. (718)888-9144
The West and the Central Districts
Tel. No. (213)687-9828
USA Canada
TORONTO
Tel. No. 905 707 8224 / 416 878 4561
VANCOUVER
Tel. No. 604 540 1004 / 604 523 1004

Do not use the cooker near
hot things such as stove, gas
stove or direct ray of light.
It can cause an electric shock, fire,
transformation or discoloration.
It can cause an electric shock or fire.
If it contact water, please separate
power cord and contact dealer
and service center.
Do not let the cooker contact any water by
sprinkling water on the cooker.
Use a single socket with the
rated current above 15A.
Using several lines in one socket can
cause overheating resulting in fire.
Use the extension cord with the
rated current above 15A.
Do not turn the Lock/Unlock
Handle to Unlock" in cooking.
Do not cover the automatic
steam outlet or pressure
weight with your hand or face.
It can cause burns.
Especially be careful to keep
it out reach of children.
Do not plug or pull the power cord with
wet hands.
It can cause an electric shock.
When you pull out the power
plug, don’t pull the power cord.
Please, surely pull out the power plug.
It can cause an electric shock.
The hot steam or any hot content
within the cooker can cause burns.
After you finish the cooking do not
try to open the cooker by force until
the steam is completely exhausted.
The following must be observed to use the product safely and correctly to prevent accident and dangerous
situations.
Warning and Caution are different as follows.
This means that the action it describes
may result in death or severe injury.
This means that the action it describes
may result in injury or property damage.
This sign is for reminding something may cause problems
under the certain situation.
Please read and follow the instruction to avoid any harmful
situation.
Indicates a prohibition
Indicates an instruction
Do not use on a rice chest or a shelf.
Do not press the power code
between furniture.
It can cause an electric shock
resulting in fire.
When use on furniture automatic
steam releasing can cause damage,
fire and an electric shock.
Do not put any needle, cleaning pin etc in
the ventilator or any gap of the cooker.
Do not insert cleaning pin to other
parts except to the valve hole of
the pressure weight.
It can cause an electric shock or fire.
Especially be careful to keep it out of
reach of children.

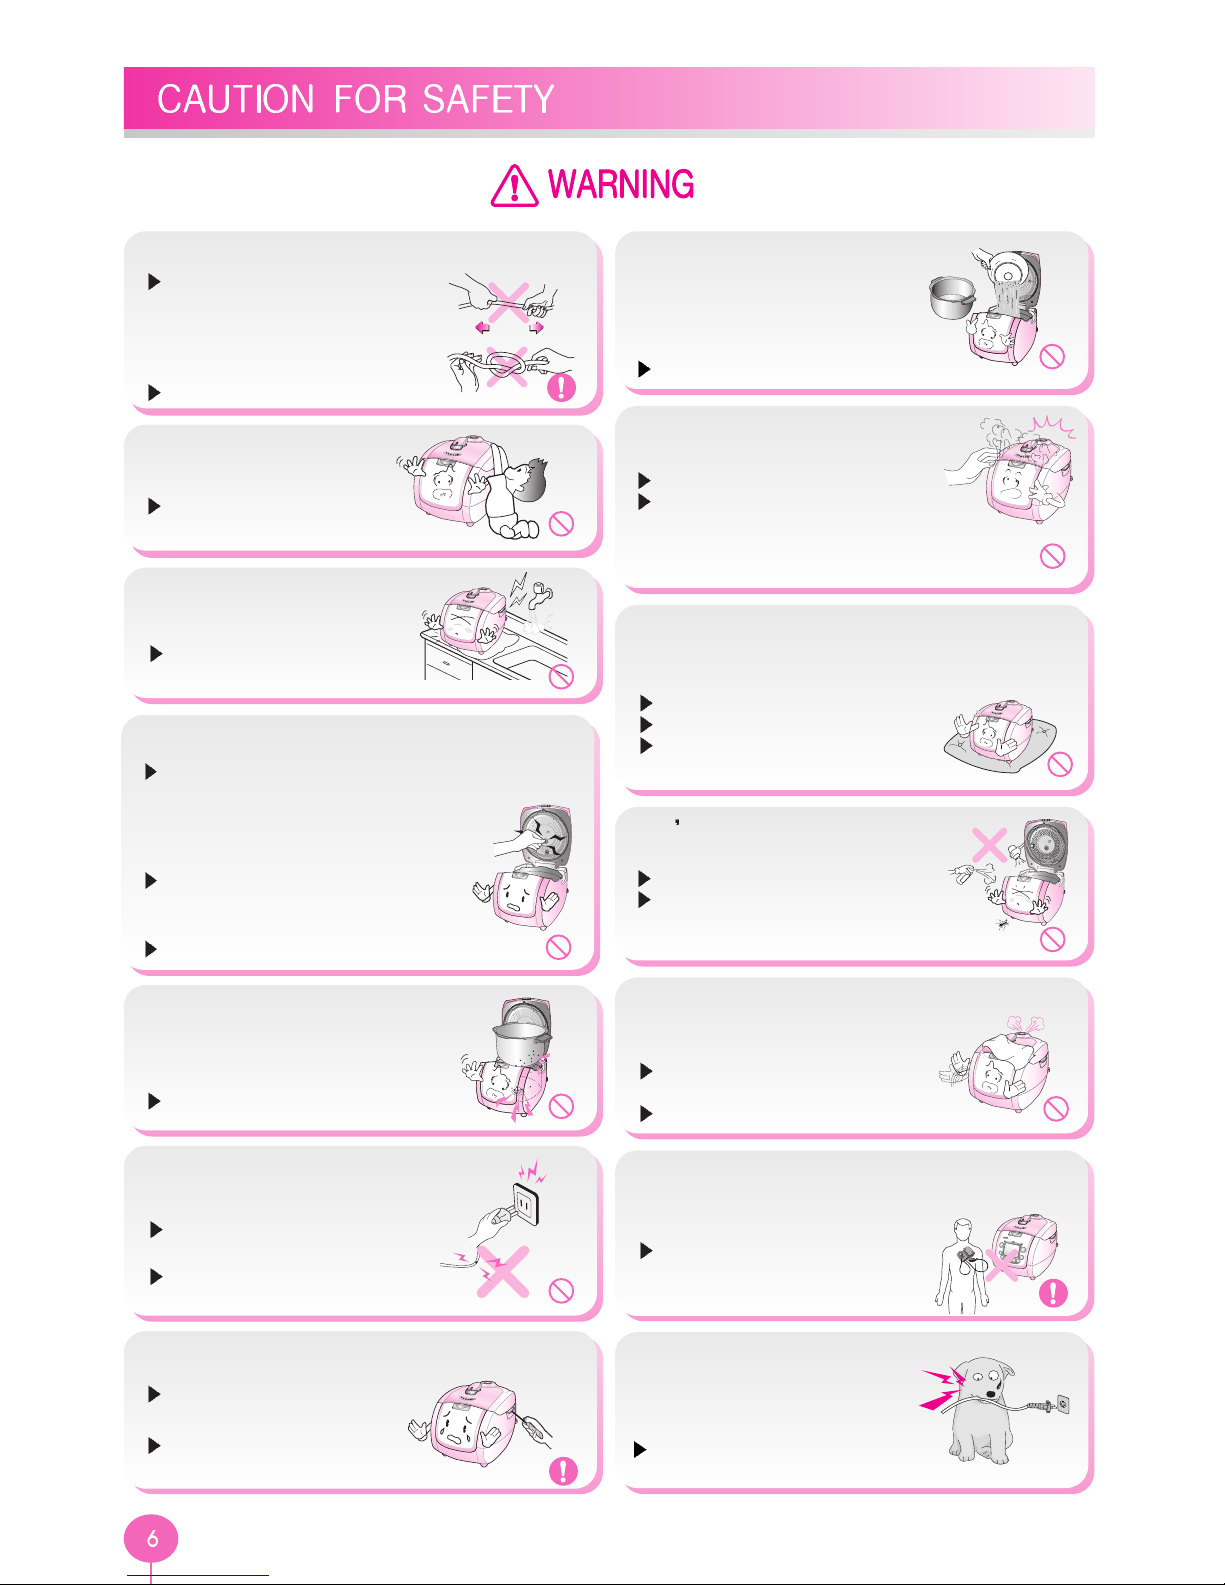
Do not use pots that are not
designed for the cooker.
Do not use abnormal pot
and do not use without
inner pot.
It can cause an electric shock or fire.
Do not open the top cover
while in heating and cooking.
It can cause burns.
If you need to open the lid while cooking,
keep pressing the “cancel” button for 2
seconds and confirm internal steam released
completely turning the pressure weight over.
Do not alter, reassemble, disassemble or repair.
It can cause fire, electric
shock or injure.
For repair, contact dealer
or the service center.
Don t spray or put any
insecticide and chemicals.
It can cause an electric shock or fire.
In case cockroach or any insects get
inside of the cooker please call a
dealer or a service center.
Clean any dust or alien substance
off the temperature sensor,
heating plate and inner pot.
It can cause a system problem or fire.
Do not use damaged power
cord, plug or loose socket.
It can cause an electric shock,
short circuit or fire.
If the plug were damaged,
contact dealer or a service center.
Do not cover the automatic steam outlet or
pressure weight with a duster,
a towel or apron, etc.
It can cause a transformation
or a breakdown.
It can cause an explosion by pressure.
If you use cardiac pacemakers or electrical
medical supporting equipment consult a
doctor before using this unit.
When this unit is working, it
can influence on any electrical
medical equipment.
Please pay careful affention
against water and chemicals.
It can cause an electric
shock or fire.
Use product at the flat place. Do not use on
the cushion. Please avoid using it on an
unstable location easy to be fallen down
It can cause a transformation or a fire.
It can cause burns or breakdowns.
Be careful to install the power cord
which does not disturb to pass.
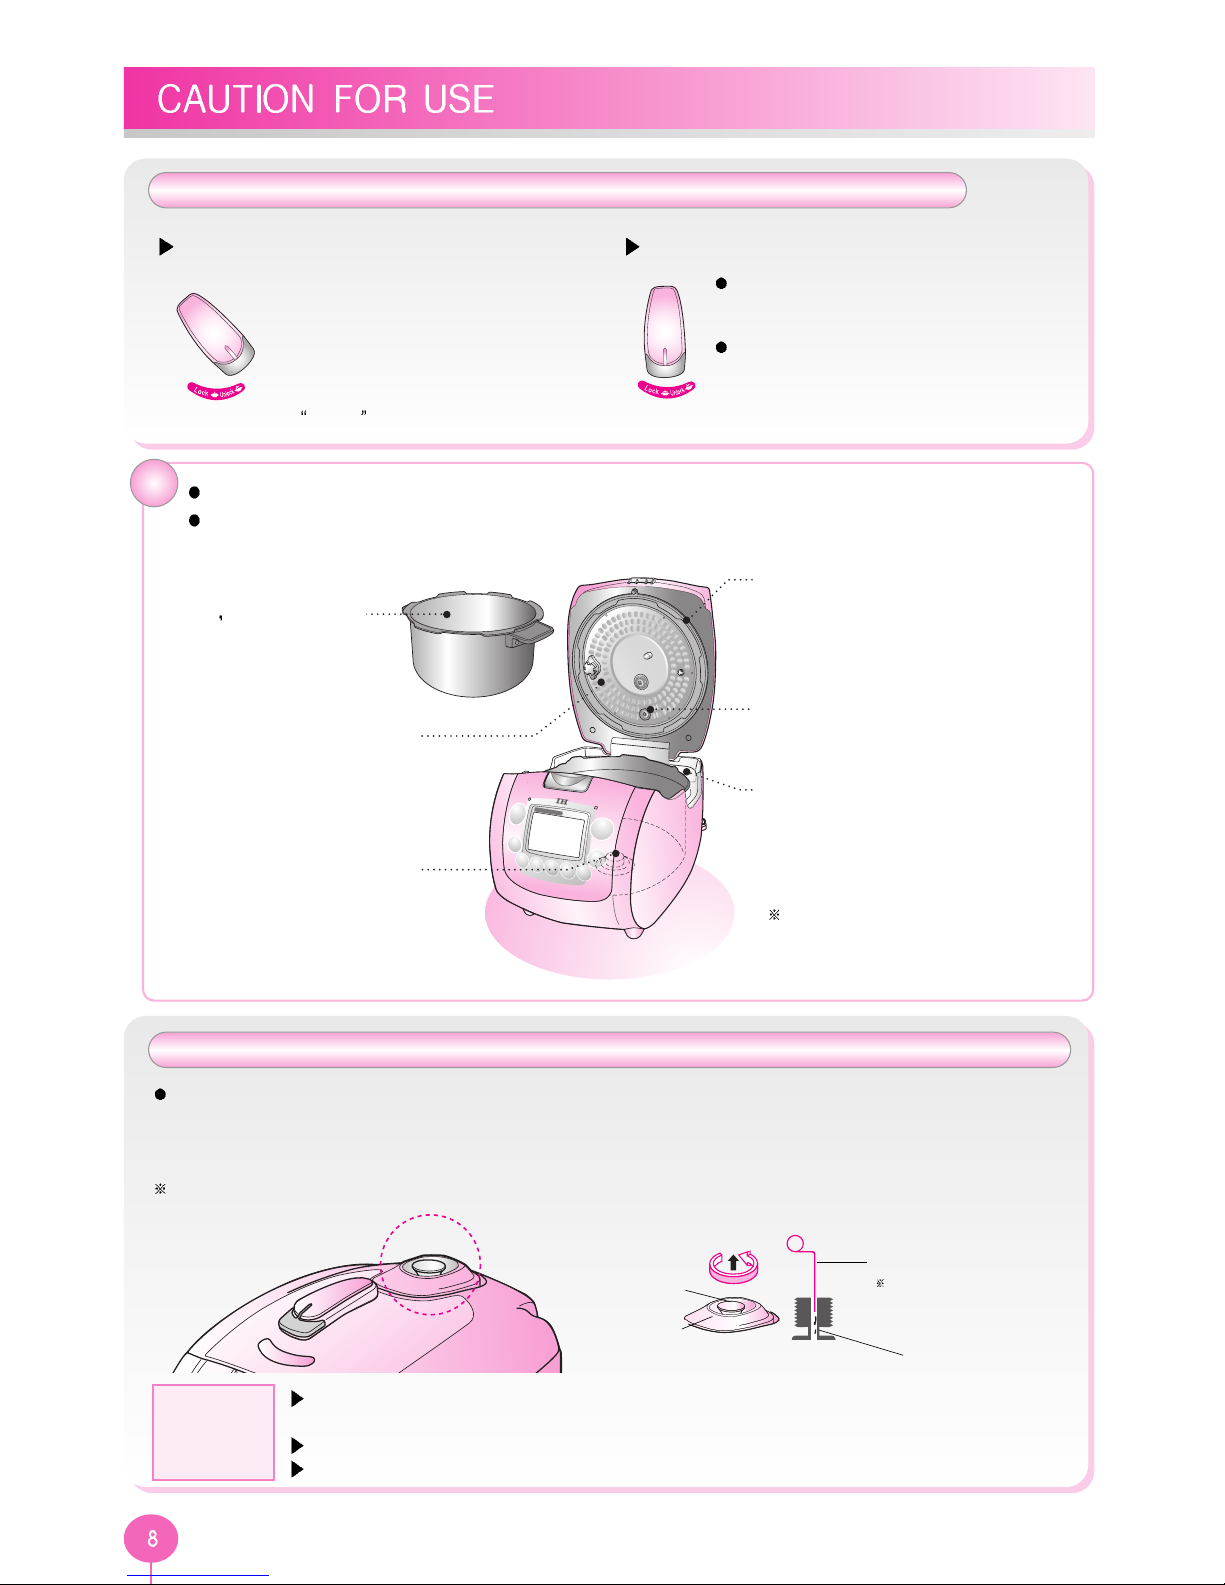
Do not pull out the clean steam vent by force.
When separate it, the steam control vent can be blocked.
Please make sure you clean and
check the assembly condition of the
clean steam vent before and after use.
If you have any problem with assembly
and cleaning of the clean steam vent,
please call a dealer or service center.
Keep clean the product before and after use.
Do not bend, tie or pull the power cord by force.
It can cause an electric shock or
short circuit resulting in fire.
Remove an alien substance on
plug with the clean cloth.
It can cause fire.
Keep the cooker out of
reach of children.
It can cause burns, electric
shock or injury.
Be careful both plug and power
cord not to be shocked by
animal attack or sharp metal
materials.
Damages by impact can cause an
electric shock or fire.

Don t use to be used for various purpose for
inner pot.
It can cause the transformation of the inner pot
It can cause to spill the inner coating.
Oven coating may wear away.
Oven coating may wear away after
long use.
When cleaning the inner pot, do not
use tough scrubber, metallic scrubber,
brush, abrasive metallic etc. (Refer to page 24)
Do not pull up the cooker by holding the
inner pot handle.
If can cause problems and dangerous situations.
There are portable handles on bottom right and left
side of the cooker.
Hold the handles
with both hands
and move it carefully.
After you finish the cooking, do not try to
open the cooker by force until the steam is
completely exhausted.
The hot steam or any hot content
within the cooker can cause burns.
Be careful with burn by the steam
when you open the top cover after
cooking is done.
Do not use over the maximum capacity.
It can cause overflow or breakdown.
Do not cook over capacity stated
for cooking of chicken soup
and congee.
Please surely pull out the
plug when not in use.
It can cause electric shocks or fire.
Use AC 120V only.
Always turn the Lock/Unlock Handle
to “Lock” when not in used.
It can cause the transformation
by remaining pressure.
Be careful about the released steam of vent.
When the steam is released
don’t be surprised.
Please keep the cooker
out of reach of children.
Don t use the cooker near the magnetic
field. Do not drop the cooker
or impact.
It can cause burns or breakdown.
It can cause the safety problem.
Please contact dealer or service center
when strange smell or smoke is occurred.
First pull out the power cord.
Please clean the body and
other parts after cooking.
It can cause the
transformation or smell.
Do not touch the metallic surface of the inner pot,
and pressure weight after cooking or warming.
It can cause burns.
Remaining hot steam can cause
burns when you tilt the
pressure weight while
and right after the cooking.
Please use the cooker for an original purpose.
It can cause the transformation or smell.
Please, clean the body and other parts after cooking.
After cooking chicken soup or, multi cook
dishes, etc., the smell may be absorbed.
Clean the oven packing, top heater plate
and inner pot every time you cook any of
those. Reference : pages 8
Please, do not pull out the clean steam vent by force.
Use dry kitchen cleaner or sponge to clean the top heater plate,
since rough scrub or metallic ones might let the coating rise.
Depending on the using methods or user’s circumstances
top heater plate might rise. Please contact the dealer
or a service center for those cases.

When the cooker is not properly cleaned, it can cause smells. Clean the top cover frequently.
If there are any rice or alien substances on the oven packing or on the inner side of the inner pot,
it can cause the steam to leak. Therefore the rice may be under-cooked and crumbly.
Don t use to be used
for various
purpose for inner pot.
Check if there is any rice or alien
substance on the oven packing.
Make sure you clean the steam
control vent before and after use
Wipe the main unit with a wet cloth
that has been squeezed out of all the
water
It can cause the transformation of
inner pot. It can cause to spill the
inner coating
Wipe the top cover with a wet
cloth that has been squeezed
out of all the water
If there is any alien substance
on the temperature sensor
carefully wipe it out without
damaging the metal plate
The valve hole of the pressure weight allowing the escape of steam should be checked regularly to ensure
that it is not blocked.
If you use the valve hole of pressure weight as it is blocked, the hot steam or any hot content within the
cooker can cause injury.
Do not use a Cleaning Pin for other use except cleaning for the valve hole of the pressure weight.
Do not try to close the top cover by force. It can cause problems.
When opening/closing the top cover.
1. Locate the handles of the inner pot
on the slot of the main unit.
(Refer to the following figure.)
2. Open and close the top cover with
the Lock/Unlock handle located on
Unlock .
When cooking/warming the rice.
Cook and warm the rice with the
Lock/Unlock handle located on “Lock”.
When steam is full inside the pan, the
Lock/Unlock handle will not turn at this
time twist the pressure weight and let the
steam out.
How to
disassemble
the pressure
weight
If the valve hole of the pressure weight part is clogged, punch it with the cleaning pin.
Under the Lock/Unlock handle is locked (located on "Lock") turn the pressure weight
counter-clockwise while pulling it up, and pull it out.
Punch the clogged valve hole with the cleaning pin and reassemble it by turning it clockwise.
When the pressure weight is properly assembled, it can freely be turned.
Attached on the bottom
of the unit.
Pressure Weight
Soft steam cap Alien Substance
Cleaning Pin

Lock/Unlock Handle
(Set the handle to lock
when cooking or
warming the rice)
Top Cover Assy
Inner Pot(Oven)
Pot Handle Set the pot handle on the slot of the main unit.
Clamp Knob
Oven
Packing
Top Heater
Plate
Power Plug
Power Cord
Control
Panel
Temperature Sensor
Main Body
Automatic Steam
Exhaust Outlet
(Solenoid valve)
Pressure Weight
Always keep it horizontal.
Soft Steam Cap
Dew Dish
Empty the water out of a dew
dish after cooking or keep-
warming. Remaining the water in
the dew dish cause bad smell.
Steam PlateRice ScoopRice Measuring
Cup
Manual Cooking guide
ACCESSORIES
How to clean the soft steam cap
Menu seal
Rice Scoop
Holder
Cleaning Pin
Attached on the
bottom of the unit.
Top Warning Sensor
Do not touch the surface of the soft steam cap right after cooking. You can get burned.
Detach the soft steam cap
like the picture. Press the hook, in theback
and follow the arrow to
detach and clean. Make
sure you clean frequently
with a sponge or a neutral
detergent.
Assemble the vent so that
it fits into the groove
perfectly.
After you attach the soft
steam cap to fit into the
pressure cookerm fit the
top of soft steam cap and
push ‘A’ to hold the soft
steam cap.
Clean steam vent

Use for Warming or reheating the
cooked rice right before eating.
(Refer to page 21~23)
The red light will be on
when it's ready to operate.
Use it for cooking the rice.
(Refer to page 13, 14)
Use it for canceling the
selected function (Refer to page 26)
Use when you set up or cancel the voice
function.
Use it to set “My mode” function.
(Refer to page 15, 16)
GABA button
(Refer to page 17, 18)
The red light will be on when it s
ready to operate turbo fuction.
Use it by presetting the
time when you desire
specific time to eat
.
(Refer to page 20)
Use it for setting the current
time and presetting time.
(Refer to page 10)
Use it for selecting, the glutinous rice,
normal rice, Mixed/Brown rice etc.
(Refer to page 13)
Make provisions for any electrical failures and clock function, unit contains lithium battery.
Battery life is about 3 years depending on using condition.
Don't short circuit, place in fire or near heat source, disassemble, or recharge.
1. Connect the power plug. 2. Press the “Hrs/Soak”,
“Min/Heat” button
more than 2 second.
3. Set the current time
using the “Hrs/Soak”,
“Min/Heat” button.
Press the button longer
than 1 second.
4. It will automatically
start in 7 seconds.
After you press the “Hrs/Soak”, “Min/Heat” button to set the time, pressing any buttons except “Hrs/Soak”,
“Min/Heat” or “Cancel” buttons will also enter the set value.
If the current time is not correct, the rice will not finish cooking at desired time.
During warming mode press the “Cancel” button to set the time.
After setting the time press “Keep warm” button: displays “
N
o
t
e

After you wash the rice thoroughly, put it in the inner pot, and adjust the water level
according to the marked line.
Place the inner pot on a leveled surface and adjust the amount of water.
About water scale
Rice for 4 persons (4 cups)
Glutinous Rice for 4 persons (4 cups)
: Set the water to scale of
GLUTINOUS
When you want to cook the OLD RICE
or want the soft rice : pour more water
than the measured scale
For overcooked rice : pour less water
than the measured scale
Measure the amount of rice you want to
cook using the measuring cup and wash
it thoroughly.
1 cup applies to 1 person.
Correct method for using the measuring cup.
Wash the rice until the water becomes
clear. This makes the rice taste better.
(Wash at the other pot.)
Keep the rice where it is cool and shady.
If the rice is kept dry it will not be good and even cause the cooked rice to smell.
Place to avoid : Hot places where boiler pipe passes by / Places under direct sunlight / Humid places.
It is recommended that you buy rice in small packages because the quality can be degraded when stored for a long period of time.
Rice storing method
Glutinous rice, Mixed/Brown rice, Nu rung gi : Pour water to scale of “GLUTINOUS”.
Max. capacity : Glutinous rice and Mixed Rice - 8 persons, Nu rung gi - 4 persons
: Pour water to scale of “SUSHI”.
Max. capacity : 4 persons.
GABA, Mixed/Brown, OLD RICE : Pour water to scale of “GABA”
Max. capacity : 4 persons.
Presoak or boil the hard grain and then press the mixed rice button.
Depending on the type of rice, the rice may only be half cooked.

When the product have any problems or use it inappropriately you can see the below marks.
When the inner pot is not placed into the unit.
When pressing the “Pressure Cook/Turbo” and “Timer” botton, while the Lock/Unlock handle is
on “Unlock”.Turn the Lock/Unlock handle “Lock”.
When setting preset time longer than 13 hours
Set the preset time within 13 hours(Refer to page 18.)
Temperature sensor problem.
(Consult the service center and dealer.)
Wipe the water on the inner pot with a dry cloth and
put it in the main unit. Then connect the power plug.
Top cover will not close if the inner pot is not placed correctly in the main body
(Place the inner pot to the corresponding parts of the main body)
If there is any alien substance on the temperature sensor or the bottom surface
of the inner pot(oven), wipe it off before putting the pot into the main unit.
Wipe the top cover heating part well before cooking the rice.
If the top cover heating part is not cleaned well it can cause smells and discoloration.
If there is any rice or alien substance on the oven packing or inside the upper part of the inner pot,
the steam will leak. This will make the rice under-cooked and crumble.
If you press the cook button without setting the Lock/Unlock
handle to “Lock” the cooker will not operate. You will hear “beep
beep beep” sound and is shown in the LCD.
If it is hard to close the top cover due to internal pressure, tilt the
pressure weight. This will make it easy to close.
After setting the Lock/Unlock handle to “Lock”,
check the pressure weight is horizontal and the
pressure Lamp is on.
pressure
Temperature
Sensor

Glutinous Rice Cooking Method
Check the Lock/Unlock handle is set to Lock
and press the “Pressure Cook/Turbo” button.
It will start to cook with the “ ” mark going
around clockwise.
When it comes near the finishing time, the remaining
time will be displayed in minutes.
Every time you press the “Menu” button, the following
menu will continuously repeat.
Check the pressure weight is horizontal before cooking
During the cooking process, the pressure is automatically controlled with the steam discharged through the
pressure weight.
2~3 minutes before the cooking is completed you will hear the “beep ” sound
and the steam will be automatically discharged.
At “Normal rice” mode, the steam will be discharged during cooking.
(Don't be surprised and be careful not to cause any burns.)
When the cooking is finished, the “beep” sound will go off 5 times and switch to warm.
When it is switched to warm, open the top cover and mix the cooked rice well.
In case of a power failure during the cooking process, it will be delayed
for the time the power is shut down. But if the power is shut down for a
long time, the condition of the rice will not be good.
When the handle doesn't turn to “Unlock”, tilt the pressure weight a little to
release the internal pressure and it will make you much easier to open it.
GLUTINOUS
SUSHI
MIXED/BROWN
GABA
OLD RICE
NUTRITIOUS
NU RUNG GI
MULTI COOK

After cooking Multi cook etc, the smell may permeate into the unit, use the Unit after cleaning the rubber
packing and lid part according to page 27, 41.
Cooking time for each menu
Menu
Cooking
Capacity
2~6
persons 2~4
persons 2~4
persons 2~4
persons 2~4
persons 2~4
persons 2~4
persons 2~4
persons Refer to
the
cooking
guide
Cooking
Time
25~33
minutes 36~46
minutes 14~20
minutes 36~47
minutes 34~51
minutes 34~40
minutes 36~42
minutes 30~34
minutes
Glutinous Sushi Turbo Glutinous rice Mixed/Brown GABA OLD RICE Nu Rung Gi Nutritious Multi Cook
Glutinous : When you want to have sticky and nutritive white rice.
Sushi: When you want to have a little more sticky and nutritive
white rice than Glutinous rice.
Mixed : For cooking together with brown rice and some other kinds of grain.
GABA: For cooking germinated brown rice. (Refer to page 17, 18)
OLD RICE: For cooking OLD RICE.
- If cooked with old, or dried rice, the boiled rice may become
crumbly or underdone.
- For OLD RICE which has been more than one year since its harvest or
by being left in a dry place for a long time, cook in the "OLD RICE
Cooking Process" for a better result.
(melanizing may occur according to the keeping conditions or moisture)
Wash rice sufficiently until wash water becomes clean.
New rice gives a better taste. But in smaller quantity.
OLD RICE may give out odor, as well as poor taste.
Multi cook : The unit cooks all kinds of stew by setting cooking time.
- Basic setting time is 20 minutes.
- Available setting time is 10-90 minutes.
- Each time you press “Hrs/Soak” the time increases 5 minutes.
- Each time you press “Min/Heat” the time decreases 5 minutes.
- The Multi cook function will start if you press “Pressure Cook/Turbo” button after setting the time.
- “Cook” mark is shown when “Multi Cook” is started. The remaining time will be displayed.
Nu Rung Gi(Scorched rice) :Have scorched rice when cooking done.
- When cooking is completed, take out boiled rice.
- The “Nu Rung Gi” on the jar bottom can be prepared for your taste. (e.g. scorched rice tea)
“Nu Rung Gi” is allowed up to 4 persons.
For “Nu Rung Gi” cooking, set the water volume at “GLUTINOUS” level.
Nutritious
- When cooking Nutrition rice, melanizing may occur depending on the volume of ingredients such as jujube and green
ginseng or condition. Please, measure the amount of ingredients when you cook the Nutrition rice as your taste.
Please refer to the cooking guide
Turbo function for Glutinous rice
Press twice “Pressure Cook/Turbo”
button after choosing the “Glutinous”
and it will switch to quick cooking and
shorten the cooking time.(It takes
about 14 minutes when you cook the
Glutinous rice for 2 persons.)
The preset time function is not for
Glutinous rice turbo cooking.
The turbo cooking function is allowed
up to 6 persons. (The condition of the
rice will not be good for more than 6
persons.)
If you soak the rice in water for about
20 minutes before cooking the rice
and then cook the rice in turbo
cooking course, the rice will taste
good.

Longer “SOAK” Time: rice becomes soft and glutinous. (selectable in 4 steps)
Longer “HEAT” Time: rice becomes tasty (selectable in 4 steps) melanizing will occur
Above 2 functions can be selected both or individually.
Cuckoo’s patented technology based on variable circuit design. User can select the degree of “softness”and
“glutinosity & tastiness” to meet a user’s specific taste.
MY MODE’ function may influence scorching or cooking quality. Ensure that cooking time is not changed, by children.
Default settings are “SOAK” Time 0 min(“ ”), “HEAT” Time 0 min(“ ”).
“MY MODE” function may elongate cooking time according to set-up time.
Scorching of rice may occur by longer “HEAT” Time(“ ”).
Set-up time is stored until the next reset. No need to set-up at every cooking.
During Cooking, Warming and preset time cooking modes, SOAK and HEAT Time cannot be readjusted.
(soak time control mode) is shown with a beep sound when you press the “My Mode” button after
selecting a desired menu to apply or start
MY MODE” function applies to “Glutinous, Mixed, GABA, OLD RICE, Nu Rung Gi” menu.
Unless one of “Glutions, Mixed, GABA, or OLD RICE” menu is selected, “Min/Heat” button cannot be
entered.
“SOAK” Time Control Mode
Press “Hrs/SOAK” button to
change the display.
“HEAT” Time Control Mode
Setting completed screen after
Press the “My Mode” button and set-
up time will be automatically entered
with a buzzer.(If you press cancel or
do not press a button within 7
seconds, the function will deactivate
and return to the standby mode.)
“MY MODE” setting screen
Press the “menu” button to select the
menu. Then selected munu will be
blinked.
(The following menu will continuously
repeat. Glutinous Mixed/Brown
GABA Old rice Nu rung gi)
Press “Min/Heat” button to change the
display.

*1. The rice becomes solid and glutinous.
*2. The rice becomes soft and well-raised rice.
*3. The rice becomes soft and glutinous.
1 . The Cuckoo customized cooking function applies to Glutinous, Turbo cooking, Sushi, Mixed rice/Brown rice, GABA, Nutrition rice,
OLD RICE collectively.
2 . On the basis of , step up the step of Cuckoo customized cooking function depending on your preference. The high step of cooking
may cause melanizing.
While cooking, you can control the heating temperature (both high and low) depending on your preference. In the
customized cooking function, press the “Pressure Cook/Turbo”
button. The mark will show ‘ ’ with a buzzer then
enter the customized cooking function mode. Display will be shown on the on the entire menu of the Cuckoo customized
cooking function instantly.
The display Cuckoo
customized cooking
function
In the custom-made rice taste
function, press the “Pressure
Cook/Turbo” button.
The Cuckoo customized
cooking function will activate.
‘ ’ displays the first mark.
Press “Hrs/SOAK” button to
change the display as 0 1
2 -2 1 0.
Press “Min/HEAT” button to
change the display as 0 1
2 2 1 0.
-2 -2nd step setting mode
Setting completed
screen after
Press the “My Mode” button and
set-up time will be automatically
entered with a buzzer.
(If you press cancel or do not press
a button within 7 seconds, the
function will deactivate and return to
the standby mode.)
-1 2nd step setting mode

Brownricehasrichernutrientsthanpolishedrice.However,brownriceisrathertoughandhardertobedigested.
By a least germination, the enzymes in the brown rice are activated, generating nutrients and more digestible.
Check the dates of harvest and pounding.
The dates should be within 1year from a harvest, 3 months from pounding.
Inspect rice with your eyes.
Check that embryo is alive
Rice surface should be light yellow and glazing. Whitely stirred up
surface, or darkish colored Brown rice is not suitable for a germination
Avoid fractured, not fully corned, or empty ear. Empty ear may generate
odor during germination and bluish- nor corned Brown rice cannot be
germinated.
0 5 10 15 20 25 30
(Times)
Phytic acid
Ferulic acid
Inositol
Food fiber
Gamma-orizanol
Gamma-aminobutyric
Germinated brown rice(22hours)
Germinated brown rice(6hours)
Glutionous rice
Germinated Brown rice increases nutrients and enhances taste which is a weak point of brown rice.
Germinated Brown rice also improves digestibility.
Taste will be greatly enhanced.
Digestive and rich in nutrients.
Diatetic hormone is generated improving digestibility.
Good as a health food for children or students.
Rich with dietary fiber.
Germinated brown rice has rich GABA (Gamma Amino Butryc Acid)
GABA promotes metabolism in liver and kidneys, suppresses neutral fat, lowers blood pressure, promotes
metabolism in brain cells - these effects have been proved by medical science.
<Comparison of Germinated
brown rice’s nutrition and
Glutinous rice’s(6 hours)
nutrition.>
Phytic acid 10.3Times
Ferulic acid 1.4Times
Gamma-orizanol
23.9Times
Gammma-aminobutyric
5Times
Inositol 10Times
Food fiber 4.3Times
Based on japan food analysis center

If smaller germ is preferred, omit pre-germination process. Select “GABA” menu, set-up appropriate
germination time, and start cooking (nutrient ingredients do not vary significantly by the size of germ).
During hot seasons, longer germination time may generate odor. Reduce germination time.
GABA cooking is allowed up to 4 persons.
City water can be used for germination. However, spring water is recommended. Germination may not
be properly performed in hot or boiled water even after cooling.
Germination rate, germ growth may differ by the Brown rice kind, condition or period of storing, etc.
- Germinated brown rice is sprouted brown rice. Germination rate and growth may differ by the Brown rice kind.
The brown rice should be within 1 year from harvest, and not long since pounded.
In GABA mode, preset on 4H, 5H, 6H may not be possible. If you want to preset the GABA, set up OH .
(See the page 20)
Put washed brown rice in an appropriate container, pour sufficient water to soak the rice.
Pre-germination shall not exceed 16 hours. Make sure to wash rice clean with flowing water before using
“GABA” menu. Be careful that too hard washing may take off embryos which generate the germination.
Unique smell may be generated according to the soaking time of pre-germination.
When pro-germination has been completed, wash the rice and put in inner pot (Oven).
Pour appropriated volume of water, and use “GABA” menu.
In summer or hot temperature environment odor may be generated. Reduce germination time and wash
clean when cooking.
When the “GABA” is selected,
“4H” is indicated in the display.
Pressing “Hrs/Soak” button
increases germination time by 1
hour.
Pressing “Min/Heat” button
decreases germination time by 1
hour.
GABA time can be set-up by
0, 4, 5, 6 hours.
If “GABA” time is set “0” hours,
pressing “Pressure Cook/Turbo”
button will start cooking immediately.
To cook without germination or
cooking germinated Brown rice, set
the time at “0”.
Pressing “Pressure Cook/Turbo”
button will begin the “GABA”
process, after which. cooking will
begin immediately.
During “GABA” mode, “Cook”
indicator will be lit together with
the germination time left.
3 more hours for germination
Default setting: 4 Hours
Method of Pre-germination
Precautions for ‘GABA’ Cooking

1. Turn the Lock/Unlock handle to Lock and press menu to select the Nu Rung Gi.
2. Press the “Pressure Cook/Turbo” button to start cooking.
3. When cooking is completed, scoop out the boiled rice. The Nu Rung Gi on the jar bottom can
be prepared for your taste (e.g. scorched rice tea)
Nu Rung Gi can be prepared for people up to 4.
For Nu Rung Gi cooking, set the water volume at Glutinous level.
Press “Hrs/Soak”, “Min/Heat” button to set up the time.
Please refer to the cooking guide for cooking time.
1. Each time you press “Hrs/Soak” button, the time increases 5 minutes.
2. Each time you press “Min/Heat” button, the time decreases 5 minutes.
3. Available setting time is 10 ~ 90 minutes.
2
Use the preset time of Multi -cook as following instruction.
1. Check the present time.
2. Turn the Lock/Unlock handle to Lock and press the “Timer” button.
3. Press the Hrs/Soak or Min/Heat to preset time.
4. Press menu to select the Multi-cook.
5. Set up the cooking time for pressing “Hrs/Soak”, “Min/Heat” button.
6. Press the “Timer” or “Pressure Cook/Turbo”
Turn the top handle to Lock, press
menu to select the Multi-cook.
When selecting Multi-cook, the display indicates cooking time to be
20 minutes.
1
Press “Pressure Cook/Turbo” button.
Press the “Pressure Cook/Turbo” button and the Multi-cook will start.
If the Multi-cook starts, the display shows the cooking mark and
remaining minutes.
3
4

Using
range of
preset
timer
From
(33minutes
+ My mode)
to 13 hours
Glutinous
Menu
From 46minutes
to 13 hours
Sushi
From
(47minutes
+ My mode)
to 13 hours
Mixed/Brown
From
(51minutes
+ My mode)
to 13 hours
GABA
From
(setting time
+1minutes) to
13 hours
Multi Cook
From
(40minutes
+ My mode)
to 13 hours
Nu Rung Gi
From 34minutes
to 13 hours
Nutritious
From
(42minutes
+ My mode)
to 13 hours
OLD RICE
Put it in the inner pot with the measured water after wash the rice and turn the Lock/Unlock handle to Lock .
Presetting time is the time when the rice cooking is completed. (According to the amount of rice the finishing time may vary)
The Preset will be displayed.
Press the “Cancel” button when you want to cancel the preset cooking.
The preset time will be stored.If you want to cook the rice to the preset time already entered,
press the “Timer” button and then press the “Pressure Cook/Turbo” button.
If you want to check the current time during the Timer cooking, press the “Hrs/Soak” or
“Min/Heat” button for 2 seconds.
If you press the “Timer” button, the “Timer” sign will be displayed with the preset time.
After pressing “Timer” button, set the preset time within 7 seconds.
The default for set time is 6:30 AM
If you press the “Timer” button without setting the lock/unlock handle on the top cover to “Lock”,
the sign will be on the display and don t operate.
In GABA mode, preset on “ ” is possible.
If the rice is old and very dry, the result of the cooking may not be good.
If the rice is not well cooked increase the amount of water about half-scale.
Press “Cancel” button and restart to change the preset time.
Set the presetting time to no more than 13 hours especially if the presetting time exceeds 7 to 8 hours during the
summer time, the rice can smell bad.
Preset time will be changed automatically and displays “ when setup time exceeds 13 hours.
If the preset time is shorter than cooking time in the below table, the cooking starts immediately.
Precautions for preset cooking
Using range of Timer Cook for each menu
Refer to page 10 for the time setting method
If the current time is not set correctly, the presetting time also be incorrect.(Make sure not to change A.M. and P.M.)
If the menu is incorrect, press the “Menu” button and select the desired menu.
Caution : Press “Hrs/Soak”, “Min/Heat” button to set a cooking time, When use the Multi cook preset mode.
Set the presetting time with the “Hrs/Soak” and “Min/Heat” button.
If the preset time is already correct, you do not need to set time again.
Example) When you want to eat the rice at 7:30AM.
Press the “Timer” button (The “Preset” sign will be displayed) and then press the “Hrs/Soak”
button, set time at 7 hours. And press the “Min/Heat” button, set time at 30 minutes.
(The unit for the “Hrs/Soak” button is 1 hour and the unit for the “Min/Heat” button is 1 minute.)
Other manuals for CRP-HF06 Fuzzy Series
1
Table of contents
Other Cuckoo Kitchen Appliance manuals

Cuckoo
Cuckoo CWP-221 User manual

Cuckoo
Cuckoo CRP-HW10 Fuzzy Series User manual

Cuckoo
Cuckoo CVB-F50SB User manual

Cuckoo
Cuckoo CR-1021 Series User manual

Cuckoo
Cuckoo CMC-HE1054F User manual

Cuckoo
Cuckoo CRP-P1009F Series User manual

Cuckoo
Cuckoo CMC-ZSN601F User manual

Cuckoo
Cuckoo HAPPINESS CR-3032 User manual

Cuckoo
Cuckoo NO.1 User manual