Cuprinol Power Pad for Decking User manual

USER GUIDE
Visit our website
www.cuprinol.co.uk
for a step by step product
demonstration

1
IMPORTANT INFORMATION - please read before you start
• Carefully read the complete user guide
before use and always follow the instructions
including those on the Cuprinol PowerPad
Decking Stain packaging.
• Keep the user guide in a safe place for future
reference.
• Dispose of all the waste packaging properly.
• The PowerPad is for outdoor use only.
• IMPORTANT: Once the applicator stem has
been assembled, do not try to pull apart
again for storage.
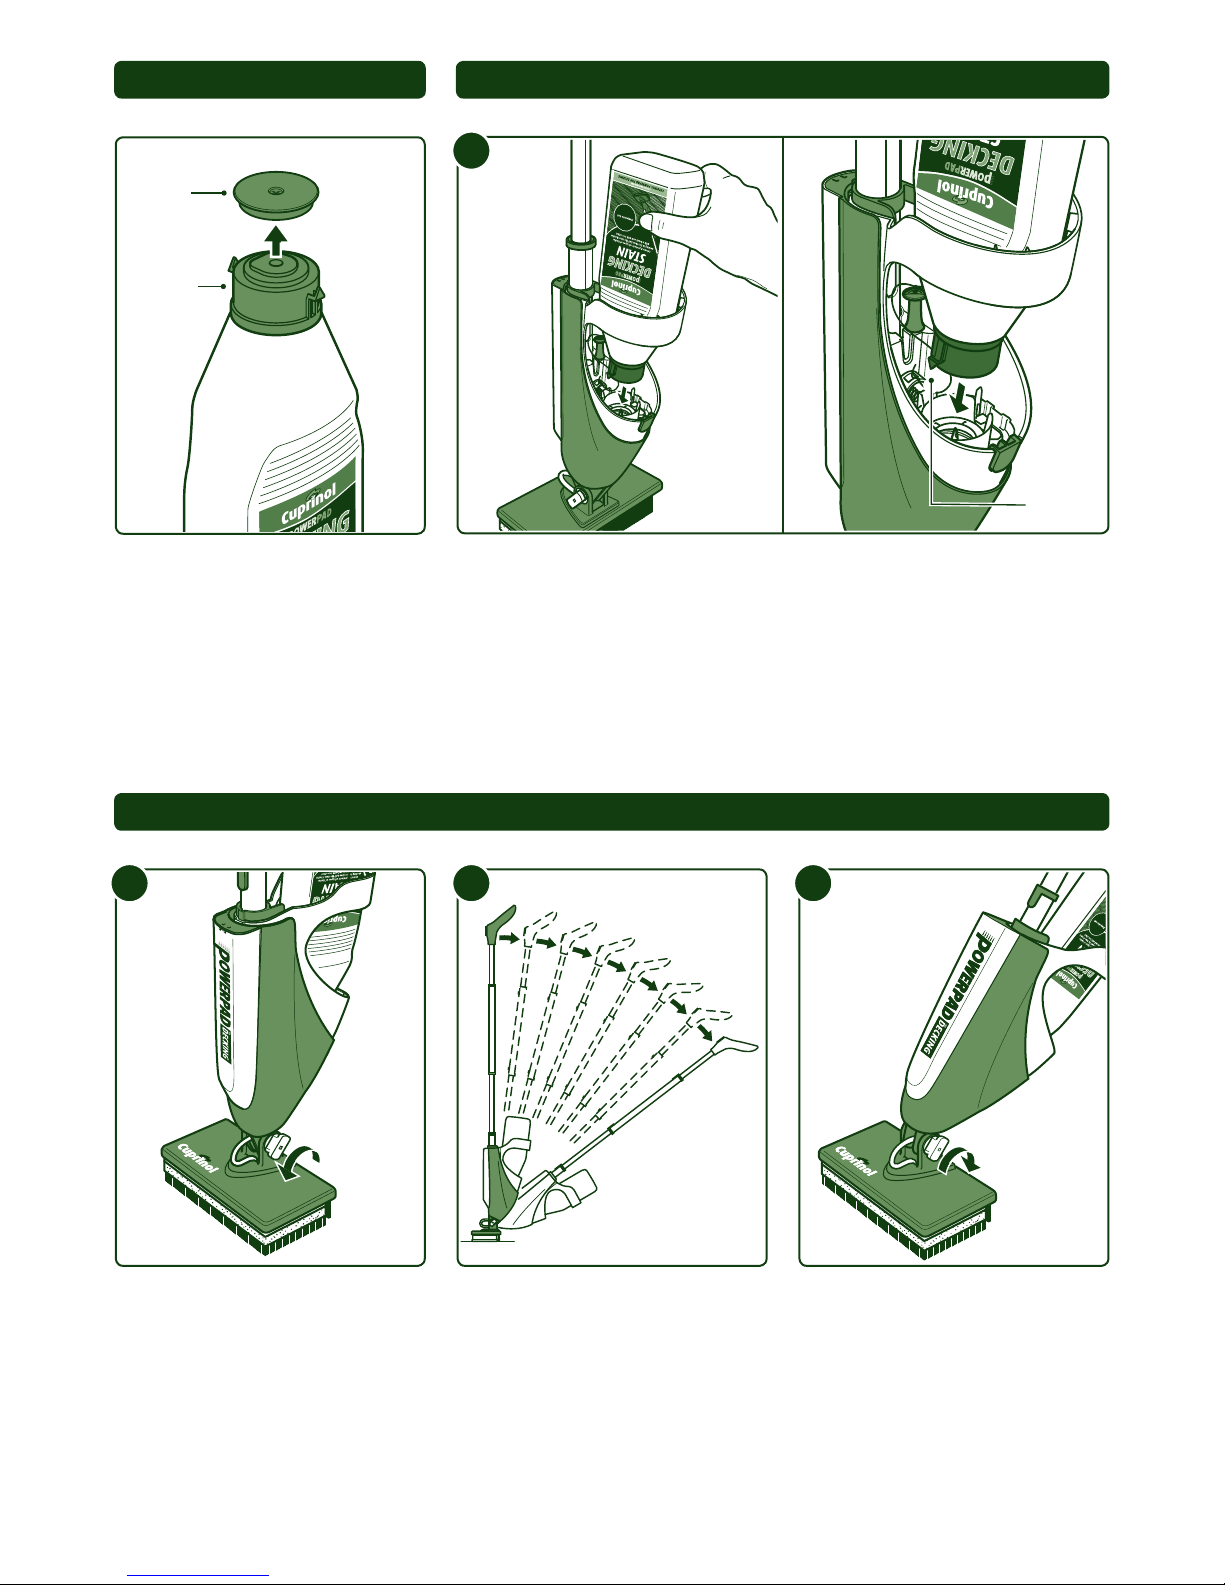
• Cuprinol PowerPad Decking Stain has been
specially formulated and the bottle has been
designed to t into the applicator perfectly
and only works using this bespoke design.
Only use Cuprinol PowerPad Decking Stain,
parts, products and accessories.
• Carefully read and follow the instructions and
advice on the Cuprinol PowerPad Decking
Stain bottle.
• The PowerPad decking stain bottle should be
shaken before use.
• Any splashes should be wiped up
immediately and will come off with water
while still wet.
• Keep the area around your workplace clean
and tidy to help avoid accidents.
• Ensure children and animals are kept away at
all times whilst operating the PowerPad.
• Keep the PowerPad away from sources of
heat, naked ames or ignition.
• Do not use if rain is likely before the
treatment can dry; if the temperature is
below 5°C; or in conditions of high humidity
or frost.
• Do not modify or dismantle the PowerPad.
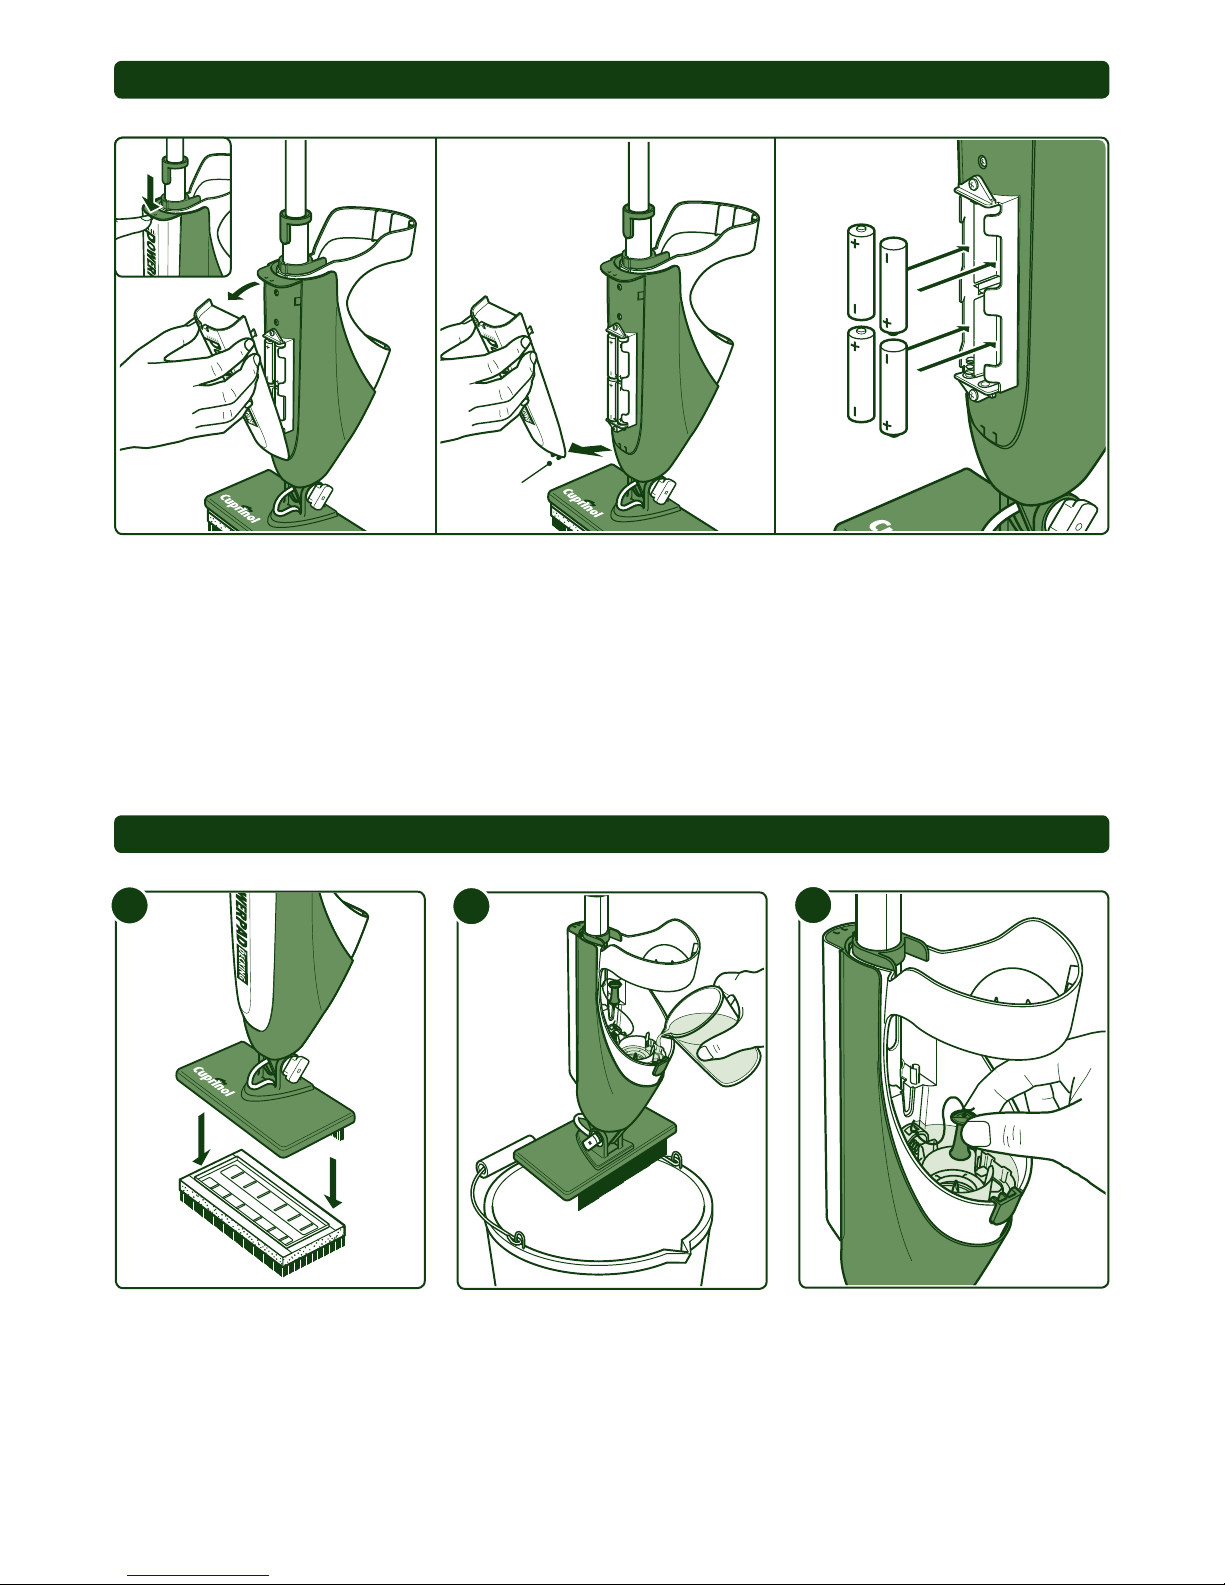
• IMPORTANT: The PowerPad must be
thoroughly cleaned with clean water after
each use to ensure it works effectively
next time.
• Do not submerge the applicator into water
higher than the hinge lock.
• Do not pour any uid except water directly
into the PowerPad.
• Do not use hot water to clean the pad. Only
store the PowerPad when clean and dry.
• Do not use solvents, detergents, chemical
or abrasive cleaners to clean the inside or
outside of the PowerPad, only clean water
should be used.
• Dispose of waste water by pouring down
the sink.
• Do not pour waste water into rain water
drains, natural water courses or onto land.
• Do not use the PowerPad if any parts of it
are damaged, excessively worn, faulty or
missing.
CUPRINOL POWERPAD FOR DECKING
Now it is easy to get perfect looking decking in a fraction of the time compared to
brush application, with the Cuprinol PowerPad.
Specially designed for decking, the PowerPad applicator gives you complete control
with less effort and no awkward bending. The unique applicator combines the
benets of both a brush and a pad – the BRISTLES get right into the grooves whilst
the pad glides over the surface giving a perfectly smooth even nish.

2
PAD and REPLACEMENT PAD
• Always clean the pad immediately after use.
• Never let the stain dry out on the pad or it
will become permanently damaged.
• The pad should be removed (using the
tabs) from the Cuprinol PowerPad before
cleaning.
• Remove any excess PowerPad stain from
the pad.
• Wear gloves when cleaning the pad. Use your
ngers to work the uid out of the pad under
cold water until the water runs clear.
• Do not leave the pad to soak in any cleaning
solution.
• Never use HOT WATER, this may shrink
the pile.
• Always leave the pad to dry at room
temperature.
• Do not use the pad again to apply further
coats of product unless completely dry.
BATTERIES
• Only use AA 1.5v replacement batteries in
the PowerPad.
• For best performance, use good quality AA
alkaline batteries.
• WARNING: Fire Hazard! Do not incinerate
waste batteries.
• Do not dispose of batteries as household
waste.
• Dispose of or recycle according to local
authority guidelines.
IMPORTANT INFORMATION - please read before you start
• Do not store batteries in any location
where temperatures may exceed 40°C.
• Do not tamper with the batteries.
• When replacing batteries, follow
manufacturer instructions.
• When storing, remove the 4 x AA batteries
from the battery casing.
DISPOSAL
Once the product has reached the end of its
useful life or if it has become damaged outside
of the one year guarantee, please dispose of
the PowerPad correctly. Do not dispose of the
PowerPad as household waste. Take to your
local authority waste electrical equipment
disposal centre.

3
SECTIONS PAGES
IMPORTANT INFORMATION - please read before you start
CONTENTS
IMPORTANT INFORMATION
ACCESSORIES
GETTING TO KNOW THE POWERPAD
ASSEMBLY
SETTING UP THE POWERPAD
USING THE POWERPAD
REMOVING THE BOTTLE
DECANTING FOR BRUSH APPLICATION
REPLACING BATTERIES
CLEANING AND MAINTENANCE
TROUBLE SHOOTING
GUARANTEE
1 - 3
3
4
5
6
7
7
7
8
8 - 9
10
10
SECTIONS PAGES
EU STATEMENT OF COMPLIANCE
The PowerPad unit conforms to:
WEEE Directive 2002/96/EC
ROSH Directive 2002/95/EC
CE/EMC Standards EN55014-1/-2,
EN61000-3-2/-3
TECHNICAL PRODUCT ADVICE
If you are experiencing technical difculties
or need product advice, visit our web site or
Customer Advice Centre.
UK
ICI Paints AkzoNobel, Wexham Road,
Slough, SL2 5DS, UK
Tel: 0870 444 1111
www.cuprinol.co.uk
ROI
ICI Cuprinol, Commons Road, Cork, Ireland
Tel: 021 422 0222
Fax: 021 422 0205
www.cuprinol.i.e
The PowerPad is designed for outdoor use.
For further information visit:
www.cuprinol.co.uk
CUP077040
140cm
20cm
25cm
850gms
PRODUCT SPECIFICATION
Model No:
Unit dimensions:
Height:
Width:
Depth:
Unit weight including batteries:
ACCESSORIES
Replacement pad packs (x2) are sold
separately and are available from retailers.

4
GETTING TO KNOW THE POWERPAD
Pad Brush strip Dispensing spout
Bottle holder
Cleaning cap
Spike/air
bleed valve
Bottle release
Stem 1
Trigger
Battery
cover
Stem 4
Stem 2
Stem 3
Handle
Pad
holder
Hinge lock
Main casing
Bottle
holder
Battery cover
release catch

5
ASSEMBLE THE STEM
IMPORTANT: Take care when handling the wired stem sections.
Do not pull or strain the wires or damage could be caused.
Insert stem 3 into stem 4 (connected to the PowerPad), it will ‘click’ into position when tted
correctly. Repeat with Stem 2 and stem 1.
IMPORTANT: Do not try to separate the stem sections once tted.
1. Press down on the catch to unclip the battery cover.
2. Completely remove the battery cover from the main casing.
3. Insert 4 x AA batteries into the battery casing as shown above.
Ret the battery cover, positioning the lower lugs into the holes on the main casing and push
back into position. It will ‘click’ into position when tted correctly.
FIT THE BATTERIES
1 32
Lugs
Stem 3
Stem 4
Stem 2
Stem 1

6
Fit the stain bottle
With the lid removed, push t the stain bottle into the bottle
holder, it will ‘click’ into position when tted correctly.
Note: To t correctly, the ‘prongs’ on the bottle cap MUST be
lined up as shown.
Shake the bottle for at least
10 seconds before removing
the lid. Do not attempt to
remove the bottle cap.
Keep the lid to reseal the
bottle after use.
a
THE STAIN BOTTLE SETTING UP THE POWERPAD
SETTING UP THE POWERPAD
Adjusting the angle of the
PowerPad
Turn the hinge lock
anticlockwise to unlock the
pivoting hinge.
Adjust the stem angle to the
required position.
bc
Once the angle is set, turn the
hinge lock clockwise to lock
the pivoting hinge in position.
d
Turn to
lock
Prongs
Lid
Cap
Turn to
unlock

7
REMOVING THE BOTTLE
Press the trigger for a few seconds to allow the stain to soak
into the pad before starting to move back and forth. Press the
trigger when more stain is needed.
Apply to one plank at a time (whole length) for an even nish,
in the same direction as the grooves. Ensure the grooves are
properly covered, you may need to go over the grooves a few
times. Use the brush and pad to smooth out any excess stain.
Press the bottle release
button to release the bottle.
Lift the bottle out and replace
the lid for future use.
Press to
release
PowerPad Decking Stain will
be touch dry in 2-6 hours in
good drying conditions. When
applying subsequent coats,
allow to dry fully before
recoating.
Avoid heavy wear and tear for
a few days after application.
Apply 2-3 coats depending
on the colour and degree of
protection required.
Note: The nal colour will
depend upon wood type,
previous treatment and the
number of coats applied.
USING THE POWERPAD
Push t the dispensing spout
onto the bottle and pour into
a suitable container.
Dispensing
spout
DECANTING FOR BRUSH APPLICATION
After use, remove the spout
and clean with water before
the stain dries.
Replace the lid for future use.

8
a
1. Press down on the catch to unclip the battery cover.
2. Completely remove the battery cover from the main casing.
3. Remove the used batteries. Insert 4 x AA replacement batteries into the battery casing as
shown above.
Ret the battery cover, positioning the lower lugs into the holes on the main casing and push
back into position. It will ‘click’ into position when tted correctly.
1 32
REPLACING BATTERIES
CLEANING AND MAINTENANCE
Pour clean water into the
holder (only ll up to the
bottle release button) and
hold over a bucket.
b
The PowerPad must be
cleaned immediately after
use, before the stain dries
inside the unit.
Remove the pad using the
tabs.
Place the cleaning cap over
the spike.
c
Continued on
the next page
Lugs

9
CLEANING AND MAINTENANCE - continued
Cleaning the brush strip
Place the pad holder into
clean, cold water and soak
for a few seconds, remove all
stain from the brush. Do not
submerge into water higher
than the hinge lock. Allow to
fully dry before storing.
Press the trigger to ush
water through the system,
remove as much water
as possible and repeat if
necessary. The system is clean
when the water starts running
clear. Remove the cleaning
cap from the spike and place
back in its storage position.
d
Ensure the PowerPad and all
parts are completely clean
and dry before storage.
If not cleaned after use, the
system may become blocked
and permanently damaged.
IMPORTANT: Do not try to
separate the stem sections.
Remove the 4 x AA batteries
from the battery casing.
Do not store in moist or damp
environments.
After storing the PowerPad in
extremely cold temperatures,
allow it to reach room
temperature before using.
Cleaning the pad
Wear gloves when cleaning
the pad. Use your ngers to
work the uid out of the pad
under cold water until the
water runs clear.
Allow to fully dry before
retting or storing.
STORAGE
g
ef
Extra brush strip cleaning
If the brush strip needs extra
cleaning e.g. if the stain is
dried on, the brush can be
removed.
Unscrew the brush strip
retaining screws and remove
from the pad holder.
Wash in clean cold water
and allow to fully dry before
retting.
Do not store the PowerPad
resting on the pad or the
brush may get deformed.

10
GUARANTEE
The guarantee is valid for one year from date of
purchase and covers the complete PowerPad
applicator with the exception of the pad.
This guarantee does not cover, and you will not be
compensated or reimbursed under the terms of this
guarantee, for any damage or loss which may be
caused by the PowerPad.
We will repair the PowerPad or replace free of
charge the complete unit or parts of, if it is faulty
due to a manufacturing or material fault.
The guarantee does not cover the application of the
PowerPad treatments.
Nothing in this guarantee is deemed to exclude or
restrict liability for death or personal injury resulting
from the negligence of the manufacturer.
The following are specically excluded from the
terms and conditions of this guarantee:
• Damage caused by misuse or improper handling of
the PowerPad or damage due to incorrect use in
accordance with the instructions
• Normal ‘wear and tear’.
• Damage suffered through negligence, wilful
damage, improper use or accidental damage.
• Any modications made by the purchaser to
the PowerPad or repairs carried out by an
unauthorised service agent.
• Damage caused by immersion in water, damp, re,
natural light and atmospheric conditions.
This guarantee does not affect your
statutory rights.
For advice on returns, contact the Cuprinol Customer
Advice Centre in your country (see page 3 for details).
TROUBLE SHOOTING
Visit either www.cuprinol.co.uk or www.cuprinol.i.e for more technical advice.
SYMPTOM POSSIBLE CAUSES ACTION
Stain is not dispensed to
the pad.
Batteries not loaded correctly
or defective batteries.
Load batteries correctly or replace with
new set.
Stain bottle not docked
correctly.
Undock and dock the bottle correctly,
ensure that you hear the ‘click’ sound.
Bottle collapses signicantly
during stain application.
(A small amount of bottle
suction is normal.)
Air bleed valve is blocked. Unblock the air bleed valve. Use a pin to
clear any blockage in both holes on the
spike/air bleed valve.
Water is not pumped during
the cleaning cycle.
Cleaning cap is not positioned
correctly.
Ensure that the cleaning cap sits tight on
the spike.
Pad ips over when pulled
along the deck.
Hinge is not locked. Lock hinge (see page 6).
Stain is leaking from the
pad.
Pad is not tted correctly. Remove pad and ret correctly.
Pad is blocked from
previous use.
Replace with new pad.
Too much stain is released. Pressing the trigger too much. Stop pressing the trigger or press the
trigger less.
Water remains in the unit
after cleaning.
Water does not reach the air
bleed valve.
Tilt the unit forward so remaining water
can reach air bleed valve.
Pour out any remaining water.

Cuprinol, the tree device, PowerPad and the distinctive
livery are trademarks of AkzoNobel© AkzoNobel 2009.
CUP077040. DATE: MARCH 2009
I
N
S
T
R
U
C
T
I
O
N
S
Table of contents