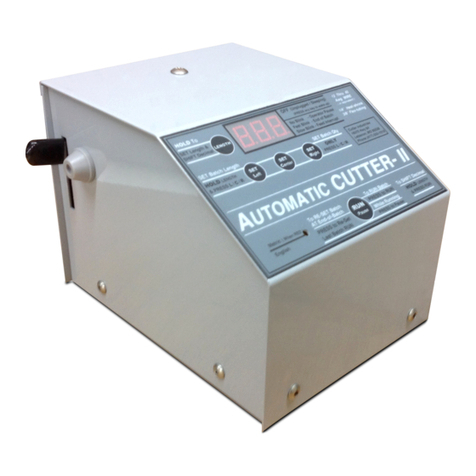
Cutter Industries Pneumatic Auto Cutter IV User manual

Pneumatic Auto Cutter IV
User Guide
For Wire and Hard Tubing
Wire 10 to 18 AWG
Tubing to 1/2” OD (Heat Shrink to 3/8” OD)
Cutter Industries Inc.
417-533-1019
info@automaticwirecutter.com
•
AutomaticWireCutter.com

SET UP
Secure the Cutter to the Bench
Insert two 1/4”-20 set screws into the bottom of the base
plate (front & back center) for permanent or semi-permanent
attachment to the workbench.
NOTE:
When the automatic cutter is plugged into a 120v power
source, it is always on. If left plugged into a 120v power source,
the machine goes into Sleep Mode after 30 minutes of inactivity
and the LED will go out. To resume, press any key. The memory
will be retained.
Calibrate Cut Length
Some materials or sizes may cut longer or shorter than the
programmed length due to their dierent compression between
the feed rollers. The variance will always repeat within 1%.
• Run a test piece (programmed to desired length) to
determine length variance.
• Reprogram for longer or shorter length compensating for
the length variance.
The default length mode always comes on in U.S. Mode (inches).
The default decimal point always comes on the 00.0 position.
Load (Insert) Material
For material over 0.2” diameter, remove the inlet feed guide.
(Use needle nose pliers)
• Press down on the tension arm located on the rear left side
of the machine.
• Insert material through the inlet hole just forward from the
tension arm.
ALWAYS insert material until it is visible at the exit side of the
machine.
OPERATION
Program a Batch Run
1. Set Length Mode (English/Metric)
• To change to metric (cm), press the English/Metric switch
through the small hole in the lower left of the face plate.
This is best done with a paper clip, pencil, etc.
• In English (U.S.) mode, length advances in 0.2 inch increments.
• In Metric mode, red light appears, length advances by 0.5 cm.
2. Set the Decimal Point
• To shift the decimal point to the right (000.)
Hold
Length
& press
Run
• To shift the decimal point to the left (00.0.)
Hold
Length
& press
Run
3. Set the Batch Quantity
• Press the buttons marked
Set Right
,
Set Center
, or
Set Left
to set desired quantity.
• Each time you press one of these buttons, the display
advances from 0 through 9.
4. Set the Batch Length
• Hold the
Length
button while pressing the
Set Right
,
Set Center
, or
Set Left
buttons.
• Each time you press one of these buttons, the display
advances from 0 through 9.
Start a Batch Run
• Press
Run.
(The display will show the remaining quantity to cut.)
Pause a Batch Run
• Press
Run.
The batch run will pause.
(The display will NOT blink.)
Resume a Batch Run
• Press
Run
to resume.
End of Batch Run
• Operation stops automatically.
(LED will display “0” blink quickly.)
Repeat Batch Run
• Press
Run
to clear the display and reset.
• Press
Run
again to start another batch with the same settings.
User Guide for the Pneumatic Auto Cutter IV
FAILURE TO USE CLEAN DRY AIR WILL VOID WARRANTY

Run New Batch
• Press
Run
to clear the settings & reset.
• Change quantity as needed.
• Change length as needed.
• Press
Run
to start the new batch.
If Feed is Interrupted or Material is Jammed
• Display will blink slowly.
• Resolve the cause of the interruption.
• Press
Run
to clear the pause.
• Press
Run
to resume.
INTERNAL ACCESS
(after one-year warranty expires)
ALWAYS DISCONNECT
the machine from the power source
before removing panels or covers.
• Remove the side panels by removing the two screws at
the base.
• Remove the back panel by removing the two screws at the
base and sliding the panel down.
• Removing the front top cover should not be needed, but if
necessary, remove the two screws at the base and one on top.
Move aside carefully to protect electronics and wire harness.
• Replace the front top cover, the back panel and the side
panels, keeping the wire harness clear of the motor fan and
air cylinder.
Changing the Knife Blade
• Remove the clip from the link holding the knife blade to the
cylinder rod.
• Using a 7/16” Allen wrench, loosen the set screw on the top
side of the knife base.
• Using a 1/8” Allen wrench, remove the shoulder screw from
the knife base at the top of the knife blade.
• Remove and replace the knife blade, keeping the nylon
washers in their original position.
• Tighten the shoulder screw through the new knife blade
and knife base into the aluminum upright.
• Reset the knife blade tension. (see instructions below)
Reset Knife Blade Tension
• Using a 7/16” Allen wrench, loosen set screw on the top
side of the knife base.
• Adjust the shoulder screw so the knife freely returns to its
neutral position from the vertical position but is a bit slow to
do so from the fully actuated position.
• Using a 7/16” Allen wrench, tighten the set screw on the top
side of the knife base.
TROUBLESHOOTING
Material is not being cut cleanly or completely
• The knife blade may be dull or damaged.
• The shoulder bolt holding the knife blade to the knife base
may be too loose.
• Foreign material on or in the cylinder rod may be preventing
a full stroke.
Material is not feeding properly
• Flattened width may not exceed 0.500”.
• Feed systems with knurled rollers have 3 lbs. minimum pull
(1 lb. for soft tubing).
• Feed systems with rubber rollers (magnetic wire) have
approximately 1/2 lb. pull.
• Drive roller knurling may be lled with foreign material.
- Steel roller knurling may need to be cleaned with a ne
steel brush.
- Rubber rollers may need to be roughed with 36 grit
sand paper.
• Knife blade may not be returning far enough and is blocking
the exiting material.
- Knife blade is held too tight to the knife base by the
shoulder bolt.
- Knife blade pivot points may need lubrication (CRC
#05359 or equivalent).
- The cylinder may be weakened or loose from the base.
• Motor doesn’t turn or feed.
- Fan interference has stopped the motor.
- Material is jammed around the drive roller.
• Tension arm roller may not be holding material against
motor drive roller.
• Tension arm roller may not be turning freely on its shoulder
bolt shaft.
• Tension arm spring may be too weak to hold processing
material.
• End of spool material may have been left between drive
roller and knife blade.
• The inlet feed guide must be in place when cutting material
is less than 1/4” diameter.

One-Year Warranty
Cutter Industries warrants the Automatic Cutter to be free of
defects in materials or workmanship for one year from the date
of purchase. During this warranty period, the unit will be repaired
or replaced, at Cutter Industries option, after the unit has been
returned to Cutter Industries for examination. All freight costs for
return of items are to be paid by the customer. Cutter Industries
shall not be liable for the air control valve, knife blade, rubber
feed rollers, physical damage or for direct or indirect damage or
personal injury which may result from improper use and any end
user alterations.
This warranty shall become null and void if the unit has been
repaired by others, has been damaged by the addition or
alteration of the unit, has been used with components or
accessories other than those supplied by Cutter Industries, or if
the unit has been misused or damaged in any way. Damage that
is deemed to be caused by the owner can be repaired at the
owner’s expense. All other warranties, expressed or implied, of
merchantability and all other warranties which extend beyond
the description of the unit on the face hereof shall terminate
upon any change of ownership. Cutter Industries shall not be
liable for any consequential damages except to the extent
required by law.
Service
If your Automatic Cutter needs service, it must be shipped to
Cutter Industries at the address below. If your unit is less than
ve (5) years old, service is $100. If your unit is more than ve
(5) years old, service is $200. Estimates of repair costs will be
provided upon request. Customer is responsible for all shipping
costs. For owners doing their own service, please call us for
standard replacement parts. To make payment for service or
parts, please call us directly.
Returns
Please call our oce before shipping your cutter to us. Please
make sure you enclose an explanation of the problem you
are experiencing, your return address, phone number, email
address and contact person with the returned machine. If
dated proof of purchase cannot be veried, the machine will
be processed as a return for service. All packages should be
insured by the owner. Cutter Industries is not responsible for any
shipping damage. When possible, returns should be made in
the original packaging. Customer is responsible for all shipping
costs. Please see our website for detailed information and
instructions if your automatic cutter needs service.
Copyright © 2019 Cutter Industries, Inc. All rights reserved.
16075 Hwy 64
•
Lebanon, MO 65536
•
417-533-1019
info@automaticwirecutter.com
•
AutomaticWireCutter.com
Other Cutter Industries Cutter manuals