Cycle Monkey Monkey Bone 160mm User manual

Cycle Monkey
Cycle MonkeyCycle Monkey
Cycle Monkey
Monkey Bone 160mm / 180mm
Monkey Bone 160mm / 180mmMonkey Bone 160mm / 180mm
Monkey Bone 160mm / 180mm
Monkey Bone Manual 21022012
Installation Instructions
1. Ensu e that you have the Monkey Bone that is app op iate
fo you disc oto diamete (160mm o 180mm; 203mm
oto s can be used with 180mm Monkey Bone and space s
(sold sepa ately))
2. Attach the Monkey Bone to the f ame using two M6x18-20
bolts. Ensu e that slot fo OEM2 axle plate faces the
d opout. Tighten bolts to a to que of 6 N-m/51 in-lbs.
3. Connect disc b ake calipe to Monkey Bone using two
M6x16 bolts. Leave bolts loose enough that calipe can
slide side to side.
4. Install wheel into d opout taking ca e to align slot in end of
OEM2 axle plate with cutout in Monkey Bone and disc oto
between b ake pads.
5. Check position of EX shift a m with OEM2 axle plate
engaged with slot in Monkey Bone; eposition axle plate as
needed fo desi ed cable outing using T20 To x w ench
(see Rohloff owne s manual). Tighten axle plate sc ews to a
to que of 3N-m/25 in-lbs.
6. Fully seat axle in d opout befo e tightening quick- elease
leve o axle nuts. Threaded axle nut torque: 35 N-m/310
in-lbs; itlock or bolt-on skewer torque: 7 N-m/60 in-lbs.
7. Follow b ake manufactu e ’s ecommendation fo setting
b ake calipe position. Tighten b ake calipe bolts to a
to que of 6 N-m/51 in-lbs.
Thank you fo pu chasing a Monkey Bone ea disc b ake
adapte . The Monkey Bone offe s a simple method of
ancho ing the axle of the Rohloff SPEEDHUB 500/14 to a
f ame th ough the disc b ake mount. In o de to use the
Monkey Bone, you SPEEDHUB 500/14 will need an
OEM2 axle plate, you f ame must have an Inte national
Standa d disc b ake inte face, and you disc b ake calipe
must have a Postmount inte face. The Monkey Bone is
not compatible with IS di ect-mount disc b ake calipe s
o f ames with Postmount disc b ake inte face.
Requi ed Tools:
•5mm Allen w ench
•To que w ench
•T20 To x w ench
Requi ed Pa ts:
•F ame with IS51 disc mount inte face
•Disc b ake calipe with Postmount inte face
•Rohloff SPEEDHUB 500/15 with OEM2 axle plate
•Monkey Bone
•2x M6x16 bolts (sold sepa ately; typically
included with disc b ake calipe )
•2x M6x18-20 bolts (sold sepa ately; often
included with disc b ake calipe )
Identifying Features
CAUTION:
Use of the Monkey Bone with some f ame geomet y can esult in the
wheel being pulled out of the d opout while pedalling due to the
fo ces exe ted by the Rohloff SPEEDHUB 500/14 onto the f ame.
When the ancho ing point of the OEM2 axle plate is located in f ont
of a line pa allel to the d opout slot, the e is a component of the
eaction fo ce in the lowest gea s that tends to push the axle down
and out of the slot. Pe Rohloff’s ecommendation, the Monkey
Bone and OEM2 axle plate combination a e not ecommended fo
use on f ames with such geomet y (see page 30 of the Rohloff
owne ’s manual fo mo e info).
Use of the Monkey Bone and OEM2 axle plate is enti ely at the use ’s
own isk. The fo ces applied to the disc b ake mount by the Rohloff
SPEEDHUB 500/14 can damage some f ames. Please contact you
f ame manufactu e to dete mine whethe this setup is app op iate
fo you f ame and whethe it affects you f ame wa anty
.
Assembly Views
Recommended
Not recommended

Cycle Monkey
Cycle MonkeyCycle Monkey
Cycle Monkey
Monkey Bone 160mm / 180mm
Monkey Bone 160mm / 180mmMonkey Bone 160mm / 180mm
Monkey Bone 160mm / 180mm
Monkey Bone Manual 21022012
Montage
1. Kont ollie en Sie die Ve sion des Monkey Bone fü die
entsp echende B emsscheibe (160mm ode 180mm), 203mm
B emsscheiben können mit dem 180mm Monkey Bone sowie
entsp echenden Distanzscheiben ve wendet we den.
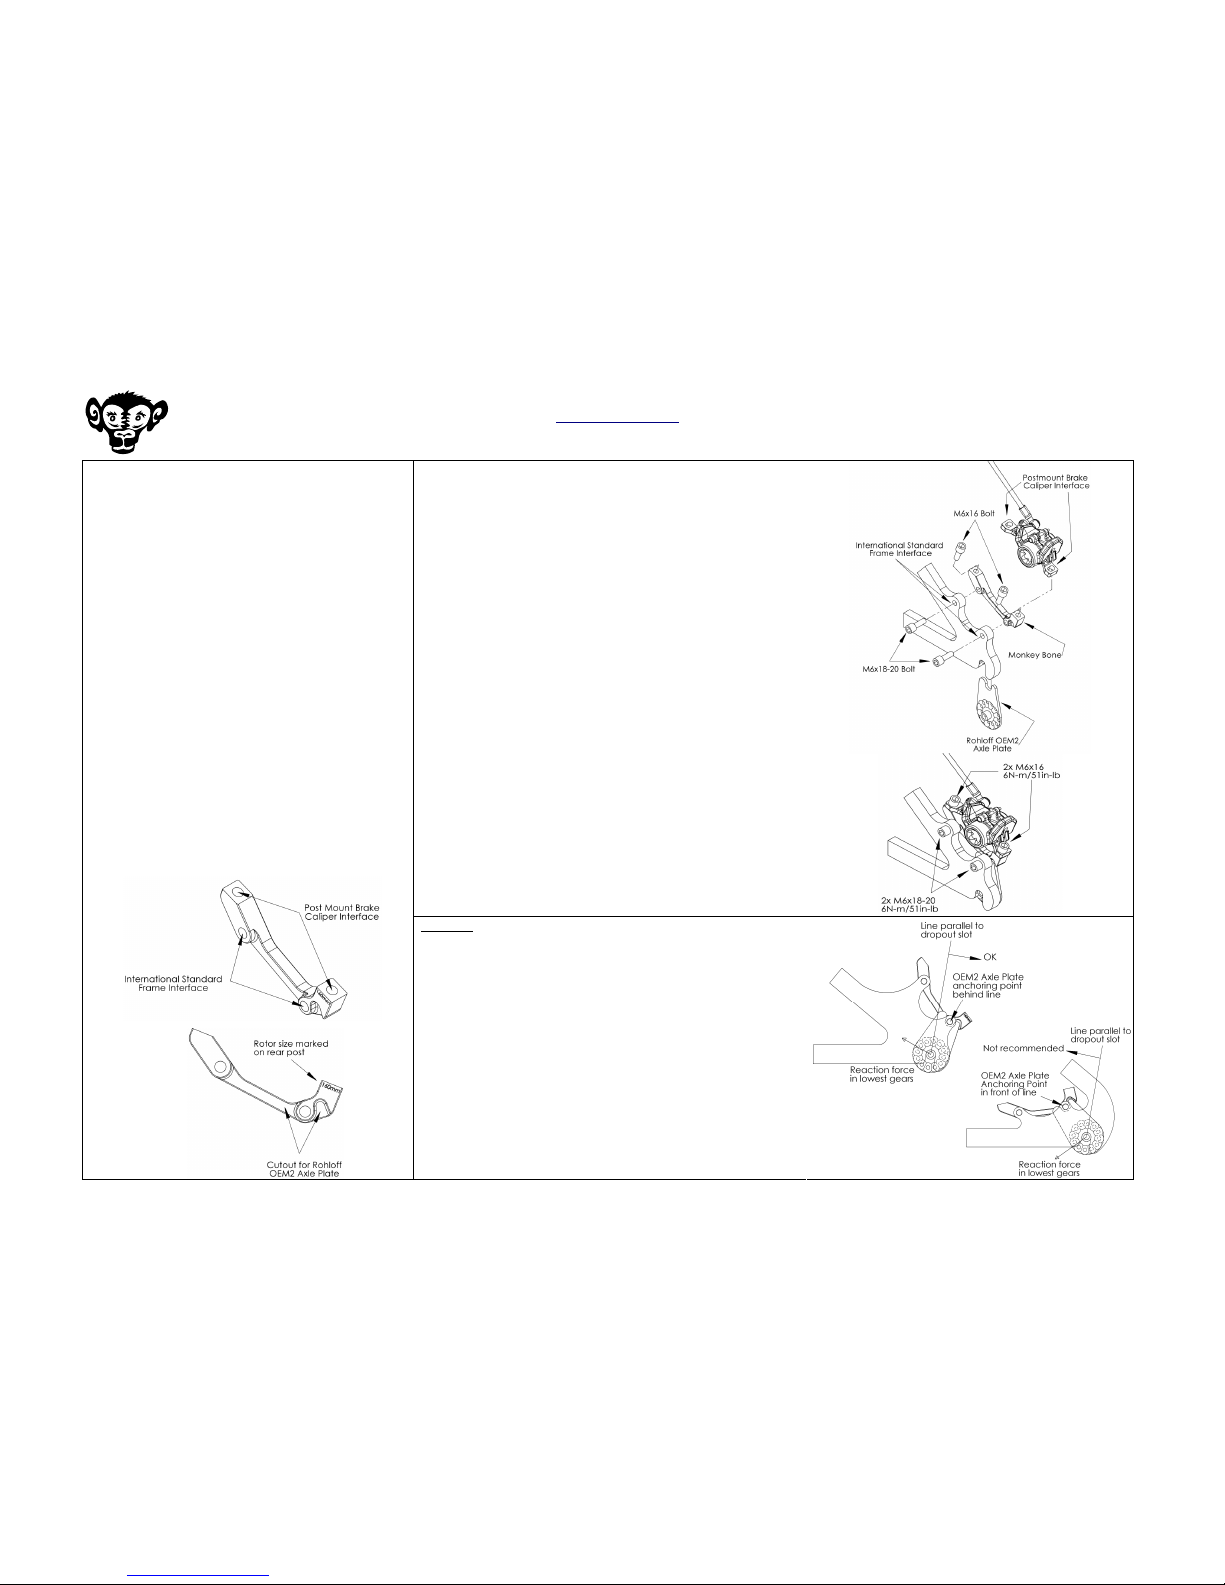
2. Den passenden Monkey Bone am Fah ad ahmen mit den zwei
M6x 18mm-20mm Sch auben befestigen (Drehmoment 6Nm).
3. PM B emssattel mit zwei M6x 16mm Sch auben auf den
Monkey Bone montie en. Lassen Sie die Sch auben vo e st
locke , um die B emse späte einstellen zu können.
4. Setzen sie das Lauf ad so in den Fah ad ahmen ein, daß die
OEM2 Achsplatte komplett in die Ausspa ung im dem Monkey
Bone g eift und de B emsscheibe ko ekt und schleiff ei
zwischen den beiden B emsklötzen sitzt.
5. Kont ollie en Sie die Zugve legung ggf. muß die
Achsplattenposition ve ände t (TX20 Schlüssel) we den, um
eine optimale Zugve legung mit möglichst wenig Bögen zu
e eichen – siehe Rohloff SPEEDHUB 500/14 Handbuch
(Drehmoment Achsplattenschrauben 3Nm).
6. Lauf ad auf ko ekten Sitz im Ausfallende p üfen, sowie
ichtiges D ehmoment de Achsbefestigung (TS Achsen max.
30Nm - CC Achsen max. 7Nm) beachten.
7. Fü ko ekte Einstellung/Montage des B emssattels bitte die
He stelle angaben des B emsenhe stelle s befolgen.
Befestigungssch auben mit 6Nm montie en.
Danke das Sie sich fü einen Monkey Bone Postmount
Adapte entschieden haben. De Monkey Bone ist ein
Adapte , um das D ehmoment fü die Rohloff SPEEDHUB
500/14 di ekt auf den Rahmen abzuleiten. Um den Monkey
Bone nutzen zu können, b auchen sie eine SPEEDHUB
500/14 ausgestattet mit eine OEM2 Achsplatte, einen
Rahmen mit Inte national Standa d (IS) fü
Scheibenb emsaufnahme sowie einen Postmount
Scheibenb emssattel (PM). De Monkey Bone ist nicht
kompatible mit IS B emsesattel ode Rahmen mit
integ ie te /di ekte Postmountaufnahme.
Benötigte Wer zeuge:
•-5mm Innensechskantschlüssel
•-D ehmomentschlüssel
•-TX20 Schlüssel
Benötigte Teile:
•-Fah ad ahmen mit IS Scheibenb emsbefestigung
•-Scheibenb emssattel fü Postmountbefestigung
•-Rohloff SPEEDHUB 500/14 mit OEM2 Achsplatte
•-Monkey Bone fü 160mm ode 180mm
B emsscheibe
•-2x M6x 16mm Sch auben ( egulä im
Liefe umfang de B emsanlage enthalten)
•-2x M6x 18mm bis 20mm Sch auben ( egulä im
Liefe umfang de B emseanlage enthalten)
Mer male:
Achtung:
De Monkey Bone da f nicht an Rahmen ve wendet we den wo sich de
Befestigungspunkt de B emsaufnahme (IS 2000) vo de pa allelen/
senk echten Linie du ch die Achse befindet.
In den nied igen/kleinen Gänge de SPEEDHUB 500/14 wi ken seh hohe
D ehmomente (bis zu 98% de übe die Ku bel eingeleiteten K aft) die
mögliche weise dazu füh en können, daß die Achse aus dem
Ausfallende ged eht we den könnte.
Die OEM2 Montage ist nu an Fah ad ahmen e laubt, die vom
Rahmenhe stelle dafü f eigegeben wu den. Ohne F eigabe des
Rahmenhe stelle s e folgt de Einsatz diese Montageva iante auf eigene
Gefah .
Montage Ansicht
Nicht zulässige Montage
Zulässige Montage
This manual suits for next models
1
Table of contents
Languages: