CYCLIC Switcharoo Series Instruction Manual

Switcharoo series
Performance Bicycle Trailers
TM
Owner’s Instructions and Safety Manual

Contents
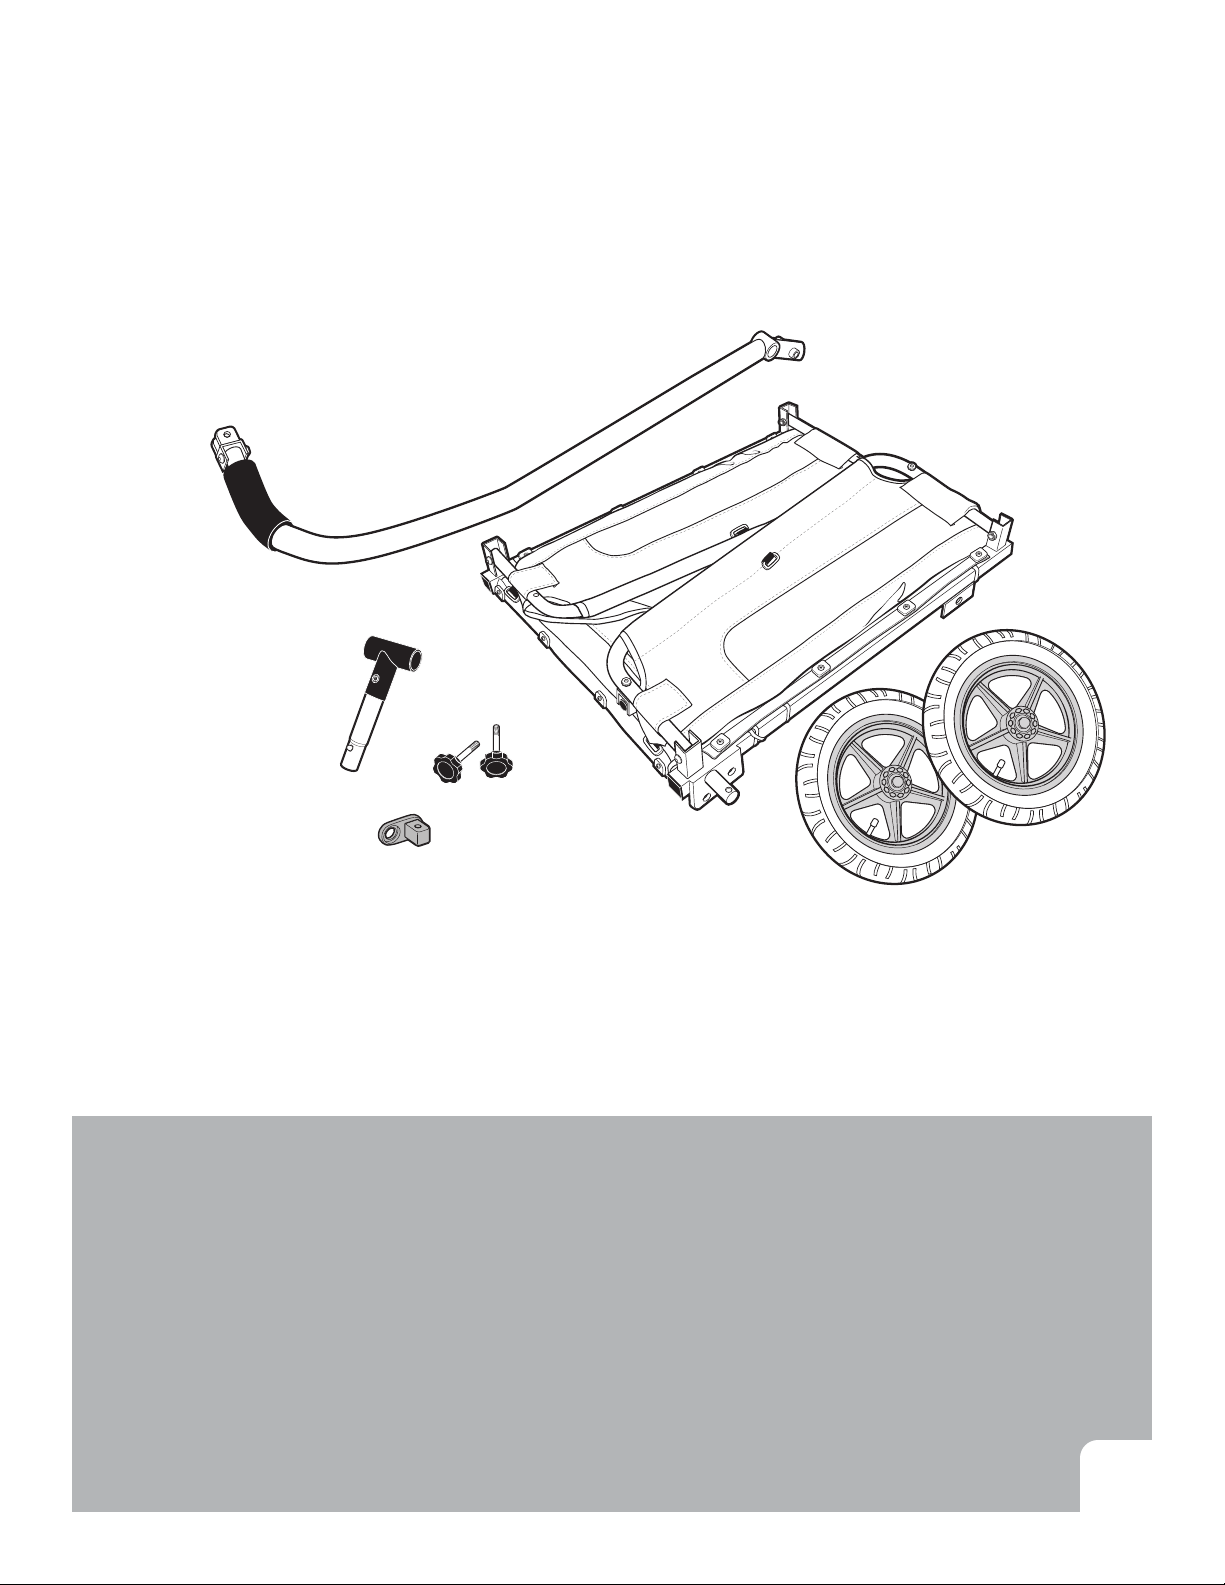
1. Trailer Components
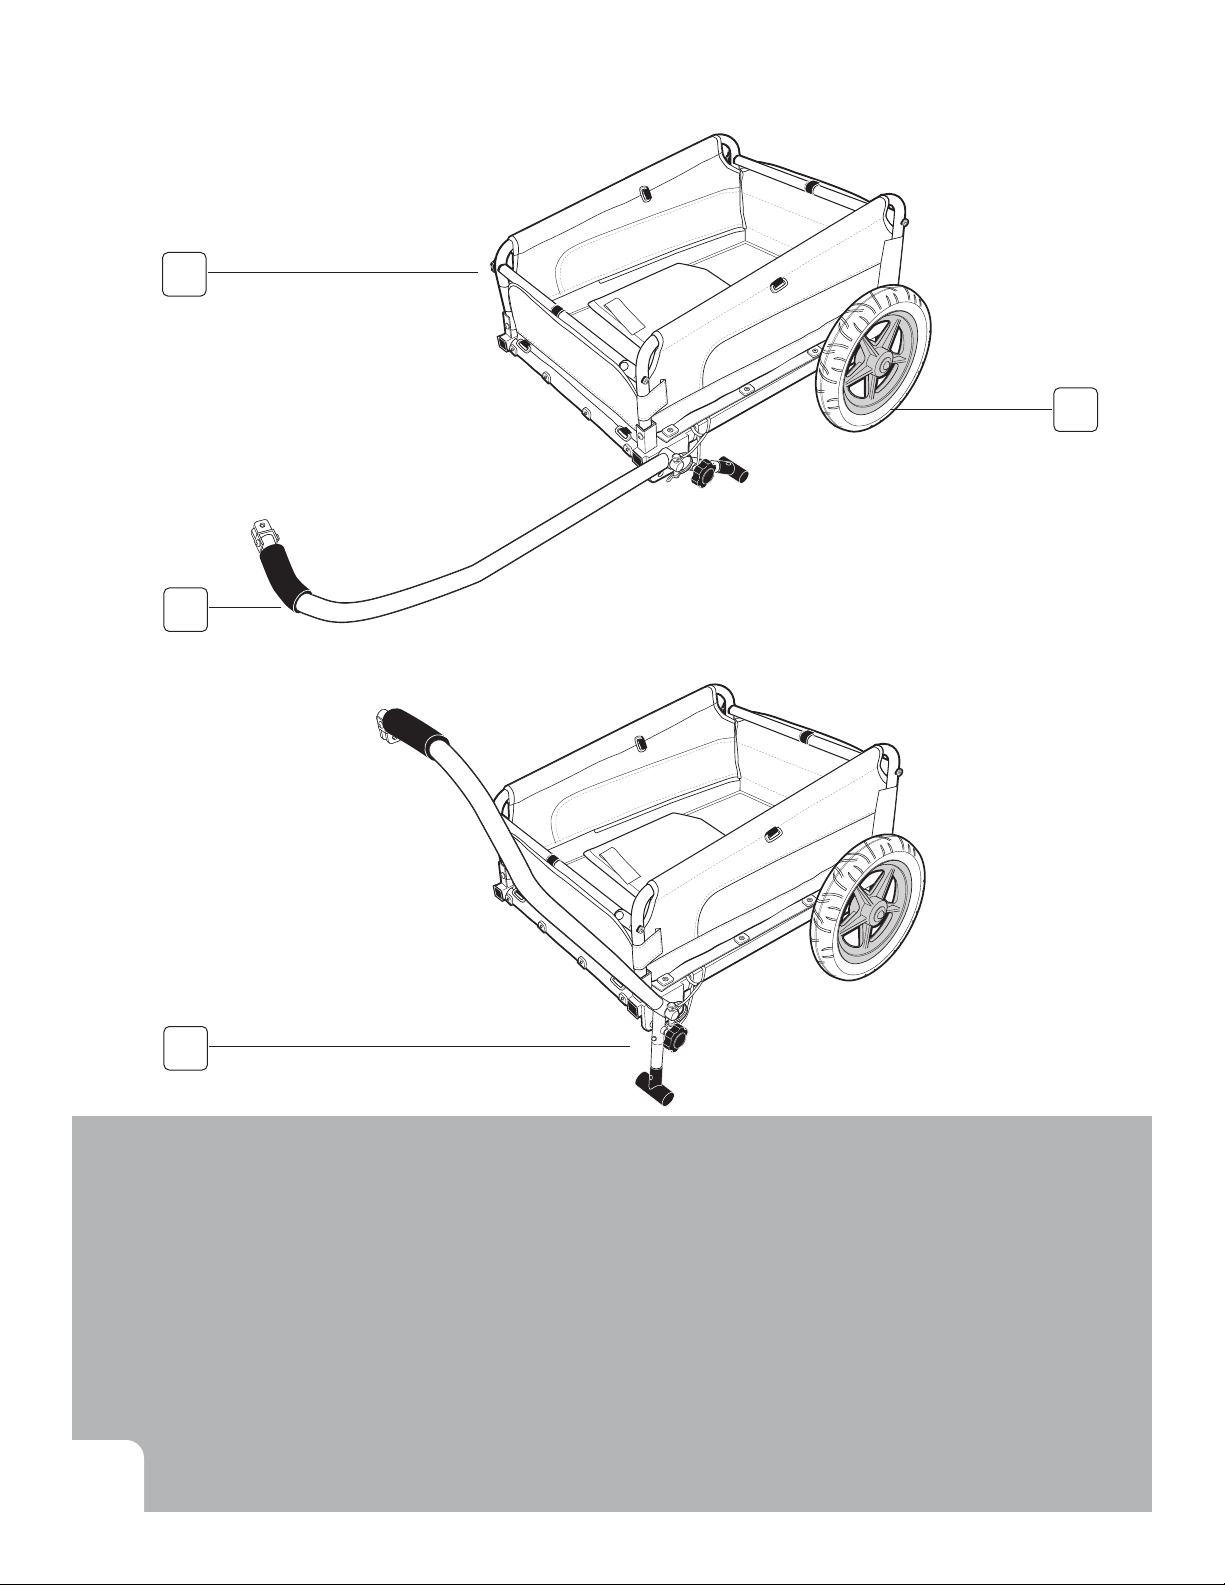
2. Tow Bar and Hitch Components
3. Assembling Your Trailer
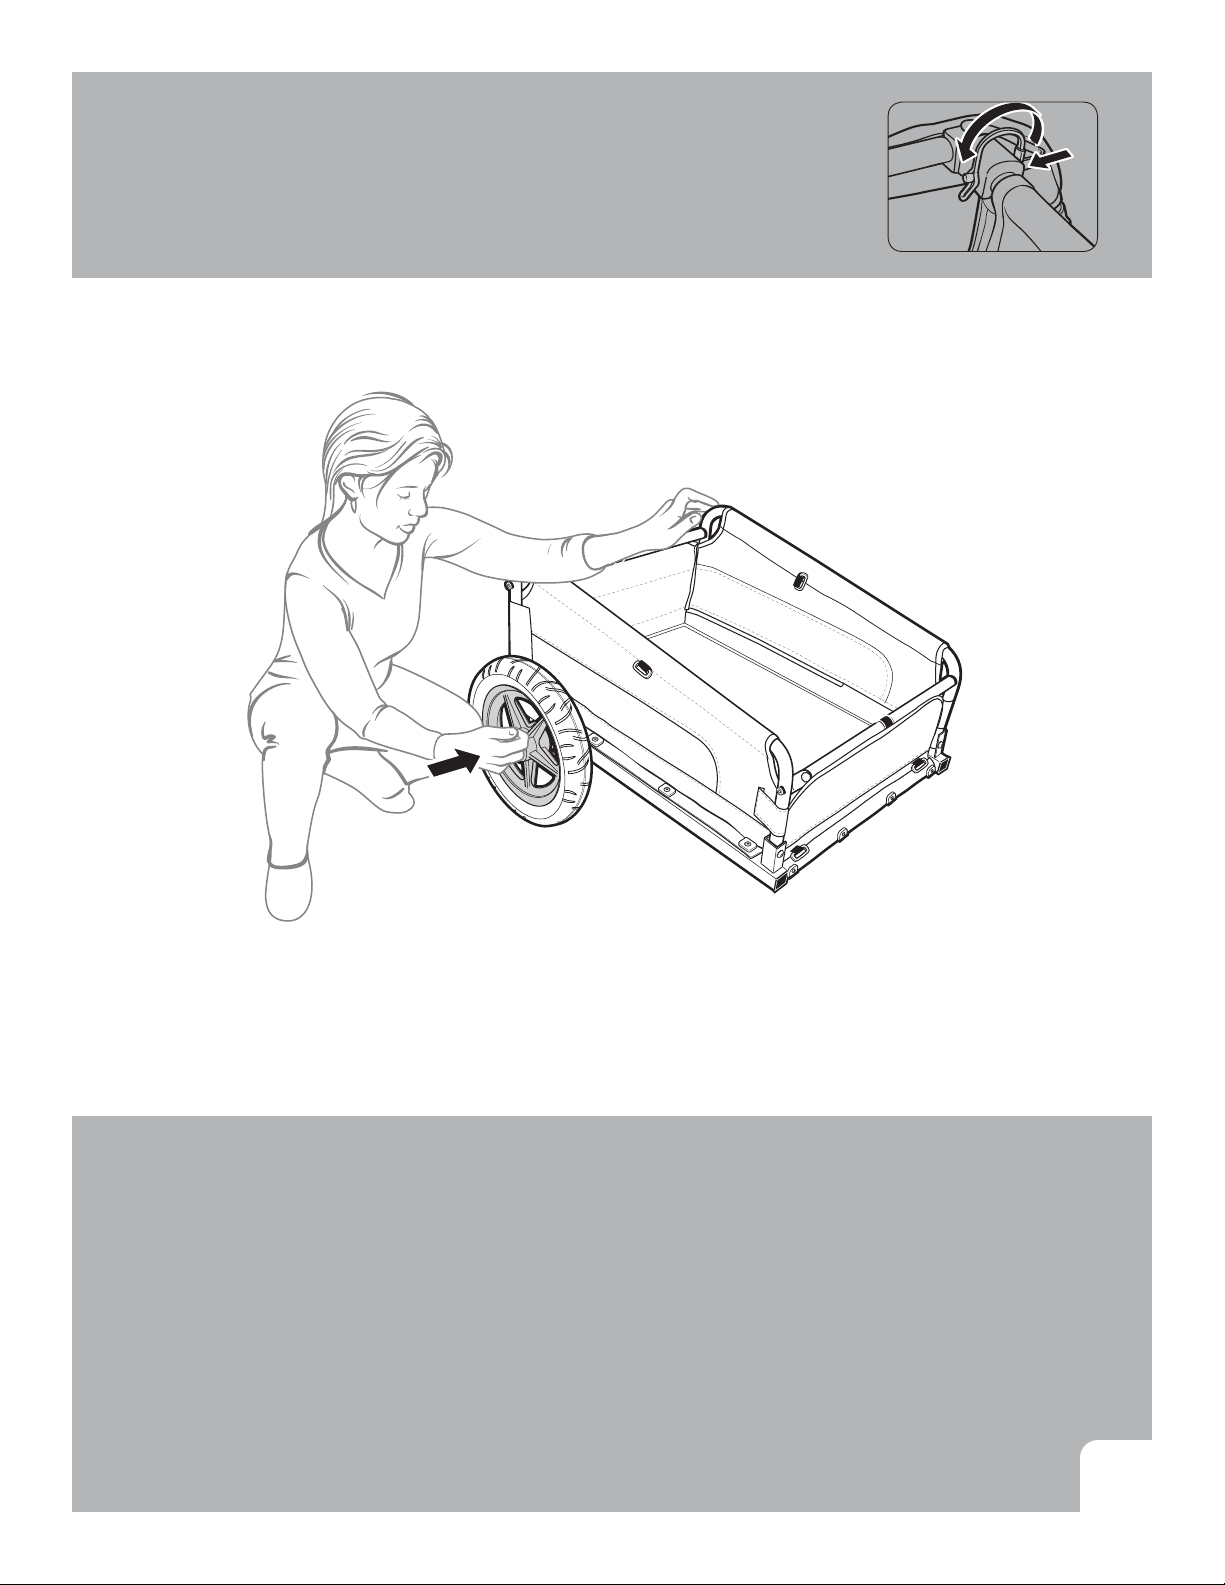
4. Attaching the Wheels
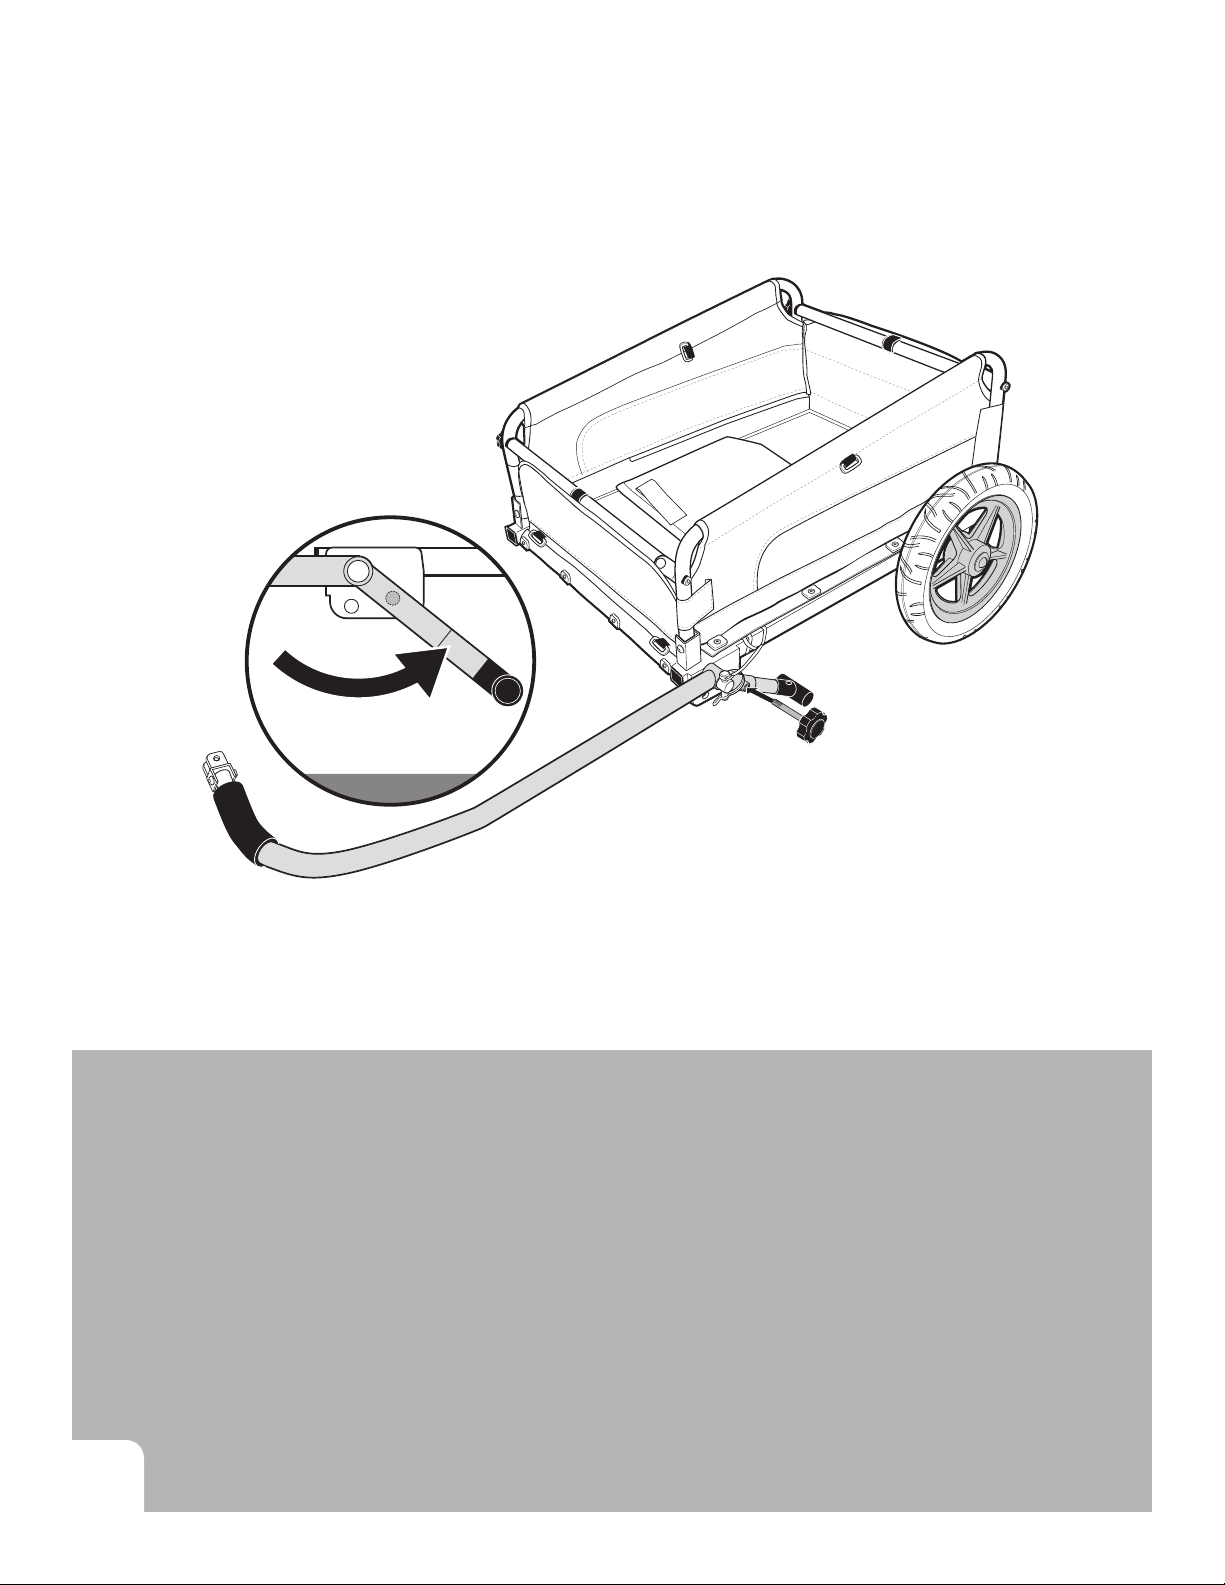
5. Securing the Tow Arm
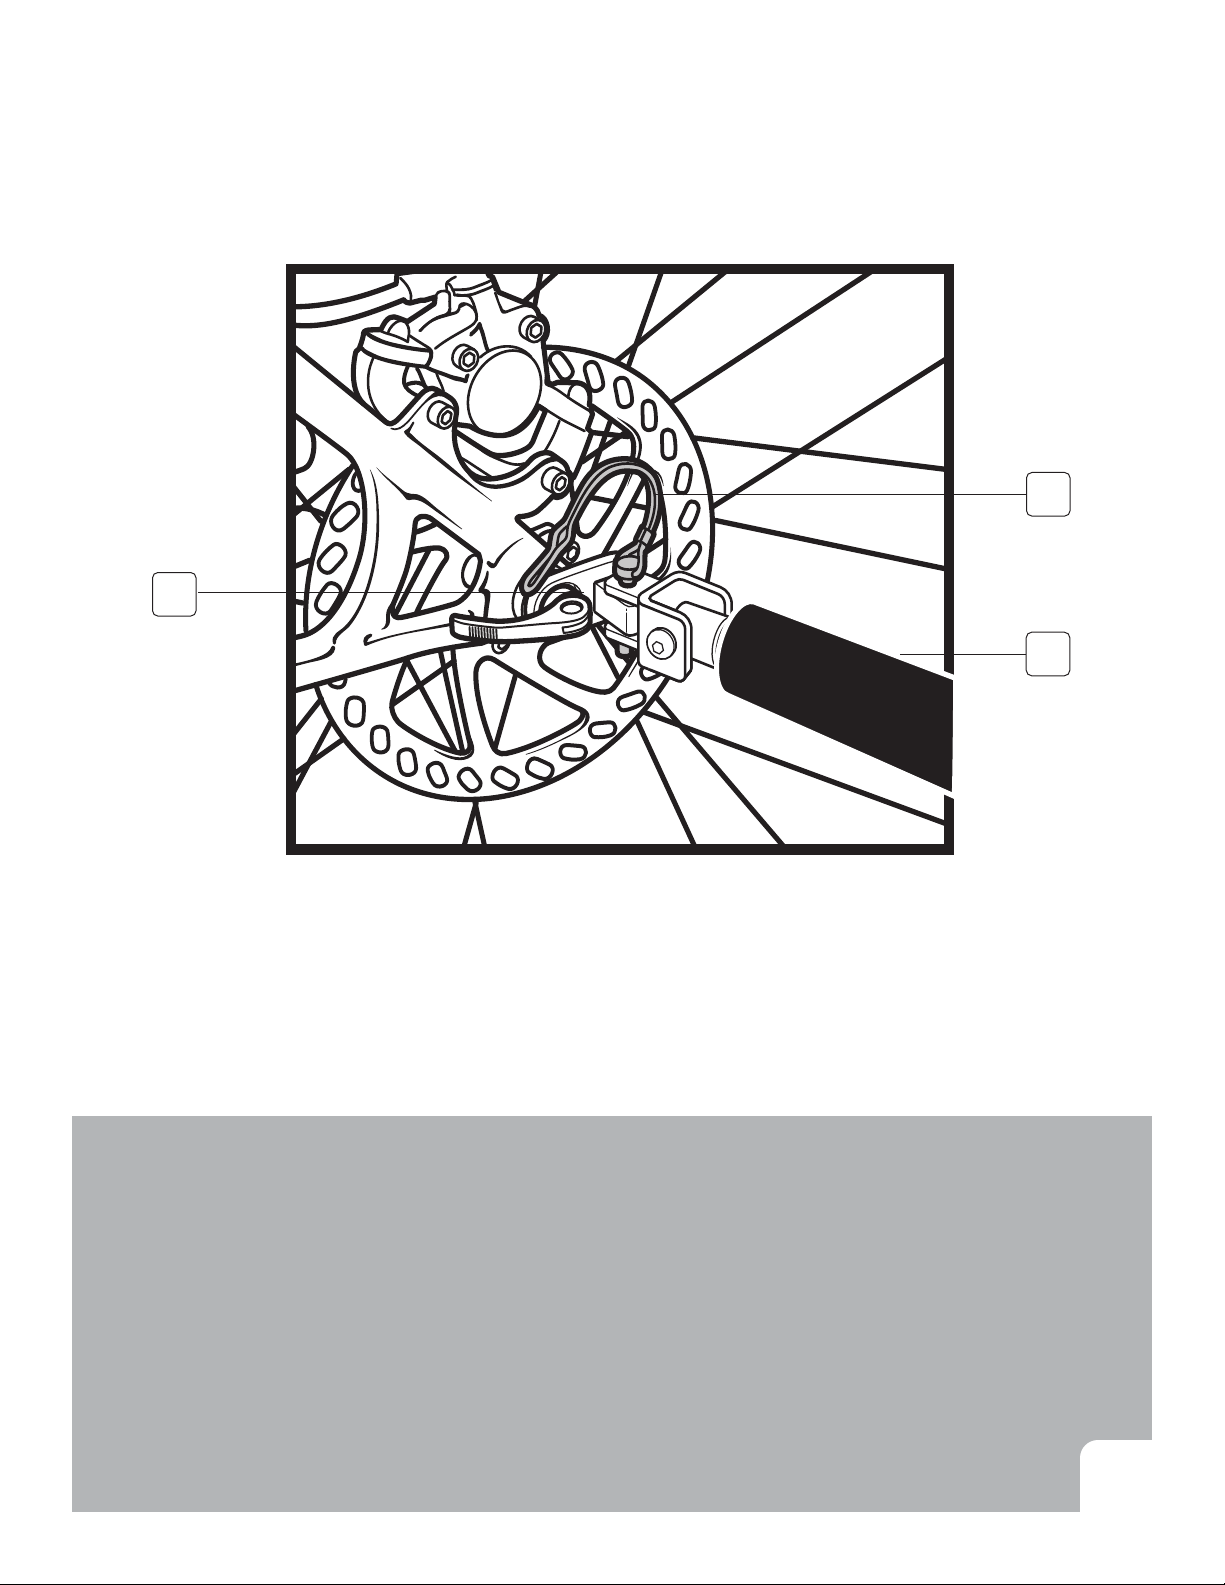
6. Attaching the Trailer to a Bike
7. Cargo Storage and Configuration
8. Configuring as a Wagaon
9. Folding your Trailer
10. Maintenance, Storage and Customer Service
11. Safety Warnings
Caution!
Biking and bicycle touring are increasingly popular recreational activities. Your new trailer is designed
and constructed to provide a portable, comfortable and sturdy addition to your outdoor ventures. Please
read the instruction manual and all safety warnings closely before using your trailer and keep manuals
for future use. For questions or additional information please visit www.cyclicsports.com or email us at
service@cyclicsports.com
1

Package Contents:
Trailer body, 2 rear wheels, tow bar with hitch connector, kick-stand, 2 small screw-knobs, one large
screw knobs (tethered) and a printed manual
Required Tools:
10mm wrench (for attaching to non quick release bicycles only)
2

Trailer Components
1.Trailer body
2. Tow bar and hitch connector
3. Rear wheels
Wagon Components
4. Kick-stand
Trailer Mode
Wagon Mode
3
1
2
4
3

Tow Bar and Hitch Connector Components
1. Hitch connector
2. Lock pin
3. Tow bar
1
2
3
4

Assembling your Trailer
1. Remove the trailer parts from the box. Set the main trailer body flat on the ground with the black side
down.
2. Lift the side wall up (fig 1) and repeat witht the opposite side (fig 2).
3. Swing the cross arms into place an locate onto the frame to align with the through hole on the
frame. (fig 3)
4. Secure the cross arms with the two screw-knobs as shown. Fasten until hand tight. (fig 4)
5. Secure the front and rear fabric walls onto the crossbars with the velcro tabs.
WARNING! Immediately discard of all plastic bags and plastic wrapping materials.
5
1
3
2
4

Attaching the Wheels
1. Insert the wheel axle into the axle receiver on the trailer body as shown.
2. Locate the through-hole on the wheel axle and secure the wheel by using the tethered spring clip pin.
2. Pull firmly on the wheel to confirm the axle is fully secure.
WARNING! You must make certain the frame and wheels are locked before using the trailer. Fail-
ure to do so could result in serious injury. Make sure the cabin assembly is securely locked together in
place before use.
6
Using Lock Pin & Spring Clip Fasteners
To use the lock pin and spring clip fasteners, insert the pin at attachment
point until it pushes through the opposite hole. Rotate the spring clip up and
over until it snaps into place over the pin head. To unlock, reverse order.

Securing the Tow/Pull Arm
1. Attach the kick-stand by inserting the stand into the end of the tow arm until the spring-pin engages.
(fig 1)
2. Attach the tow arm onto the trailer frame as shown and secure with the lock-pin (fig 2 and fig 3)
WARNING! Check this pin periodically during and before each use to be sure it has not become
loose. Failure to do so could result in serious injury.
7
2
1
3

Attaching the Trailer to a Bike
Your trailer is designed to attach easily to just about any full-size bicycle. Once installed the hitch con-
nector can be left on the bicycle and the trailer released using the spring clip.
The hitch fitting must be attached to the left rear axle of the bike. Do not attach to any cycle where
it cannot attach to the axle. It is recommended that the bicycle(s) to which the trailer will be attached
undergo a safety check by a qualified bicycle mechanic before attaching the trailer to it. This trailer is
not designed to be used with electric bikes or motorcycles.
Note: Additional hitch connectors for use on multiple bikes can be purchased at
www.cyclicsports.com.
8

Attaching the Trailer to a Bike
Position the tow arm into a horizonal postion as shown and secure with the large screw-knob as shown.
WARNING! Check this pin periodically during and before each use to be sure it has not become
loose. Failure to do so could result in serious injury.
9

Attaching the Trailer to a Bike
1. Remove the quick release or nut from the left side of the bikes rear axle. Install the hitch connector
between the quick release or nut and the bike frame. Tighten the quick release or nut according to the
manufacturers recommendation.
2. Insert the flex connector onto the hitch connector. Insert the lock pin and close the spring clip. Wrap
the safety strap around the frame of the bike and latch to the D-ring on the tow bar.
WARNING! Safety strap must attach to the bike frame when using this product in trailer mode.
Quick -release lock pin must be in place and locked before riding.
The height of the hitch clamp shall not exceed 15.7in (400mm) above the road surface and the stan-
dard drawbar load shall be between 30 and 80N.
1
2
3
4
10

Removing the Trailer from the Bike
1. Remove the safety strap by releasing the clip on the D-ring. Remove the quick-release lock pin to
release the flex connector and trailer. The hitch connector can remain on the bike when the trailer is
removed.
Note: Additional hitch connectors for use on multiple bikes can be purchased at
www.cyclicsports.com.
12
11

Cargo Storage and Configuration
The trailer includes a divider panel which can be configured to divide and hold cargo securely. To use,
attach the velcro tabs onto the side anchors. The panel can also be completely removed by unzipping
along the zipper at the panel base.
WARNING! NOT FOR USE WITH CHILDREN OR PETS. DO NO transport flammable or toxic ma-
terials. Distribute cargo carefully and evenly. Unevenly loaded items may cause the trailer to become
unstable. Failure to comply with this warning could result in serious injury.
12

Configuring as a Wagon
1. If the vehicle is in trailer mode, unscrew the large screw knob at the tow arm anchor.
2. Rotate the tow arm 45 degrees upwards and align the screw knob through-hole.
3. Seure the arm in place by fastening into place using the large screw-knob.
Check this pin periodically during and before each use to be sure it has not become loose. Failure to
do so could result in serious injury.
13

14
Folding Your Trailer
1. Remove the tow-bar by unscrewing the large screw-knob and then releasing the spring-clip.
2. Remove the wheels by releasing the spring-clips on either side.
3. Fold the trailer body by unscrewing the two screw-knobs and folding the cross-bars against the side
wall.
4. Fold the two side walls down.
1
3
2
4

15
General Maintenance
From time to time, check your trailer for loose hardware, worn parts, torn material or stitching.
Repair or replace parts as needed. Over or under inflation of tires may cause handling issues for the
trailer. Replace tires only with street tread tires.
We suggest you periodically clean all parts, wipe dry and then let air dry, especially if exposed to salt
water, salt spray, beach sand etc.
WARNING! Do not make any modifications to the trailer. Be sure that the trailer and bike are in
good working conditions. A bike dealer can help you with inspection and maintenance.
Do not use cleaning solvents. Clean only with mild soap and water.
Seasonal Storage of Your Trailer
Inspect the trailer and its parts before and after each use and storage. Check the working conditions of
both trailer and bike before each use.
Store trailer in a dry area and always make sure trailer is dry before storing.
WARNING! To prevent color fading and eventual weakening of the fabrics or components, store
the trailer out of direct sunlight.
Service and Repair of Your Trailer
Service and repair can be performed by any bike shop.
For any assembly questions or for replacement parts, please do not return to the store.
Call customer service at
Email customer service at
888-995-7437

16
WARNINGS!
Please read the warnings carefully. Failure to follow these warnings and assembly instructions
could result in serious injury or death.
• This trailer is designed for transportation of cargo only. DO NOT transport children or pets in
the trailer under any condition.
• DO NOT transport flammable or toxic materials.
• Maximum weight capacity for the trailer is 70 lbs (31 kgs). Exceeding capacity may cause the
trailer to change balance and become unstable.
• Always secure cargo
• Always distrubute load evenly inside the trailers.
• Ride slower than you would if you were riding without the trailer.
• You will require extra stopping distance. Use your brakes early. Take corners very gradually.
• Do not exceed a speed over 13 kmph (8 mph) and reduce speed to 3mph (5kmph) when turn-
ing.
• Use on smooth roads only. Do not ride over curbs, potholes or off-road.
• Do not install a car seat or any other seating device to this trailer.
• Do not make any modifications to the trailer.
• Install a rearview mirror on your bike to inspect the trailer while riding.
• Never leave children unattended in or around the trailer.
• Never allow children to assemble, fold, or disassemble this unit.
• Periodically re-check all fasteners to make sure they are tight.
Pre-Ride Safety Check
Before every ride the following safety check should be performed.
• Check to ensure hitch connector is tight.
• Check to ensure hitch safety strap is secure.
• Check that the load is evenly distributed and secure.
• Check TIRE AIR PRESSURE. Always maintain 20in wheels between 40 PSI and 65 PSI (2.7
BAR and 4.4 BAR) and 12in wheel between 30 PSI and 50 PSI (2.1 BAR and 3.5 BAR) or as
indicated on tire sidewall.
General Safety Guidelines
SAFETY FIRST! Check the working conditions of both bike and trailer before each use. If you dis-
cover broken components, misalignments or missing parts, correct the problem prior to use. Please
refer to all warning and guidelines for the proper use of this trailer. Be aware of what is necessary
to safely control the bike-trailer combination.

Follow these safety guidelines for safe and effective performance.
• Inspect the trailer and its parts before and after each use. Proper care and maintenance of
the trailer are essential to safety.
• When assembling the trailer, make sure that the wheels are correctly and securely installed
as described in the assembly instructions. Inflate the tires to the desired pressure and check
the pressure before each use. Over-inflation may cause the trailer to bounce or turn over.
Use only tires with street tread and not with BMX or knobby tread.
• Attach the hitch connector securely to the bicycle frame. The connector should be tightened
and the safety strap wrapped around the stay or frame and the hook snapped into the D-
ring.
• The person riding the towing bicycle should be at least 18 years of age and in good
physical condition.
•
• Be sure that the bicycle used with the trailer is in good working condition and has good
brakes. A bicycle shop can help you with inspection and maintenance. Please have your
bicycle inspected by a qualified bicycle mechanic for compatibility.
• Riding at dusk or dawn with this trailer is not recommended. A reflector that complies with
CPSC regulations must be mounted and visible on the rear and sides of the trailer.
• Do not overload the trailer. The load limit for cargo and/or passengers is 70 lbs (31 kgs).
Position the load as low as possible and center it within the trailer (front to rear and left to
right). Any extra gear should be placed towards the rear. All loads should be secured so
that it does not shift.
• Use extra caution when turning on uneven pavement, and going downhill.
• Do not ride over curbs. Avoid bumps and holes. Always signal your turns.
• Do not travel on the highways, busy streets or in areas unsafe for bicycling.
• Do not use trailer in snow or icy conditions.
• Do not travel or descend at high speeds.
IMPORTANT: Do not allow children or pets to ride in the trailer. Do not attempt to install seating
systems in the trailer. It is not designed for car seats, stroller seats, infant beds, or any other
type of seating. Any modification of the trailer will void the warranty, and may result in dam-
age to the trailer or injury of the passengers.
Pulling this trailer affects the operation of the bicycle. Stopping, starting and turning are affect-
ed, depending on the weight of the cargo. To familiarize yourself with the changes, load the
trailer to capacity and practice in a safe area. Do not use your trailer until you have become
accustomed to how it affects your bicycle handling.
SUFFOCATION WARNING: Plastic bags can be dangerous. To avoid danger of suffocation,
keep plastic bags away from babies and children.
17
For more on the world of CYCLIC, please visit us at
www.cyclicsports.com


13
Table of contents