CyClone BT20 Troubleshooting guide

frEmffffitrtng
Operational Manual & Parts Listing
Model BT2O Abrasive Blast System
P.O. Box 815 Dowatiac. Ml 49047 USA
Ph 26S,782-967O Fx 26$782-9623 on the web: cycloneblasters.com
ema il cyclonemf r@f rontier.com
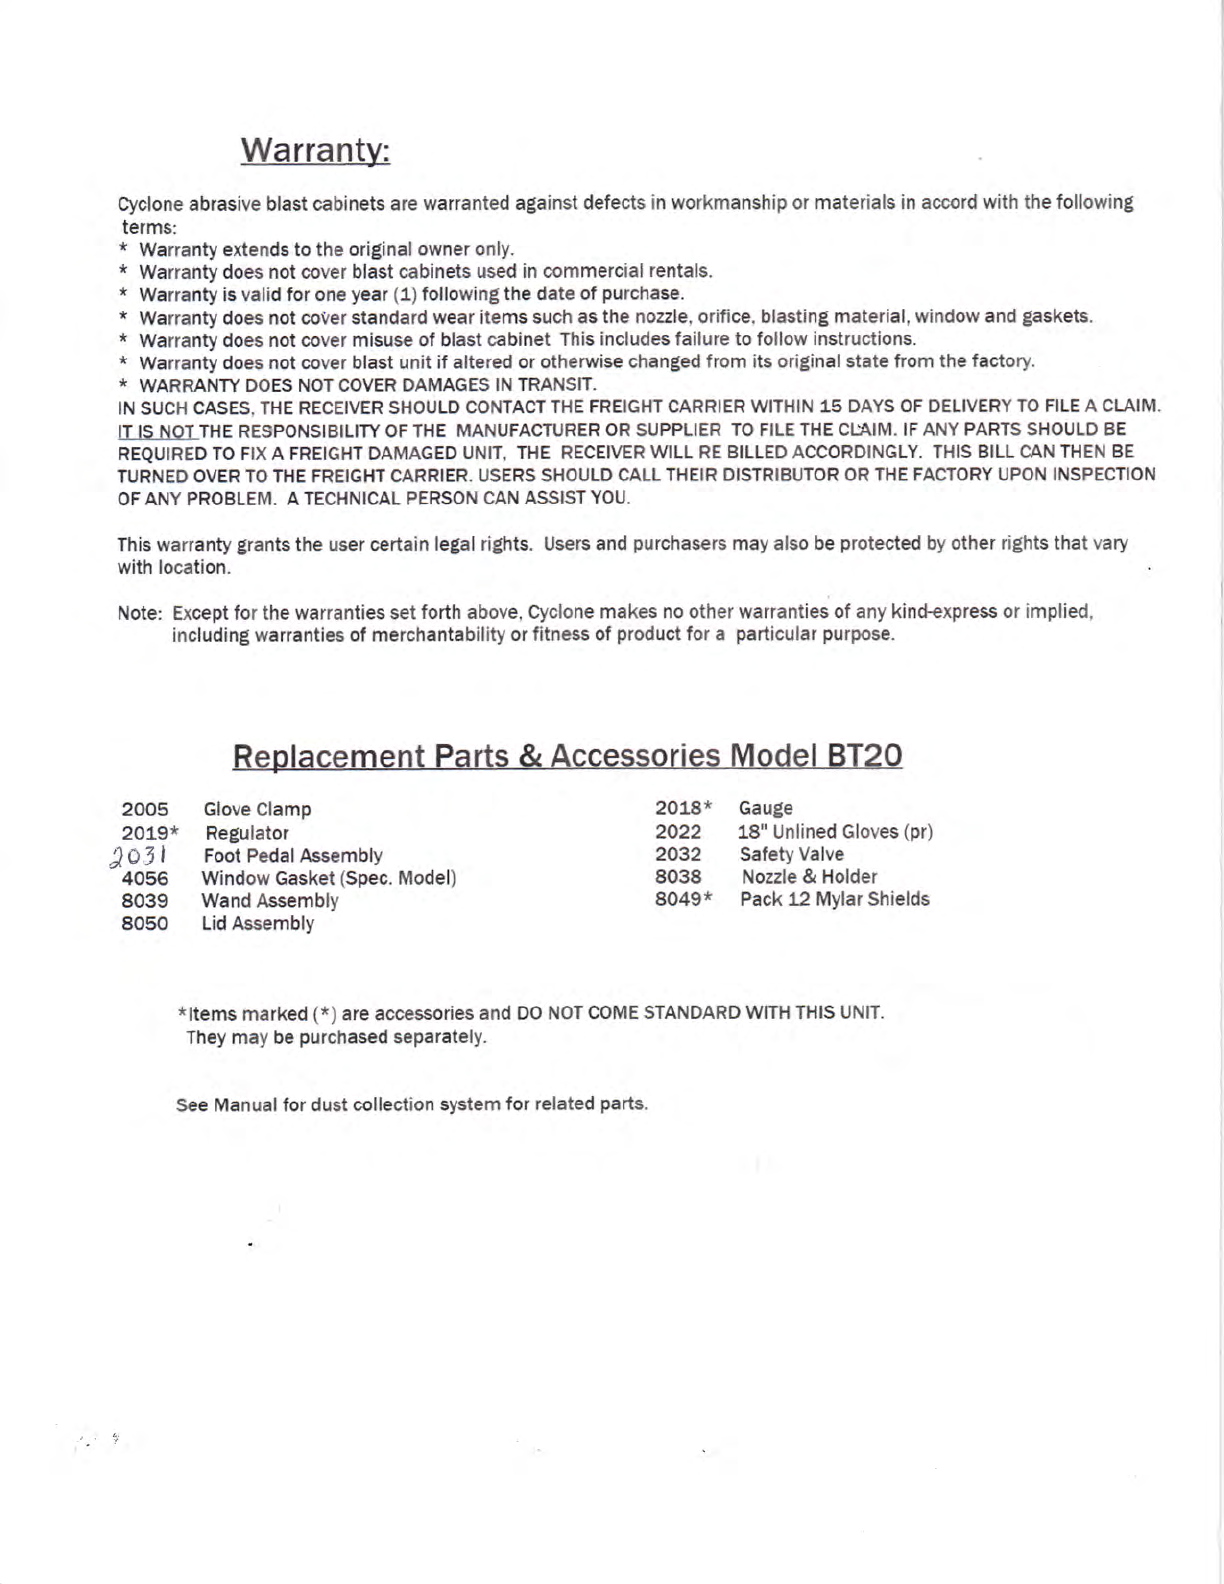
Safety alert siEnal words based on ANSI 2535.+1998 are used to
may be encountered during operation of this equipment. ANSI
Caution used alert symbol indicates a potentially
razardous situation which. if not avoided, may result in property which, if not avoided, may result in minor or moderate
!amage.
Adamage.
A
Warning indicates a potentiafly hazardous situation which, if
not avoided. could result in seriouE injury or death .
Danger indicates an imminently hazardous situation
which, if not avoided, will result in seriouE injury or death .
- ,]fi,t;;::*-JflIflffi.safety codes as wellas the NationalElectric code (NEC) and the occupationar
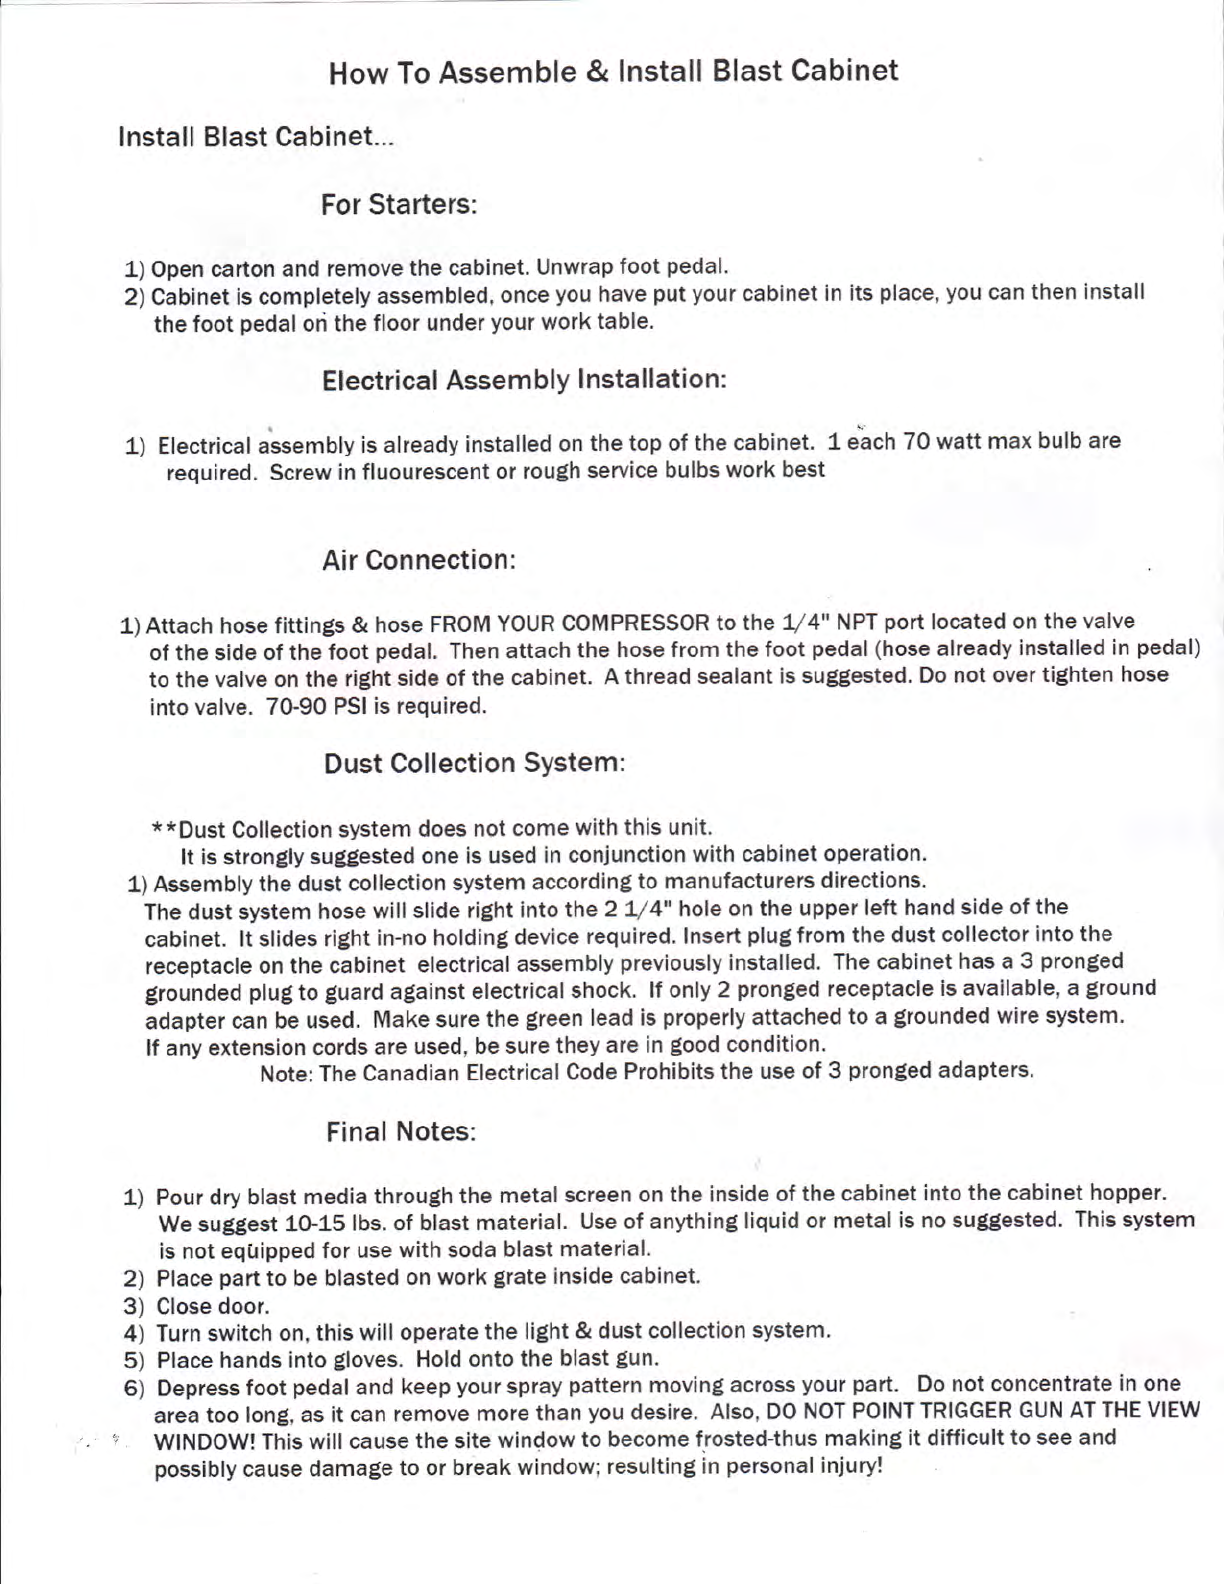
w 2) Follow assembly inetructions BEFORE plugging system in to electrical or air supply. Use caution even when
installint a light bulb.
1) The unit is equipped with a 3 prong Elroundang plug for your protection egainst alectrical shock. Use only adequate
CATJT]ON* ext€nsion cords with 3 prong grounding type plugs which ate appropriate for long periods ot use. Replace damaged or
"etilr#asF worn extension cord(s) irnmediatly. Use a 3 prong receptacle lo plug systern or ertension cord intc.
2) Make sure power source conforms to the requirernents of your equipment,
3) This is a dry blast system. lt is not msde to accomodate use wlth anything liquid or metal.
4) Chandr blasting material regularly. Contanued use of blast abrasives will result in poor performance and oxcess dust.
5) Do not exceed recommended maximurn eil prsssure of 120 P"S.l.
6) Check and clean dust collsction system and filters regularly. Do not wait until du$t is escaping from dust collaction
housings andlor blast cabinet before cleaning the system.
1) Keep any spilt blast abraeive clear from all paths around and near the bla6t cabinet" Many blast abrasives
are pawder fine and can be very slippery eausing a person to slip and fall.
2)silica sand should be avoided for use in blast systems for health hazards.
1) DO NOT OPIRATE CAEINEf WITH LID ANDIOR DOOH OPEN!!This will result in skin damage, serious eye
damag* andlor blindness if the blaet spray wele to come lnto contact with unrproteeted parts of the body.
2) This system is assembled standard with a 1r4" thick clear acrylic view window. Replacement with tempered
or single strength glass lS DANGEROUS. Replacin$ view window with material other than acrylic will result in
dangerous gla6s breakage that can lnjure the operator or bystanders.
., 3) Never use any type of flamable or combustable material in this blast system.
CAUTION

How To Assemble & Install Blast Cabinet
lnstall Blast Cabinet-..
For Starters:
1) Open cafion and remove the cabinet. Unwrap foot pedal.
2) Cabinet is completely assembled, once you have put your cabinet in its place, you can then install
the foot pedal ori the floor under your work table.
Electrical Assembly lnstallation:
i!
L) Electrical assembly is already installed on the top of the cabinet. l each 70 watt max bulb are
required. Screw in fluourescent or rough service bulbs work best
Air Connection:
1) Attach hose fittings & hose FROM YOUR COMPRESSOR to the L/4i' NPT port located on the valve
of the side of the foot pedal. Then attach the hose from the foot pedal (hose already installed in pedal)
to the valve on the right side of the cabinet. A thread sealant is sugfgfested. Do not over ti$hten hose
into valve. 7O-9O PSI is required.
Dust Collection System:
**Dust Collection system does not come with this unit.
It is strongly sug;gested one is used in conjunction with cabinet operation.
1) Assembly the dust collection system according to manufacturers directions.
The dust system hose will slide right into the 2 A4" hole on the upper left hand side of the
cabinet. lt slides right in-no holding device required. lnsert plug from the dust collector into the
receptacle on the cabinet electrical assembly previously installed. The cabinet has a 3 pronged
grounded plug to guard aglainst electrical shock. lf only 2 pronlied receptacle is available, a ground
adapter can be used. Make sure the €lreen ]ead is properly attached to a $rounded wire system.
lf any extension cords are used, be sure they are in $ood condition.
Note: The Canadian Electrical Gode Prohibits the use of 3 pronEed adapters.
Final Notes:
li Pour dry blast media through the metal screen on the inside of the cabinet into the cabinet hcpper.
We suggest 1S,15 lbs. of blast material" Use of anythin{ liquid or metal is no sugf$ested. This system
is not eqfiipped for use with soda blast material.
2) Place part to be blasted on work glrate inside cabinet.
3) Close door.
4) Turn switch on, this wil! operate the li$ht & dust collection system,
5) Place hands into glloves. Hold onto the blast Eun.
6) Depress foot pedal and keep your spray pattern movin$ acro$s your part. Oo not concentrate in one
area too long, as it can remove mere than you desire. Also, DO NOT POINT TRIGGER GUN AT THE VIEW
l WINDOW! This will cause the site window to become frosted-thus making it difficult to see and
pos$ibly cause damage to or break window; resultin$ in personal injury!

Problem Gause
Exoessive Dust Duat mllection system failing
Blasting materialworn
Too much blasting material
Blasl materialworn
Gun parts worn
Too much air
foo much blaet material
change in humidity
Faulty ground wiring
Exessively worn gun parts.
P/N e050 View Window
i\
I
Remedy
Too much blasting material
Remove excess material
Replace with new material
Remove excess material
Replaee with new material
Replae with new no:zle & orifice
Regulate air to 7&90 psi
Remove ex6e$B material. r+zO iL max
Stand on cardhoard/rubber mat.
lnEtall static elec{ric band
Check electrical wiring
Get lined gloves
Replace parts and be sure thby are in the proper
place.
,{F-*" :"'."
t
Surging
lnadequate Blast
Static
Unit Won't Blast
-1*-
r-
l:-{*- . \--
1t'
t:
{:r
. -T-.
sh-'
*Er*
I
-'::-. - '-
P/N 8049 Pk 12 Mylar Shields
P,/t{ 8038 Nozzte Holder & Iip
P/H 8039 Complete llozzle End & Tubings

Cyclone abrasive blast cabinets are warranted against defects in workmanship or materials in accord with the tollowing
terms:
* Warranty extenda to the orisinal owner only.
* Warranty does not cover blast cabinets used in commercial rentals.
* Warranty is valid for one year (1) following the date of purchase.
* Warranfi does not coVer standard wear items such as the nozzle, orifice, blasting material, window and gaskets.
* Warranty does not cover misus€ of blast cabinet This includes failure to follow insttuctions.
* Warranty does not cover blast unit if altered or otherwise changed from lts original state from the factory.
* WARRANTY DOES NOTCOVER DAMAGES IN TRANSIT.
IN SUCH CASES. THE RECEIVER SHOULD CONTA T THE FREIG}TT CARRIER WITHIN 15 DAYS OF DELIVERY TO FILE A CLAIM.
IT IS NOT THE RESPONSIB]IITY OF THE MANUFACTURER OR SUPPLIER TO FILE THE CI.AIM. IF ANY PARTS SHOULD BE
REqUTRED TO FtX A FRETGHT DAMAGED UN|T, THE RECEIVER wlLL RE BTLLED ACCORDINGLY" THIS BILL CAN THEN BE
TURNED OVER TO THE FREIGHT CARRIER. USERS SHOULD CALL THEIR DISTRIBUTCIR OR THE FACTORY UPON INSPECTION
OF ANY PROBLEM. A TECHNICAL PERSON CAN ASSIST YOU.
This warranty grants the user certain legal rights. Users and purchasers may also be protec{ed by other rights that vary
with location
Note: Exoept for the warranties set forth above. Cyclone rnakes no other warranties of any kin*expre*s or implied.
including warranties of merchantabiSity or fitness of produet for a pa*icular purpose.
2005 Glove Clamp
2019* Regulator
.rO.11 Foot Pedal Rseembly
4056 Window Gasket (Spec, Itlodel)
8039 Wand Assembly
8050 Lid Assembly
2018t Gauge
2A22 18" Unlined Gloves (p$
2A32 Safety Valve
8038 Nozzle & Holder
8049* PackL2 Mylar Shields
*ltems marked (*) are accessories and DO NOT COME STANDARD WlTl{ THIS UNIT.
They may be purchased separately.
See Manual for dust collection system for related parts.
Other CyClone Industrial Equipment manuals