CYCLOPS PARALYSER 375 User manual

PARALYSER 375
USER INSTRUCTIONS
CYCL PS
R
U
I
C
T
Y
E
S
S
S
Y
S
M
T
E
Proudly designed and engineered in
Australia by Dynamco Pty Ltd.

Immobiliser Vehicle
Security System
CYCLOPS PARALYSER 375
User Instructions
Congratulations on having one of the world's most advanced and
unique Australian designed and engineered vehicle security
systems, installed in your vehicle!
The Cyclops Paralyser 375 has been tested to and meets
Australian Standards 4601:1999.
CYCL PS
R
U
I
C
T
Y
E
S
S
S
Y
S
M
T
E

ARMING AND DISARMING
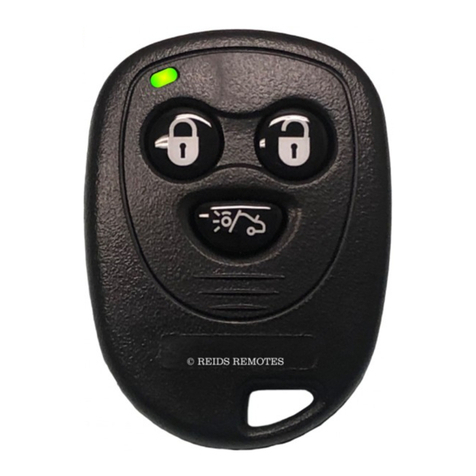
To arm or disarm the system, press the larger button on the remote control. Arming the system is
accompaniedbytwoflashesfromtheindicatorsandoneflashfordisarming.Ifthesirenconfirmationoption
isenabledtheP375willalso“chirp”thesirentwiceforarmingandoncefordisarming.
PANIC
Ifthelargerbuttonontheremotecontrolispressed and held down for more than two seconds thesystemwill
go into a panic mode. In this mode the indicators will flash and the siren will sound. The panic mode will
continue for thirty seconds. If you wish to cancel the panic signal before the thirty seconds then simply press
thelargerbuttonoftheremotecontrolagain
BOOTRELEASE(OPTIONAL)
Disarm the P375 by pressing the larger button on the remote control. Then press the smaller button on the
remotecontroland keep it depressed until the boot releases. This will take about3seconds.Thisfunctionwill
onlyoperateifthevehicleisequippedwithanelectricalbootreleaseanditisconnected.
AUTO-ARMING
The system is set to automatically immobilise the vehicle. The engine will be immobilised within 30 - 40
seconds after the ignition has been turned off. If turned off with the remote control, the system will re-arm
itself (immobiliser only) within the same time period. This will be accompanied by two flashes of the
indicators,andifthesirenconfirmationoptionisenabledtheP375willalso“chirp”thesirentwice.

INTRUSIONDETECTION
TheP375 is equippedwithfourzonesof protection doors, bonnet,glassbreakage&auxiliary.Each zone can
be triggered a maximum of three times after arming. When a zone is triggered, the siren will sound for 30
secondsand the indicatorswillflashforone minute. Thesirenwillresetforfive seconds aftereach30-second
triggerperiodbeforesoundingduetosubsequenttriggers.
WhentheP375 has autoarmed(immobilised), all zones(exceptignition) will nottriggerthe siren. However
ifan attempt is made to start thevehicle, without firstdisarming the system,the indicator lights will flash for
fiveseconds.If the ignition isstill on, the sirenwill sound for 30seconds.When the P375 isdisarmed and no
doorsareopened,itwillrearmwithin30-40seconds.IfcentrallockingisfittedandconnectedtotheP375,it
willalsore-lockthedoors&re-armthealarmfunctions120secondslater.TheP375willnotlockthedoorsif
anyhavebeenopenedduringthistime.Theuserhasthechoiceofare-lockfunctionortheinteriorlightbeing
activatedfor30secondsafterdisarming.Seeoptionsettingtochangeifrequired.
ENGINEIMMOBILISATION
When the system is armed the engine is immobilised. The two independent, normally open circuits of
immobilisationensuresthe engine is starved ofeither fuel or spark. Immobilisationpoints vary from vehicle
tovehicle; common engine killplacesincludefuelinjection,fuelpump, fuel cut-off solenoids, mainignition
feed,low-tensiondistributorsuppliesandstartermotorsolenoids,etcetc.

GLASSBREAKAGEPROTECTION
The P375 is equipped with a sophisticated glass breakage detection unit. The system will only respond to the
breakingofanyglassinthevehicle.
TotesttheunitsimplywindupallthewindowsandarmtheP375.Wait30 seconds before tapping the driver's
sidewindowwithametalobjectsuchasacoin.Thesirenandindicatorswillsoundandflash.
You should notice that there should be no trigger, regardless of how hard you hit the window or body of the
vehiclewithyourhand.Thiseliminatesallfalsealarms.
OPTIONS
The PARALYSER 375 has a number of options than can be set or reset by means of the ignition switch and
remotecontrol.Tochangetheseoptionsyouneedtodothefollowing:
!Openandleaveopenthedriver'sdoor.
!Turn the ignition switch from ACC position to the ON position the required number of times. During this
process the key must not remain in either position for more than two seconds, or else the P375 will drop
outofprogrammingmode.CounteachtimetheswitchisintheONposition.
!LeavetheswitchintheONpositionwhentherequirednumberisreached.
!The vehicle indicators will flash approximately two seconds after last turn. Indicates P375 is ready to alter
optionsetting.
!Pressthelargerbuttononeitherremotecontrol.
!The P375 will respond by flashing the indicators. Three flashes shows that the option is set and one flash
showsithasbeenreset.

OPTIONS
Thefollowinglistdetailshowmanytimesyouneedtoturntheignitionontoachievethe
desiredchange
IGNITION SWITCH TURNS 1 FLASH 3FLASHES
3 Anti Hi Jack Disabled Enabled
9 auto-lock/dome light Auto-lock Dome light
11 Horn output type Pulsed Constant
13 Arm/disarm confirmation Disabled Enabled
15 Indicator disarm flash 1 second 10 seconds
SPECIFICATIONS
Manufactured by : Dynamco Pty Ltd.
Model Number : Paralyser 375.
Standards met : AS/NZS 4601:1999.
Supply voltage : +12VDC.
Current consumption : less than 10 mA (while armed).

BATTERYREPLACEMENT
Using a small Phillips-head screwdriver, remove the three screws at the back of the
remote and carefully separate the two body housings taking take care not to disturb the
circuit board. Remove the old battery whilst paying attention to the orientation of the
positive and negative terminals. Insert new battery in identical fashion to the original
and re-assemble remote. Replace screws and test remote control by pressing main
button.Forfurtherinformation,pleasecontactyourlocalCyclopsservicecentre.
Remotebatterytype27a.

OVERRIDE
The system can be overridden by means of a Personal Identification Number (PIN).
Every unit is supplied with its own PIN. It is important to make a note of this PIN or
keepthecardsuppliedwiththeunitinasafep1aceasitalsohasthePINdetailedonit.
** Any digit marked '0', indicates 10 flashes.
OVERRIDEPROCEDURE
!Insert the ignition key into the ignition switch and turn to the ON position. The red
statusLEDmountedonthedashwillglowconstantly.
!Turn the ignition key back to the ACC position, the status LED will begin to flash
slowly. Count the number of flashes for the first digit in the PIN of the P375.
ReturnthekeytotheONpositionwhenthecorrectnumberiscounted.
!Repeatstep2for the remaining digitsinthePIN.When all four digitsareentered,the
indicatorswillflashonce,theP375willthendisarm.
NB: If the engine is not started with 39 seconds of over-riding, the P375 with
immobilisetheengine.

PROBLEM SOLVING
System won't activate when the door is opened
- Make sure you have used the remote to set the system. It will not trigger if the
systemhasautoarmed.
- Make certain the system is activated. LED should be flashing on the dashboard.
- Make sure that the interior dome light has not been left in the permanently ON
position.
-Make surethatyouhaveallowedatleast 10secondsaftersettingthesystem,before
openingthedoor.
System won't activate or deactivate. LED won't flash or extinguish
- Make sure that ignition switch is in the OFF position.
- Make sure the vehicle battery is not flat.
- Try your spare remote transmitter unit.
The remote fails to operate
Iftheremotefails tooperate andtheLEDdoesnotlightupwhenthebuttonispressed
thenchangethebattery.Todothisyouwillneedasmall“Philipshead”screwdriver.

ANNUALINSPECTION
Dynamco prides itself on the durability and integrity of its car security systems. We
welcome users to contact a Cyclops service centre every twelve months for an annual
inspection.(Pleasenoteachargemaybeleviedforthisinspection)
1st Inspection
Date:
Venue:
Comment:
Signed:
2nd Inspection
Date:
Venue:
Comment:
Signed:

WARRANTY
Subject to the conditions stated below, to be free from manufacturing defects and faulty material within the warranty period
statedbelow.
CONDITIONS
!That the warranty registration has been completed in full at the time of purchase and / or installation and is produced when
warrantyserviceissought.
!The warranty does not cover general maintenance such as cleaning of bonnet switches, door switches, light switches etc,
norreplacementofconsumableitemssuchaspilotlampsortransmitterbatteries.
!Thiswarrantyshallbenullandvoidif:-
!The product has been repaired by any other person other than by an authorised Cyclops service centre.
!Should a defect become apparent within the warranty period Dynamco Pty Ltd will repair the product free of charge for
partsandlabour.Shouldamobileserviceberequired,acall-outchargemayapply.
!Theproducthasbeenalteredortamperedwithinanywayortheserialnumberaltered,defacedorremoved.
!Thedefecthasbeencausedbynegligencebytheownerortheiragent.
!Theproducthas not been operated correctly,installed by an authorised Cyclopsinstalleror has been subjectedtomisuse or
unduewearandtear.
!Siren,controlmoduleoranysystempartisdamagedbywater.
THEWARRANTYDOESNOTCOVERTHEFOLLOWINGCOSTS:-
!TransportoftheproducttoandfromCyclopsservicecentres.
!InsuranceoftheproduceintransittoorfromtheCyclopsservicecentres.
!CostofanyservicecallwheretheproductisfoundbyCyclopstobeingoodworkingorder.
Thebenefitsconferredby thiswarrantyareinadditiontoallotherrightsandremedies, whichtheconsumerhasconferredby
law.

WARRANTY REGISTRATION
PURCHASED FROM
OWNER’S NAME
TYPE OF VEHICLE
VEHICLE REGO
MODULE OF UNIT
DATE OF INSTALL’
WARRANTY PERIOD :
AFTER HOURS EMERGENCY PHONE
CONTROL MODULE
REMOTES & SIREN
CYCL PS
R
U
I
C
T
Y
E
S
S
S
Y
S
M
T
E
Table of contents
Other CYCLOPS Car Alarm manuals

CYCLOPS
CYCLOPS PARALYSER 355 User manual

CYCLOPS
CYCLOPS PARALYSER 385 Installation instructions

CYCLOPS
CYCLOPS PARALYSER 755 User manual

CYCLOPS
CYCLOPS PARALYSER 165 User manual

CYCLOPS
CYCLOPS X3 Manual

CYCLOPS
CYCLOPS PARALYSER 455 User manual

CYCLOPS
CYCLOPS PARALYSER 275 User manual
CYCLOPS
CYCLOPS PARALYSER 485 User manual
CYCLOPS
CYCLOPS 661-3 User manual
Popular Car Alarm manuals by other brands

Omega Research & Development
Omega Research & Development KeyCounter KEY-3.1 owner's manual

Auto Mate
Auto Mate 4105A owner's guide

Auto Page
Auto Page RS-727LCD Operation manual

Auto Page
Auto Page RF-505 Operation manual

Auto Mate
Auto Mate AM14 owner's guide

Auto Page
Auto Page RF-503 Operation instructions