Cypress S6SAE101A00SA1002 User manual

S6SAE101A00SA1002
Solar-Powered Internet of Things (IoT) Device Kit
Operation Manual
Publication Number S6SAE101A00SA1002_SS901-00041 Revision 1.0 Issue Date August 24, 2015

OPERATION M ANUAL
Preface
This manual explains howto use the evaluation board. Be sure to read this manual before using the product.
For this product, please consult with sales representatives or support representatives.
Handling and Use
Handling and use of this product and notes regarding its safe use are described in the manuals.
Follow the instructions in the manuals to use this product.
Keep this manual at hand so that you can refer to it anytime during use of this product.
Notice on This Document
All information included in this document is current as of the date it is issued. Such information is subject to
change without any prior notice.
Please confirm the latest relevant information with the sales representatives.
2 S6SAE101A00SA1002_SS901-00041-1v0-E, August 24, 2015
CONFIDENTIAL

OPERATION M ANUAL
Caution of the Products Described in This Document
The following precautions apply to the product described in this manual.
WARNING Indicates a potentially hazardous situation which could result in death or serious injury and/or a
fault in the user’s system if the product is not used correctly.
Electric shock,
Damage
Before performing any operation described in this manual, turn off all the power supplies to the
system.
Performing such an operation with the power on may cause an electric shock or device fault.
Electric shock,
Damage
Once the product has been turned on, do not touch any metal part of it.
Doing so may cause an electric shock or device fault.
CAUTION
Indicates the presence of a hazard that may cause a minor or moderate injury, damages to this
product or devices connected to it, or may cause the loss of software resources and other
properties such as data, if the device is not used appropriately.
Cuts, Damage
Before moving the product, be sure to turn off all the power supplies and unplug the cables.
Watch your step when carrying the product. Do not use the product in an unstable location such
as a place exposed to strong vibration or a sloping surface. Doing so may cause the product to
fall, resulting in an injury or fault.
Cuts The product contains sharp edges that are left unavoidably exposed, such as jumper plugs.
Handle the product with due care not to get injured with such pointed parts.
Damage Do not place anything on the product or expose the product to physical shocks. Do not carry the
product after the power has been turned on.
Doing so may cause a malfunction due to overloading or shock.
Damage
Since the product contains many electronic components, keep it away from direct sunlight, high
temperature, and high humidity to prevent condensation. Do not use or store the product where
it is exposed to much dust or a strong magnetic or electric field for an extended period of time.
Inappropriate operating or storage environments may cause a fault.
Damage Use the product within the ranges given in the specifications.
Operation over the specified ranges may cause a fault.
Damage To prevent electrostatic breakdown, do not let your finger or other object come into contact with
the metal parts of any of the connectors. Before handling the product, touch a metal object
(such as a door knob) to discharge any static electricity from your body.
Damage
When turning the power on or off, follow the relevant procedure as described in this document.
Before turning the power on, in particular, be sure to finish making all the required connections.
Furthermore, be sure to configure and use the product by following the instructions given in this
document. Using the product incorrectly or inappropriately may cause a fault.
Damage Because the product has no casing, it is recommended that it be stored in the original
packaging. Transporting the product may cause a damage or fault. Therefore, keep the
packaging materials and use them when re-shipping the product.
August 24, 2015, S6SAE101A00SA1002_SS901-00041-1v0-E 3
CONFIDENTIAL

OPERATION M ANUAL
Table of Contents
1. Description ..................................................................................................................................... 6
2. Features......................................................................................................................................... 7
3. Applications.................................................................................................................................... 7
4. Kit Introduction................................................................................................................................ 8
4.1 Contents ........................................................................................................................... 8
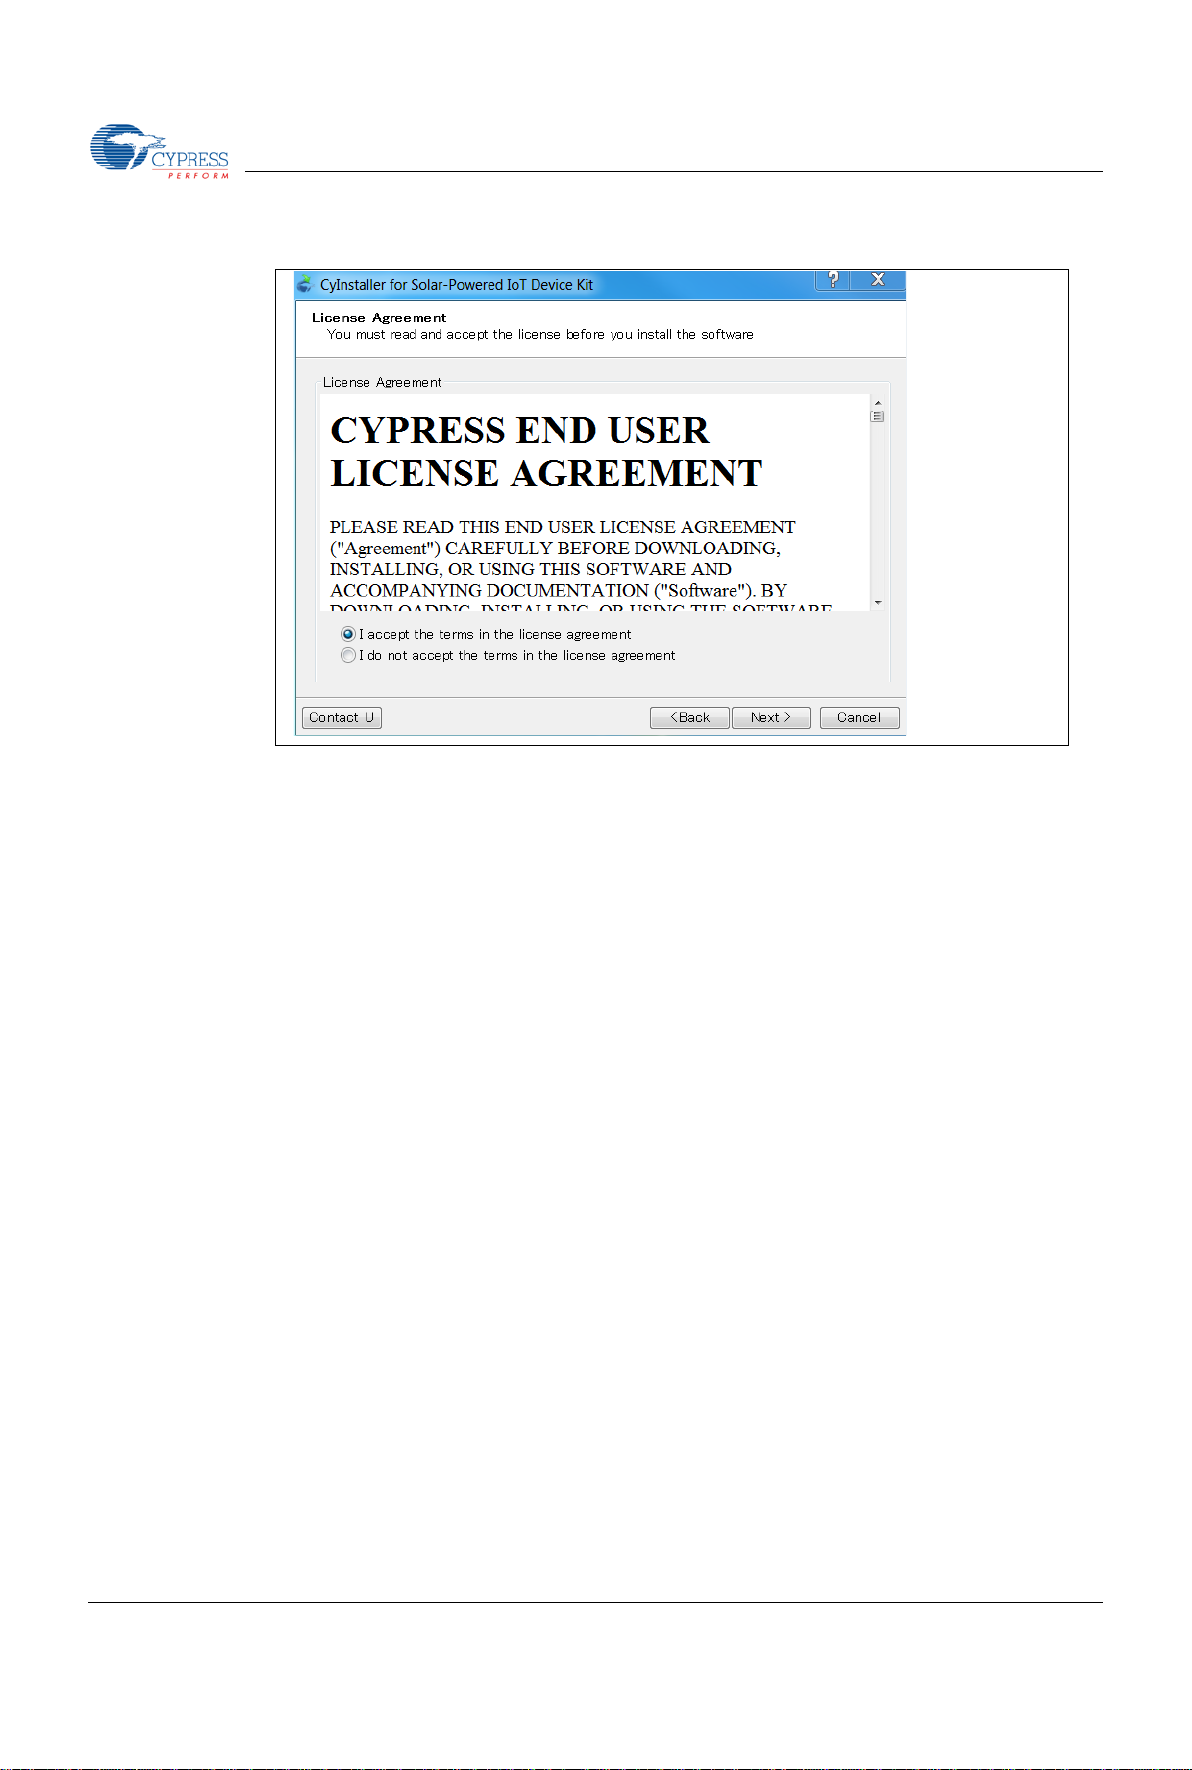
5. Software Installation....................................................................................................................... 8
5.1 Install Software.................................................................................................................... 8
5.2 Uninstall Software ............................................................................................................. 11
5.3 PSoC Creator™ ................................................................................................................ 11
6. Getting Started ............................................................................................................................. 12
6.1 Solar-Powered BLE Beacon Operation............................................................................. 12
6.1.1 USB Driver Installation of the BLE-USB Bridge................................................ 12
6.1.2 USB Driver Installation failed............................................................................ 14
6.1.3 USB Driver Installation for the Motherboard..................................................... 16
6.1.4 Establishing BLE Connection........................................................................... 19
6.1.5 Vibration Energies Connection (Optional) ........................................................ 21
6.2 Solar-Powered Wireless Sensor Node (WSN) with BLE Beacon...................................... 22
6.2.1 Configuring the Motherboard as a WSN........................................................... 22
6.2.2 Confirm that your WSN is Operating................................................................ 26
6.3 Serial Command List......................................................................................................... 27
7. Program and Debug..................................................................................................................... 31
7.1 UART Bootloader (Program Only)..................................................................................... 31
7.2 PSoC Creator with MiniProg3 (Program and Debug)........................................................ 36
7.2.1 Program............................................................................................................ 36
7.2.2 Debug............................................................................................................... 41
8. Example Project........................................................................................................................... 47
8.1 Flow Diagram.................................................................................................................... 47
8.2 Function List...................................................................................................................... 48
8.3 BLE Beacon Process ........................................................................................................ 49
8.4 WSN with BLE Beacon Process........................................................................................ 55
8.5 BLE Beacon Format.......................................................................................................... 59
8.6 Sensor Transmitter Specification of WSN......................................................................... 61
9. Energy Harvesting PMIC (S6AE101A)......................................................................................... 62
9.1 Recommended Operating Conditions ............................................................................... 62
9.2 DC Characteristics ............................................................................................................ 62
9.3 Block Diagram................................................................................................................... 63
10. Hardware...................................................................................................................................... 64
10.1 Energy Harvesting Motherboard ....................................................................................... 64
10.1.1 Board Detail...................................................................................................... 64
10.1.2 Input/Output Pin Description............................................................................. 65
10.1.3 Debug Connector Description .......................................................................... 66
10.1.4 Jumper Description .......................................................................................... 66
10.1.5 Switch Description............................................................................................ 67
10.1.6 LED Description ............................................................................................... 67
10.1.7 Circuit............................................................................................................... 68
10.1.8 BOM List........................................................................................................... 70
10.2 BLE-USB Bridge ............................................................................................................... 71
10.2.1 Board Detail...................................................................................................... 71
10.2.2 Test Pin Description.......................................................................................... 72
10.2.3 Switch Description............................................................................................ 72
10.2.4 LED Description ............................................................................................... 73
4 S6SAE101A00SA1002_SS901-00041-1v0-E, August 24, 2015
CONFIDENTIAL

OPERATION M ANUAL
10.2.5 Circuit............................................................................................................... 74
10.2.6 BOM List........................................................................................................... 78
11. Appendix ...................................................................................................................................... 80
11.1 Other Sample Project........................................................................................................ 80
11.1.1 LED ONOFF Project......................................................................................... 80
11.1.2 Simple BLE Project .......................................................................................... 83
11.2 How to Use Extra Components......................................................................................... 89
11.2.1 10Ω Resistor for Current Measurement............................................................ 89
11.2.2 220 μF capacitor for additional ......................................................................... 92
12. Ordering Information..................................................................................................................... 94
13. Major Changes............................................................................................................................. 95
Figures
Figure 1-1 Block Diagram of Development Kit ........................................................................................... 6
Figure 9-1 Block Diagram......................................................................................................................... 63
Figure 10-1 Energy Harvesting Motherboard........................................................................................... 64
Figure 10-2 BLE-USB Bridge................................................................................................................... 71
Tables
Table 6-1 Light level vs Time Interval ....................................................................................................... 19
Table 6-2 Commands List......................................................................................................................... 27
Table 9-1 Recommended Operating Conditions....................................................................................... 62
Table 9-2 DC Characteristics.................................................................................................................... 62
Table 10-1 Input/Output Pin Description................................................................................................... 65
Table 10-2 Debug Connector Description................................................................................................. 66
Table 10-3 Jumper Description................................................................................................................. 66
Table 10-4 Switch Description.................................................................................................................. 67
Table 10-5 LED Description...................................................................................................................... 67
Table 10-6 Test Pin Description................................................................................................................ 72
Table 10-7 Switch Description.................................................................................................................. 72
Table 10-8 LED Description...................................................................................................................... 73
Table 12-1 Ordering Information............................................................................................................... 94
August 24, 2015, S6SAE101A00SA1002_SS901-00041-1v0-E 5
CONFIDENTIAL

S6SAE101A00SA1002
Solar-Powered Internet of Things (IoT) Device Kit
Operation Manual
1. Description
The Solar-Powered IoT Device Kit provides an easy-to-use platform for the development of a solar-powered
IoT device with BLE wireless connectivity. It includes the S6AE101AEnergy Harvesting Power Management
IC (PMIC) device, which is ideal for solar- or light-powered Energy Harvesting Systems (EHS) since it only
consumes 250nA. The S6AE101Aalso supports a hybrid EHS that uses a solar cell Energy Harvesting
Device (EHD) along with a coin cell battery, and an optional vibration EHD with external diode bridge. The
output voltage from the S6AE101A is configurable from 1.1V to 5.2V, supporting a broad range of device
components for an IoT device.Also included in the kit is Cypress' EZ-BLE™ PRoC™ Module
(CYBLE-022001-00), a fully integrated Bluetooth Low Energy (BLE) module solution that offers high
flexibility for a wide variety of IoT device uses. A USB port is provided by Cypress' USB-UART LP Bridge
Controller device (CY7C65213).
Figure 1-1 Block Diagram of Development Kit
PC based Windows 7/ 8/ 8.1/ 10
Energy Harvesting Motherboard
45mm
25mm
6 S6SAE101A00SA1002_SS901-00041-1v0-E, August 24, 2015
CONFIDENTIAL

OPERATION M ANUAL
2. Features
The Solar Powered IoT Device Kit provides everything needed to develop a light-powered sensor node that
transmits sensor data using BLE:
Operates using light (>200 lux) energy harvested by the included solar cell
−Supports the use of a vibration Energy Harvesting Device with an external diode bridge (not
included)
−Also supports the use of a coin cell battery (optional, not supplied)
Supports BLE communication with a PC through the provided BLE-USB Bridge that is pre-programmed
with custom firmware for this kit
Includes firmware that supports the following applications:
−Bluetooth Low Energy (BLE) Beacon, transmitting data at 1.5 sec intervals with ambient light as low
as 200 lx
−Wireless Sensor Node (WSN),transmitting data at 6 sec intervals with ambient light as low as 200 lx
Includes an expandable terminal on the Motherboard that can support the following:
−Reset button for EZ-BLE Module
−JTAG header to debug EZ-BLE Module
−Expandable sensor interface (I2C/UART/SPI/GPIO)
−DIP switch for future expansion (Not mounted)
−LEDs for USB power and status
Includes reference schematic, BOM list, and layout data for easy design
Uses the following Cypress Devices:
−S6AE101Aultra low power Energy Harvesting PMIC
−CYBLE-022001-00 EZ-BLE PRoC Module
−CY7C65213 USB-UART LP Bridge Controller
−MB39C022G LDO
3. Applications
Battery-less wireless sensor node (WSN)
IoT device that monitors various sensors
BLE Beacon
Wearable device
Building Energy Management System (BEMS)
Home Energy Management System (HEMS)
Factory Energy Management System (FEMS)
Wireless lighting control
Wireless HVAC sensor
Security system
August 24, 2015, S6SAE101A00SA1002_SS901-00041-1v0-E 7
CONFIDENTIAL

OPERATION M ANUAL
4. Kit Introduction
4.1 Contents
1 The 220 μF capacitor is an additional output capacitor. The 10Ωresistor is for current measurement. Refer
to "11.2 How to Use Extra Components" for detailed information.
5. Software Installation
5.1 Install Software
Follow these steps to install the S6SAE101A00SA1002 Solar-Powered IoT Device Kit software:
1. Download and install the Solar-Powered IoT Device Kit software from
www.cypress.com/energy-harvesting.
The Solar-Powered IoT Device Kit software is available in two different formats for download:
a. Solar-Powered IoT Device Kit Complete Setup: This installation package contains the files
related to the kit. However, it does not include the Windows Installer or Microsoft .NET
framework packages. If these packages are not on your computer, the installer directs you to
download and install them from the Internet.
b. Solar-Powered IoT Device Kit Only Package: This executable file installs only the kit
contents, which include code examples, hardware files, and user documents. This package
can be used if all the software prerequisites are installed on your computer.
c. Solar-Powered IoT Device Kit ISO: This file is a complete package, stored in a CD-ROM
image format that can be used to create a CD, or extract using ISO extraction programs, such
as WinZip or WinRAR. This file includes all the required software, utilities, drivers, hardware
files, and user documents.
1. Energy Harvesting Motherboard
2. BLE-USB Bridge
3. Solar Module (Panasonic AM-1801)
4. Two jumper wires
5. 220 μF Capacitor and 10ΩResistor1
6. USB Standard-A to Mini-B cable
7. Quick Start Guide
1
2
3
4
5
6
7
8 S6SAE101A00SA1002_SS901-00041-1v0-E, August 24, 2015
CONFIDENTIAL

OPERATION M ANUAL
2. Run Install Solar-Powered IoT Device Kit to start the installation, as shown below.
3. Select the folder to install the Solar-Powered IoT Device Kit -related files. Choose the directory and
click Next.
4. The Solar-Powered IoT Device Kit ISO installer automatically installs the required software, if it is not
present on your computer. The Solar-Powered IoT Device Kit Setup installer directs you to download
the required software from the Internet.
5. Choose the Typical/Custom/Complete installation type in the Product Installation Overview window.
Click Next after you select the installation type.
August 24, 2015, S6SAE101A00SA1002_SS901-00041-1v0-E 9
CONFIDENTIAL

OPERATION M ANUAL
6. Read the Cypress License Agreement and make a selection based on the terms of the license
agreement. Click Next to continue the installation.
7. When the installation begins, a list of packages appears on the installation page.Agreen check mark
appears next to each package after successful installation.
8. Click Finish to complete the Solar-Powered IoT Device Kit installation.
9. Enter your contact information or select the Continue Without Contact Information check box. Click
Finish to complete the Solar-Powered IoT Device Kit installation.
10. After the installation is complete, the kit contents are available at the following location:
<Install directory>\ Solar-Powered IoT Device Kit
Default location (Example. Windows 7):
64-bit: C:\Program Files (x86)\Cypress\ Solar-Powered IoT Device Kit
32-bit: C:\Program Files\Cypress\ Solar-Powered IoT Device Kit
10 S6SAE101A00SA1002_SS901-00041-1v0-E, August 24, 2015
CONFIDENTIAL

OPERATION M ANUAL
5.2 Uninstall Software
You can uninstall the Solar-Powered IoT Device Kit software using one of the following methods:
Example. Windows 7
■Go to Start > All Programs > Cypress > Cypress Update Manager; click the Uninstall button.
■Go to Start > Control Panel > Programs and Features. Select the Solar-Powered IoT Device Kit program
from the list and click the Uninstall/Change button.
5.3 PSoC Creator™
PSoC Creator1is a state-of-the-art, easy-to-use integrated design environment (IDE). It is a revolutionary
hardware and software co-design environment, powered by a library of preverified and precharacterized
PSoC Components™. With PSoC Creator, you can:
■Drag and drop PSoC Components to build a schematic of your custom design
■Automatically place and route components and configure GPIOs
■Develop and debug firmware using the included component APIs
PSoC Creator also enables you to tap into an entire tool ecosystem with integrated compiler chains and
production programmers for PSoC devices.
PSoC Creator 3.2 SP1 or newer: Download the latest version from www.cypress.com/psoccreator.
For sample firmware information for this kit, refer to "8.Example Project".
1 To develop firmware for the Solar-Powered IoT Device Kit, require PSoC Creator 3.2 SP1 or newer.
August 24, 2015, S6SAE101A00SA1002_SS901-00041-1v0-E 11
CONFIDENTIAL

OPERATION M ANUAL
6. Getting Started
You will become familiar with the different components of the Solar-Powered IoT Device Kit by successfully
establishing a BLE Beacon connection between the Energy Harvesting Motherboard operating as a WSN,
and a PC with the BLE-USB Bridge. This will also confirm that the Motherboard, BLE-USB Bridge, and your
PC are operating properly.
6.1 Solar-Powered BLE Beacon Operation
You will confirm that the Motherboard and BLE-USB Bridge are properly operating by establishing a BLE
connection. The Motherboard contains all of the components of the WSN which are: the energy harvesting
PMIC S6AE101A; capacitors for energy storage; an EZ-BLE PRoC Module for transmitting data; and an I2C
temperature and humidity sensor. A USB to serial device is also included on the Motherboard to allow the
user to configure parameters such as the ID into the EZ-BLE module from a PC application. The
Motherboard comes with pre-loaded firmware to operate as a BLE Beacon. By connecting the Solar Module
to the Motherboard and exposing it to ambient light, it will power up and begin transmitting.
The BLE-USB Bridge is pre-configured to look for the transmission from the Motherboard operating as a
BLE Beacon. By installing the BLE-USB Bridge on a Windows PC and using the provided software, you will
be able to detect the Motherboard, and determine the distance between the Motherboard and the PC using
BLE.
6.1.1 USB Driver Installation of the BLE-USB Bridge
1. Plug in the BLE-USB Bridge into your computer's USB port.
2. The driver Installation starts automatically and the following message window will appear. Click the
message window for status.
12 S6SAE101A00SA1002_SS901-00041-1v0-E, August 24, 2015
CONFIDENTIAL

OPERATION M ANUAL
3. Confirm that the device driver installation has successfully completed (all components will be "Ready
to use"). If the installation fails, do installation manually using a file in the "USB drivers" folder. Refer
to “6.1.2 USB Driver Installation failed” below.
Completed
(Next to step4)
Failed
(Refer to “6.1.2 USB Driver
Installation failed”)
4. After successful device driver installation, confirm that a new COM port called KitProg USB-UART
was added:
a. Open the Device Manager:
Windows 7 Start Menu > Control Panel > Device Manager
Windows 8/8.1/10 Right Click Start Button > Device Manager
b. Under Ports (COM & LPT), confirm that a COM port called KitProg USB-UART was added.
Note the COM number (COMxx).
5. Skip the “5.1.2 USB Driver Installation failed”, continue with the “6.1.3 USB Driver Installation for the
Motherboard”.
August 24, 2015, S6SAE101A00SA1002_SS901-00041-1v0-E 13
CONFIDENTIAL

OPERATION M ANUAL
6.1.2 USB Driver Installation failed
1. If the device driver installation fails, confirm that an unconfigured KitProg USB-UART appears in the
device manager:
a. Open the Device Manager:
Windows 7 Start Menu > Control Panel > Device Manager
Windows 8/8.1/10 Right Click Start Button > Device Manager
b. Under Other devices, confirm that KitProg USB-UART appears with no associated COM port.
2. Update the USB driver software or the unconfigured KitProg USB-UART.
a. Click the right mouse button on KitProg USB-UART
b. Select Update Driver Software…
3. Select “Browse my computer for driver software”.
14 S6SAE101A00SA1002_SS901-00041-1v0-E, August 24, 2015
CONFIDENTIAL

OPERATION M ANUAL
4. Search for USB driver in the Lab files.
a. Check the “Include subfolders” box
b. Push the “Browse my computer for driver software” button
c. Select the “USB drivers” folder in the kit files
<Install directory>/Solar-Powered IoT Device Kit/1.0/USB drivers
d. Push the “OK” button
e. Push the “Next” button
5. Start installing USB driver. Push the “Close” button when the driver installation of the KitProg
USB-UART finishes.
b
c
d
e
a
August 24, 2015, S6SAE101A00SA1002_SS901-00041-1v0-E 15
CONFIDENTIAL

OPERATION M ANUAL
6. After successful device driver installation, confirm that a new COM port called KitProg USB-UART
was added:
a. Open the Device Manager.
b. Under Ports (COM & LPT), confirm that a COM port called KitProg USB-UART was added.
Note the COM number (COMxx).
6.1.3 USB Driver Installation for the Motherboard
1. Run CypressDriverInstaller.exe, which is the installer for the USB serial device on the Motherboard.
<Install directory>/Solar-Powered IoT Device Kit/1.0/USB drivers
2. Push the “Next >” button.
16 S6SAE101A00SA1002_SS901-00041-1v0-E, August 24, 2015
CONFIDENTIAL

OPERATION M ANUAL
3. Push the “I Agree” button.
4. Push the “Install” button. Use the “Browse…” button if you want to change the Destination Folder.
5. Push the “Finish” button when the driver installation for the Motherboard finishes.
August 24, 2015, S6SAE101A00SA1002_SS901-00041-1v0-E 17
CONFIDENTIAL

OPERATION M ANUAL
6. Configure the Motherboard to receive power from the USB port. Change jumper J4 to "USB" from
"EH".
7. Connect the Motherboard to your computer using a USB cable.
8. The driver Installation starts automatically and the following message window will appear. Click the
message window for status.
9. Confirm that the device driver installation has successfully completed (all components will be "Ready
to use").
10. After successful device driver installation, confirm that a new COM port called USB Serial Port was
added:
a. Open the Device Manager.
b. Under Ports (COM & LPT), confirm that a COM port called KitProg USB-UART was added.
Note the COM number (COMxx).
USB Cable
18 S6SAE101A00SA1002_SS901-00041-1v0-E, August 24, 2015
CONFIDENTIAL

OPERATION M ANUAL
11. Finally, disconnect the USB cable, then reset the jumper J4 set in step 6 back to "EH" from "USB" to
supply power from the Solar Module.
6.1.4 Establishing BLE Connection
1. Connect the Solar Module (AM-1801, included in the kit) to the Energy Harvesting Motherboard.
Plug the black wire (negative) to J1-6 and the red wire (positive) to J1-5 as shown below.
2. Place the Motherboard with Solar Module under an office light. The firmware to operate the
Motherboard as a BLE Beacon is pre-loaded from the factory. After attaching the Solar Module and
placing the Motherboard under a suitable light level (Refer to Table 5-1), it will automatically power
up and begin transmitting.
Table 6-1 Light level vs Time Interval
Typical Light Level Environment Time Interval of Beacon
1
~1 lx
Moonlight
Does not work
50 lx~100 lx
Under street lighting
Does not work
200 lx~400 lx
At Museum
1.0 sec ~ 5.0 sec
400 lx~500 lx Office lighting 0.6 sec ~ 1.0 sec
1000 lx Shopping mall, Rainy day 0.4 sec ~ 0.6 sec
1The initial setting of time interval is set 1.5 sec. You need to configure an "ITRVL" command to
change time interval. Refer to "6.3 Serial Command List".
Note that J1-1
to J1-4 and
J1-7 to J1-10
are unused
J2 J1
August 24, 2015, S6SAE101A00SA1002_SS901-00041-1v0-E 19
CONFIDENTIAL

OPERATION M ANUAL
3. Plug in the BLE-USB Bridge into your computer's USB port.
4. Run PMIC.exe, which is in the Windows application used to view data received from the
Motherboard. It is located in the PMIC Software folder that you installed earlier
<Install directory>/Solar-Powered IoT Device Kit/1.0/PMIC Software
A dialog box will appear. Select KitProg USB-UART (COMxx) in the drop down menu under Port #1,
where COMxx corresponds to the port that was confirmed in step 5. Leave the Specific Device # to
“Don’t care”. Push the “OK” button.
5. Find your MAJOR number (Refer to "6.3 Serial Command List") of the Motherboard on the PMIC
Software. Then move the Motherboard further away from your computer. The Received Signal
Strength Indicator (RSSI) value will change and the graphic will be updated.
Near Far (About 5m)
20 S6SAE101A00SA1002_SS901-00041-1v0-E, August 24, 2015
CONFIDENTIAL
Table of contents
Other Cypress Network Hardware manuals
Popular Network Hardware manuals by other brands

Network Instruments
Network Instruments GigaStor 114ff user guide

ADC
ADC HiGain HMS-318 List 3 user manual

Cisco
Cisco NCS 2000 series manual

Motorola
Motorola 68436 - Vanguard 100I - Remote Access Server Operator's guide

PaloAlto Networks
PaloAlto Networks PA-455 quick start guide

Omron
Omron DeviceNet DRT2-ROS16 Operation manual

Universal Remote Control
Universal Remote Control total control MRX-10 owner's manual

D-Link
D-Link ShareCenter DNS-327L user manual

Hanwha Techwin
Hanwha Techwin Wisenet QRN-420S quick guide

Minicom
Minicom PHANTOM MX IP installation guide

Itel
Itel MPX-S user manual

Avermedia
Avermedia EB5208DVD PRO user manual