D Devices D SCADLER U User manual
EN_ User manual
ES_ Manual de instrucciones
D_SCADLER U

1. The installation and components of equipment 3
2. Tnstallation and adjustment 7
3. Maintenance 9
4. Cleaning, Disinfection and Sterilization 12
5. Precaution 19
6. After service 21
7. Symbol instruction 21
8. Environmental protection 22
9. Manufacturer’s right 22
10. European authorized representative 22
11. EMC - Declaration of conformity 22
12. Statement 25
Content
Ultrasonic Scaler
User manual
Model: D_Scaler LED U
EN_

ENGLISH
3
1. The installation and components of equipment
1.1 Instruction
Guilin Woodpecker Medical Tnstrument Co., Ltd. is a professional manufacturer researching, developing and
producing ultrasonic scalers. The product is mainly used for teeth cleaning and also an indisensable equipment for
teeth disease prevention and treatment.
The device has scaling, perio functions with the following features:
1.1.1 The handpiece can be autoclaved under high temperature 134ºC and high pressure 0.22Mpa.
1.1.2 Automatic frequency tracking ensures that the machine always works on the best frequency and more
steadily.
1.1.3 Digital control, easy operation and more efcient for scalin
1.2 Components
1.2.1 The components of machine are listed in the packing list.
1.2.2 Product performance and structural composition
The device is composed of electrocircuit, water way and ultrasonic transducer.
1.2.3 Scope of applicationThe device is used for the dental calculus elimination and root canal treatment.
1.3 The main technical specication
Technical description is included in the instructions for use.
1.3.1 Power supply input: 220-240V- 50Hz/60Hz 150mA
1.3.2 Main unit input: 24V- 50Hz/60Hz 1.3A
1.3.3 Output primary tip vibration excursion: <90µm
1.3.4 Output half-excursion force: :<2N
1.3.5 Output tip vibration frequency: 28kHz±3kHz
1.3.6 Output power: 3W to 20W
1.3.7 Main unit fuse: T1.6AL 250V
1.3.8 Power supply fuse: T0.5AL 250V
4
1.3.9 Water pressure: 0.01MPa to 0.5MPa
1.3.10 Weight of main unit: 628g
1.3.11 Operating mode: Continuous operation
1.3.12 Type of protection against electric shock: class II equipment
1.3.13 Degree of protection against electric shock: Type B applied part
1.3.14 Applied part of the equipment: handpiece and tip
1.3.15 Degree of protection against harmful ingress of water: Ordinary equipment, the foot switch is drip-proof
equipment (IPX1)
1.3.16 Degree of safety of application in the presence of a Flammable Anesthetic Mixture with air, Oxygen or Nitrous
Oxide: Equipment is not suitable for being used in the presence of a ammable anesthetic mixture with ai , oxygen or
nitrous oxide.
1.3.17 Toe main unit use a power adapter to connet network power supply, isolation mode from network power su-
pply is transformer isolation and solid insulation of the enclosure.
1.4 Instruction ofthe main components
Instruction and component sketch map
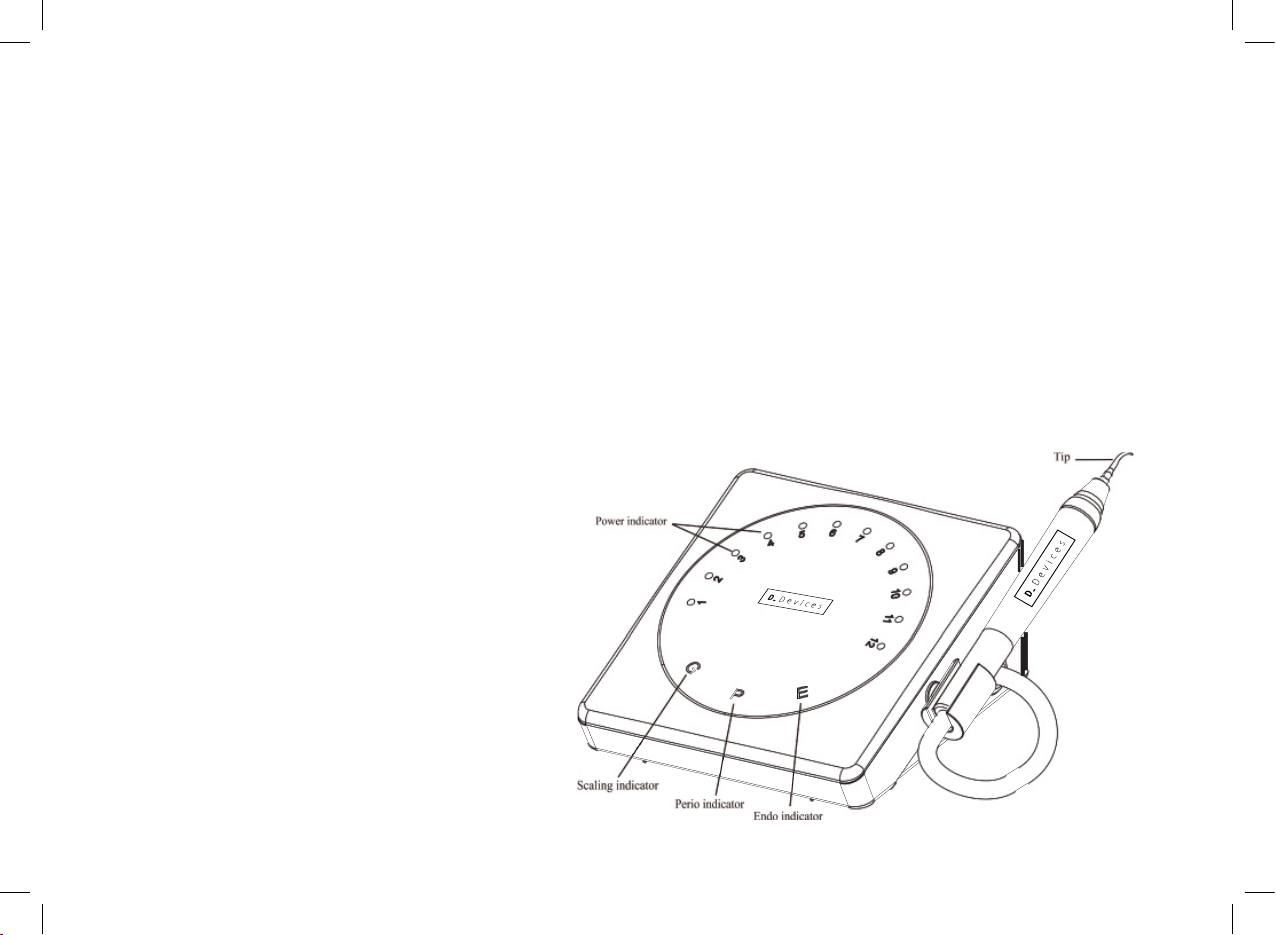
1.4.1 Front of the main unit sketch map
picture 1
D_Scaler Led U

ENGLISH
5
1.4.2 Back of the main unit sketch map
1.4.3 Instruction of using wrench
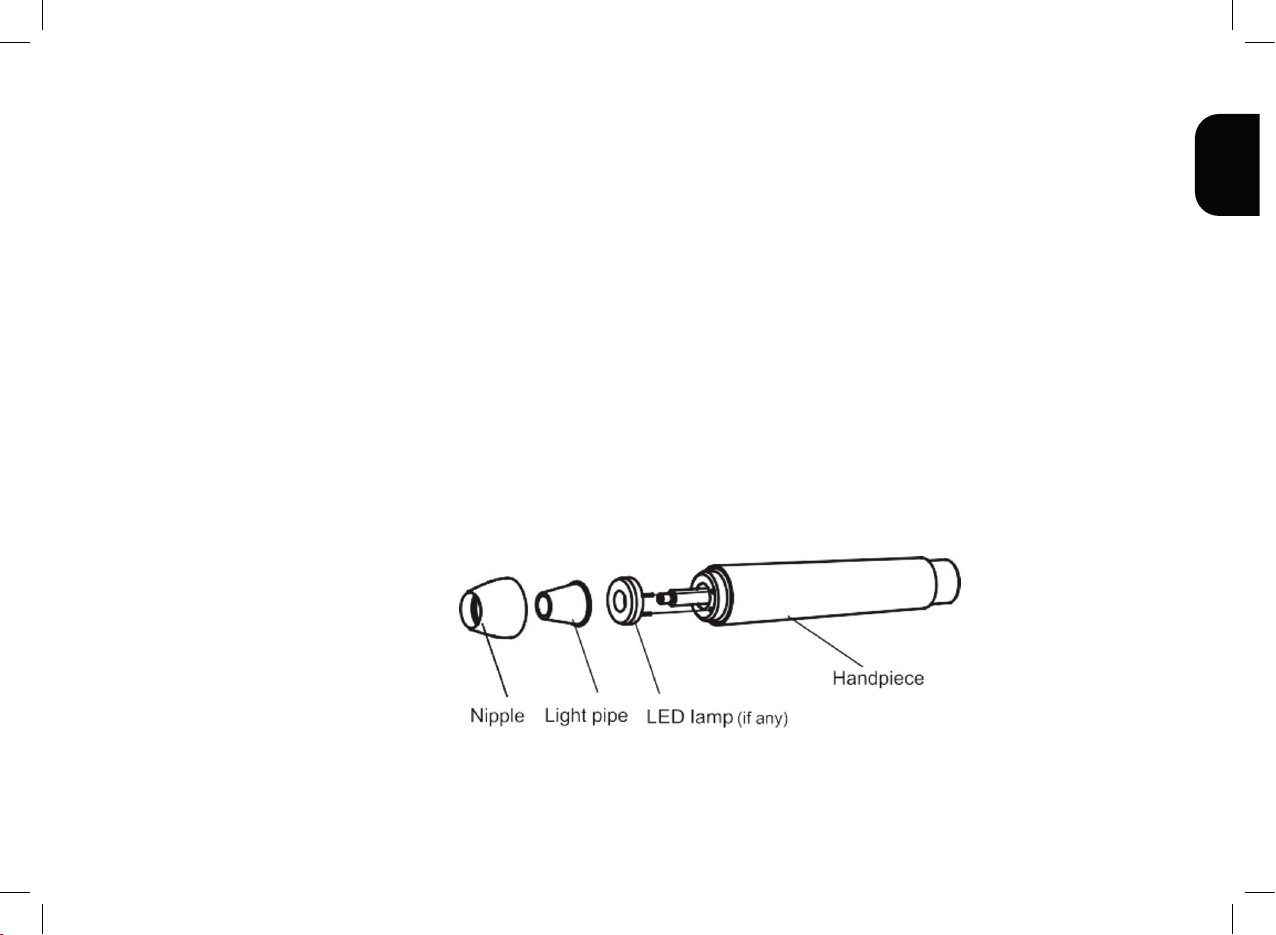
Nipple Light pipe LED lamp Index point Cable
The connector
of cable
picture 2
picture 3
picture 2
Picture 2
6
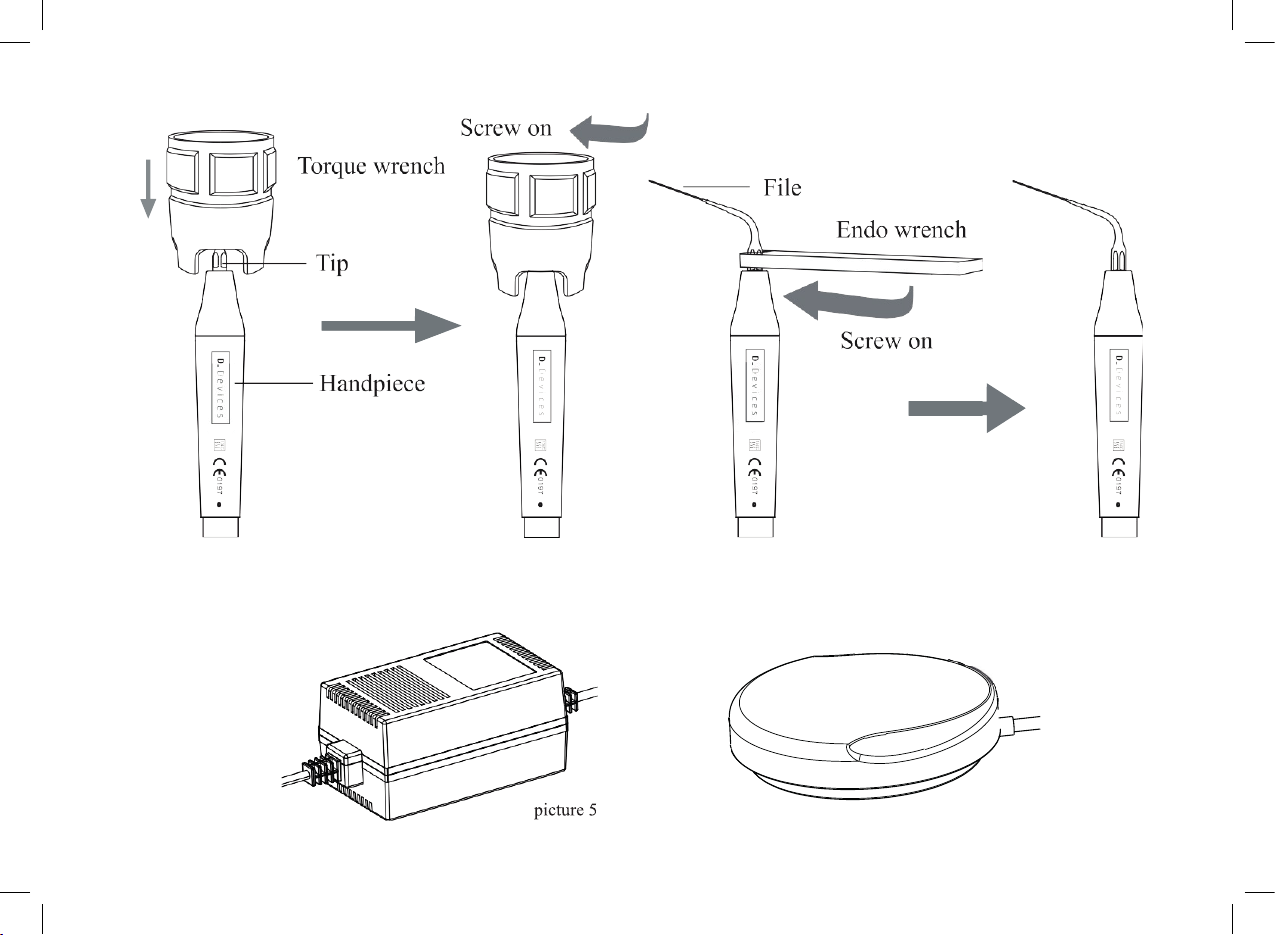
1.4.4 List of removable parts
picture 4
picture 5 picture 6
picture 5

ENGLISH
7
2. Installation and adjustment
2.1 Operation
2.1.1 Open the packing box, make sure that all the parts and accessories are complete according to the packing list,
take the main unit out of the box, and put it on the the stable plane facing to the operator.In addtion,install the device
to an operator-friendly position.
2.1.2 Turn the water control knob to the max according to the picture 1 direction, Do not screw it over tight in case of
damage. [ note 1]
2.1.3 Insert the plug of the foot switch to its socket. (see picture 2)
2.1.4 Connect one end of the water pipe to the water entrance, and the other end to the clean water sourse. (see
picture 2)
2.1.5 Before treatment, make sure scaling tip, wrench and handpiece have been sterilized. Choose the scaling tip
according to the requirement, and x the scaling tip with the wrench. ( see picture 4)
2.1.6 Turn on the power switch, the power indicator lighted and the machine is ready for work. Touch panel is applied
to this machine, power can be adjusted by directly touching the power indicator on the touch panel.
2.1.7 Under normal working condition, the frequency of the tips is very high, light touch and a certain to-and-fro motion

8
will eliminate the tartar without obvious heating, overexetion and overatay are forbidden.
2.1.8 Vibrating intensity: Adjust the vibrating intensity according to your need, usually adjust to the middle grade,
and adjust the vibrating during the clinical treatment according to the patient’s sensitivity and the rigidity of the tartar.
2.1.9 Step on the foot switch, the tip begins to vibrate, and the LED lamp on the top of the handpiece shines. Relea-
se the foot switch, the LED lamp keep shining for 10 seconds.
2.1.10 Water volume adjustment: Step on the foot switch, and the tip begins to vibrate, then turn the water control
switch to ne spray to cool down the handpiece and clean the teeth.
2.1.11 The handpiece can be handled in the same gesture as a pen in hand.
2.1.12 Be sure not to make the end of the tip touch the teeth vertically, and not use too much pressure when the tip
touch the surface of the teeth, in order not to hurt the teeth and the tip.
2.1.13 After nishing operation, keep the machine working for 30 seconds with the water supply to clean the han-
dpiece and the tip.
2.1.14 Unscrew the scaling tip and sterilize it.
2.1.15 After operating, turn off the power switch to cut off the power, then pull off the plug of power adapter.

ENGLISH
9
Note: Don’t screw the scaling tips when stepping on the foot switch, and the machine is working.
3. Maintenance
3.1 Troubleshooting
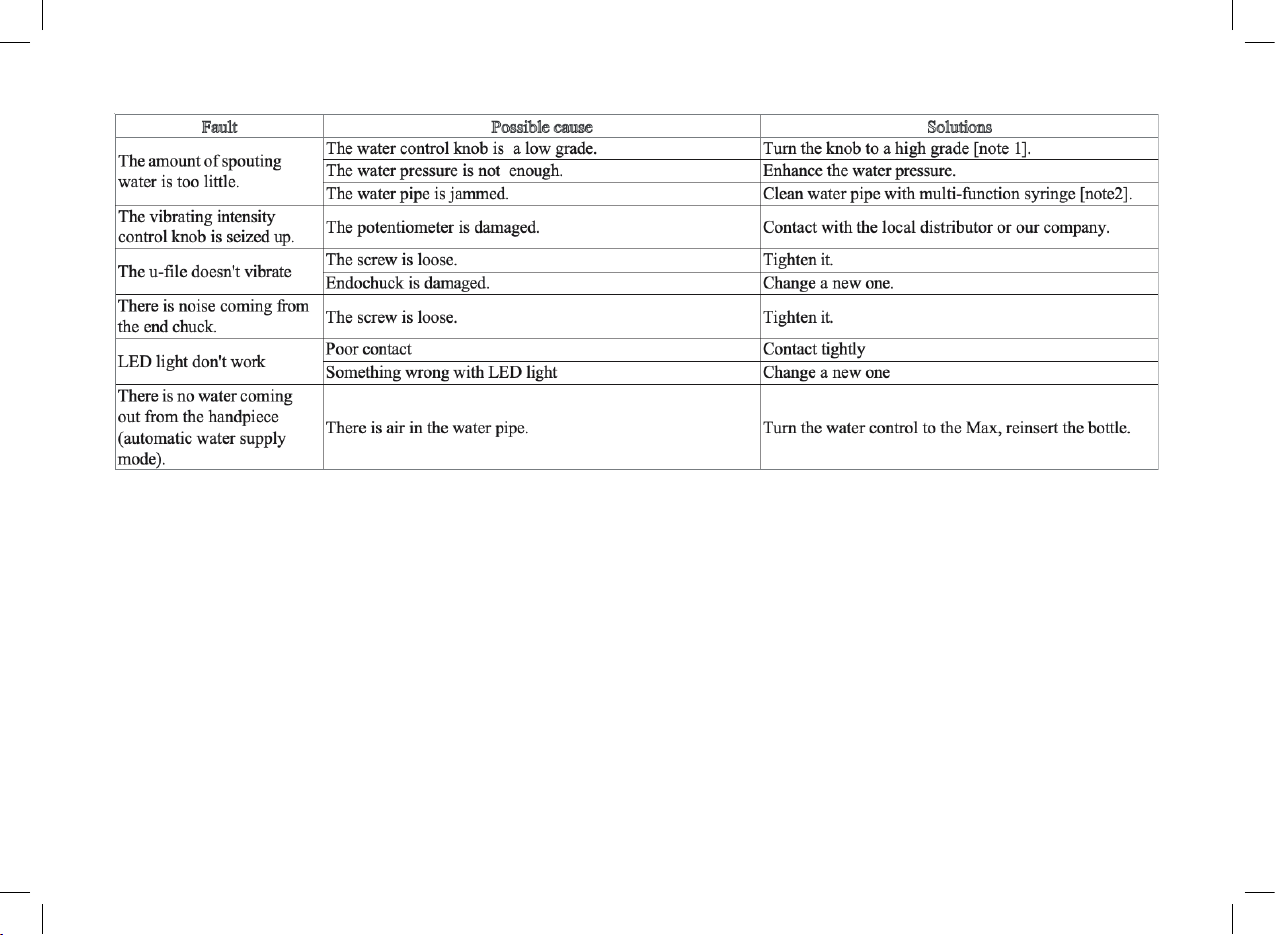
10
If the problem still can’t be solved, please contact with local dealer or manufacturer.
Manufacturer will provide circuit diagrams, component part lists, descriptions, calibration instructions to assist to servi-
ce personnel in parts repair.
3.2 Notice
[Note 1] The water control knob can adjust the water volume according to the symbol.
[Note 2] To clean the water pipe with the multi-function syringe of the dental unit ( see picture 7):

ENGLISH
11
a) Snip the water pipe at a distance of 10cm to 20cm from the water entrance.
b) Turn on the power switch, get through to the power.
c) Connect the multi-function syringe of the dental unit to the water pipe.
d) Screw off the scaling tip or pull out the handpiece.
e) Step on the foot switch.
f) Turn on the switch of the multi-function syringe, press the air or water into the water pipe to clean and eliminate the
impurity.
[Note 3 ] Tf the scaling tip has been screwed on tightly and there is ne spray too, the following phenomena show that
the scaling tip is damaged:
a) The vibrating intensity and the pulverization degree become weak obviously.
b) During operating, there is some buzz when the scaling tip is working.
[Note 4] Tf the power cable connected to the grid electricity end of the power adapter is damaged, as the power cable
is not removable, for your safety, please contact a professional for replacement.
picture 7

12
4. Cleaning, Disinfection and Sterilization
The cleaning, disinfection and sterilization of handpiece, tip, and wrench (include torque wrench and Endo wrench)
are as follow. Unless otherwise stated, they will be hereinafter referred to as “products”.
Warnings
The use of strong detergent and disinfectant (alkaline pH>9 or acid pH <5) will reduce the life span of products. And in
such cases, the manufacturer takes no responsibility.
Do not clean the handpiece with ultrasound cleaning machine.
This device shall not be exposed to high temperature above 138C.
Processing limit
The products have been designed for a large number of sterilization cycles. The materials used in manufacture were
selected accordingly. However with every renewed preparation for use, thermal and chemical stresses will result in
ageing of the products. The maximum number of sterilizations for handpiece is 600 times. For tips, it is 300 times. And
for wrench, it is 1000 times.
4.1 Initial processing
4.1.1 Processing principles
It is only possible to carry out effective sterilization after the completion of effective cleaning and disinfection. Please
ensure that, as part of your responsibility for the sterility of products during use, only sufciently validated equipment
and product-specic procedures are used for cleaning/ disinfection and sterilization, and that the validated parameters
are adhered to during every cycle.
Please also observe the applicable legal requirements in your country as well as the hygiene regulations of the hospi-
tal or clinic,especially with regard to the additional requirements for the inactivation of prions.
4.1.2 Post-operative treatment
The post-operative treatment must be carried out immediately, no later than 30 minutes after the completion of the
operation. The steps are as follows:
1. Let the Ultrasonic Scaler works for 20-30 seconds at maximum water volume to ush the handpiece and tip;
ENGLISH
13
2. Remove the handpiece from the Ultrsonic Scaler, and rinse away the dirt on the surface of product with pure water
(or distilled water/deionized water);
3. Dry the product with a clean, soft cloth and place it in a clean tray.
Notes
a) The water used here must be pure water, distilled water or deionized water.
4.2 Preparation before cleaning
Steps
Tools: Torque wrench, tray, soft brush, clean and dry soft cloth.
1. Remove the tip from product with torque wrench provided by Guilin Woodpecker Medical Instrument Co., Ltd, and
then put the tip and wrench into a clean tray.
2. Unscrew the nipple of product counterclockwise, remove the sealing ring, light pipe (if any), and LED lamp(if any),
and put them in the tray.
3. Use a clean soft brush to carefully brush the joints between product and the connector of cable, front thread, horn,
nipple, seal ring, light pipe (if any) and LED lamp(if any) until the dirt on surface is not visible. Then use soft cloth to
dry the product and accessories and put them into a clean tray. The cleaning agent can be pure water, distilled water
or deionized water.
Disassembling steps
4.3 Cleaning
The cleaning should be performed no later than 24 hours after the operation.
The cleaning can be divided into automated cleaning and manual cleaning. Automated cleaning is preferred if condi-

14
tions permit.
4.3.1 Automated cleaning
•The cleaner is proved to be valid by CE certication in accordance with EN ISO 15883.
•There should be a ushing connector connected to the inner cavity of the product.
•The cleaning procedure is suitable for the product, and the irrigating period is sufcient.
•Do not clean the handpiece with ultrasound.
It is recommended to use a washer-disinfector in accordance with EN ISO 15883. For the specic procedure, please
refer to the automated disinfection section in the next section “Disinfection”.
Notes
a) The cleaning agent does not have to be pure water. It can be distilled water, deionized water or multi-enzyme. But
please ensure that the selected cleaning agent is compatible with the product.
b) In washing stage, the water temperature should not exceed 45 ºC, otherwise the protein will solidify and it would be
difcult to remove.
c) After cleaning, the chemical residue should be less than 10mg / L.
4.4 Disinfection
Disinfection must be performed no later than 2 hours after the cleaning phase. Automated disinfection is preferred if
conditions permit.
4.4.1 Automated disinfection-Washer-disinfector
•The washer-disinfector is proved to be valid by CE certication in accordance with EN ISO 15883.
•Use high temperature disinfection function. The temperature does not exceed 134 ° C, and the disinfection under the
temperature cannot exceed 20 minutes.
•The disinfection cycle is in accordance with the disinfection cycle in EN ISO 15883. Cleaning and disinfecting steps
by using Washer-disinfector
1. Carefully place the product into the disinfection basket. Fixation of product is needed only when the product is re-
movable in the device. The products are not allowed to contact each other.
2. Use a suitable rinsing adaptor, and connect the internal water lines to the rinsing connection of the

ENGLISH
15
washer-disinfector.
3. Start the program.
4. After the program is nished, remove the product from the washer-disinfector, inspect (refer to section “Inspection
and Maintenance”) and packaging (refer to chapter “Packaging”). Dry the product repeatedly if necessary (refer to
section “Drying”).
Notes
a) Before use, you must carefully read the operating instructions provided by the equipment manufacturer to familiari-
ze yourself with the disinfection process and precautions.
b) With this equipment, cleaning, disinfection and drying will be carried out together.
c) Cleaning: (c1) The cleaning procedure should be suitable for the product to be treated. The ushing period should
be sufcient (5-10 minutes). Pre-wash for 3 minutes, wash for another 5 minutes, and rinse it for twice with each rinse
lasting for 1 minute. (c2) In the washing stage, the water temperature should not exceed 45 ºC, otherwise the protein
will solidify and it is difcult to remove. (c3) The solution used can be pure water, distilled water, deionized water or
multi-enzyme solution, etc., and only freshly prepared solutions can be used. (c4)During the use of cleaner, the con-
centration and time provided by manufacturer shall be obeyed. The used cleaner is neodisher MediZym (Dr. Weigert).
d) Disinfection: (d1) Direct use after disinfection: temperature 2: 90 º C, time 2: 5 min or A0 2: 3000. (d2)Sterilize it
after disinfection and use: temperature 2: 90 º C, time 2: 1 min or A0 2: 600.
(d3) For the disinfection here, the temperature is 93 ° C, the time is 2.5 min, and A0>3000.
e) Only distilled or deionized water with a small amount of microorganisms (<10 cfu/ml) can be used for all rinsing
steps. (For example, pure water that is in accordance with the European Pharmacopoeia or the United States Phar-
macopoeia).
f) After cleaning, the chemical residue should be less than 10mg / L.
g) The air used for drying must be ltered by HEPA.
h) Regularly repair and inspect the disinfector.
4.5 Drying
If your cleaning and disinfection process does not have an automatic drying function, dry it after cleaning and disinfec-

16
tion.
Methods
1. Spread a clean white paper (white cloth) on the at table, point the product against the white paper (white cloth),
and then dry the product with ltered dry compressed air (maximum pressure 3 bar). Until no liquid is sprayed onto the
white paper (white cloth), the product drying is completed.
2. It can also be dried directly in a medical drying cabinet (or oven). The recommended drying temperature is
80C-120C and the time should be 15~40 minutes.
Notes
a) The drying of product must be performed in a clean place.
b) The drying temperature should not exceed 138 ºC;
c) The equipment used should be inspected and maintained regularly.
4.6 Inspection and maintenance
In this chapter, we only check the appearance of the product. After inspection, if there is no problem, the handpiece
should be immediately reassembled, installing the sealing ring, LED, light guide, and cone head in sequence to the
handpiece, and then tighten the cone head clockwise.
4.6.1 Check the product. If there is still visible stain on the product after cleaning/disinfection, the entire cleaning/disin-
fection process must be repeated.
4.6.2 Check the product. If it is obviously damaged, smashed, detached, corroded or bent, it must be scrapped and
not allowed to continue to be used.
4.6.3 Check the product. If the accessories are found to be damaged, please replace it before use. And the new ac-
cessories for replacement must be cleaned, disinfected and dried.
4.6.4 If the service time (number of times) of the product reaches the specied service life (number of times), please
replace it in time.
4.7 Packaging
Install the disinfected and dried product and quickly package it in a medical sterilization bag (or special holder, sterile

ENGLISH
17
box).
Notes
a) The package used conforms to ISO 11607;
b) It can withstand high temperature of 138 ºC and has sufcient steam permeability;
c) The packaging environment and related tools must be cleaned regularly to ensure cleanliness and prevent the intro-
duction of contaminants;
d) Avoid contact with parts of different metals when packaging.
4.8 Sterilization
Use only the following steam sterilization procedures (fractional pre-vacuum procedure*) for sterilization, and other
sterilization procedures are prohibited:
• The steam sterilizer complies with EN13060 or is certied according to EN 285 to comply with EN ISO 17665;
• The highest sterilization temperature is 138 º C;
• The sterilization time is at least 4 minutes at a temperature of 132C/134C and a pressure of 2.0 bar - 2.3 bars.
• Allow a maximum sterilization time of 20 minutes at 134 °C.
Verication of the fundamental suitability of the products for effective steam sterilization was provided by a veried
testing laboratory.
Notes
a) Only products that have been effectively cleaned and disinfected are allowed to be sterilized;
b) Before using the sterilizer for sterilization, read the Instruction Manual provided by the equipment manufacturer and
follow the instructions.
c) Do not use hot air sterilization and radiation sterilization as this may result in damage to the product;
d) Please use the recommended sterilization procedures for sterilization. It is not recommended to sterilize with other
sterilization procedures such as ethylene oxide, formaldehyde and low temperature plasma sterilization. The manu-
facturer assumes no responsibility for the procedures that have not been recommended. If you use the sterilization
procedures that have not been recommended, please adhere to related effective standards and verify the suitability
and effectiveness.

18
* Fractional pre-vacuum procedure = steam sterilization with repetitive pre-vacuum. The procedure used here is to
perform steam sterilization through three pre-vacuums.
4.9 Storage
1. Store in a clean, dry, ventilated, non-corrosive atmosphere with a relative humidity of 10% to 93%, an atmospheric
pressure of 70KPa to 106KPa, and a temperature of -20 ºC to +55 ºC;
2. After sterilization,the product should be packaged in a medical sterilization bag or a clean sealing container, and
stored in a special storage cabinet. The storage time should not exceed 7 days. If it is exceeded, it should be repro-
cessed before use.
Notes:
a) The storage environment should be clean and must be disinfected regularly;
b) Product storage must be batched and marked and recorded.
4.10 Transportation
1. Prevent excessive shock and vibration during transportation, and handle with care;
2. It should not be mixed with dangerous goods during transportation.
3. Avoid exposure to sun or rain or snow during transportation.
The cleaning and disinfection of main unit are as follows.
• Before each use, wipe the surface of the main unit, the connector of cable and cable with a soft cloth or paper towel
soaked in 75% medical alcohol. Repeat the wipe for at least 3 times.
• Before each use, please let the Ultrasonic scaler works for 20-30 seconds at maximum water volume, then install the
handpiece.
• After each use, please let the Ultrasonic scaler works for 20-30 seconds at maximum water volume, then remove the
handpiece.
• After each use, wipe the surface of the main unit, the connector of cable and cable with a soft cloth soaked in clean
water (distilled or deionized water) or a clean disposable wipe. Repeat the wipe for at least 3 times.

ENGLISH
19
5. Precaution
5.1 Usage notice
5.1.1 The use of the product must comply with the relevant regulatory requirements of the medical regulatory authori-
ties, and should only be used by trained doctors or technicians.
5.1.2 Keep the scaler clean before and after operation.
5.1.3 The scaling tip, wrench and handpiece must be sterilized before each treatment.
5.1.4 Don’t screw the scaling tip when stepping on the foot switch.
5.1.5 The scaling tip must be fastened. There must be ne spray coming out from the tip when operating.
5.1.6 Change a new one when the tip is damaged or worn excessively.
5.1.7 Don’t twist or rub the tip.
5.1.8 While scaler working, the heat of scaling tip will become higher if there is no water owing out. Please keep the
water ow smoothly.
5.1.9 Don’t use impure water source, and be sure not to use normal saline instead of pure water source.
5.1.10 If use the water source without hydraulic pressure, the water surface should be one meter higher than the head
of the patient.
5.1.11 Don’t knock or rub the handpiece.
5.1.12 Please put the power plug into the socket easy to pull out, to make sure it can be pull out in emergency.
5.1.13 When using the equipment, please keep the water get through smoothly, otherwise patient’s tooth surface
would be injured by overheat in the handpiece.
5.1.14 After operating, turn off electrical source, and then pull out the plug of power adapter.
5.1.15 As a professional manufacturer of medical instruments, we are only responsible for the safety on the following
conditions: I.The maintenance, repair and modication are made by the manufacturer or the authorized dealer.
II. The changed components are original of “DTE” and operated correctly according to instruction manual.
III. Maintenance is forbidden while the device is used for treatment.
5.1.16 The screw thread of the scaling tips produced by other manufacturers maybe coarse, rusty and collapsed,
which will damage the screw thread of the handpiece irretrievably. Please use “WOODPECKER” brand scaling tip.
5.1.17 Please select a suitable power when using different type of tips (refer to “TABLE OF OPERATING POWER

20
OF THE TIPS”).
5.2 Contraindication
5.2.1 The patient who has hemophilia is not allowed to use this equipment.
5.2.2 The patient or doctor who with heart pacemaker is forbidden to use this equipment.
5.2.3 The heart disease patient, pregnant woman and children should be cautious to use the equipment.
5.3 Storage and maintenance
5.3.1 The equipment should be handled carefully and lightly. Be sure that it is far from the vibration, and is installed or
kept in a cool, dry and ventilated place.
5.3.2 Don’t store the machine together with the articles that are combustible poisonous, caustic, or explosive.
5.3.3 This equipment should be stored in a room where the relative humidity is 10% ~ 93%, atmospheric pressure is
70kPa to106kPa, and the temperature is -20°C ~ +55°C.
5.3.4 Please turn off the power switch and pull out the power plug when the equipment is not used. If the machine is
not used for a long time, please make it get through to the power and water once per month for ve minutes.
5.4 Transportation
5.4.1 Excessive impact and shake should be prevented in transportation. Lay it carefully and lightly and don’t invert it.
5.4.2 Don’t put it together with dangerous goods during transportation.
5.4.3 Avoid getting it exposed to sun, rain or snow during transportation.
5.5 Working condition
5.5.1 Environment temperature: +5°C to +40°C
5.5.2 Relative humidity: 30%~75%
5.5.3 Atmosphere pressure: 70kPa to 106kPa
5.5.4 A temperature of the water at the inlet: not higher than +25°C
Table of contents
Languages:
Other D Devices Dental Equipment manuals

Popular Dental Equipment manuals by other brands

Coxo
Coxo C-SMART-I Usage manual

KRUUSE
KRUUSE Trio Reception, operation, maintenance

Velopex
Velopex AquaCare Twin Installation, operation & maintenance manual

Digital Doc
Digital Doc LUM G2 user manual

Ultradent
Ultradent Ultrapro TX Cordless Instructions for use

B.A. International
B.A. International Ultimate BA-603 Operation manual

vita
vita Easyshade LITE Instructions for use

Dentsply Sirona
Dentsply Sirona Propex Pixi user manual

Amanngirrbach
Amanngirrbach ceramill matik Maintenance instructions

Micromega
Micromega HEROfill Obturator n 20 operating instructions

Midwest
Midwest Quiet-air Maintenance instructions

mectron
mectron STARJET Use and maintenance manual


