D Devices D Endo Rotatory User manual

D_ENDO ROTATORY
EN_ User manual
ES_ Manual de instrucciones
2
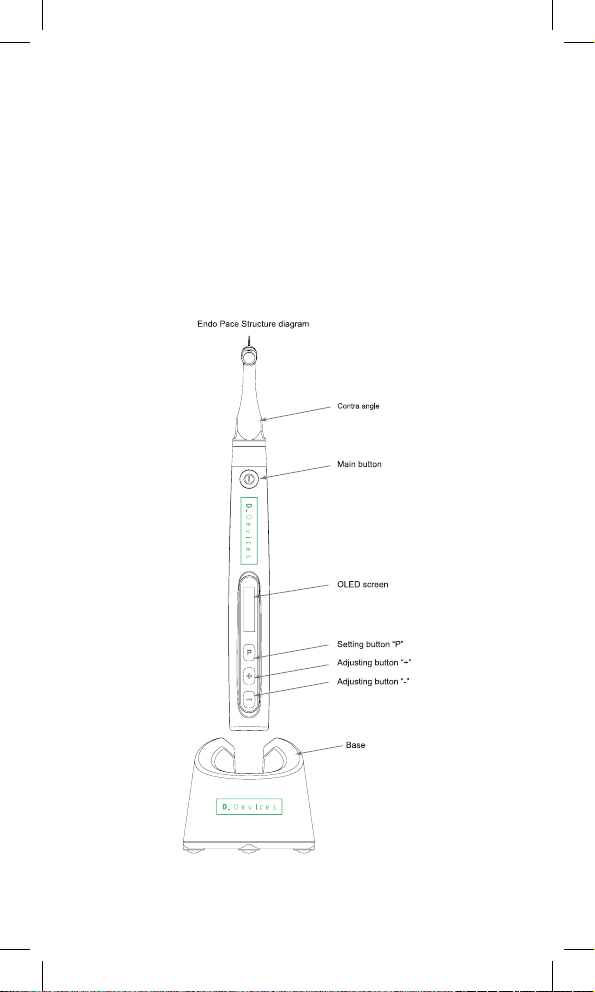
Endo Pace
User manual
Model: D_Endo Rotatory
EN_
Contents
Preface 3
1. 3noitcudortnI
2. 6noitallatsnI
3. Function and operation of product 9
4. Operation instruction 11
5. Motor Operation 17
6. Cleaning, Disinfection and Sterilization 18
7. Storage and transportation 26
8. Environmental protection 27
9. After service 27
10. European authorized representative 27
11. Symbol instruction 27
12. Statement 28
13. EMC - Declaration of conformity 28

ENGLISH
3
Note: the description on reciprocating mode is only
applicable for the device that has reciprocating mode.
Preface
Guilin Woodpecker Medical Instrument Co., Ltd is a professional ma-
nufacturer researching, developing, and producing dental products.
Woodpecker owns a sound quality control system. Guilin Woodpec-
ker Medical Instrument Co., Ltd has two brands, Woodpecker and
DTE. Its main products include Ultrasonic Scaler, Curing light, Apex
locator, Ultrasurgery, Endo Motor, etc.
1 Product introduction
1.1 Product description
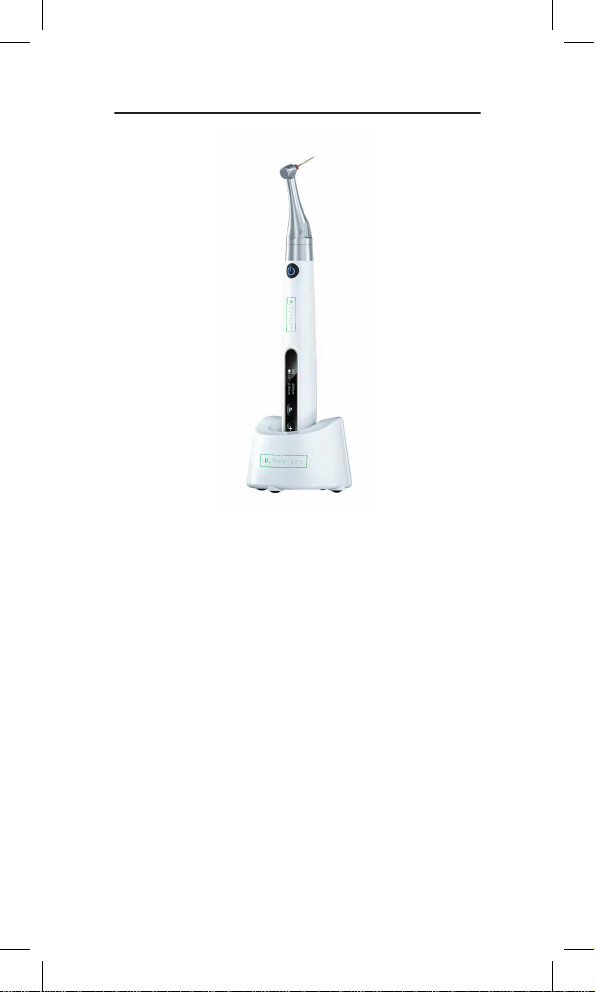
The device is mainly used in Endodontic treatment. It is a cordless
endo motor which can be connected to the matched Apex locator
to add an apex locator function. It can be used as a endo motor for
preparation and enlargement of root canals. By connecting the endo
the canal can be monitored during the procedure and many automa-
tic functions such as Apical Slow Down can be activated.
Features:
a) Use effcient brushless motor, bringing lower noise and longer
service life.
b) Cordless portable endo motor which can be connected to the
matched Apex locator.
c) The contra angle can be rotated for 360°.
The device
1.3 Performance and composition
The device is composed of base, motor handpiece, contra angle,
USB wire, power adapter, protective silicon cover, etc.
1.4 Indications for Use
The device is cordless endodontic treatment motorized handpie-
ce with root canal measurement capability. It can be used for
preparation and enlargement of root canals, or measuring the canal
length. And it can be used to enlarge the canals while monitoring the
1.5 Scope of application
1.5.2 The device must be operated in hospital and clinic by the
1.6 Caution
4
Federal law restricts this device to sale by or on the order of a
dentists.
1.7 Contraindication
a) The doctor with a pacemaker is disabled.
b) Patients with cardiac pacemakers (or other electrical equipment)
are warned not to use small appliances (such as Electric razors,
hair dryers, etc.) patients are disabled.
c) Hemophilia patients are banned.
d) Use with caution in patients with heart disease, pregnant women
and young children.

ENGLISH
5
1.8 Warnings
operation.
1.8.3 Do not directly or indirectly place this device near heat source.
Operate and store this device in reliable environment.
1.8.4 This device requires special precautions regarding electromag-
netic compatibility (EMC) and must be in strict accordance with the
EMC information for installation and use. Do not use this equipment
especially in the vicinity of fuorescent lamps, radio transmitting de-
vices, remote control devices, handheld and mobile high- frequency
communication devices.
1.8.5 Long time use of Reciprocating Mode may result in motor
handpiece overheat, thus it should be left to cool for use. If the motor
handpiece is overheated frequently, please contact local distributor.
1.8.6 Please use the original contra angle. Otherwise it will not be
used or cause adverse consequences.
1.8.7 Please do not make any changes to the device. Any changes
may violate safety regulations, causing harm to the patient. There
1.8.8 Please use original power adapter. Other power adapter will
result in damage to lithium battery and control circuit.
1.8.9 The motor handpiece cannot be autoclaved. Use disinfectant of
neutral pH value or ethyl alcohol to wipe its surface.
1.8.10 Before the contra angle stopping rotating, do not press the
push cover of contra angle. Otherwise the contra angle will be
broken.
1.8.11 Before the motor handpiece stopping rotating, do not remove
the contra angle. Otherwise the contra angle and the gear inside
motor handpiece will be broken.
before starting the motor handpiece.
-
1.8.14 Error in replacing lithium batteries can lead to unacceptable
risks, so please contact local distributors to replace the battery if
necessary.
1.8.15 Don’t place the device in a position diffcult to disconnect
fromthe network power.
1.8.16 Don’t maintain the machine while in use.

6
1.9.1 Type of operation mode: Continuous operating device
1.9.2 Type of protection against electric shock: Class II equipment
with internal power supply
1.9.3 Degree of protection against electric shock: B type applied part
1.9.4 Degree of protection against harmful ingress of water: Ordinary
equipment (IPX0)
1.9.5 Degree of safety application in the presence of a fammable
anesthetic mixture with air, oxygen, or nitrous oxide: Equipment
cannot be used in the presence of a fammable anesthetic mixture
with air, oxygen, or nitrous oxide.
1.9.7 The contact duration of applied part: 1 to 10 minutes.
1.9.8 The temperature of the surface of applied part may reach 41°C.
1.10.1 Battery
Lithium battery in motor handpiece: 3.6V /850mAh
1.10.2 Power adapter
Input: ~100V-240V 50Hz/60Hz 0.4A Max Output: DC5V/1A
1.10.3 Torque rang: 0.4N·cm-4.2N·cm
1.10.4 Speed rang: 100r/min~1500r/min
1.11 Working environment parameters
1.11.1 Environment temperature: +5°C ~ +40°C
1.11.2 Relative humidity: 30% ~ 75%
1.11.3 Atmospheric pressure: 70kPa ~ 106kPa
2 Installation
2.1 Basic accessories of product
USB Wire Disposable insulation sleeves Protective silicon cover

ENGLISH
7
2.2 Instructions for contra angle
2.2.1 The contra angle adopts precision gear transmission, and the
transmission ratio is 6:1.
disinfect contra angle with disinfectant of neutral PH value. After
under high temperature and high pressure (134°C, 2.0bar~2.3bar
(0.20MPa~0.23MPa)).
2.2.3 The contra angle can only be used cooperatively with this
device. Otherwise the contra angle will be damaged.
2.3 Installation and removal of contra angle.
2.3.1 Installation
Align any locating pin of the contra angle with the positioning slot
on the motor handpiece and push the contra angle horizontally. The
four locating pins on the contra angle are inserted into those four
positioning holes on the motor handpiece. A “click” sound indicates
that the installation is in place.
The contra angle can be rotated 360° freely.
The contra angle rotates 360° so that the OLED display can always
be viewed easily.
2.3.2 Removal
Pull out the contra angle horizontally when the motor handpiece
does not run.

8
Warnings:
motor handpiece.
has been well installed.
head.
the contra angle.
chuck of contra angle.
02.334 – 2.350 mm)
Warnings:
stopped.
chuck of contra angle.

ENGLISH
9
3 Function and operation of product
3.3 Display Screens
3.3.1 Display Screens for 4 Operation Modes and Standby
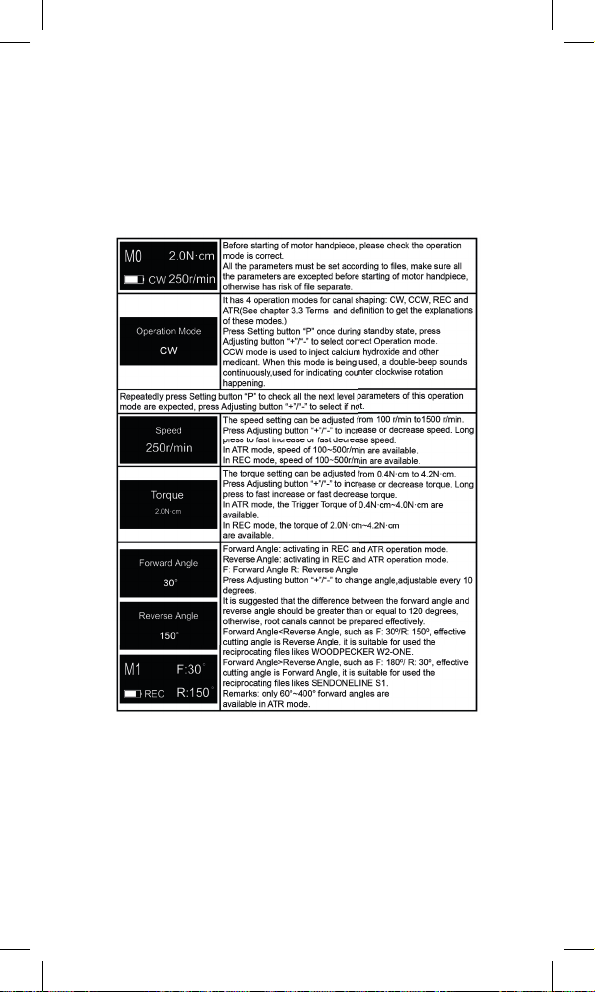
3.3.1.1 CW Mode
The motor handpiece rotates forward 360°,clockwise direction. Used

10
3.3.1.2 CCW Mode
The motor handpiece rotates counterclockwise direction only. This
mode is used to inject calcium hydroxide and other medicant. When
this mode is being used, a double-beep sounds continuously.
3.3.1.3 REC Mode
F: Forward angle, R: Reverse angle F/R: Forward angle/ Reverse
angle
Forward Angle<Reverse Angle, such as F: 30/R: 150, effective cut-
ting angle is Reverse Angle, it is suitable for used the reciprocating
Forward Angle>Reverse Angle, such as F: 180/R: 30, effective cut-
ting angle is Forward Angle, it is suitable for used the reciprocating
SENDONELINE S1.
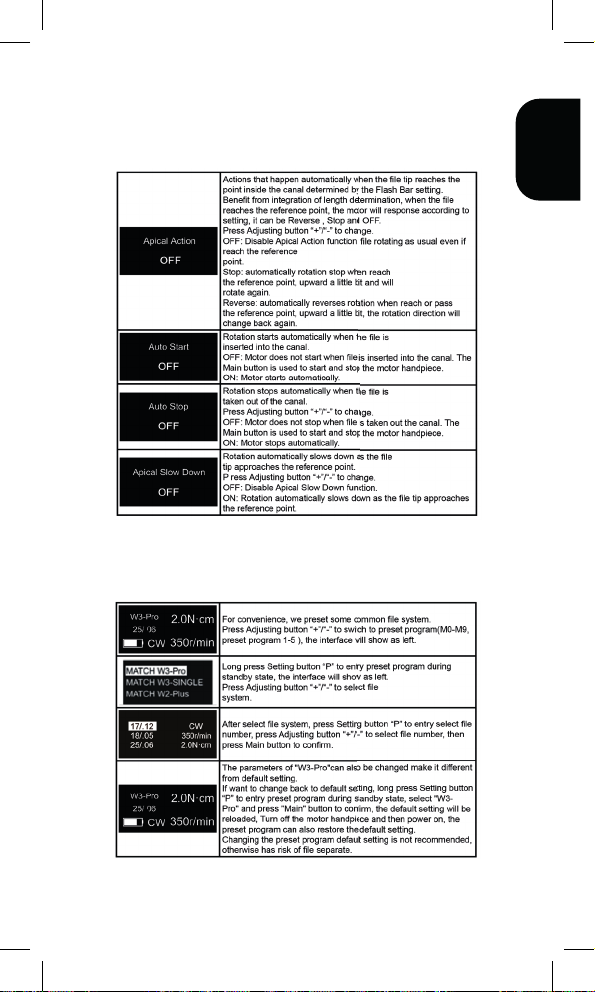
3.3.1.4 ATR Mode
ATR: Adaptive Torque Reverse function.
3.3.2 Torque Display
This appears when the motor is running. Meter shows the torque

ENGLISH
11
4 Operation instruction
4.1 Working environment parameters
4.1.1 Environment temperature: +5°C ~ +40°C
4.1.2 Relative humidity: 30% ~ 75%
4.1.3 Atmospheric pressure: 70kPa ~ 106kPa
4.2 Starting and stopping of motor handpiece
a) Under the power off state of motor handpiece, press Main but-
ton,and then the motor handpiece will enter Standby interface. The
interface displays are as follow:
Standby interface
b) Under Standby interface, press Main button, and then the motor
handpiece will enter Working interface. The interface displays are
as follow:
Working interface
Press the Main button again, and then the motor handpiece backs
to Standby interface.
c) Hold down the Setting button “P”, then press Main button to turn
off motor handpiece. In the standby interface without any key
down of the motor handle.
4.3 Selecting customized program sequence number
The motor handpiece has 10 memory programs(M0-M9) and 5
preset programs, press Adjusting button “+”/“-” to change customized
program sequence number during standby state.
M0-M9 is a memory program for canal shaping and measurement,
every memory program has its own parameters such as Operation
mode, speed and torque, all these parameters can be changed.
4.4 Parameter setting
12
ENGLISH
13
4.5 Preset program selection
14
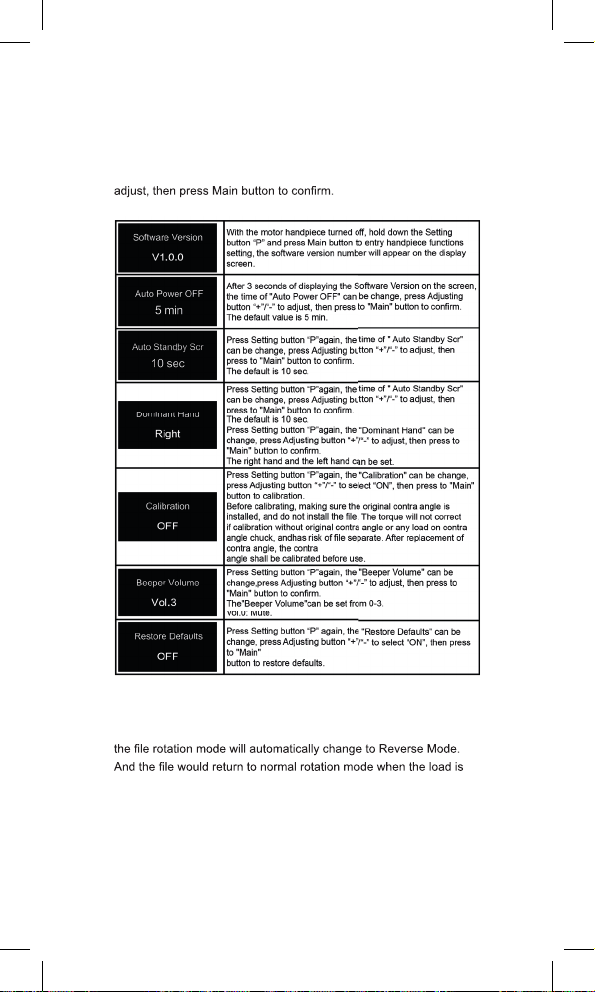
4.6 Handpiece functions setting
With the motor handpiece turned off, hold down the Setting button
“P” and press Main button to entry handpiece functions setting, press
Setting button “P” till target setting, press Adjusting button “+”/“-” to
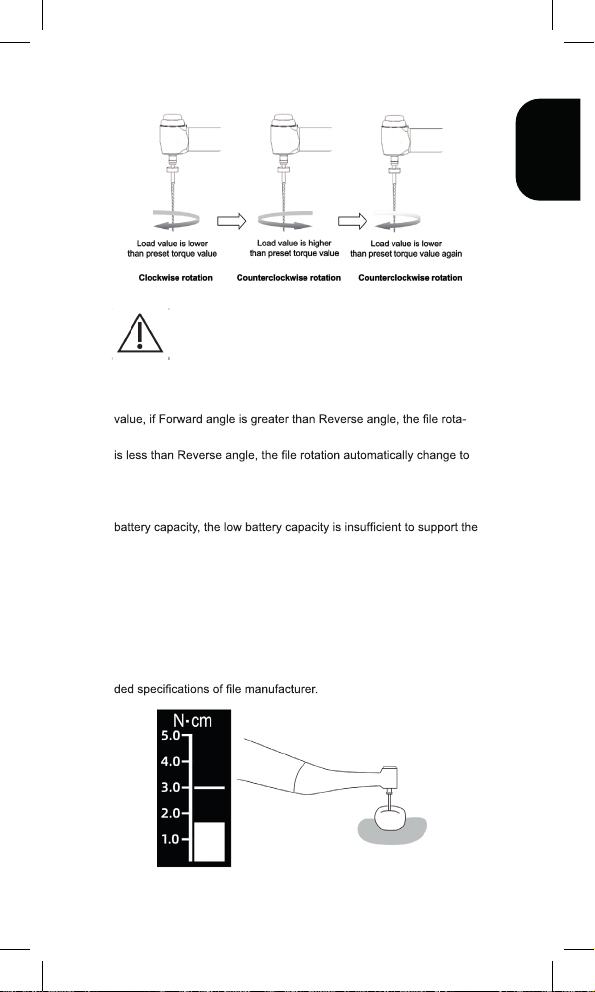
4.7 Protective function of automatic reverse
During operation, if the load value exceeds the preset torque value,
below the preset torque value again.
ENGLISH
15
Cautions:
1. Protective function of automatic reverse is ONLY suitable for CW
mode.
2. In REC mode, when the load value is higher than preset torque
tion automatically change to reverse rotation, and if Forward angle
forward rotation.
3. This function is forbidden under CCW mode, ATR mode.
4. When the motor handpiece battery indicator indicates a low
motor handpiece to reach the limit torque value, that is, the auto-re-
verse function will not work properly. Please charge it in time.
5. If the motor handpiece is under load all the time, the machine may
stop automatically as a result of overheat protection. lf it happens,
turn off the motor handpiece for a while until the temperature drops.
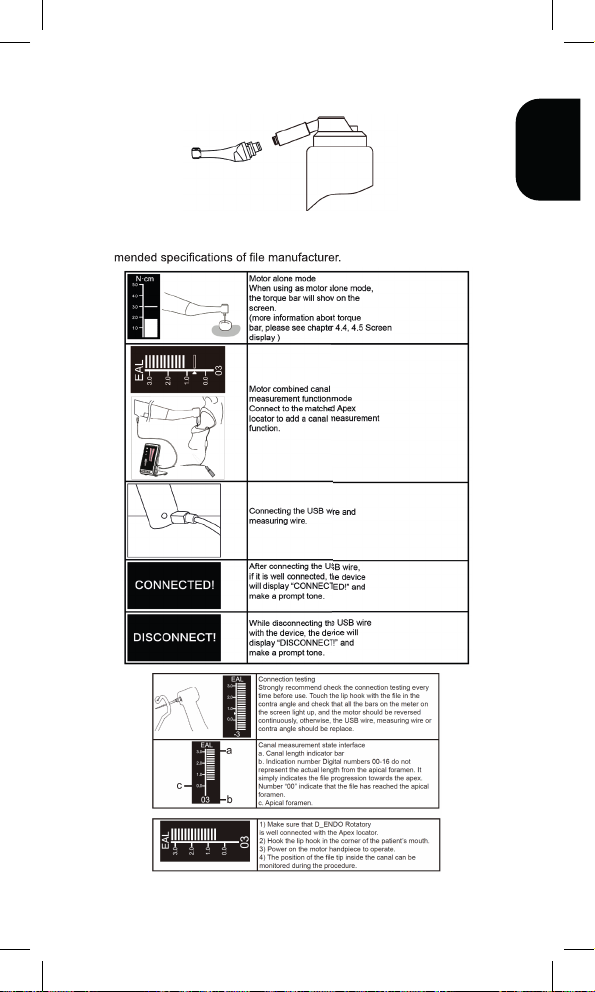
4.8 Motor operation
Please set operation mode, torque and speed as per the recommen-
16
When using as motor alone mode, the torque bar will show on the
screen.
4.9 Battery Charging
There is a built-in rechargeable lithium battery in the motor han-
dpiece.Insert the power adapter plug into the Motor handpiece and
When the screen battery indicator fashes, it is charging. After char-
ging, please unplug the power adapter.
This device must use the original power adapter.
4.10 Replacing Battery
If the battery needs to be replaced,please contact local distributors.
Here is how to replace the battery.
a) Turn the motor handpiece power off.
b) Use tweezers etc. to open the rubber cover and then remove the
screw.
c) Gently separate the upper and lower cover of the Motor handpie-
ce.
d) Remove the old battery and disconnect the connector.
e) Connect the new battery and put it in the motor handpiece.
f) Fasten the upper and lower cover of the Motor handpiece, tighten
the screws and install the rubber cover.
4.11 Oiling of contra angle
Only the original oil injection nozzle can be used for oiling of contra
angle. The contra angle needs to be lubricated after cleaning and
disinfection, but before sterilization.
1. Firstly, screw the injecting nozzle into jet of oil bottle. (Around 1 to
3 circles)
2. Next, plug the nozzle into the end part of contra angle, and then
grease the contra angle for 2-3s till the oil fow out of contra angle
head part.
3. Vertically place the end part of contra angle more than 30 minutes
to let go the redundant oil under gravity.
Warnings
Cautions
a: To avoid the contra angle from fying out for the pressure use hand
to safely hold the contra angle while greasing.
b: Do not use a swirling nozzle. Swing nozzle can only be used for
injection of gas, not for oiling.
ENGLISH
17
5 Motor operation
5.1 Please set operation mode, torque and speed as per the recom-
18
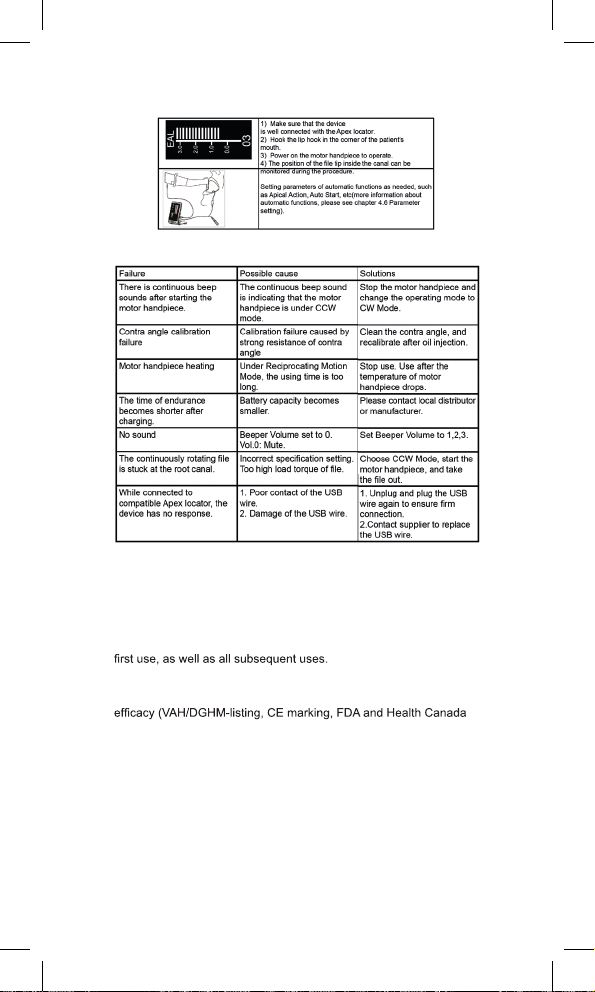
5.2 Trouble shooting
6 Cleaning, Disinfection and Sterilization
6.1 Foreword
For hygiene and sanitary safety purposes, the contra-angle, the
protective silicon cover must be cleaned, disinfected and sterilized
before each usage to prevent any contamination. This concerns the
6.2 General recommendations
6.2.1 Use only a disinfecting solution which is approved for its
approval) and in accordance with the DFU of the disinfecting solution
manufacturer.
6.2.2 Do not place the contra-angle in a disinfectant solution or in an
ultrasonic bath.
Do not use chloride detergent materials.
6.2.3 Do not use bleach or chloride disinfectant materials.
6.2.4 For your own safety, please wear personal protective equip-
ment(gloves, glasses, mask).
ENGLISH
19
6.2.5 The user is responsible for the sterility of the product for the
-
ged or dirty instruments where applicable after sterility.
6.2.6 The water quality has to be convenient to the local regulations
especially for the last rinsing step or with a washer-disinfector.
instructions for use.
6.2.8 The contra-angle needs to be lubricated after cleaning and
disinfection, but before sterilization.
6.3 Cleaning and disinfection steps for the motor handpiece, the AC
adapter and the base.
Before and After each use, all the objects that were in contact with
infectious agents should be cleaned using towels impregnated with
a disinfecting and detergent solution (a bactericidal, fungicidal and
aldehyde free solution) approved by VAH/DGHM-listing, CE marking,
FDA and Health Canada.
Warning: Do not sterilize the motor handpiece, the AC
adapterand the
base.
6.3.1 Pre-Op processing Before each use, the handpiece, charger,
as follows:
Warning: The handpiece, charger, and base cannot be
cleaned and
disinfected with automatic equipment. Manual cleaning and disinfec-
tion is required.
6.3.1.1 Manual cleaning steps:
1. Take out the handpiece, charger, and base on the workbench.
2. Wet the soft cloth completely with distilled water or deionized
water, and then wipe all the surfaces of the components such as the
handpiece, charger, base, etc. until the surface of the component is
not stained.
3. Wipe the surface of the component with a dry soft nap-free cloth.
4. Repeat the above steps at least 3 times. Note:
a)Use distilled water or deionized water for cleaning at room
temperature.
6.3.1.2 Manual disinfection steps:
1. Soak the dry soft cloth with 75% alcohol.
2. Wipe all surfaces of headpiece, charger, base and other compo-
20
nents with a wet soft cloth for at least 3 minutes.
3. Wipe the surface of the component with a dry soft nap-free cloth.
Note:
a) The cleaning and disinfection must be performed within 10min
before use.
b) The disinfectant used must be used immediately, no foaming is
allowed.
c) In addition to 75% alcohol, you can use non-residue disinfec-
tants such as Oxytech from Germany, but you must respect the
manufacturer.
d) After cleaning and disinfecting the handpiece, you must install a
disposable isolation sleeve before use.
6.3.1.3 Post-Op processing
After each use, clean and disinfect the handpiece, charger, and base
Tools: Nap-free soft cloth, tray
1. Remove the contra-angle from the handpiece, place it in a clean
tray, and then remove the disposable isolation sleeve from the
handpiece.
2. Soak the nap-free soft cloth with distilled water or deionized
water, and then wipe all the surfaces of the components such as the
handpiece, charger, base, etc. until the surface of the component is
not stained.
3. Wet the dry soft cloth with 75% alcohol, and then wipe all surfaces
of the handpiece, charger, base and other components for 3
minutes.
4. Put the handpiece, charger, base and other components back into
the clean storage area.
Note:
a) The cleaning and disinfection must be performed within 10min
before use.
b) The disinfectant used must be used immediately, no foaming is
allowed.
c) In addition to 75% alcohol, you can use non-residue disinfec-
tants such as Oxytech from Germany, but you must respect the
manufacturer.
d) After cleaning and disinfecting the handpiece, you must install a
disposable isolation sleeve before use.
Table of contents
Languages:
Other D Devices Dental Equipment manuals


