D-Link DMP-HD610 User manual

Review Package Contents
Make sure that the package contains the following items. If any items are
missing, please contact the reseller.
§D-Link Roq-it 10 GB
§Drivers and Software
§USB Cable
§Earphones
§User’s Manual
§Quick Install Guide
§Carrying Case
§AC Power Adapter
§Lithium-Ion rechargeable
Battery
§IR remote control
§Shoulder Strap
Battery Installation
For safety, the battery is not installed at the factory. Please install the
battery as shown in the diagrams below.
Connect the AC power adapter to the Jukebox. The Battery Recharge
Indicator LED should light up. It is recommended that you charge the
battery for approximately 8 hours prior to first use as a portable player.
Note:
The hard drive is pre-installed inside the Roq-it 10 GB. Do
not remove the hard drive. If you do, you do so at your own
risk and at the risk of voiding the warranty.

Installing Drivers and Connecting the
Roq-it 10 GB to your Computer
In this section you will install the USB driver for the Roq-it 10 GB and
connect it to your computer. The driver is required for the Roq-it 10 GB
to communicate with your computer.
This includes instructions for different operating systems. Please locate
the section that corresponds with the operating system you intend to use
with the Roq-it 10 GB.
Make sure that the Roq-it 10 GB and your computer are powered ON
before connecting the USB cable to your computer.
If you use Windows XP, Windows 2000 or
Windows Me
§Connect the type A end of the USB cable to the USB port on your
computer. (This is the flatter end.)
§Connect the other end of the USB cable to the Roq-it 10 GB.
Windows will detect the Roq-it 10 GB and load the appropriate drivers.
If you use Windows 98 or Windows 98SE
§Insert the driver CD into your CD-ROM drive. An autorun screen will
appear. (If the autorun screen does not appear, please locate and
execute autorun.exe on the CD-ROM.)
§Click the button labeled “USB Driver [Win98]”.
§Follow the on-screen instructions to install the USB driver by clicking
“Next” on each screen.
§When the “Installation Completed!” message is shown, click the
Finishbutton. The USB driver is now installed.

If you use Macintosh OS
§Insert the Driver CD into the CD-ROM drive and double click the
CD-ROM drive when it appears.
§Double click the “USB-driver” folder and then the “Mac” folder.
§Double click the “USB2IDEDriver_20f4.hqx”icon. Then the driver
will be installed onto your Macintosh computer automatically.
§Once the installation is complete, turn on the Roq-it 10 GB, and then
connect it to your Macintosh computer via the USB cable.
§The system should automatically detect the new device and place an
“untitled” hard drive icon on your desktop.
§Double click the newly created hard drive icon on the desktop to view
the contents of the Roq-it 10 GB. You can now begin adding music to
the drive by dragging and dropping your MP3 files to the drive.
Downloading Music to the Roq-it 10 GB
When connected to your computer, the Roq-it 10 GB functions as an
external USB hard drive. Once the USB driver is installed and the Roq-it
10 GB is connected to your computer, a new drive letter should
automatically appear in “My Computer” (when using a Windows OS), or
as a new drive letter on the desktop (when using a Macintosh OS).
To view the contents of the Roq-it 10 GB, double click onthe new drive
letter.

Downloading Music to the Roq-it 10 GB continued…
To add music to the Roq-it 10 GB, simply drag and drop your MP3 music
files or music folders to the new drive. You may want to organize your
music in folders by category or artist. Doing so will make it easier for you
to navigate between songs and find the music you want to listen to.
To start listening to the music you have just downloaded to the Roq-it 10
GB, you must first disconnect the USB cable.
Playing Music on the Roq-it 10 GB
Press the “Browse” button to view your selection of MP3 files or folders.
Use the Navigation buttons to navigate through the files and folders.
Navigating is simple: press the [FF] button to go deeper into folders and
[RW] to go back. Then scroll up and down to see the songs in the chosen
directory.
Folders or Directories are indicated with a “down arrow.” Use the Up and
Down buttons to select the folders. Press the “FF” button to view to
contents of the selected folder.
Songs are indicated by a “musical note.” Use the Up and Down buttons to
select the songs.
Press “Play” to begin playing the selected song or folder.

Tips and Technical Support
§When connecting the USB cable to the computer, make sure that the
USB cable is inserted securely.
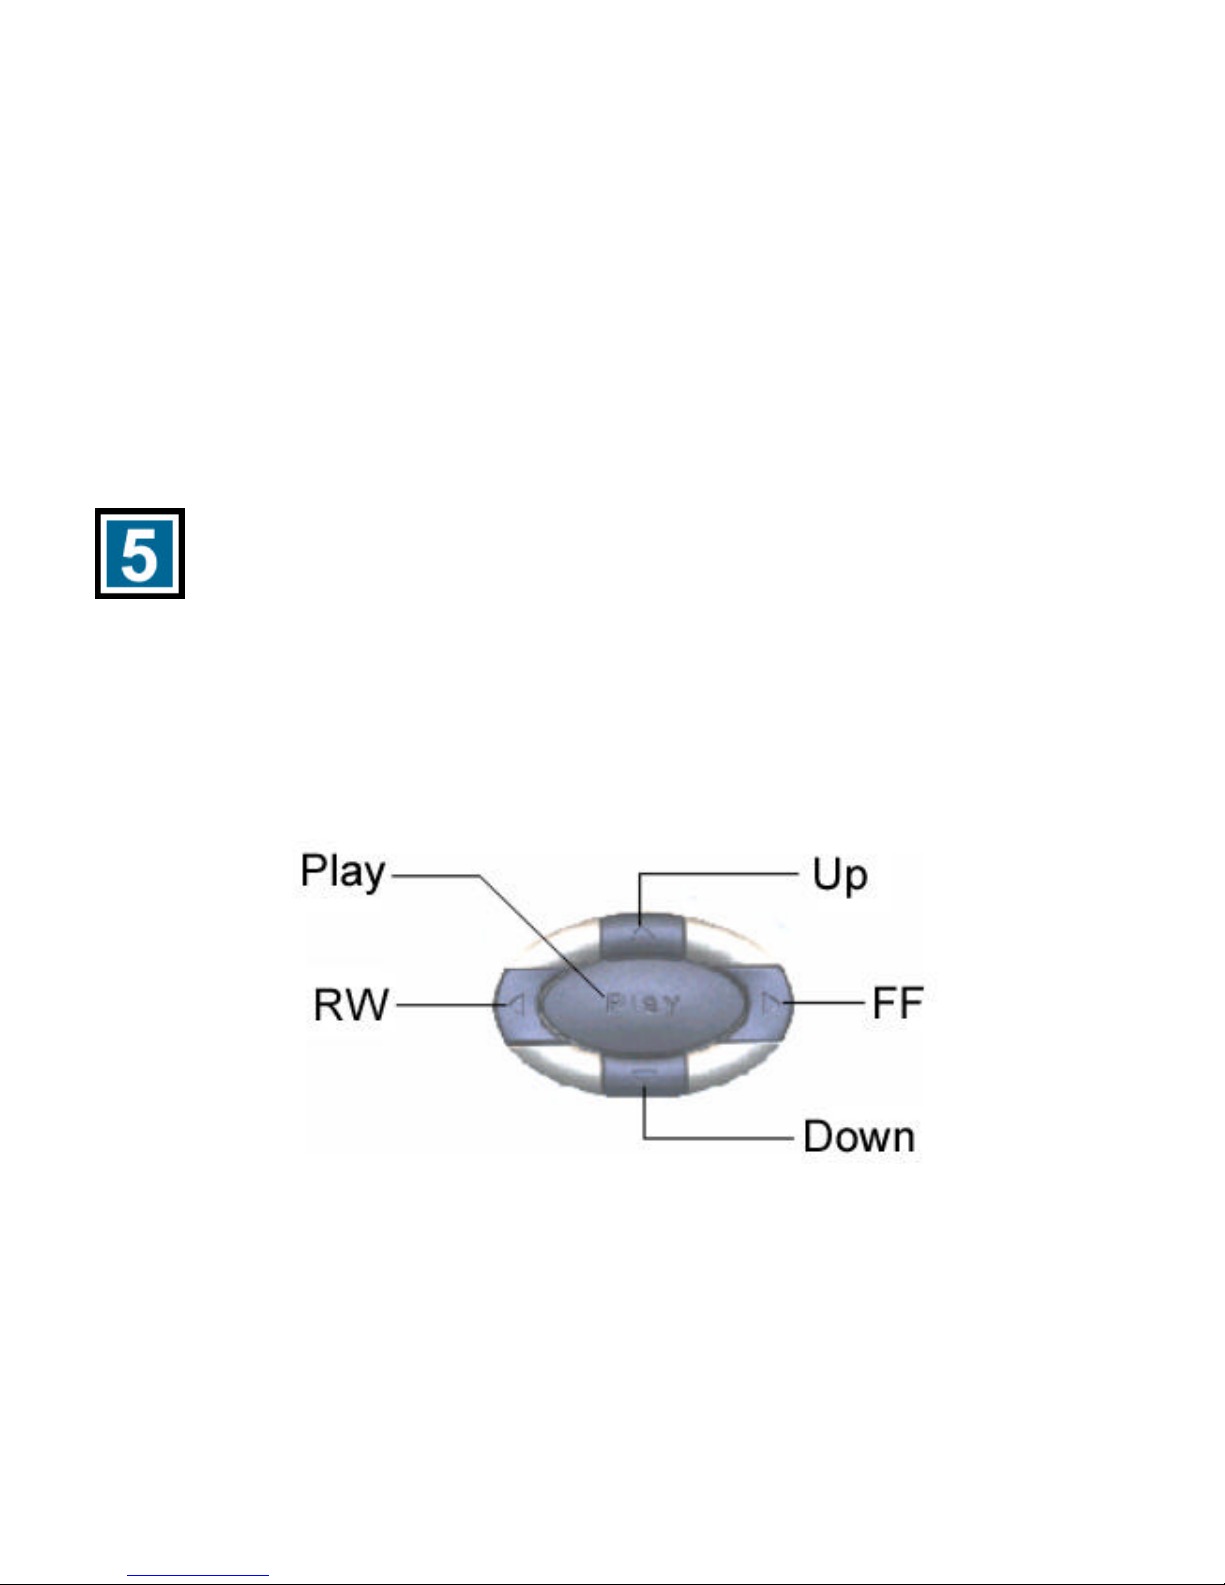
§Organization is the key to navigating your music on the Roq-it 10 GB.
Organize your music into relevant folders for easy access.
§Use only the AC adapter provided in this package. Using other AC
adapters may result in damage and may render the product
unworkable.
Caution:
§Listening at loud volumes for extended periods of time may damage
hearing and may result in loss of hearing.
§Do not attempt to service this product. Contact D-Link Technical
Support for instructions on servicing.
§To reduce the risk of fire or electrical shock, do not expose this
product to water or moisture.
§Do not expose this product to extreme heat.
§Remove the batteries when not in use for extended periods of time.
Technical Support
D-Link provides free technical support for customers within the United
States during the warranty period. U.S. customers can contact D-Link
Technical Support through our web site, e-mail or by phone.
D-Link Technical Support over Telephone:
(949) 790-5290
6 a.m. to 6 p.m. Monday thruFriday
D-Link Technical Support over the Internet:
www.dlink.com
If you are a customer residing outside of the United States, please refer to the list of D-Link locations that is
included in the User’s Manual. 11120011235
Other manuals for DMP-HD610
1
This manual suits for next models
1
Table of contents
Other D-Link Jukebox manuals