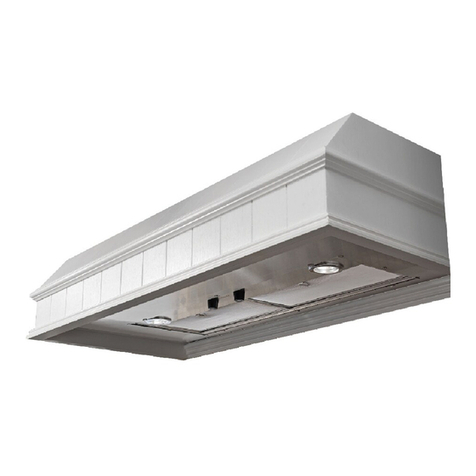
Dacor IVS1 User manual

Use and Care Manual
Custom Hood Integrated Ventilation Systems
Part No. 65210 Rev. F
Models: IVS1, IVSR1, IVS2 and IVSR2
Table of Contents
Important Safety Instructions ...........................................1
Operating Your Raised Vent............................................3
Care and Cleaning .......................................................4
Before You Call for Service.............................................5
Warranty and Service ...................................................6
Warranty Card.............................................. Back Cover
Important InformatIon
• OperatingInstructions
• CareandCleaningInstructions
• SafetyTips
SAFETY IS EVERYONE’S RESPONSIBILITY. ALL DACOR
®
APPLIANCES ARE
DESIGNED AND CONSTRUCTED TO GIVE YOU MANY YEARS OF SAFE OPERATION.
THE OPERATION WILL BE FURTHER ENHANCED IF PROPER CARE AND JUDGEMENT
ARE EXERCISED IN THE USE AND MAINTENANCE OF THIS APPLIANCE.
NOTES:
Contains helpful hints and tips.
WARNINGS:
Must be followed carefully to avoid personal injury or damage.
READANDSAVETHESEINSTRUCTIONS

© 2007 Dacor, all rights reserved.

1
Important Safety Instructions
Purpose of This Manual
This use and care manual is designed to enable you to
properly operate and maintain your new integrated ven-
tilation system (IVS). Please keep this manual handy for
easy access and quick reference.
Additional information may be requested writing or phon-
ing the Dacor Customer Service Team. The address and
phone number of this department are listed on the inside
front cover of this manual.
Product Registration
Please enter the information requested in the spaces
provided below. This information will be required in the
unlikely event that a service call becomes necessary:
Model number __________________________________
Serial number __________________________________
Date of purchase ________________________________
Date installed ___________________________________
Purchased from _________________________________
Address _______________________________________
Phone _________________________________________
Since Dacor continuously improves the quality and perfor-
mance of our products, we may need to make changes to
the appliance without updating this manual.
warning
To reduce the risk of a range top grease fire:
a) Never leave surface units unattended at high
settings. Boil-overs cause smoking and greasy spill-
overs that may ignite. Heat oils slowly on low or
medium settings.
b) Always turn hood ON when cooking at high heat or
when flambéing food (i.e. Crepes Suzette, Cherries
Jubilee, Peppercorn Beef Flambe’).
c) Clean ventilating fans frequently. Grease should not
be allowed to accumulate on fan or filter.
d) Use proper pan size. Always use cookware
appropriate for the size of the surface element.
CaUTiOn
For general ventilating use only. Do not use to exhaust
hazardous or explosive materials and vapors.
warning
TO REDUCE THE RISK OF INJURY TO PERSONS IN
THE EVENT OF A RANGE TOP GREASE FIRE:
• SMOTHER FLAMES with a close-fitting lid, cookie
sheet or metal tray, then turn off the burner. BE
CAREFUL TO PREVENT BURNS. If the flames do not
go out immediately, EVACUATE AND CALL THE FIRE
DEPARTMENT.
• NEVER PICK UP A FLAMING PAN - you may be
burned.
• DO NOT USE WATER, including wet dish clothes or
towels - a violent steam explosion may result.
• Use a fire extinguisher ONLY if:
◊ You have a Class ABC extinguisher, and you
already know how to operate it.
◊ The fire is small and contained in the area where
it started.
◊ The fire department is being called.
◊ You can fight the fire with your back to an exit.
warning
WARNING - TO REDUCE THE RISK OF FIRE,
ELECTRIC SHOCK, OR INJURY TO PERSONS,
OBSERVE THE FOLLOWING:
a) Use this unit only in the manner intended by the
manufacturer. If you have questions, contact the
manufacturer.
b) Before servicing or cleaning unit, switch power off
at service panel and lock the service disconnecting
means to prevent power from being switched on
accidentally. When the service disconnecting means
cannot be locked, securely fasten a prominent
warning device, such as a tag, to the service panel.
READANDSAVETHESEINSTRUCTIONS

2
Important Safety Instructions
• If you received a damaged product, immediately
contact your dealer or builder. Do not install or use
a damaged product.
• Ensure that the unit is properly installed and
grounded by a qualified technician. Have the
installer show you where the fuse box or circuit
breaker panel is located so that you know how and
where to turn off power.
• Always be certain that nothing will interfere with the
vent intake.
• Use the vent system for its intended purpose only
as outlined in this manual.
• Clean the filters and all grease-laden surfaces often
to prevent grease fires and maintain performance.
• If the cooktop and vent hood are near a window,
use an appropriate window treatment. Avoid long
drapes or other window coverings that could blow
over the cooktop and vent hood, resulting in a fire
hazard.
• Always run the blower whenever a cooktop is
operating.
• Never operate the IVS without the filters in place.
• Do not operate the blower if a flame or flare-up
develops. In the event of a flame, immediately
turn off the blower. Smother the flame or use an
appropriate class dry chemical or foam-type fire
extinguisher.
warning
• Never leave the appliance unattended when using
high heat settings. Boil-overs and greasy spills may
smoke and/or ignite.
• Do not leave children alone or unattended in the
area where the cooktop and hood are in use. Never
allow children to sit or stand on an appliance. Do
not let children play with a cooktop or vent hood.
• CAUTION: Do not store items of interest to children
above or at the back of the cooktop or vent, as they
could climb on the appliance to reach items and be
injured.
• Do not repair or replace any part of the IVS
unless specifically recommended in literature
accompanying it. All service should be referred to a
qualified technician.
• Do not use water on grease fires. A violent steam
explosion may result. Also, avoid using wet pot
holders, sponges or clothes, as steam burn may
occur.
warning

3
Operating Controls
warning
Do not operate the ventilation system without the filters
in place or with dirty, grease-laden filters.
Your Dacor IVS has two knobs that control the halogen
lights and the exhaust blower. Turning the knobs clock-
wise will turn on the lights and the blower. When turning
the lights or blower off, turn the knob counter-clockwise
until it clicks.
Blower Knob: The further clockwise you turn the knob
the faster the blower runs.
Light Knob: The further clockwise you turn the knob
the brighter the light. Turn the knob until you reach the
desired light level.
Operating Tips:
• Activate the blower a few minutes before starting to
cooktoestablishanairowpatternintheroom.
Operation
• Adjust the fan speed according to the volume and
weight of the cooking exhaust.
• Always activate the blower whenever using the cook-
ing appliance.
• Eliminate air currents in the vent vicinity by shut-
ting nearby windows and doors, turning off ceiling
fans and closing adjacent heating and air conditioning
outlets.
• Place your largest pans, skillets and stock pots on the
rear burners whenever possible.
Energy Saving Tips
• Do not operate the blower at a speed that is higher
than necessary to remove the cooking exhaust. Run-
ning at excessive speeds removes more air from the
inside of the house that must be replaced by outside
air. This may be especially costly when the housing air
conditioning or heating system is in operation.
• Cleanltersandgrease-ladensurfacesoftento
improveefciency.
• Turn off the blower as soon as all cooking smoke and
odors have been eliminated.
• Always use lids on cookware to retain heat and mois-
ture.
• Minimize the amount of liquid used to cook food.
• Select cookware of the proper size, material and con-
struction for the cooking task being performed.
Fan Knob Light Knob

4
Changing the Light Bulbs
The suction cup, part number 62408, supplied with the
IVS, is designed to assist in the removal and replace-
ment of the halogen light bulbs, should they burn out. To
remove a bulb, simply press the suction cup onto the face
of the bulb and unscrew in a counter-clockwise direction
(as you are facing the bulb). To install the new bulb, start
the new bulb in the socket in a clockwise direction by
turning a few times by hand, then attach the suction cup
to the face of the bulb and complete the installation. Keep
the suction cup in a safe place for future maintenance.
For replacement lamps, contact your Dacor parts distribu-
tor and order part number 62351.
CaUTiOn
If commercially available stainless steel cleaners are
used, it is important to read the labels for chlorine
compounds. Chlorine is a corrosive substance. If these
compounds are present, rinse thoroughly and dry with a
soft lint-free cloth. Follow manufacturer’s instructions for
application of polish.
Proper cleaning is necessary to maintain performance
and appearance, while also ensuring safe operation. The
frequency of cleaning should be adjusted according to the
type and amount of cooking. Best results will be achieved
by cleaning soiled components as soon as possible.
Theltersmustbecleanedregularly.Removeonelterat
atime,graspthelterhandleandgentlypushbackand
pull the front down.
Theltersmaybecleanedbyhandwashinginhotwater
with a mild detergent solution or by placing them in an
automaticdishwasher.Drythelterscompletelybefore
using them again.
STAINLESS STEEL, BRASS AND CHROME SURFACES
should be cleaned with a solution of mild detergent and
warm water. Rinse and dry with a soft lint-free cloth.
Always wipe stainless steel surfaces with the grain. Never
wipeacrossthegrain.Aftercleaning,reinstallthelters
carefully.
Care and Cleaning

5
Troubleshooting
Unnecessary service calls may be expensive, frustrating and time consuming. Before you call for service, please review
the potential problems, possible causes and remedies shown in the table below.
PROBLEM POSSIBLE CAUSE REMEDY
Nothing works. Vent power supply interrupted or
not energized.
Have an electrician check power supply,
including the house circuit breaker, wiring and
fuses.
Lights do not turn on. A loose or burned out light. Check the light.

6
Warranty and Service
Getting Help
Before you request service:
1. Review the Before You Call For Service section of
this manual.
2. Use the helpful tips found in our Problem Solution
Guide.
3. Become familiar with the warranty terms and condi-
tions of your product.
4. If none of these tips or suggestions resolves your
problem, call our Customer Service center at the
number below.
Dacor’s Customer Service center is available
6:00 a.m.– 5:00 p.m. Pacic Time
For warranty repairs or questions and for Dacor
Distinctive Service (DDS) in the US and Canada
Phone: (800) 793-0093, extension 2822
For non-warranty repairs or questions in the US and
Canada Dacor Customer Service
Phone: (800) 793-0093, extension 2813
Contact us through our web site at:
www.dacor.com/contact-us
Warranty
What Is Covered
CERTIFICATE OF WARRANTIES:
DACOR INTEGRATED VENTILATION SYSTEMS
WITHIN THE FIFTY STATES OF THE U.S.A., THE DIS-
TRICT OF COLUMBIA, AND CANADA:
FULL ONE-YEAR WARRANTY
The warranty applies only to the Dacor appliance sold to
therstusepurchaser,startingfromthedateoforigi-
nal retail purchase or closing date for new construction,
whichever period is longer. Warranty is valid on products
purchased brand new from a Dacor Authorized Dealer or
other seller authorized by Dacor.
If your Dacor product fails to function within one year of
the original date of purchase, due to a defect in material
or workmanship, Dacor will remedy it without charge to
you.
All cosmetic damage (such as scratches on stainless steel,
paint/porcelain blemishes, etc.) to the product or included
accessories must be reported to Dacor within 60 days of
the original purchase date to qualify for warranty cover-
age.
Consumablepartssuchasltersandlightbulbsarenot
covered and are the responsibility of the purchaser.
LIMITATIONS OF COVERAGE
Service will be provided by a Dacor designated service
company during regular business hours. Please note ser-
vice providers are independent entities and are not agents
of Dacor.
Dealer display and model home display products with a
production date greater than 5 years, products sold “As
Is,” and products installed for non-residential use, which
includebutarenotlimitedtoreligiousorganizations,re
stations, bed and breakfast and spas carry a one year
parts warranty only. All delivery, installation, labor costs
and other service fees are the responsibility of the pur-
chaser.
Warranty will be null and void on product that has altered,
defaced or missing serial numbers and tags.
The owner must provide proof of purchase or closing
statement for new construction upon request. All Dacor
products must be accessible for service.
Warranty is null and void if non-ETL or non-CUL approved
product is transported from the U.S.A.
OUTSIDE THE FIFTY STATES OF THE U.S.A., THE
DISTRICT OF COLUMBIA, AND CANADA:
LIMITED FIRST YEAR WARRANTY
If your Dacor product fails to function within one year of
the original date of purchase due to a defect in material or
workmanship, Dacor will furnish a new part, F.O.B. factory
to replace the defective part.
All delivery, installation, labor costs and other service fees
are the responsibility of the purchaser.
What Is Not Covered
• Slight color variations may be noticed because of dif-
ferences in painted parts, kitchen lighting, product
placement and other factors; this warranty does not
apply to color variation.
• Service calls to educate the customer on proper use
and care of the product.
• Service fees for travel to islands and remote areas,
which include but are not limited to, ferries, toll roads
or other travel expenses.
• Consequential or incidental damage, including but not
limited to food or medicine loss, time away from work
or restaurant meals.
• Failure of the product when used for commercial,
business, rental or any application other than for resi-
dential consumer use.
• Failure of the product caused by improper product
installation.
• Replacement of house fuses, fuse boxes or resetting
of circuit breakers.

7
Warranty and Service
• Damagetotheproductcausedbyaccident,re,ood,
power interruption, power surges or other acts of God.
• Liability or responsibility for damage to surrounding
propertyincludingcabinetry,oors,ceilingsandother
structures or objects around the product.
• Breakage, discoloration or damage to glass, metal
surfaces, plastic components, trim, paint or other cos-
meticnishcausedbyimproperusage,care,abuseor
neglect.
Out of Warranty
Should you experience a service issue beyond the stan-
dard warranty period, please contact us. Dacor reviews
each issue and customer concern to provide the best pos-
sible solution based on the circumstances.
THE REMEDIES PROVIDED IN THE ABOVE EXPRESS WARRAN-
TIES ARE THE SOLE AND EXCLUSIVE REMEDIES. THEREFORE,
NO OTHER EXPRESS WARRANTIES ARE MADE, AND OUTSIDE
THE FIFTY STATES OF THE UNITED STATES, THE DISTRICT
OF COLUMBIA AND CANADA, ALL IMPLIED WARRANTIES,
INCLUDING BUT NOT LIMITED TO, ANY IMPLIED WARRANTY OF
MERCHANTABILITY OR FITNESS FOR A PARTICULAR USE OR
PURPOSE, ARE LIMITED IN DURATION TO ONE YEAR FROM THE
DATE OF ORIGINAL PURCHASE. IN NO EVENT SHALL DACOR
BE LIABLE FOR INCIDENTAL EXPENSE OR CONSEQUENTIAL
DAMAGES. IN THE EVENT DACOR PREVAILS IN ANY LAWSUIT,
DACOR SHALL BE ENTITLED TO REIMBURSEMENT OF ALL COSTS
AND EXPENSES, INCLUDING ATTORNEY’S FEES, FROM THE
DACOR CUSTOMER. NO WARRANTIES, EXPRESS OR IMPLIED,
ARE MADE TO ANY BUYER FOR RESALE.
Some states do not allow limitations on how long an
implied warranty lasts, or do not allow the exclusion or
limitation of inconsequential damages, therefore the
above limitations or exclusions may not apply to you. This
warrantygivesyouspeciclegalrights,andyoumayalso
have other rights that vary from state to state.

8
Notes

fold here
DACOR
ATTN WARRANTY PROCESSING DEPT
PO BOX 90070
CITY OF INDUSTRY CA 91715-9907
NO POSTAGE
NECESSARY
IF MAILED
IN THE
UNITED STATES
BUSINESS REPLY MAIL
FIRST-CLASS MAIL CITY OF INDUSTRY CAPERMIT NO 1600
POSTAGE WILL BE PAID BY ADDRESSEE

Web site: www.dacor.com
Corporate phone: (800) 793-0093
WARRANTY INFORMATION
IMPORTANT:
Your warranty will not be activated until you activate it online or return this form to Dacor. If you have purchased more
than one Dacor product, please return all forms in one envelope or activate the warranty for each product online.
Please rest assured that under no conditions will Dacor sell your name or any of the information on this form for mailing list purposes. We
are very grateful that you have chosen Dacor products for your home and do not consider the sale of such information to be a proper way
of expressing our gratitude!
Your willingness to take a few seconds to fill in the section below will be sincerely appreciated. Thank you.
1. How were you first exposed to Dacor products? (Please check one only.)
A. T.V. Cooking Show F Builder
B. Magazine G. Architect/Designer
C. Appliance Dealer Showroom H. Another Dacor Owner
D. Kitchen Dealer Showroom I. Model Home
E. Home Show J. Other
2. Where did you buy your Dacor appliances?
A. Appliance Dealer D. Builder
B. Kitchen Dealer E. Other
C. Builder Supplier
3. For what purpose was the product purchased?
A. Replacement only C. New Home
B. Part of a Remodel D. Other
4. What is your household income?
A. Under $75,000 D. $150,000 – $200,000
B. $75,000 – $100,000 E. $200,000 – $250,000
C. $100,000 – $150,000 F. Over $250,000
5. What other brands of appliances do you have in your kitchen?
A. Cooktop C. Dishwasher
B. Oven D. Refrigerator
6. Would you buy or recommend another Dacor product?
Yes No
Comments:
Owner’s Name:
Street:
City: State: Zip:
Purchase Date: Email: Telephone:
Dealer:
City: State: Zip:
(Please Print or Type)
Last
First Middle
cut herecut here
Please visit www.dacor.com to activate your warranty online.
Thank you very much for your assistance. The information you have
provided will be extremely valuable in helping us plan for the future
and giving you the support you deserve.
Other manuals for IVS1
4
This manual suits for next models
3
Table of contents
Other Dacor Fan manuals
Popular Fan manuals by other brands

aerauliqa
aerauliqa Quasar Series installation manual

Zehnder Rittling
Zehnder Rittling Centair CMEV.4e User/Homeowner Guide

Wentronic
Wentronic goobay 52718 user manual

Valor
Valor 796 Installation and operating instructions

KDK
KDK M56XR Operating and installation instructions

Vent-Axia
Vent-Axia SDX Series Installation and wiring instructions

aerauliqa
aerauliqa QCmev 80 installation manual

S&P
S&P Ventur DECOR-300 User instructions

Casablanca
Casablanca S3 owner's manual

Vornado
Vornado Breesi LS user manual

Carrier
Carrier 40VM Series Installation and operating instructions

Delta Electronics
Delta Electronics BFB1112H Dimensions and installation information