Daema DWP-502YB User manual

Distributed by:
DAEWOO ELECTRONICS
SALES & SERVICES (M) SDN BHD
Lot 886, Bay B2-B4, Jalan Subang 9,
Taman Perindustrian Subang,
Batu14, Jalan Puchong-Hicom,
47100 Puchong, Selangor Darul Ehsan.

Technical Specifications
Model DWP-502YB
Voltage 220-240V~50/60Hz
Power 730W
Capacity 5.0L
3Specifications are subject to change without prior notice
with the development of technology.
Before Using
1. Please read these instructions carefully before using and keep
them for future reference.
2. Please make sure your local main voltage is the same as the
voltage stated on the appliance.
3. Handle power cord carefully. Do not bend or pull cord. Unplug
from wall socket when not in use.
4. Always use Electric Air Pot in a vertical upright position.
5. Allow Electric Air Pot to cool before cleaning.
6. Air pot may be deformed or damaged when exposed to heat or
used in unstable surroundings (excess water or humidity).
7. Boiling without any contents in the Electric Air Pot would damage
the unit.
8. Avoid touching outer body of this Electric Air Pot during operation.
Always allow unit to cool before handling.
9. Do not wash power cord or immerse Electric Air Pot in any water
or liquid.
10. Close supervision is necessary when Electric Air Pot is used by
or near to children. Never leave appliance unattended.
11. Do not operate the Electric Air Pot with a damaged cord or plug
or has malfunctions or has been damaged in any manner.
12. Do not attempt to repair the Electric Air Pot. Please bring it back
to service agent for rectification as special repair tools may be
required.
13. The use of unnecessary attachments is not recommended as it
may result in hazards.
14. The appliance is not intended for outdoor use or in damp areas. It
is for household use only.
15. Power cord should not be knotted, left on hot surfaces or left
hanging over table edges.
16. Electric Air Pot should be given ample air circulation on all sides.
An insulated hot pad is recommended on surfaces where heat
may cause problems.
-1-
17. Do not use appliance for other than its intended usage.
18. Beware of hidden steam under lid.
19. Place steam vent away from power point switch and furniture.
20. Do not place flammable material near Electric Air Pot.
21. Handle power cord carefully, cord may malfunction if dropped.
22. It is normal for smoke and smell to emit during first use. It will
stop after a short period of usage.
23. Be cautious when moving Electric Air Pot filled with hot liquids.
24. Do not fill the unit’s water tank till it exceeds the “Full” water
indicator scale or allow the water level to be below the minimum
water indicator scale.
25. Do not cover steam vent with cloth or any material.
26. Always ensure that Electric Air Pot lid is closed properly.
27. Make full use of carrying handle when moving Electric Air Pot
around.
28. Do not fill the Air Pot with any substance other than water.
How To Operate
3HAZARDS
3Detaching Top Lid
Place the handle towards the rear side of the Electric Air Pot. Open the lid by
lifting the lid handle (Beware of hidden steam). Positioning the lid at a 45°
angle, pull lid out of securing hinge.
1. Never remove lid while the appliance is operating.
2. Beware of hidden steam.
-2-
To protect against electric
shock.
Do not immerse unit,
base, cord or plug in
water or other liquid.
Do not place the Air Pot
on unstable surfaces.
Only fill with pure water
(not milk or anything
similar.)
Do not fill the Electric Air Pot above
the maximum water level mark
inside the tank or lower than the
minimum water level to avoid
damage to the product.
Do not place on or near a hot gas or
electric burner, or a heated oven.

3Attaching Top Lid
Place the handle towards the rear side of the Air pot. Insert the shaft of the
hinge on the lid into the hinge holder. Ensure that lid attached properly. Close
and press on lid until it clicks.
3Using The Air pot For The First Time
1. Wash and rinse inner tank with water.
2. Fill water up to “Full” water indicator scale.
3. Boil once and discard water by pumping it out.
OPENING TOP LID
Set Air pot on table top. Open top lid
and fill water to
desired capacity.
3Always fill water above the
minimum mark but below the
maximum water level line
indicator.
CLOSING TOP LID
Carefully close lid by pressing down
until a click sound is heard.
3Do not close the upper lid
forcefully (Hot water may gush
out and cause scalding).
1. Insert the receptacle into the Air
pot power inlet. Plug in the other
end of the power cord plug into
the wall socket.
2. Do not switch on when the
container is empty.
3When rotating the body, be
careful that the power cord does
not get in the way.
BOIL KEEP WARM
BOIL BOIL
KEEP KEEP
WARM WARM
1. “Boil” light is on during boiling
process.
2. It will switch to “keep warm”
automatically after the water is
boiled.
3Do not open the upper lid.
3Do not touch the steam coming
out of the steam vent.
3Do not place cloth or any other
items covering the steam vent.
3Do not dispense hot water while
the water is boiling.
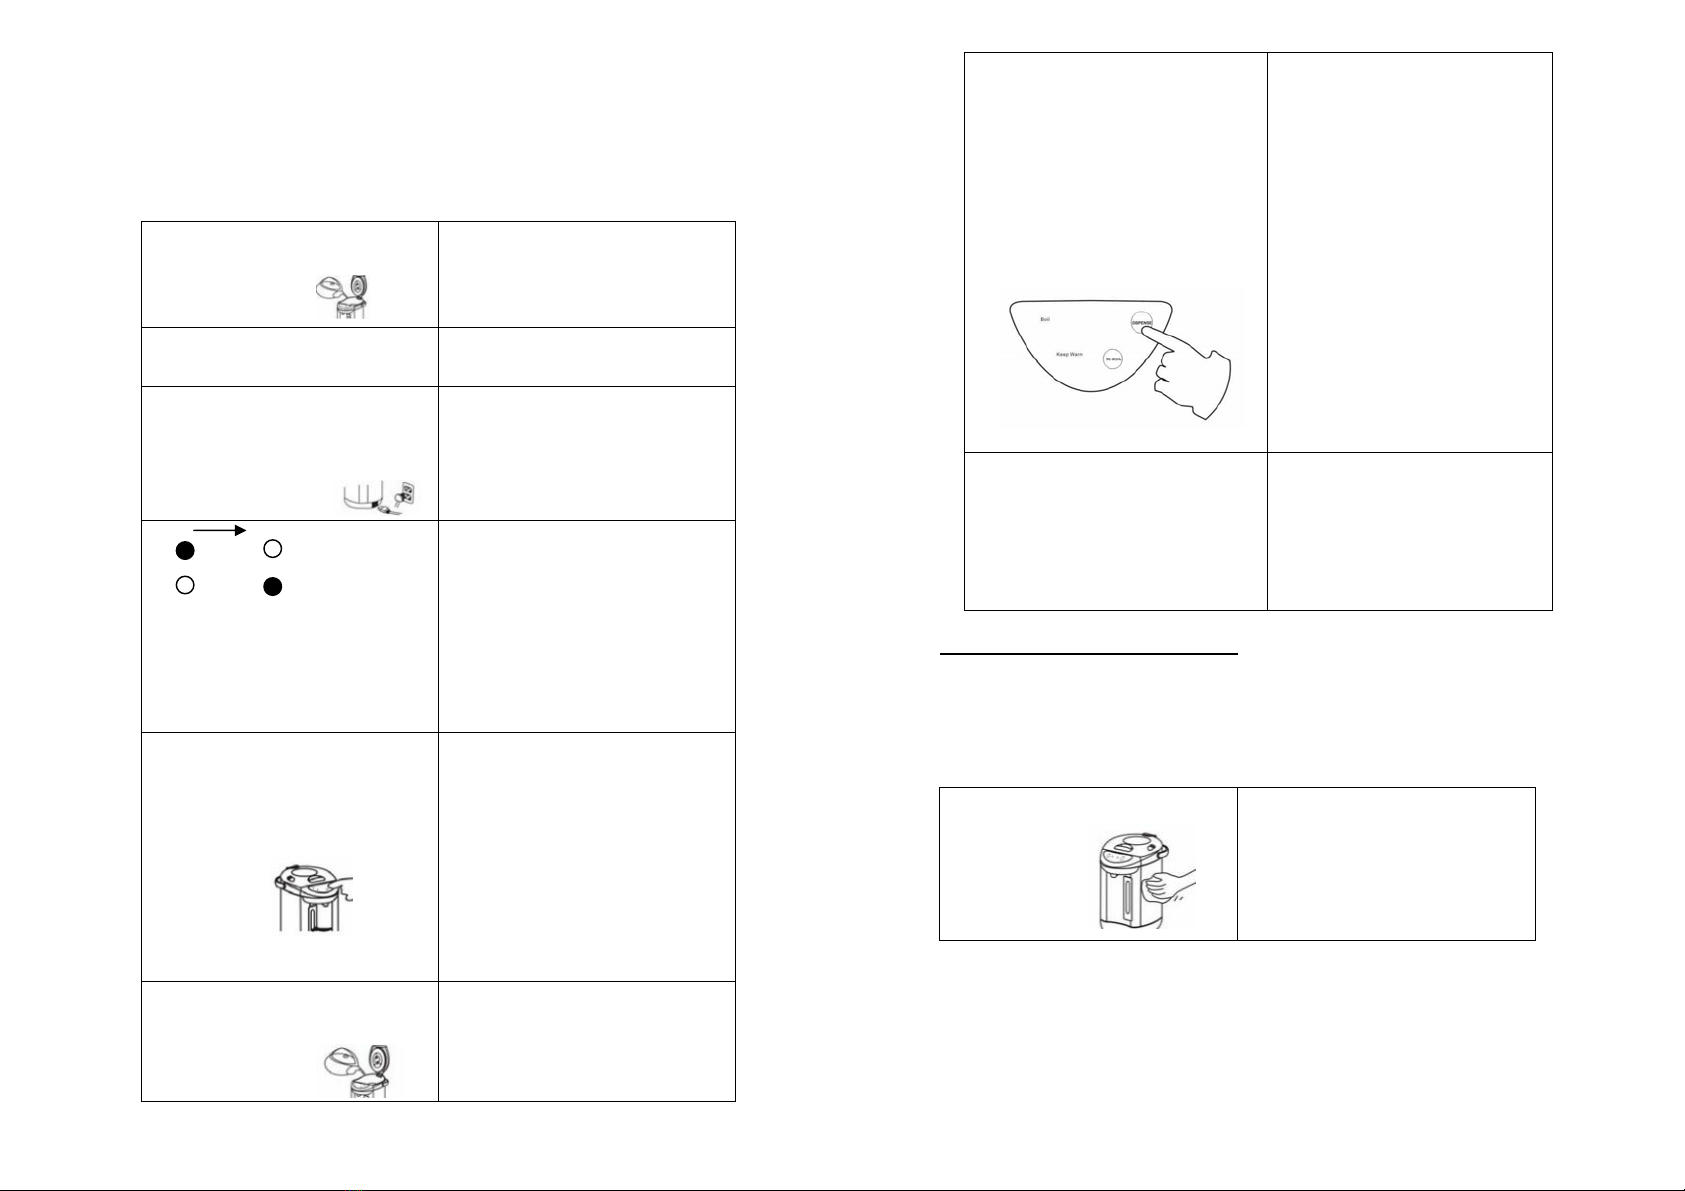
POURING HOT WATER
1. The hot water might not
dispense smoothly right after
boiling.
2. Press on the “AUTO
DISPENSE” button to dispense
hot water.
3CAUTION: Always keep the lid
closed while the Air Pot is in
operation as there is hot steam
trapped under the lid.
3Do not press the dispensing
button when the inner water tank
is empty.(Doing so can cause
damage.)
3You cannot dispense hot water
by pressing Auto Dispense
button, Cup Switch or the
Manual Dispenser if the Air Pot
is unplugged.
REFILL WATER
When water reaches to minimum
water level mark, add water for
automatic boiling.
3Do not add water above full-
water indicator scale. Water
level should not be below the
minimum mark as it may cause
malfunctions.
- 3-
Cleaning And Maintenance
1. Always allow appliance to cool before cleaning.
2. Remember to unplug power cord from wall socket and power inlet.
3. Detach upper lid and pour out remaining water.
4. If mineral deposits accumulate, loud noises may be heard during boiling and
you may face difficulties dispensing hot water. Regular cleaning will avoid
such problems.
Wipe upper lid and body with a soft,
clean, damp cloth.
3Never immerse any part of the
Air Pot in water.
3Never splash water on the
operation panel.
3Do not use abrasive materials to
clean appliance.
-4-
RE-BOIL THE HOT WATER
UNDER THE KEEP WARM MODE.
3Re-boiling a full tank of water
takes about 3 minutes.
3Before Re-boiling, make sure
the water level is above the
minimum mark.
3The Re-boil button may have
no effect right after the water
has boiled.
3When adding water to the Air
pot, be careful not to get scald
by hot steam as you open the
top lid.
3Once the Re-boil button is
pressed, the boiling process
cannot be reset until the Air
Pot automatically switches to
the keep warm mode.
3Do not press the Re-boil
button repeatedly as the
continuous boiling process will
cause malfunction.
AFTER USE
Unplug the power cord
Detach the lid and
Dispose the water.
3Allow the Air Pot to dry
completely.
3Do not place the Air pot in a
dishwasher or dish dryer. This
will damage the Air pot.
3If not in use, seal the unit in a
plastic bag to protect it from
dust and insects.

Discoloration of the inner tank and
white particles floating in the water.
3Red rust-like spots, milky or
black discoloration, and white
floating particles are caused by
minerals in the water and are not
caused by discoloration or
deterioration of the inner tank
itself. Although this is not a
hygiene problem, do clean the
inner tank periodically.
3Cut a lemon into four pieces,
wrap the lemon in a cloth and
place in the inner tank.
3Pour water up to the full level
mark indicated in the inner tank.
3Boil and then retain heat for
about one hour.
3Pour out the water and use a
soft nylon brush to clean the
water tank.
3To remove the smell of the
lemon, boil water again and
dispose the water.
Stainless steel water tank.
3Wash with a sponge and then
rinse with clean water.
3IMPORTANT: Do not use the
following to clean the tank.
3Dish soap (This causes an
unpleasant odor). Scrubbing
powder or scrubbing brushes
(These will damage the tank and
lid).
3Benzine or inner thinner (These
will damage the lid and casing).
Correct Disposal of this Product
This marking indicates that this product should not be
disposed with other household wastes throughout the
nation. To prevent possible harm to the environment
or human health from uncontrolled waste disposal,
recycle responsibly to promote the sustainable reuse
of material resources.
-5-
Other Daema Kitchen Appliance manuals
Popular Kitchen Appliance manuals by other brands

KitchenAid
KitchenAid W11563953A owner's manual

Jata electro
Jata electro CF1030 Instructions of use

SEVERIN
SEVERIN SM-3799 Instructions for use

Mach
Mach 250rr Use and maintenance manual

Brentwood Appliances
Brentwood Appliances SK-45 Operating and safety instructions

Lattemento
Lattemento LM-166P operating instructions