Daewoo DACNQ740S User manual

Manufactured under license of Daewoo International Corporation, Korea
www.daewoopowerproducts.com
USER'S MANUAL
DACNQ740S
Concrete cutter

INDEX
1. KEY TO SYMBOLS....................................................................................................................................
2. MACHINE'S SAFETY EQUIPMENT..........................................................................................................4
3. CUTTING BLADES................................................................................................................................... 7
4. ASSEMBLING AND ADJUSTMENTS.....................................................................................................13
5. FUEL HANDLING.....................................................................................................................................16
6. OPERATING.............................................................................................................................................19
7. STARTING AND STOPPING....................................................................................................................
8. MAINTENANCE.......................................................................................................................................32
9. TROUBLESHOOTING..............................................................................................................................38
10. TECHNICAL DATA.................................................................................................................................39
11. EXPLODED VIEW AND PARTS LIST....................................................................................................40
WARRANTY.................................................................................................................................................46
2
28
1

2
1. KEY TO SYMBOLS
This manual is the International version used for all English speaking countries outside North Ameri-
ca. If you operate in North America use the US-version.
Symbols on the machine
WARNING! The machine can be a dangerous tool if used incorrectly or carelessly, which can
cause serious or fatal injury to the operator or others.
Please read the operator's manual carefully and make sure you understand the instructions
before using the machine.
Wear personal protective equipment. See instructions under the "Personal protective equip
ment" heading.
This product is in accordance with applicable EC directives.
WARNING! Dust forms when cutting, this can cause injuries if inhaled. Use an approved
breathing mask. Avoid inhaling exhaust fumes. Always provide for good ventilation.
WARNING! Kickbacks can be sudden, rapid and violent and can cause life threatening inju
ries. Read and understand the instructions in the manual before using the machine.
WARNING! Sparks from the cutting blade can cause re in combustible materials such as:
petrol (gas), wood, clothes, dry grass etc.
Ensure the blades are not cracked or damaged in any other way.
Do not use circular saw blades
Choke.
Air purge
Decompression valve
Starter handle
Refuelling, petrol/oil mix
Starting instruction decal See instructions under
the heading Starting and stopping.
Cutting equipment decal
A= Cutting blade diameter
B= Max. speed of output shaft
C= Max blade thickness
D= Direction of blade rotation
E= Bushing dimension
Noise emission to the environment
according to the European Community's
Directive. The machine's emission is
specied in the Technical data chapter and
on the label.
Rating plate
Row 1: Brand, Model (X,Y)
Row 2: Serial No. with manufacturing date (Y, W, X):
Year, Week, Sequence No.
Row 3: Product No. (X)
Row 4: Manufacturer (X)
Row 5: Manufacturer address
Row 6: If applicable, EC typ-approval (X,Y): Approval code, Approval stage or Chinese MEIN number
Other symbols/decals on the machine refer to special certication requirements for certain markets
Explanation of warning levels
The warnings are graded in three levels.
WARNING!
CAUTION!
NOTICE!

3
1. KEY TO SYMBOLS
This manual is the International version used for all English speaking countries outside North Ameri-
ca. If you operate in North America use the US-version.
Symbols on the machine
WARNING! The machine can be a dangerous tool if used incorrectly or carelessly, which can
cause serious or fatal injury to the operator or others.
Please read the operator's manual carefully and make sure you understand the instructions
before using the machine.
Wear personal protective equipment. See instructions under the "Personal protective equip
ment" heading.
This product is in accordance with applicable EC directives.
WARNING! Dust forms when cutting, this can cause injuries if inhaled. Use an approved
breathing mask. Avoid inhaling exhaust fumes. Always provide for good ventilation.
WARNING! Kickbacks can be sudden, rapid and violent and can cause life threatening inju
ries. Read and understand the instructions in the manual before using the machine.
WARNING! Sparks from the cutting blade can cause re in combustible materials such as:
petrol (gas), wood, clothes, dry grass etc.
Ensure the blades are not cracked or damaged in any other way.
Do not use circular saw blades
Choke.
Air purge
Decompression valve
Starter handle
Refuelling, petrol/oil mix
Starting instruction decal See instructions under
the heading Starting and stopping.
Cutting equipment decal
A= Cutting blade diameter
B= Max. speed of output shaft
C= Max blade thickness
D= Direction of blade rotation
E= Bushing dimension
Noise emission to the environment
according to the European Community's
Directive. The machine's emission is
specied in the Technical data chapter and
on the label.
Rating plate
Row 1: Brand, Model (X,Y)
Row 2: Serial No. with manufacturing date (Y, W, X):
Year, Week, Sequence No.
Row 3: Product No. (X)
Row 4: Manufacturer (X)
Row 5: Manufacturer address
Row 6: If applicable, EC typ-approval (X,Y): Approval code, Approval stage or Chinese MEIN number
Other symbols/decals on the machine refer to special certication requirements for certain markets
Explanation of warning levels
The warnings are graded in three levels.
WARNING!
CAUTION!
NOTICE!

4
2. MACHINE'S SAFETY EQUIPMENT
General
This section describes the machine's safety equipment, its purpose, and how checks and mainte-
nance should be carried out to ensure that it operates correctly.
Throttle trigger lockout
The throttle trigger lock is designed to prevent accidental operation of the throttle. When the lock (A)
is pressed in this releases the throttle (B).
The trigger lock remains pressed in as long as the throttle is pressed. When the grip on the handle is
released the throttle trigger and the throttle trigger lock both return to their original positions. This is
controlled by two independent return spring systems. This means that the throttle trigger is automa-
tically locked in the idle position.
Checking the throttle lockout
- Make sure that the throttle trigger is locked at idle setting when the throttle trigger lockout is
released.
- Press the throttle lockout and make sure it returns to its original position when you release it.

5
- Check that the throttle trigger and throttle lockout move freely and that the return springs work
properly.
- Start the power cutter and apply full throttle. Release the throttle control and check that the
cutting blade stops and remains stationary. If the cutting bladec rotates when the throttle is in the
idle position you should check the carburettor's idle adjustment. See instructions in the section
"Maintenance".
Stop switch
Use the stop switch to switch off the engine.
Checking the stop switch
Start the engine and make sure the engine stops when you move the stop switch to the stop setting.
Blade guard
This guard is tted above the cutting blade and is designed to prevent parts of the blade or cutting
fragments from being thrown towards the user.

6
Checking the blade and the blade guard
- Check that the guard over the culling blade is not cracked or damaged in any other way. Replace
when damaged.
- Check that the cutting blade is tted correctly and does not show signs of damage. A damaged
culling blade can cause personal injury.
Vibration damping system
Your machine is equipped with a vibration damping system that is designed to minimize vibration
and make operation easier.
The machine's vibration damping system reduces the transfer of vibration between the engine
unit/cutting equipment and the machine's handle unit. The engine body, including the cutting equip-
ment, is insulated from the handles by vibration damping units.
Checking the vibration damping system
Check the vibration damping units regularly for cracks or deformation. Replace them if damaged.
Check that the vibration damping element is securely attached between the engine unit and handle
unit.

7
Mufer
The mufer is designed to keep noise levels to a minimum and to direct exhaust fumes away from
the user.
Inspecting the mufer
Check regularly that the mufer is complete and secured correctly.
3. CUTTING BLADES

8
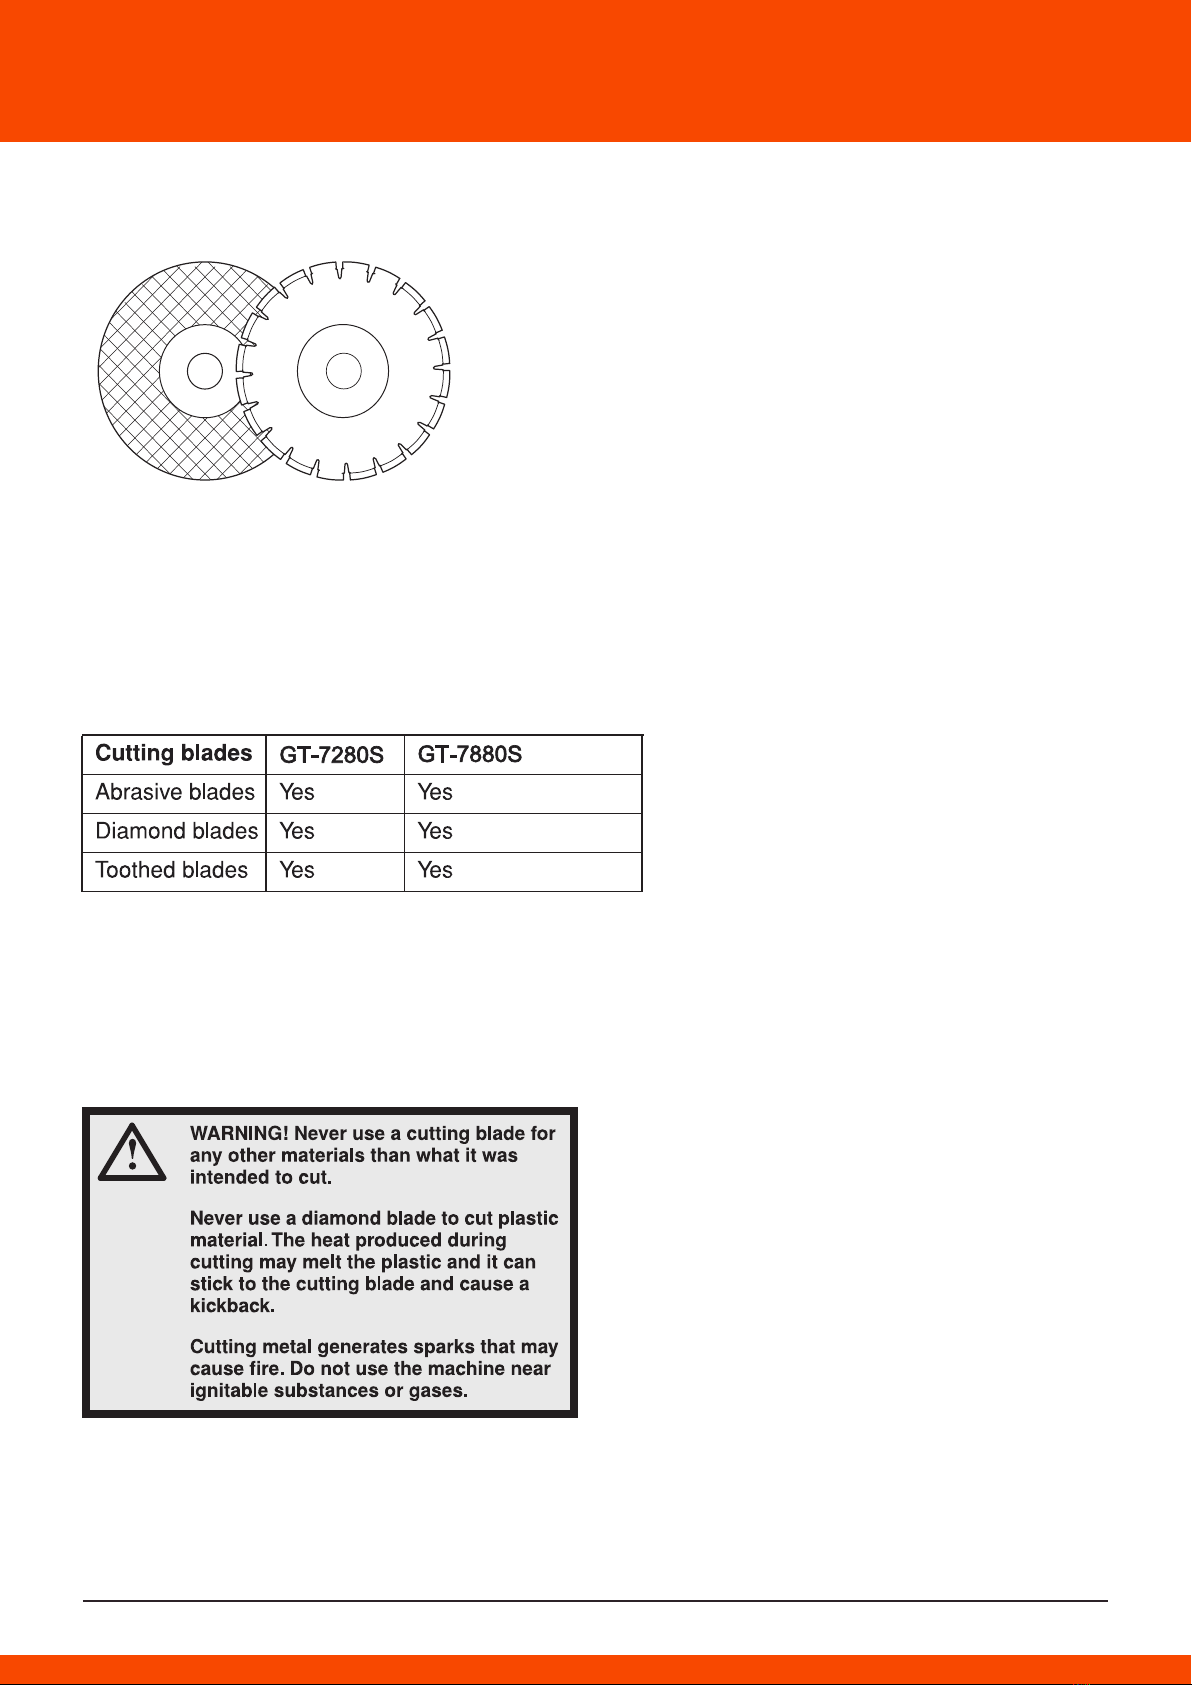
- Cutting blades are available in two basic designs; abrasive blades and diamond blades.
- High-quality blades are often most economical. Lower quality blades often have inferior cutting
capacity and a shorter service life, which results in a higher cost in relation to the quantity of mate-
rial that is cut.
- Make sure that the right bushing is used for the cutting blade to be tted on the machine. See the
instructions under the heading Fitting the cutting blade.
Suitable cutting blades
For more information, see the '"Technical data" section.
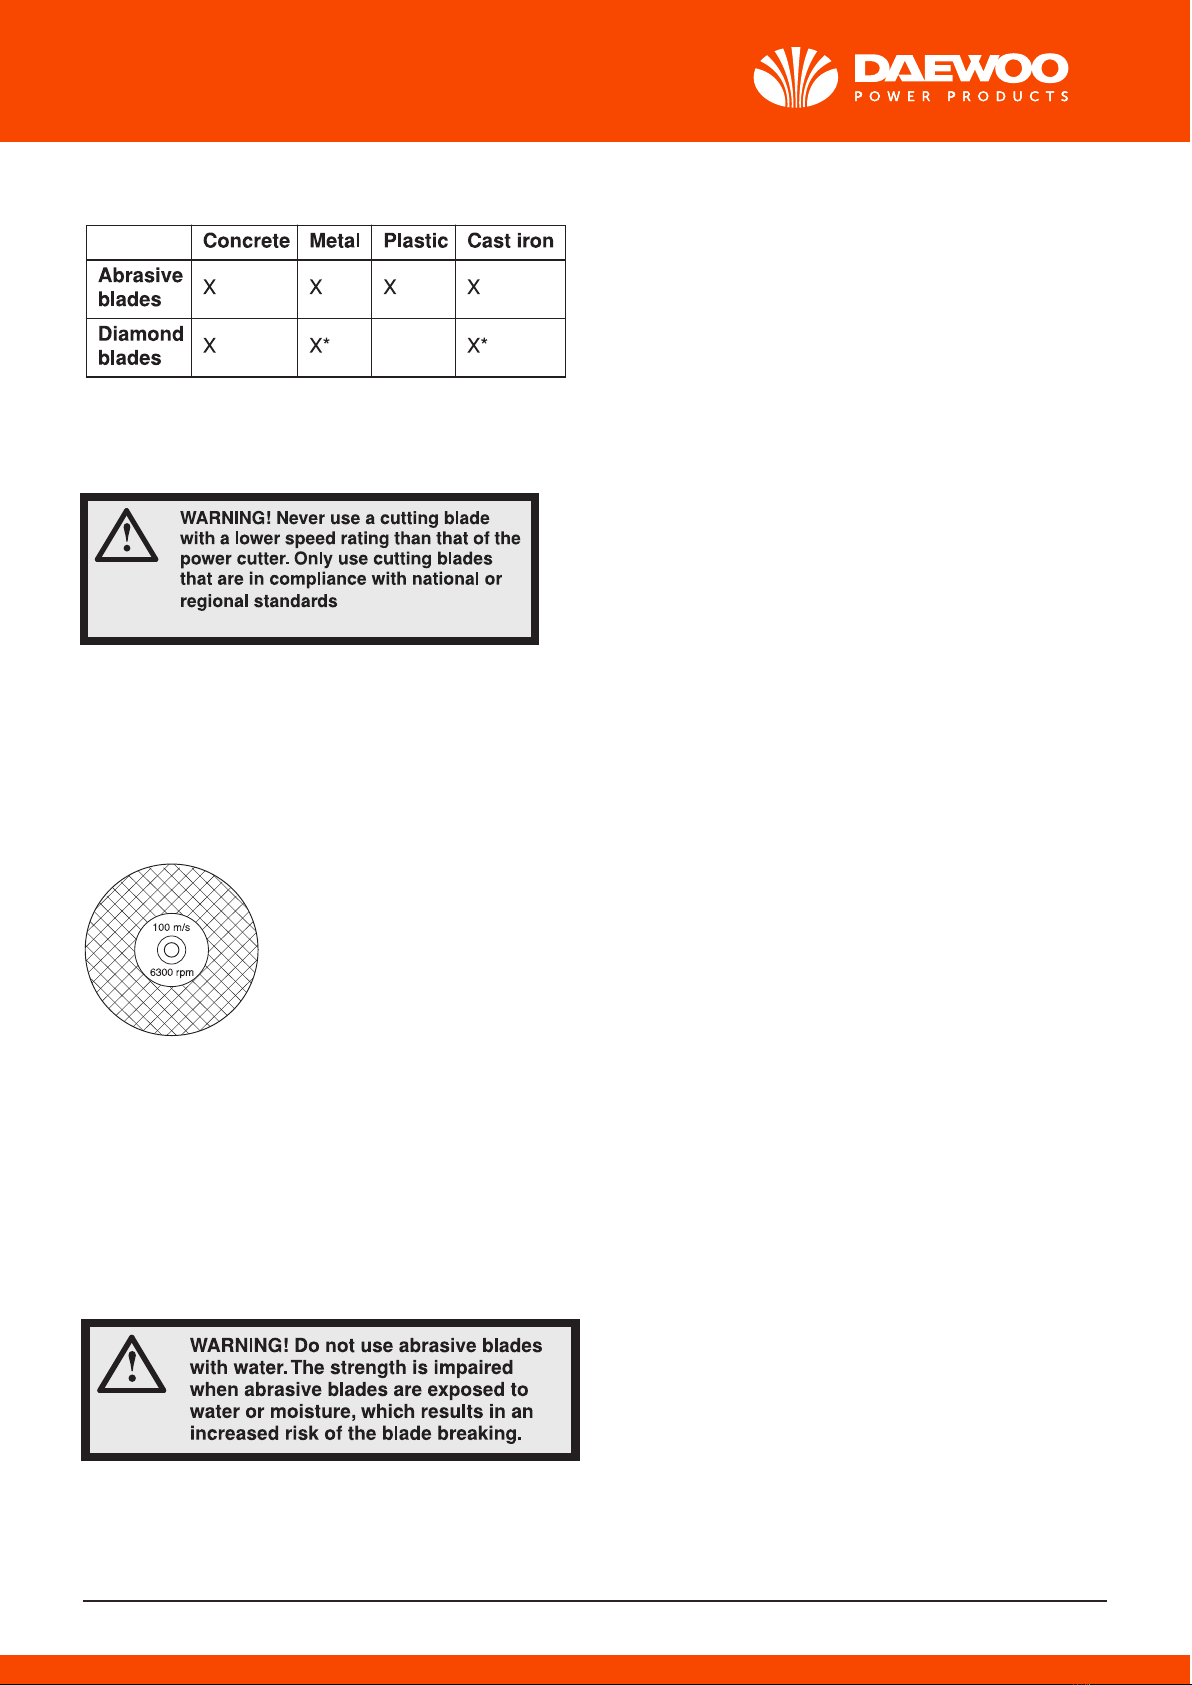
*Without water
**See instructions under the heading "Toothed blades, carbide tipped blades and emergency situa-
tions".
Cutting blades for different materials
Follow the instructions supplied with the culling blade concerning the suitability of the blade for
various applications, or consult your dealer in case of doubts.
- Diamond blades consist of a steel core provided with segments that contain industrial diamonds.
- Diamond blades ensure lower costs per cutting operation, fewer blade changes and a constant
cutting depth.
- When using diamond blades make sure that it rotates in the direction indicated by the arrow on the
blade.
Diamond blades for different materials
- Diamond blades are ideal for masonry, reinforced concrete and other composite materials.
- Diamond blades are available in several hardness classes.
- Special blades should be used when cutting metal. Ask your dealer for help in choosing the right
product.
Sharpening diamond blades
- Always use a sharp diamond blade.
- Diamond blades can become dull when the wrong feeding pressure is used or when cutting
certain materials such as heavily reinforced concrete.
- Working with a dull diamond blade causes overheating, which can result in the diamond segments
coming loose.
- Sharpen the blade by cutting in a soft material such as sandstone or brick.
Diamond blades and cooling
- During culling the friction in the cut causes the diamond blade to be heated up. If the blade is
allowed to get too hot this can result in loss of blade tensioning or core cracking.
Diamond blades for dry cutting
- Although no water is required for cooling, dry cutting blades must be cooled with air ow around
the blades. For this reason dry cutting blades are recommended only for intermittent cutting. Every
few seconds of cutting the blade should be allowed to run 'free" with no load to allow the air ow
around the blade to dissipate the heat.
Diamond blades for wet cutting
- Wet cutting diamond blades must be used with water to keep the blade core and segments cool
during sawing.
- Wet cutting blades should NOT be used dry.
- Using wet cutting blades without water can cause excessive heat build-up, resulting in poor
performance, severe blade damage and is a safety hazard.
Diamond hlade - side clearance
Water cools the blade and increases its service life while also reducing the formation of dust
Toothed blades, carbide tipped blades and emergency situations

9
- Only specialty blades.
Hand held, high speed machines
- Many cutting blades that might t this power cutter are intended for stationary saws and have a
lower speed rating than is needed for this hand-held saw. Cutting blades with a lower speed rating
shall never be used on this saw. cutting blades are manufactured for highspeed, portable power
cutters.
- Check that the blade is approved for the same or higher speed according to the aproval plate of
the engine. Never use a cutting blade with a lower speed rating than that of the power cutter.
CUTTING BLADES
Blade vibration
- The blade can become out-of-round and vibrate if an excessive feed pressure is used.
- A lower feed pressure can stop the vibration. Otherwise replace the blade.
Abrasive blades
.
- Diamond blades consist of a steel core provided with segments that contain industrial diamonds.
- Diamond blades ensure lower costs per cutting operation, fewer blade changes and a constant
cutting depth.
- When using diamond blades make sure that it rotates in the direction indicated by the arrow on the
blade.
Diamond blades for different materials
- Diamond blades are ideal for masonry, reinforced concrete and other composite materials.
- Diamond blades are available in several hardness classes.
- Special blades should be used when cutting metal. Ask your dealer for help in choosing the right
product.
Sharpening diamond blades
- Always use a sharp diamond blade.
- Diamond blades can become dull when the wrong feeding pressure is used or when cutting
certain materials such as heavily reinforced concrete.
- Working with a dull diamond blade causes overheating, which can result in the diamond segments
coming loose.
- Sharpen the blade by cutting in a soft material such as sandstone or brick.
Diamond blades and cooling
- During culling the friction in the cut causes the diamond blade to be heated up. If the blade is
allowed to get too hot this can result in loss of blade tensioning or core cracking.
Diamond blades for dry cutting
- Although no water is required for cooling, dry cutting blades must be cooled with air ow around
the blades. For this reason dry cutting blades are recommended only for intermittent cutting. Every
few seconds of cutting the blade should be allowed to run 'free" with no load to allow the air ow
around the blade to dissipate the heat.
Diamond blades for wet cutting
- Wet cutting diamond blades must be used with water to keep the blade core and segments cool
during sawing.
- Wet cutting blades should NOT be used dry.
- Using wet cutting blades without water can cause excessive heat build-up, resulting in poor
performance, severe blade damage and is a safety hazard.
Diamond hlade - side clearance
Water cools the blade and increases its service life while also reducing the formation of dust
Toothed blades, carbide tipped blades and emergency situations

10
- The cutting material on abrasive blades consists of grit bonded using an organic binder. "Reinfor-
ced blades" are made up of a fabric or bre base that prevents total breakage at maximum working
speed if the blade should be cracked or damaged.
- A cutting blade's performance is determined by the type and size of abrasive corn, and the type
and hardness of the bonding agent.
- Ensure the cutting blade is not cracked or damaged.
- Test the abrasive blade by hanging it on your nger and tapping it lightly with a screwdriver or the
like. If the blade does not produce a resonant, ringing sound it is damaged.
Abrasive blades for different materials
Diamond blades
General
- Diamond blades consist of a steel core provided with segments that contain industrial diamonds.
- Diamond blades ensure lower costs per cutting operation, fewer blade changes and a constant
cutting depth.
- When using diamond blades make sure that it rotates in the direction indicated by the arrow on the
blade.
Diamond blades for different materials
- Diamond blades are ideal for masonry, reinforced concrete and other composite materials.
- Diamond blades are available in several hardness classes.
- Special blades should be used when cutting metal. Ask your dealer for help in choosing the right
product.
Sharpening diamond blades
- Always use a sharp diamond blade.
- Diamond blades can become dull when the wrong feeding pressure is used or when cutting
certain materials such as heavily reinforced concrete.
- Working with a dull diamond blade causes overheating, which can result in the diamond segments
coming loose.
- Sharpen the blade by cutting in a soft material such as sandstone or brick.
Diamond blades and cooling
- During culling the friction in the cut causes the diamond blade to be heated up. If the blade is
allowed to get too hot this can result in loss of blade tensioning or core cracking.
Diamond blades for dry cutting
- Although no water is required for cooling, dry cutting blades must be cooled with air ow around
the blades. For this reason dry cutting blades are recommended only for intermittent cutting. Every
few seconds of cutting the blade should be allowed to run 'free" with no load to allow the air ow
around the blade to dissipate the heat.
Diamond blades for wet cutting
- Wet cutting diamond blades must be used with water to keep the blade core and segments cool
during sawing.
- Wet cutting blades should NOT be used dry.
- Using wet cutting blades without water can cause excessive heat build-up, resulting in poor
performance, severe blade damage and is a safety hazard.
Diamond hlade - side clearance
Water cools the blade and increases its service life while also reducing the formation of dust
Toothed blades, carbide tipped blades and emergency situations

11
- Diamond blades consist of a steel core provided with segments that contain industrial diamonds.
- Diamond blades ensure lower costs per cutting operation, fewer blade changes and a constant
cutting depth.
- When using diamond blades make sure that it rotates in the direction indicated by the arrow on the
blade.
Diamond blades for different materials
- Diamond blades are ideal for masonry, reinforced concrete and other composite materials.
- Diamond blades are available in several hardness classes.
- Special blades should be used when cutting metal. Ask your dealer for help in choosing the right
product.
Sharpening diamond blades
- Always use a sharp diamond blade.
- Diamond blades can become dull when the wrong feeding pressure is used or when cutting
certain materials such as heavily reinforced concrete.
- Working with a dull diamond blade causes overheating, which can result in the diamond segments
coming loose.
- Sharpen the blade by cutting in a soft material such as sandstone or brick.
Diamond blades and cooling
- During culling the friction in the cut causes the diamond blade to be heated up. If the blade is
allowed to get too hot this can result in loss of blade tensioning or core cracking.
Diamond blades for dry cutting
- Although no water is required for cooling, dry cutting blades must be cooled with air ow around
the blades. For this reason dry cutting blades are recommended only for intermittent cutting. Every
few seconds of cutting the blade should be allowed to run 'free" with no load to allow the air ow
around the blade to dissipate the heat.
Diamond blades for wet cutting
- Wet cutting diamond blades must be used with water to keep the blade core and segments cool
during sawing.
- Wet cutting blades should NOT be used dry.
- Using wet cutting blades without water can cause excessive heat build-up, resulting in poor
performance, severe blade damage and is a safety hazard.
Diamond hlade - side clearance
Water cools the blade and increases its service life while also reducing the formation of dust
Toothed blades, carbide tipped blades and emergency situations
12

- Diamond blades consist of a steel core provided with segments that contain industrial diamonds.
- Diamond blades ensure lower costs per cutting operation, fewer blade changes and a constant
cutting depth.
- When using diamond blades make sure that it rotates in the direction indicated by the arrow on the
blade.
Diamond blades for different materials
- Diamond blades are ideal for masonry, reinforced concrete and other composite materials.
- Diamond blades are available in several hardness classes.
- Special blades should be used when cutting metal. Ask your dealer for help in choosing the right
product.
Sharpening diamond blades
- Always use a sharp diamond blade.
- Diamond blades can become dull when the wrong feeding pressure is used or when cutting
certain materials such as heavily reinforced concrete.
- Working with a dull diamond blade causes overheating, which can result in the diamond segments
coming loose.
- Sharpen the blade by cutting in a soft material such as sandstone or brick.
Diamond blades and cooling
- During culling the friction in the cut causes the diamond blade to be heated up. If the blade is
allowed to get too hot this can result in loss of blade tensioning or core cracking.
Diamond blades for dry cutting
- Although no water is required for cooling, dry cutting blades must be cooled with air ow around
the blades. For this reason dry cutting blades are recommended only for intermittent cutting. Every
few seconds of cutting the blade should be allowed to run 'free" with no load to allow the air ow
around the blade to dissipate the heat.
Diamond blades for wet cutting
- Wet cutting diamond blades must be used with water to keep the blade core and segments cool
during sawing.
- Wet cutting blades should NOT be used dry.
- Using wet cutting blades without water can cause excessive heat build-up, resulting in poor
performance, severe blade damage and is a safety hazard.
Diamond hlade - side clearance
Water cools the blade and increases its service life while also reducing the formation of dust
Toothed blades, carbide tipped blades and emergency situations
13
Use of this power cutter with a carbide tipped blade is a violation of work safety regulations.
Due to the hazardous nature and exigent circumstances involved with re ghting and rescue ope-
rations conducted by the various highly trained public safety forces, safety professionals (re
departments), e are aw re that they may use this power cutter with carbide tipped blades in certain
emergency situations due to the ability of carbide tipped blades to cut many different types of
obstructions and materials in combination without having to take time to switch blades or machines.
When using this power cutter be aware at all times that carbide tipped blades are more kickback
prone than abrasive or diamond blades if not used properly. Carbide tipped blades can also throw
pieces of material away from the blade.
For these reasons, a power cutter equipped with a carbide tipped blade should never be used
except by highly trained public safety professionals who are aware of the risks associated with its
use and then only in those exigent circumstances when other tools are deemed inefcient and
ineffective to for re or rescue operations. A power cutter equipped with carbide tipped blade
should never be used to cut wood in non-rescue operations.
Transport and storage
- Do not store or transport the power cutter with the cutting blade tted. All blades should be remo-
ved from the cutter after use and stored carefully.
- Store cutting blades in dry, frost free conditions. Special care should be taken with abrasive
blades. Abrasive blades must be stored on a at, level surface. If an abrasive blades is stored in
humid conditions, this can cause imbalance and result in injury.
- Inspect new blades for transport or storage damage.
4. ASSEMBLING AND ADJUSTMENTS
General
The blades are high speed approved for hand held power cutters
Checking the spindle shaft and ange washers
When the blade is replaced with a new one, check the ange washers and the spindle shaft.
- Check that the threads on the spindle shaft are undamaged.
- Check that the contact surfaces on the blade and the ange washers are undamaged, of the
correct dimension, clean, and that they run properly on the spindle shaft.
Do not use warped, notched, indented or dirty ange washers. Do not use different dimensions of
ange washers.
Checking the arbor bushing
The arbor bushings are used to t the machine to the centre hole of the cutting blade. The machine
is supplied with either a bushing that can be ipped over to t blades with either 20 mm or 1" (25,4
mm) centre holes, or with a xed 20 mm bushing. A decal on the blade guard indicates which bus-
hing has been factory tted together with appropriate blade specication.
- Check that the bushing on the machine's spindle shaft corresponds with the centre hole of the
cutting blade. The blades are marked with the diameter of the centre hole.
Checking the direction of the blade rotation
- When using diamond blades make sure that it rotates in the direction indicated by the arrow on the
blade. The direction of rotation for the machine is shown by arrows on the cutting arm.
Fitting the cutting blade
The blade is placed on the bushing (A) between the inner ange washer (B) and the ange washer
(C). The ange washer is turned so that it ts on the axle.

- Diamond blades consist of a steel core provided with segments that contain industrial diamonds.
- Diamond blades ensure lower costs per cutting operation, fewer blade changes and a constant
cutting depth.
- When using diamond blades make sure that it rotates in the direction indicated by the arrow on the
blade.
Diamond blades for different materials
- Diamond blades are ideal for masonry, reinforced concrete and other composite materials.
- Diamond blades are available in several hardness classes.
- Special blades should be used when cutting metal. Ask your dealer for help in choosing the right
product.
Sharpening diamond blades
- Always use a sharp diamond blade.
- Diamond blades can become dull when the wrong feeding pressure is used or when cutting
certain materials such as heavily reinforced concrete.
- Working with a dull diamond blade causes overheating, which can result in the diamond segments
coming loose.
- Sharpen the blade by cutting in a soft material such as sandstone or brick.
Diamond blades and cooling
- During culling the friction in the cut causes the diamond blade to be heated up. If the blade is
allowed to get too hot this can result in loss of blade tensioning or core cracking.
Diamond blades for dry cutting
- Although no water is required for cooling, dry cutting blades must be cooled with air ow around
the blades. For this reason dry cutting blades are recommended only for intermittent cutting. Every
few seconds of cutting the blade should be allowed to run 'free" with no load to allow the air ow
around the blade to dissipate the heat.
Diamond blades for wet cutting
- Wet cutting diamond blades must be used with water to keep the blade core and segments cool
during sawing.
- Wet cutting blades should NOT be used dry.
- Using wet cutting blades without water can cause excessive heat build-up, resulting in poor
performance, severe blade damage and is a safety hazard.
Diamond hlade - side clearance
Water cools the blade and increases its service life while also reducing the formation of dust
Toothed blades, carbide tipped blades and emergency situations
Use of this power cutter with a carbide tipped blade is a violation of work safety regulations.
Due to the hazardous nature and exigent circumstances involved with re ghting and rescue ope-
rations conducted by the various highly trained public safety forces, safety professionals (re
departments), e are aw re that they may use this power cutter with carbide tipped blades in certain
emergency situations due to the ability of carbide tipped blades to cut many different types of
obstructions and materials in combination without having to take time to switch blades or machines.
When using this power cutter be aware at all times that carbide tipped blades are more kickback
prone than abrasive or diamond blades if not used properly. Carbide tipped blades can also throw
pieces of material away from the blade.
For these reasons, a power cutter equipped with a carbide tipped blade should never be used
except by highly trained public safety professionals who are aware of the risks associated with its
use and then only in those exigent circumstances when other tools are deemed inefcient and
ineffective to for re or rescue operations. A power cutter equipped with carbide tipped blade
should never be used to cut wood in non-rescue operations.
Transport and storage
- Do not store or transport the power cutter with the cutting blade tted. All blades should be remo-
ved from the cutter after use and stored carefully.
- Store cutting blades in dry, frost free conditions. Special care should be taken with abrasive
blades. Abrasive blades must be stored on a at, level surface. If an abrasive blades is stored in
humid conditions, this can cause imbalance and result in injury.
- Inspect new blades for transport or storage damage.
4. ASSEMBLING AND ADJUSTMENTS
General
The blades are high speed approved for hand held power cutters
Checking the spindle shaft and ange washers
When the blade is replaced with a new one, check the ange washers and the spindle shaft.
- Check that the threads on the spindle shaft are undamaged.
- Check that the contact surfaces on the blade and the ange washers are undamaged, of the
correct dimension, clean, and that they run properly on the spindle shaft.
Do not use warped, notched, indented or dirty ange washers. Do not use different dimensions of
ange washers.
Checking the arbor bushing
The arbor bushings are used to t the machine to the centre hole of the cutting blade. The machine
is supplied with either a bushing that can be ipped over to t blades with either 20 mm or 1" (25,4
mm) centre holes, or with a xed 20 mm bushing. A decal on the blade guard indicates which bus-
hing has been factory tted together with appropriate blade specication.
- Check that the bushing on the machine's spindle shaft corresponds with the centre hole of the
cutting blade. The blades are marked with the diameter of the centre hole.
Checking the direction of the blade rotation
- When using diamond blades make sure that it rotates in the direction indicated by the arrow on the
blade. The direction of rotation for the machine is shown by arrows on the cutting arm.
Fitting the cutting blade
The blade is placed on the bushing (A) between the inner ange washer (B) and the ange washer
(C). The ange washer is turned so that it ts on the axle.
14

- Diamond blades consist of a steel core provided with segments that contain industrial diamonds.
- Diamond blades ensure lower costs per cutting operation, fewer blade changes and a constant
cutting depth.
- When using diamond blades make sure that it rotates in the direction indicated by the arrow on the
blade.
Diamond blades for different materials
- Diamond blades are ideal for masonry, reinforced concrete and other composite materials.
- Diamond blades are available in several hardness classes.
- Special blades should be used when cutting metal. Ask your dealer for help in choosing the right
product.
Sharpening diamond blades
- Always use a sharp diamond blade.
- Diamond blades can become dull when the wrong feeding pressure is used or when cutting
certain materials such as heavily reinforced concrete.
- Working with a dull diamond blade causes overheating, which can result in the diamond segments
coming loose.
- Sharpen the blade by cutting in a soft material such as sandstone or brick.
Diamond blades and cooling
- During culling the friction in the cut causes the diamond blade to be heated up. If the blade is
allowed to get too hot this can result in loss of blade tensioning or core cracking.
Diamond blades for dry cutting
- Although no water is required for cooling, dry cutting blades must be cooled with air ow around
the blades. For this reason dry cutting blades are recommended only for intermittent cutting. Every
few seconds of cutting the blade should be allowed to run 'free" with no load to allow the air ow
around the blade to dissipate the heat.
Diamond blades for wet cutting
- Wet cutting diamond blades must be used with water to keep the blade core and segments cool
during sawing.
- Wet cutting blades should NOT be used dry.
- Using wet cutting blades without water can cause excessive heat build-up, resulting in poor
performance, severe blade damage and is a safety hazard.
Diamond hlade - side clearance
Water cools the blade and increases its service life while also reducing the formation of dust
Toothed blades, carbide tipped blades and emergency situations
15
- Lock the shaft. Insert a tool in the hole in the cutting head and rotate the blade until it is locked.
- Tightening torque for the bolt holding the blade is: 25 Nm (215 in.lb).
Blade guard
The guard for the cutting equipment should be adjusted so that the rear section is ush with the
work piece. Spatter and sparks from the material being cut are then collected up by the guard and
led away from the user. The blade guard is friction locked.
- Press the ends of the guard against the work piece or adjust the guard with the adjustment handle.
The guard must always be tted on the machine.
Reversible cutting head
The machine is tted with a reversible cutting head allowing cutting close to a wall or at ground
level, restricted only by the thickness of the blade guard. In the event of a kickback it is harder to
control the machine when cutting with the cutting head reversed. The cutting blade is further away
for the centre of the machine which means the handle and the cutting blade are no longer in align-
ment. It is more difcult to restrain the machine if the blade gets jammed or stuck in its kickback
danger zone. See under the "Kickback" heading in the "Operating" section for additional informa-
tion. Some of the machine's good ergonomic features are jeopardised such as balance. Cutting with
the cutting head reversed should only occur with cuts that are not possible in a standard manner.
- Loosen the three nuts (A) holding the upper belt guard. Turn the belt tensioner (B) to position "O"
to release the tension.
- Remove the upper belt guard.
- Disconnect the water hose nipples and handle from the blade guard (C). Remove the stop (D).

- The cutting head is now loose and can be removed from the machine. Remove the belt from the
belt pulley.
- Rotate the bearing housing to opposite direction and reassemble the stop.
5. FUEL HANDLING
General
WARNING! Running an engine in a conned or badly ventilated area can result in
death due to asphyxiation or carbon monoxide poisoning. Use fans to ensure proper
air circulation when working in trenches or ditches deeper than one meter.
Fuel and fuel fumes are ammable and can cause serious injury when inhaled or
allowed to come in contact with the skin. For this reason observe caution when
handling fuel and make sure there is adequate ventilation.
The exhaust fumes from the engine are hot and may contain sparks which can start
a re. Never start the machine indoors or near combustible material!
Do not smoke and do not place any hot objects in the vicinity of fuel.
16

17
Fuel
Petrol
- Use good quality unleaded or leaded petrol.
- The lowest octane recommended is 90 (RON). If you run the engine on a lower octane grade than
90 socalled knocking can occur. This gives rise to a high engine temperature, which can result in
serious engine damage.
- When working at continuous high revs a higher octane rating is recommended.
Environment fuel
We recommends the use of alkylate fuel, either Aspen two-stroke fuel or environmental fuel for
four-stroke engines blended with two-stroke oil as set out below. Note that carburettor adjustment
may be necessary when changing the type of fuel (see the instructions under the heading Carburet-
tor).
Ethanol blended fuel, E10 may be used (max 10% ethanol blend). Using ethanol blends higher than
E10 will create lean running condition which can cause engine damage.
Two-stroke oil
- For best results and performance use twostroke engine oil, which is specially formulated for our
air-cooled two-stroke engines.
- Never use two-stroke oil intended for water-cooled engines, sometimes referred to as outboard oil
(rated TCW).
- Never use oil intended for four-stroke engines.
Mixing
- Always mix the petrol and oil in a clean container intended for fuel.
- Always start by lling half the amount of the petrol to be used. Then add the entire amount of oil.
Mix (shake) the fuel mixture. Add the remaining amount of petrol.
- Mix (shake) the fuel mixture thoroughly before lling the machine's fuel tank.
- Do not mix more than one month's supply of fuel at a time.
NOTICE! The machine is equipped with a two-stroke engine and must always be run
using a mixture of petrol and two-stroke oil. It is important to accurately measure the
amount of oil to be mixed to ensure that the correct mixture is obtained. When mixing
small amounts of fuel, even small inaccuracies can drastically affect the ratio of the
mixture.

18
Mixing ratio
Fueling
Never start the machine:
- If you have spilled fuel or engine oil on the machine. Wipe off the spill and allow the remaining fuel
to evaporate.
- If you have spilled fuel on yourself or your clothes, change your clothes. Wash any part of your
body that has come in contact with fuel. Use soap and water.
- If the machine is leaking fuel. Check regularly for leaks from the fuel cap and fuel lines.
- Unless the fuel cap is securely lightened after refueling.
WARNING! Taking the following precautions, will lessen the risk of re:
Do not smoke and do not place any hot objects in the vicinity of fuel.
Always stop the engine and let it cool for a few minutes before refuelling.
The engine should be switched off, and the stop switch in STOP position.
When refuelling, open the fuel cap slowly so that any excess pressure is released
gently.
Clean the area around the fuel cap.
Tighten the fuel cap carefully after refuelling.
If the cap is not properly tightened the cap might vibrate lose and fuel may
escape from the fuel tank creating a re hazard.
Move the machine at least 3 m from the refuelling point before starting it.

19
Transport and storage
- Store and transport the machine and fuel so that there is no risk of any leakage or fumes coming
into contact with sparks or open ames, for example, from electrical machinery, electric motors,
electrical relays/ switches or boilers.
- When storing and transporting fuel always use approved containers intended for this purpose.
Long-term storage
When storing the machine for long periods the fuel tank must be emptied. Contact your local petrol
station to nd out where to dispose of excess fuel.
6. OPERATING
Protective equipment
General
- Do not use the machine unless you are able to call for help in the event of an accident.
Personal protective equipment
You must use approved personal protective equipment whenever you use the machine. Personal
protective equipment cannot eliminate the risk of injury but it will reduce the degree of injury if an
accident does happen. Ask your dealer for help in choosing the right equipment.
Always wear:
• Approved protective helmet
• Hearing protection
• Approved eye protection. If you use a face shield then you must also wear approved protective
goggles.
• Approved respiratory protection
• Heavy-duty, rm grip gloves.
• Tight-lling, heavy-duty and comfortable clothing that permits full freedom of movement. Cutting
generates sparks that can ignite clothing. recommends that you wear ame-retardant cotton or
heavy denim. Do not wear clothing made of material such as nylon, polyester or rayon. If ignited
such material can melt and cling to the skin. Do not wear shorts
• Boots with steel toe-caps and non-slip sole.
WARNING! The use of products such as cutters, grinders, drills, that sand or form
material can generate dust and vapours which may contain hazardous chemicals.
Check the nature of the material you intend to process and use an appropriate
breathing mask.
Long-term exposure to noise can result in permanent hearing impairment.
Always use approved hearing protection. Listen for warning signals or shouts
when you are wearing hearing protection. Always remove your hearing protection as
soon as the engine stops.
Table of contents
Other Daewoo Cutter manuals
Popular Cutter manuals by other brands

Metkon
Metkon METACUT 302 Operation & instruction manual

EINHELL
EINHELL RT-TC 430 U operating instructions

Mafell
Mafell KSS 400/36V Original operating instructions

Husqvarna
Husqvarna K1250 Operator's manual

AL-KO
AL-KO GS 7,2 Li Translation of the original instructions for use

Baumr-AG
Baumr-AG RC-16 user manual