Secabo SC30 User manual

OPERATING INSTRUCTIONS
for the Sheet Vinyl Cutter
Secabo SC30
Congratulations on the purchase of your Secabo Sheet Vinyl Cutter!
Please carefully read the operating manual to easily integrate your unit into your production
environment.
Any type of reproduction of this operating manual requires the written permission of Secabo
GmbH. Changes and errors in the technical data and the product characteristics are reserved.
The Secabo GmbH is not liable for any direct or indirect damages occurring as a result of the use
of this product.
Version 1.0 (30.04.2018)
Secabo GmbH | Hochstatt 6-8 | 85283 Wolnzach | Germany | [email protected] | www.secabo.com
1

Safety measures
Please read the information and safety measures carefully prior to initial operation of the unit!
● Do not place any magnetic objects in the vicinity of the cutting head; otherwise uniform
contact pressure is not ensured.
● Do not remove the connection cable to the computer while plotting is in progress.
● Relieve the pressure on the pressure rollers when not in use by moving the pressure lever
up.
● Do not reach into the unit when it is connected to electricity supply.
● Never open the casing and do not make any modifications to the unit yourself.
● Ensure that neither liquids nor metal objects are put inside the Sheet Cutter.
● Ensure that the wall socket used is grounded and protected with a ground fault switch.
● Ensure that the connected voltage (230V) does not deviate by more than ±10%. Otherwise
install a voltage stabilizer.
● Pull the power plug if the unit will not be in use for a longer period of time.
● Never reach into the unit in the vicinity of the blade holder during the cutting operation!
● Discontinue any printing jobs in progress before readjusting the blade holder!
● Always ensure that the Sheet Cutter is out of reach of children during operation and never
leave the unit or individual parts of it switched on without supervision.
● Do not touch the tip of the sliding blade to avoid injury.
● Always place the unit on a stable base to prevent it from falling down.
● Do not operate the unit during thunderstorms; it can be damaged or destroyed by lightning.
Secabo GmbH | Hochstatt 6-8 | 85283 Wolnzach | Germany | [email protected] | www.secabo.com
2
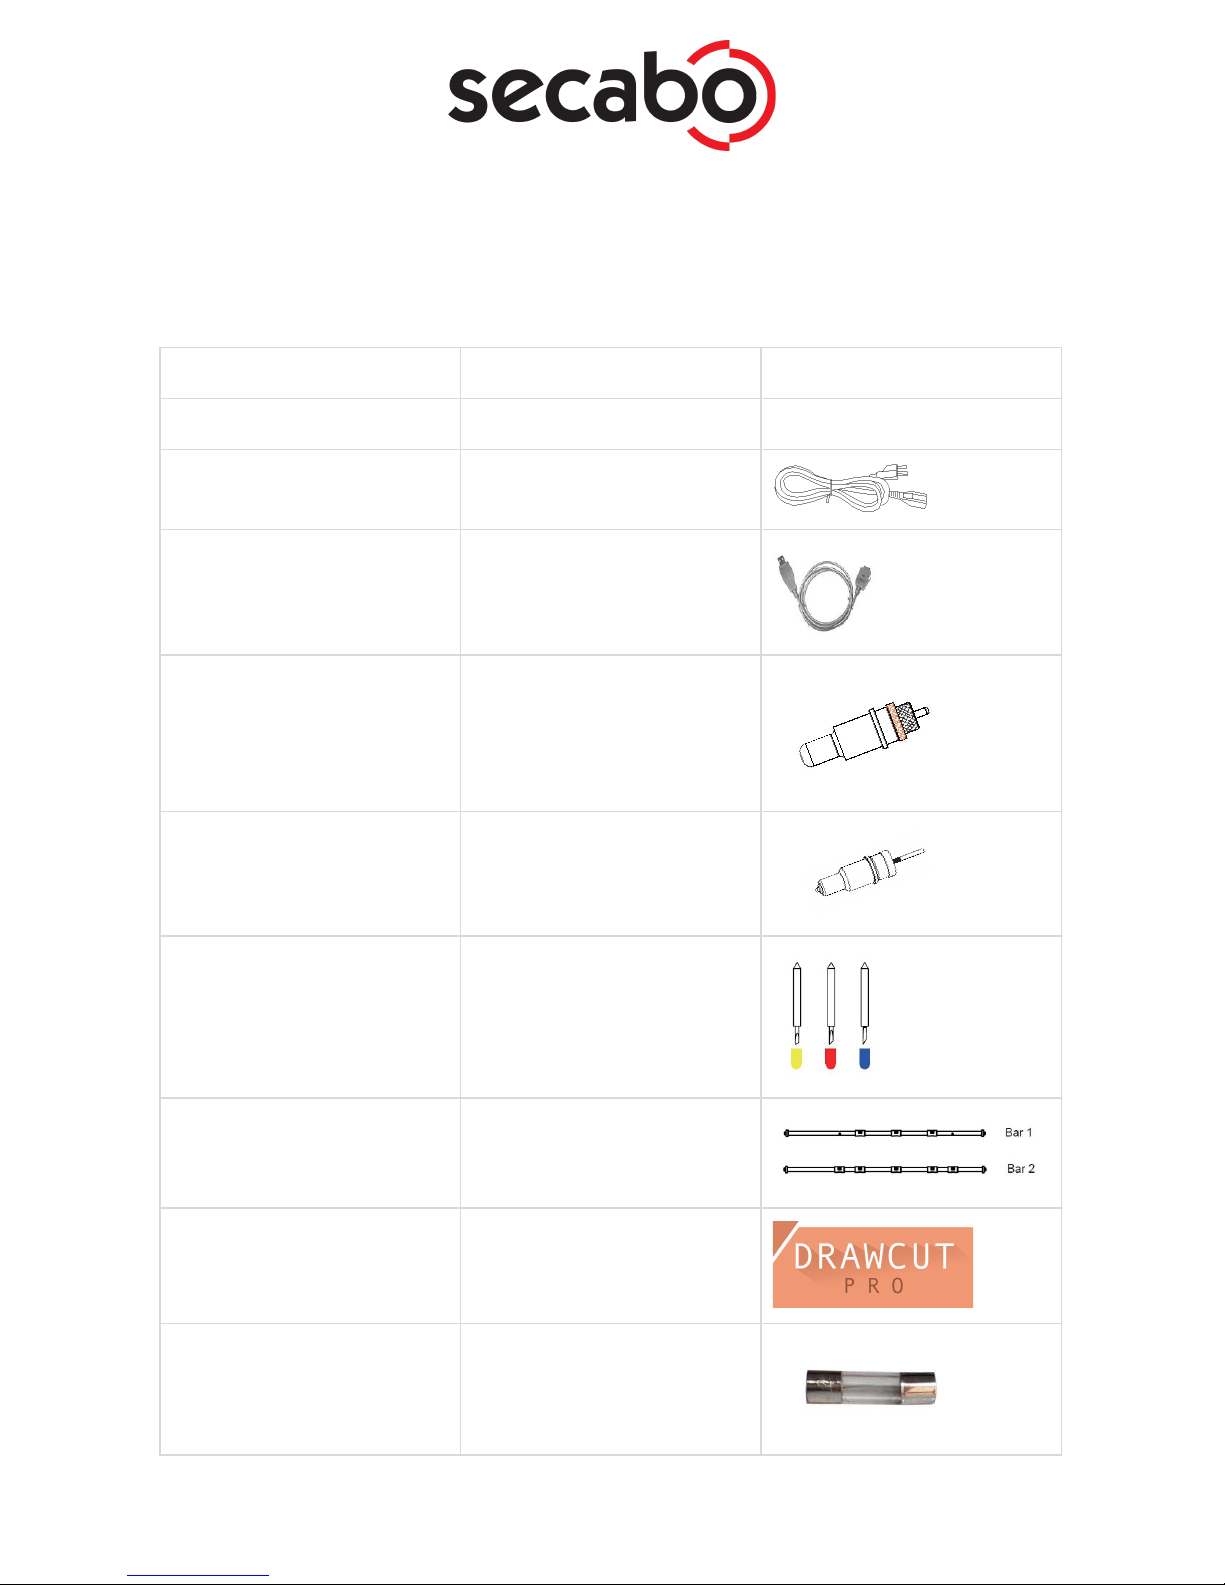
Items included
Before starting work, please check whether the following items are all present:
Article
Quantity
SC30 Sheet Cutter
1
Power cable
1
USB connection cable
1
Blade holder
1
Pen holder
1
Drag knife
1x 30° (yellow cap)
1x 45° (red cap)
1x 60° (blue cap)
Front bars
1x Bar 1 for DIN A4 size
1x Bar 2 for DINA3 or A3 plus
Certificate of DrawCut PRO
(Sheet Cutter) license
1
Fuse 5A
1

Device parts and their function
1. Support paper parts
2. Power switch
3. Paper tray
4. Paper guidance
5. Cover handle
6. Control panel with operation buttons
7. Drawer
8. Cable Clamp for USB cable
9. USB interface connector
10. SD-card interface connector (without assignment)
11. Carriage
12. The switch of bar
13. Front bar
14. Rubber Feet
15. Carriage Belt
16. Blade Holder
Secabo GmbH | Hochstatt 6-8 | 85283 Wolnzach | Germany | [email protected] | www.secabo.com
4
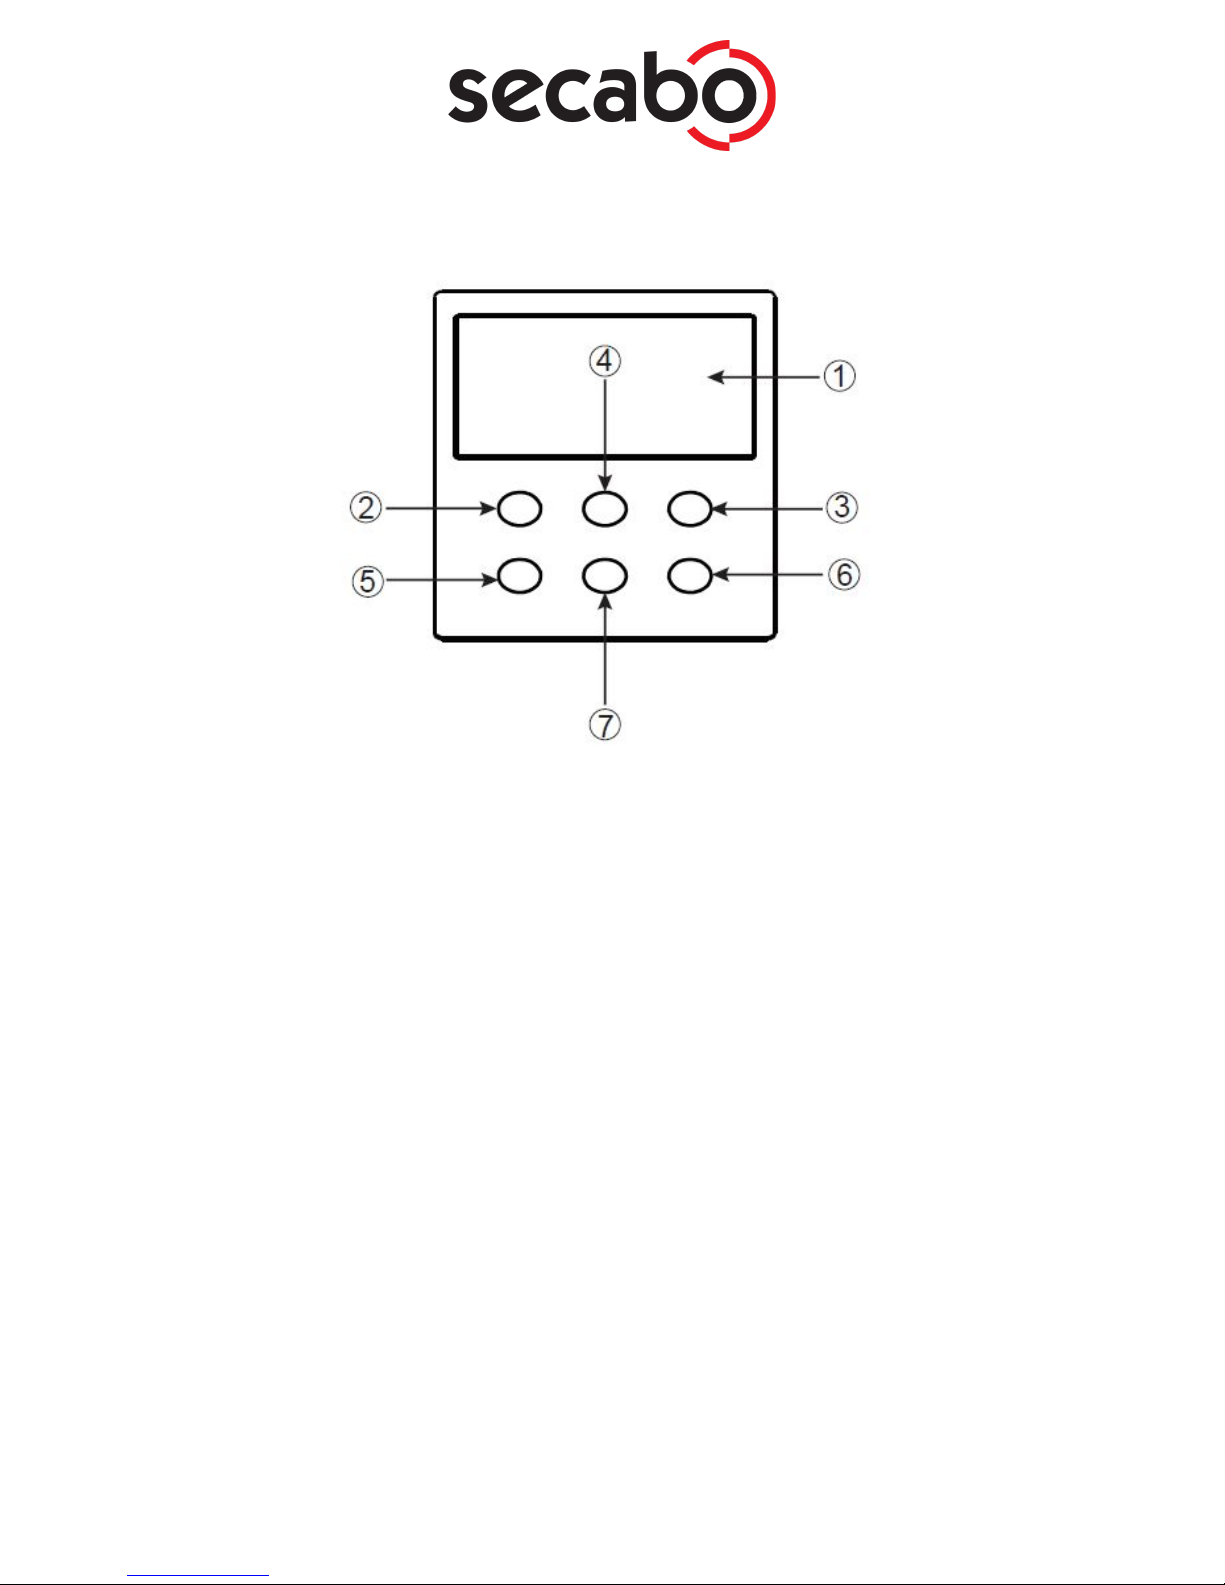
Control panel
1. Touch Screen
a. Set
i. Speed: Display speed parameters, (the data refers to the fastest cutting
straight line)
ii. Force: Display force parameters.
iii. XP:The scaling of the X direction(feeding direction),generally do not need to
change
iv. YP:The scaling of the Y direction(Carriage direction),generally do not need
to change.
v. Fan Setting: Suction fan switch and settings,Prt Sensor Val: This is useless
for user.
vi. LED: LED lights above the carriage, please keep it open when
working-Enable
vii. VER: The version for firmware.
b. Test
i. Force: Directly adjust the pressure.
ii. Sensor status: it will show red if the sensor has a cover and the opposite
shows black.
iii. S1: The position in front of the front bar,checking after the work, the paper is
remove the plotter or not.
iv. S2: The position in back of the pinch roller,control the feeding.
v. S3: The position in paper tray,checking if there is any paper in the tray and
control the feeding.
Secabo GmbH | Hochstatt 6-8 | 85283 Wolnzach | Germany | [email protected] | www.secabo.com
5

vi. Load: Take a piece of paper on the S1 sensor, press load, the machine will
automatically feed the paper and the carriage moved to the paper, ready to
test.
vii. Scale Test: The carriage will cut one squares(100mm×100mm)
viii. Force Test: The carriage will cut one squares and triangles in order to test
the force.
ix. Eject: Exit the paper directly.
x. Return: Save the force setting and back the main interface.
c. Offline: you can move the carriage and feeding direction manually and set the
origin
2. Key without assignment
3. Back---Return to the last interface
4. Direction Key----Up key
5. Direction Key----Left key
6. Direction Key----Right key
7. Direction Key----Down key
Initial operation of machine and software
Caution! Please note that the smooth installation and complete configuration
requires DrawCut PRO to be installed first.
Installation DrawCut PRO
Minimum Computer Configuration
● IBM Compatible 1Ghz CPU
● 2Gb of available Hard Disk Drive space
● 2Gb of RAM
● SVGA color monitor set to a min 1024*768
● 256Mb SVGA Video/Graphics card
● 2 Button Mouse
● Microsoft Windows Xp ( Service Pack 3 )
●
Recommended Computer Configuration
●Intel Quad-Core+
● 100Gb+ of available Hard Disk space
● 16Gb+ of RAM
● DVD Read Write Drive
● Dual 24’’+ Color monitors(1900 Pixels+ Wide)
● 4.0Gb+ Video/Graphics card
● 2 Button Scrolling Wheel Mouse
● Sound & Speakers
● Microsoft Windows 7, 8 or 10 pro (64 bit)
Secabo GmbH | Hochstatt 6-8 | 85283 Wolnzach | Germany | [email protected] | www.secabo.com
6

Your Secabo Sheet Cutter is delivered with the cutting software DrawCut PRO. This software must
be activated over the Internet. You do not necessarily need internet access on the computer, on
which DrawCut will be installed. The activation can also be done on another computer.
In order to control your Sheet Cutter via your computer, install the software as described below:
● Disable the Windows Firewall and your anti-virus software for the time of installation.
● Download the current version of DrawCut PRO (Sheet Cutter) at
http://fcws6.com/downloads/drawcut/Install_DrawCutPro_DL_MV_BCA.exe and follow the
installation wizard.
● Find your 26-digit DrawCut serial number on the printout that was delivered with your
Sheet Cutter. Enter it when you are prompted to do so.
● Choose the language
● Select your model
● Now you can use DrawCut PRO (Sheetcutter).
Installation of your Secabo Sheet Cutter in DrawCut
● First, make sure that your PC is connected to the Internet.
● Connect the Sheet Cutter to your computer using the supplied USB cable.
● Switch on the device.
● Your Secabo Sheet Cutter will now be detected. Windows will search for the appropriate
drivers and automatically install them. This can take some time. After that, the device is
ready for operation.
● Start DrawCut.
● Run the Spooler in Drawcut Pro
Secabo GmbH | Hochstatt 6-8 | 85283 Wolnzach | Germany | [email protected] | www.secabo.com
7

● Click on Lapos Q Controller
● The Lapos Q module should now be running.
Secabo GmbH | Hochstatt 6-8 | 85283 Wolnzach | Germany | [email protected] | www.secabo.com
8
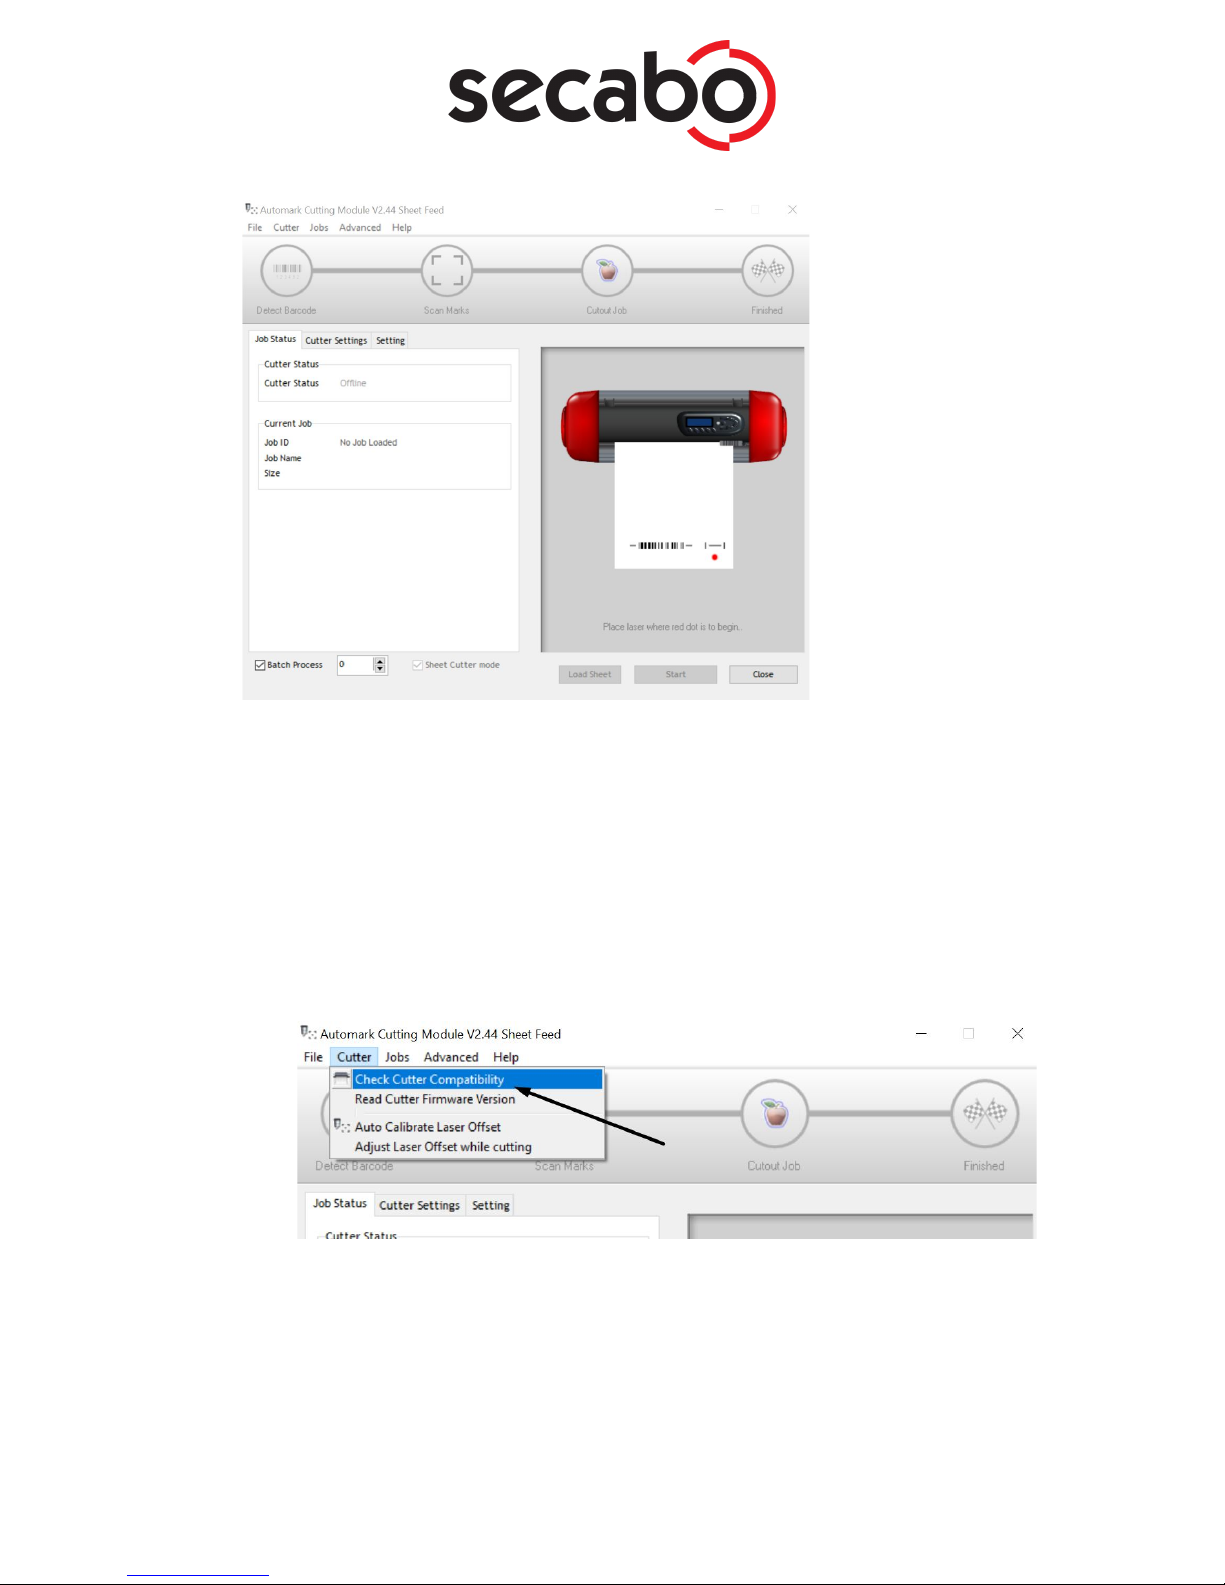
● Confirming that the machine has the correct firmware version
○ After you have first installed the program you will need to run a quick test to ensure
that the machine has been shipped with necessary firmware version needed to scan
barcodes correctly.
○ 1. Open the Barcode controller module.
○ 2. Ensure that the machine is connected to the computer, plugged in and turned on.
○ 3. From the “Cutter” menu, click on “Check Cutter Compatibility”
The software will then inform you if the machine has the required firmware and is ready to
be used with the software.
Secabo GmbH | Hochstatt 6-8 | 85283 Wolnzach | Germany | [email protected] | www.secabo.com
9

Initial Calibration
After you have installed the program you will need to perform an initial calibration of the Lapos
sensor. This calibration is required and has to be done only once.
Instructions:
● Remove the blade from the cutter, and load the pen tool. Load a sheet of plain A4 paper
and test if the pen is drawing correctly. Adjust the force if required until you are able to get a
sharp continuous pen line.
● Load a blank sheet of paper into the machine and position the pen in the middle of the
sheet of paper and set the base point (origin) to 0,0.
● Run the Barcode controller, and from the “Cutter” menu, click on “Auto Calibrate Laser
Offset”
● The machine will move over the area it is about to mark with the pen. If the cutter
does not move the pen off the edge of the paper, click ok to begin the automatic
calibration process.
● Once completed, the software will now be calibrated, ready to use.
Note:If the calibration process fails, ensure that the pen is making clear,
sharp lines on the paper.
Cutting the Sample test print
Secabo GmbH | Hochstatt 6-8 | 85283 Wolnzach | Germany | [email protected] | www.secabo.com
10

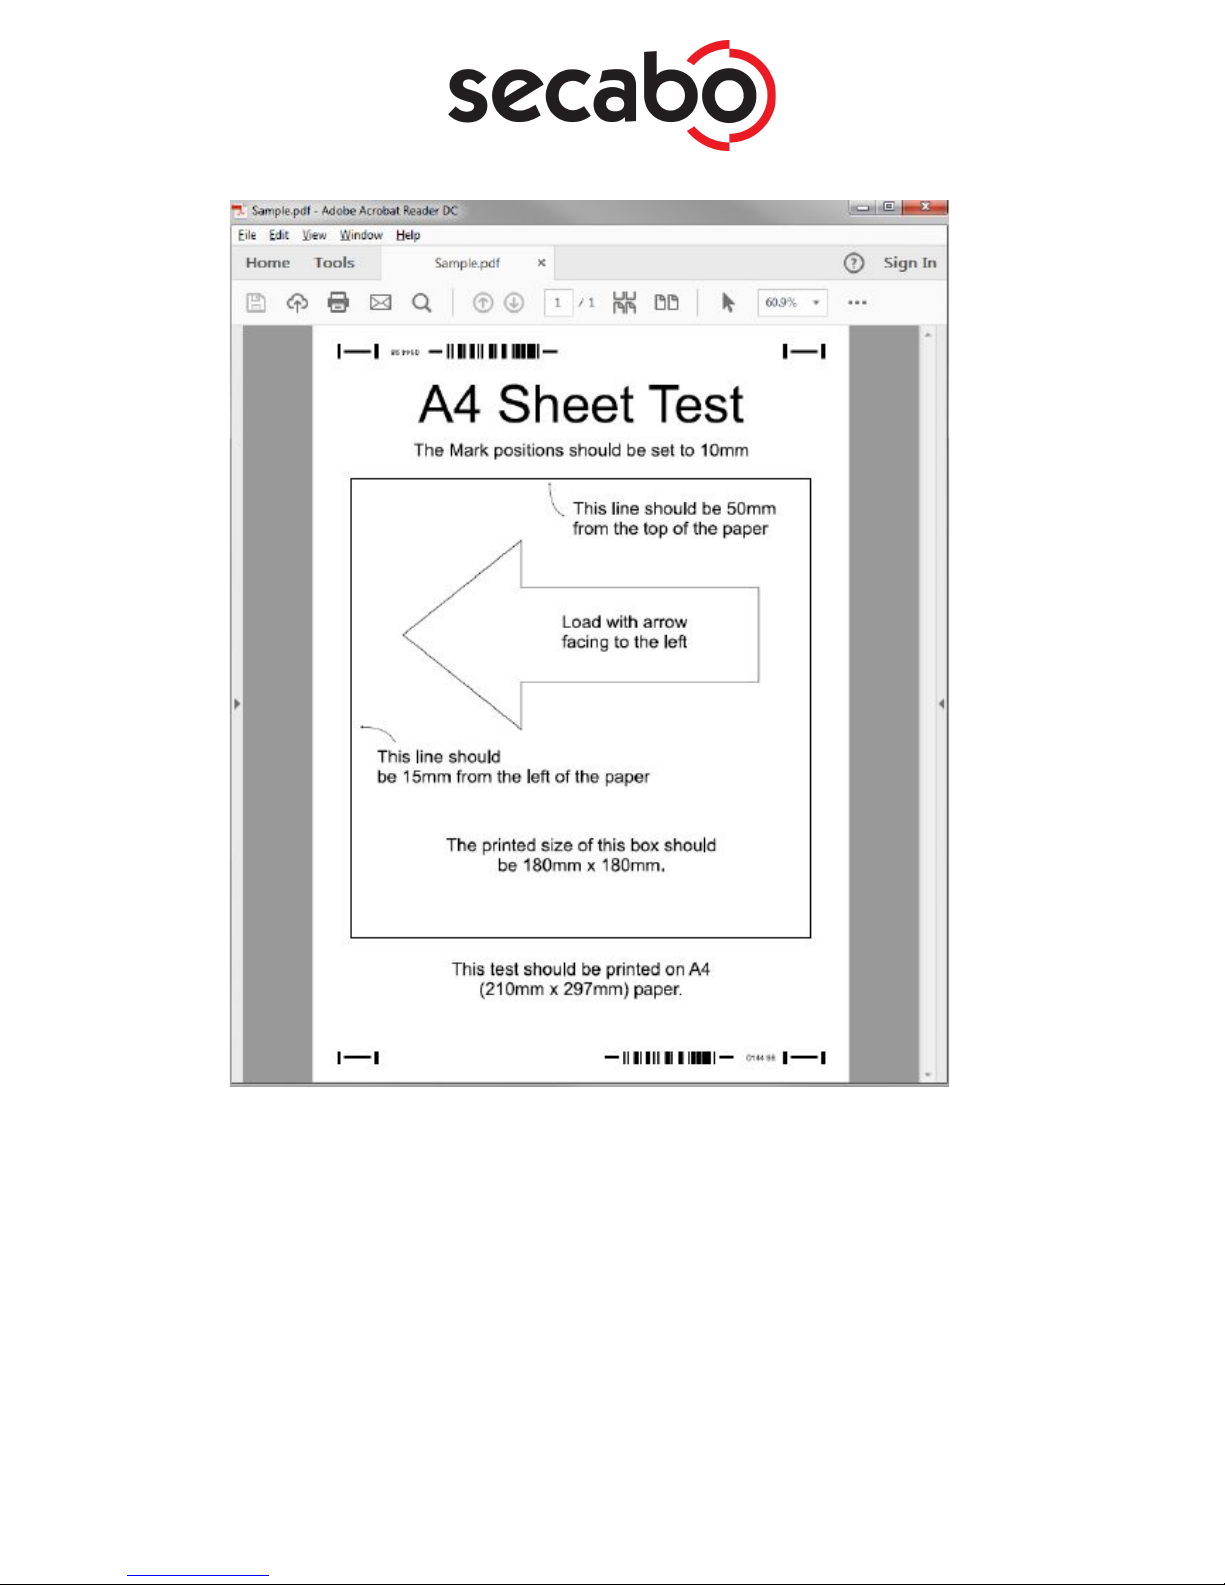
● After calibrating the laser offset, you are ready to perform a cutting test using a predesigned
sample.
● Open the barcode controller.
● From the “Jobs” menu, click on “Sample File” to open the pre-designed sample file.
● Print this PDF file at 100% size. This is a very important detail when using the sheet cutter.
All artwork needs to be printed at the actual size, and not scaled to fit the paper.
The sample test print contains a box that should measure 180mm x 180mm, which you can
check after printing to confirm that the artwork is printing at the correct size.
Secabo GmbH | Hochstatt 6-8 | 85283 Wolnzach | Germany | [email protected] | www.secabo.com
11
● Load the test print(s) into the sheet cutter.
● In the Barcode controller, set the Mark positions to match the position of the marks in this
job.
Secabo GmbH | Hochstatt 6-8 | 85283 Wolnzach | Germany | [email protected] | www.secabo.com
12
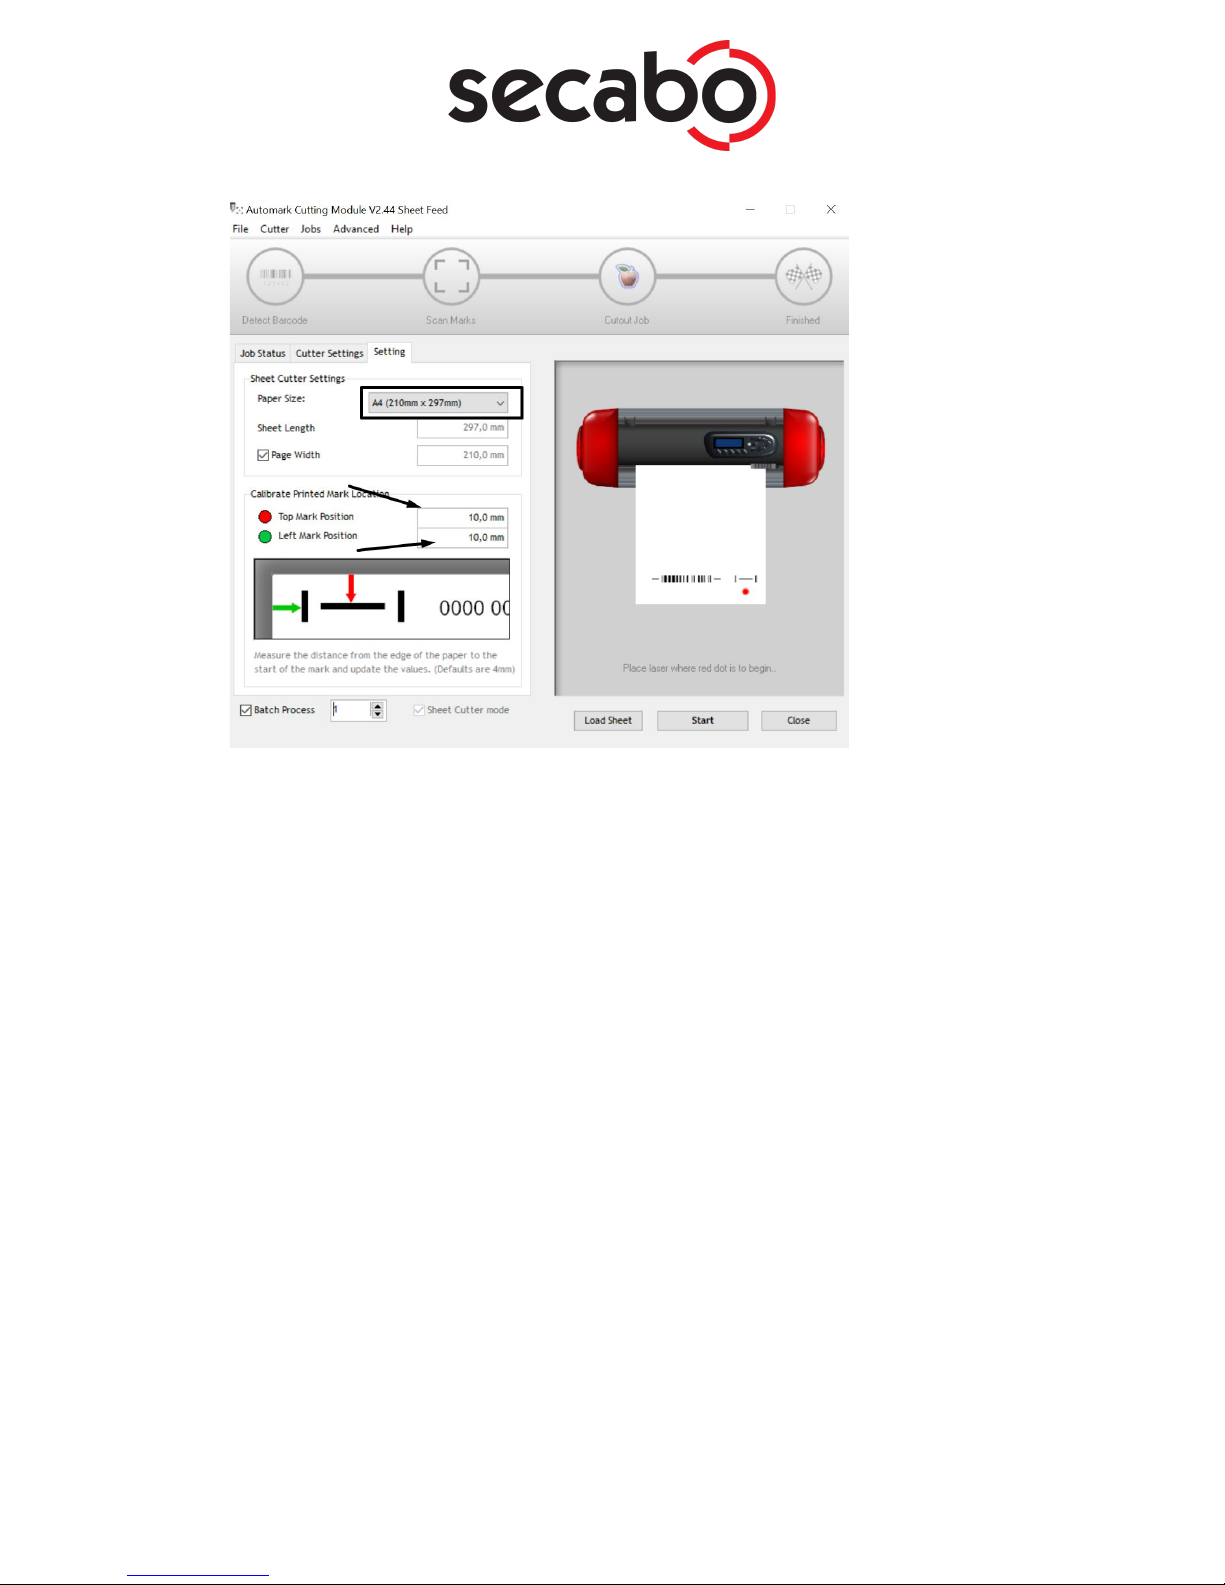
Note:
When designing the artwork, you are able to choose how far the marks are placed
from the edge of the paper. You should try to use the same value for all jobs, so you
do not have to keep changing this value. If you do not have the mark positions set
correctly, the cutter will try to look for the marks in the wrong place, and be unable to
find them.
● Click “Start” to begin scanning and cutting the sheet.
Note:
If you are using plain paper, remember to use the pen tool, and not the blade tool!
Secabo GmbH | Hochstatt 6-8 | 85283 Wolnzach | Germany | [email protected] | www.secabo.com
13

Creating your first design
After you have practiced with sample print, you are now ready to create your own artwork.
The instructions below show you the main steps required to build, print and send the
artwork to the machine.
● Ensure that the page size for your artwork is set to either A4 or A3 (or for A3+,
320mmx480mm)
● Click on the “Contour Cut Wizard” so you can add the scanning marks and barcode.
Secabo GmbH | Hochstatt 6-8 | 85283 Wolnzach | Germany | [email protected] | www.secabo.com
14

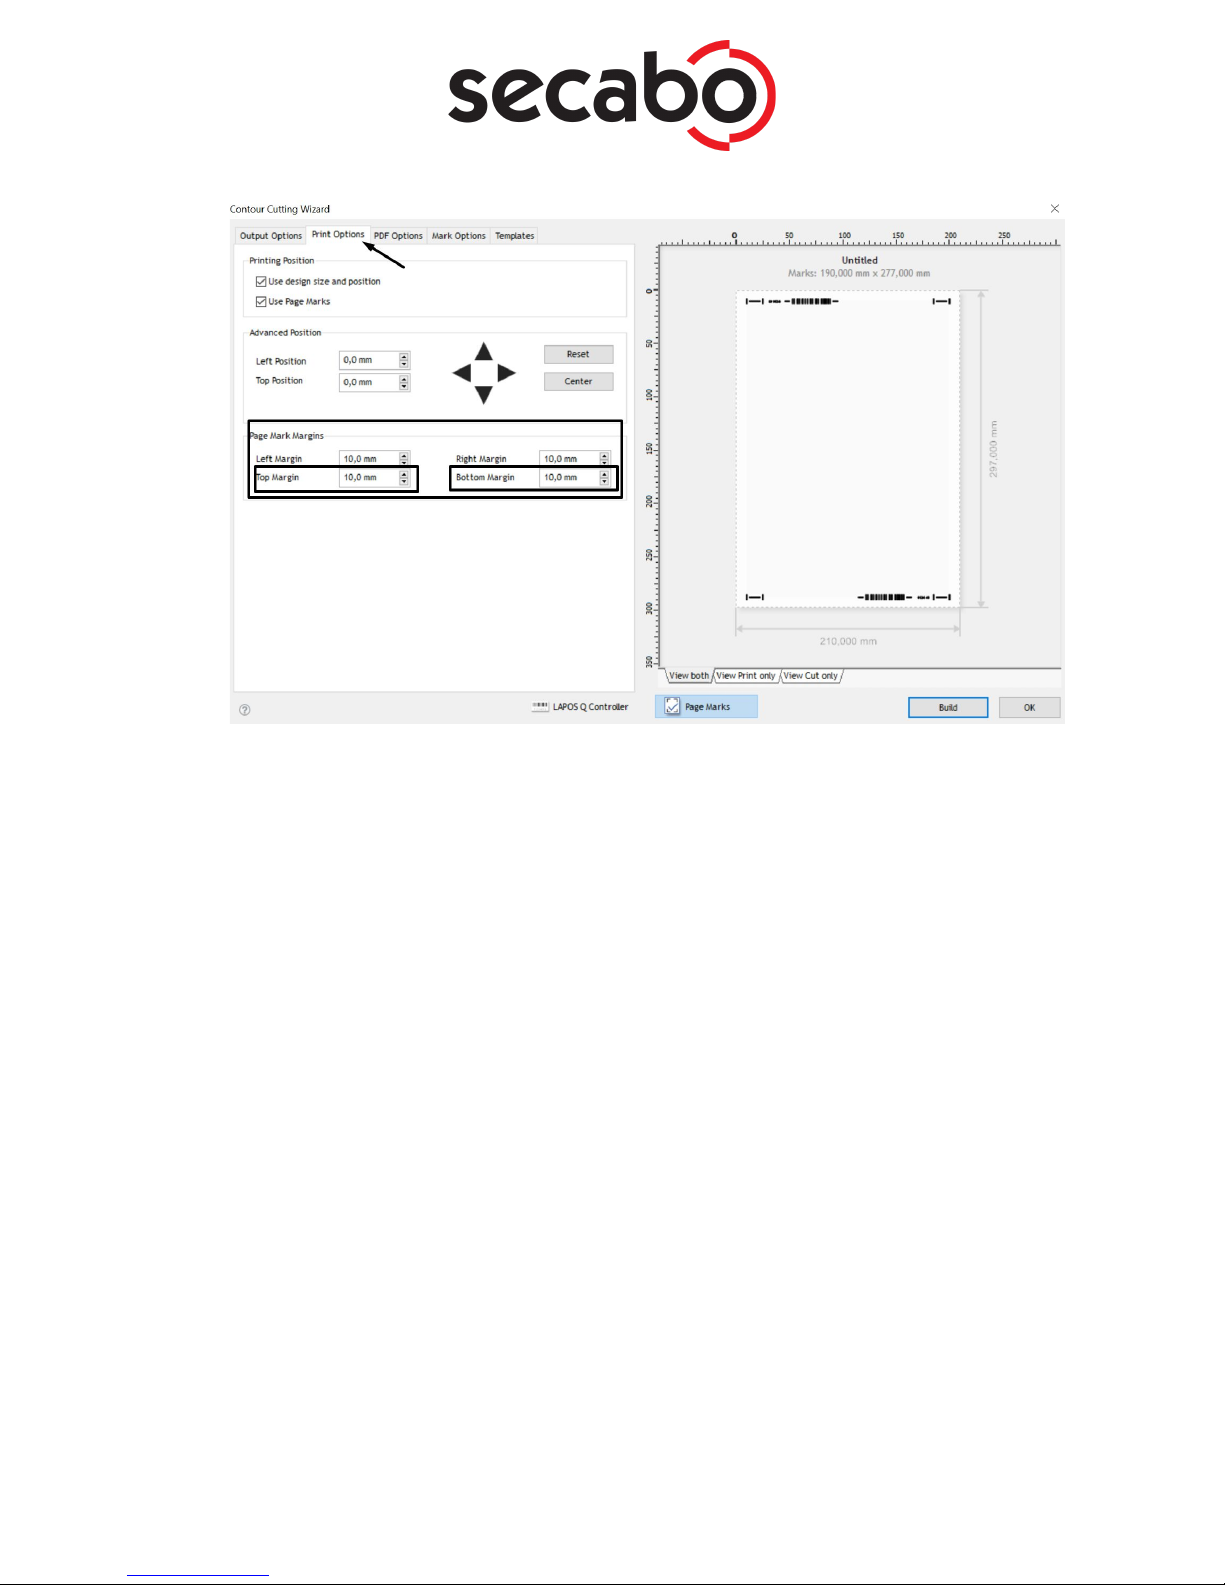
● Click on “Page Marks” to apply page marks and confirm that with OK.
● Check if the Page Mark Margins are correct in the Print Options.
Note:
You should ensure that the Top margin and the Bottom margin are set to the same
value, so you can load the sheets upside down as well as the normal way.
Secabo GmbH | Hochstatt 6-8 | 85283 Wolnzach | Germany | [email protected] | www.secabo.com
15
● Close the Contour Cutting Wizard with OK to return to the designing window.
● Load your artwork that you want to cut (using the “File” -> “Import” menu)
Secabo GmbH | Hochstatt 6-8 | 85283 Wolnzach | Germany | [email protected] | www.secabo.com
16

● Click on “Create Cut Contour” to build the cutting contour
● Generate the cutting contour then click “Accept”
Secabo GmbH | Hochstatt 6-8 | 85283 Wolnzach | Germany | [email protected] | www.secabo.com
17

● Duplicate the logo, using either the “Tile Array” tool, or manually making copies using the
“+” key on the number pad.
Secabo GmbH | Hochstatt 6-8 | 85283 Wolnzach | Germany | [email protected] | www.secabo.com
18

● Click “Contour Cut Wizard” again.
Secabo GmbH | Hochstatt 6-8 | 85283 Wolnzach | Germany | [email protected] | www.secabo.com
19
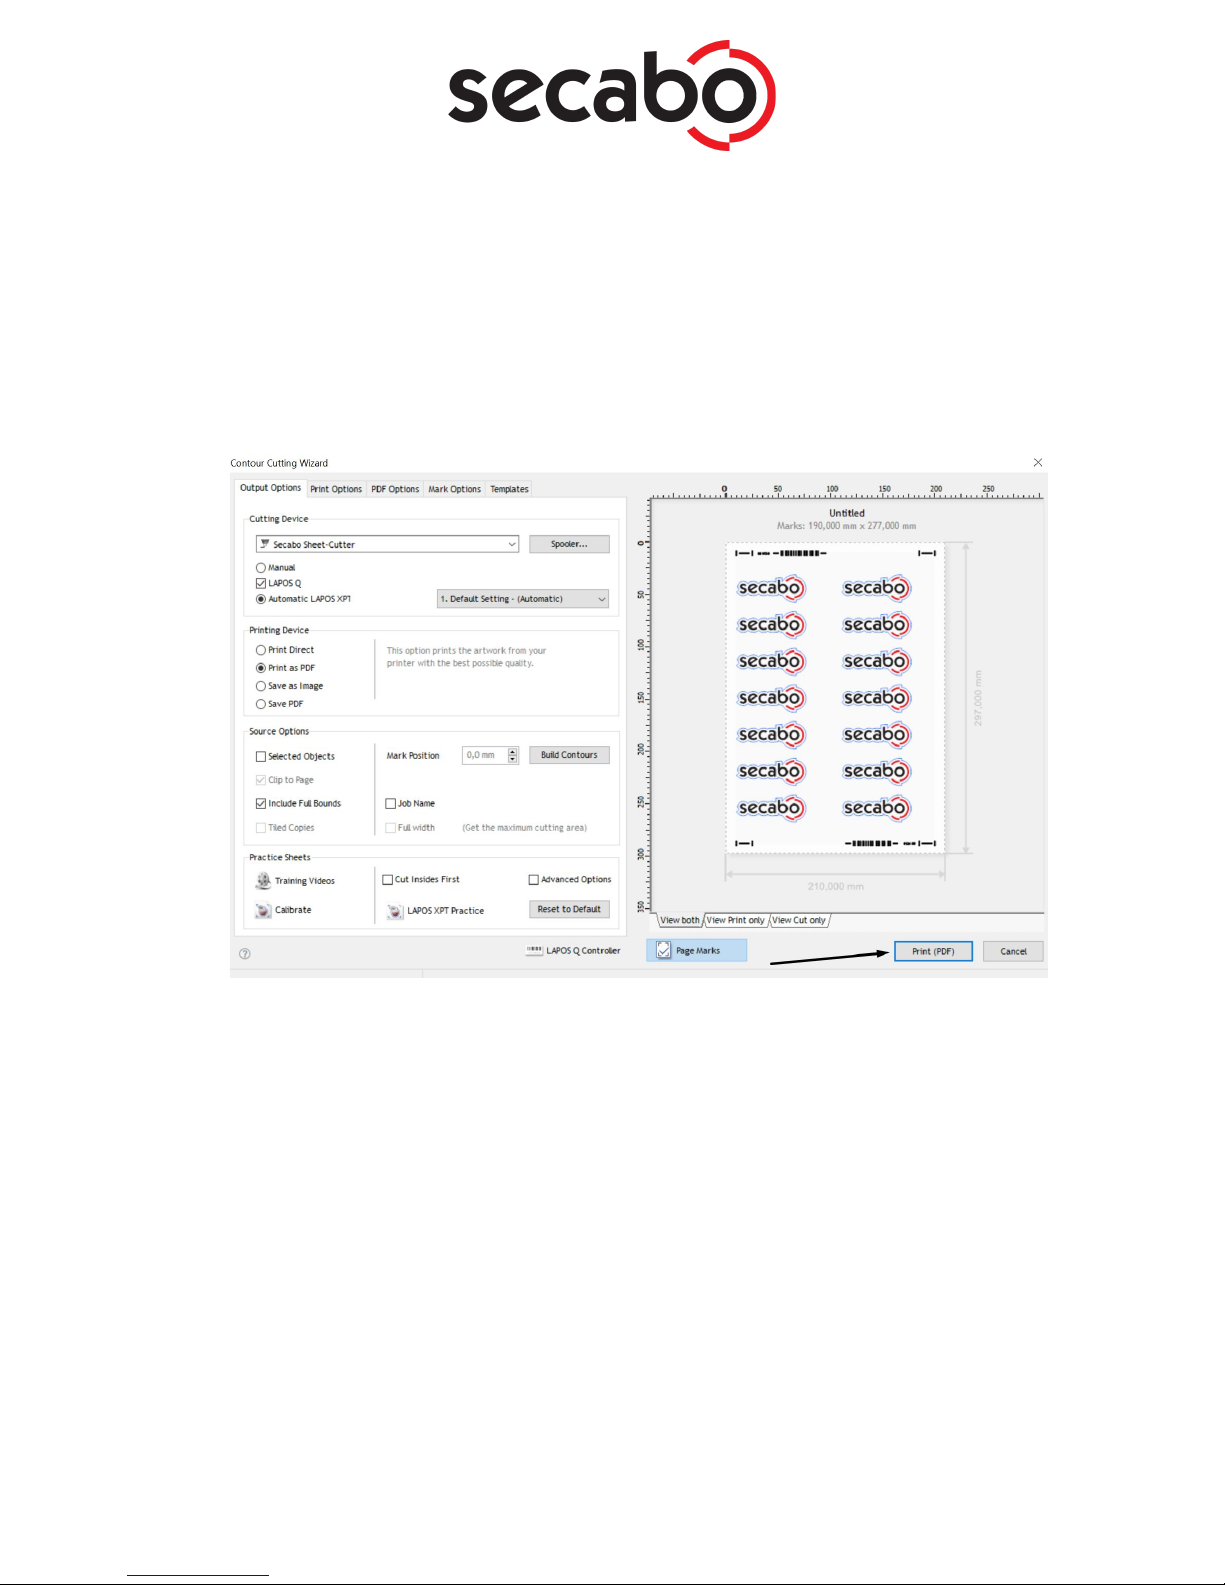
● Choose the “Printing Device”, based on how you want to create the printing artwork. You
can either print directly to your printer, or save a PDF or TIFF file to be printed by some
other means.
IMPORTANT:
After you have built the print artwork, which we recommend you use “Save PDF”
option, so you always have a copy of the actual artwork with the correct barcode
number, you must also submit the cutting data (Add CutJob).
● Make sure that the print is at 100%
Secabo GmbH | Hochstatt 6-8 | 85283 Wolnzach | Germany | [email protected] | www.secabo.com
20
Table of contents
Other Secabo Cutter manuals


