Daikin DCM601A51 Quick start guide

Commissioning Manual
intelligent Touch Manager
Model
DCM601A51
MONITOR
CPU ALIVE
SLAVE
MASTER
BACKUP
LAN SW
SERVICE LAN
FRONT BACK
DⅢMASTER
ON
OFF RESET
LAN LINK
DⅢMONITOR

Commissioning Manual EM11A021
DCM601A51 intelligent Touch Manager
1
Contents
System Overview............................................................................4
1. About the iTM (intelligent Touch Manager)......................................................4
1-1 System Configuration ......................................................................................................... 4
2. Engineering ........................................................................................................5
2-1 Engineering Workflow......................................................................................................... 5
2-2 Logging into Service Mode ................................................................................................. 7
Names and Functions ....................................................................9
3. Detailed Screen Description .............................................................................9
3-1 Setup Screen Structure ...................................................................................................... 9
3-2 Service Settings Tab ......................................................................................................... 10
3-3 System Settings Tab ......................................................................................................... 12
Basic Functions............................................................................13
4. Service Settings ...............................................................................................13
4-1 Mgmt. Point Data Regist ................................................................................................... 13
•Registering a management point with the iTM unit....................................................... 14
•Detailed Mgmt. Point Attributes screen and button descriptions................................... 21
•Registering management points using a CSV file......................................................... 33
4-2 Other Setting..................................................................................................................... 38
4-3 DIII-NET Engineering ....................................................................................................... 39
4-4 Time Zone......................................................................................................................... 41
4-5 Changeover Option........................................................................................................... 41
4-6 History Mgmt. (Delete)...................................................................................................... 43
4-7 Pre-engineering ................................................................................................................ 44
•Displaying the main screen........................................................................................... 46
•Scenario 1: Installation to new property........................................................................ 48
•Scenario 2: Maintenance of existing property
(When carrying out pre-engineering using the current setting).................. 52
•Scenario 3: Restore with existing property’s backup data............................................. 54
•Scenario 4: Implementation of new functions due to existing property’s upgrade ........ 55
Contents

Commissioning Manual EM11A021
DCM601A51 intelligent Touch Manager
2
4-8 Upgrade ............................................................................................................................ 55
4-9 Backup.............................................................................................................................. 56
4-10 Installation...................................................................................................................... 58
4-11 Contact Info.................................................................................................................... 60
4-12 Setting outdoor unit........................................................................................................ 62
•Precautions when using DIII-NET EXPANDER ADAPTER........................................... 63
•Table of types ................................................................................................................ 63
4-13 Leakage Check .............................................................................................................. 69
•Preparations.................................................................................................................. 70
•Registering indoor units ................................................................................................ 70
•Running Leakage Check by Schedule Control ............................................................. 72
•Copying a schedule program ........................................................................................ 74
•Starting Leakage Check by manual operation .............................................................. 75
•Stopping Leakage Check by manual operation ............................................................ 76
•Outputting the Leakage Check results to a CSV file..................................................... 77
•Conflict with other controls............................................................................................ 79
•Failure mode ................................................................................................................. 81
Optional Functions.......................................................................84
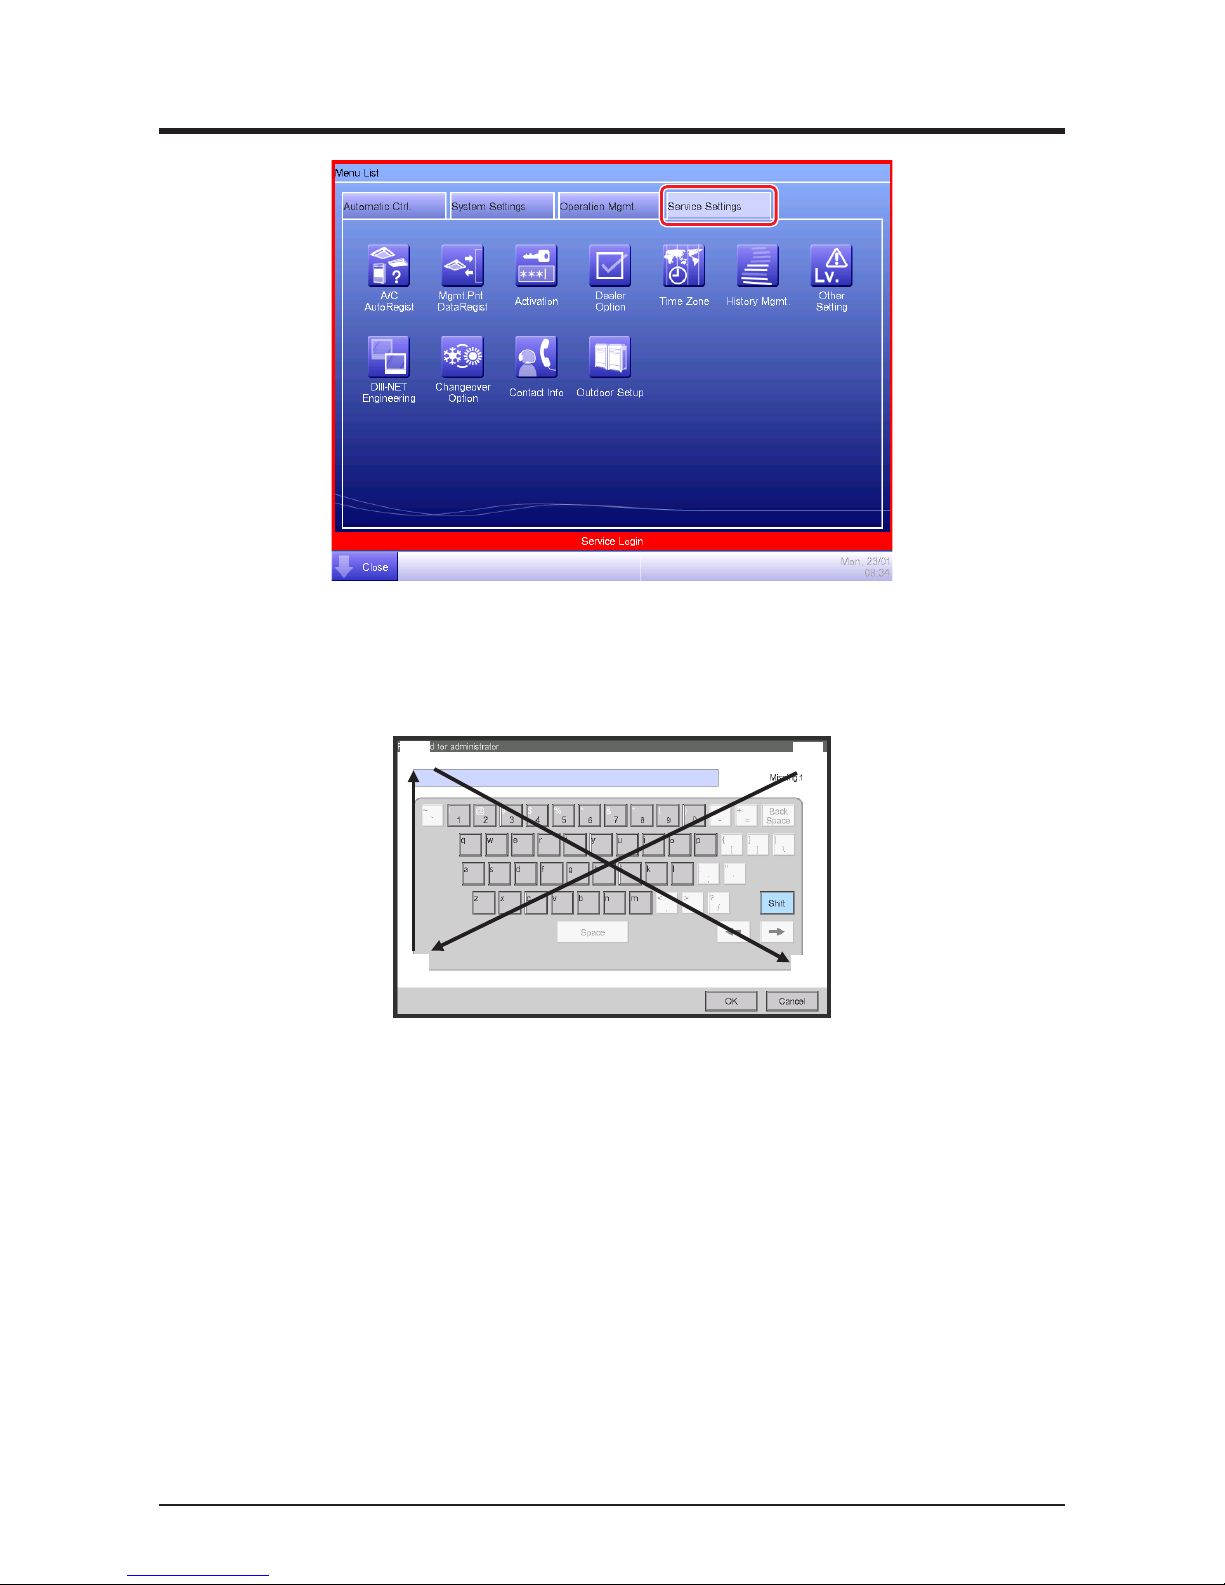
5. Service Settings ...............................................................................................84
5-1 Activation .......................................................................................................................... 84
•Acquiring the Activation key.......................................................................................... 84
•Entering the Activation key............................................................................................ 84
5-2 Dealer Option Setup ......................................................................................................... 86
Operating Optional Functions.....................................................87
6. System Settings ...............................................................................................87
6-1 Network ............................................................................................................................ 87
6-2 Web Remote Management............................................................................................... 90
•Connecting the PC and iTM.......................................................................................... 91
•Checking the Web browser and Flash Player versions ................................................. 92
•Setting up the IP address (Windows XP Professional) ................................................. 93
•Setting up the IP address (Windows Vista Business) ................................................... 97
•Setting up the IP address (Windows 7 Professional) .................................................. 101
•Precautions when using Internet Explorer on Windows Vista and Windows 7............ 104
•Network Connection Check ........................................................................................ 105

Commissioning Manual EM11A021
DCM601A51 intelligent Touch Manager
3
•Logging into Service Mode via Web Remote Management........................................ 108
iTM integrator Explanation .......................................................109
7. iTM integrator .................................................................................................109
7-1 Basic Setup..................................................................................................................... 109
7-2 iTM integrator Service Settings ...................................................................................... 114
•Service Settings Tab (Menu List Screen).................................................................... 115
•Controller Access Setup ............................................................................................. 116
Appendix .....................................................................................120
8. Useful Information .........................................................................................120
8-1 Troubleshooting .............................................................................................................. 120
9. Hardware Specifications ...............................................................................122
9-1 iTM Hardware Specification............................................................................................ 122

Commissioning Manual EM11A021
DCM601A51 intelligent Touch Manager
4
1. About the iTM (intelligent Touch Manager)
1-1 System Conguration
iTM
iTM
plus adaptor
iTM
plus adaptor
iTM
plus adaptor
iTM
plus adaptor
iTM
plus adaptor
iTM
plus adaptor
USB memory
Di/Pi port
RS485
(Expansion adapter port)
Di/Pi port
Up to 7
D3net port
Up to 64 groups
LAN port
USB port
D3net
ROUTER
Web Remote Management
Port 1~4:
Port 1:
Port 2~4:
HUB/SWITCH/ROUTER/....
Emergency Stop signal input
Power meter pulse input
Input signal (contact) such as
power outage signal
Emergency Stop signal input
Power meter pulse input
Input signal (contact) such as
power outage signal
Intranet/Internet
Web Remote Management possible from network-
connected PC
Simultaneous login of max. 4 managers and 16
users supported.
System Overview

Commissioning Manual EM11A021
DCM601A51 intelligent Touch Manager
5
2. Engineering
2-1 Engineering Workow
Various engineering works are necessary for using the iTM.
Engineering works can be roughly divided into those carried out at the ofce in advance and those
carried out on site after installation.
The following diagram shows the engineering workow.
New installation (Without using the pre-engineering tool)
At the ofce See:
Prepare various information.
Check the equipment to connect to DIII-NET.
Allocate the Group Address.
Acquire the upgrade data. 4-8 Upgrade
Acquiring the Activation key
* When necessary
5-1 Activation
Acquiring the Activation key
At the site
Install the iTM. Installation Manual (EM11A016)
Install the upgrade data. 4-10 Installation
Make basic settings.
(Boot sequence) Installation Manual (EM11A016)
Set up “Main” and “Sub”. 4-3 DIII-NET Engineering
Activate optional maker functions.
Enable dealer options.
* When necessary
5-1 Activation
Entering the Activation key
5-2 Dealer Option Setup
Register management points and Layout View.
(Load from CSV or register manually) 4-1 Mgmt. Point Data Regist

Commissioning Manual EM11A021
DCM601A51 intelligent Touch Manager
6
New installation (By using the pre-engineering tool)
At the ofce See:
Prepare various information.
Check the equipment to connect to DIII-NET.
Allocate the Group Address.
Acquire the upgrade data. 4-8 Upgrade
Back up the iTM data.
*In the case of maintenance (When pre-engineering by
using the current settings)
4-9 Backup
Set up management points.
(Pre-engineering tool, spreadsheet such as Microsoft
Excel)
4-7 Pre-engineering
Create the Layout View.
(Layout View creation tool)
* When necessary
Commissioning Manual Supplementary
Volume
Layout View Creation Tool (EM11A024)
Acquiring the Activation key
* When necessary
5-1 Activation
Acquiring the Activation key
At the site
Install the iTM. Installation Manual (EM11A016)
Install the upgrade data. 4-10 Installation
Make basic settings.
(Boot sequence) Installation Manual (EM11A016)
Set up “Main” and “Sub”. 4-3 DIII-NET Engineering
Install pre-engineering data and Layout View data. 4-10 Installation
Activate optional maker functions.
Enable dealer options.
* When necessary
5-1 Activation
Entering the Activation key
5-2 Dealer Option Setup

Commissioning Manual EM11A021
DCM601A51 intelligent Touch Manager
7
2-2 Logging into Service Mode
To run engineering, you must log into the Service (SE) Mode from the Menu List screen.
In the SE Mode, the Service Settings tab, which is normally hidden, is displayed on the Menu List.
Also, special buttons available only in SE Mode are displayed on the tabs.
The following describes how to log into the SE Mode.
1. Display the Menu List screen.
(1)
(3)
(2) (4)
2. Touch the four corners of the screen in the indicated order. The Password Input dialog appears.
3. Enter the service password (daikin) and touch the OK button to log into the SE Mode.

Commissioning Manual EM11A021
DCM601A51 intelligent Touch Manager
8
Furthermore, if the screen is locked, entering the service password instead of the administrator
password after carrying out the special operation indicated below, allows you to unlock the
screen and log into the SE Mode.
(1)
(4)
(2)
(3)

Commissioning Manual EM11A021
DCM601A51 intelligent Touch Manager
9
3. Detailed Screen Description
3-1 Setup Screen Structure
Service Settings Tab
A/C Auto Regist
Mgmt. Point Data Regist
Other Setting
DIII-NET Engineering
Time Zone
Changeover Option
History Mgmt. (Delete)
Pre-engineering
Upgrade
Backup
Installation
Contact Info
Setting outdoor unit
Leakage Check
Activation
Dealer Option Setup
System Settings Tab
Network
Web Remote Management
Displays a list of functions configurable by service engineers
This function automatically registers air conditioners that are
not yet registered as management points
This function allows you to manually register, edit, or delete
management points
Allows you to configure the error detection level and enable or
disable the Dry mode
Allows you to switch the master and slave settings and, when
used in conjunction with an upper level central controller,
configure the setpoint limitation function
Allows you to configure the time difference between the UTC
(Universal Time Coordinated) and the local time
This function allows you to configure or cancel the
cooling / heating selection right
This function allows you to delete the history data
This tool allows you to preconfigure necessary settings on the PC
Allows you to write a new system file for upgrade
This function allows you to read the current system file and
configuration data
This function allows you to install the data for upgrade or
restoration
Configure the contact information for inquires about system
errors or other problems
Configure the model type of the outdoor unit
This function automatically detects refrigerant leak
This function allows you to enter the Activation key required
to activate a manufacturer option
Allows you to enable or disable a dealer option
Displays a list of functions related with system settings
Allows you to configure the network IP address and other
related settings
Allows you to configure the Web Remote Management user
(See page 10.)
(See page 10.)
(See page 13.)
(See page 38.)
(See page 39.)
(See page 41.)
(See page 41.)
(See page 43.)
(See page 44.)
(See page 55.)
(See page 56.)
(See page 58.)
(See page 60.)
(See page 62.)
(See page 69.)
(See page 84.)
(See page 86.)
(See page 12.)
(See page 87.)
(See page 90.)
Basic Functions
Names and Functions

Commissioning Manual EM11A021
DCM601A51 intelligent Touch Manager
10
3-2 Service Settings Tab
(1) (2) (3) (4) (5) (6) (7)
(8) (9) (10) (11) (12) (13)
The button of an optional function is hidden unless the option is enabled.
NOTE
(1) A/C Auto Regist
Automatically registers as management points those air conditioners that are connected to the iTM
but not registered as management point. The air conditioner icons to be displayed on the Standard
View screen are also set up automatically.
Automatic registration is supported only for indoor units and Ventilator.
NOTE
(2) Mgmt. Point Data Regist
Registers, modies, and deletes management points to be operated/controlled using the iTM. The
management point data can also be input from/output to a le in CSV format.
(3) Activation
Enables optional maker functions based on entered Activation keys.
Optional maker functions refer to the Power Proportional Distribution and Energy Navigator
functions.
NOTE

Commissioning Manual EM11A021
DCM601A51 intelligent Touch Manager
11
(4) Dealer Option
Enables/Disables dealer options.
(5) Time Zone
Sets up the difference between the Universal Time Coordinated (UTC) and local time.
(6) History Mgmt. (Delete)
Deletes history records of a specied period from the history.
(7) Other Setting
Enables/Disables the “Detect Level” and “Dry Operation Mode”.
Detect Level: When enabled, indicates management point error alarms via icons and history.
Dry Operation Mode: When enabled, allows you to set Dry mode from the touch panel, the
Schedule or Interlocking function.
(8) DIII-NET Engineering
Sets up the iTM as Main or Sub. When an upper central controller is also installed, sets Setpoint
Restriction to “Enable” or “Auto”.
The “Auto” option automatically Enables/Disables Setpoint Restriction depending on whether
an upper central unit is installed or not.
NOTE
(9) Changeover Option
Enables/Disables the Changeover Option for an air conditioner.
(10) Layout Setup (Optional function)
Displayed only when Layout View data exists.
Allows you to Enter/Output Layout View data.
(11) Contact Info
Sets up contact information (three lines) for inquiries regarding errors in the system and the like.
(12) Outdoor Setup
Allows you to manually register the indoor units that belong to the refrigeration system of each
outdoor unit based on the indoor and outdoor unit’s installation information.
Also, allows you to automatically check leakage for each refrigeration system in a multi-refrigeration
system. You can also make it run at a set time by using the Schedule function.
(13) Energy Navigator (Optional function)
Sets up the reference room temperature, month to start collecting data, and energy conversion type
to be used by the Energy Navigator.

Commissioning Manual EM11A021
DCM601A51 intelligent Touch Manager
12
3-3 System Settings Tab
(2)
(1)
(3)
(1) Network
Sets up the network IP addresses as well as the Web Servers.
(2) Web Access Users
Sets up Web users for Web Remote Management.
(3) Backup
Allows you to export the system le and setup data.

Commissioning Manual EM11A021
DCM601A51 intelligent Touch Manager
13
Basic Functions
4. Service Settings
4-1 Mgmt. Point Data Regist
Register, modify, and delete management points to be controlled using the iTM. Management points can be
registered in two ways: directly with the iTM unit, or by editing a CSV le on a PC and loading it to the iTM unit.
The gure below shows the owchart of a management point registration.
Install iTM and equipment
in the site
Install iTM and
equipment in the site
Install iTM and
equipment in the site
Start up iTM and auto
recognize A/C
Start up iTM and auto
recognize A/C
Replace A/C and register
management points
using auto recognition
Start up iTM and auto
recognize A/C
Scope of this chapter
See 4-7 Pre-engineering
Preparation Operation (Control/Check) Operation (Update)
Workflow
When creating management
point data after installing iTM
When installing iTM after creating
management point data
When creating management point data using
pre-engineering tool and loading the management
point data to an installed iTM
Output CSV file with
management point data
to register management
points other than A/C
Edit the CSV file and
create the manage-
ment point data
Merge the created
management point data
in the CSV file with that
on the site’s iTM
Control and monitor
equipment based on
the registered
management point data
Replace or add A/C
and/or equipment,
and output CSV
file, and register
management point
data
Start up the iTM to be
installed in the site and output
a CSV file without any
registered management point
Edit the CSV file and
create the management
point data
Enter the created
management point data in
the CSV file to the iTM to be
delivered to the site
Check that the management
point data registered in
advance has no errors
Create management
point data using the
pre-engineering tool
Load the management
point data created using
the pre-engineering tool
to iTM

Commissioning Manual EM11A021
DCM601A51 intelligent Touch Manager
14
The following describes the operating procedure.
Registering a management point with the iTM unit
1. Automatically recognizing air conditioners
Automatically recognize air conditioners. The iTM unit will search for any D3 units that can be
registered, but have not yet been registered with it.
Log into SE Mode from the Menu List screen and display the Service Settings tab (see page 7).
Touch the Mgmt. Pnt Data Regist button on the Service Settings tab to display the main Mgmt.
Point Data Register screen (see page 10).
(1)
(2)
(1) is the list of registered management points.
Touch the A/C Auto Register button (2) to display the Auto Search Result screen.
(3)
(4)
(3) is the search results list. The Detailed Type and Port/Address are displayed.

Commissioning Manual EM11A021
DCM601A51 intelligent Touch Manager
15
For management points whose Detailed Type is unknown, you can select the management point
and display the Management Point Types screen by touching the Detailed Type button (4).
(5)
Using the radio buttons (5), select the management point type. Touch the OK button to save and
return to the Auto Search Result screen for air conditioners.
(7)
(8)
(6)
Touching the Refresh button (6) updates the Search Result List (7) to its most recent status.
Selecting a management point to register and touching the Add button adds it to the Register
Candidate List (8). To register all management points listed in (7), touch the Add ALL button.
To delete a management point from the Register Candidate List (8), select it and touch the
Remove button. The management point moves to (7) and is deleted from the list of candidates
that can be registered. Touching the Rem. ALL button deletes all of the candidates that can be
registered.

Commissioning Manual EM11A021
DCM601A51 intelligent Touch Manager
16
Touch the OK button to register the management point (8) and return to the main Mgmt. Point
Data Register screen.
The Add and Add ALL buttons are grayed out when the upper limit of registration has been
reached and thus no more management points can be registered.
NOTE
2. Manually registering management points
Register one by one the management points that are not registered by automatic recognition.
(9)
Touch the Add button (9) to display the Management Point Types screen.

Commissioning Manual EM11A021
DCM601A51 intelligent Touch Manager
17
Select the management point type to register from Indoor, Outdoor, Ventilator, Di, and Pi.
To select another type, select the Others radio button and touch the Select button. The
Management Point Types screen for other types appears.
Select the management point type and touch the OK button to save and return to Management
Point Types screen.
Remark: External Ao or External Pi are not supported by this model.
When nished, touch the OK button to display the Mng. Point Attributes screen.
3. Setting up details for a management point
Set up details for a management point.
Tabs and items displayed on the Mng. Point Attributes screen vary depending on the selected
management point type. Set up by switching the displayed tabs as necessary.
For details of each tab, see page 21 onwards.

Commissioning Manual EM11A021
DCM601A51 intelligent Touch Manager
18
When nished with all the tabs, touch the OK button to save the settings and return to the main
Mgmt. Point Data Register screen.
4. Deleting/Editing/Copying a management point
(13)
(10) (11) (12)
Touching the Delete button (10) deletes the management point selected in the list.
Touching the Edit button (11) displays the Mng. Point Attributes screen for editing the
management point selected in the list. (See procedures 1 to 3)
Touching the Copy button (12) makes a copy of the management point selected in the list.
Modify as necessary since the copy has exactly the same data. Registering as is will cause
duplicated address error and the like.
NOTE

Commissioning Manual EM11A021
DCM601A51 intelligent Touch Manager
19
5. Checking the setting results
Touching the Check button (13) checks the content of the current settings data and displays the
check results on the Information check screen.
If an error is found, discards the edited content retained until then and restores the saved original data.
“No error” is displayed if no error is found. Touch the Close button to close the screen.
Check items list
Classication
Check item Message
Common
Duplicated
management point
names
===== Mng. point name duplication
[Management point name] ([Management point ID]) <-> [Management point name] ([Management point ID])
===== Mng. point name duplication
Excess of total number of
other management points
Mgmt. points exceeded (Other)
Excess of number of
chiller management points
Chiller Mgmt. Pnt
Excess of number of
outdoor management points
Outdoor Unit Mgmt. points exceeded
Excess of total number
of Internal Pi
management points
Internal Pi Mgmt. point exceeded
DIII Duplicated D3
addresses
===== D3 address duplication
[Management point name] ([Management point ID]) <-> [Management point name] ([Management point ID])
===== D3 address duplication
Di, Pi Duplicated port
numbers
===== Di/Pi address duplication
[Management point name] ([Management point ID]) <-> [Management point name] ([Management point ID])
===== Di/Pi address duplication
Internal Ai
Ai reference
management point
error
Ai:[Management point name]([Management point ID]):
The reference Mng. point is inaccurate
Ai:[Management point name]([Management point ID]):
Analog type error [Invalid]
Internal Pi Duplicated port
numbers
===== Internal Pi address duplication
[Management point name] ([Management point ID]) <-> [Management point name] ([Management point ID])
===== Internal Pi address duplication
BACnet Duplicated object IDs
===== Duplicate object IDs
[Management point name] ([Management point ID]) <-> [Management point name] ([Management point ID])
===== Duplicate object IDs
Other manuals for DCM601A51
4
Table of contents
Other Daikin Control Panel manuals