Daikin BRC1HHDAW User guide

Installer and user reference guide
Human Comfort Interface English
+
-
Installer and user
reference guide
Human Comfort Interface
BRC1HHDAW
BRC1HHDAS
BRC1HHDAK

Table of contents
Installer and user reference guide
2
BRC1HHDAW+BRC1HHDAS+BRC1HHDAK
Human Comfort Interface
4P534402-1 – 2018.06
Table of contents
1 General safety precautions 2
1.1 For the user ............................................................................... 3
1.2 For the installer.......................................................................... 3
2 About this document 3
For the user 4
3 User interface: Overview 4
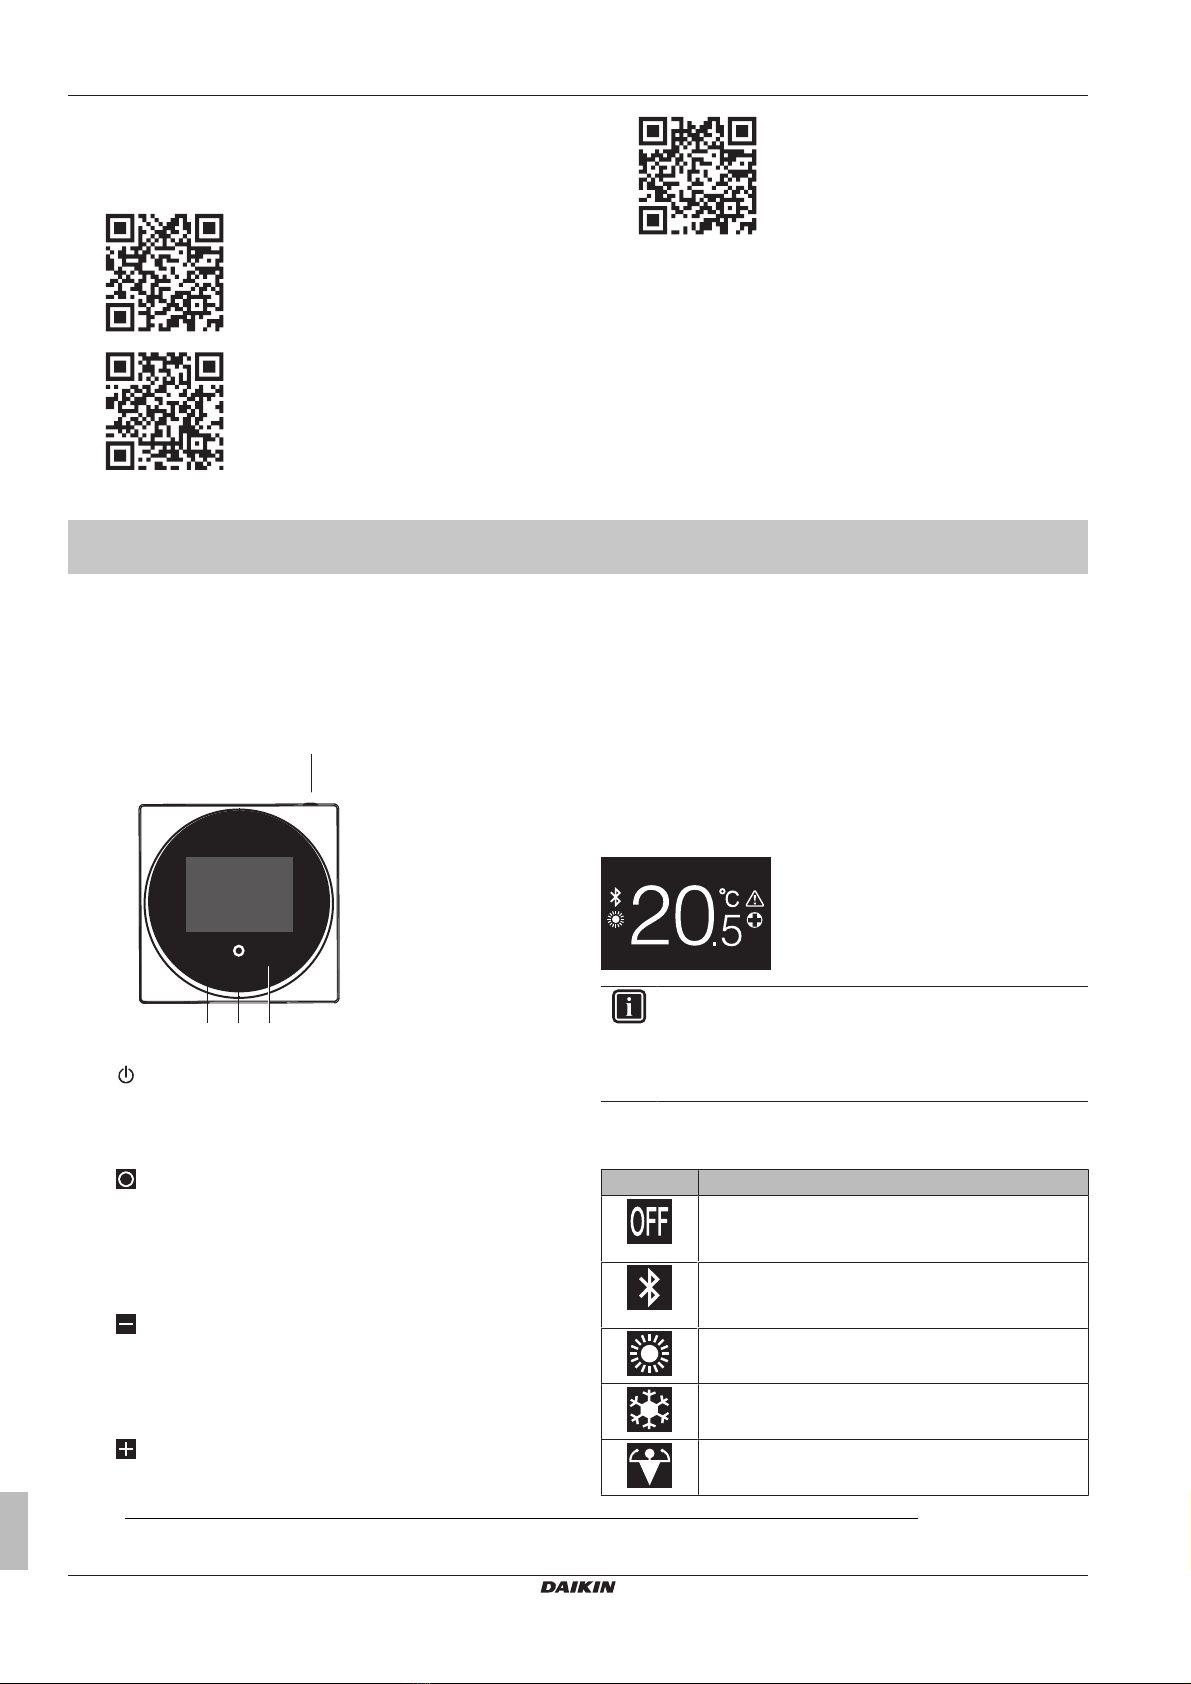
3.1 Buttons ...................................................................................... 4
3.2 Home screen ............................................................................. 4
3.3 Status icons............................................................................... 4
3.4 Status indicator.......................................................................... 5
4 Operation 5
4.1 Basic usage............................................................................... 5
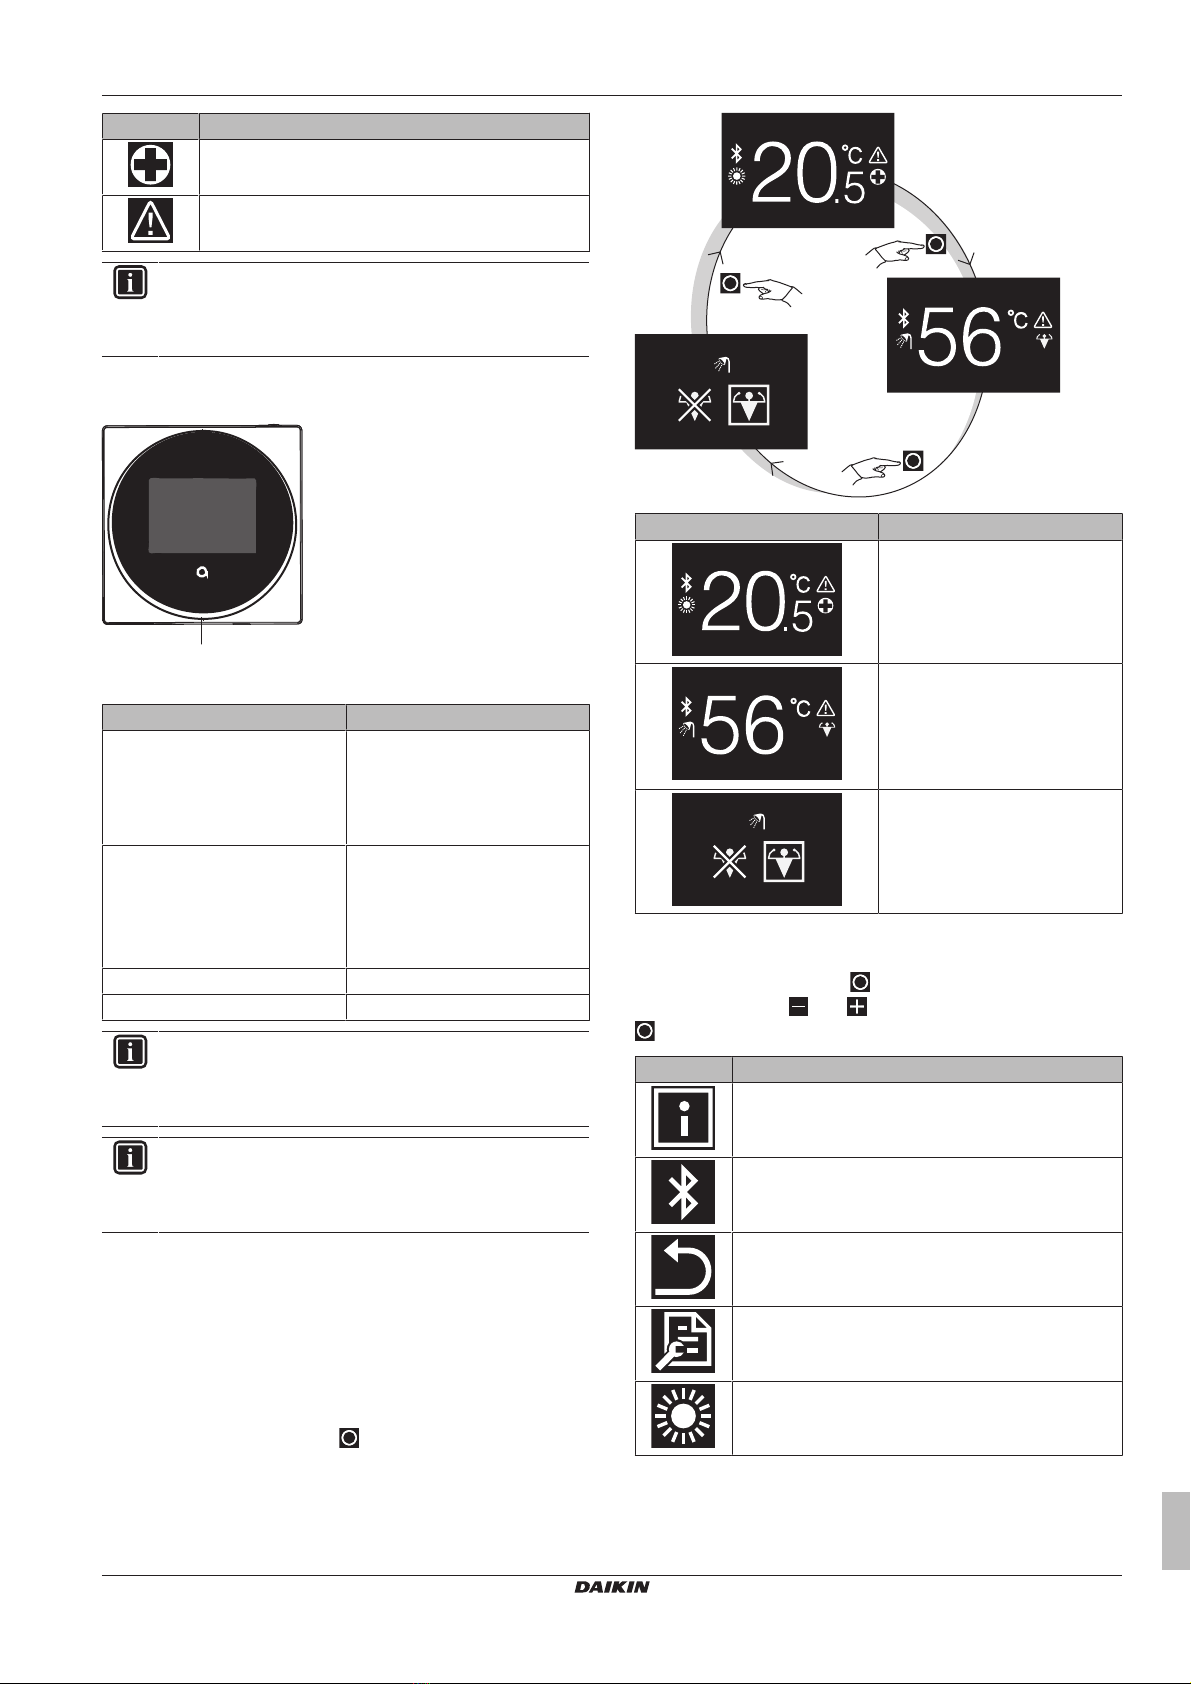
4.1.1 Operation screens....................................................... 5
4.1.2 Main menu .................................................................. 5
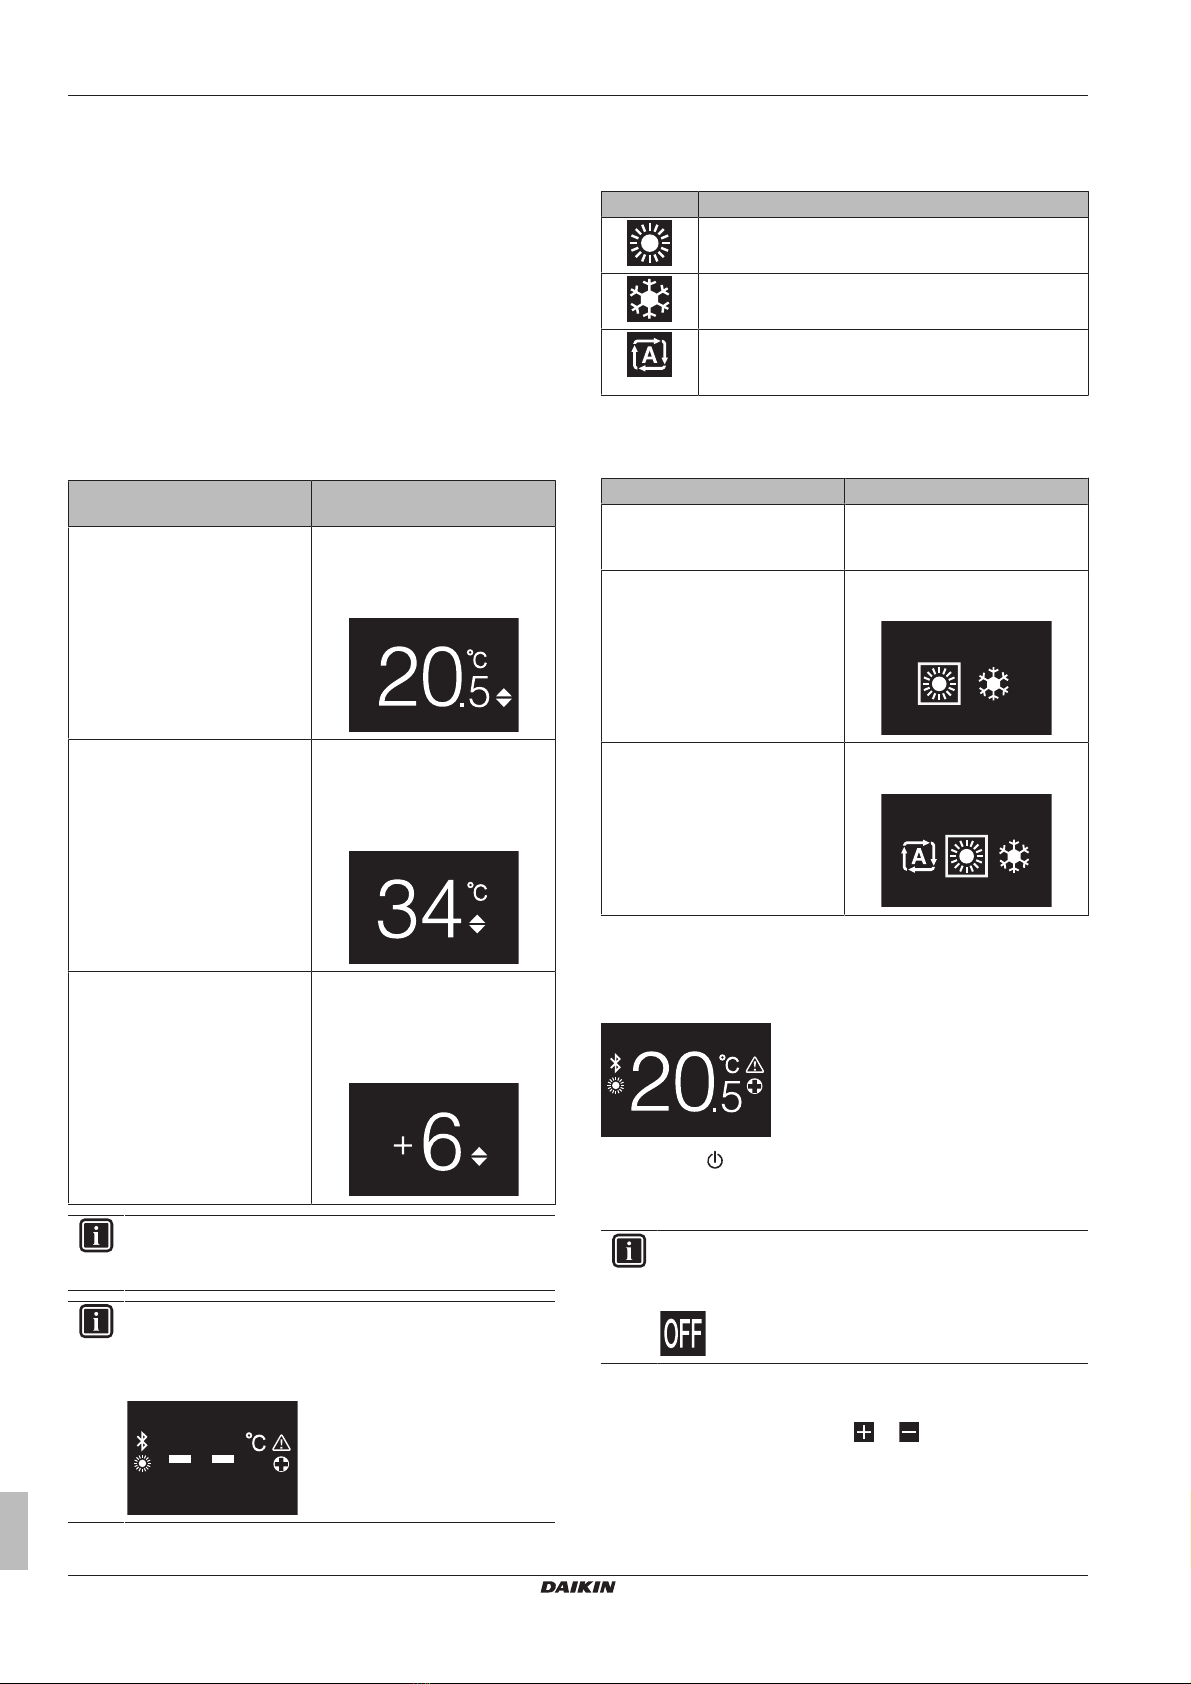
4.2 Space heating/cooling control ................................................... 6
4.2.1 About space heating/cooling control........................... 6
4.2.2 To turn ON/OFF space heating/cooling operation ...... 6
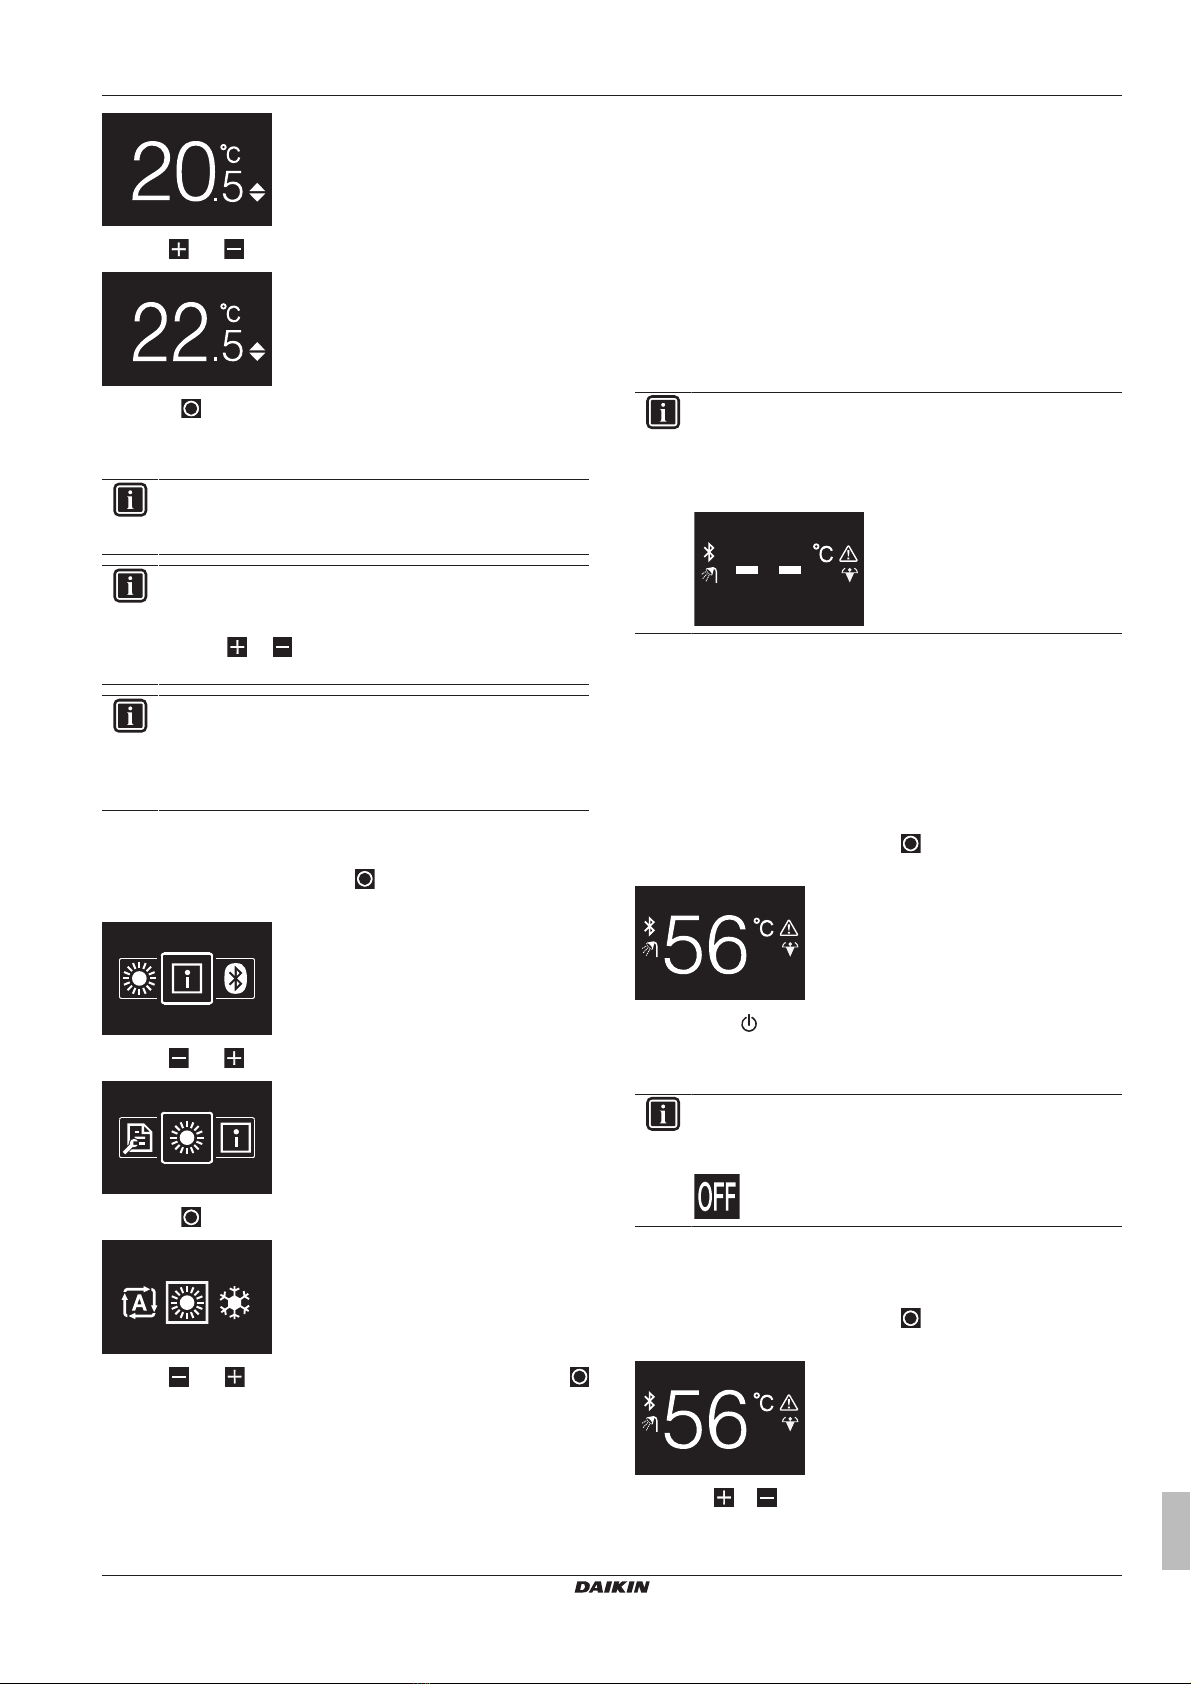
4.2.3 To change the room temperature ............................... 6
4.2.4 To change the space operation mode ........................ 7
4.3 Domestic hot water control........................................................ 7
4.3.1 About domestic hot water control................................ 7
4.3.2 To turn ON/OFF domestic hot water operation........... 7
4.3.3 To change the domestic hot water temperature ......... 7
4.3.4 Using DHW powerful operation................................... 8
5 Maintenance and service 8
5.1 Overview: Maintenance and service ......................................... 8
6 Troubleshooting 8
6.1 Overview: Troubleshooting........................................................ 8
For the installer 8
7 About the box 8
7.1 To unpack the user interface..................................................... 8
8 Preparation 9
8.1 Wiring requirements .................................................................. 9
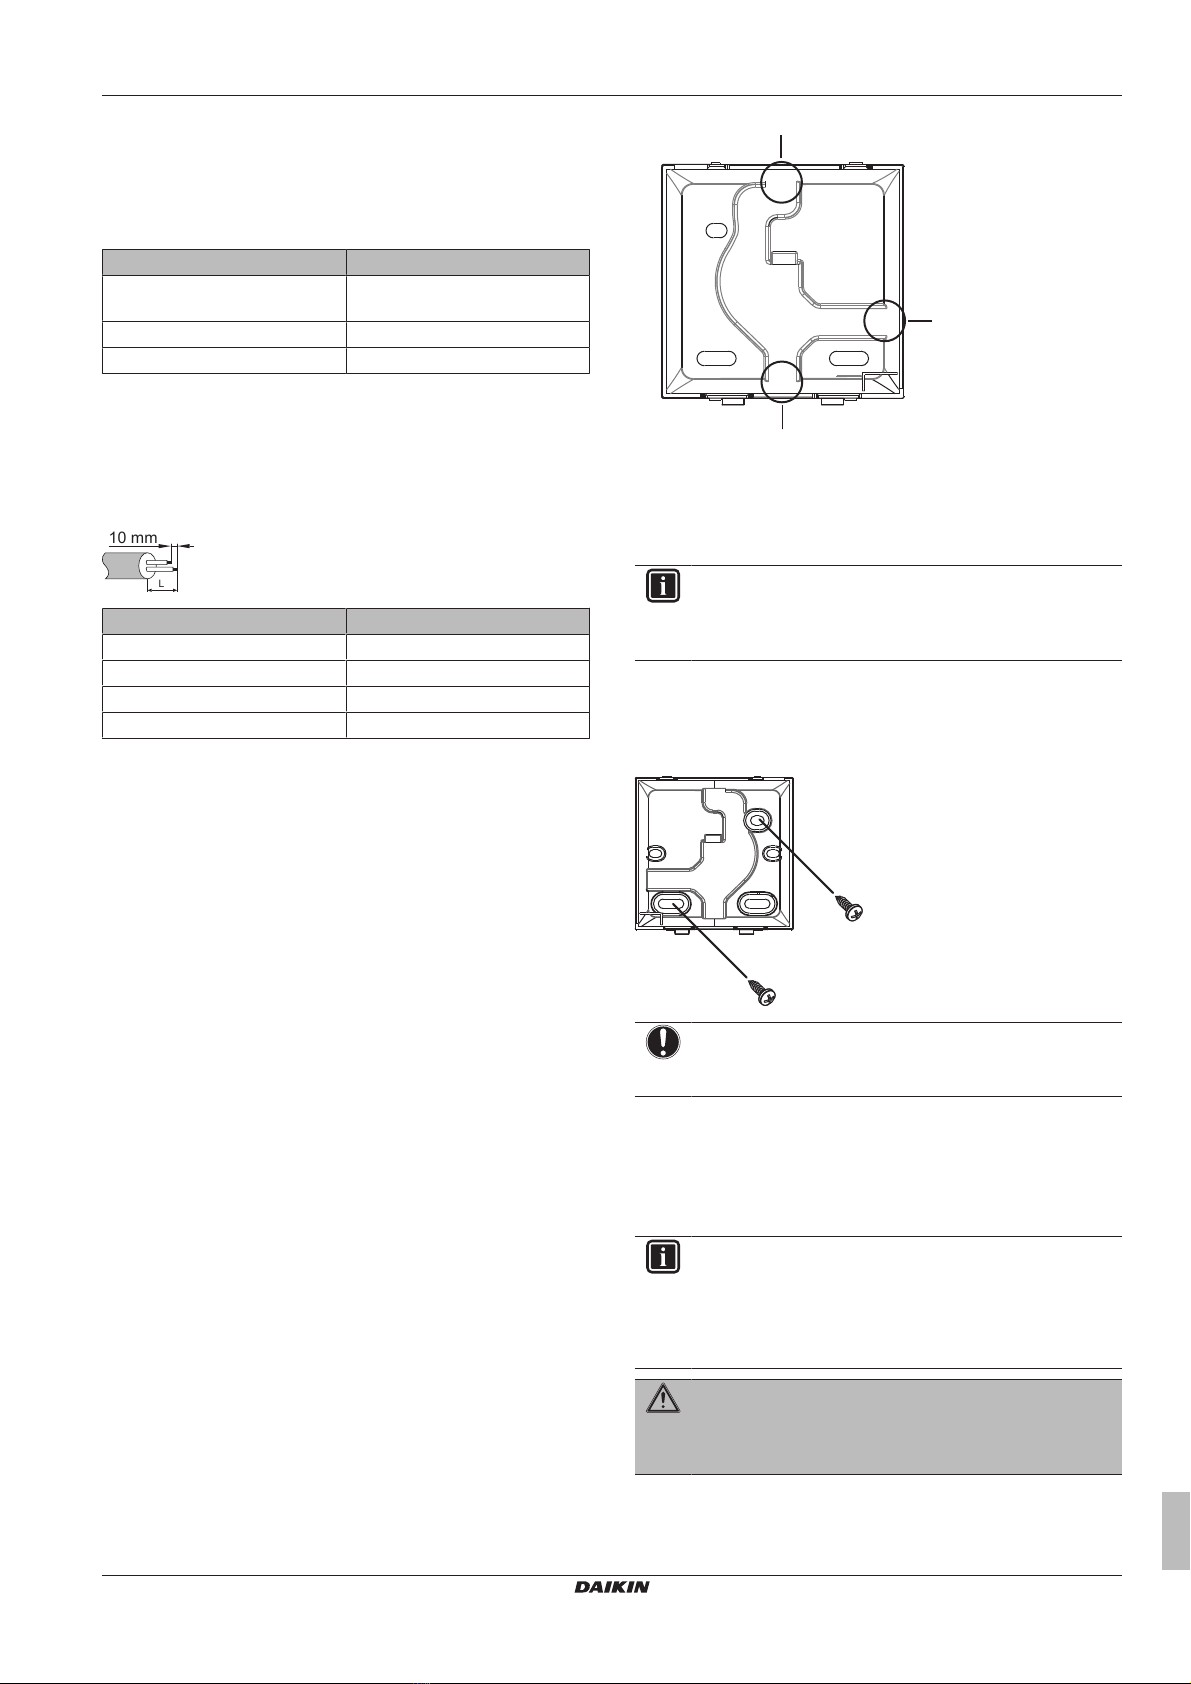
8.1.1 To prepare the wiring for installation........................... 9
9 Installation 9
9.1 Overview: Installation ................................................................ 9
9.2 Mounting the user interface....................................................... 9
9.2.1 About mounting the user interface.............................. 9
9.2.2 To mount the user interface........................................ 9
9.3 Connecting the electrical wiring................................................. 9
9.3.1 Precautions when connecting the electrical wiring ..... 9
9.3.2 To connect the electrical wiring................................... 10
9.4 Closing the user interface.......................................................... 10
9.4.1 Precautions when closing the user interface .............. 10
9.4.2 To close the user interface.......................................... 10
9.5 Opening the user interface ........................................................ 10
9.5.1 Precautions when opening the user interface............. 10
9.5.2 To open the user interface.......................................... 11
10 Starting up the system 11
11 User interface: Overview 11
11.1 Buttons ...................................................................................... 11
11.2 Home screen ............................................................................. 11
11.3 Status icons............................................................................... 12
11.4 Status indicator........................................................................... 12
12 Operation 12
12.1 Basic usage................................................................................ 12
12.1.1 Operation screens........................................................ 12
12.1.2 Main menu ................................................................... 12
12.2 Space heating/cooling control .................................................... 13
12.2.1 About space heating/cooling control............................ 13
12.2.2 To turn ON/OFF space heating/cooling operation ....... 13
12.2.3 To change the room temperature ................................ 14
12.2.4 To change the space operation mode ......................... 14
12.3 Domestic hot water control......................................................... 14
12.3.1 About domestic hot water control................................. 14
12.3.2 To turn ON/OFF domestic hot water operation............ 14
12.3.3 To change the domestic hot water temperature .......... 15
12.3.4 Using DHW powerful operation.................................... 15
13 Configuration 15
13.1 Information ................................................................................. 15
13.1.1 About the information menu......................................... 15
13.1.2 To see information ....................................................... 15
13.2 Settings menu ............................................................................ 16
13.2.1 About the settings menu .............................................. 16
13.2.2 Screen settings ............................................................ 16
13.2.3 Status indicator settings............................................... 16
13.2.4 Night mode................................................................... 16
13.3 Software update ......................................................................... 17
13.3.1 About software updates ............................................... 17
13.3.2 Software update with app ............................................ 17
13.3.3 Software update with updating tool.............................. 18
14 Maintenance 19
14.1 Maintenance safety precautions................................................. 19
14.2 To clean the user interface......................................................... 19
15 Troubleshooting 19
15.1 Error codes of the indoor unit ..................................................... 19
1 General safety precautions
Please read these general safety precautions carefully before
installing air conditioning equipment, and be sure to install the
equipment correctly.
Failure to follow these instructions properly may result in property
damage or personal injury, which may be serious depending on the
circumstances.
Meaning of warnings and symbols
These safety messages are used to attract your attention. The
meaning of each safety message is described below:
WARNING
Indicates a situation that could result in death or serious
injury.
CAUTION
Indicates a situation that could result in minor or moderate
injury.
DANGER
Indicates a situation that results in death or serious injury.
DANGER: RISK OF EXPLOSION
Indicates a situation that could result in explosion.
INFORMATION
Indicates useful tips or additional information.

2 About this document
Installer and user reference guide
3
BRC1HHDAW+BRC1HHDAS+BRC1HHDAK
Human Comfort Interface
4P534402-1 – 2018.06
NOTICE
Indicates a situation that could result in equipment or
property damage.
1.1 For the user
INFORMATION
Also see the operation manual delivered with the outdoor
and indoor unit.
WARNING
Do NOT play with the unit or its user interface. Accidental
operation by a child may result in impairment of bodily
functions and harm health.
WARNING
To prevent electric shocks or fire:
▪ Do NOT operate the user interface with wet hands.
▪ Do NOT disassemble the user interface and touch
interior parts. Contact your dealer.
▪ Do NOT modify or repair the user interface. Contact
your dealer.
▪ Do NOT relocate or reinstall the user interface by
yourself. Contact your dealer.
WARNING
Do NOT use flammable materials (e.g. hairspray or
insecticide) near the user interface.
NOTICE
To clean the user interface, do NOT use organic solvents,
such as paint thinner. Possible consequence: damage,
electric shock, or fire.
1.2 For the installer
The precautions described in this document cover very important
topics, follow them carefully.
INFORMATION
This user interface is an option and cannot be used
standalone. It can ONLY be used in combination with a
main user interface. Also see the installation and operation
manual of the indoor and outdoor units.
NOTICE
Improper installation or attachment of equipment or
accessories could result in electric shock, short-circuit,
leaks, fire or other damage to the equipment. Only use
accessories, optional equipment and spare parts made or
approved by Daikin.
WARNING
All field wiring and components MUST be installed by a
licensed electrician and MUST comply with the applicable
legislation.
NOTICE
The user interface MUST be mounted indoors.
NOTICE
When the user interface is used as room thermostat, select
an installation location where the average temperature in
the room can be detected.
Do NOT install the user interface in the following places:
▪ In places that are exposed to direct sunlight.
▪ In places that are near a heat source.
▪ In places that are affected by outside air or air draught due to e.g.
door opening/closing.
▪ In places where the display can easily get dirty.
▪ In places where there is NO easy access to the controls.
▪ In places with temperatures <–10°C and >50°C.
▪ In places where the relative humidity is >95%.
▪ In places where there is machinery that emits electromagnetic
waves. Electromagnetic waves may disturb the control system,
and cause malfunction of the equipment.
▪ In places where it may be exposed to water, or in generally moist
areas.
If you are NOT sure how to install or operate the unit, contact your
dealer.
After finishing installation:
▪ Conduct a trial operation to check for faults.
▪ Explain the user how to operate the user interface.
▪ Ask the user to store the manual for future reference.
INFORMATION
Consult your dealer regarding the relocation and
reinstallation of the user interface.
2 About this document
Target audience
Authorised installers + end users
Documentation set
This document is part of a documentation set. The complete set
consists of:
▪Installation and operation manual:
▪ Installation instructions
▪ Basic operation instructions
▪ Format: Paper (in the box of the user interface)
▪Installer and user reference guide:
▪ Extended installation and operation information
▪ Format: Digital files on http://www.daikineurope.com/support-
and-manuals/product-information/
▪Declaration of conformity:
▪ Hereby, Daikin Europe N.V. declares that the radio equipment
type BRC1HHDA is in compliance with the Directive 2014/53/
EU. The original declaration of conformity is available from the

3 User interface: Overview
Installer and user reference guide
4
BRC1HHDAW+BRC1HHDAS+BRC1HHDAK
Human Comfort Interface
4P534402-1 – 2018.06
BRC1HHDA product pages https://qr.daikin.eu/?
N=BRC1HHDW, https://qr.daikin.eu/?N=BRC1HHDS, and
https://qr.daikin.eu/?N=BRC1HHDK.
▪ Format: Digital file from the product pages
(BRC1HHDAW)
(BRC1HHDAS)
(BRC1HHDAK)
Latest revisions of the supplied documentation may be available on
the regional Daikin website or via your dealer.
The original documentation is written in English. All other languages
are translations.
Technical engineering data
▪ A subset of the latest technical data is available on the regional
Daikin website (publicly accessible).
▪ The full set of latest technical data is available on the Daikin
extranet (authentication required).
For the user
3 User interface: Overview
3.1 Buttons
+
-
c b d
a
a ON/OFF
▪ When space heating/cooling and/or domestic hot water
operation is OFF, press to turn it ON.
▪ When space heating/cooling and/or domestic hot water
operation is ON, press to turn it OFF.
b CYCLE/ENTER/ACTIVATE /CONFIRM
▪ From the home screen, short press to cycle through the
operation screens.
▪ From the home screen, long press to go to the main menu.
▪ In the main menu, short press to enter one of the menus.
▪ In any of the menus, activate/confirm a function, value, or
setting.
c ACTIVATE/CYCLE/ADJUST
▪ On the room temperature/domestic hot water operation
screen, activate the setpoint screen.
▪ In the main menu, cycle left.
▪ In any of the menus/operation screens, adjust a function,
value, or setting (default: decrease).
d ACTIVATE/CYCLE/ADJUST
▪ On the room temperature/domestic hot water operation
screen, activate the setpoint screen.
▪ In the main menu, cycle right.
▪ In any of the menus/operation screens, adjust a function,
value, or setting (default: increase).
3.2 Home screen
The home screen displays the actual room temperature, and all
kinds of information through status icons. After a period of operation
inactivity the user interface will always revert to the home screen.
INFORMATION
The user interface is equipped with a power saving
function that causes the screen to darken after a period of
inactivity. To make the screen light up again, press one of
the buttons.
3.3 Status icons
Icon Description
System operation OFF. Indicates that space heating/
cooling operation and/or domestic hot water operation
are turned OFF.
Bluetooth.1 Indicates that Bluetooth is activated, and
that the user interface is ready to perform a software
update.
Heating operation. Indicates that the system is
operating in Heating operation mode.
Cooling operation. Indicates that the system is
operating in Cooling operation mode.
Powerful operation. Indicates that Powerful
operation is active.
(1) The Bluetooth® word mark and logos are registered trademarks owned by the Bluetooth SIG, Inc. and use of such marks by
Daikin Europe N.V. is under license. Other trademarks and trade names are those of their respective owners.

4 Operation
Installer and user reference guide
5
BRC1HHDAW+BRC1HHDAS+BRC1HHDAK
Human Comfort Interface
4P534402-1 – 2018.06
Icon Description
Emergency operation. Indicates that Emergency
operation is active.
Malfunction. Indicates that a malfunction occurred.
INFORMATION
When the user interface signals Emergency operation or
Malfunction, see the main user interface to see what is
wrong.
3.4 Status indicator
+
-
a
aStatus indicator
Status indicator behaviour Condition
Continuous blue Operation ON
▪ The unit is in operation (i.e.
actually heating up/cooling
down the space, or producing
domestic hot water)
OFF Operation OFF
▪ The unit is in standby (i.e.
turned ON, but not in
operation)
▪ The unit is OFF
Blinking red System error
Continuous red System malfunction
INFORMATION
Status indicator behaviour is different when night mode is
active. For more information, see "13.2.4 Night mode" on
page16.
INFORMATION
In case of system errors, the status indicator blinks red. As
soon as you press any button, the status indicator will shift
to "continuous red".
4 Operation
4.1 Basic usage
4.1.1 Operation screens
From the home screen, press (shortly) to cycle through the
operation screens.
Operation screen Description
Room temperature. See the
actual room temperature, and
control the (desired) room
temperature.
Domestic hot water
temperature. See the actual
domestic hot water temperature,
and control the (desired)
domestic hot water temperature
(i.e. tank heating operation).
Powerful operation. Activate or
deactivate Powerful operation
(i.e. fast tank heating operation).
4.1.2 Main menu
From the home screen, press and keep it pressed until you enter
the main menu. Use and to cycle through the menus. Press
again to enter one of the menus.
Menu Description
Information. See information about the user
interface.
Bluetooth. Make the user interface send out a
Bluetooth signal to perform a software update.
Return. Return to the home screen.
Settings. Make user interface settings.
Space operation mode. Set the space operation
mode.

4 Operation
Installer and user reference guide
6
BRC1HHDAW+BRC1HHDAS+BRC1HHDAK
Human Comfort Interface
4P534402-1 – 2018.06
4.2 Space heating/cooling control
4.2.1 About space heating/cooling control
Space heating/cooling control involves:
▪ Controlling the room temperature;
▪ Setting the space operation mode.
Room temperature
Room temperature control is performed from the home screen. The
home screen displays the actual room temperature, as measured by
a temperature sensor mounted in the user interface. For instructions
on how to change the room temperature, see "4.2.3To change the
room temperature"on page6.
The way you control the room temperature depends on the
temperature control method that is set on the main user interface.
Main user interface
temperature control method
Room temperature control
Room thermostat control Change the actual room
temperature by increasing or
decreasing the desired room
temperature value.
Leaving water temperature
control (fixed)
Change the room temperature by
increasing or decreasing the
leaving water temperature (i.e.
the temperature of the water that
is sent to the heat emitters).
Leaving water temperature
control (weather dependent)
Change the room temperature by
lowering or raising the weather
dependent curve, represented on
the user interface by a shift
value.
INFORMATION
For more information on the temperature control methods,
see the documentation of the indoor units.
INFORMATION
When the temperature sensor inside the user interface is
broken, the system goes in error, and the operation screen
displays "--" instead of the actual temperature.
Space operation mode
Space operation modes are selected from the space operation mode
menu. The system can run in the following space operation modes:
Icon Operation mode
Heating. Heat up the space.
Cooling. Cool down the space.
Automatic. Automatic switching between heating and
cooling, as required by the room temperature
setpoint.
Depending on the type of indoor unit and/or settings made on the
main user interface, it is possible that some operation modes are not
available.
If… Then…
The user interface is used in
combination with heating-only
indoor units
The space operation mode menu
is absent from the main menu.
Automatic operation mode is
made unavailable on the main
user interface
You can only select heating or
cooling operation mode.
None of the above conditions are
true
You can select all operation
modes.
4.2.2 To turn ON/OFF space heating/cooling
operation
Prerequisite: The user interface displays the home screen.
1press the button.
Result: The user interface will turn ON or OFF space heating/
cooling operation, depending on the previous state.
INFORMATION
To indicate operation is OFF, the user interface displays
"OFF" on the home screen.
4.2.3 To change the room temperature
1From the home screen, press or to activate the setpoint
screen.

4 Operation
Installer and user reference guide
7
BRC1HHDAW+BRC1HHDAS+BRC1HHDAK
Human Comfort Interface
4P534402-1 – 2018.06
2Use and to change the setpoint.
3Press to confirm the setpoint.
Result: The user interface implements changes and returns to the
home screen.
INFORMATION
When operation is OFF, the user interface does not allow
setpoint changes.
INFORMATION
Depending on settings made on the main user interface,
setpoint changes might not be possible. If this is the case,
pressing or from the room temperature or domestic
hot water operation screen is futile.
INFORMATION
The way you control the room temperature depends on the
temperature control method that is set on the main user
interface. For more information, see "4.2.1 About space
heating/cooling control"on page6.
4.2.4 To change the space operation mode
1From the home screen, press and keep it pressed until you
enter the main menu.
2Use and to navigate to the space operation mode menu.
3Press to enter the menu.
4Use and to select a space operation mode, and press
to activate it.
Result: The user interface implements changes and returns to the
home screen.
4.3 Domestic hot water control
4.3.1 About domestic hot water control
Domestic hot water control involves:
▪ Controlling the domestic hot water temperature;
▪ Activating or deactivating Powerful operation.
Domestic hot water temperature
The indoor unit creates domestic hot water in the domestic hot water
tank. The temperature of the domestic hot water can be increased or
decreased.
INFORMATION
When the temperature sensor inside the domestic hot
water tank is broken, the system goes in error, and the
operation screen displays "--" instead of the actual water
temperature.
Powerful operation
Powerful operation allows the domestic hot water to be heated by
the backup heater or booster heater, depending on the indoor unit.
Use this mode on days when there is more hot water usage than
usual.
4.3.2 To turn ON/OFF domestic hot water
operation
1From the home screen, press to go to the domestic hot
water operation screen.
2press the button.
Result: The user interface will turn ON or OFF domestic hot water
operation, depending on the previous state.
INFORMATION
To indicate operation is OFF, the user interface displays
"OFF" on the home screen.
4.3.3 To change the domestic hot water
temperature
1From the home screen, press to go to the domestic hot
water operation screen.
2Press or to activate the setpoint screen.

5 Maintenance and service
Installer and user reference guide
8
BRC1HHDAW+BRC1HHDAS+BRC1HHDAK
Human Comfort Interface
4P534402-1 – 2018.06
3Use and to change the setpoint.
4Press to confirm the setpoint.
Result: The user interface implements changes and returns to the
domestic hot water operation screen.
INFORMATION
When operation is OFF, the user interface does not allow
setpoint changes.
INFORMATION
Depending on settings made on the main user interface,
setpoint changes might not be possible. If this is the case,
pressing or from the room temperature or domestic
hot water operation screen is futile.
4.3.4 Using DHW powerful operation
1From the home screen, press to go to the Powerful
operation screen.
2To activate Powerful operation, use and to select
"activate".
3To deactivate Powerful operation, use and to select
"deactivate".
4Press to confirm your selection.
Result: The user interface implements changes and returns to the
home screen.
INFORMATION
To indicate Powerful operation is active, the user interface
displays the Powerful icon on the domestic hot water
operation screen.
INFORMATION
For more information on Powerful operation, see the
installer reference guide and the user reference guide of
the units.
5 Maintenance and service
5.1 Overview: Maintenance and
service
When the user interface needs to be maintained or serviced, consult
your dealer.
6 Troubleshooting
6.1 Overview: Troubleshooting
When the system is in error, the user interface displays on the
home screen. Simultaneously, the main user interface displays an
error code. Check the main user interface to see the error code. For
a list of error codes and what they mean, see the documentation of
the indoor unit. To have the error solved, consult your dealer.
For the installer
7 About the box
7.1 To unpack the user interface
1Open the box.
2Separate the accessories.
a b
1× 2×
aInstallation and operation manual
bWood screws + wall plugs (Ø4.0×30)

8 Preparation
Installer and user reference guide
9
BRC1HHDAW+BRC1HHDAS+BRC1HHDAK
Human Comfort Interface
4P534402-1 – 2018.06
8 Preparation
8.1 Wiring requirements
All wiring must comply with the following requirements:
Wire specification Value
Type Sheathed vinyl cord or cable (2
wires)
Section 0.75~1.25 mm2
Maximum length 500 m
8.1.1 To prepare the wiring for installation
1Peel the sheath of the part of the cable that needs to pass
through the inside of the rear casing (L), according to the figure
and the table.
2Keep a 10mm distance between the length of the 2 wires.
10 mm
L
Wiring outlet L
Top ±150mm
Left ±120mm
Bottom ±100mm
Rear No requirements
9 Installation
9.1 Overview: Installation
The installation of the user interface typically consists of the
following stages:
1 Determining how you want to route the electrical wiring, and
nipping away a piece of the rear casing accordingly.
2 Mounting the rear casing to the wall.
3 Connecting the electrical wiring.
4 Closing the user interface.
9.2 Mounting the user interface
9.2.1 About mounting the user interface
Before you can mount the user interface, you have to determine the
wiring routing, and accordingly, remove a piece of the user
interface's rear casing.
The wiring can be routed from the top, the rear, the left, or the
bottom. Remove a piece of the rear casing according to the
illustration:
a
b
c
aWiring from the top
bWiring from the left
cWiring from the bottom
In case you are routing the wiring from the rear, you don't have to
remove anything.
INFORMATION
When routing the wiring from the top or from the rear,
insert the wiring through the knockout hole before
mounting the rear casing to the wall.
9.2.2 To mount the user interface
1Take the screws and plugs from the accessory bag.
2Mount the rear casing to a flat surface.
NOTICE
Be careful not to distort the rear casing by overtightening
the mounting screws.
9.3 Connecting the electrical wiring
9.3.1 Precautions when connecting the
electrical wiring
INFORMATION
Also read the precautions and requirements in the
following chapters:
▪ General safety precautions
▪ Preparation
WARNING
All field wiring and components MUST be installed by a
licensed electrician and MUST comply with the applicable
legislation.

9 Installation
Installer and user reference guide
10
BRC1HHDAW+BRC1HHDAS+BRC1HHDAK
Human Comfort Interface
4P534402-1 – 2018.06
CAUTION
When connecting the user interface to the indoor unit,
make sure the indoor unit switchbox and transmission
wiring are not connected.
NOTICE
The wiring for connection is NOT included.
NOTICE
When wiring, run the wiring away from the power supply
wiring in order to avoid receiving electric noise (external
noise).
INFORMATION
P1 and P2 have no polarity.
9.3.2 To connect the electrical wiring
Connect user interface terminals P1/P2 to indoor unit terminals P1/
P2.
From the top
P1P2
From the rear
P1P2
From the left
P1P2
From the bottom
P1P2
9.4 Closing the user interface
9.4.1 Precautions when closing the user
interface
CAUTION
Never touch the internal parts of the user interface.
CAUTION
When closing the user interface, be careful not to pinch the
wiring.
NOTICE
To prevent damage, make sure the front of the user
interface is clicked into the rear casing securely.
9.4.2 To close the user interface
1Click the front of the user interface into the rear casing.
1
2
2When the installation site is dust‑free, peel off the protective
seal.
9.5 Opening the user interface
9.5.1 Precautions when opening the user
interface
NOTICE
The user interface PCB is mounted into the front casing.
When opening the user interface, be careful not to damage
the PCB.
NOTICE
When the front and rear casing are separated, make sure
the PCB does not come into contact with dust or moisture.

10 Starting up the system
Installer and user reference guide
11
BRC1HHDAW+BRC1HHDAS+BRC1HHDAK
Human Comfort Interface
4P534402-1 – 2018.06
9.5.2 To open the user interface
1Insert a flat-head screwdriver in one of the bottom closing
mechanisms and slowly twist it.
10 Starting up the system
The user interface gets its power from the indoor unit. It will start up
as soon as it is connected. For the user interface to be operable,
therefore make sure the indoor unit is powered on.
Before the user interface is ready for operation, it will synchronise
with the main user interface and go through the following start-up
sequence:
Start-up sequence
1
User interface booting up
2
User interface synchronising with the main user interface
3
User interface ready for operation
11 User interface: Overview
11.1 Buttons
+
-
c b d
a
a ON/OFF
▪ When space heating/cooling and/or domestic hot water
operation is OFF, press to turn it ON.
▪ When space heating/cooling and/or domestic hot water
operation is ON, press to turn it OFF.
b CYCLE/ENTER/ACTIVATE /CONFIRM
▪ From the home screen, short press to cycle through the
operation screens.
▪ From the home screen, long press to go to the main menu.
▪ In the main menu, short press to enter one of the menus.
▪ In any of the menus, activate/confirm a function, value, or
setting.
c ACTIVATE/CYCLE/ADJUST
▪ On the room temperature/domestic hot water operation
screen, activate the setpoint screen.
▪ In the main menu, cycle left.
▪ In any of the menus/operation screens, adjust a function,
value, or setting (default: decrease).
d ACTIVATE/CYCLE/ADJUST
▪ On the room temperature/domestic hot water operation
screen, activate the setpoint screen.
▪ In the main menu, cycle right.
▪ In any of the menus/operation screens, adjust a function,
value, or setting (default: increase).
11.2 Home screen
The home screen displays the actual room temperature, and all
kinds of information through status icons. After a period of operation
inactivity the user interface will always revert to the home screen.
INFORMATION
The user interface is equipped with a power saving
function that causes the screen to darken after a period of
inactivity. To make the screen light up again, press one of
the buttons.

12 Operation
Installer and user reference guide
12
BRC1HHDAW+BRC1HHDAS+BRC1HHDAK
Human Comfort Interface
4P534402-1 – 2018.06
11.3 Status icons
Icon Description
System operation OFF. Indicates that space heating/
cooling operation and/or domestic hot water operation
are turned OFF.
Bluetooth.2 Indicates that Bluetooth is activated, and
that the user interface is ready to perform a software
update.
Heating operation. Indicates that the system is
operating in Heating operation mode.
Cooling operation. Indicates that the system is
operating in Cooling operation mode.
Powerful operation. Indicates that Powerful
operation is active.
Emergency operation. Indicates that Emergency
operation is active.
Malfunction. Indicates that a malfunction occurred.
INFORMATION
When the user interface signals Emergency operation or
Malfunction, see the main user interface to see what is
wrong.
11.4 Status indicator
+
-
a
aStatus indicator
Status indicator behaviour Condition
Continuous blue Operation ON
▪ The unit is in operation (i.e.
actually heating up/cooling
down the space, or producing
domestic hot water)
OFF Operation OFF
▪ The unit is in standby (i.e.
turned ON, but not in
operation)
▪ The unit is OFF
Blinking red System error
Continuous red System malfunction
INFORMATION
Status indicator behaviour is different when night mode is
active. For more information, see "13.2.4 Night mode" on
page16.
INFORMATION
In case of system errors, the status indicator blinks red. As
soon as you press any button, the status indicator will shift
to "continuous red".
12 Operation
12.1 Basic usage
12.1.1 Operation screens
From the home screen, press (shortly) to cycle through the
operation screens.
Operation screen Description
Room temperature. See the
actual room temperature, and
control the (desired) room
temperature.
Domestic hot water
temperature. See the actual
domestic hot water temperature,
and control the (desired)
domestic hot water temperature
(i.e. tank heating operation).
Powerful operation. Activate or
deactivate Powerful operation
(i.e. fast tank heating operation).
12.1.2 Main menu
From the home screen, press and keep it pressed until you enter
the main menu. Use and to cycle through the menus. Press
again to enter one of the menus.
Menu Description
Information. See information about the user
interface.
(2) The Bluetooth® word mark and logos are registered trademarks owned by the Bluetooth SIG, Inc. and use of such marks by
Daikin Europe N.V. is under license. Other trademarks and trade names are those of their respective owners.

12 Operation
Installer and user reference guide
13
BRC1HHDAW+BRC1HHDAS+BRC1HHDAK
Human Comfort Interface
4P534402-1 – 2018.06
Menu Description
Bluetooth. Make the user interface send out a
Bluetooth signal to perform a software update.
Return. Return to the home screen.
Settings. Make user interface settings.
Space operation mode. Set the space operation
mode.
12.2 Space heating/cooling control
12.2.1 About space heating/cooling control
Space heating/cooling control involves:
▪ Controlling the room temperature;
▪ Setting the space operation mode.
Room temperature
Room temperature control is performed from the home screen. The
home screen displays the actual room temperature, as measured by
a temperature sensor mounted in the user interface. For instructions
on how to change the room temperature, see "12.2.3To change the
room temperature"on page14.
The way you control the room temperature depends on the
temperature control method that is set on the main user interface.
Main user interface
temperature control method
Room temperature control
Room thermostat control Change the actual room
temperature by increasing or
decreasing the desired room
temperature value.
Leaving water temperature
control (fixed)
Change the room temperature by
increasing or decreasing the
leaving water temperature (i.e.
the temperature of the water that
is sent to the heat emitters).
Leaving water temperature
control (weather dependent)
Change the room temperature by
lowering or raising the weather
dependent curve, represented on
the user interface by a shift
value.
INFORMATION
For more information on the temperature control methods,
see the documentation of the indoor units.
INFORMATION
When the temperature sensor inside the user interface is
broken, the system goes in error, and the operation screen
displays "--" instead of the actual temperature.
Space operation mode
Space operation modes are selected from the space operation mode
menu. The system can run in the following space operation modes:
Icon Operation mode
Heating. Heat up the space.
Cooling. Cool down the space.
Automatic. Automatic switching between heating and
cooling, as required by the room temperature
setpoint.
Depending on the type of indoor unit and/or settings made on the
main user interface, it is possible that some operation modes are not
available.
If… Then…
The user interface is used in
combination with heating-only
indoor units
The space operation mode menu
is absent from the main menu.
Automatic operation mode is
made unavailable on the main
user interface
You can only select heating or
cooling operation mode.
None of the above conditions are
true
You can select all operation
modes.
12.2.2 To turn ON/OFF space heating/cooling
operation
Prerequisite: The user interface displays the home screen.
1press the button.
Result: The user interface will turn ON or OFF space heating/
cooling operation, depending on the previous state.

12 Operation
Installer and user reference guide
14
BRC1HHDAW+BRC1HHDAS+BRC1HHDAK
Human Comfort Interface
4P534402-1 – 2018.06
INFORMATION
To indicate operation is OFF, the user interface displays
"OFF" on the home screen.
12.2.3 To change the room temperature
1From the home screen, press or to activate the setpoint
screen.
2Use and to change the setpoint.
3Press to confirm the setpoint.
Result: The user interface implements changes and returns to the
home screen.
INFORMATION
When operation is OFF, the user interface does not allow
setpoint changes.
INFORMATION
Depending on settings made on the main user interface,
setpoint changes might not be possible. If this is the case,
pressing or from the room temperature or domestic
hot water operation screen is futile.
INFORMATION
The way you control the room temperature depends on the
temperature control method that is set on the main user
interface. For more information, see "12.2.1 About space
heating/cooling control"on page13.
12.2.4 To change the space operation mode
1From the home screen, press and keep it pressed until you
enter the main menu.
2Use and to navigate to the space operation mode menu.
3Press to enter the menu.
4Use and to select a space operation mode, and press
to activate it.
Result: The user interface implements changes and returns to the
home screen.
12.3 Domestic hot water control
12.3.1 About domestic hot water control
Domestic hot water control involves:
▪ Controlling the domestic hot water temperature;
▪ Activating or deactivating Powerful operation.
Domestic hot water temperature
The indoor unit creates domestic hot water in the domestic hot water
tank. The temperature of the domestic hot water can be increased or
decreased.
INFORMATION
When the temperature sensor inside the domestic hot
water tank is broken, the system goes in error, and the
operation screen displays "--" instead of the actual water
temperature.
Powerful operation
Powerful operation allows the domestic hot water to be heated by
the backup heater or booster heater, depending on the indoor unit.
Use this mode on days when there is more hot water usage than
usual.
12.3.2 To turn ON/OFF domestic hot water
operation
1From the home screen, press to go to the domestic hot
water operation screen.
2press the button.
Result: The user interface will turn ON or OFF domestic hot water
operation, depending on the previous state.
INFORMATION
To indicate operation is OFF, the user interface displays
"OFF" on the home screen.

13 Configuration
Installer and user reference guide
15
BRC1HHDAW+BRC1HHDAS+BRC1HHDAK
Human Comfort Interface
4P534402-1 – 2018.06
12.3.3 To change the domestic hot water
temperature
1From the home screen, press to go to the domestic hot
water operation screen.
2Press or to activate the setpoint screen.
3Use and to change the setpoint.
4Press to confirm the setpoint.
Result: The user interface implements changes and returns to the
domestic hot water operation screen.
INFORMATION
When operation is OFF, the user interface does not allow
setpoint changes.
INFORMATION
Depending on settings made on the main user interface,
setpoint changes might not be possible. If this is the case,
pressing or from the room temperature or domestic
hot water operation screen is futile.
12.3.4 Using DHW powerful operation
1From the home screen, press to go to the Powerful
operation screen.
2To activate Powerful operation, use and to select
"activate".
3To deactivate Powerful operation, use and to select
"deactivate".
4Press to confirm your selection.
Result: The user interface implements changes and returns to the
home screen.
INFORMATION
To indicate Powerful operation is active, the user interface
displays the Powerful icon on the domestic hot water
operation screen.
INFORMATION
For more information on Powerful operation, see the
installer reference guide and the user reference guide of
the units.
13 Configuration
13.1 Information
13.1.1 About the information menu
In the information menu, you can see the following information:
Information Description
SW1 User interface software ID
Ver User interface software version
SW2 Communication module
(Bluetooth) software ID
--:--:--:--:--:--: Communication module
(Bluetooth) MAC address
13.1.2 To see information
1From the home screen, press and keep it pressed until you
enter the main menu.
2Press to enter the information menu.
3Press to go to the second page.

13 Configuration
Installer and user reference guide
16
BRC1HHDAW+BRC1HHDAS+BRC1HHDAK
Human Comfort Interface
4P534402-1 – 2018.06
13.2 Settings menu
13.2.1 About the settings menu
In the settings menu you can make the following settings:
Category Icon Settings
Screen Set brightness
Set contrast
Status indicator Set intensity
Night mode Activate or deactivate
To enter the settings menu
1From the home screen, press and keep it pressed until you
enter the main menu.
2Use and to navigate to the settings menu.
3Press to enter the menu.
Result: You are in the settings menu.
13.2.2 Screen settings
To set screen brightness
Prerequisite: You are in the settings menu.
1Navigate to the screen brightness menu.
2Press to enter the menu.
3Use and to adjust screen brightness.
4Press to confirm.
Result: The user interface implements changes and returns to the
home screen.
To set screen contrast
Prerequisite: You are in the settings menu.
1Navigate to the screen contrast menu.
2Press to enter the menu.
3Use and to adjust screen contrast.
4Press to confirm.
Result: The user interface implements changes and returns to the
home screen.
13.2.3 Status indicator settings
To set status indicator intensity
Prerequisite: You are in the settings menu.
1Navigate to the status indicator intensity menu.
2Press to enter the menu.
3Use and to adjust status indicator intensity.
4Press to confirm.
Result: The user interface implements changes and returns to the
home screen.
13.2.4 Night mode
About night mode
Activate night mode to have the user interface operate with altered
screen and status indicator behaviour, so as not to bother the user at
night.
Condition Night mode behaviour
Screen
Expiration of inactivity timer OFF
Status indicator

13 Configuration
Installer and user reference guide
17
BRC1HHDAW+BRC1HHDAS+BRC1HHDAK
Human Comfort Interface
4P534402-1 – 2018.06
Condition Night mode behaviour
Error Blinking, red. After touching any
button, or after a timer expires:
OFF.
Malfunction OFF
Operation ON OFF
Operation OFF OFF
To activate night mode
Prerequisite: You are in the settings menu.
Prerequisite: The user interface is not in night mode.
1Navigate to the night mode menu.
2Press to enter the menu.
3Use and to select "activate".
4Press to activate night mode.
Result: The user interface enters night mode and returns to the
home screen.
To deactivate night mode
Prerequisite: You are in the settings menu.
Prerequisite: The user interface is in night mode.
1Navigate to the night mode menu.
2Press to enter the menu.
3Use and to select "deactivate".
4Press to deactivate night mode.
Result: The user interface leaves night mode and returns to the
home screen.
13.3 Software update
13.3.1 About software updates
It is strongly recommended that the user interface has the latest
software version. There are two ways to perform a software update.
Software update Instructions
Madoka Assistant app "13.3.2Software update with
app"on page17
Updating tool "13.3.3Software update with
updating tool"on page18
13.3.2 Software update with app
To update the software with the app:
1Activate Bluetooth on the user interface, according to the
instructions set out in "To make a Bluetooth connection" on
page17.
2In the home screen of the app, tap the tile of the user interface
of which you want to update the software, and follow the
instruction from there.
INFORMATION
The Madoka Assistant app is available from Google Play
and the Apple Store.
INFORMATION
When it is the first time you connect a user interface to
your device, app and user interface initiate a numeric
comparison procedure. To successfully connect the user
interface to the app, follow the procedure.
After each successful connection to a mobile device, the
user interface automatically stores information about that
mobile device, this to facilitate future reconnection. This
information is called "bonding information".
When no bonding information is stored, (i.e. at first
connection, or after it got manually removed), you will have
to go through the numeric comparison procedure.
When bonding information is stored, you can connect the
user interface to the mobile device just by making the user
interface send out a Bluetooth signal and tapping the tile of
the user interface in the app. The user interface will then
connect to the mobile device automatically.
Bonding information gets stored automatically, and can be
removed manually. Remove the bonding information from
the user interface when you want to update the software
from another mobile device than the one the user interface
contains information about.
INFORMATION
To connect the user interface to the mobile device with
Bluetooth, and to perform a software update, it is required
that you stay close to the user interface (i.e. within
Bluetooth range).
To make a Bluetooth connection
Prerequisite: You have a mobile device on which the Madoka
Assistant app is installed and running.
Prerequisite: On that mobile device, Bluetooth is turned ON.
Prerequisite: You are close to the user interface.
1From the home screen, press and keep it pressed until you
enter the main menu.

13 Configuration
Installer and user reference guide
18
BRC1HHDAW+BRC1HHDAS+BRC1HHDAK
Human Comfort Interface
4P534402-1 – 2018.06
2Use and to navigate to the Bluetooth menu.
3Press to enter the menu.
4Press to activate and make the user interface send out a
Bluetooth signal.
Result:
Numeric comparison
5In the Madoka Assistant app, tap the tile of the user interface of
which you want to update the software.
Result: If it is the first time you make a connection, or when
bonding information was removed, the operating system of your
mobile device sends out a pairing request, including a numeric
string.
Result: The user interface displays a numeric string, for
comparison with that of the pairing request.
6In the app, accept the pairing request.
7On the user interface, press to confirm the numeric string.
Result: The user interface and the mobile device are connected via
Bluetooth.
8To update the software, follow the instructions from the app.
To terminate the Bluetooth connection
1From the home screen, press and keep it pressed until you
enter the main menu.
2Use and to navigate to the Bluetooth menu.
3Press to enter the menu.
4Press to stop the user interface from sending out a
Bluetooth signal.
Result:
To remove bonding information
1From the home screen, press and keep it pressed until you
enter the main menu.
2Use and to navigate to the Bluetooth menu.
3Press to enter the menu.
4Press to remove the bonding information from the user
interface.
Result:
13.3.3 Software update with updating tool
To update the software with Updater
Prerequisite: PC with Updater (contact your dealer for the correct
version of the software)
Prerequisite: PC USB cable EKPCCAB4 or higher (includes a USB
cable and additional connection cables)
1Make sure that the indoor unit is powered OFF.

14 Maintenance
Installer and user reference guide
19
BRC1HHDAW+BRC1HHDAS+BRC1HHDAK
Human Comfort Interface
4P534402-1 – 2018.06
2Connect the user interface to the PC.
a
b
c
d
X2A
X2A
aPC with Updater
bUSB cable
cUser interface PCB
dTo indoor unit
3Power ON the indoor unit.
4Open Updater.
5In Updater, go to "Update procedure".
6Type in the model name of the user interface.
7Select the desired update procedure.
8Follow the on-screen instructions.
14 Maintenance
14.1 Maintenance safety precautions
WARNING
Before carrying out any maintenance or repair activities,
stop system operation with the user interface, and turn off
the power supply circuit breaker. Possible consequence:
electric shock or injury.
NOTICE
To clean the user interface, do NOT use organic solvents,
such as paint thinner. Possible consequence: damage,
electric shock, or fire.
WARNING
Do not wash the user interface. Possible consequence:
electric leakage, electric shock, or fire.
INFORMATION
When the dirt on the surface cannot be removed easily
while cleaning the user interface, soak the cloth in neutral
detergent diluted with water, squeeze the cloth tightly, and
clean the surface. Afterwards, wipe dry with a dry cloth.
14.2 To clean the user interface
1Wipe the screen and other surface parts of the user interface
with a dry cloth.
15 Troubleshooting
15.1 Error codes of the indoor unit
When the indoor unit is in error, the user interface displays on the
home screen. Simultaneously, the main user interface displays an
error code. Check the main user interface to see the error code. For
a list of error codes and what they mean, see the documentation of
the indoor unit.
Solve the cause of the error.

4P534402-1 2018.06
Copyright 2018 Daikin
This manual suits for next models
2
Table of contents
Other Daikin Recording Equipment manuals