Daily Youth GT3DA User manual

- 1 -
GT3DA
Android DC Light Commercial
Motorized Treadmill

- 2 -
Thank you very much to choose our products. Before installation and usage,
please read the instructions carefully.
Contents
I. Warning, main technical parameters and features ………………………………………………………1
II. Product introduction ……………………………………………………..…………………………………3
III. Product explosion diagram …………………………………………………………….…………………4
IV. Particular sheet of explosion diagram ………………………………………………...…………………5
V. Assembly step ………………………………………………………………………………………………6
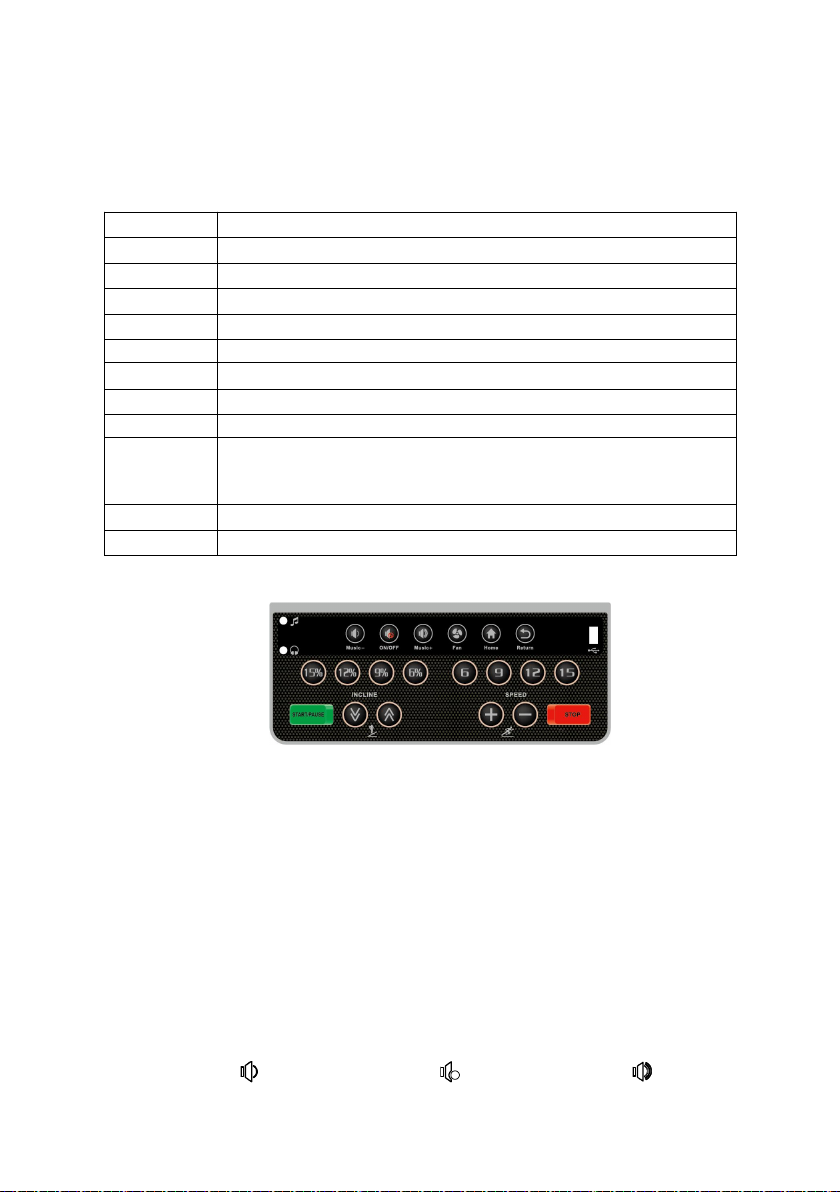
VI. Display and function operation of electronic meter .……………………………………………………7
VII. Use method and safety protection for treadmill ………………………………………………………16
VIII. Precautions …………………………………………………………………..…………………………17
IX. Daily servicing and maintenance of electric treadmill ……………………………..…………………18
X. Elimination methods for common faults…………………………………………..…………………… 20
XI. Precautions for exercise……………………………………………………………...………………… 22
I. Warning, main technical parameters and features
Warning!
1. When you are using the treadmill, please prevent your kids from approaching the treadmill.
Juveniles should not use the treadmill without the adult’s accompany to prevent any accident.
2. Before using the treadmill, please clip the safety switch on the clothes of users. Please take down
the safety switch when you do not use the safety switch.
3. The power supply for treadmill should be well grounded. The treadmill may be damaged by using
outlet without good grounding and the Manufacturer may not provide warranty for this! After the
practice, stop the treadmill and shut off the power supply.
4. Laymen must not open the front cover of treadmill and adjust the electronic control without
approval, to avoid unnecessary troubles.
5. In order to lengthen the service life of treadmill and ensure your safety, it is forbidden for
overweighed (beyond the weight limit) persons to use the treadmill and for two or more persons to
use one treadmill simultaneously.
6. Please do not walk up or down the treadmill from the rear part to avoid getting hurt by the machine.
7. When the treadmill is operating, do not contact the running belt with hands or run on the treadmill
with bare feet.
8. The heart rate monitoring is only for reference and cannot act as medical data; hypertensives and
cardiopaths should not use the treadmill alone to prevent accident.
9. When you are using the treadmill, if you feel chest tightness and dizziness, stop your motion
immediately for excessive motion may cause serious harm or accident.
10. Emergency jump-off method: if emergency happens during the movement process and the
treadmill belt does not stop, hold the handrail with your hands to support your body and separate
your feet from the treadmill belt surface, step on the stepping platform at two sides as well as get
away from the treadmill from one side.
11. A 2000mm×1000mm safety area shall be reserved behind the treadmill to prevent accident during
treadmill operation.
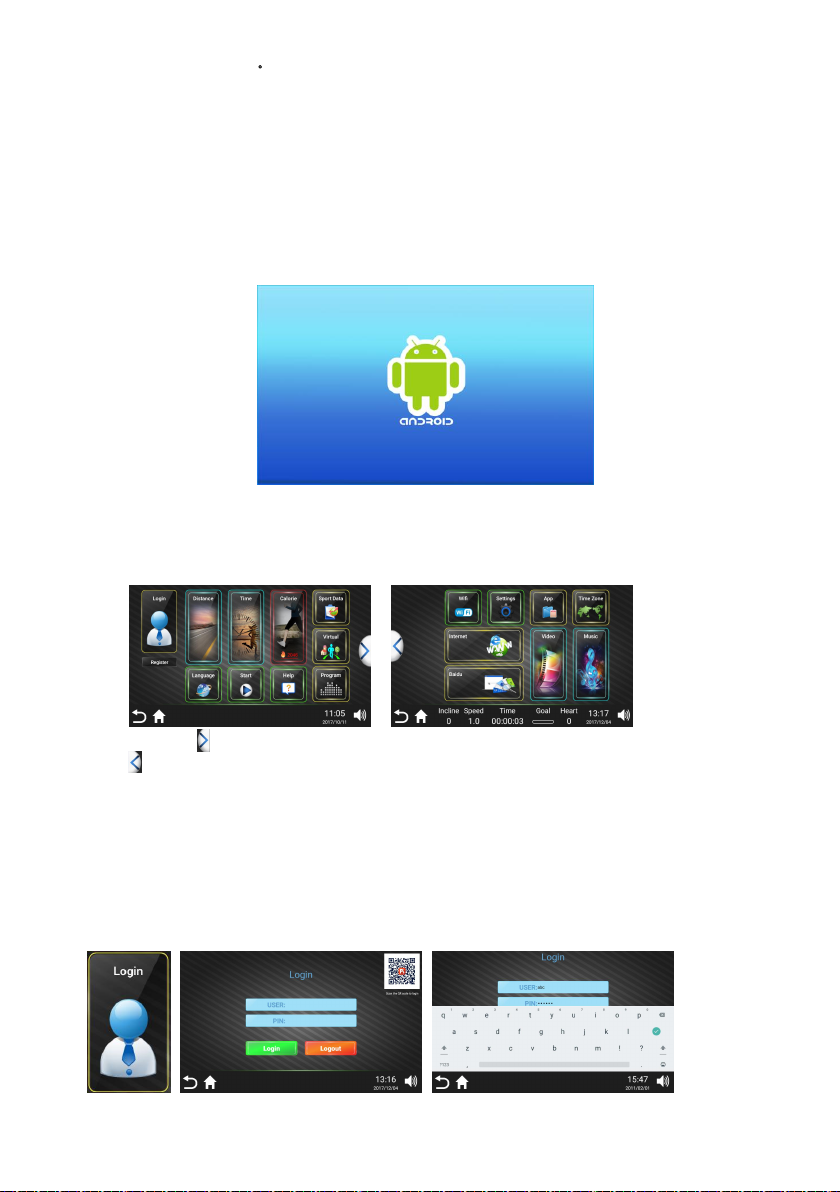
12. For your safety, please operate the following functions when the treadmill is idle: “Wireless Net”,
“Bluetooth”, “Application”, “Time Zone”, “Video”, “Music”. When the treadmill is operating, please
use the real buttons on the control panel to perform relevant operations as possible.
For the health and safety of your family, please read following operating instructions
and precautions before your start practicing on it so that you can get more fun from the
practice. (It is forbidden for unauthorized after-sales service personnel to adjust the
treadmill.)
Special
Note

- 3 -
The weight limit is exposed on this product. If your body weight is over 150Kg (330Ib), the service life of the treadmill
may be affected.
Main technical parameters
Input power voltage: AC220-240V(50Hz-60Hz)
Rated voltage:14.5A
Operating ambient temperature:0~40℃
Motor power:2600W
Scope of operating speed: 1~18 (km/h)
Gradient regulating range:0-15%
Time display range: 00:00:00~99:59:59(HH:MM:SS)
Scope of distance display: 0.00~99.99(km)
Scope of heart rate: 50~200(b/pm)
Scope of calorie display: 0~9999(calories)
Floor area: 188×89×150cm
Effective usable floor area: 140×50cm
Features
※DC Motor: 2625W
※Double safety protection functions with both emergency stop and soft stop
※PU handrail
※Use 10.1” multipoint capacitive touch screen with resolution at: 1024X600
※Android 5.1 operation system; RK3128 Cortex-A7 1.2GHZ quad-core processor; Memory:
DDR3 1GB; Hard disc: Nand Flash 8GB
※USB2.0 interface on console
※Support ultrafast WIFI internet surfing
※Preset 12 intelligent running programs and virtual scene modes.
※High-power Hi-Fi system; MP3 audio input
※Smart fan provides you extra oxygen by increasing air circulation
※Intelligent APP supports multi-platforms and multiple languages
※Intelligent internet treadmill brings you a lot of fun by sharing the fitness data, interaction,
attending online running race and etc
※Professional and simple user operation interface; Quick buttons for speed, incline and
program; Humanity management of system setting.
※New design of hidden mobile device bracket
※Multilayer shock absorption system
※Hydraulic folding with lock device

- 4 -
II. Product introduction
Screen
Safety switch
Right armrest
Meter head
Left armrest
Left upright pole
Right upright pole
Upper protective cover
Upper edge strip
Running belt
Right regulating
box
Treadmill frame
Left regulating box
Edge strip at left side
Left shoe
Underframe

- 5 -
III. Product explosion diagram
48
70
20
20
17
20
30
20
17
40
40
20
20
20
76
74
75
55
45
4
21
52
54
12
57
39
57
73
27
32
31
38
49
69
41
71
58
7
24
17
46
50
36
43
16
37
29
35
34
62
60
5
10
67
66
26
51
64
68
22
23
9
8
14
44
6
61
42
33
2
3
65
72
18
15
28
11
13
59
19
53
25
20
40
56
63
47
1

- 6 -
IV. Particular sheet of explosion diagram
S/N
Part name
Qty.
S/N
Part name
Qty.
1
Small diamond LOGO
1
39
M10 self-locking nut
6
2
Screen
1
40
M10 small flat gasket
25
3
Electronic meter
1
41
M10×45 hexagon socket pan head screw
5
4
Safe switch
1
42
Welding parts of erector
1
5
Big diamond LOGO
1
43
Support pad of erector
2
6
Motor’s protective cover
1
44
Base plate of motor
1
7
Large crossed flat head screw
4
45
Belt
1
8
Right edge strip
1
46
M8 check nut
8
9
Upper edge strip
2
47
Bulkhead
4
10
Fixed part of edge strip
8
48
M8×130 hexagonal screw
1
11
Running belt
1
49
M10×85 hexagon socket pan head screw
1
12
M8×25 crossed countersunk head screw
6
50
Line clip
1
13
Running plate
1
51
Dust cover
1
14
Left edge strip
1
52
M8×55 hexagon socket head cap screw
1
15
Support column of running plate
1
53
Front drum
1
16
Shock pad
6
54
M8×45 crossed countersunk head screw
2
17
M8 check nut
10
55
Shock pad
4
18
Welding parts of running plate
1
56
Motor
1
19
Rear drum
1
57
Spring washer
12
20
M8 flat washer
17
58
M10×30 hexagon socket head cap screw
4
21
M8×75 hexagon socket head cap screw
2
59
Lifting motor
1
22
Right regulating box
1
60
Lower controller
1
23
Left regulating box
1
61
Front protective cover of treadmill
1
24
large crossed flat head screw
10
62
Power plug
1
25
54 wheel
2
63
Power switch
1
26
Caster cover
2
64
Right shoe
1
27
M8×55 hexagon socket pan head screw
2
65
Welding parts of right upright pole
1
28
Welding parts of underframe
1
66
Right shoe cover
1
29
Foot pad
4
67
Left shoe cover
1
30
Roller of treadmill
2
68
Left shoe
1
31
M8×45 hexagon socket pan head screw
2
69
M10×55 hexagon socket pan head screw
4
32
M8×55 hexagon socket pan head screw
1
70
M10×30 hexagon socket pan head screw
4
33
Gas spring casing
1
71
Welding parts of left upright pole
1
34
Pedal sleeve
1
72
Spring washer
6
35
Small shrapnel
1
73
M8X hexagonal screw
6
36
Gas spring
1
74
M6 flat washer
4
37
Plug
2
75
Spring washer
4
38
M8×55 hexagon socket pan head screw
1
76
M6×25 hexagon socket head cap screw
4

- 7 -
V. Assembly step
All parts of electric treadmill have been strictly assembled and debugged before the ex works. An
electric treadmill can be easily assembled into if the installation is carried out by observing following
steps.
Step I: Install upright pole. Open packing box of
treadmill and lift the treadmill. Lock left upright
pole on the treadmill with two M10x30 round
head hexagon socket screws and two M10×60
round head hexagon socket screws (with spring
washer and flat washer). Fit right upright pole
(control line inside upright pole) to reserved
control line of the treadmill, plug joint of control
line into overline hole of the underframe, and
lock right upright pole on the treadmill with two
M10×30 round head hexagon socket screws and
two M10×60 round head hexagon socket screws
(with spring washer and flat washer), as shown
in the following figure:
Step III: install display screen: open packing box
of the display screen, take out of display screen,
correspondingly connect lines on the display
screen and the lines on the meter, plug the
display screen into the meter, lock it on the meter
with four M6×20 hexagon socket head cap
screws (with spring washer and flat washer), as
shown in the following figure:
Step II: install meter, take out of meter. Connect
control line of right upright pole and control line
of bottom right end of meter, insert them into left
and right upright poles, lock the meter on left and
right upright poles with 6 hexagonal pan head
screws M8×16 (with spring washer and flat
washer), as shown in the following figure:
Step IV: install shoes of upright pole and
decorating parts in the following table: fix shoes
outside left and right upright poles on the
underframe with four M8×10 large crossed flat
head screws, fix shoes inside left and right
upright poles on the upright poles and
underframe with four M4×10 large crossed flat
head screws, fix decorating parts on left and
right sides of meter on decorating parts on
external side of the meter with eight M4×10
round head tail-out tapping screws, as shown in
the following figure:
M4×10 round head
tail-out tapping screws
M4×10 large flat
head screws

- 7 -
Step V: Carefully inspect the fastening of each part of treadmill; start the treadmill at low speed and
inspect the flexible rotation of each part of running belt and the tightness of running belt; the
non-offset and non-skidding of running belt shall prevail (see the “Daily servicing and maintenance of
electric treadmill”). After the inspection, move the treadmill to a proper position for use.
VI. Display and function operation of electronic meter
1. Specification parameters of Android treadmill system:
Operation system
Android 5.1
Processor
Rockchip RK3128 Cortex-A7 1.2GHZ quad-core processor
Screen
10.1 inches, multiple-point capacitive touch screen 1024X600 liquid crystal display
System memory
DDR3 1GB
Flash memory
capacity
Nand Flash 8GB
Wi-Fi
WIFI 2.4G
Video file
MP4, ASF, FLV, MKV, TS, WMV, MOV, 3GP, AVI
Audio file
MP3, WAV
USB2.0
1
Physical button
Start/Pause, Stop, Speed+, Speed -, Incline︽, Incline︾, Volume+, Volume -, Volume
switch, Fresh air switch, Main interface button, Return button, Speed shortcut key,
Incline shortcut key
Audio interface
1 LINE IN interface and 1 earphone interface
Power supply
AC, 220V, 50hz
2. Functions of panel keys of the electronic meter:
2.1 “START/PAUSE” key: in case that power is on and safe lock is fully attracted, press this key
to start the treadmill; during operation of the treadmill, press this key to pause the treadmill
and keep the operating data, and press the key again to continue with the just-set
parameters.
2.2 “STOP” key: during exercise, press this key to stop operation of the treadmill and reset.
2.3 “Speed+” and “Speed -” (SPEED) are speed +/- key: use these keys to regulate speed with
the regulating range of 0.1 km/time after start; when the keys are pressed and held for over
0.5s, the speed increases or decreases continuously.
2.4 “Incline ︽” and “Incline︾” (INCLINE) are incline +/- key: use these keys to regulate incline
with the regulating range of 1 section/time after start; when the keys are pressed and held
for over 0.5s, the incline increases or decreases continuously.
2.5 “Speed: 6, 9, 12, 15” are short-cut keys for speed regulating: they can be used to regulate the
speed quickly.
2.6 “Incline: 6%, 9%, 12%, 15%” are short-cut keys for gradient regulating: they can be used to
regulate the gradient quickly.
2.7 “Volume down (Music-), volume switch (ON/OFF), volume plus ( Music+)” are
power amplifier control key.

- 8 -
2.8 “Fresh air switch (FAN) ” key: when fan is in closed state, press this key to operate fan,
press this key again to turn off fan.
2.9 “Main interface (Home)” key: press this key to enter into main interface at any operation
interface.
2.10 “Return (Return) ” key: return to previous operation interface from current interface or
exit from application program.
3. Window display and unction description of touch keys
3.1Starting interface
Connect power supply of the treadmill, Android treadmill system will automatically start. After
start, starting interface displayed on the display screen of the electronic meter is as follows:
3.2 Main interface of display screen of the electronic meter have two pages and display
interfaces are as follows after entering into standby state:
Page 1 page 2
Ouch icon “ ”on the interface of display screen and switch to the interface of Page 2. Touch
icon “ ”on the interface of display screen and switch to the interface of Page 1. In above interfaces:
touch any icon on the display screen and then enter into corresponding submenu.
3.3 User management: (it can be operated when the treadmill is in halted state)
3.3.1 Login: After connecting to the Internet, you can use your existing account to log in or exit
from your account.
Operating steps are as shown in the following figure: touch “Login” key, fill in user name and
code, press “Login” to complete it; or open “Sports show” APP of cellphone, pad and other
terminals, scan two-dimensional code on upper right side of the login interface to complete login.
After running ends, press “Logout” to cancel your account.

- 9 -
3.3.2 Registration: After connecting to the Internet, fill in basic information and register a new
user.
Operating steps are as shown in the following figure: touch “Register” key, fill in basic
information (user name, code, nickname, weight, male/female), press “Confirm” to complete
registration.
3.4 Manual mode
3.4.1 “Start” key: A. Directly press “Start” key in standby state. The screen starts three-second
count-down with warning tone. After count-down ends, the treadmill operates with the speed
of 1.0km/h and incline of 0; and then enter into “Target” window of the exercise interface.
B. “Target” window starts positive count-down. And it automatically stops when it’s up to 100
hours. Press “Speed +/- key” or “Speed shortcut key” to change the speed; press “Incline +/-
key” or “Incline shortcut key” to change the incline; during exercise, press this key to stop
operation of the treadmill and reset.
C. In exercise interface, display window includes (time, distance, calorie, heartbeat, exercise
target, climbing height, incline +/-, stop, pause, speed +/-). Incline +/-, stop, pause and speed
+/- can be synchronously operated with the keys on panel of the electronic meter.
D. Sporter stands on edge strips and starts the treadmill. Heartbeat data is displayed on
heartbeat window of the exercise interface when heartbeat grip is hold with both hands for
5-10 seconds. (Heartbeat measuring numbers of the grip can only be reference of exercise
level other than medical data)

- 10 -
3.4.2 “Distance” key: after setting exercise distance, user starts to move and ends exercise after
expected exercise distance is achieved. During exercise, user can freely increase and
decrease speed and incline and directly press “Stop” to stop its operation.
Operating steps are as shown in the following figure: touch “Distance” key, determine your target
exercise distance and press “Start” to start it.
3.4.3 “Time” key: after setting exercise time, user starts to move and ends exercise after expected
exercise time is achieved. During exercise, user can freely increase and decrease speed and
incline and directly press “Stop” to stop its operation.
Operating steps are as shown in the following figure: touch “Time” key, determine your target
exercise time and press “Start” to start it.
3.4.4 “Calorie” key: after setting exercise calories, user starts to move and ends exercise after
expected exercise calories are achieved. During exercise, user can freely increase and
decrease speed and incline and directly press “Stop” to stop its operation.
Operating steps are as shown in the following figure: touch “Calorie” key, determine your target
exercise calories and press “Start” to start it.
3.5 Built-in programs
12 intelligent scientific running programs (including lose weight, burn fat, mountain and so on)
are built in the system. After the user selects desired exercise program and sets exercise time, press
“Start” key, the treadmill start to operate built-in program. During operation of the treadmill, speed and
incline can be regulated, but when entering the following section, it can be automatically regulated to
default values of the program. During the exercise, user can press “Stop” key to stop the operation at
any time.
Each built-in program includes 16 sections, and the operating time of each section is equal to the
set time/16. When the previous section ends, it automatically enters the following section, and the
speed and incline can be automatically regulated to the numbers of this section. When operation of
all sections and program are completed, treadmill slows down slowly and stops finally.

- 11 -
Operating steps are as shown in the following figure: touch “exercise program” key, select built-in
program (there are two pages for table of built-in programs), select previous and next page by pressing
arrow, click required program, set exercise time of the program and press “Start” to operate the
treadmill.
Date sheet of built-in program
Time period
Program
Operating time of each section=setting time/16
1
2
3
4
5
6
7
8
9
10
11
12
13
14
15
16
P01- Lose
weight
Speed
3
6
7
8
9
10
9
8
8
9
10
9
8
7
6
3
Incline
0
2
2
4
4
4
2
2
2
3
3
4
4
3
2
1
P02- Burn fat
Speed
5
7
9
9
11
8
8
10
10
8
10
8
6
5
4
3
Incline
3
5
4
4
3
5
5
3
3
5
3
5
5
3
3
3
P03- Mountain
Speed
3
4
6
5
3
5
6
4
5
6
7
6
8
6
5
3
Incline
6
8
10
12
14
12
10
14
12
10
8
10
6
4
3
2
P04- Road
Speed
3
6
7
7
8
9
9
10
10
10
9
9
8
6
4
3
Incline
1
1
2
2
3
3
3
2
2
2
3
3
2
2
1
1
P05- Race
Speed
3
5
6
8
12
8
6
5
6
8
12
8
6
8
6
3
Incline
3
6
5
3
1
3
5
6
5
3
1
3
5
3
5
2
P06- Slow walk
Speed
3
4
5
5
6
5
5
4
5
5
6
5
5
4
5
3
Incline
2
2
3
2
3
2
3
2
3
3
2
2
3
3
2
2

- 12 -
P07- Quick walk
Speed
3
5
6
7
7
6
6
7
7
6
6
7
7
6
5
3
Incline
3
4
5
5
4
4
3
3
4
4
5
5
4
4
2
2
P08- Random
Speed
5
10
6
11
7
11
8
11
9
6
10
7
11
9
6
3
Incline
3
4
5
6
5
4
5
6
5
4
5
6
5
4
3
2
P09- Jog
Speed
5
7
8
9
9
9
8
8
9
9
9
8
9
8
6
5
Incline
2
2
3
3
4
4
3
3
4
4
3
3
4
4
3
2
P10- Sprint
Speed
2
6
7
8
9
10
10
11
11
11
10
9
8
6
4
2
Incline
4
5
6
7
8
9
10
10
10
10
10
9
5
7
5
2
P11- Gradual
Speed
3
4
5
6
7
7
5
6
7
7
5
7
6
5
4
3
Incline
2
2
3
2
3
2
3
2
3
3
2
3
2
3
2
2
P12- Learner
Speed
3
5
6
5
5
6
5
5
6
5
5
5
5
4
3
3
Incline
2
3
2
3
3
2
3
4
3
3
3
3
3
2
2
1
3.6 Virtual scene:
After selecting the scene, start to operate the treadmill. During exercise, the scene will give
people an immersive feeling. During exercise, users can freely increase and decrease speed and
incline, or directly press “Stop” to stop operation. The speed of live scene can make the scene
faster or slower according to manual adjustment speed.
3.7 Exercise management
3.7.1. Exercise data: check data of previous exercise, including: time, distance and calorie.
3.7.2. Exercise record: after login, you can check the history of exercise records and exercise
statistics. Exercise information stored in the system can be selected to store when it satisfies certain
conditions (≥200m), exercise information temporarily stored in the system has certain duration. The
system regularly cleans up exercise information of the user.

- 13 -
3.8 Language
User can check languages provided by
the system.
3.9 Help
Operating steps are as shown in
right figure: touch “Help” key,
window displays precautions during
use of treadmill and introduction to
functions of keys on main interface.
3.10 Wireless network
Operating steps are as shown in
right figure: touch “Wireless
network” key, select WI-FI signal,
input WI-FI connection code,
complete connection and setting of
WI-FI for high-speed internet.
3.11 Setting
User can select bright adjust, cache
cleaning and engineering mode.
Operating steps are as shown in
right figure: touch Functional
interface required to select for
operation.
3.7.3. Record data of historical exercise of
the treadmill is synchronous with data of
terminals of cellphone and pad. Open Sports
show on terminals of cellphone and pad and
check data. Data records are shown in right
figure. Specific operation is shown in “Sports
show.pdf”. For cellphones of Apple version 4S
and above, log in Sport show App
sofeware(search “Sports show”) at Apple Store.
For cellphones of Android version, log in the
latest version of App software at
http://www.ifitshow.com/. Scan the following
two-dimensional code and install Sports show
App:

- 14 -
3.11.1 Bright adjust
Operating steps are as shown in right figure: touch
“ ”key, enter into set interface for
bright adjust, slide and select desired brightness, touch
“Return” key to complete brightness adjustment.
3.11.2 Cache cleaning
Operating steps are as shown in right figure: touch
“ ”key, enter into interface for cache
cache, select application required to clean cache, touch
“Clean cache” to complete cleaning.
3.12 Application
System pre-loaded APP application
can be open
Operating steps are as shown in right
figure: touch “Application”key, enter into APP
application interface, touch any icon on upper
side of the display screen to enter into
corresponding submenu.
3.13 Time zone
User can freely adjust time zone and
time according to your time zone.
Operating steps are as shown in right
figure: touch “Time zone”key, enter into
submenu and set required time zone and then
return to main interface.
3.14 Internet
Browse webpage online.

- 15 -
3.15 Yahoo
Search.
3.16 Video
Play local video files. Plug U disk with
videos and other storage devices into USB
interface, click “Video” key and enter into
software interface, click “refresh” key in the
upper right corner for list renewal, click lift file
to play corresponding video.
3.17 Music
Play local audio files. Plug U disk with
music and other storage devices into USB
interface, click “Music” key, click “Songs” and
enter into the list to play corresponding music.
3.18 Main interface key
Click icon of bottom left conner of the display screen in any interface to return to main
interface; operation function is equal to function of panel keys of the electronic meter.
3.19 Return key
Click icon of bottom left conner of the display screen in any interface to return to previous
operation interface or exit from application program; operation function is equal to function
of panel keys of the electronic meter.
3.20 Volume control key
Click icon of bottom right conner of the display screen to cntrol volume; operation function
is equal to function of panel keys of the electronic meter.

- 16 -
4. Operation during exercise
4.1 Press Speed – key to reduce operating speed of the treadmill; press Speed + key to add
operating speed of the treadmill.
4.2 Press Incline – key to reduce incline of the treadmill; press Incline + key to add incline of the
treadmill.
4.3 Press Speed shortcut key to adjust speed; press Incline shortcut key to adjust incline.
4.4 Press Stop key or directly disconnect safe lock so that the treadmill will slows down and stop
operation.
5. Heartbeat measurement
Sporter stands on edge strips and starts the treadmill. Heartbeat data is displayed on
heartbeat window of the exercise interface when heartbeat grip is hold with both hands for 5-10
seconds. Heartbeat measuring numbers of the grip can only be reference of exercise level other
than medical data.
6. USB input
After inserting U disk, play videos or audio with corresponding support formats of U disk
through the player; charge cellphone by connecting USB data connecting line and USB jack of
dial plate, but cellphone must be open charging state, output voltage is: DC 5V 1A.
7. Audio input/output
Plug external audio equipment (like MP3) into audio input port through audio cable to play music;
insert earphone into audio output port to receive audio signal. Press Volume – “ ” and Volume +
“ ” to adjust volume; press sound switch “ ” to close or open sound.
8. Dormant and automatic shutdown function
When it stops operation for 10 minutes, it enters into dormant state; if nobody uses it without load,
it enters into shutdown mode 120 seconds later.
9. Safety lock function
In any state, the motor can emergently stop operation by pressing safe lock and “safe lock
falls off” is displayed on the window; trumpet sends burst sound of Bi-Bi-Bi. If motor is in operation,
the motor will emergently stop operation.
10. Shut down
The treadmill can be off by turn off the power or the treadmill at any time, which does not
damage it.
11. Parameter display and set range:
Initial
Setting initial value
Setting range
Display range
Time (hour: minute : second)
0:00
20:00
1-120:00
1-120:00
Speed (km/h)
0.0
1.0
1.0-18.0
1.0-18.0
Slope (section)
0
0
0-15
0-15
Distance (km)
0.0
3.00
1-100
1-100
Calorie (kcl)
0
100
1-1000
1-1000
VII. Use method and safety protection for treadmill
1. Debugging of treadmill
1.1 After the installation is completed, position the safety lock to the corresponding position
of electronic meter.
1.2 Before the powering, inspect whether the power ground wire is well grounded and pull
the running belt with hands to check whether it can run flexibly without any abnormal sound.
1.3 Plug in the power supply and open the power supply lock. Then, all windows on the
electronic meter show the initial values and the running belt is still.
1.4 Press the “Start” Key and the treadmill starts operating at a low speed (the operating
speed is 1km/h). Observe whether the treadmill and electronic meter can operate normally.

- 17 -
1.5 Press the “Speed-up” Key and “Speed-down” Key to observe whether the regulation is
normal.
1.6 Press the “Stop” Key or pull in the safety lock, and the treadmill may stop operating. Turn
off the power switch and unplug the power supply.
2. Operating instructions
After being debugged, the electric treadmill can be put into use
2.1 Plug the power supply in the household 220V outlet. The outlet must be provided with
appropriate grounding wire.
2.2 Emplace the safety lock and press “Start” Key, and then the running belt may operate
slowly (the speed is about 1km/h). The speed per hour is displayed on the meter.
2.3 If the treadmill needs to be
accelerated, press the “Speed-up” Key
and the buzzer’s “tick” indicates one level
up. The maximum speed per hour is
18km/h.
2.4 If you cannot wait for the deceleration
while running on the treadmill at a high
speed, you can pull out the safety lock
and the treadmill may immediately stop.
2.5 Press “STOP” after running and the
treadmill slows down until it stops.
2.6 Folding operation: During the folding
operation, switch off the power supply
firstly, unplug the power supply in the
front of treadmill, and uplift the rear end of
treadmill frame with hands. Please be
sure that the locking is not tight enough
until a sound of “click” is heard from the
hook-type protective device. After the
locking, move or leave the treadmill.
When the treadmill is placed down, pick
up the treadmill frame with hands, stamp
the air spring casing so that the air spring
can retract into the casing, and slowly set
the treadmill level in order. The stamping
for air spring casing is as shown in the
figure.
3. Safety protection for treadmill
3.1. In any emergency, as long as the exerciser takes off the safety lock, the treadmill may be
power off. Therefore, when you are exercising, please be sure to clip the safety lock on the
appropriate position the on your clothes to ensure the safety.
3.2. When the treadmill belt skids or the running belt is stuck, the motor may stop in about
3s.
VIII. Precautions
1. Circuit
1.1 Avoid using other electric appliances in the same power supply circuit. The power supply
circuit must be able to supply over 14.5A electricity current.
1.2 It is required that the service voltage should be in the range of 220V-240V. The voltage
beyond this range may lead to the abnormal operation.
1.3 Check whether the power is on or not before sporting; check whether the safety lock is
efficient or not.
1.4 Whether there are abnormal conditions or not during sporting; the treadmill may quickly
slow down until to stop by pulling off the safety lock; put the safety lock in the place again and
reset the equipment waiting for entering order.
1.5 After being used, the treadmill should be immediately unplugged.
1.6 In Winter, certain humidity should be kept indoors to avoid strong static electricity.
1.7 If the power wire is damaged after use, please go to specified products distributor for
replacement or purchase.
1.8 If you have any questions about the treadmill, please contact the distributor. It is not
allowed for laymen to disassemble or maintain the treadmill for fear of damaging the treadmill.
2. Placing environment
2.1 It is only proper for the treadmill to be placed indoors for protection against humidity. It is

- 18 -
forbidden to splash water on the treadmill. It is forbidden to place any foreign materials on or
inserted them in the treadmill.
2.2 During the operation of the treadmill, the motor may generate a small number of sparks, so
the treadmill should be placed at a drafty place and kept away from explosives.
2.3 When the treadmill is used, ensure its fore and rear feet reliably contact the ground. If the
ground surface is uneven, it should be stably padded with carpet or rubber plate.
2.4 Pay attention to the interior hygiene usually to reduce indoor dust because its sensibility
may be influenced by the dust adhered on the electronic components.
3. Precautions before or during exercise
3.1 For your safety, wear sports clothes and select suitable sports shoes when using the
treadmill. It is strictly forbidden to exercise on the treadmill with bare feet.
3.2 It is not allowed for two or more persons to do exercises on the treadmill at the same time.
3.3 Prepare a towel before running to prevent sweat from dropping on the running belt and
being thrown into the enclosure to damage the electric appliance.
3.4 The beginner can get on the treadmill only after he stands on the edge to test several times
with one foot and feels capable of keeping up with the speed of the running belt.
3.5 The treadmill has enough motor power. In principle, the zero start can be realized, but to
extend the service life of the treadmill, it is suggested that you should stand on both edges of
the treadmill and get on it for exercise after the normal start.
3.6 It is strictly forbidden to get on and off from the rear end as it is very easy for people to
tumble in such way.
3.7 The strength should be equal when the hands are on the armrests and run on it straightly to
avoid belt deflection.
3.8 When people run in a normal state, the two hands should be moved from the armrests. The
arms can be swung boldly so that the exercise result may be better.
3.9 The stop lock should be pressed when get off the treadmill. Don’t get off the treadmill until
the running belt stops completely.
3.10 Keep the child away from the running treadmill for fear that the hand or the clothes may
clamped by the running belt to cause serious injury.
3.11 It is strictly forbidden to touch the working running belt by hands.
4. Additional precautions
4.1 The cardiac should not use the electric treadmill alone.
4.2 Determine the running speed according to your physical conditions; and the sick should not
use the treadmill or use it under the instruction of a doctor.
4.3 The heart rate sensor is not a medical facility and the detection results are for reference
only.
IX. Daily servicing and maintenance of electric treadmill
During the daily use of the treadmill, the following should be noted for the maintenance.
1. Keep the treadmill clean
1.1 The service life of the treadmill can be significantly extended by keeping clean. Often
wipe the running board and footboard exposed on the two sides of the running belt. Reduce
long-term accumulation of the dust and dirt under the running belt.
1.2 The running belt can be wiped with soft cloth dipped with soapsuds. Don’t let the water
flow to the bottom of the running belt and into the shield.
1.3 Regularly check each bolt and nut. Please tighten and fix them immediately with tools if
they are loose.
1.4 Regularly check whether the groove of the motor belt is clean. If there are residual, they
must be cleaned off to avoid unnecessary vibration when it is used.
1.5 Regularly clean the electric control system and the dust surrounding the motor to ensure
normal operation of the treadmill.
2. Lubrication
2.1 A bottle of special lubricating oil for running board is attached. Running board surface
should be evenly lubricated with special lubrication regularly to avoid the damage of running
belt and running board caused by the temperature rise due to the friction between them, and
to reduce the load of the motor. (Note: the child should not play with it in fear of eating by

- 19 -
mistake)
2.2 After the treadmill has been used for accumulatively 50km, the running belt and running
board should be lubricated with the special lubricant. The lubrication should not be excessive.
It is recommended that a 30ml bottle of special lubricating oil for the treadmill should be used
for ten times.
2.3 Lubricating method: Loosen the right and left adjustment bolts at the rear end of the
treadmill with special tools, lift the running belt about 10-15cm, pour a good amount of special
lubricating oil on the top surface of the running board, and smear it evenly and tighten the
running belt. (For adjustment method, see the “Adjusting method for the tightness of running
belt”) The over lubrication should be avoided. As for the lubrication, it is by no means “the
more the better”. Please remember: reasonable lubrication is an important factor to extend
the service life of the treadmill!
3. Judgment for friction:
The frictional force of the running board and running belt can be increased by uncleanness or
reduction of lubricant, which may damage the motor and control panel. The excessive frictional
force is characterized with followings:
3.1 Under the power off condition, it is arduous to drive the belt by feet, or even the belt
cannot be driven;
3.2 The treadmill runs at an intermediate speed. The running belt completely stops as soon
as the safety switch is turned off;
3.3 The increment of frictional force may cause the damage of motor or control panel, short
circuit, tripping, fuse burn-out, etc.
4. Adjustment for the tightness of running belt:
4.1 Although all treadmills have been adjusted at exworks, the running belt may become
loose after the treadmill is used for some time. The maintenance is mainly carried out by the
user. If the running belt is too loose, the skidding phenomenon of running belt and drum may
occur when you step on the running belt. But excessive tightness is not good either because
it may damage motor, running belt and drum, increase the running noise of the treadmill, etc.
In general condition, it is better to lift the two sides of running belt 5-6cm away from the
running board.
4.2 Judgment method for tightness of running belt
Adjust the treadmill speed to 1.5 km/h, grasp the armrest forcefully with both hands and
prevent the operating of running belt with feet. At this time, if the running belt stops running,
the front drum continues running, but the running belt continues running after being released,
indicating that the running belt is excessively loose. Meanwhile, the user may feel the halt at
sometimes, and the long-term use under the loose state may shorten the service life of
running belt. Therefore, adjustment should be done timely.
4.3 Adjusting method for the tightness of running belt: After the treadmill is used for some
time, the halt may be felt while you are running on it, which is caused by the excessive loose
running belt. The tightening adjustable bolt of the right and left rear regulating box is used to
adjust the tightness and deflection. It is the core component of the adjustment of the
complete treadmill.
Adjusting method: (note: the clockwise means tightening and the anticlockwise means
loosening. All the tightening and loosening as shown below stand for clockwise and
anticlockwise respectively.) After the treadmill is used for some time, the running belt may get
extended slightly. If you feel the skidding running bet, it shows the running belt is too loose.
Thus, tighten the adjustable bolts of rear cover at both sides at the same time by 1/4 circle
until no skidding or halt is felt while you are running on the treadmill.
Special attention: As for the running belt, it is not the tighter the better. The tightness
should be adjusted as required. The service life of the running belt may be shortened if
it is too tight.
5. Adjustment for deflection of running belt:
As for all treadmills, although the running belt has been adjusted at exworks, the running belt
may suffer the deflection after the treadmill is used for some time. This is attributed to
Table of contents
Other Daily Youth Treadmill manuals