Daily Youth GT5Ds User manual

GT5Ds
DC Commercial
Motorized Treadmill

-1-
Thank you very much to choose our products. Before installation and usage, please read the
instructions carefully.
Contents
I. Warning, main technical parameters and features ………………………………………………….…….............1
II. Product introduction ……………………………………………………..…………………………………..............3
III. Product explosion diagram …………………………………………………………….………………....…..........4
IV. Particular sheet of explosion diagram ………………………………………………...…………………..............5
V. Assembly step ………………………………………………………………………………………………..............6
VI. Display and function operation of electronic meter.……………………………………………………...............7
VII. Use method and safety protection for treadmill …………………………………………………….............…13
VIII. Precautions …………………………………………………………………..…………………………..............14
IX. Daily servicing and maintenance of electric treadmill ……………………………..…………………..............15
X. Elimination methods for common faults…………………………………………..……………………...............17
XI. Precautions for exercise……………………………………………………………...…………………...............18
I. Warning, main technical parameters and features
Warning!
1. When you are using the treadmill, please prevent your kids from approaching the treadmill. Juveniles should
not use the treadmill without the adult’s accompany to prevent any accident.
2. Before using the treadmill, please clip the safety switch on the clothes of users. Please take down the safety
switch when you do not use the safety switch.
3. The power supply for treadmill should be well grounded. The tread
mill may be damaged by using outlet without good grounding and the Manufacturer may not provide warranty
for this! After the practice, stop the treadmill and shut off the power supply.
4. Laymen must not open the front cover of treadmill and adjust the electronic control without approval, to
avoid unnecessary troubles.
5. In order to lengthen the service life of treadmill and ensure your safety, it is forbidden for overweighed
(beyond the weight limit) persons to use the treadmill and for two or more persons to use one treadmill
simultaneously.
6. Please do not walk up or down the treadmill from the rear part to avoid getting hurt by the machine.
7. When the treadmill is operating, do not contact the running belt with hands or run on the treadmill with bare
feet.
8. The heart rate monitoring is only for reference and cannot act as medical data; hypertensives and
cardiopaths should not use the treadmill alone to prevent accident.
9. When you are using the treadmill, if you feel chest tightness and dizziness, stop your motion immediately for
excessive motion may cause serious harm or accident.
10. Emergency jump-off method: if emergency happens during the movement process and the treadmill belt
does not stop, hold the handrail with your hands to support your body and separate your feet from the
treadmill belt surface, step on the stepping platform at two sides as well as get away from the treadmill from
one side.
11. A 2000mm×1000mm safety area shall be reserved behind the treadmill to prevent accident during treadmill
operation.
For the health and safety of your family, please read following operating instructions and
precautions before your start practicing on it so that you can get more fun from the practice. (It is
forbidden for unauthorized after-sales service personnel to adjust the treadmill.)
The weight limit is exposed on this product. If your body weight is over 150Kg (330Ib), the service life of the
treadmill may be affected.
Special
Note

-2-
Main technical parameters
Input power voltage: AC220V-240V (50Hz-60Hz)
Rated voltage: 16.7A
Operating ambient temperature: 0~40℃
Motor power: 3000W
Scope of operating speed: 1~18 (km/h)
Gradient regulating range: 0-18%
Time display range: 0:00 ~99:59 (M:S)
Distance display range: 0.00~99.90(km)
Scope of heart rate: 50~200 (b/pm)
Scope of calorie display: 0~999.0(calories)
Floor area: 20 0 ×86 × 15 0 cm
Effective usable floor area: 146×52cm
Features
3000W DC motor
Double safety protection functions with both emergency stop and soft stop
PU handrail
Multi-windows LED display
Preset 12 intelligent running programs, 3 user-defined modes
One-button start and program choosing
High-power Hi-Fi system; MP3 audio input
Smart fan
Professional and simple user operation interface; Quick buttons for speed, incline and program; Humanity
management of system setting
New design of hidden mobile device bracket
Multilayer shock absorption system

-3-
II. Product introduction
Screen
Safety switch
Right armrest
Right upright pole
Upper protective cover
Upper edge strip
Running belt
Right regulating box
Treadmill frame
Left regulating box
Edge strip at
left side
Erector
Left upright pole
Left armrest
Meter head

-4-
III. Product explosion diagram
1
2
3 4 5
7
6
8
9
10
11
12
13
14
15
16
17
18 19 20 21 22 23 24
25
26
27
28
29
30
31
33
34
35
36
37
38
40
41
42
43
44
45
46
47
48
49
50
51
54 55
57 58
59 60 61 62
64
32
52
63
39
56
53

-5-
IV. Particular sheet of explosion diagram
S/N
Part name
Qty.
S/N
Part name
Qty.
1
Meter head
1
33
Welding part of left upright pole
1
2
M6X25 hexagon socket head cap bolt
4
34
M10 small flat gasket
21
3
M6 flat shim
4
35
Bulkhead of upright pole
6
4
Screen
1
36
M10X30 round head hexagon socket screw
4
5
Safety switch
1
37
M8X16 hexagon socket pan head screw
6
6
Front drum
1
38
Decorative element at lower left of the
meter
1
7
M8X45 hexagon socket head cap bolt
1
39
M4×10 round head tail-cut tapping screw
4
8
Upper protective cover
1
40
M4X8 flat head screw
18
9
Upper edge strip
2
41
Decorative element at lower right of meter
1
10
Running belt (tire tread)
1
42
DC motor
1
11
Rear drum
1
43
M8×30 hexagon socket head cap bolt
4
12
M8X75 hexagon socket head cap bolt
2
44
φ18×1.5 flat shim
4
13
φ8×1.6 flat gasket
9
45
Spring shim
4
14
High-density running plate
1
46
M10×45 hexagonal screw
1
15
Edge strip at right side
1
47
DC motor base
1
16
Right regulating box
1
48
Motor cushion
4
17
Left regulating box
1
49
M10X40 hexagon socket pan head screw
1
18
Universal foot pad
2
50
Lifting motor
1
19
Edge strip at left side
1
51
M10X95 hexagon socket pan head screw
1
20
M10X70 hexagon socket pan head
screw
2
52
Plastic shim
2
21
M10 self-locking nut
6
53
M10×85 hexagonal screw
22
Erector welding part
1
54
Decorative element of right upright pole
1
23
Castor
2
55
Rubber belt of motor
1
24
M10X58 hexagon socket pan head
2
56
Upper strip block piec
2
25
Dust cover
1
57
M8X45 crossed countersunk head screw
2
26
Motor’s bottom cover
1
58
Support column of running plate
1
27
Left upright pole decorative element
1
59
Shock pad
6
28
Lower control
1
60
M8X25 crossed countersunk head screw
6
29
Front protective cover
1
61
Edge strip positioning buckle
6
30
One-piece switch
1
62
Tabletting of edge strip
2
31
Welding part of right upright pole
1
63
M4X12 flat head screw
2
32
M10X20 round head hexagon socket
screw
4
64
Welding part of GT5D treadmill frame
1

-6-
V. Assembly step
All parts of electric treadmill have been strictly assembled and debugged before the ex works. An electric
treadmill can be easily assembled into if the installation is carried out by observing following steps.
Step I: Install upright pole: Open the packing box (box
B) and then bring out the treadmill. Firstly, lock the left
upright pole on the treadmill frame in 2 M10×20 and 2
M10×30 round head hexagon socket screw
(containing shim); secondly, connect the right upright
pole (control line is provided in the upright pole) with
the control line reserved on the control line; then,
insert the connector of the control line into the
wire-through hole of the right upright pole; finally, lock
the right upright pole on the treadmill frame in 2
M10×20 and 2 M10×30 round head hexagon socket
screw (containing shim), as shown in the figure below:
Step II: Install meter head: Open the packing box (box
A) and then bring out the meter head. Firstly, connect
the control line in the right upright pole with that at the
lower right of the meter head; secondly, insert the
meter head into the left and right upright poles; finally,
lock the meter head on the left and right upright poles
in 6 M8×16 hexagon socket pan head screw
(containing shim), as shown in the figure below:
Step III: Install screen: Open the packing box and
then take out the screen. Firstly, connect the wire of
the screen with that of the meter head in one-to-one
way; secondly, insert the screen into the meter head;
finally, lock the screen on the meter head in 4 M6×25
hexagon socket head cap bolts (containing shim), as
shown in the figure below:
Step IV: Install the decorative elements of upright pole
and lower meter: Firstly, fix the decorative elements of
left and right upright poles at the treadmill in 6 M8×8
large crossed flat head screw; secondly, fix the
decorative elements at lower left and right of the
meter on the left and right upright poles below the
meter head in 2 M4×8 large crossed flat head screw
and 4 M4×10 round head tail-cut tapping screw, as
shown in the figure below:
M4×10 round head
tail-cut tapping
screw
M4×8 large
crossed flat
head screw

-7-
Step V: Install bulkhead and power line: Firstly, plug the installing holes below the left and right upright poles
and the meter head with 6 bulkhead; finally, connect the power line with one-piece power switch of the
treadmill (note: guarantee the power line is off before connecting the power line, so as to avoid personal
injury), as shown in the figure below:
Step VI: Carefully check if each part of the treadmill is tightened. Run the treadmill at the slow speed and check
if the each part of the running belt is flexibly rotated and whether the tightness of the running belt is proper. As
for the running belt, no offset and sliding will prevail (see “Daily maintenance of powered treadmill”). Move the
treadmill to the proper position and then use it after the check is completed.
VI. Display and function operation of electronic meter
1. Introduction on operating interface of electronic meter

-8-
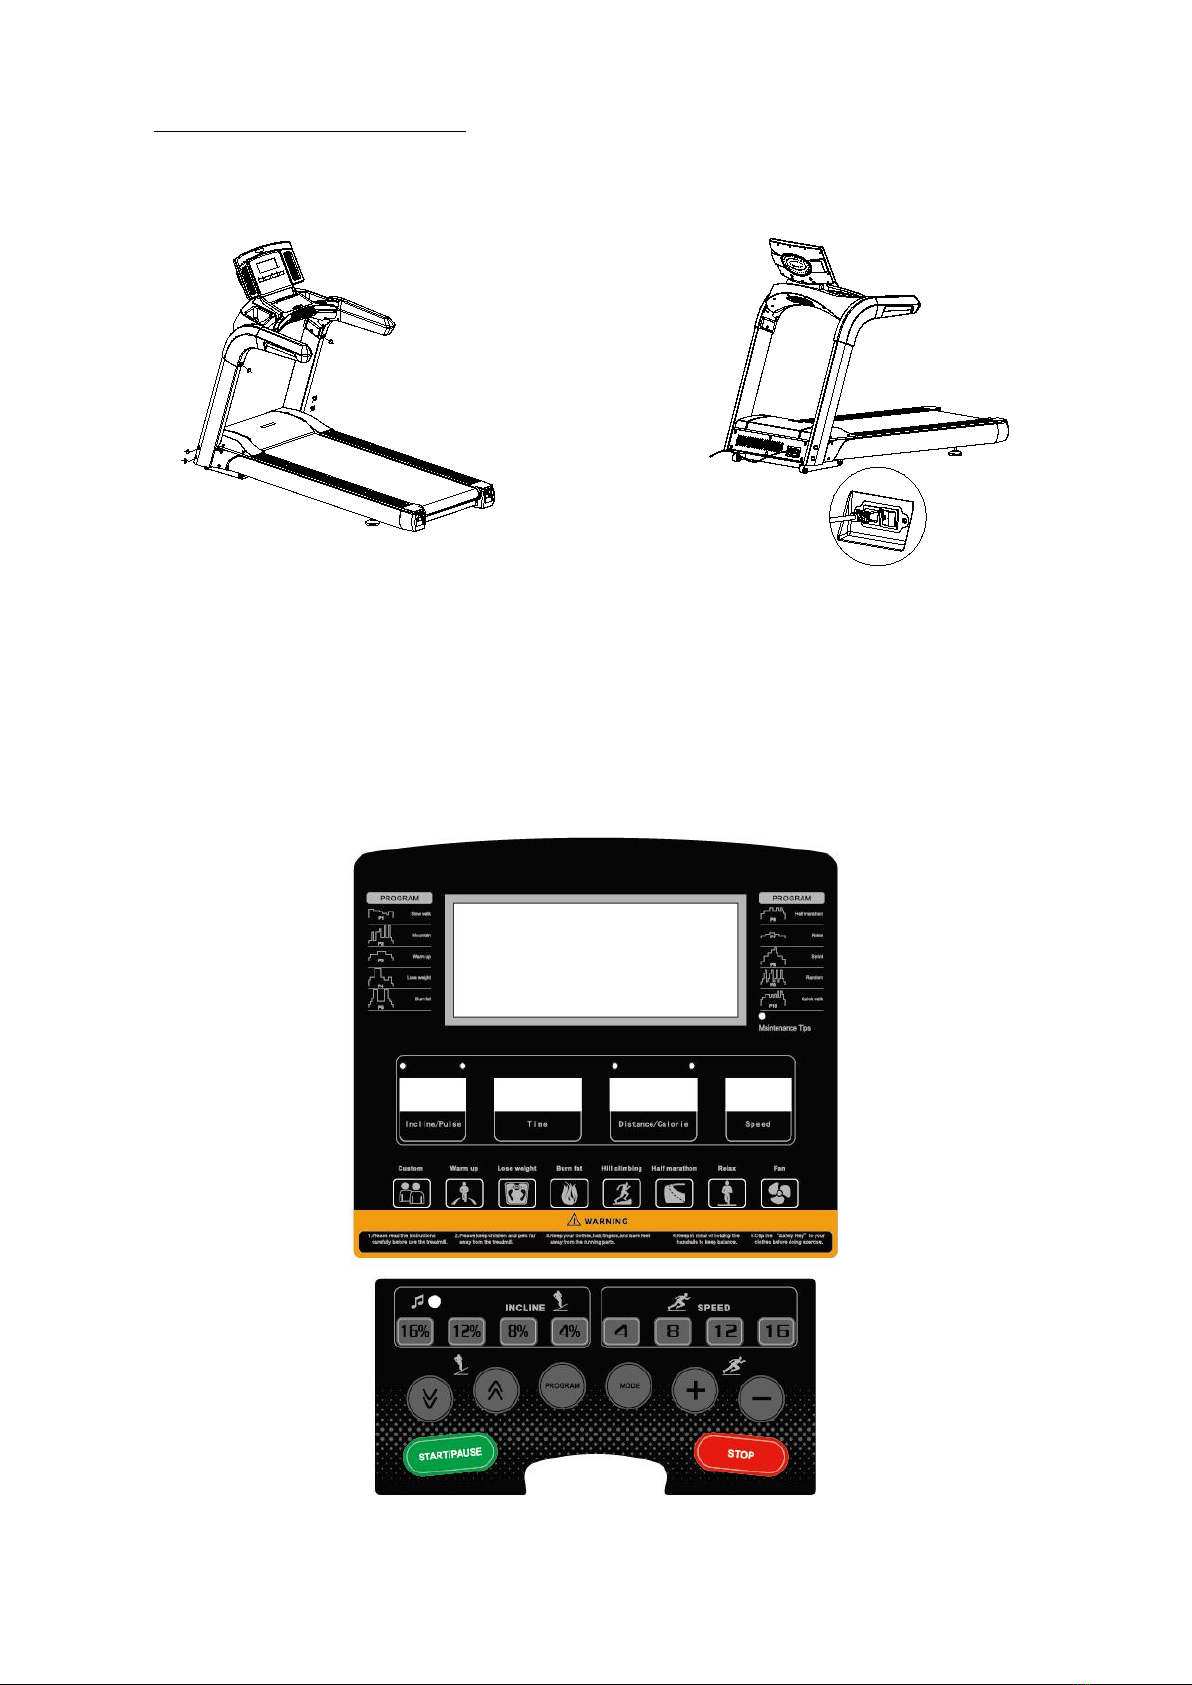
2. Instructions to display function:
2.1 “Incline /Pulse” Window: Displays the current slope value, with a slope display range of 0-18
segments. The system can automatically detect the heartbeat frequency of the sporter and display the
heartbeat value in this window when the sporter holds the heartbeat sensing handle with both hands.
The heartbeat value display range is 50-200 beats/minute. (This data is for reference only and cannot
be used as medical data.)
2.2 “Time”window: “FAT” will be displayed in the program selection for fat measurement mode.
The exercise time is displayed. The forward timing of the manual mode is from 0: 00 to 99: 59.
When the timing reaches 99: 59, the treadmill will slow down steadily and stop running, and the speed
window will display "End". The treadmill will enter the standby state 5 seconds after complete stop.
The forward timing of distance and calorie modes is from 0: 00 to 99: 59, and will be cleared after
timing reaches 99: 59 to continue operation. The countdown will decrease from the set time to zero.
When the countdown reaches 0: 00, the treadmill will slow down steadily and stop running. It will enter
the standby state 5 seconds after complete stop.
2.3 "Distance/Calorie” window:Display “P01-…-P12-U01-…-U03” and exercise distance in program
selection state;
Positive count-down is 0.00-99.00, nd it resets and continue to operate after overflow; reverse
count-down time decreases progressively from setting time to 0, and when it counts down to 0, the
treadmill steadily slows down, stops operation and displays “End”. It enters into standby state when it
fully stops operation for 5 seconds.
Display exercise calorie. Positive count-down is 0.0-999.0, and it resets and continue to operate
after overflow; during reverse count-down, it counts down to 0, and when it counts down to 0, the
treadmill steadily slows down, stops operation and displays “End”. It enters into standby state when it
fully stops operation for 5 seconds.
2.4 "Speed" Window: Displays the current speed value in the running state, and the metric speed displays
the range: 1.0-18.0KMH;The British speed range is 0.6-11.2MPH.
2.5 Large dot matrix window (hereinafter referred to as information window): a program diagram showing
the speed and slope during operation, and a 400-meter runway during operation in mode.
2.6 Maintenance Tips: The starting state is not bright, and the red light will be on after 100KM. Whether
the user does not manually clear the red light, the calculation will start from 0 after clearing. Press and
hold the "Speed+"key for a long time without putting a red light to prompt elimination.
3.Key function:
3.1 "Program Switching" is a program key: when it is in standby mode, press this key to circularly select
the built-in fixed program "P1-P2-…-P12- U01-…-U03-FAT".
3.2 "Target Setting" is the mode selection key: Press this key to cyclically select "0: 00", "30: 00", "1.00"
and "50.0" ("0: 00" is the manual mode, "30: 00" is the time counter mode, "1.00" is the distance
counter mode, "50.0" is the calorie counter mode. ) When selecting various modes, the speed and
slope addition and subtraction keys can be used to set the relevant count value. After the setting is
completed, press the "Start" key to start the treadmill.
3.3 "custom program" key: press this key to cycle through the "U01-U02-U03" custom program.
3.4 “Warm-up program” key: in standby state, press this key for three-minute (time window flashes)
warm-up. The treadmill operates with the speed of 1.0KM/H. press three-minute time count-down
and gradually speed up to 6KM/H (maximum speed is 6.0KM/H). After completion of count-down,
the treadmill shuts down slowly. When it’s in running “Warm-up program” state, press “Start/Pause”
key and leap over “Warm-up program”. When it’s not in Warm-up program” state, press “Start/Pause”
key to pause exercise.

-9-
3.5 “Lose weight” key: Under the standby state, press this key to directly select lose weight.
3.6 “Burn fat” key: Under the standby state, press this key to directly select burn fat.
3.7 “Mountain” key: Under the standby state, press this key to directly select Mountain.
3.8 “Half marathon” key: Under the standby state, press this key to start half marathon with the distance of
21.1KM.
3.9 “Relaxation program” key: press this key in operating state. If current speed≥8KM/H, it totally
wastes three minutes (time window flashes) from 8km to shutdown; If current speed <8KM/H and
≥2.5KM/H, it will shut down 2 minutes later and the speed is from high value to cease; if current speed
<2.5KM/H, it will shut down 18 seconds later. Press “Relaxation program” key, time window flashes
with display. The speed only can be reduced other than increase. In this state, it’s not effective by
pressing “Pause” key.
3.10 "Start/Pause" key: Press this key at any time to start the running of the treadmill when the power
supply is turned on and the safety lock is engaged. Press this key to pause the movement in the
running state.
3.11 "Stop" key: This key can be used to stop the running of the treadmill and reset it to zero during
exercise. Press this key during treadmill setup to exit setup.
3.12 "Speed+""Speed-"is the speed addition and subtraction key: standby state, which is used to adjust
The set value. It is used to adjust the speed in the running state , and its adjustment amplitude value
is 0.1 at each time. When it is continuously pressed and held for more than 0.5 seconds, it will
automatically continuously increase or decrease.
3.13 " Incline︽" " Incline ︾": Standby state, used to adjust the set value. It is used to adjust the slope
in the running state, and its adjustment amplitude value is 1 segment/time. When it is continuously
pressed and held for more than 0.5 seconds, it will automatically continuously increase or decrease.
3.14 “Speed: 4, 8, 12, 16” are short-cut keys for speed regulating: they can be used to regulate the
speed quickly.
3.15 “Incline: 4, 8, 12, 16” are short-cut keys for gradient regulating: they can be used to regulate the
gradient quickly.
3.16 Cool Wind Switch: Press this key to turn off the fan when the fan is off, and press this key to turn off
the fan when the fan is on.
3.17 POress "Speed+"and "Speed-"for 3 seconds to enter the total mileage view in standby mode .
4. Main functions:
4.1 Quick start (manual mode):
a. Turn on the power switch and correctly attach the safety lock to the safety lock position of the
treadmill.
b. Press the "start/pause" key, the system will enter a 3-second countdown, and the buzzer will sound
a warning tone. at the same time, the speed window will show that the treadmill will start running at
a speed of 1km/h after the countdown of 3, 2, 1, and 3 seconds is completed.
c. After starting, the speed of the treadmill can be adjusted according to needs by using the
"speed+""speed-"; Use the "Slope" and "Slope" keys to adjust the slope of the treadmill.
4.2 Operation during exercise:
4.2.1 Press “Speed –” key to reduce operating speed of the treadmill.
4.2.2 Press “Speed +” key to increase operating speed of the treadmill.
4.2.3 Press “Incline ︾” key to reduce incline of the treadmill.
4.2.4 Press “Incline︽” key to increase incline of the treadmill.
4.2.5 Press “Stop” key so that the treadmill will slow down and stop operation.
4.2.6 Heartbeat data will be displayed for about 3 seconds (heartbeat data is only used for general

-10-
reference of exercise, and cannot be used as medical data) when the sporter holds the heartbeat
handle with both hands.
4.3 Manual mode:
4.3.1 Press the "Start" key directly in the standby state, and the treadmill will start running at a speed of
1.0km/h and a slope of 0. Other windows count forward from 0, and press the "Slope ︽,"
"Slope ︾" or "Speed+""Speed-"keys to change the slope and speed.
4.3.2 Press “Target setting” to enter into time count-down mode in standby state, “Time” window
display “30:00” and flashes. Press “Incline︽” key, “Incline︾” key, “Speed +” key, “Speed –” key
to set exercise time, setting range is:5:00—99:00.
4.3.3 In time count-down mode, press “Target setting” to enter into distance count-down mode,
“Distance/Calorie” window displays “1.00” and flashes. Press “Incline ︽” key, “Incline ︾” key,
“Speed +” key, “Speed –” key to set exercise distance, and setting range of the distance is:
0.50–99.9 (connect bluetooth 0.50-60.0).
4.3.4 In distance count-down mode, press “Target setting” to enter into calorie count-down mode,
“Distance/Calorie” window displays “50.0” and flashes. Press “Incline ︽” key, “Incline ︾” key,
“Speed +” key, “Speed –” key to set calorie, and setting range of the calorie is: 10.0–999.0.
4.3.5 Select one of the three reverse counting modes and press the start button after the setting is
completed. The treadmill will start running after reverse counting for 3 seconds. Press the "Slope
︽," "Slope ︾" or "Speed+""Speed-"keys to adjust the speed and slope; Press the stop key to
stop the treadmill.
4.4 Built-in programs:
Press “program switch” key, select any one of built-in programs of P01---P12.
At this time, the "distance/calorie" window displays: program numbers P01---P12;
“Information window” displays: program diagram corresponding to P01—P12;
At this time, the "Time" window displays the default movement time and flashes. You can press
the "Slope︾," "Slope ︽" key or the "Speed+""Speed-"key to adjust the required movement time.
(The built-in program is divided into 16 sections, and the running time of each section is set time
divided by 16.)
Press the "Start" key, the system will start running according to the speed and slope value of the
first segment of the built-in program after entering the countdown of "3, 2 and 1". After the last
segment is finished, the next segment will automatically run. The slope and speed will be
automatically adjusted to the value of this segment at the same time. During the running process,
the slope can be adjusted by pressing the "Slope ︾" "Slope ﹀" key, and the speed can be
adjusted by pressing the "Speed+""Speed-"key. However, it will automatically adjust to the program
default value when entering the next paragraph. After all segments are completed, the program
ends, and the treadmill slowly slows down to a stop. The user can press the "stop" key or
disconnect the "safety switch" at any time to stop the running of the treadmill during exercise.
Date sheet of built-in program
Time period
Program
1/16 of set time = operating time of each section
1
2
3
4
5
6
7
8
9
10
11
12
13
14
15
16
P01- Slow walk
Speed
6
6
6
5
5
5
5
4
4
3
3
3
2
4
4
4
Incline
1
2
3
4
5
6
7
8
9
10
11
12
4
2
2
0

-11-
4.5 User defined program:
Except 12 system built-in programs, treadmill is equipped another three user defined programs
that allows self to set according to personnel situation: U01, U02 and U03.
4.5.1 Setting of user defined program:
Press the "Custom Program" key in standby mode to set the user-defined program
"Distance/Calories" window to display "U01-U03", press the "Target Setting" key to enter the setting,
the "Time" window to display "S-01 ... S-16", and the speed and slope windows to display relevant
data of corresponding segments. Then, each time period can be set. During the setting, use the
"speed+""speed-"key or the speed shortcut key to set the speed, use the "slope ︽" "slope︾" key to
set the lift, press the "target setting" key to complete the setting of this time period and enter the
setting state of the next time period until the setting of all 16 time periods is completed. After the
setting is completed, the data will be saved permanently until you reset it next time. This data will
not be lost due to power failure.
4.5.2 Start of user defined program:
Press the "Custom Program" key in standby state until the user-defined program (U01-U03) you
want to run is reached, and press the start key after the running time is set.
Pressing the start button can also start immediately after the user-defined program and runtime
P02- Mountain
Speed
2
2
8
2
2
8
8
10
4
4
12
4
4
12
4
2
Incline
0
2
2
2
6
6
2
2
4
4
2
2
4
2
2
0
P03-Warm up
Speed
2
4
4
4
4
4
6
6
6
6
6
4
4
4
4
2
Incline
0
2
2
2
2
2
2
2
2
2
2
2
2
2
2
0
P04- Lose
weight
Speed
4
6
6
6
12
12
12
12
6
6
4
4
4
6
6
2
Incline
0
2
2
4
4
6
8
8
6
6
6
4
4
2
2
0
P05- Burn fat
Speed
2
4
6
12
12
12
4
4
4
4
12
12
12
6
4
2
Incline
0
2
4
6
6
6
6
6
6
4
4
2
2
2
4
0
P06- Half
marathon
Speed
4
4
6
6
6
6
8
8
6
6
8
8
6
8
6
4
Incline
0
2
4
4
4
4
4
2
2
2
2
2
2
2
2
0
P07- Relax
Speed
2
2
2
3
3
3
4
4
4
3
3
3
2
2
2
2
Incline
0
1
1
1
1
2
2
2
2
1
1
1
1
1
1
0
P08- Sprint
Speed
2
2
6
6
6
8
8
10
10
12
8
6
6
6
4
4
Incline
0
2
2
4
2
2
2
4
2
2
2
4
2
2
2
0
P09- Random
Speed
2
4
8
10
2
4
8
10
2
4
10
2
4
10
4
2
Incline
0
2
2
4
4
6
6
8
8
10
8
6
4
2
2
0
P010- Quick
walk
Speed
4
6
6
8
8
8
6
8
6
8
6
10
6
10
8
4
Incline
0
2
2
2
4
4
4
4
4
4
6
6
6
4
4
0
P11- Jog
Speed
4
6
6
8
8
8
6
8
6
8
6
10
6
10
8
4
Incline
0
2
2
2
4
4
4
4
4
4
6
6
6
4
4
0
P12- Race
Speed
4
6
8
10
8
6
4
6
8
12
8
6
8
12
12
6
Incline
0
2
2
4
4
6
6
8
8
6
6
4
4
2
2
0

-12-
settings are completed.
4.5.3 Setting description of user defined program:
Each program divides operating time into 16 time section. During setting, complete settings of
speed, lifting time and operating time of 16 time sections so that start key can be pressed to start
the treadmill.
4.6 Body fat measurement:
Press the "program switching" key continuously to enter the body mass index (FAT) detection
function in the standby state , and press the "target setting" key to enter the F-1, F-2, F-3, F-4, F-5
interfaces (f-1-gender, f-2-age, f-3-height, f-4-weight, F-5- body mass detection), Press the "Slope
︽" , "Slope︾" , "Speed+," Speed-"keys to set the parameters of 01-04 (the parameters are shown
in the following table). After setting, press the" Target Setting "key to enter the F-5 physical
examination interface. At this time, your body mass index will be displayed after holding the heart
rate handle in both hands for 5-6 seconds to see if your weight and height are commensurate. Body
mass index (FAT) is a measure of the relationship between a person's height and weight, not the
proportion of the body. FAT is suitable for any male or female and provides the basis for people to
adjust their weight together with other health indicators. The ideal FAT should be between 20 and 24.
If it is lower than 19, it means too thin. If it is between 25 and 29, it is overweight. If it is over 30, it is
considered obese. (This data is for reference only and cannot be used as medical data.)
F-1
Gender
01Male
02Female
F-2
Age
10------99
F-3
Body height
100----200
F-4
Body weight
20-----150
F-5
Body fat index
≤19
Too thin
Body fat index
=(20---24)
Ideal
Body fat index
=(25---29)
Overweight
Body fat index
≥30
Fat
4.7 Display range of each value:
Setting parameter
Initial
Setting initial value
Setting range
Display range
Time (m:s)
0:00
30:00:00
5:00-99:00
0:00-99:59
Slope (section)
0
0
0-15
0-15
Speed (km/h)
1.0
1.0
1.0-18
1.0-18.0KMH
Distance (km)
0.00
1.00
0.50-99.90
0.00-99.90
Heart rate (time/m)
P
N/A
N/A
50-200
Calorie (kcl)
0.0
50.0
10.0-999.0
0.0-999.0
5.Safety lock function:
Pulling off the safety lock can stop the running of the treadmill in any state . The treadmill is
stopped in an emergency. The speed window displays "-",and the buzzer gives an alarm of "BB" 3
times. At this time, the treadmill cannot perform any other operation except shutdown. After the safety
lock is correctly installed again, the treadmill enters the standby state again, waiting for the input
command.

-13-
6.Power saving mode:
This system has power saving function. If there is no key command input within 10 minutes in
standby state, the system enters power saving mode, automatically turns off the display, and presses
any key to wake up the system again.
7.MP3 function:
When MP3 or other audio equipment is connected after power is applied, the electronic watch can
play music. The volume control of sound is on the audio equipment, please pay attention to control the
volume of sound so as not to affect the quality of sound and the built-in audio circuit.
8.Shut down:
The treadmill can be off by turn off the power or the treadmill at any time, which does not damage it.
9.Precautions:
9.1 Check whether the power supply is loaded before the movement; Check whether the safety lock
is valid.
9.2 Whether there are abnormal conditions or not during sporting; the treadmill may quickly slow down
until to stop by pulling off the safety lock; put the safety lock in the place again and reset the
equipment waiting for entering order.
9.3 If you have any questions about the treadmill, please contact the distributor. It is not allowed for
laymen to disassemble or maintain the treadmill for fear of damaging the treadmill.
VII. Use method and safety protection for treadmill
1. Debugging of treadmill
1.1 After the installation is completed, position the safety lock to the corresponding position of electronic
meter.
1.2 Before the powering, inspect whether the power ground wire is well grounded and pull the running
belt with hands to check whether it can run flexibly without any abnormal sound.
1.3 Plug in the power supply and open the power supply lock. Then, all windows on the electronic meter
show the initial values and the running belt is still.
1.4 Press the “Start” Key and the treadmill starts operating at a low speed (the operating speed is
1km/h). Observe whether the treadmill and electronic meter can operate normally.
1.5 Press the “Speed-up” Key and “Speed-down” Key to observe whether the regulation is normal.
1.6 Press the “Stop” Key or pull in the safety lock, and the treadmill may stop operating. Turn off the
power switch and unplug the power supply.
2. Operating instructions
After being debugged, the electric treadmill can be put into use
2.1 Plug the power supply in the household 220V outlet. The outlet must be provided with appropriate
grounding wire.
2.2 Emplace the safety lock and press “Start” Key, and then the running belt may operate slowly (the
speed is about 1km/h). The speed per hour is displayed on the meter.
2.3 If the treadmill needs to be accelerated, press the “Speed-up” Key and the buzzer’s “tick” indicates
one level up. The maximum speed per hour is 18km/h.
2.4 If you cannot wait for the deceleration while running on the treadmill at a high speed, you can pull
out the safety lock and the treadmill may immediately stop.
2.5 Press “STOP” after running and the treadmill slows down until it stops.

-14-
3. Safety protection for treadmill
3.1. In any emergency, as long as the exerciser takes off the safety lock, the treadmill may be power off.
Therefore, when you are exercising, please be sure to clip the safety lock on the appropriate position
the on your clothes to ensure the safety.
3.2. When the treadmill belt skids or the running belt is stuck, the motor may stop in about 3s.
VIII. Precautions
1. Circuit
1.1 Avoid using other electric appliances in the same power supply circuit. The power supply circuit
must be able to supply over16.7A electricity current.
1.2 It is required that the service voltage should be in the range of 220V±10%. The voltage beyond this
range may lead to the abnormal operation.
1.3 Check whether the power is on or not before sporting; check whether the safety lock is efficient or
not.
1.4 Whether there are abnormal conditions or not during sporting; the treadmill may quickly slow down
until to stop by pulling off the safety lock; put the safety lock in the place again and reset the equipment
waiting for entering order.
1.5 After being used, the treadmill should be immediately unplugged.
1.6 In Winter, certain humidity should be kept indoors to avoid strong static electricity.
1.7 If the power wire is damaged after use, please go to specified products distributor for replacement or
purchase.
1.8 If you have any questions about the treadmill, please contact the distributor. It is not allowed for
laymen to disassemble or maintain the treadmill for fear of damaging the treadmill.
2. Placing environment
2.1 It is only proper for the treadmill to be placed indoors for protection against humidity. It is forbidden
to splash water on the treadmill. It is forbidden to place any foreign materials on or inserted them in the
treadmill.
2.2 During the operation of the treadmill, the motor may generate a small number of sparks, so the
treadmill should be placed at a drafty place and kept away from explosives.
2.3 When the treadmill is used, ensure its fore and rear feet reliably contact the ground. If the ground
surface is uneven, it should be stably padded with carpet or rubber plate.
2.4 Pay attention to the interior hygiene usually to reduce indoor dust because its sensibility may be
influenced by the dust adhered on the electronic components.
3. Precautions before or during exercise
3.1 For your safety, wear sports clothes and select suitable sports shoes when using the treadmill. It is
strictly forbidden to exercise on the treadmill with bare feet.
3.2 It is not allowed for two or more persons to do exercises on the treadmill at the same time.
3.3 Prepare a towel before running to prevent sweat from dropping on the running belt and being thrown
into the enclosure to damage the electric appliance.
3.4 The beginner can get on the treadmill only after he stands on the edge to test several times with one
foot and feels capable of keeping up with the speed of the running belt.
3.5 The treadmill has enough motor power. In principle, the zero start can be realized, but to extend the
service life of the treadmill, it is suggested that you should stand on both edges of the treadmill and get
on it for exercise after the normal start.
3.6 It is strictly forbidden to get on and off from the rear end as it is very easy for people to tumble in
such way.
3.7 The strength should be equal when the hands are on the armrests and run on it straightly to avoid
belt deflection.
3.8 When people run in a normal state, the two hands should be moved from the armrests. The arms
can be swung boldly so that the exercise result may be better.
3.9 You should press the “Stop” button and leave the treadmill until it stops completely.
3.10 Keep the child away from the running treadmill for fear that the hand or the clothes may clamped
by the running belt to cause serious injury.
3.11 It is strictly forbidden to touch the working running belt by hands.

-15-
4. Additional precautions
4.1 The cardiac should not use the electric treadmill alone.
4.2 Determine the running speed according to your physical conditions; and the sick should not use the
treadmill or use it under the instruction of a doctor.
4.3 The heart rate sensor is not a medical facility and the detection results are for reference only.
IX. Daily servicing and maintenance of electric treadmill
During the daily use of the treadmill, the following should be noted for the maintenance.
1. Keep the treadmill clean
1.1 The service life of the treadmill can be significantly extended by keeping clean. Often wipe the
running board and footboard exposed on the two sides of the running belt. Reduce long-term
accumulation of the dust and dirt under the running belt.
1.2 The running belt can be wiped with soft cloth dipped with soapsuds. Don’t let the water flow to the
bottom of the running belt and into the shield.
1.3 Regularly check each bolt and nut. Please tighten and fix them immediately with tools if they are
loose.
1.4 Regularly check whether the groove of the motor belt is clean. If there are residual, they must be
cleaned off to avoid unnecessary vibration when it is used.
1.5 Regularly clean the electric control system and the dust surrounding the motor to ensure normal
operation of the treadmill.
2. Lubrication
2.1 A bottle of special lubricating oil for running board is attached. Running board surface should be
evenly lubricated with special lubrication regularly to avoid the damage of running belt and running
board caused by the temperature rise due to the friction between them, and to reduce the load of the
motor. (Note: the child should not play with it in fear of eating by mistake)
2.2 After the treadmill has been used for accumulatively 50km, the running belt and running board
should be lubricated with the special lubricant. The lubrication should not be excessive. It is
recommended that a 30ml bottle of special lubricating oil for the treadmill should be used for ten times.
2.3 Lubricating method: Loosen the right and left adjustment bolts at the rear end of the treadmill with
special tools, lift the running belt about 10-15cm, pour a good amount of special lubricating oil on the top
surface of the running board, and smear it evenly and tighten the running belt. (For adjustment method,
see the “Adjusting method for the tightness of running belt”) The over lubrication should be avoided. As
for the lubrication, it is by no means “the more the better”. Please remember: reasonable lubrication is
an important factor to extend the service life of the treadmill!
3. Judgment for friction:
The frictional force of the running board and running belt can be increased by uncleanness or reduction of
lubricant, which may damage the motor and control panel. The excessive frictional force is characterized
with followings:
3.1 Under the power off condition, it is arduous to drive the belt by feet, or even the belt cannot be
driven;
3.2 The treadmill runs at an intermediate speed. The running belt completely stops as soon as the
safety switch is turned off;
3.3 The increment of frictional force may cause the damage of motor or control panel, short circuit,
tripping, fuse burn-out, etc.
4. Adjustment for the tightness of running belt:
4.1 Although all treadmills have been adjusted at exworks, the running belt may become loose after the
treadmill is used for some time. The maintenance is mainly carried out by the user. If the running belt is
too loose, the skidding phenomenon of running belt and drum may occur when you step on the running
belt. But excessive tightness is not good either because it may damage motor, running belt and drum,
increase the running noise of the treadmill, etc. In general condition, it is better to lift the two sides of
running belt 5-6cm away from the running board.
4.2 Judgment method for tightness of running belt

-16-
Adjust the treadmill speed to 1.5 km/h, grasp the armrest forcefully with both hands and prevent the
operating of running belt with feet. At this time, if the running belt stops running, the front drum continues
running, but the running belt continues running after being released, indicating that the running belt is
excessively loose. Meanwhile, the user may feel the halt at sometimes, and the long-term use under the
loose state may shorten the service life of running belt. Therefore, adjustment should be done timely.
4.3 Adjusting method for the tightness of running belt: After the treadmill is used for some time, the halt
may be felt while you are running on it, which is caused by the excessive loose running belt. The
tightening adjustable bolt of the right and left rear regulating box is used to adjust the tightness and
deflection. It is the core component of the adjustment of the complete treadmill.
Adjusting method: (note: the clockwise means tightening and the anticlockwise means loosening. All the
tightening and loosening as shown below stand for clockwise and anticlockwise respectively.) After the
treadmill is used for some time, the running belt may get extended slightly. If you feel the skidding
running bet, it shows the running belt is too loose. Thus, tighten the adjustable bolts of rear cover at
both sides at the same time by 1/4 circle until no skidding or halt is felt while you are running on the
treadmill.
Special attention: As for the running belt, it is not the tighter the better. The tightness should be adjusted
as required. The service life of the running belt may be shortened if it is too tight.
5. Adjustment for deflection of running belt:
As for all treadmills, although the running belt has been adjusted at exworks, the running belt may suffer
the deflection after the treadmill is used for some time. This is attributed to following reasons:
5.1 The treadmill body is placed unevenly.
5.2 While exercising on the treadmill, the user fails to run on the central position of the running belt.
5.3 The strength of user’s feet is uneven.
5.4 Adjustment for deflection: It only takes a few minutes to recover artificial deflection by no-load
operation. As for the non-recoverable deflection, the running belt adjusting bolts should be adjusted with
the auxiliary special tools by half a circle. For example, if the deflection is leftward, clockwise adjust the
left adjusting bolts or anticlockwise adjust the right adjusting bolts, and if the deflection is rightward,
clockwise adjust the right adjusting bolts or anticlockwise adjust the left adjusting bolts. The deflections
of running belt are mainly maintained and repaired by the user. As the deflection may seriously damage
the running belt, the deflection should be timely corrected if any.
6. Adjustment for motor belt:
6.1 As for all treadmills, although the motor belt has been adjusted at exworks, the running belt may
suffer the halt after the treadmill is used for some time, because the motor belt gets loose.
6.2 Judgment method for tightness of running belt: adjust the treadmill speed to 1.5 km/h, grasp the
armrest forcefully with both hands and prevent the operating of running belt with feet. If the running belt
stops running, the front drum continues running, but the running belt continues running after being
released, indicating that the running belt is excessively loose. Meanwhile, the user may feel the halt at
sometimes, and the long-term use under the loose state may shorten the service life of running belt.
Therefore, adjustment should be done timely.
6.3 Solution: Use special tools to clockwise adjust the motor belt adjusting bolts for several circles until
the user cannot feel the halt. This adjustment is mainly carried out by the user.
Adjusting method for motor belt: Clockwise adjust the motor belt adjusting bolts by half a circle with
auxiliary tools.
X. Elimination methods for common faults

-17-
Fault or phenomenon
Possible reasons
Handling method
No display of the treadmill
A. power is not plugged or there is
no power supply.
Plug the power lines into the AC current, or
check the AC socket
B. The power switch is not on.
Switch the power to “ON”
C. The driver is not-powered or has
been damaged.
Replug the drive power cord or replace the
drive
D. Disconnection of the Electronic
meter signal lines.
Replace the signal lines and plug the lines
again
E. The Electronic meter is damaged
Replace Electronic meter
The treadmill is displayed incompletely
and lack of strokes
A. Insufficient welding or
connecting welding of drive IC is
displayed
It is required to carry out repair, check the
welds and weld them in place again.
B. Bus bar slides and isn’t fixed in
place
Reassemble bus bar
C. Bad drive IC is displayed
It is required to carry out repair and weld
new display drive IC
The operation of the treadmill is not
smooth, shaking or without force.
A. There is resistance in the
transmission parts
Adjust the transmission parts or add
lubrication oil
B. The transmission belt is over
tight or over loose
Adjust the tightness of the transmission belt
C. The torque of the drive is over
little or over large
Adjust the torque potentiometer to the
proper position
Display of
the
Electronic
meter
---or----
A. The safety lock fell off
Put the safety lock onto the plate for the
actuation or the card inserting position
B. The magnetron is not connected
properly
Install the magnetron into the right position
E01- communication fault
(the Electronic meter signal
cannot be received by the
drive);
E13- communication fault
(the drive signal cannot be
received by the Electronic
meter)
A .The signal lines of the electronic
meter is not well plugged or poor
connection
Plug the lines again
B. The signal lines are damaged or
there is short circuit or open circuit
Replace the signal lines
C. Line fault of the electronic meter
signal
Replace the electronic meter
D. Line fault of the drive
Replace the drive
E02- stalling protection
(explosion-proof protection
or the major motor is
abnormal)
A. The motor lines are not well
connected or the motor inside is
open circuit
Plug the motor line again or replace the
motor
B. The puncture and damage of the
drive IGBT
Replace the drive
C. The voltage of the outside AC
current is too low
Stop using and let the electrician eliminate
the fault
E04- hoisting self-checking
learning failure(with hoisting
drive)
A. The motor lines of the motor or
the signal lines are not well plugged
Check whether the lines are wrong
connected or not, plug the lines again
B. Bad hoisting motor
Replace hoisting motor
C. Bad drive
Replace the drive
E05- overcurrent protection
A. Overload
Systematic protection, restart if there is
man-made lock
B. The transmission parts are stuck
or impeded
Adjust the transmission parts or add
lubrication oil
C. The motor inside is short circuit
Replace the motor
D. Burnout of the drive
Replace the drive
E06- it is usually open
circuit of motor
A. The motor lines are not well
plugged
Plug the motor line again
B. The motor inside is open circuit
Replace the motor
C. Motor idling
Please install the treadmill and test it due to
the error when the current is over little
E08- storage 24C02 error
A. Storage IC is not plugged in
Reconnect IC socket and pay attention to

-18-
(with 24C02 actuator
externally)
place (non-switching power supply)
position of lower PIN1
B. Storage IC is damaged or
relevant lines are poor
Replace storage IC or actuator
E09- inversion error (with
inverted actuator)
A. Treadmill is erected or placed
not horizontally
Adjust and horizontally place treadmill
B. Poor line due to inversion of
actuator
Replace actuator
E10- it is usually transient
peak current abnormality of
motor and overcurrent
protection
A. The torque of the drive is over
large
Adjust the torque potentiometer to the
proper position
B. The motor inside is short circuit
Replace the motor
C. The transmission parts are stuck
Adjust the transmission parts or add
lubrication oil
XI. Precautions for exercise
Warm-up: Before each exercise, it is necessary to take 5~10 min to do the warming up, including the
warm-up (including the stepping machine, treadmill, rowing machine and exercise bike) and
stretching (stretch the muscles in the training part and bend the joints) to prevent the sport injury.
Breath: During the exercise, it is not allowed to hold the breath. Generally, inhale from noise when doing
the preparing or homing actions and exhale from mouth when putting forth the strength. The breath
should be coordinating with the actions. In case of short breath, stop exercising immediately.
Frequency: The training for the same muscle should be carried out at the interval of 48h, that is to say, the
training for the same muscle should be carried out every other day.
Load: determine exercise amount according to own physical condition and then make gradual load
exercise. It is normal that the muscle pains at the beginning of exercise.
Relax: After each exercise, you should do 5-minute homing actions, especially the stretching and relaxing
for muscles of trained legs to prevent the muscle from getting long-term spasm and maintain the
elasticity of muscle.
Diet: In order to protect the digestive system, the exercise can be carried out 1 hour after the meal and
have meals at least half an hour after the exercise. During the exercise, drink water as little as
possible. It is forbidden to swallow much water for fear of burdening the heart and kidney.
If you have any questions about the treadmill, please contact the distributor. It is not allowed for laymen to
disassemble or maintain the treadmill for fear of damaging the treadmill.
Attention:
The right of final interpretation for the appearance, specification, model, etc. of products is owned by
our company. Any product is subjected to change without notices and product pictures are for
reference only!
Table of contents
Other Daily Youth Treadmill manuals