Dakota Micro DMAC?9M?C1 User manual

UsersManual
DMAgCam®
PartNumber:DMAC‐9M‐C1(2)
Contents:Page
1. IncludedComponents.....................................2
2. StandardFeatures
a. Camera................................................3
b. Monitor................................................3
c. Cables..................................................3
3. Installation&Mounting
a. CameraInstallation&Mounting.........4
b. CableInstallation&Mounting............4‐5
c. MonitorInstallation&Mounting........5‐7
4. Monitor&RemoteOperation.........................7‐8
5. StandardMenuSettings..................................8‐9
6. DigitalVideoTunerSettings............................9‐11
7. HiddenMenuSettings.....................................11‐12
8. Specifications...................................................13
9. Warranty..........................................................14
10. Warnings..........................................................15
11. DealerInformation..........................................16
Alwaysreadthemanualspriortooperatingthisequipment.
Pleasefollowallsafetysignsandprecautions.

1
1. IncludedComponents
MonitorKitContents:
1.Monitor
2.MonitorBase
3.MonitorRemote
4.A/Cpoweradaptor(stylemayvary)
5.12v/Hardwirekit
6.A/VIn‐OutCable
7.Misc.Accessories(notshown)
CameraKitContents:
1.Cameraw/bracket&magneticbase
2.60’Cable
3.20’Cable
4.Cableclips

2
ThankyouforpurchasingtheDMAgCam®.TheAgCam®isadurable,reliablesurveillancesystemwiththe
innovativeabilitytobequicklymovedfromoneapplicationtothenext.
2. StandardFeatures
a. Camera
•Waterproof,shockproof,suitablefornearlyanyuse.
•Minimumfocaldistanceof5”.
•Built‐in,highqualityCCDcamerawithhighperformanceinfrared(IR)illuminatormodules.
•IRhaseffectiverangeofupto35’incompletedarkness
•In‐lineconditionerandsurgesuppressorpreventsover/underpoweringofunit,preventing
damage.
•Built‐inCDSlight‐sourcesensorcanautomaticallyturnon/offtheIR’sbydetectingthelight
intensityoftheenvironment.
•OurexclusivePhotograycamerabodylensdarkensinbrightconditionsandbecomescompletely
transparentunderlowlightconditions.Thislensisalsotransparentofinfraredlight,allowingthe
LED’stopenetrateevenwhenitisdarkened.
•Standardlensfeatures92°fieldofview(3.6mm).
•Optionallensesavailableinclude:6mm,12mm&16mm.(Acompletelensguideisavailableon
ourwebsiteatwww.AgCam.com).
b. Monitors
•FeaturesthelatestinLCDtechnology.TFTor“ThinFilmTransistor”allowsforalargerdegreeof
viewing.
•Color,brightness,contrastandvolumecontrolsthatallowcompensationforuseindifferent
environments.
•Selectableaudiovideoinputs.(Allmonitorscomeequippedwithtwo(2)videoinputs.However,
onlytheonemarkedwithawhitebandiscapableofaudio).
•BuiltindigitalTVtuner.
•Remotecontrol.
c. Cables
•Siliconejacketenableshighflexibilityinalltemperatures
•Ourdurableextensioncablescomein20’and60’standardlengthsandfeaturesturdy,
watertightconnectors.
•Customvideocableslengthsof10’,40’and50’aswellas60’audioenabledcablesareavailable.

3
3. Installation
a. CameraInstallation&Mounting
1. CameraBody
2. MountingBracket
3. MagneticBase
4. RetainingScrew
5. FiberWasher
6. Power/VideoInput
7. BracketScrew
TemporaryMount:
Fortemporarymounting,itisrecommendedthatyouusethesupplied#25pullmagnet.Ifusingmagneticmount,fasten
cameracablewithaziptieorotherstylefastener.Thiswillactasa“safetywire”intheeventyourcameraisknockedloose
forsomereason.Whenselectingalocation,makesurethattheequipmentsurfaceiscleanofallforeignmaterialandasflat
aspossibletoensurethatthemagneticcamerabasewillhavegoodcontactandnotvibrateoff.
PermanentMount:
Forpermanentmounting,itisrecommendedthatyouremovethemagnetandattachtoanysolidsurfacewithtwo(2)
screws.
Aftercameraissecurelymounted,plugPower/VideoInput(6inabovediagram)intoAgCam®extensionpower/videocable.Make
suretheyaresecurelyattachedandlocked(¼turnwilllockthecablestogether).
SuggestionsforMountingCamera:
Whendeterminingthelocationforthecameraitisalwaysbesttouseasolidsurfacetominimizevibration.Laddersarenotgood
mountingchoicesduetolackofstability.
IfyouwillbeusingyourAgCam®forassistinginvisibilityforimplement/vehicletowing,youwillwanttopositionthecamerasoyou
canseethedesiredareaandaportionofthevehicleintow,thiswillgiveyousomereferencetodistance.Youwillalsowanttouse
themirroredsettinginthemonitormenusoastoaccuratelyrepresentleftandright(thiswillgiveyoutheeffectoflookinginarear
viewmirror).
CameraWarnings
•NEVERRELYONYOURAGCAM®ASASAFETYFEATURE.Itisuptoyourdiscretiontokeepyourroadtravelandother
operationssafe.YourAgCam®willprovideyouwithinformationonlybasedonwhatitsees.Operationofmachinerysafety
guidelinesstillapply.
•TheAgCam®isequippedwithanarrayofinfraredlightemitterswhichareinvisibletothehumaneye.Thisfeaturewillaid
inlowlightconditionsbuthaslimitations.Theeffectiverangeofthenightvisionfeatureis1to40feetandwillproducea
monochromeimageonly.Donotattempttodrivemachineryusingthisfeature
b. CableInstallation&Mounting

4
Thereare2lengthsofcablewithyourcamerasystem:One(1)20’andone(1)60’.The20’cableistobeusedtoroutefromthecab
tothehitchofyourtractor.The60’canbeusedtorunfromthehitchendoftheimplement(airseederforexample)tothecamera
mountinglocation.Thiswillallowforeasyseparationofthetractorandimplementwithouthavingtoremovethecamera.Ifthe
cameraistobeusedonatruckorothervehicle,the20’orthe60’cablemaybesufficient.Therefore,extracablewillnotbeneeded.
Ifyouwouldliketopurchasedifferentoradditionalcablelengths,pleasecontactyourdealerwhereyoupurchasedyourAgCam®.
CableWarnings
•Cableroutingisimportant.Whereyouchosetorunthecablesshouldnotinterferewiththenormaloperationofthe
machineoranysafetyequipment.
•ALWAYSbeawareofany“pinchpoints”orotherpotentialhazardstothecable.
•Secureallcablestovehicle/equipmentusingincludedcableclips,ziptiesorotherstylefastener.
•IfyouintendtouseyourAgCam®forshortlengthPTOoperatedimplement,avoidexcesscablelengthsifpossible.When
youdecideonalocationyoushouldfixthecameratoapermanentbracketusing¼inchbolts,andattachanyloosecable
securelysothereisnochanceofentanglementinthePTOorothermovingparts.
•IfyouuseyourAgCam®tomonitoracombinehopperorothercombineoperations,takecaretorememberthatcombines
havemanymovingparts.Useextremecarewhenroutingcables,anditisstronglyrecommendedthatyouuseboltsto
securethecamera.Whileitwouldbesufficienttousethemagneticbaseformonitoringpurposesduringroadtravel,itis
advisedtosecurethecamerawithboltsduringoperationofthecombine.
c. MonitorInstallation&Mounting
Mounting:
Removeyourmonitorcarefullyfrompackaging,andinspectallmountinghardware.Mountinglocationisthemostimportantpartof
themonitorinstallationtoensuremaximumvisualbenefitfromyourAgCam®system.
Keepinmind:
•Leastdirectsunlight.Keepingyourmonitoroutofdirectsunlightwillprolongthelifeoftheunitaswellasensureoptimum
visibility
•Doesnotobstructyourview
•Doesnotinterferewiththenormaloperationofvehicle
Examples:
Tractorw/airseederintow GrainTruck
Drymountthemonitortotheincludeduniversalmountingbracketby:
1. Slidingthesquaremountingstudontopofmountingbracketintotheslotonbackofthemonitor.
2. Tightennutbyturningtheknobonthebackofmountingbracketclockwise.(Optionalstylemonitorbracketsareavailable:
suctioncupstyleandhardmount.Bothofthesestylebracketshaveasquaremountingstudaswell).
Onceyouhaveattachedthemonitortothemountingbracket,followthesestepstofinalizetheinstallation.
1. Withthemountandmonitorattached,findandmarkthedesiredpositionforthemonitor.
2. Removethemonitorfromthemount.
3. Thoroughlycleantheintendedmountinglocationwithalcoholprepwipeorothernon‐oilbasedcleaner.
4. Removethepaperbackingfromthestandandpressfirmlyindesiredlocation.
5. Ifmountinginotherthanaflat,levellocation,usesmallscrewsinthefourcornersofthemountingbrackettopermanently
secure.

5
6. DONOTexpectthattheadhesivewillholdupyourmonitor(i.e.ontheceilingorsidepostofacab),itisONLYintended
toholdthebracketdown.
7. Attachthemonitortothemountandtightenthewingnut.
Installation:
1) AV1‐Audio/VideoInput
2) AV2–VideoInput
3) PowerInput
Onlythecablemarkedwithwhite
bandisaudioenabled.
Power:
12vPower:
1. AttachthePowerInputconnector(3above)toyourincluded12vcigarettelighteradaptor
2. Plugcigarettelighteradaptorinto12vpowersource
HardwirePower(7.5ampmaximumcircuitcapability):
1. Clipoff12vadaptorRIGHTABOVEthecigarettelighteradaptor.
2. Split+(withstripe)and–(black)wires
3. Stripbothwirestoexposeapprox.½”barewire
4. Insert+(withstripe)intoREDmaleScotchlokandcrimp
5. Insert–(blackwire)intoBLUEmaleScotchlokandcrimp
6. Attachcorresponding+(RED)/‐(BLUE)femaletapto+/‐keyswitched,max7.5ampfusedcircuit.
*Thereisasmallglassfuselocatedinsideofthetipofthe12vportionofthepoweradaptor.Whenreplacingblownfuses,usea
MAX4ampglassfuse.
Video:
YoucannowplugyourmonitorA/Vinput(s)intoeitheryourroutedAgCam®cable(s)orcamera(s).Makesuretheyaresecurely
attachedandlocked.
4.Monitor&RemoteOperation
Turnthemonitorononlyafterithasbeensecurelymounted,suppliedwithpower,andthecamerasareconnected

6
1. Antenna
2. EarphonesIn
3. A/V1In.ForusewithAVIn‐Outcable.NOTE:This
inputoverrideexternalAV1port
4. A/V2In.ForusewithAVIn‐Outcable.NOTE:This
inputoverrideexternalAV2port
5. A/VOut.Allowsforoutputofvideosignalto
externaldevice.
6. –=volumedown&menuoptions
7. +=volumeup&menuoptions
8. CH‐=Channeldown&menuoptions
9. CH+=Channelup&menuoptions
10. MENU=enablesmonitormenuaccess
11. A/V=allowsforAudio/Videochannelselection
12. POWER=PowerON/OFF
13. Onlythecablemarkedwithwhitebandisaudio
enabled.
Mute
PowerON/OFF
MENU1 AllowsaccesstoStandardmenusettings
EXI
T
Exitsuserfrommenuscreens
MENU2AllowsaccesstoDigitalTunermenu(if
enabled)
OK Allowsentryselection
SwitchesbetweenAV1/AV2/Tuner
FAV Up/Down/Left/Right(allarrows)
INFO ONLY
RETURNSwitchestothelastchannelyouwere
viewing
TV/AV Providesbasicsettinginfo
SOUND Non‐Functional
GUID VolumeAdjust
CC/ON ChannelInfo
C/A CCON/OFF
FORMAT Channel/Antennainputselection
PROG Displaysaspectratiosetting
1‐0AllowschannelProgramming
ChannelSelectionkeys
GettingStarted:
1. Poweronmonitorbypushing“POWER”buttononthefaceofmonitororremote.
2. Ifyoudonotseevideofromyourcamera,pushtheAVbuttononmonitororTV/AVbuttononremote.Repeatedlypushing
theAVbuttonwillcyclethroughthetwovideochannels(andthetwoTVtunerchannelsifenabled).
3. YourmonitorcomesfromthefactorywiththedigitalTVtunerdisabled.Toenablethisfeaturesee“HiddenMenu”pages
11‐12ofthismanual.
5.StandardMenuSettings
PresstheMENUkeyonthemonitororMENU1ontheremote.PressingMENUmultipletimeswillscrollthroughthedifferent
categoriesshownatthetopofthescreen.

7
1. UseCH‐/CH+onthemonitor(upanddownarrowsonremote)toselectanitemundereachsection.Selectedmenuitems
turnred.
2. Use‐/+onthemonitor(leftandrightarrowsonremote)tochangethevalueofthehighlighteditem.
3. Toexit:
a. PressMENUkeyonthemonitormultipletimestillthemenugoesaway
b. PressEXITontheremote
c. Allowmonitortotimeout(approximately5seconds).
PICTURE
BRIGHT:Adjuststhebrightnessofthe
image
CONTRASTAdjuststhecontrastofthe
image
COLOR:Adjuststhecoloroftheimage
ENGLISH:Selectthemenulanguage
(English,French,orSpanish)
VOLUME
VOLUME:Adjuststhevolumelevel
OPTION

8
Mirrortheimagetopandbottom
Mirrorlefttoright
ZOOM:Adjuststheaspectratioofthe
screen(16:9or4:3)
COLOR:Adjuststhecoloroftheimage
SYSTEM
*S‐COLOR:Adjuststhecolorsystemfor
yourcountry(Auto,PAL,NTSC,orSECAM)
*USonly‐shouldalwaysbeonAutoorNTSC.Anyothersettingmightcausedistortion.
CLOCK
SLEEP:Sethowmanyminutesbeforethe
monitorautomaticallyturnsoff
TIME:Setthecurrenttime
OFF‐TIME:Setthetimeyouwantthe
monitortoautomaticallyturnoff
ON‐TIME:Setthetimeyouwantthe
monitortoautomaticallyturnon
6.DigitalTVTunerMenuSettings

9
[Thisfeaturewillfirsthavetobeenabledthroughthe“HiddenMenu”.Pleaserefertothe“HiddenMenu”sectiononpage11for
instructions.]
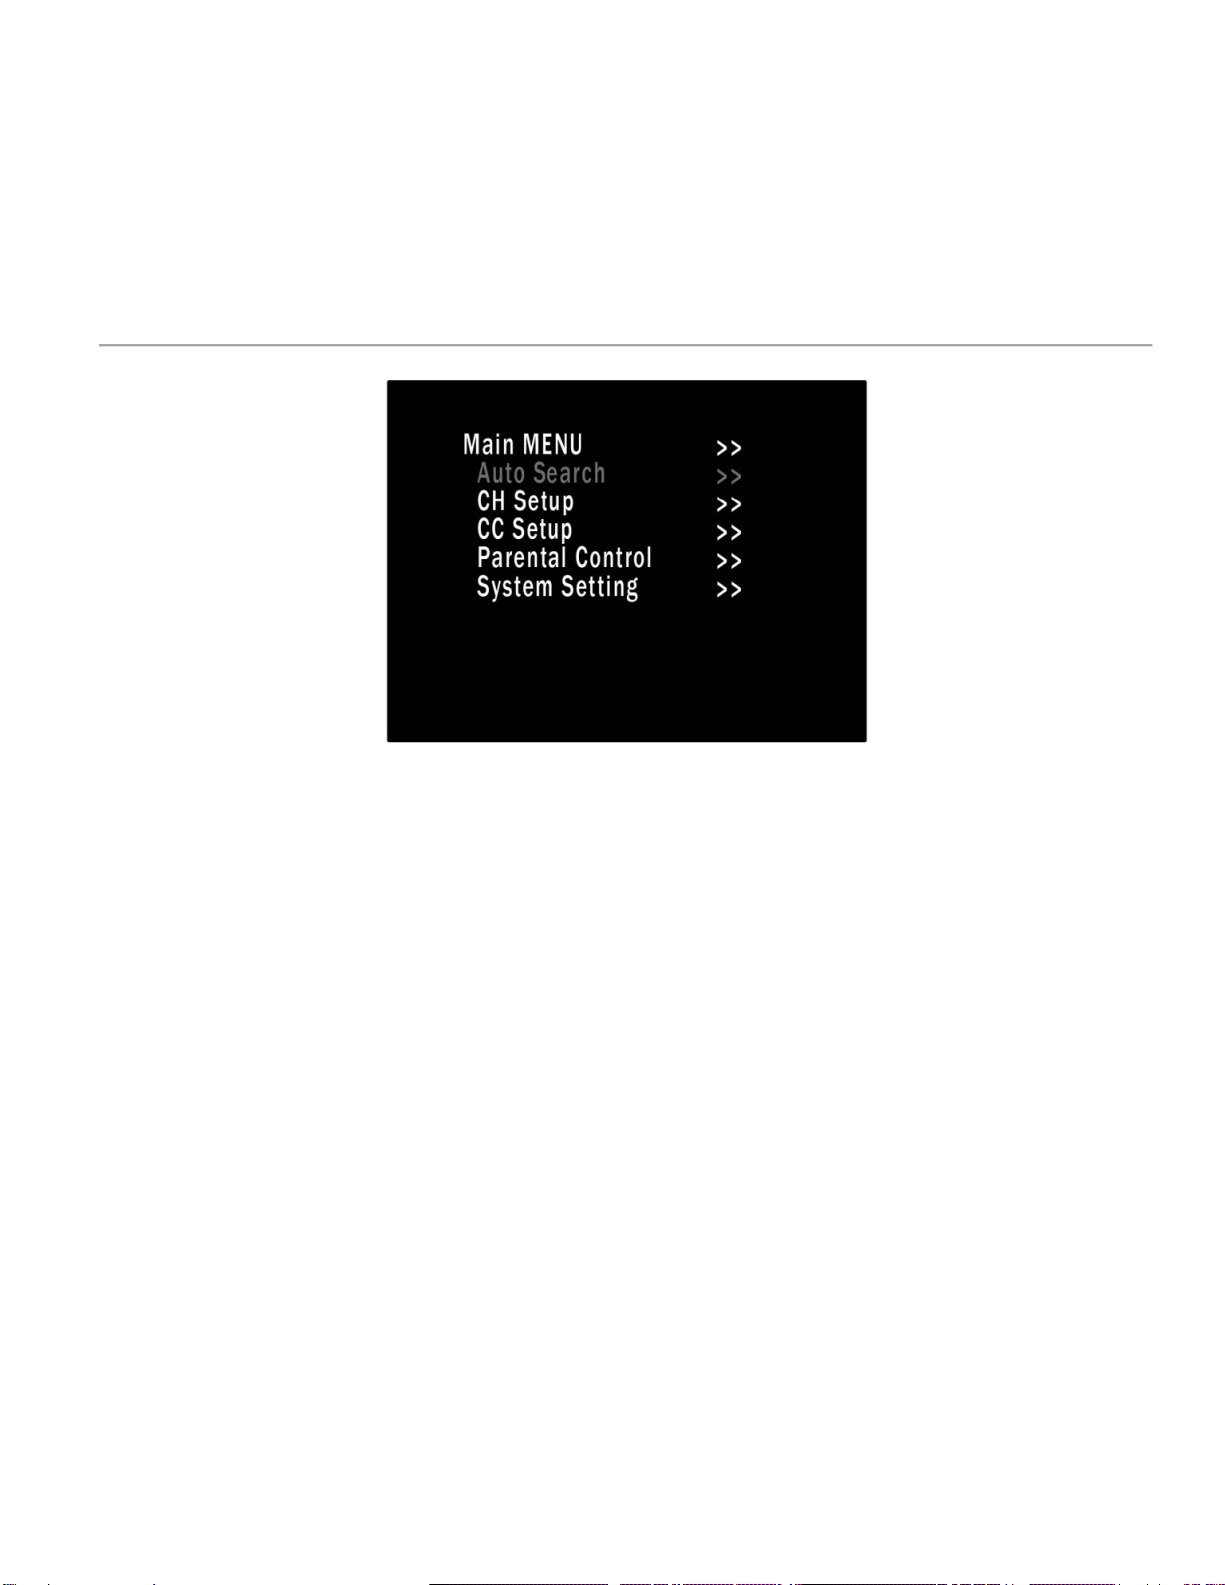
1. ToaccesstheDigitalTunerMenu
a. PresstheA/VbuttononthemonitoruntilyouareinTunermode,thenpresstheMENUbutton
b. ORyoucanpresstheMENU2buttonontheremote,regardlessofthemenuselectiononthemonitor.
2. UseCH‐/CH+onthemonitor(upanddownarrowsonremote)toselectanitem.Theselecteditemturnsgreen.
3. Use‐/+onthemonitor(leftandrightarrowsonremote)toselectthehighlighteditem.
4. Toexitthemenu
a. presstheMENUkeyonthemonitor,EXITorMENU2ontheremoteor
b. letittimeoutonitsownbydoingnothing(approximately25seconds).
AUTOSEARCH–Automaticallyfindsandstoresallthedigitalchannelsavailableinthearea(Includedantennamustbeattached
tomonitor)
•SourceType–Howthetunerreceivesit’ssignal(Antennaorcable)
•StartSearch–Searchesforallavailablechannelsandstorestheminmemory
CHSETUP–Addorremovechannelsinmemory
•Channel–Selectthechannelyouwanttoaddorremove
•Skip–SelectingONwillremovethechannelfrommemorySelectingOFFwillallowthechanneltobeviewed.
CCSETUP–SettingsforClosedCaptioning(CC)
•CCDisplay–TurnCConoroff
•608CCType–Selectthetypeof608CC(C1,C2,C3,C4,T1,T2,T3,orT4)
•708CCType–Selectthetypeof708CC(Service1,2,3,4,5,or6)
•CCMode–UsethebroadcastedCCformatorsetyourownstyle(BroadcastorCustomer)
•Customer–BecomesselectableONLYif“CCMode”issetto“Customer”
oCCSize–Selectthesizeofthelettering(Standard,Large,orSmall)
oCCFont–Selectthefonttypeofthelettering(Font0,1,2,3,4,5,6,or7)
oCCOpacity–SelectthefontOpacity(Solid,Flashing,Trnsl,orTrnsp)
oCCColor–ColoroftheCCletters(White,Red,Green,Blue,Yellow,Magenta,Cyan,orBlack)
oEdgeColor–OutlinecoloroftheCCletters(Black,Gray,Red,Green,Blue,Yellow,Navy,orDarkGray)
oEdgeType–EdgestylefortheCCletters(None,Raised,Depressed,Outline,L.Shadow,orR.Shadow)
oBkgrd.Color–BackgroundcoloroftheCC(Black,Gray,Red,Green,Blue,Yellow,Navy,orDarkGray)
oBkgrd.Opacity–Intensityofthebackgroundcolor(Solid,orTrnsl)
ParentalControl–Setapasswordforthemonitor
SystemSettings–Language,time,andscreensizesettings
•Reset–ResetsONLYthedigitaltunertofactorydefaults

10
•TimeSetup–Timesettingsforthedigitaltuner
oClock–Mostofthetime,thisisautomaticallysetbythebroadcastingchannel
oTimeZone–Selectthetimezonetoautomaticallyadjustthebroadcastedtime(Pacific,Mountain,Central,
Eastern,Atlantic,Newfoundland,Samoa,Hawaii,orAlaska)
oDaylightSaving–Selectwhetherornotyouarecurrentlyindaylightsavingstime(YesorNo)
•OSDLanguage–SelectthelanguageoftheOnScreenDisplay(English,Spanish,orFrench)
•AudioLanguage–Selectanalternativebroadcastedlanguageifavailable(English,Spanish,orFrench)
•Format–Setsthescreensize(Normal,Zoom,orFull)
7. HiddenMenuSettings:
EnablingtheDigitalTunerwillslowdowntheprocessofswitchingbetweentheavailableA/Vchannels.VIDEO1toVIDEO2willbe
instant,however,onceyouswitchtotheDigitalTuner,ittakesapproximately5secondsforittoenableitself.Youcannotswitch
backtoVIDEO1tillthisprocesshascompleted.
Beverycautiouswhileusingthismenu.Animpropersettingmaymakeyourmonitorunusableorremovefunctionsthatyouneed
toviewyourAgCam®’s.
Toenterthehiddenmenu:
1. MakesurethemonitorisonVIDEO1orVIDEO2
2. Unplugthemonitor
3. PushandholdtheA/Vbuttononthemonitor
4. Pluginthemonitor
5. ReleasetheA/Vbutton
6. UseCH‐/CH+onthemonitor(upanddownarrowsonremote)toselectanitem.Selecteditemsappearinred.
1. Use‐/+onthemonitor(leftandrightarrowsonremote)tochangethevalueofthehighlighteditem.
2. Makepreferredchanges
3. PressMENUonthemonitortoexittheHiddenMenu
4. Turnthepoweroff,thenbackontoenablethenewsettings
Additionalmenulanguagescanbe
enabledontheleftsideofthe
screen.Asettingof1meansitis
enabled.Asettingof0meansitis
turnedoff.Thetop4optionson
therightsideareforthedifferent
videochannelsavailable.
(DefaultSettingsShown)

11
TV..................AnalogTVTuner
VIDEO1.........VideoinputforAgCam®orRCAadapter(Shouldbesetto1)
VIDEO2.........2ndinputforAgCam®orRCAadapter(Shouldbesetto1)
DVD...............Digitaltuner(Thissettingneedstobe1ifyouwanttowatchdigitalchannelsinyourarea)
DIFSS...........Donotchangethissetting
DIFSOUR......Donotchangethissetting
VCOMDC.......Donotchangethissetting
VCOMAC.......Donotchangethissetting
NEXT.............Gotopage2(PressMENUwhilethisishighlightedtogotothenextpage)
(DefaultSettingsShown)
PMODE........Donotchangethissetting
LOGOS..........setto1ifyouwouldliketoshowalogothatyoudefinebelow
LOGOC........Textcolorofthelogoyoudefinebelow
1=Blue,2=Green,3‐Yellow,4=Red,5=Cyan,6=Yellow,7=White
LOGO:E........Enterthetextyouwouldliketouseasalogo.Thiswillshowuponthescreenwhenyoufirstturnthemonitor
onandwhenthereisnovideo.
(DefaultSettingsShown)
MonitorWarnings:
•Nightvisionwilldisplayblackandwhiteimagesonlyandthecoloradjustmentwillnotaffecttheimage.
•Shuttingoffthemonitordoesnotinterruptcamerapower.Youmustunplugitfromthepowersourcetoterminatepower
tothecameras.Ifhardwiringintovehicle,youmustinstallanON/OFFswitchorwireitintoanaccessoryonposition.

12
7. Specifications
A.Camera:
EffectivePictureElements 510*492
ImagePick‐upDeviceSONY1/3”SuperHADCCDsensor
HorizontalResolution540Horizontallines
MinimumIllumination0.1 LUX@F2.0
S/NRationMorethan48dB
AutoElectronicShutter1/60s~1/100,000s,ON/OFFSwitch‐
able
AutoWhiteBalanceColorTemperature:2500K~9500K
AutoGainControlHigh/LowSwitch‐able
AutoIrisControlVideo‐DriveIrisControl
ScanningSystemInterlace2:1
GammaCharacteristic0.45
LensesFurnishedBoardLens3.6mm/F2.0,Photogray
BodyLens
SynchronousSystemInternal,Negativesync.
BackLightCompensation On/OffSwitch‐able
VideoOutput1Vp‐p/75Ohms.
OperatingTemp.‐45°F~150°F(‐42°C~66°C)
ConstructionAnodizedAluminumCase
WaterproofingcriteriaIP68/69
Dimensions53x58(L)mm(BodyOnly)
B.LCDMonitor:
ScreenSize9”
PowerinputDC12V+/‐/‐10%,1,200ma(2
cameras)
OperatingTemp.23°F~140°F(‐5°C~60°C)
StorageTemp.‐4°F~176°F(‐20°C~+80°C)
DisplayMethodTFTActiveMatrixSystem
Resolution(HxV)960(H)x234(V)=224,640dots
BackLightColdCathodeFilamentTube
ViewingAngleL/R:80°Top:30°Down:10°

13
9.ConsumerLimitedWarranty
DakotaMicroInc.warrantstothefirstconsumerpurchaserthatthisDakotaMicrobrand
productwillbefreefromdefectiveworkmanshipandmaterials,andagreesthatitwill,atits
option,eitherrepairthedefectorreplacethedefectiveProductorpartthereofwithanewor
remanufacturedequivalentatnochargetothepurchaseforpartsorlaborfortheperiodof
two(2)yearsformonitors,quadsandRanchHands,One(1)yearforcablesandallother
accessories.Warrantycoverageforcamerasextendsfortheperiodofthree(3)years.
ThiswarrantydoesnotapplytoanyappearanceitemsoftheProductnortoanyProductthe
exteriorofwhichhasbeendamagedordefaced,whichhasbeensubjectedtoimproper
voltageorothermisuse,abnormalserviceorhandling,orwhichhasbeenalteredormodified
indesignorconstruction.
Inordertoenforcetherightsunderthislimitedwarranty,thepurchasershouldfollowthe
stepssetforthbelowandprovideproofofpurchasetotheservicer.
Neitherthesalespersonnelofthesellernoranyotherpersonisauthorizedtomakeany
warrantiesotherthanthosedescribedherein,ortoextendthedurationofanywarranties
beyondthetimeperioddescribedhereinonbehalfofDakotaMicroInc.
ThewarrantiesdescribedhereinshallbethesoleandexclusivewarrantiesgrantedbyDakota
MicroInc.andshallbethesoleandexclusiveremedyavailabletothepurchaser.Correctionof
defects,inthemannerandfortheperiodoftimedescribedherein,shallconstitutecomplete
fulfillmentofallliabilitiesandresponsibilitiesofDakotaMicrotothepurchaserwithrespectto
theProduct,andshallconstitutefullsatisfactionofallclaims,whetherbasedoncontract,
negligence,strictliabilityorotherwise.InnoeventshallDakotaMicrobeliableorinanyway
responsibleforanydamagesordefectsintheProductwhichwerecausedbyrepairsor
attemptedrepairsperformedbyanyoneotherthanDakotaMicro.NorshallDakotaMicrobe
liableorinanywayresponsibleforanyincidentalorconsequentialeconomicorproperty
damage.Somestatesdonotallowtheexclusionofincidentalorconsequentialdamages,so
thataboveexclusionmaynotapplytoyou.
Anyactionatlaw,suitinequity,orotherjudicialproceedingfortheenforcementofany
warrantyprovidedforhereinorotherwise,shallbeinstitutedonlyintheCourtsoftheStateof
NorthDakota,thelawsofwhichshallgovern.
Thiswarrantygivesyouspecificlegalrightsandyoumayalsohaveotherrights,whichmay
varyfromstatetostate

14
10.Warnings
•Donotlookdirectlyintocamera.Usecarewhentouchingthebodyofthecameraunit,itisnormalforthe
cameratobeheatedupto150°F.
•Toavoidelectricalshockandmaintain,donotopentheenclosures.Highvoltageispresentandthereare
nouserserviceablepartsinside.
•Wheninstallingcameraavoidpointingdirectlyatpaperorflammablematerials.
•Whenmountingcamera,avoidsituationswherethelenswillcomeintocontact(orrub)hardsurfaces.
•Donotuseanychemicalsolvent,cleaningagentorcorrosivedetergenttocleanawaydirtonthesurfaceof
thescreenorlens.Tocleanoffdirtorfingerprintsitisrecommendthatyouuseasoftdampcleaningcloth
orsoftcameralensbrush.
•Ourphoto‐graycameralenseshavebeenmadeimpact‐resistantandhavebeendrop‐balltestedaccording
toSec.3.84,21CRFBUTARENOTUNBREAKABLE.Becausetheyhavebeenhardenedchemically,theyshow
nostresspattern.Inspectyourlensesfrequently.Chippedorscratchedsurfaceswillreduceprotection.
Suchlensesshouldbereplacebythemanufacturer,pleasecontactyourlocaldealershipformore
information.
•Thiscamerausesaspecialcoatedopticlenswithphotochromaticproperties,ifthelensneedstobe
replacedwerequirethatitbereturnedtothefactorytoensurethattheunitwillbesealedproperly.
•Powertocamerasisnotinterruptedbyturningoffmonitor;12vpowersourcemustbeterminatedwhen
notinusetoavoidbatterydrain.Toavoidthisproblembesurewhenhardwiringaunit,useafused
circuit.

15
11.DealerInformation
Dakota Micro, Inc.
1866GO‐AGCAM®
www.AgCam.com
8659148thAve.SE
Cayuga,ND58013
DakotaMicroInc.products,specifications,pricingandprogramsaresubjecttochangewithoutpriornotice.Dakota
MicroInc.reservestherighttomakedesignchangesatanytimewithoutobligationtoretroactivelyinstallthemon
previouslysoldunits.
DateofPurchase:_____________________________________________
SilNb
FAQ’s
This manual suits for next models
3
Table of contents
Other Dakota Micro Automobile Accessories manuals
Popular Automobile Accessories manuals by other brands

ST
ST M95040-125 user manual

Metra Electronics
Metra Electronics 88-00-3302 installation instructions

Directed
Directed Xpresskit DBALL2 installation guide

Whispbar
Whispbar K071W Fitting instructions

Kolpin Outdoors
Kolpin Outdoors 35-5010 Assembly and installation manual

Advantage
Advantage SURE-FIT installation instructions