Danby DCD5505W User manual

0
60’
50’
40’
30’
20’
Max5 Kg
Max 2,5 Kg
R
OO
OOWW
WWNN
NNEE
EERR
RR’’’’ SS
SS MM
MMAA
AANN
NNUU
UUAA
AALL
LL
MM
MMAA
AANN
NNUU
UUEE
EELL
LL DD
DD'''' UU
UUTT
TTIIIILL
LLIIIISS
SSAA
AATT
TTIIIIOO
OONN
NN
MM
MMoo
oodd
ddee
eellll ••
•• MM
MMoo
oodd
ddèè
èèllll ee
ee
DD
DDCC
CCDD
DD55
5555
5500
0055
55WW
WW--
--11
11
SS
SSAA
AAVV
VVEE
EE TT
TTHH
HHEE
EESS
SSEE
EE IIIINN
NNSS
SSTT
TTRR
RRUU
UUCC
CCTT
TTIIIIOO
OONN
NNSS
SS
CC
CCAA
AAUU
UUTT
TTIIIIOO
OONN
NN:::: RR
RRee
eeaa
aadd
dd aa
aann
nndd
dd ff
ffoo
oollll llll oo
ooww
ww aa
aallll llll ss
ssaa
aaff
ffee
eettttyy
yy
rr
rruu
uullll ee
eess
ss aa
aann
nndd
dd oo
oopp
ppee
eerr
rraa
aattttiiii nn
nngg
gg iiii nn
nnss
ssttttrr
rruu
uucc
ccttttiiii oo
oonn
nnss
ss
bb
bbee
eeff
ffoo
oorr
rree
ee ff
ffiiii rr
rrss
sstttt uu
uuss
ssee
ee oo
ooff
ff tttthh
hhiiii ss
ss pp
pprr
rroo
oodd
dduu
uucc
cctttt....
PP
PPRR
RRÉÉ
ÉÉCC
CCAA
AAUU
UUTT
TTIIIIOO
OONN
NN:::: VV
VVee
eeuu
uuiiii llll llll ee
eezz
zz llll iiii rr
rree
ee aa
aattttttttee
eenn
nnttttiiii vv
vvee
ee--
--
mm
mmee
eenn
nntttt llll ee
eess
ss cc
ccoo
oonn
nnss
ssiiii gg
ggnn
nnee
eess
ss dd
ddee
ee ss
sséé
éécc
ccuu
uurr
rriiii ttttéé
éé ee
eetttt llll ee
eess
ss
iiii nn
nnss
ssttttrr
rruu
uucc
ccttttiiii oo
oonn
nnss
ss dd
dd'''' uu
uuttttiiii llll iiii ss
ssaa
aattttiiii oo
oonn
nn aa
aavv
vvaa
aann
nntttt llll '''' uu
uuttttiiii llll iiii --
--
ss
ssaa
aattttiiii oo
oonn
nn iiii nn
nniiii ttttiiii aa
aallll ee
ee dd
ddee
ee cc
ccee
ee pp
pprr
rroo
oodd
dduu
uuiiii tttt....
®
CLOTHES DRYER
Owner’s Manual . . . . . . . . . . . . . . . . . . . . .3-1
•Important Safety Instructions
•Electrical Requirements
•Installation Instructions
•Control Panel Features
•Operation
Manuel d'utilisation . . . . . . . . . . . . . . . . . .17-29
•Importantes Instructions de Sécurité
•Spécifications Électriques
•Instructions d’Installation
•Panneau de Commandes
•Fonctionnement
Danby Products Limited, PO Box 1778, Ontario, Canada N1H 6Z9
Danby Products Inc., PO Box 669, Findlay, Ohio, USA 45839-0669
DCD5505W.07.02

CC
CCLL
LLOO
OOTT
TTHH
HHEE
EESS
SS DD
DDRR
RRYY
YYEE
EERR
RR
LL
LLiiii mm
mmiiii ttttee
eedd
dd PP
PPrr
rroo
oodd
dduu
uucc
cctttt WW
WWaa
aarr
rrrr
rraa
aann
nnttttyy
yy ((((IIIInn
nn--
--HH
HHoo
oomm
mmee
ee SS
SSee
eerr
rrvv
vviiii cc
ccee
ee))))
This quality product is warranted to be free from manufacturer’s defects in material and workmanship, provided that the unit is used under
the normal operating conditions intended by the manufacturer.
This warranty is available only to the person to whom the unit was originally sold by Danby or by an authorized distributor of Danby, and
is non-transferable.
TT
TTEE
EERR
RRMM
MMSS
SS OO
OOFF
FF WW
WWAA
AARR
RRRR
RRAA
AANN
NNTT
TTYY
YY
The limited warranty period listed below is based upon the selection of brand name of product purchased.
Any electrical parts of this product found to be defective will be repaired or replaced, including labour, at warrantor's option for the ORIGI-
NAL purchaser, covering service listed below per product selection. Consumable parts (i.e. light bulbs) are not warranted or guaranteed
for any length of time.
The product warranty coverage is as follows:
Parts and Labour Coverage One (1) Year
Corrosion on Cabinet (No labour after 2nd year) Five (5) Years
Stainless Steel Drum (Parts Only) Lifetime
TT
TTOO
OO OO
OOBB
BBTT
TTAA
AAIIIINN
NN SS
SSEE
EERR
RRVV
VVIIIICC
CCEE
EE
Contact your dealer from whom your unit was purchased, or contact your nearest authorized Danby service depot, where service must be
performed by a qualified service technician. If service is performed on the unit by anyone other than an authorized service depot, or the
unit is used for commercial application, all obligations of Danby under this warranty shall be at an end.
EE
EEXX
XXCC
CCLL
LLUU
UUSS
SSIIIIOO
OONN
NNSS
SS
Save as herein provided, there are no other warranties, conditions, representations or guarantees, express or implied, made or intended
by Danby Products Limited (Canada) or Danby Products Inc. (U.S.A) or its authorized distributors and all other warranties, conditions,
representations or guarantees, including any warranties, conditions, representations or guarantees under any Sale of Goods Act or like
legislation or statute is hereby expressly excluded.
Save as herein provided, Danby Products Limited (Canada) or Danby Products Inc. (U.S.A), shall not be responsible for any damages to
persons or property, including the unit itself, howsoever caused or any consequential damages arising from the malfunction of the unit
and by the purchase of the unit, the purchaser does hereby agree to indemnify and save harmless Danby Products Limited from any
claim for damages to persons or property caused by the unit.
GG
GGEE
EENN
NNEE
EERR
RRAA
AALL
LL PP
PPRR
RROO
OOVV
VVIIIISS
SSIIIIOO
OONN
NNSS
SS
No warranty or insurance herein contained or set out shall apply when damage or repair is caused by any of the following:
11
11)))) Power Failure.
22
22)))) Damage in transit or when moving the appliance.
33
33)))) Improper power supply such as low voltage, defective house wiring or inadequate fuses.
44
44)))) Accident, alteration, abuse or misuse of the appliance such as inadequate air circulation in the room or abnormal operating con-
ditions, (extremely high or low room temperature).
55
55)))) Use for commercial or industrial purposes.
66
66)))) Fire, water damage, theft, war, riot, hostility, acts of God such as hurricanes, floods etc.
77
77)))) Service calls resulting in customer education.
88
88)))) Damage to porcelain tubs due to foreign objects.
Proof of purchase date will be required for warranty claims; so, please retain bill of sale. In the event warranty service is required, pres-
ent this document to our AUTHORIZED SERVICE DEPOT. or contact:
IIIIMM
MMPP
PPOO
OORR
RRTT
TTAA
AANN
NNTT
TT:::: PP
PPllll ee
eeaa
aass
ssee
ee cc
ccoo
oomm
mmpp
ppllll ee
eettttee
ee aa
aann
nndd
dd rr
rree
eettttuu
uurr
rrnn
nn tttthh
hhee
ee ee
eenn
nncc
ccllll oo
ooss
ssee
eedd
dd rr
rree
eegg
ggiiii ss
ssttttrr
rraa
aattttiiii oo
oonn
nn cc
ccaa
aarr
rrdd
dd ww
wwiiii tttthh
hhiiii nn
nn tttthh
hhiiii rr
rrttttyy
yy dd
ddaa
aayy
yyss
ss ff
ffoo
oorr
rr ww
wwaa
aarr
rrrr
rraa
aann
nnttttyy
yy cc
ccoo
oovv
vvee
eerr
rraa
aagg
ggee
ee....
DD
DDaa
aann
nnbb
bbyy
yy PP
PPrr
rroo
oodd
dduu
uucc
ccttttss
ss LL
LLiiii mm
mmiiii ttttee
eedd
dd
PP
PPOO
OO BB
BBoo
ooxx
xx 11
1177
7777
7788
88,,,, GG
GGuu
uuee
eellll pp
pphh
hh,,,, OO
OOnn
nnttttaa
aarr
rriiii oo
oo,,,, CC
CCaa
aann
nnaa
aadd
ddaa
aa NN
NN11
11HH
HH 66
66ZZ
ZZ99
99
TT
TTee
eellll ee
eepp
pphh
hhoo
oonn
nnee
ee:::: ((((55
5511
1199
99)))) 88
8833
3377
77--
--00
0099
9922
2200
00 FF
FFAA
AAXX
XX:::: ((((55
5511
1199
99)))) 88
8833
3377
77--
--00
0044
4444
4499
99
DD
DDaa
aann
nnbb
bbyy
yy PP
PPrr
rroo
oodd
dduu
uucc
ccttttss
ss IIIInn
nncc
cc....
PP
PPOO
OO BB
BBoo
ooxx
xx 66
6666
6699
99,,,, FF
FFiiii nn
nndd
ddllll aa
aayy
yy,,,, OO
OOhh
hhiiii oo
oo,,,, UU
UU.... SS
SS.... AA
AA.... 44
4455
5588
8833
3399
99--
--00
0066
6666
6699
99
TT
TTee
eellll ee
eepp
pphh
hhoo
oonn
nnee
ee:::: ((((44
4411
1199
99)))) 44
4422
2255
55--
--88
8866
6622
2277
77 FF
FFAA
AAXX
XX:::: ((((44
4411
1199
99)))) 44
4422
2255
55--
--88
8866
6622
2299
99
07.02
®

SS
SSÉÉ
ÉÉCC
CCHH
HHEE
EEUU
UUSS
SSEE
EE
GG
GGaa
aarr
rraa
aann
nnttttiiii ee
ee LL
LLiiii mm
mmiiii ttttéé
ééee
ee
((((DD
DDoo
oomm
mmiiii cc
cciiii llll ee
ee))))
Cet appareil de qualité est garantie exempt de tout vice de matière première et de fabrication, s’il est utilisé dans les conditions normales
recommandées par le fabricant.
Cette garantie n’est offerte qu’à l’acheteur initial de l’appareil vendu par Danby ou par l’un des ses distributeurs agréés et elle ne peut
être transférée.
CC
CCOO
OONN
NNDD
DDIIIITT
TTIIIIOO
OONN
NNSS
SS
La période de garantie limitée est basée sur le choix de la marque de fabrique du produit acheté.
Toutes les pièces électriques de cet appareil qui s'avèrent défectueuses seront réparées ou remplacées, y compris la mian-d'oeuvre,
selon le choix du fabricant pour le produit choisi.
La garnatie du produit couvre:
Pièces et main-d'oeuvre Un (1) an
Corrosion du caisson (aucune garantie de main-d'oeuvre après 2 ans) Cinq (5) ans
Cuve en acier inoxydable (Pièces seulement) Garantie à vie
PP
PPOO
OOUU
UURR
RR BB
BBÉÉ
ÉÉNN
NNÉÉ
ÉÉFF
FFIIIICC
CCIIIIEE
EERR
RR DD
DDUU
UU SS
SSEE
EERR
RRVV
VVIIIICC
CCEE
EE SS
SSOO
OOUU
UUSS
SS GG
GGAA
AARR
RRAA
AANN
NNTT
TTIIIIEE
EE
S'adresser au détaillant qui a vendu l'appareil, ou à la station technique agréée de service la plus proche, où les réparations doivent être
effectuées par un technicien qualifié. Si les réparations sont effectuées par quiconque autre que la station de service agréée où à des
fins commerciales, toutes les obligations de Danby en vertu de cette garntie seront nulles et no avenues
EE
EEXX
XXCC
CCLL
LLUU
UUSS
SSIIIIOO
OONN
NNSS
SS
En vertu de la présente, il n’existe aucune autre garantie, condition ou représentation, qu’elle soit exprimée ou tacite, de façon manifeste
ou intentionnelle, par Danby Products Limitée (Canada) ou Danby Products Inc. (E.- U. d’A.) ou ses distributeurs agréés. De même, sont
exclues toutes les autres garanties, conditions ou représentations, y compris les garanties, conditions ou représentations en vertu de
toute loi régissant la vente de produits ou de toute autre législation ou règlement semblables.
En vertu de la présente, Danby Products Limitée (Canada) ou Danby Products Inc. (E.- U. d’A.) ne peut être tenue responsable en cas
de blessures corporelles ou des dégâts matériels, y compris à l’appareil, quelle qu’en soit les causes. Danby ne peut pas être tenue
responsable des dommages indirects dus au fonctionnement défectueux de l’appareil. En achetant l’appareil, l’acheteur accepte de met-
tre à couvert et de dégager Danby Products Limitée de toute responsabilité en cas de réclamation pour toute blessure corporelle ou tout
dégât matériel causé par cet appareil.
CC
CCOO
OONN
NNDD
DDIIIITT
TTIIIIOO
OONN
NNSS
SS GG
GGÉÉ
ÉÉNN
NNÉÉ
ÉÉRR
RRAA
AALL
LLEE
EESS
SS
La garantie ou assurance ci-dessus ne s’applique pas si les dégâts ou réparations sont dus aux cas suivants:
11
11)))) Panne de courant;
22
22)))) Dommage subis pendant le transport ou le déplacement de l’appareil;
33
33)))) Alimentation électrique incorrecte (tension faible, câblage défectueux, fusibles incorrects);
44
44)))) Accident, modification, emploi abusif ou incorrect de l’appareil;
55
55)))) Utilisation dans un but commercial ou industriel;
66
66)))) Incendie, dommage causés par l’eau, vol, guerre, émeute, hostilités, cas de force majeure (ouragan, inondation, etc.);
77
77)))) Visites d’un technicien pour expliquer le fonctionnement de l’appareil au propriétaire.
Une preuve d’achat doit être présentée pour toute demande de réparation sous garantie. Prière de garder le reçu. Pour faire honorer la
garantie, présenter ce document à la station technique agréée ou s’adresser à:
IIIIMM
MMPP
PPOO
OORR
RRTT
TTAA
AANN
NNTT
TTEE
EE:::: PP
PPrr
rriiii èè
èèrr
rree
ee dd
ddee
ee rr
rree
eemm
mmpp
ppllll iiii rr
rr ee
eetttt dd
ddee
ee rr
rree
eenn
nnvv
vvoo
ooyy
yyee
eerr
rr llll aa
aa cc
ccaa
aarr
rrttttee
ee dd
dd'''' ee
eenn
nnrr
rree
eegg
ggiiii ss
ssttttrr
rree
eemm
mmee
eenn
nntttt dd
ddaa
aann
nnss
ss llll ee
eess
ss 33
3300
00 jjjj oo
oouu
uurr
rrss
ss pp
ppoo
oouu
uurr
rr vv
vvaa
aallll iiii dd
ddee
eerr
rr llll aa
aa gg
ggaa
aarr
rraa
aann
nnttttiiii ee
ee....
7/02
DD
DDaa
aann
nnbb
bbyy
yy PP
PPrr
rroo
oodd
dduu
uucc
ccttttss
ss LL
LLiiii mm
mmiiii ttttéé
ééee
ee
CC
CCPP
PP 11
1177
7777
7788
88,,,, GG
GGuu
uuee
eellll pp
pphh
hh,,,, OO
OOnn
nnttttaa
aarr
rriiii oo
oo,,,, CC
CCaa
aann
nnaa
aadd
ddaa
aa NN
NN11
11HH
HH 66
66ZZ
ZZ99
99
TT
TTéé
ééllll éé
éépp
pphh
hhoo
oonn
nnee
ee:::: ((((55
5511
1199
99)))) 88
8833
3377
77--
--00
0099
9922
2200
00 TT
TTéé
ééllll éé
éécc
ccoo
oopp
ppiiii ee
eeuu
uurr
rr:::: ((((55
5511
1199
99)))) 88
8833
3377
77--
--00
0044
4444
4499
99
DD
DDaa
aann
nnbb
bbyy
yy PP
PPrr
rroo
oodd
dduu
uucc
ccttttss
ss IIIInn
nncc
cc....
PP
PPOO
OO BB
BBoo
ooxx
xx 66
6666
6699
99,,,, FF
FFiiii nn
nndd
ddllll aa
aayy
yy,,,, OO
OOhh
hhiiii oo
oo,,,, UU
UU.... SS
SS.... AA
AA.... 44
4455
5588
8833
3399
99--
--00
0066
6666
6699
99
TT
TTee
eellll ee
eepp
pphh
hhoo
oonn
nnee
ee:::: ((((44
4411
1199
99)))) 44
4422
2255
55--
--88
8866
6622
2277
77 FF
FFAA
AAXX
XX:::: ((((44
4411
1199
99)))) 44
4422
2255
55--
--88
8866
6622
2299
99
®

INSTRUCTIONS FOR USE
Instructions for Use 3
Tumble Dryer
Thank you for your trust and for buying our tumble drier. We hope it will successfully
serve its purpose for many years.
This appliance was designed for drying clothes,
for home use only.
IMPORTANT: Please read and follow all
instructions provided inside this manual and
observe all safety rules and operating
instructions before attempting to use this
product. SAVE THESE INSTRUCTIONS:
Before Use ................................................... 4
Important Warnings .................................. 4
Important Safety Instructions................... 5
Positioning and Installation....................... 6
Door ............................................................. 9
Drying................................................... 10-12
Cleaning and Maintenance...................... 13
Trouble Shooting Guide........................... 14

INSTRUCTIONS FOR USE
Instructions for Use
4
Before Use
Wipe the interior of the drum with a soft cloth and
mild liquid detergent. Do not use aggressive
cleaning agent which could damage the surface.
WHEN YOU FIND YOUR APPLIANCE IS OUT
OF USE AND NO LONGER NEEDED, TRY NOT
TO BURDEN THE ENVIRONMENT WITH IT.
CALL THE NEAREST AUTHORIZED
“COLLECTING SERVICE FOR USED
APPLIANCES”.
Useful Hints
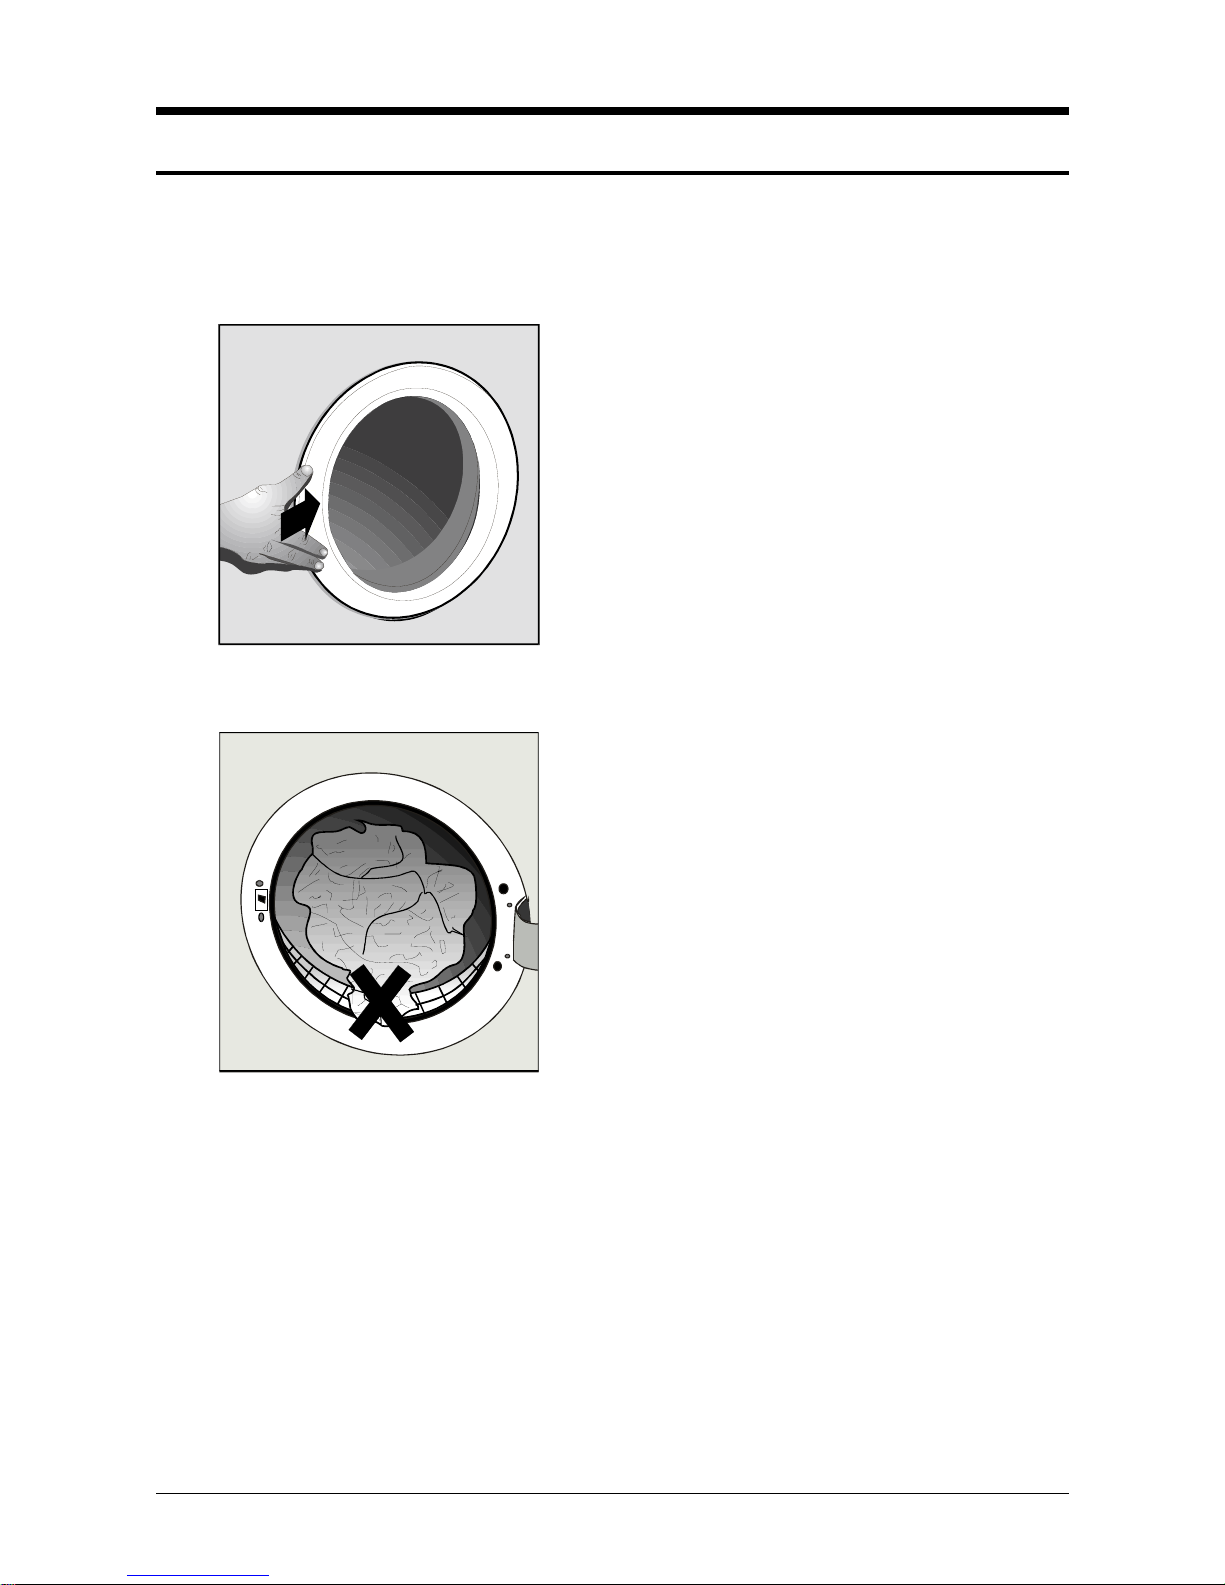
Avoid drying large laundry loads, as this causes
garments to easily crease and dry unevenly. (A
maximum drying load should not exceed 11lbs
dry-weight)
Drying very delicate laundry items such as
woolens and silk garments is not recommended
as they may shrink or lose their shape.
Synthetic curtains, fabrics with metal threads,
nylon stockings, as well as lingerie with prevailing
foam rubber components or rubber-like materials,
should be dried at a low temperature setting
(delicate laundry programs or time setting
programs). Place delicate fabrics in a laundry
sack, when drying together with other laundry.
When drying is finished, immediately remove all
laundry from the dryer to avoid excessive
creasing.
When drying laundry in the dryer, there is no
need to add conditioners. Conditioners are added
only when rinsing synthetics to neutralize static
electricity.
When buying clothes, especially underwear, do
not forget that they may shrink during washing as
well as during drying.
Clothes marked with a "no tumble dry" label, are
not suitable for tumble drying.
Energy consumption when drying laundry is
essentially increased if the spin speed of your
washing machine is set to operate lower than
800 r.p.m.
Important Warnings
•Only laundry washed with water can be dried in
this dryer. Never try to dry laundry washed or
cleaned with any flammable cleaning agents,
(e.g. benzine, trichlor ethylene) as it may cause
an explosion.
•Close supervision of children is always
necessary when any appliance is being used.
Never let children play on or near this
appliance while it is operational.
•Frequent cleaning of the lint filter is necessary
when using a clothes dryer. We recommend
cleaning the filter after each time a load is
finished. (It only takes a couple of seconds)
After cleaning, the lint filter must be reinstalled
back inside the air duct, located in the inner
door panel. Operating the dryer with damaged
filter or without the filter is dangerous and can
cause fire.
•Never let children or pets enter (the drum
of) the dryer
After use always switch the tumble dryer off
and cut the power supply to the appliance.
•All service interventions on the machine should
be left to an expert. Never attempt to service
the dryer yourself. Call an authorized service
agent if your dryer is in need of service. For the
location of the closest service agent in your
area, check the service listing enclosed with
the appliance, or contact the retailer, or contact
the manufacturer direct at 1 800 26 DANBY for
customer service.
•The data plate with all essential (technical)
information about the dryer is located on the
front side of appliance.

INSTRUCTIONS FOR USE
Instructions for Use 5
Important safety instructions
WARNING - To reduce the risk of fire, electric
shock, or injury to persons when using your
appliance, follow basic precautions, including the
following:
1. Read all instructions before using the
appliance.
2. Do not dry articles that have been previously
cleaned in, washed in, soaked in, or spotted
with gasoline, dry-cleaning solvents, or other
flammable or explosive substances, as they
give off vapours that could ignite or explode.
3. Do not allow children to play on or in the
appliance. Close supervision of children is
necessary when the appliance is used near
children.
4. Before the appliance is removed from service
or discarded, remove the door to the drying
compartment.
5. Do not reach into the appliance if the drum is
moving.
6. Do not install or store this appliance where it
will be exposed to the weather.
7. Do not tamper with controls.
8. Do not repair or replace any part of the
appliance or attempt any servicing unless
specifically recommended in the user-
maintenance instructions or in published user-
repair instructions that you understand and
have the skills to carry out.
9. Do not use softeners or product to eliminate
static unless recommended by manufacturer
of the fabric softener or product.
10. Do not use heat to dry containing foam rubber
or similarly textured rubber-like materials.
11. Clean lint screen before or after each load.
12. Keep area around the exhaust opening and
adjacent surrounding areas free from the
accumulation of lint, dust, and dirt.
13. The interior of the appliance and exhaust duct
should cleaned periodically by qualified
service personnel.
14. Do not place items exposed to cooking oils in
your dryer. Item contaminated with cooking
oils may contribute to a chemical reaction that
could cause a load to catch fire.
Save these instructions
GROUNDING INSTRUCTIONS
This appliance must be grounded. In the event of
malfunction or breakdown, grounding will reduce
the risk of electric shock by providing a path of
least resistance for electric current. This
appliance is equipped with a cord having an
equipment-grounding conductor and a grounding
plug. The plug must be plugged into an
appropriate outlet that is properly installed and
grounded in accordance with all local cordes and
ordinances.
WARNING-Improper connection of the
equipment-grounding conductor can result in a
risk of electric shock. Check with a qualified
electrician or serviceman if you are in doubt as to
whether the appliance is properly grounded.
Do not modify the plug provided with the
appliance-if it will not fit the outlet, have a proper
outlet installed by a qualified electrician.

INSTALLATION INSTRUCTIONS
Instructions for Use
6
Positioning and Installation
Your clothes dryer must be placed in a room with
adequate ventilation.
Choosing the Right Place
The most appropriate space is a room with a
window or built-in ventilation fan (Figure 1).
In closed, smaller rooms without adequate
ventilation there is too much moisture in the air,
the drying time is increased and so is energy
consumption.
If during the drying procedure there isn't
adequate ventilation in the room, we recommend
you direct moist air out in the open by means of
vent pipe (Fig. 2).
2
1
Vent pipe can be bought in any local hardware
store.
Positioning
This dryer is a self standing appliance and can
stand alone, or it can be placed either together
with a washing machine or in the kitchen as a
kitchen unit.
If the floor is uneven, use the adjustable feet to
level the machine.
3
3a
Undo the nuts. Rotate the feet to level the
machine (fig. 3).
Lock the nuts (fig. 3a).
• Do not remove the adjustable feet. The
machine must be placed horizontally.
•Do not put the dryer on a thick rug thus
preventing the possibility of air circulation.
Moist Air Outlet
The ventilation opening for venting out humid air,
is located at the rear side of the dryer. Fig. 4-5
(bottom left-hand corner) The ventilation opening
is designed to accept standard 4 inch, flexible or
solid exhaust pipe. (not included with the dryer)
The ventilation exhaust can be purchased at any
local hardware store.
The distance between the dryer and venting
opening (air duct or window) must not exceed 80
inches, otherwise condensation can accumulate
in the tube, (Fig 5).
1 Solid Piping
2 Flexible pipe

INSTALLATION INSTRUCTIONS
Instructions for Use 7
Connecting to power supply
IMPORTANT NOTE: This dryer does not come
complete with an electrical power cord. Electrical
power cord kits must be purchased by the
consumer and are available at most local
hardware stores. Before purchasing a power
cord kit for your dryer, you must first establish
which type of power cord plug is required
(compatible) to fit the electrical receptacle in your
laundary room. i.e. 3 wire - 4 wire. (See Fig. 6)
When purchasing a 3-wire or 4-wire power cord
kit with strain relief, make sure the cord meets
the following requirements:
•UL listed dryer cord kit
•240 V minimum rated
•30 A rated
•type SRD or SRDT
•minimim five feet long
•closed-loop terminals or open-end spade lugs
with upturned ends
This dryer has a pre-installed (rear mount)
external junction box to facilitate easy connection
of the power cord kit with suitable plug.
Fig. 6
Electrical connection
WARNING:
This dryer is manufactured with the cabinet-
ground conductor connected to the
NEUTRAL (center) of the supply cord at the
terminal block.
Only a 4-conductor cord shall be used when
the appliance is installed in a mobile home or
an area where local codes do NOT permit
grounding through the neutral. Use »FOUR-
WIRE CONNECTION« instructions.
Four-wire connection
Junction box
Fig. 7
To connect power cord:
•Remove the screws from the cover of the
junction box located at the top rear of the dryer.
•Loosen/remove the two screws on the strain
relief clamp and remove from 4-wire supply
cord.
•The strain relief splits into two indentical parts.
•Insert the large flange of both sections into the
hole located on the left side of the junction box
housing. The short flange of both sections and
screws must remain positioned on the external
side of the junction box housing.

INSTALLATION INSTRUCTIONS
Instructions for Use
8
•Insert the 4- wire supply cord through both
sections of the strain relief and re-install strain
relief screws, do not fully tighten until electrical
connections are complete.
•Attach the power cord ground conductor (green
wire) to the ground terminal marked with the
ground symbol. Tighten screw until ground
conductor is secure. (See Fig. 7)
•Attach the power cord neutral conductor (white
wire) to the neutral terminal. (marked N)
Tighten screw until neutral conductor is secure.
(See Fig. 7)
•Attach the power cord phase conductor (black
wire) to the phase terminal (marked L3).
Tighten screw until power conductor is secure.
(See Fig. 7)
•Attach the power cord phase conductor (red
wire) to the phase terminal (marked L1).
Tighten screw until power conductor is
secure.(See Fig. 7)
•Tighten the screws on the strain relief so that
the power cord cannot be moved.
•Re-install the cover of the junction box and
secure with four screws removed earlier.
•The dryer is now ready to be connected to the
power supply receptacle.
Three-wire connection
Junction box
Fig. 8
To connect power cord:
•Remove the screws from the cover of the
junction box located at the top rear of the dryer.
•Loosen/remove the two screws on the strain
relief clamp and remove from 3-wire supply
cord.
•The strain relief splits into two indentical parts.
•Insert the large flange of both sections into the
hole located on the left side of the junction box
housing. The short flange of both sections and
screws must remain positioned on the external
side of the junction box housing.
•Insert the 3- wire supply cord through both
sections of the strain relief and re-install the
strain relief screws, do not fully tighten until
electrical connections are complete.
•Attach the power cord ground conductor (green
wire) to the ground terminal marked with the
ground symbol. Tighten screw until ground
conductor is secure. (See Fig. 8)
•Attach the two remaining power cord phase
conductors ( left = black wire and right = red
wire ) to the phase terminals (marked L3 & L1).
Tighten screws so that the power conductors
are secure. (See Fig. 8)
•Tighten the screws on the strain relief so that
the power cord cannot be moved.
•Re-install the cover of the junction box and
secure with four screws removed earlier.
•The dryer is now ready to be connected to the
power supply receptacle.
Note:
The receptacle should be located so that the plug
and receptacle will be accessible with the dryer in
its installed position.
Additional Grounding Procedure
Some local codes may require a separate
ground. In such cases, the required accessory
ground wire, clamp and screw must be
purchased separately.
Never ground the dryer to plastic plumbing lines,
gas lines or hot water pipes.

INSTALLATION INSTRUCTIONS
Instructions for Use 9
Door
Door of the dryer can be opened by pressing the
door frame against the machine, as shown in the
figure.
The door is closed in the same way, If the door is
not closed properly the machine will not operate.
Be careful not to pinch the laundry with the door
as it might get damaged.
IMPORTANT
•The door may be opened during the drying
process. The program is interrupted and is
resumed as soon as the door is closed again
and the START button is pressed.

OPERATING INSTRUCTIONS
Instructions for Use
10
Drying
Drying program selection elements are set in the
control panel as well as the indicator light which
is on during the operation of the machine.
Preparing the Laundry for
Drying
•Sort the laundry before drying according to type
of the laundry.
•Fasten buttons, zippers, tie loose strings and
turn pockets inside out.
•Very delicate laundry (fine underwear with
laces) should prior to drying be put in a special
sack so that it won't get damaged by buttons,
zippers and pins.
•We recommend loading the drum with items of
different size. Larger pieces of laundry can get
tucked during drying. So we recommend you
take them out, shake them and then put them
back.
•When drying large sheets (bed sheets, table
cloths) put 2 to 3 pieces for one load and when
drying delicate smaller items (shirts, blouses)
fill only 5 to 6 pieces for one load (max 4,5 lbs).
•Never put dripping wet laundry inside the dryer.
(electrical hazard)
•Most clothes nowadays have labels marked
with recommended drying mode.
DRYING
Drying in tumble drier allowed
Wring, hang on clothes line and dry
No wringing, drip dry
Wring, dry flat
Drying in tumble drier not allowed
Drying at normal temperature
Drying at lower temperature
ON – OFF button
The appliance is switched on and off by pushing
the ON/OFF button.
Signal lamp operation
Signal lamp illuminates when the appliance is in
operation.
Prior drying
•Switch the dryer on by pressing the ON/OFF
button.
•Before first selecting a drying program, set the
program selector knob to the STOP/0 position.
(for 1 second)
•Set the program selector knob to the desired
drying program. The signal lamp, adjacent to
the selected program will illuminate. (except
when using timed dry programs)
•Press the "START" button to start the program.
The beginning of operation is signaled by a
beep. The program signal light goes off and
actual humidity level indicator light turns on.
•If you wish to change the selected drying
program after the machine has been put into
operation, set the program selector knob back
to the STOP/0 position. (for 1 second) You may
select any desired drying program, and start it
by pressing the START button. In case this
procedure is not performed, the machine will
continue executing the originally selected
program, notwithstanding the position of the
program selector.
•If the preceding program has been completed
(indicator light END and ANTI-CREASE signal
light will illuminate), you may select a new
program and start it with the START button. It
is not necessary to set the program selection
button to the STOP/0 position.
Drying program selection button
The appropriate program is selected by operating
the program selector knob, which may be turned
in either direction. There is a basic choice of
three drying groups:
Regular laundry (5 programs), with
automatic moisture measuring
Delicate laundry (4 programs) with
automatic moisture measuring
Preset (timed) drying for both resistant and
delicate laundry

OPERATING INSTRUCTIONS
Instructions for Use 11
The drying temperature is selected automatically
by the selection of the drying program, and it is
lower for delicate laundry than for the resistant
one. During the drying program with preset time
the temperature is the same for both the delicate
and resistant laundry.
Drying stage indicator
Damp for machine ironing
Damp for ironing
Mildly damp
Dry for storage
Very dry
Anti crease
End
The drying stage indicator displays the actual
drying stage at any given moment. This is
signaled by the indicator light, illuminated
adjacent to a particular drying stage symbol. The
end of drying is signaled by the indicator light
END or ANTI-CREASE.
START button
This button starts the operation of the appliance.
In case of program interruption (open door,
voltage failure, condensation receptacle full), it
serves to continue the actual program, after the
cause for interruption had been removed.
Drying
Drying time depends upon the selected program
and the quantity of laundry. If you selected time
defined drying the machine stops upon the expiry
of set time. If you selected any of the programs
for automatic determination of moisture, drying
time will largely depend upon the quantity of
laundry and the extent of moisture present in the
laundry (after the final spin stage of the wash
program).
Actual stage of moisture during the program is
indicated by the moisture stage display, so you
may remove particular pieces of clothing you
wish to remain damp at any time during the
program. When you open the door (add or
remove pieces of laundry) the drying program
stops automatically and the drum interior is
illuminated. When you close the door the light
goes off and the program continues by pressing
the START button.
In case of a power failure during a selected
program, the drying operation stops. When the
power is reinstated, you must to press the
START button to continue the program.
Each program concludes with a 10 minute
cooling down period, to prevent extracting hot
laundry from the appliance and to improve the
anti-crease function.
Drying programs are complete when the signal
beep sounds and the indicator light “END” and
“ANTI-CREASE” illuminate at the end of the
program. This indicates that the laundry is dried
to the point of the preset moisture stage, or the
preset drying time has expired. The drum stops
and laundry may be removed from the machine.
NOTE: If the laundry is not removed immediately
after the drying cycle is completed, (and the
machine is not switched off) the dryer will
automatically start a special anti crease program.
ANTI-CREASE PROGRAM: Consist of:
•5 minute “OFF” (dormant) cycle
•5 second “ON” tumbling cycle (ho heat)
This program helps to prevent laundry from
sitting idle in the same position and helps to
reduce creasing/wrinkling. The “anti-crease”
program stops automatically after one hour of
operation, but may be interrupted at any time by
opening the door or turning the appliance off.
After drying
•Open the dryer door. Remove and clean the lint
filter. If the filter is not cleaned regularly, the air
circulation is obstructed. This obstruction will
increase the drying time and may cause the
unit to overheat and fail.
•Reinsert the filter.
•Remove laundry from the drum.
•Close the door and disconnect the power
supply.

OPERATING INSTRUCTIONS
Instructions for Use
12
The program chart
Program Type of laundry Example of laundry
White/colored regular laundry
(1)
loading: 11 lbs
Very dry Thick or multi-layer laundry
requiring to be dried out
Terry cloth, bath robes,
etc.
Dry for storage Equally thick laundry, not
requiring ironing
Terry cloth, knitted wear
Mildly damp Thin laundry, needing
ironing
Knitted wear laundry, thin cotton
T-shirts
Damp for ironing Cotton or flax, normally thick Bed linen, table cloth, etc.
Damp for machine ironing Cotton or flax for machine ironing Bed linen, table cloth, etc.
Synthetic and mixed fabric laundry, improved laundry
(1)
loading: 4,5 lbs
Very dry Thick or multi-layer laundry need to
be dried out
Pullovers, suits, blankets
Dry for storage Thin laundry, not needing
ironing
Shirts, blouses, bed linen, socks,
children clothes, etc.
Mildly damp Thin laundry, needing
ironing
Knitted wear, T-shirts, table cloth,
etc.
Damp for ironing Laundry, needing ironing Shirts, blouses, bed linen, table
cloth, etc.
(2)
Preset timed programs (1)
loading: 11 lbs
20 to 60 minutes Single pieces of thick laundry,
requiring to be dried out
Bath robes, bathing towels,
pullovers, small quantity of
laundry (up to 0,5 lbs),etc.
Airing of laundry
Cold air – 10 minutes Laundry needing to be aired, or
straightening of mildly creased
clothes
(1) weight of dry laundry;
(2) drying temperature is lower, like for the mixed laundry programs.
Economic use of the dryer
Time and energy will be saved with your dryer, if
the following is considered:
•spin the laundry as much as possible – the
higher the number of spin revolutions the
shorter the drying time, the lower the energy
consumption;
•by setting the adequate drying temperature,
over-drying of laundry can be avoided and
consequently difficult ironing;
•Always load the dryer maximally as this is the
most economical. At the same time you can dry
the laundry for “dry, ready to be stored” and
“moist for ironing” by taking the latter out when
it is still adequately moist for ironing;
•By regular cleaning of the filter an optimum
drying time with minimum energy consumption
can be ensured.
•Dryer consumption when used at a lower
electric power rate can save additional energy
cost.

USER-MAINTENANCE INSTRUCTIONS
Instructions for Use 13
Cleaning and Maintenance
Before cleaning, always disconnect the appliance
from power supply.
Exterior Cabinet
Wipe the cabinet with a soft wet cloth and mild
cleaning agent. Do not use aggressive cleaning
agents which could damage the paint surface.
Cleaning dryer
If your drier is installed in a room with poor air
circulation or if operates daily, dust deposits will
accumulate in the interior bottom of the appliance
and in the ventilation exhaust pipe. This
accumulation of dust can lead dryer
malfunctions. So once a year, clean the dust in
the interior of the drier with a damp cloth and
check the exhaust ventilation for blockage.
Cleaning procedure
−Disconnect the dryer from the power supply.
−Undo the screws and remove the cover (B).
−Clean (with a vacuum cleaner) the bottom of
the drier and parts on the bottom.
−Reinsert the cover in reverse order.
Lint Filter
After each drying cycle, remove the lint filter trap
located inside the inner door and gently wipe
over the filter with a soft cloth or soft brush to
remove any accumulated lint. Clean the filter
cabinet as well.
The lint filter can also be cleaned under running
water; however, it must be thoroughly dried
before being replaced.
NOTE
The accumulation of lint on the lint filter is a
consequence of normal (wear and tear)
laundering and has nothing to do with drying in
the machine.

USER-MAINTENANCE INSTRUCTIONS
Instructions for Use
14
Trouble Shooting Guide
Some problems are minor in nature and can be
easily resolved without having to call for service.
The following guide list some of the problems you
should check before calling for service.
If you are unable to resolve the problem after
checking this guide, call our Toll Free Number (I
800 26 DANBY) and ask for assistance.
Malfunction Check the following:
The machine doesn't
operate:
−Check the supply in the outlet socket and the fuse.
−Make sure the cable cord is correctly plugged into the socket.
The socket is energized, but
the drum doesn't rotate:
−Is the door correctly closed (if not, push them towards the
machine).
−if the program is started by pressing the START button;
−if the correct drying time is set, or if appropriate program is
selected.
Wet laundry:
−Is the fluff filter clean?
−Is the amount of loaded laundry too large?
−Is the vent pipe too long?
−if the laundry loaded into the appliance had been dried enough,
or if the appropriate program has been selected.
Laundry not uniformly dried: −Is the amount of loaded laundry too large?
−Does the load consist of only large pieces of laundry (always load
smaller and larger pieces together).
−Does the load consist of laundry made of different materials
(always load clothes made of similar fabrics).
After you have considered all the above stated
instructions and the problem still cannot be
eliminated. Please call the nearest Danby
authorized service agent or call our Toll Free
Number (1 800 26 DANBY) and ask for customer
assistance.
Any claim or malfunction caused by improper
installation or misuse is not covered by the
manufactures warranty. All repair costs shall be
covered by the user.
WE RESERVE THE RIGHT FOR MODIFICATIONS
WITH NO INFLUENCE ON THE OPERATION OF
THE APPLIANCE.
THIS INSTRUCTION MANUAL CANNOT BE A
REASON FOR A COMPLAINT.

Mode d'emploi 17
Sèche-linge à tambour
Nous vous remercions vivement de la confiance que vous nous avez témoignée en achetant
un sèche-linge de notre marque. Nous espérons qu'il vous donnera entière satisfaction
durant de longues années.
Cet appareil, destiné au séchage du linge, est
conçu exclusivement pour un usage domestique.
IMPORTANT : Nous vous invitons à lire
attentivement tous les conseils contenus dans
ce mode d'emploi avant d’utiliser votre nouvel
appareil et à toujours observer les
instructions de fonctionnement et les
consignes de sécurité. CONSERVEZ CE
MANUEL.
Avant la mise en service........................... 18
Important !................................................ 18
Consignes de sécurité importantes ......... 19
Emplacement et installation.................... 20
Le hublot ................................................... 23
Séchage ...................................................... 24
Nettoyage et entretien .............................. 27
Dépannage................................................. 28

Mode d'emploi
18
Avant la mise en service
Essuyez l’intérieur du tambour avec un chiffon
doux et un détergent liquide léger. N’utilisez pas
de produits agressifs qui pourraient endommager
sa surface.
LORSQUE VOUS NE VOUS SERVIREZ PLUS
DE VOTRE MACHINE ET QUE VOUS
VOUDREZ VOUS EN DEBARRASSER, EVITEZ
QU'ELLE N'ENCOMBRE L'ENVIRONNEMENT.
REMETTEZ-LA AUX ORGANISMES HABILITES
POUR LA COLLECTE DES APPAREILS
MENAGERS "USAGES".
Conseils utiles
Évitez de mettre trop de linge dans l’appareil car
il se froisserait et ne serait pas uniformément
sec. (La charge maximale ne doit pas excéder
11lbs de linge sec).
Il n’est pas recommandé de faire sécher dans
l’appareil les lainages ou soiries, car ils
risqueraient de rétrécir ou de se déformer.
Les voilages en synthétique, les vêtements
contenant des fils métalliques, les bas nylon, la
lingerie comportant du caoutchouc ou des
matières équivalentes doivent être séchés à
faible température (programme linge délicat ou
programme avec réglage de la durée e séchage).
Si vous faites sécher du linge délicat avec
d’autres pièces plus résistantes, mettez-le dans
une housse spéciale. Lorsque le séchage est
terminé, retirez immédiatement tout le linge afin
d’éviter qu’il ne se froisse trop.
Lorsque vous utilisez votre sèche-linge, il est
inutile d’ajouter un produit de traitement. Ces
produits doivent être employés exclusivement
lors du rinçage des synthétiques pour neutraliser
l’électricité statique.
Quand vous achetez des vêtements, et en
particulier des sous-vêtements, pensez qu’ils
peuvent rétrécir au lavage et au séchage. Les
articles portant l’étiquette « ne pas faire sécher
dans un sèche-linge » ne doivent pas être mis à
sécher dans votre appareil.
Vous augmenterez la consommation électrique
lors du séchage si vous essorez votre linge dans
votre machine à laver à une vitesse inférieure à
800 tours/min.
Important !
•Seul le linge lavé à l’eau peut être séché dans
le sèche-linge. Ne mettez jamais dans votre
sèche-linge des vêtements nettoyés avec des
solvants inflammables (par exemple benzine,
tricloréthylène), il y aurait un risque d’explosion.
•Il est conseillé de surveiller attentivement les
enfants lors du fonctionnement d’un appareil
ménager. Ne laissez jamais les enfants jouer à
proximité de cet appareil au cours de son
utilisation.
•Il est nécessaire de nettoyer fréquemment le
filtre à peluches du sèche-linge. Nous
conseillons de nettoyer ce filtre après chaque
utilisation. (Cela ne prend que quelques
secondes) Après nettoyage, le filtre à peluches
doit être replacé dans le conduit à air, situé à
l’intérieur, dans le panneau de la porte. Il est
dangereux d’utiliser le sèche-linge sans filtre ou
avec un filtre endommagé ; cela peut
provoquer un incendie.
•Ne laissez jamais les enfants ou les
animaux domestiques pénétrer dans le
tambour du sèche-linge.
Éteignez toujours le sèche-linge après
utilisation et coupez l’alimentation électrique de
l’appareil.
•La maintenance de l’appareil doit toujours être
effectuée par un professionnel. N’essayez
jamais de réparer le sèche-linge vous-même.
Si votre appareil a besoin de réparations,
appelez un professionnel agréé. Pour trouver le
prestataire de services le plus proche de chez
vous, veuillez consulter la liste des
professionnels jointe à l’appareil ou contactez
votre revendeur. Vous pouvez également
appeler directement le service après-vente du
fabricant au 1 800 26 DANBY
•La plaque signalétique comportant les
caractéristiques principales du sèche-linge se
trouve sur la face avant de l'appareil.

Mode d'emploi 19
Consignes de sécurité importantes
ATTENTION – Afin de réduire les risques
d’incendie, d’électrocution et d’accidents
corporels lors de l’utilisation de votre appareil,
veuillez prendre les précautions élémentaires de
sécurité et respecter les consignes suivantes :
1. Avant l'utilisation lisez l'entière notice
d'utilisation.
2. Ne faites pas sécher dans l'appareil des
vêtements qui ont été nettoyés, mouillés ou
arrosés auparavant avec de l'essence, des
solvants pour le nettoyage à sec ou autres
nettoyants inflammables car les vapeurs
peuvent s'enflammer ou même exploser.
3. Ne permettez pas aux enfants de se jouer sur
ou dans l'appareil. Quand les enfants se
trouvent au voisinage de l'appareil en service,
il faut les surveiller avec une attention
extraordinaire.
4. Lorsque vous n'utilisez plus votre sèche-linge
et désirez vous en débarrasser, démontez le
hublot.
5. Ne restez pas à proximité du seche-linge
pendant son fonctionnement.
6. N'installez ou ne mettez pas l'appareil aux
endroits qui sont exposés aux influences de
temps.
7. Ne jouez pas avec les manettes de
commande.
8. Ne dépannez ou remplacez aucune pièce de
l'appareil par vous-mêmes et ne faites aucune
maintenance sauf si cela est expressément
conseillé dans la notice de maintenance pour
l'utilisateur ou dans la notice publiée des
réparations lesquelles peuvent être faites par
l'utilisateur qui les comprend et peut les faire
appliquer.
9. Lors du lavage précédant le séchage dans
l'appareil, n'utilisez pas d'assouplissants ni de
produits similaires pour neutraliser l'électricité
statique sauf s'ils sont recommandés par le
fabricant des textiles ou vêtements.
10. N'utilisez pas le sèche-linge pour sécher du
linge ou des objet contenant du caoutchouc
mousse ou autres matériaux similaires.
11. Avant et après chaque séchage, débarrassez
le filtre des fibres recueillies.
12. Enlevez régulièrement les fibres, la poussière
et les saletés qui s'accumulent dans l'orifice
d'aération et à proximité.
13. L'intérieur de l'appareil et le conduit d'aération
doivent être nettoyés de temps en temps par
un professionnel du service après-vente.
14. N'introduisez dans le sèche-linge ni textiles ni
objets comportant des traces d'huile de table
car cela pourrait entraîner une réaction
chimique capable d'enflammer le contenu de
l'appareil.
Conservez ces consignes
CONSIGNES POUR LA MISE A LA TERRE
Cet appareil doit être branché à une prise de
terre. En cas de panne ou de fonctionnement
défectueux, le branchement à une prise de terre
réduira les risques d’électrocution en fournissant
un chemin de moindre résistance au courant
électrique. Cet appareil est muni d’un câble de
raccordement à la terre et d’une prise de terre
mâle. Cette prise doit être branchée sur une
prise femelle appropriée, correctement installée
et reliée à la terre, conformément à la
réglementation en vigueur.
ATTENTION – Il y a risques d’électrocution en
cas de raccordement inadéquat du câble à la
terre. Veuillez faire contrôler la mise à la terre de
votre installation électrique par un électricien
qualifié ou un prestataire de service agréé.
Ne modifiez pas la prise fournie avec l’appareil si
elle ne s’adapte pas à votre installation. Faites
installer une prise femelle adéquate par un
électricien qualifié.

Mode d'emploi
20
Emplacement et installation
Votre sèche-linge doit être placé dans un local
suffisamment aéré.
Choisir le bon emplacement
L’endroit le plus approprié est une pièce
disposant d’une fenêtre ou d’un ventilateur.
(Figure 1)
Dans des pièces petites et fermées, ne disposant
pas d’une aération suffisante, l’humidité
ambiante augmente la durée du séchage et, par
conséquent, la consommation d’électricité.
Si la ventilation de la pièce est insuffisante en
cours de séchage, nous conseillons d’ évacuer
l’humidité à l’extérieur au moyen d’un tuyau (Fig.
2)
2
1
On peut trouver des tuyaux d’évacuation dans
toutes les quincailleries.
Emplacement
Ce sèche-linge est un appareil en pose libre et
peut être installé seul, placé près de la machine
à laver ou intégré à la cuisine.
Si le sol n’est pas plan, mettez l’appareil à niveau
à l’aide des pieds réglables.
3
3a
Dévissez les écrous. Faites tourner les pieds
pour mettre la machine à niveau. (Fig. 3)
Revissez les écrous. (Fig. 3a)
• Ne retirez pas les pieds réglables. L’appareil
doit être placé à l’horizontale.
•N’installez pas le sèche-linge sur une moquette
épaisse afin de ne pas gêner la circulation de
l’air.
Évacuation de l’air humide
L’ouverture pour l’évacuation de l’air humide est
située à l’arrière (en bas, à gauche) du sèche-
linge. (Fig. 4-5) Cette ouverture est conçue pour
accepter un tuyau d’évacuation d’air flexible ou
rigide standard, de 4 inch. Ce tuyau n’est pas
fourni avec le sèche-linge, on peut s’en procurer
dans toutes les quincailleries.
La distance entre le sèche-linge et la fenêtre ou
la conduite d’air ne doit pas excéder 80 inches,
sinon la condensation risque de s’accumuler
dans le tuyau. (Fig. 5)
1 Tuyau rigide
2 Tuyau flexible

Mode d'emploi 21
Connexion au secteur
IMPORTANT: ce sèche linge n'est pas livré avec
un cordon secteur. L'utilisateur devra se procurer
un kit de connexion au secteur, disponible dans
la plupart des quincailleries. Avant d'acheter le kit
de connexion pour votre sèche-linge, vous
devrez déterminer quel type de fiche raccordée
au câble est compatible avec la prise secteur de
votre buanderie, par exemple 3 fils ou 4 fils (voir
fig. 6).
Lorsque vous achèterez votre kit de connexion 3
ou 4 fils avec serre-câble, veillez à ce qu’il ait les
caractéristiques suivantes :
Kit de connexion sèche-linge certifié UL
•240 V minimum
•30 A
•type SRD ou SRDT
•minimum 5 pieds de long
•terminaisons avec cosses fermées (à œil) ou
ouvertes (à fourches à extrémités recourbées)
Ce sèche-linge a été équipé d’une boîte de
jonction externe sur le panneau arrière afin de
faciliter la connexion du câble d’alimentation
pourvu de la fiche convenable.
Fig. 6
Raccordement électrique
ATTENTION
Ce sèche-linge est livré avec une mise à la
terre raccordée au NEUTRE (centre) à
l’extrémité du cordon secteur.
Seul un câble 4 fils pourra être utilisé si
l’appareil est installé dans un mobile home ou
si la réglementation locale ne permet pas une
mise à la terre par le neutre. Veuillez suivre
dans ce cas les instructions concernant le
RACCORDEMENT PAR UN CABLE 4 FILS.
Raccordement par un câble 4 fils
Boîte de jonction
Fig. 7
Pour raccorder le cordon secteur
•Retirez les vis du couvercle de la boîte de
jonction située en haut du panneau arrière du
sèche linge.
•Desserrez/retirez les 2 vis du serre-câble et
enlevez-le du cordon secteur 4 fils.
•Le serre-câble se divise en 2 parties
identiques.
•Insérez le grand côté des 2 parties dans le trou
situé sur le côté gauche du logement de la
boîte de jonction. Le petit côté des 2 parties et
les vis doivent rester positionnées sur la face
externe du logement de la boîte de jonction.
This manual suits for next models
1
Table of contents
Languages:
Other Danby Dryer manuals
Popular Dryer manuals by other brands

Whirlpool
Whirlpool HFCX80410 Health & Safety, Use & Care, Installation Guide and Online Warranty Registration Information

Hyco
Hyco CYCA26F Operating instructions and parts manual

LG
LG VD-H9066WS owner's manual

Dyson
Dyson ab08 installation guide

Defy
Defy DTD 297 user manual

LG
LG TD-V10150EM owner's manual