manuals.online logo
Brands
  1. Home
  2. •
  3. Brands
  4. •
  5. Dancing Wings Hobby
  6. •
  7. Tools
  8. •
  9. Dancing Wings Hobby Eagle II User manual

Dancing Wings Hobby Eagle II User manual


E19

散件 KIT
EPP Airplane
工具
Tools Needed
飞行参数
Specification
翼展: 1430mm
机长: 760mm
起飞重量≈550-580g
Wingspan: 1430mm
Length: 760mm
Flying Weight≈550-580g
推荐配置
Suggested Equipment
推荐马达: 2212-2216 900-1300kv
推荐电调: 20-30A
推荐舵机: 9g*4
推荐桨叶: 8-10 inch
推荐电池: 3S 1800-2200mAh
通道≥4CH
Suggested Motor: 2212-2216
900-1300kv
Suggested ESC: 20-30A
Suggested Servos: 9g*4pcs
Suggested Propeller: 8-10 inch
Suggested Battery: 3S 1800-2200mAh
Radio≥4CH
● 这个产品不是玩具,而是一个复杂的具有难度的飞行器。您和您身边人的安全取决于您如何操作它,您需要了解相关知识,并谨慎操作。禁止
没有成人陪伴的儿童独自操作该设备。不适合14岁以下人群使用。再次强调,这不是一个玩具。
● This product should not be considered a toy, but rather a complicated and sophisticated flying model. Your safety depends
on how you use and fly it, If not correctly operated, could cause injury to you or your family members. Children must be
accompanied by an adult at all times if operating this product. Not suitable for children under the age of 14. THIS IS NOT A
TOY.
● 不要在机场,军事基地,居民区或其他任何受限制的地方飞行。
● Do not fly around some restricted location like airports, military bases, residential areas, etc.
● 您需要对发射机进行距离检查,以确保没有收到任何干扰。
● You will need to range check the transmitter to be sure you are not experiencing any interference.
● 始终保持先打开发射机后打开接收机,先关闭接收机后关闭发射机的步骤。
● Always turn on the receiver last after turning on the transmitter and shut off the receiver first before turning off the transmitter.
● 如果您是初学者,建议您在有经验玩家的协助下调试和飞行。
● If you are only a beginner to the radio control model flying, do not attempt to fly your model without any assistance or advice from
advanced expert fliers.
● 请将相关物品放置在孩子们够不到的地方
● Keep relevant items out of reach of children.
● 这个设备的设计已经超过我们正常使用所需要刚性要求,但若您需要以超出我们推荐的动力飞行时,请合理控制动作幅度并适当增加机体强度。
● This product has been flight tested to meet or exceed our rigid performance and reliability standards in normal use,if you plan to perform
any high-stress flying, you are solely responsible for taking any and all necessary steps to control movement range and reinforce the body
strength.
● 您的设备中可能包括一些玻纤和碳纤雕刻的部件,这些纤维部件所带的粉尘可能会引起眼睛,皮肤的不适,请您在需要的时候带上护目镜或者防尘服。
● This product may include some fiberglass and carbon-fiber reinforced plastic parts,which may cause eye and skin discomfort,pls wear the
goggles or dust-proof clothes when needed.
● 因航空运输安全管制,您收到的产品可能没有清单中出现过的胶水,请您理解无法发送胶水给您的原因。您可以在当地文具店很方便的购买到您所需要
的胶水。
● Due to air traffic safety control, the products you receive may not have the glue that appears in the list. Please understand and purchase the
glue you need at your local stationery store.
注意事项
SAFETY PRECAUTIONS
http://www.dwhobby.com/
A1-3:机翼部件 B1-B4:机身部件 C:尾翼 D1-D4:木件 E:碳片
F:三角木 G:圆木杆 H:桨叶 I:钢丝连杆 J:魔术胶带 K:舵角 L:塑料夹
M:快装接头 N1:长螺丝 N2:爪牙螺母 N3:短螺丝 O:橡皮筋
散件
KIT
A1
A1
A2
B1 B1
B2
C
D1
D1
D2 D3 D4
E
EF
G
HII
C
B3 B4
A3
JK
LM
N1 N2 N3
O
A1-3:Wing parts B1-B4:Fuselage parts C:Tail Wing D1-D4:Wood pieces
E:Carbon pieces F:Triangle wood G:Round Wooden rods H:Propeller
I:Steel wire linkage J:Magic tape K:servo horns L:Plastic clips
M:EZ-Connector N1:Long screws N2:Claw nuts N3:Short screws
O:Rubber band
配件图仅做参考用,您收到的实物可能因为修改/优化的原因导致与图片有略有不同。
Photos shown here just for reference, the product you received maybe slightly
differ from the photos due to continuous improvement on products.
02 机身组装Assemble the Fuselage
机翼组装 Assemble the Wing
01
注意:各部件结合处用泡沫胶粘合。
Note: the joints of the parts are bonded with foam glue.
03 安装尾翼 Assemble tail wing
1
GLUE
01-1 01-2
01-3
GLUE GLUE
01-4
GLUE
GLUE
A1 A1 A1
A2
GLUE
D1
D1
对齐 Aligned对齐 Aligned
D4
注意朝向
Pay attention to
the direction
D2×2
D2×2
N2 爪牙螺母 Claw nut
B2
B3
B4
GLUE
GLUE
GLUE
GLUE
GLUE
F
C
01-6 01-7
A3
GLUE
在机翼对接处涂抹胶水,然后
把两片机翼粘合在一起。反面
的预留槽线对齐。
Apply glue to the wing
docking and then bond the
two wings together. The
reverse reserved slot lines
must be aligned.
把粘合好的机翼反转到反面,在预留槽内嵌入碳片,用胶水粘牢固。
Reverse the bonded wing to the reverse side, insert the carbon
sheets in the reserved groove, and glue it firmly with glue.
翻转到机翼正面,在上图位置粘贴碳片。
Flip to the front of the wing and attach the
carbon sheet to the position above.
在机翼两端粘贴翼尖,然后翻转到背面,用美工刀切掉翼尖多余部分。
Apply the wing tips to both ends of the wing, then flip it to the
back and use the knife to cut off the spare part of the wing tips.
在机身侧板上粘贴木件D1,粘
贴时,木件的圆孔对准机身侧板
的圆孔。
Attach the wooden piece D1
to the side panel of the
fuselage. When pasting, the
round holes of the wooden
piece are aligned with the
round holes of the side panel
of the fuselage.
把粘好的两侧机身通过D4粘合在一起。
木件用快干胶粘合。
Paste together the both bonded sides
of fuselage through D4,the wood
pieces are bonded with quick-drying
glue.
在机身头部粘贴马达防火板,注意装有螺
母一面朝机身内。防火板2片粘在一起,
并装爪牙螺母。
Attach the motor firewall to the head
of the fuselage, pay attention to the
nut side facing the inner of the
fuselage. The two pieces of the
firewall are glued together and the
claw nut is installed.
粘贴B2在机身底部。
Paste the B2 at the bottom of the
fuselage.
粘贴B3,B4在机身顶部。
Paste B3, B4 at the top of the fuselage.
在尾翼预留槽内嵌入碳片,用胶水粘固。
Insert a carbon sheet in the reserved groove of
the tail and glue it with glue.
在机身尾部粘贴三角木(如上图所示)。
Paste the triangle wood at the end of the
fuselage (as shown above).
01-5
02-1
02-2
02-3
02-4
02-5
03-1 03-2
04 舵机,舵角及连杆 Servo,Servo horn and Linkages
07 安装电子设备 调整重心
Install the electronic equipment
Adjust the center of gravity
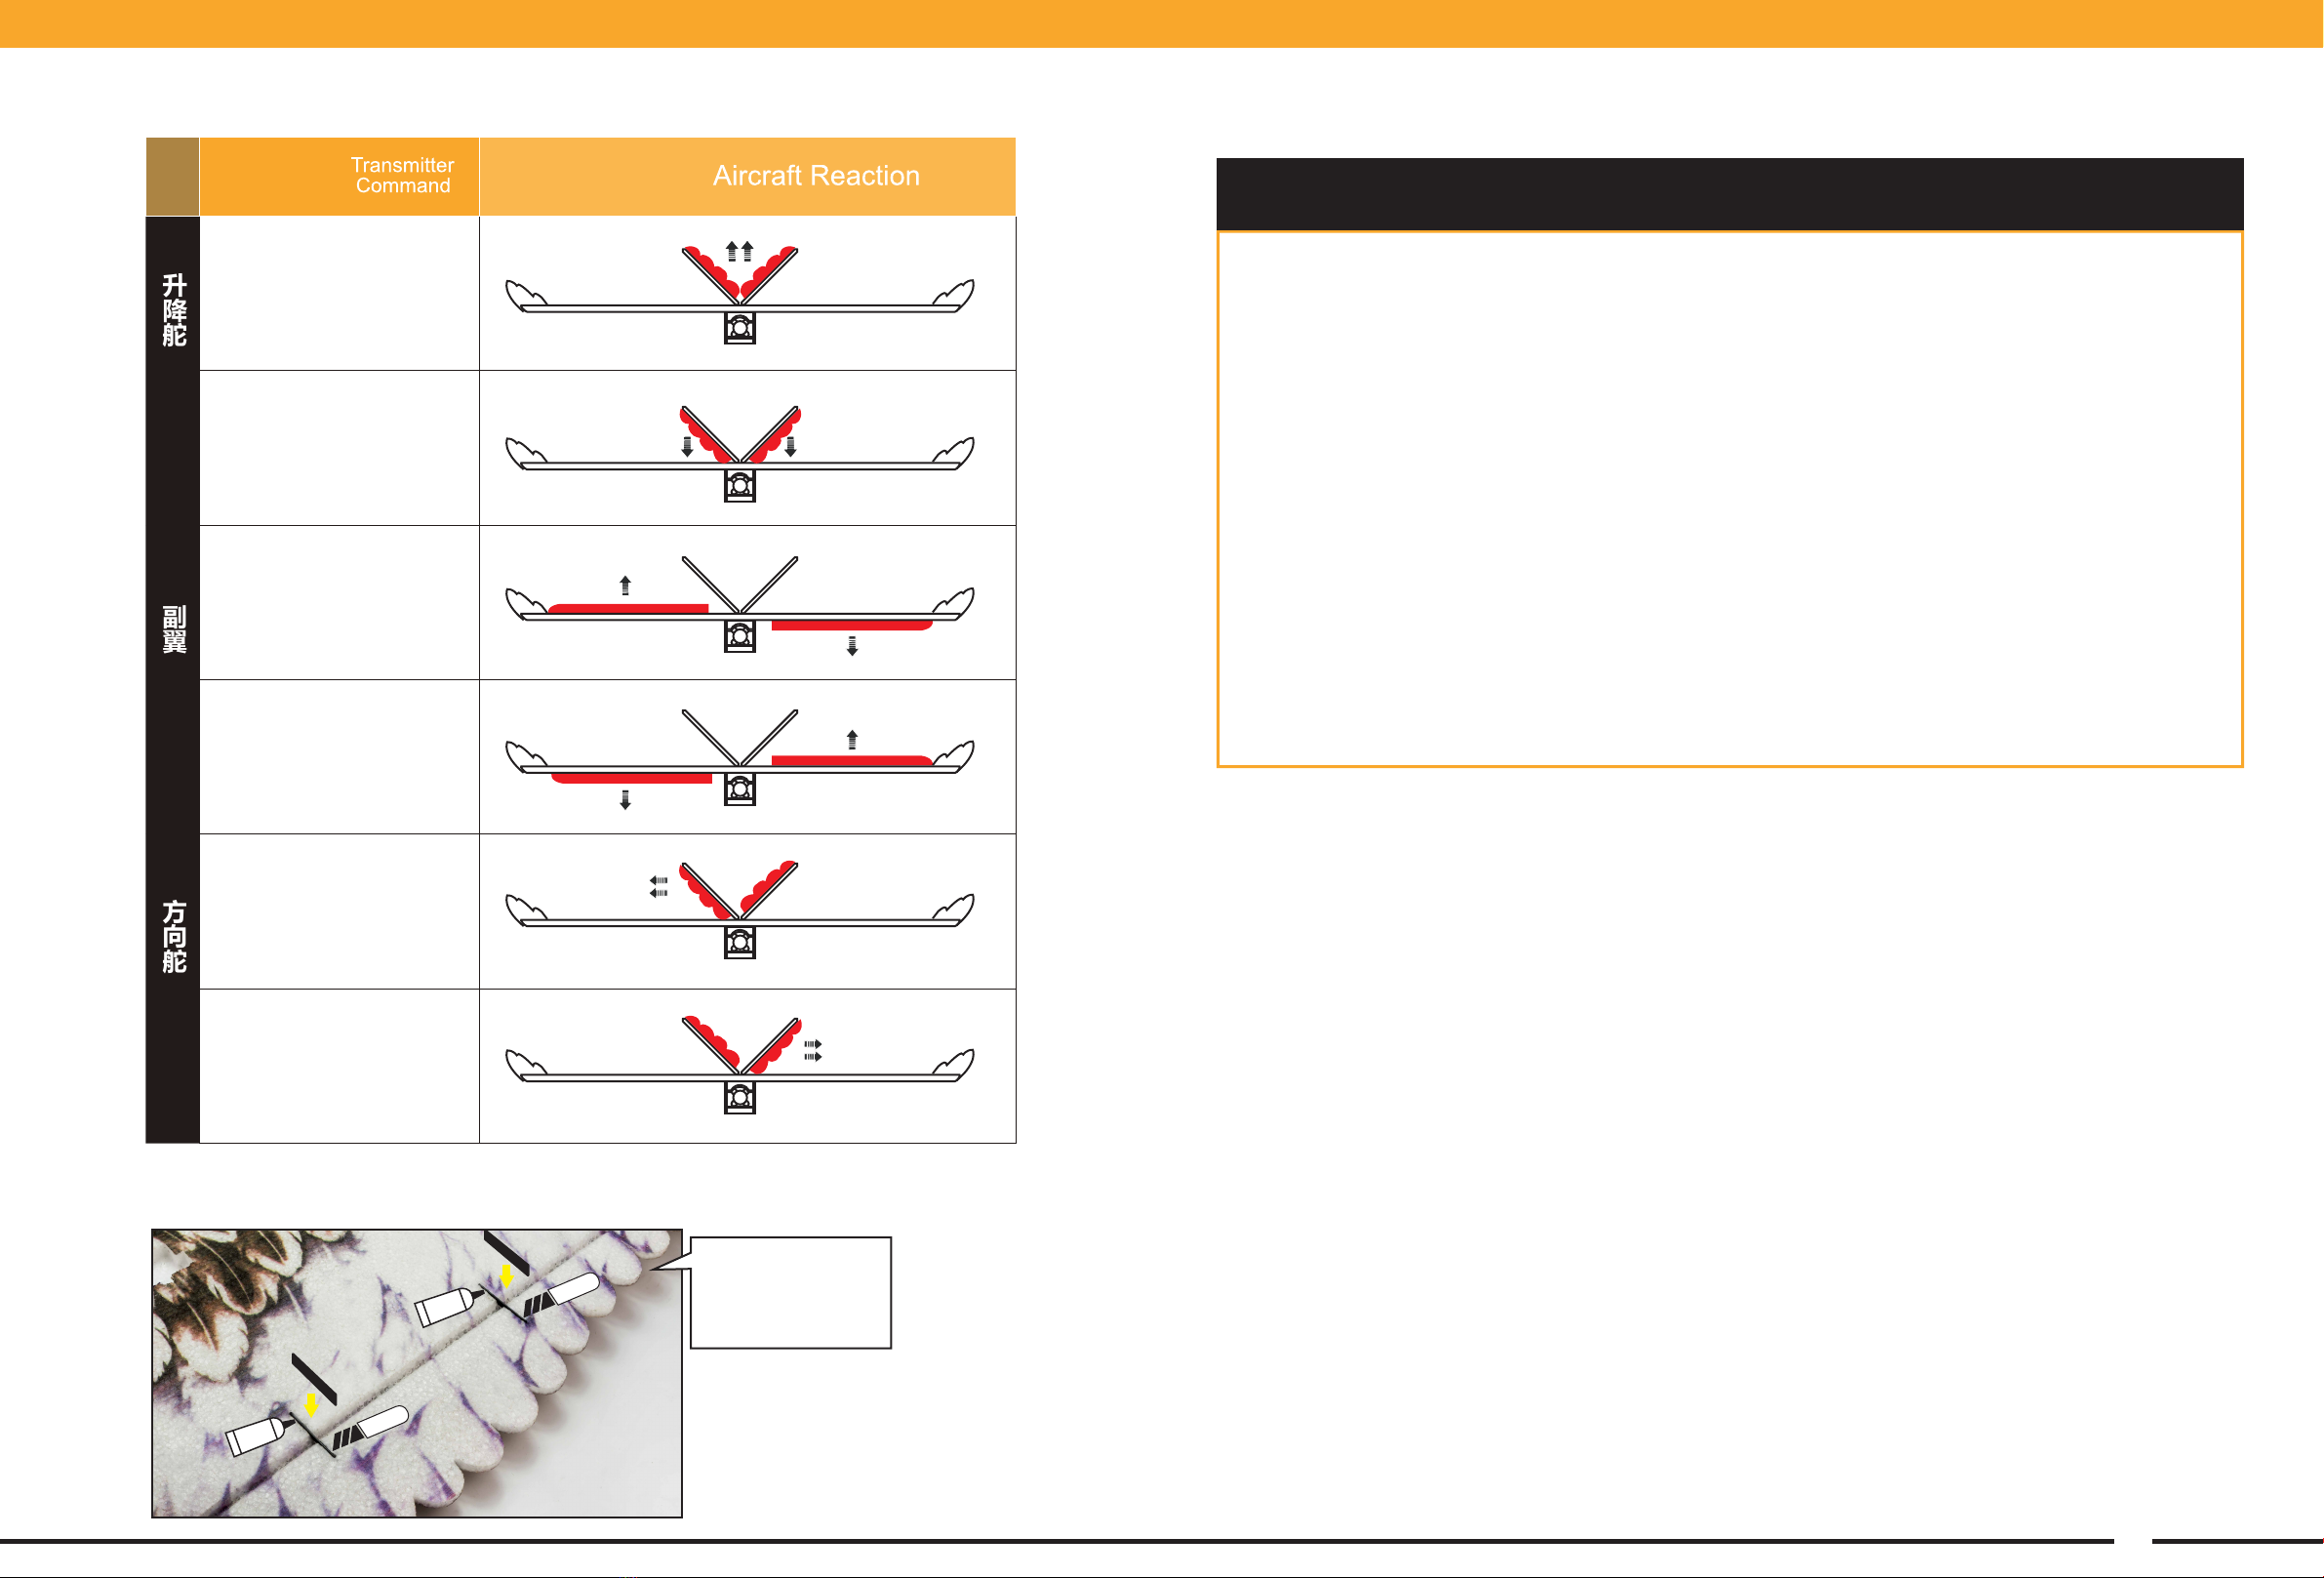
Aileron
通常情况下,舵面角度的设置如下:
Usually, the control throws set as below:
≈60mm
15°
15°-30°
15°-30° 15°
副翼
常规飞行(Normal Flying) 3D飞行 部分飞机支持(3D Flying only support some models)
副翼 Aileron ±(15°-30°) ±40° 或者更大(or larger)
平尾 Elevator ±15° ±40° 或者更大(or larger)
垂尾 Rudder ±15° ±40° 或者更大(or larger)
常用襟翼 Flap (起飞 take-off)15°-20° (降落 Landing)20°-40°
部分特殊机型会有V型尾翼,襟翼,前缘机翼或舵面很小等,可以以常规飞行的角度作为参考,在您不确认且没有有经验人员指导的情况下,我们
建议您先以小角度试飞以确认您的设置是否正确。
Some special models will have V-tails, flaps, leading edge wings, etc., which can be used as a reference for conventional flight angles.
If you do not confirm and there is no experienced person to guide you, we recommend that you first test at a small angle to confirm
that your settings are correct.
05 安装马达,桨叶 Install the Motor and Propeller
06 安装机翼 Assemble the Wing
2
GLUE
C
C
快装接头
EZ-connetor
快装接头
EZ-connetor
安装马达时,可以在马达座背面垫入一些废木片,
使马达调整出右拉角和下拉角。具体角度参考左边
图示。
When installing the motor, you can put some
waste wood pieces on the back of the motor
seat to adjust the right pull angle and the
pull-down angle. Check the specific angle
reference on the left.
L
L
K
K
GLUE
D3
D3
N1 长螺丝
Long screw
V尾舵面
V-tail rudder surface
≈60MM
2-3° 2-3°
顶视
Top View 侧视
Side View
90°
把2片尾翼粘贴到三角木上,使尾翼呈V型。注意涂装正反。
Paste the two tails onto the triangle wood to make the tail a
V-shaped. Pay attention to the positive and negative painting.
在机身中部安舵机,舵臂上安
装快装接头,钢丝连杆穿入快
装接头并锁定。
Install the servo in the
middle of the fuselage,install
the EZ-connetors onto the
rudder arm,and the steel
wire rod is inserted into the
EZ connector and locked.
快装接头
EZ-connetor
机身内连接舵机的连杆从尾部预留孔穿出,末端安
装塑料夹。在V尾舵面合适位置安装舵角,塑料夹
连接舵角。
The linkage rod connecting the servos inside
the fuselage passes through the reserved
hole at the tail, and the plastic clip is installed
at the end. Install the servo horn at the
appropriate position on the V-tail rudder
surface, and connect the servo horn to the
plastic clip.
在机翼舵机预留孔内安装舵机,
用胶水粘固,舵机线埋入预留槽
内,引导到机身中部。
Install the servo in the
reserved hole of the wing,
glue it with glue, and bury
the servo lines into the
reserved slot and guide it to
the middle of the fuselage.
钢丝连杆一端用舵臂的快装接头固定,另一端安装塑料夹,在机翼副翼合适位置安装舵角,
塑料夹连接舵角。
One end of the steel wire rod is fixed with the EZ connector of the servo arm, the
other end is equipped with plastic clip, the servo horn is installed at a suitable
position of the aileron, and the plastic clip is connected with the servo horn.
把马达固定到马达
座D3上。
Secure the motor
onto the motor
mount D3.
把马达固定到防火板
上。此时根据你所选
马达的大小垫入D3,
调整到合适长度。
Secure the motor
to the firewall. At
this time, according
to the size of the
motor you
selected, pad D3
and adjust to the
appropriate length.
机身预留孔穿入圆木杆,如上图。
Insert the round wood rod into the reserved
hole of the fuselage as shown above.
把机翼放置到机身居中位置,用橡皮筋锁定机翼。(如上图所示)
Place the wing in the center of the fuselage and lock the wing
with rubber band as shown above.
电池放入机身,调整好适配重心的位置后用魔术胶
带粘贴到机身。
Put the battery inside the fuselage, adjust the
position of the center of gravity, and then paste
it into the fuselage with magic tape.
10-15mm
10-15mm
03-3
05-1 05-2
06-1 06-2
Control Directions Tests
Elevator
升降舵
方向舵
副翼
AileronRudder
遥控器动作 飞机反应
升降杆下拉
Direction rod to the left
升降杆上推
Direction rod to the right
Steering rod to the left
Steering rod to the right
Lifting rod up
Lifting rod down
转向杆向右
转向杆向左
方向杆向右
方向杆向左
地面控制方向测试
● 安装舵机前,请先将舵机通电让舵机中心点回中,以便能更好的调试舵面。
● Check/adjust servo centering, in order to adjust the control surface better.
● 初次启动电机,您需要确认电机旋转的方向以适配您的机型。
● Double-check the spinning direction of motor at first usage, and sure it’s suitable for your model.
● 请将重心(CG)调整至说明书所述位置并尽量靠近。如果有需要,您可以增加机头或者机尾的重量,以确保机体有更
好的飞行姿态。
● Set the center of gravity (CG) at the position that manual already marked out. If necessary, add weight to
the nose or tail to ensure the best flight performance.
● 检查机身内部,确保所有设备正常连接;检查机身表面,包括但是不限于蒙皮,固定螺丝,舱盖,座舱罩等位置。
● Double-check the inside of the fuselage, make sure all the equipments are correctly connected; Check the
heat-shrink covering material’s surface, Make certain all screws, bolts, cabin and canopy remain secure.
● 在飞行前,请检查您电池情况,若有低电压,电池损坏等情况,请您停止操作并马上更换电池。
● Take great care when connecting/disconnecting the battery, pls replace the battery immediately once found
low voltage or damage to battery.
● 机身内部设备连接的方式,会和您的收发设备有关,在一些功能更多的收发设备上,您可以通过设置简化机身内部设
备的连接。详细请查看您的收发设备以确认是否满足您需要的功能。
● The way the internal devices of the fuselage are connected will be related to your transmitter-receiver
device. For those transmitter-receiver devices with more functions, you can simplify the connection of the
internal devices of the fuselage. Check your device for details to see if it meets the features you need.
● 动力设备和收发设备第一次配对时,可能需要设置油门最大行程,请您自行设置。
● When the power system and transmitter-receiver device are paired for the first time, you may need to set
the maximum stroke of the throttle. Please set it yourself.
飞行前的建议
PRE-FLIGHT CHECKS
3
备注:此款飞机也可封闭副翼,仅靠V尾飞行,具体设置调试方式请参考三角翼设置方式。
Remarks: This aircraft can also lock the ailerons, only rely on the V-tail flight.
Please refer to the delta wing setting method for the specific setting.
在副翼处切小口,嵌入碳片,
用胶水粘固,即可封闭副翼。
Cut a small opening in the
aileron, insert a carbon
sheet, and glue it to seal the
aileron.
GLUE
GLUE

Popular Tools manuals by other brands

Alice's Garden EXWH30RT manual

Alice's Garden

Alice's Garden EXWH30RT manual

MW TOOLS HNP20 manual

MW TOOLS

MW TOOLS HNP20 manual

BGS technic 8158 manual

BGS technic

BGS technic 8158 manual

Hilti NPR 019 IE-A22 Original operating instructions

Hilti

Hilti NPR 019 IE-A22 Original operating instructions

Makita DGP180 instruction manual

Makita

Makita DGP180 instruction manual

G.B.C PIPE 8 instruction manual

G.B.C

G.B.C PIPE 8 instruction manual

CHICAGO 8832 manual

CHICAGO

CHICAGO 8832 manual

Champion Power Equipment 200940 Operator's manual

Champion Power Equipment

Champion Power Equipment 200940 Operator's manual

Virutex eb25 operating instructions

Virutex

Virutex eb25 operating instructions

Würth DSF 10 Translation of the original operating instructions

Würth

Würth DSF 10 Translation of the original operating instructions

RoutingJigs Adjustable Hinge Jig Instruction leaflet

RoutingJigs

RoutingJigs Adjustable Hinge Jig Instruction leaflet

Grizzly G1600 instructions

Grizzly

Grizzly G1600 instructions

Staubli 16BL-MP Series Assembly instructions

Staubli

Staubli 16BL-MP Series Assembly instructions

ReelCraft LP80000 Series operating instructions

ReelCraft

ReelCraft LP80000 Series operating instructions

Jet PH-24T Operating instructions and parts manual

Jet

Jet PH-24T Operating instructions and parts manual

Sealey SA894.V3 instructions

Sealey

Sealey SA894.V3 instructions

AEMC instruments E94 user manual

AEMC instruments

AEMC instruments E94 user manual

pela tools 74266 manual

pela tools

pela tools 74266 manual

manuals.online logo
manuals.online logoBrands
  • About & Mission
  • Contact us
  • Privacy Policy
  • Terms and Conditions

Copyright 2025 Manuals.Online. All Rights Reserved.