Dart DAPB-2 User manual

FLYSCREEN FITTING INSTRUCTIONS -
BMW RnineT
Thank you for purchasing a Dart flyscreen.
It has been carefully designed and
manufactured to suit a specific
motorcycle model and by following
these instructions you should
encounter no problems with fitting.
The kit should comprise the
following:
1 x Makrolon® polycarbonate
screen
4 x EPDM rubber grommets
1 x screen mounting bracket
4 x M5 x 30mm stainless hex
head machine screws
2 x aluminium bushes (15mm)
2 x aluminium bushes (12mm)
4 x stainless hex head machine screws
4 x washers
1. Firstly, you’ll need some space to work. Remove the two
Torx T30 screws which secure the headlight assembly to the
bottom yoke, and remove the headlight. We rest it on the mudguard, using a cloth for protection.
2. Remove the wire cable tidy on the front of the headtube.
3. Remove the four T25 screws which hold the plastic instrument bracket to the top yoke. The left
hand screw has another wire cable tidy. This won’t be needed, so keep it safe with the other one.
4. Fit the four bushes into the underside of the instrument bracket. The stepped rings should snap into
the holes in the plastic bracket. The two longer bushes need to be in the middle holes, with the two
shorter bushes on the outside.
5. Now position the screen bracket underneath the instrument bracket, and hold them together like a
sandwich. Guide the assembly into position under the top yoke.
6. Holding the assembly in position, feed one of the centre pair of M5 x 30mm screws in from below
the bracket, and screw into the top yoke. Then fit the second screw.
7. Check that everything is in position and fit the other two screws. Locate them by hand evenly, then
gradually tighten them fully with a 3mm Allen key.
8. That’s the difficult part done. Now refit the headlight.
9. Insert the grommets in the holes in the screen. This is best achieved from the back of the screen.
10. Hold the screen blade in position and loosely fit the bottom two hexagon head machine screws
with their washers, ensuring that they engage in the captive nuts on the brackets. Do not tighten
these yet.
11. Fit the top two machine screws. Once everything is in position, gradually tighten all the screws
evenly until they are seated on the brackets.
12. Double check that everything is sufficiently tight and if so, fitting is now complete!
MAINTENANCE: No special maintenance is required. Do not use solvents to clean - just warm soapy water.
Many proprietary glass cleaners are suitable for polycarbonate - check the label before trying.
IMPORTANT NOTICE: Whilst the screen provides a good level of impact protection, it is not warranted
unbreakable. It is NOT a substitute for eye protection, which should be worn at all times while riding.
Designed and produced by Dart Flyscreens Ltd, Unit 10, Blackheath Business Centre, London SE10 8BA
e-mail: steve@dartflyscreens.com

FLYSCREEN FITTING INSTRUCTIONS -
BMW RnineT
Thank you for purchasing a Dart flyscreen.
It has been carefully designed and
manufactured to suit a specific
motorcycle model and by following
these instructions you should
encounter no problems with fitting.
The kit should comprise the
following:
1 x Makrolon® polycarbonate
screen
4 x EPDM rubber grommets
1 x screen mounting bracket
4 x M5 x 30mm stainless hex
head machine screws
2 x aluminium bushes (15mm)
2 x aluminium bushes (12mm)
4 x stainless hex head machine screws
4 x washers
1. Firstly, you’ll need some space to work. Remove the two
Torx T30 screws which secure the headlight assembly to the
bottom yoke, and remove the headlight. We rest it on the mudguard, using a cloth for protection.
2. Remove the wire cable tidy on the front of the headtube.
3. Remove the four T25 screws which hold the plastic instrument bracket to the top yoke. The left
hand screw has another wire cable tidy. This won’t be needed, so keep it safe with the other one.
4. Fit the four bushes into the underside of the instrument bracket. The stepped rings should snap into
the holes in the plastic bracket. The two longer bushes need to be in the middle holes, with the two
shorter bushes on the outside.
5. Now position the screen bracket underneath the instrument bracket, and hold them together like a
sandwich. Guide the assembly into position under the top yoke.
6. Holding the assembly in position, feed one of the centre pair of M5 x 30mm screws in from below
the bracket, and screw into the top yoke. Then fit the second screw.
7. Check that everything is in position and fit the other two screws. Locate them by hand evenly, then
gradually tighten them fully with a 3mm Allen key.
8. That’s the difficult part done. Now refit the headlight.
9. Insert the grommets in the holes in the screen. This is best achieved from the back of the screen.
10. Hold the screen blade in position and loosely fit the bottom two hexagon head machine screws
with their washers, ensuring that they engage in the captive nuts on the brackets. Do not tighten
these yet.
11. Fit the top two machine screws. Once everything is in position, gradually tighten all the screws
evenly until they are seated on the brackets.
12. Double check that everything is sufficiently tight and if so, fitting is now complete!
MAINTENANCE: No special maintenance is required. Do not use solvents to clean - just warm soapy water.
Many proprietary glass cleaners are suitable for polycarbonate - check the label before trying.
IMPORTANT NOTICE: Whilst the screen provides a good level of impact protection, it is not warranted
unbreakable. It is NOT a substitute for eye protection, which should be worn at all times while riding.
Designed and produced by Dart Flyscreens Ltd, Unit 10, Blackheath Business Centre, London SE10 8BA
e-mail: [email protected]

Fixez les œillets au saute-vent. La manœuvre est plus facile à
partir de l'arrière.
Prévoir de l’espace pour travailler. Retirer les vis Torx T30 qui maintiennent le montage du phare au Té
inférieur et retirer le phare. Le déposer sur le garde boue en utilisant un chiffon pour le protéger.
Retirer le rangement de câble de l’avant du tube avant.
Retirer les 4 vis T25 qui maintiennent le support plastique d’instruments au Té supérieur. La vis de gauche
possède un autre rangement de câble. Cela ne sera pas nécessaire, le mettre de côté avec l’autre.
Insérer les 4 douilles dans la partie inférieure du support d’instruments. Les anneaux étagés doivent
s'enclencher dans les trous du support plastique. Les deux douilles plus longues doivent être dans les trous
centraux avec les deux douilles plus courtes à l'extérieur.
Positionner le support de saute-vent au dessous du support d’instruments et les maintenir ensemble comme
un sandwich. Guider l’assemblage en position sous le Té supérieur.
Tout en maintenant le montage en position, insérer l’une des paires centrales de vis M5x30mm par dessous le
support et visser dans le té du haut. Insérer ensuite la seconde vis.
Vérifier que tout est en position et insérer les deux autres vis. Les visser à la main de manière homogène puis
les serrer graduellement à l’aide d’une clé Allen de 3mm.
La partie la plus difficile étant terminée, remettre le phare.
Insérer les œillets dans les perçages du saute-vent. Le plus efficace est de la faire par l’arrière du saute-vent.
Maintenir le saute-vent en position et insérer les 2 vis à tête hexagonales avec leurs rondelles en s’assurant
qu’elles sont engagées dans les écrous captifs des supports. Ne pas les resserrer.
Vérifier à nouveau que toutes les vis et boulons sont suffisamment serrés. Le montage est maintenant terminé.
11. Fit the top two machine screws. Once everything is in position, gradually tighten all the screws
evenly until they are seated on the brackets.
12. Double check that everything is sufficiently tight and if so, fitting is now complete!
MAINTENANCE: No special maintenance is required. Do not use solvents to clean - just warm soapy water.
Many proprietary glass cleaners are suitable for polycarbonate - check the label before trying.
IMPORTANT NOTICE: Whilst the screen provides a good level of impact protection, it is not warranted
unbreakable. It is NOT a substitute for eye protection, which should be worn at all times while riding.
Designed and produced by Dart Flyscreens Ltd, Unit 10, Blackheath Business Centre, London SE10 8BA
e-mail: steve@dartflyscreens.com
INSTRUCTIONS D’INSTALLATION DU
SAUTE-VENT - BMW RnineT
Merci d'avoir choisi le saute-vent Dart. Il a été
soigneusement conçu afin de convenir à un
modèle spécifique de moto. Si vous suivez ce
mode d'emploi, le montage ne devrait pas
présenter de problèmes. Liste des articles
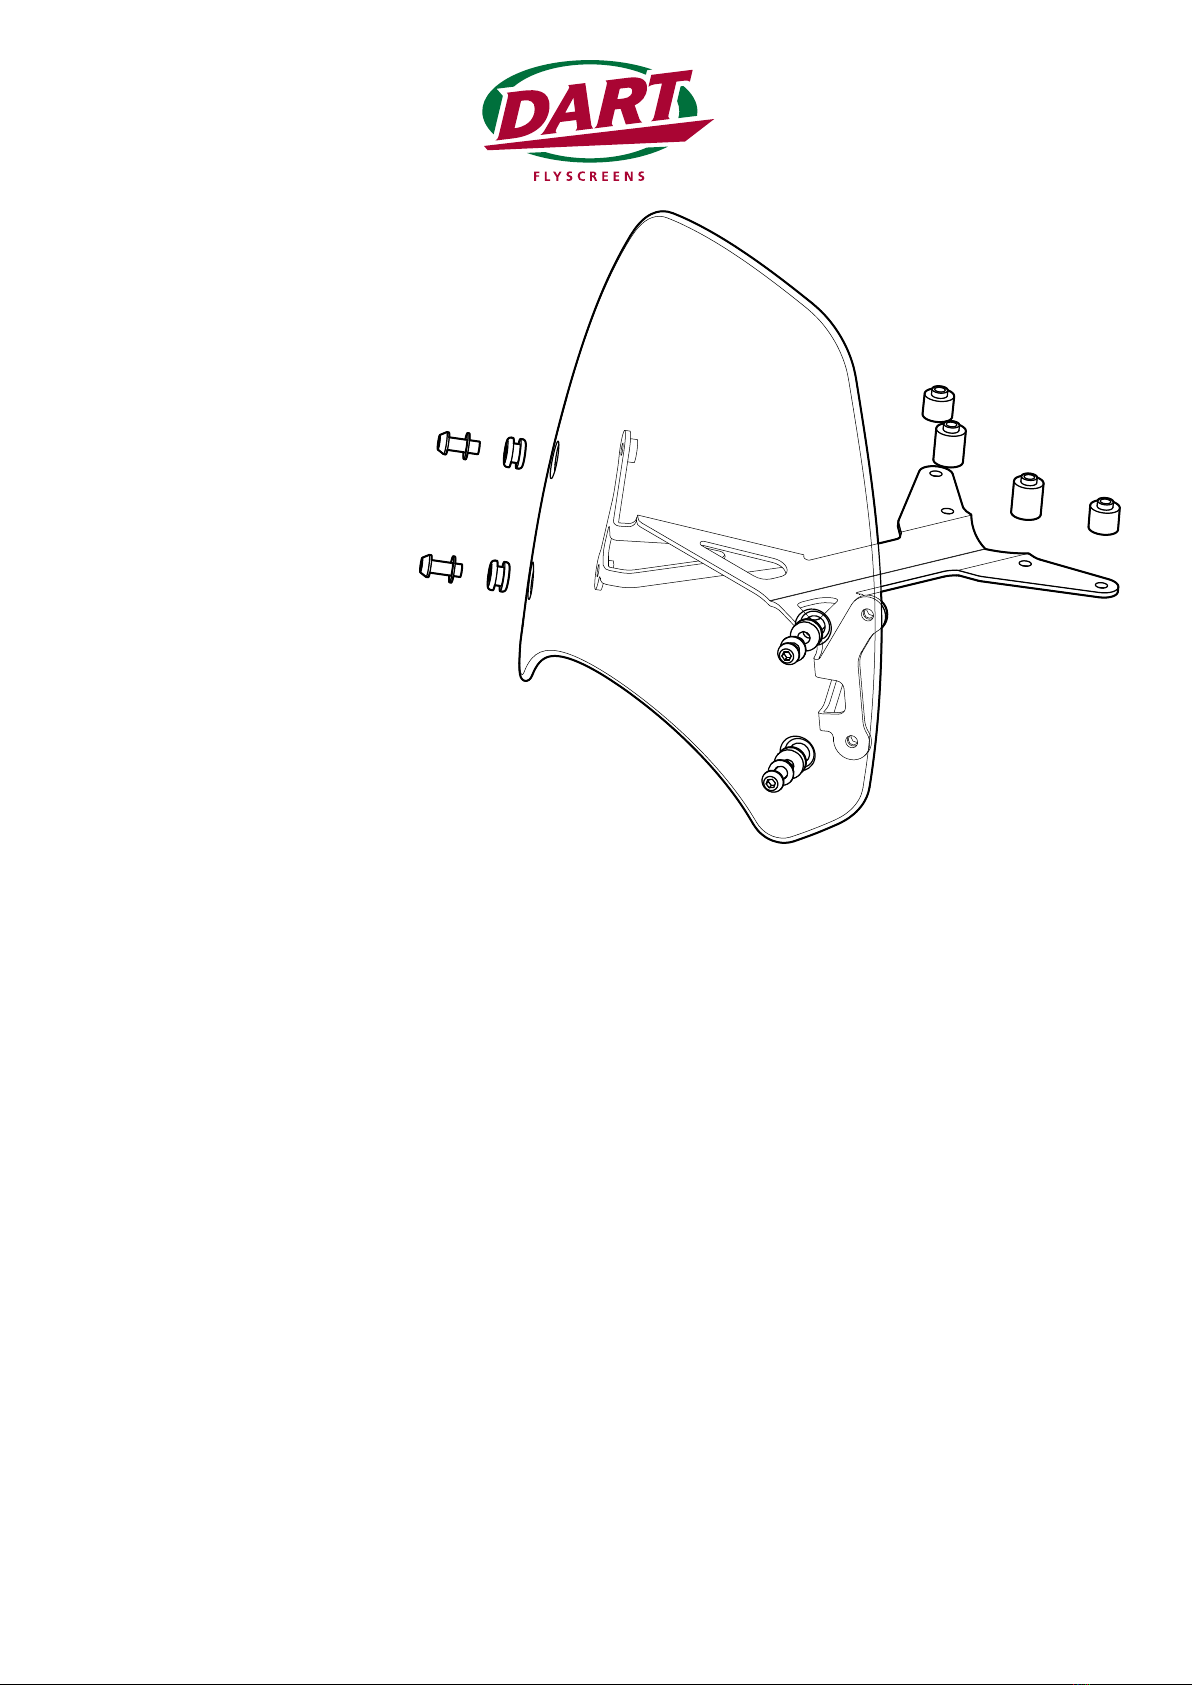
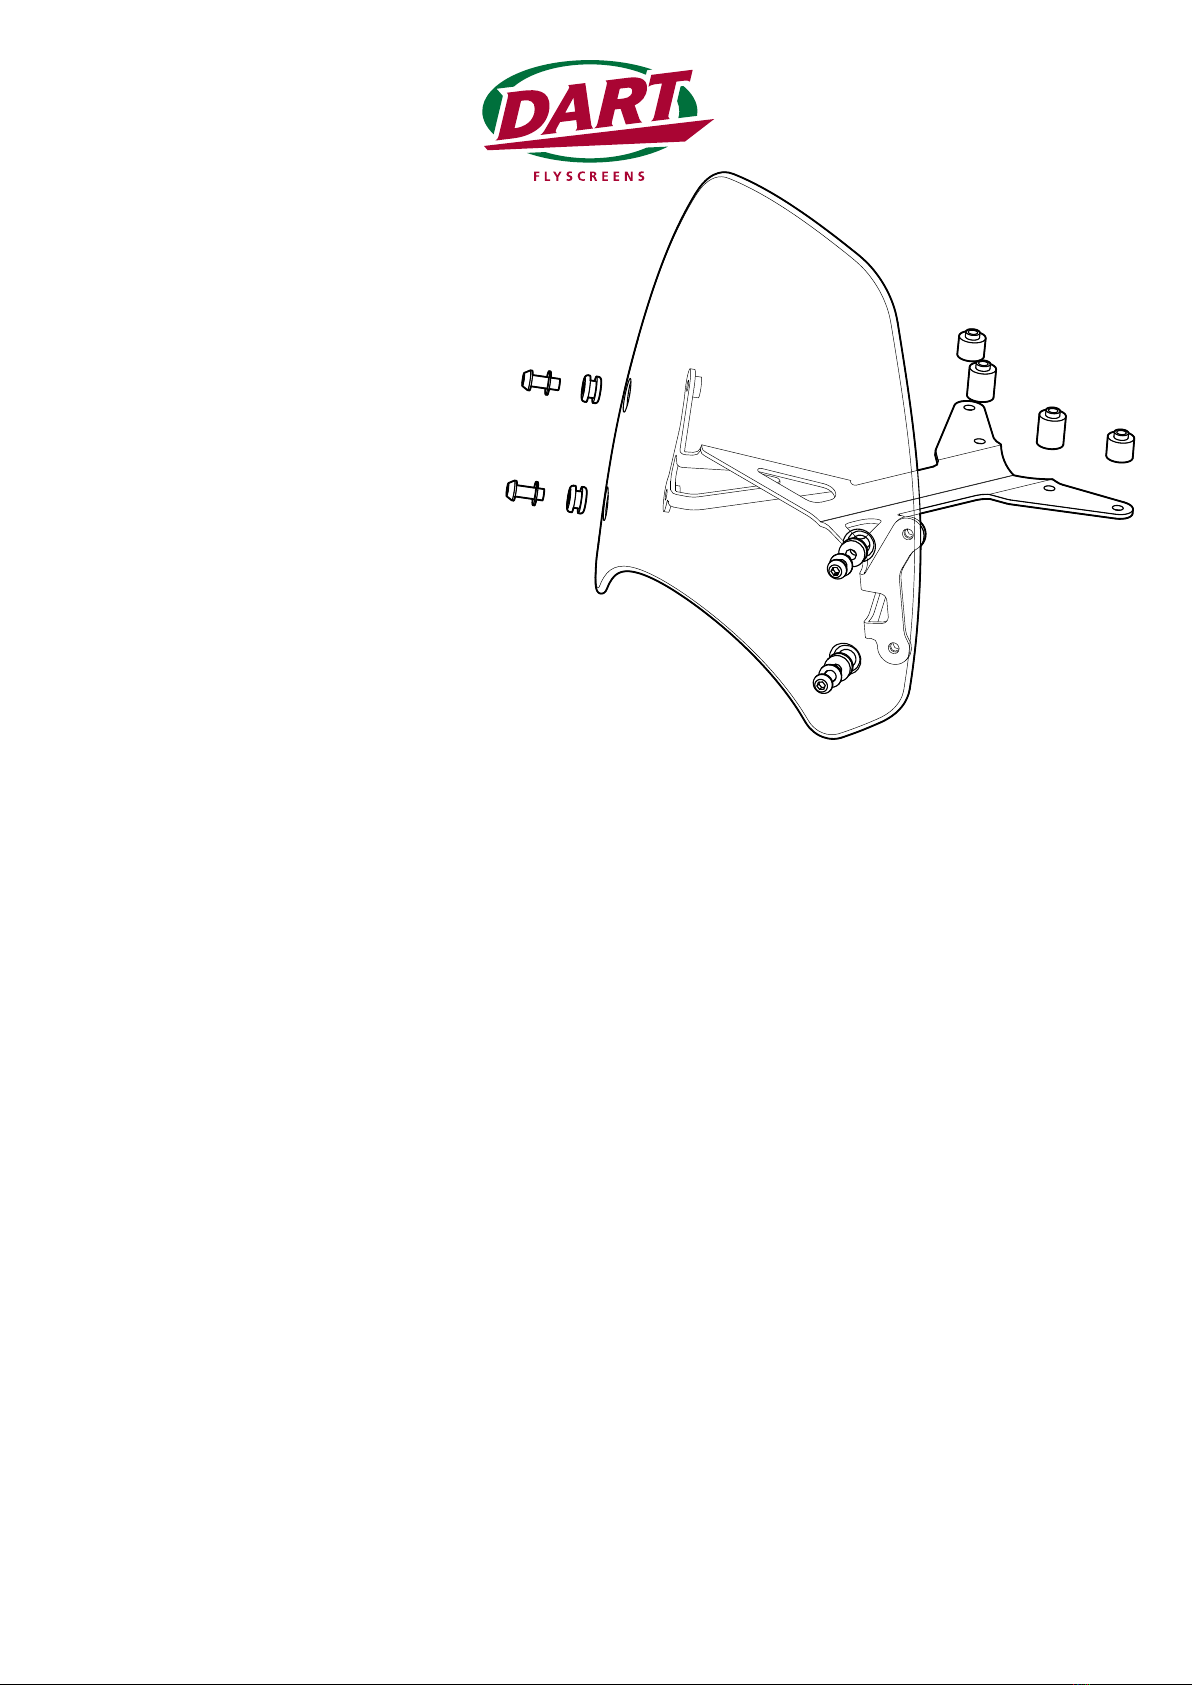
contenus dans la boîte :
1 x saute-vent polycarbonate Makrolon®
4 x oeillets en caoutchouc EPDM
1 x patte de fixation gauche pour le saute-vent
1 x patte de fixation droite pour le saute-vent
2 x manchons en Aluminium (15mm)
2 x manchons en Aluminium(12mm)
4 x vis hexagonale inoxydable M5 x 30mm
4 x vis hexagonale inoxydable à métaux
4 x rondelles
8
9
10
11
12
REMARQUE IMPORTANTE : le saute-vent fournit un bon niveau de protection mais n'est cependant pas incassable. Il
ne remplace PAS une protection pour les yeux, qui doit être portée en permanence pendant la conduite.
Conçu et fabriqué par Dart Flyscreens Ltd, 59 Boyne Road, London SE13 5AN
e-mail: [email protected]

Die Dichtungen an der Scheibe befestigen - dies wird am besten von der Scheibenrückseite aus erreicht.
Zuerst brauchen Sie etwas Platz zum Arbeiten. Entfernen Sie beide Torx T30 Schrauben, die für den
Scheinwerferbau vorgesehen sind und bringen diese an den unteren Bügel an. Dabei sollten Sie den
Scheinwerfer selbst ebenfalls entfernen.
Den Scheinwerfer sollten Sie dann auf das Schutzblech ablegen. Dabei können Sie ein Tuch als
Unterlage verwenden, damit der Scheinwerfer nicht beschädigt wird.
Den Kabelkanal am vorderen Teil des Gabelschafts sollten Sie ebenfalls entfernen.
Anschließend alle T25 Schrauben entfernen, die zur Befestigung des Armaturenbretts an dem oberen
Bügel verwendet wurden. Die Schraube auf der linken Seite verfügt ebenfalls über einen Kabelkanal.
Diese brauchen Sie aber nicht und sie sollte deswegen aufbewahrt werden.
Die abgesetzten Außenringe sollten sich in die dafür vorgesehenen Löcher des Plastikmontagebügels
einführen lassen.
Positionieren Sie den Montagebügel unter den Instrumentenhalter und drücken Sie diese anschließend
zusammen. Die nun fertige Zusammenstellung sollte unter den oberen Bügel positioniert werden.
Halten Sie diese in der Position fest und führen Sie gleichzeitig eine der M5 x 30mm Schauben in das
vorgesehene Loch in der Halterung ein. Diese bringen Sie anschließend an den oberen Bügel an. Drehen
Sie die Schraube ein.
Prüfen Sie, dass die Position aller Bestandteile der nun fertigen Zusammenstellung korrekt ist und
schrauben Sie anschließend die verbliebenen zwei Schrauben auf. Diese können nach der Befestigung
mit einem 3mm Inbusschlüssel festgezogen werden.
Den schwierigen Teil dieses Zusammenbaus haben Sie nun hinter sich. Der Scheinwerfer müsste aber
jetzt eigentlich wieder angebracht werden.
11. Fit the top two machine screws. Once everything is in position, gradually tighten all the screws
evenly until they are seated on the brackets.
12. Double check that everything is sufficiently tight and if so, fitting is now complete!
MAINTENANCE: No special maintenance is required. Do not use solvents to clean - just warm soapy water.
Many proprietary glass cleaners are suitable for polycarbonate - check the label before trying.
IMPORTANT NOTICE: Whilst the screen provides a good level of impact protection, it is not warranted
unbreakable. It is NOT a substitute for eye protection, which should be worn at all times while riding.
Designed and produced by Dart Flyscreens Ltd, Unit 10, Blackheath Business Centre, London SE10 8BA
e-mail: steve@dartflyscreens.com
1
2
3
4
5
6
7
8
9
10
MONTAGEANLEITUNG FÜR DIE
FRONTSCHEIBE - BMW RnineT
Vielen Dank für den Kauf einer Dart
Frontscheibe. Sie wurde sorgfältig für ein
spezifisches Motorradmodell entworfen und
hergestellt, und bei Befolgen dieser Anleitung
sollten Sie keine Probleme bei der Montage
haben. Der Satz sollte die folgenden Teile
beinhalten:
1 x Makrolon® Polycarbonat-Scheibe
4 x EPDM Gummidichtungen
1 x linke Scheibenhalterung
1 x rechte Scheibenhalterung
4 x M5x 30mm Sechskantschrauben
2 x Aluminiumbuchsen(15mm)
2 x Aluminiumbuchsen (12mm)
4 x rostfreie Sechskantschrauben
4 x Unterlegscheiben

FLYSCREEN FITTING INSTRUCTIONS -
BMW RnineT
Thank you for purchasing a Dart flyscreen.
It has been carefully designed and
manufactured to suit a specific
motorcycle model and by following
these instructions you should
encounter no problems with fitting.
The kit should comprise the
following:
1 x Makrolon® polycarbonate
screen
4 x EPDM rubber grommets
1 x screen mounting bracket
4 x M5 x 30mm stainless hex
head machine screws
2 x aluminium bushes (15mm)
2 x aluminium bushes (12mm)
4 x stainless hex head machine screws
4 x washers
1. Firstly, you’ll need some space to work. Remove the two
Torx T30 screws which secure the headlight assembly to the
bottom yoke, and remove the headlight. We rest it on the mudguard, using a cloth for protection.
2. Remove the wire cable tidy on the front of the headtube.
3. Remove the four T25 screws which hold the plastic instrument bracket to the top yoke. The left
hand screw has another wire cable tidy. This won’t be needed, so keep it safe with the other one.
4. Fit the four bushes into the underside of the instrument bracket. The stepped rings should snap into
the holes in the plastic bracket. The two longer bushes need to be in the middle holes, with the two
shorter bushes on the outside.
5. Now position the screen bracket underneath the instrument bracket, and hold them together like a
sandwich. Guide the assembly into position under the top yoke.
6. Holding the assembly in position, feed one of the centre pair of M5 x 30mm screws in from below
the bracket, and screw into the top yoke. Then fit the second screw.
7. Check that everything is in position and fit the other two screws. Locate them by hand evenly, then
gradually tighten them fully with a 3mm Allen key.
8. That’s the difficult part done. Now refit the headlight.
9. Insert the grommets in the holes in the screen. This is best achieved from the back of the screen.
10. Hold the screen blade in position and loosely fit the bottom two hexagon head machine screws
with their washers, ensuring that they engage in the captive nuts on the brackets. Do not tighten
these yet.
11. Führen Sie Dichtungsringe in die Löcher im Schirm ein. Zur einfacheren Handhabung sollten Sie den
Schutzschirm auf die Rückseite drehen.
12. Nun dürften beide Halterungen fixiert sein und Sie können den Schirm anhand zweier
Sechskantschrauben und deren Muttern locker befestigen, wobei Sie wie bereits erwähnt vor allem
darauf achten sollten, dass diese in die Halterungen eingeschraubt werden. Drehen Sie noch nicht
fest.
13. Prüfen Sie nochmals, dass alles ausreichend fest sitzt. Ist dies der Fall, ist die Montage nun beendet!
WICHTIGER HINWEIS: Obwohl die Scheibe einen guten Grad an Stoßschutz aufweist, gilt sie nicht als
unzerbrechlich. Sie ist KEIN Ersatz für einen Augenschutz, der jederzeit beim Fahren eines Motorrades getragen
werden sollte.
Entworfen und hergestellt durch Dart Flyscreens Ltd, 59 Boyne Road, London SE13 5AN, England.
e-mail: [email protected]

1. Ajuste las arandelas aislantes a la cúpula. Inserte las arandelas aislantes desde la parte de
2. Atrás de la cúpula, ya que así es mucho más fácil.En primer lugar, necesitarás un poco de espacio
para trabajar. Retira los dos tornillos Torx T30 que fijan el montaje del faro a la abrazadera inferior, y
retira el faro. Puede dejarlo sobre el guardabarros, usando una gamuza para protegerlo.
3. Retira el cable instalado en la parte frontal del mástil central.
4. Retira los cuatro tornillos T25 que sujetan el instrumento soporte de plástico a la abrazadera
superior. El tornillo izquierdo tiene otro cable instalado. Esto no será necesario, así que guárdalo
seguro con el otro.
5. Coloca los cuatro pernos en la parte inferior del instrumento de soporte. Los anillos escalonados
deberían encajar en los orificios del soporte de plástico. Los dos pernos largos tienen que estar en
los orificios del medio, con los dos pernos más cortos en los extremos.
6. Ahora, coloca el soporte del parabrisas debajo del soporte de instrumento, y sujétalos como si
fuese un sándwich. Mientras está todo junto, colócalo bajo la abrazadera superior.
7. Sujetando el conjunto en su sitio, coloca uno del par centrales de tornillos M5 x 30mm desde
debajo del soporte, y sujétalo a la abrazadera superior. Luego ajusta el segundo tornillo.
8. Comprueba que todo está colocado y ajusta los otros dos tornillos. Colócalos a mano de manera
regular, luego apriétalos de manera gradual hasta que esté completamente colocados, con una
llave Allen de 3mm.
9. Lo difícil ya se ha hecho. Ahora a recolocar el faro.
10. Inserta las arandelas en los orificios de la pantalla. Esto se consigue más fácilmente desde la parte
trasera de la pantalla.
11. Fit the top two machine screws. Once everything is in position, gradually tighten all the screws
evenly until they are seated on the brackets.
12. Double check that everything is sufficiently tight and if so, fitting is now complete!
MAINTENANCE: No special maintenance is required. Do not use solvents to clean - just warm soapy water.
Many proprietary glass cleaners are suitable for polycarbonate - check the label before trying.
IMPORTANT NOTICE: Whilst the screen provides a good level of impact protection, it is not warranted
unbreakable. It is NOT a substitute for eye protection, which should be worn at all times while riding.
Designed and produced by Dart Flyscreens Ltd, Unit 10, Blackheath Business Centre, London SE10 8BA
e-mail: steve@dartflyscreens.com
INSTRUCCIONES DE MONTAJE DE LA
CÚPULA - BMW RnineT
Le agradecemos que haya adquirido una cúpula
Dart. Nuestras cúpulas han sido cuidadosamente
diseñadas y fabricadas para adaptarse a un
modelo específico de moto y, si sigue estas
instrucciones, no debería tener ningún problema a
la hora de montarlas. El kit completo del producto
debería incluir los siguientes elementos:
1 x cúpula Makrolon® de policarbonato
4 x arandelas aislantes de gomero EPDM
1 x soporte de montaje
4 x tornillos inoxidables M5 x 30mm
2 x aluminium bushes (15mm)
2 x aluminium bushes (12mm)
4 x tornillos inoxidables
4 x arandelas

FLYSCREEN FITTING INSTRUCTIONS -
BMW RnineT
Thank you for purchasing a Dart flyscreen.
It has been carefully designed and
manufactured to suit a specific
motorcycle model and by following
these instructions you should
encounter no problems with fitting.
The kit should comprise the
following:
1 x Makrolon® polycarbonate
screen
4 x EPDM rubber grommets
1 x screen mounting bracket
4 x M5 x 30mm stainless hex
head machine screws
2 x aluminium bushes (15mm)
2 x aluminium bushes (12mm)
4 x stainless hex head machine screws
4 x washers
1. Firstly, you’ll need some space to work. Remove the two
Torx T30 screws which secure the headlight assembly to the
bottom yoke, and remove the headlight. We rest it on the mudguard, using a cloth for protection.
2. Remove the wire cable tidy on the front of the headtube.
3. Remove the four T25 screws which hold the plastic instrument bracket to the top yoke. The left
hand screw has another wire cable tidy. This won’t be needed, so keep it safe with the other one.
4. Fit the four bushes into the underside of the instrument bracket. The stepped rings should snap into
the holes in the plastic bracket. The two longer bushes need to be in the middle holes, with the two
shorter bushes on the outside.
5. Now position the screen bracket underneath the instrument bracket, and hold them together like a
sandwich. Guide the assembly into position under the top yoke.
6. Holding the assembly in position, feed one of the centre pair of M5 x 30mm screws in from below
the bracket, and screw into the top yoke. Then fit the second screw.
7. Check that everything is in position and fit the other two screws. Locate them by hand evenly, then
gradually tighten them fully with a 3mm Allen key.
8. That’s the difficult part done. Now refit the headlight.
9. Insert the grommets in the holes in the screen. This is best achieved from the back of the screen.
10. Hold the screen blade in position and loosely fit the bottom two hexagon head machine screws
with their washers, ensuring that they engage in the captive nuts on the brackets. Do not tighten
these yet. AVISO IMPORTANTE: Aunque la cúpula proporciona un buen nivel de protección contra los impactos, no está garantizado
que sea irrompible. La cúpula NO es un sustituto de la protección ocular; los ojos deberían llevarse siempre protegidos
mientras se está conduciendo.
Diseñada y fabricada por Dart Flyscreens Ltd, 59 Boyne Road, London SE13 5AN
e-mail: [email protected]
Sujeta la lámina de la pantalla en su posición y ajusta sin apretar demasiado los dos tornillos de cabeza
hexagonal de la parte inferior con sus arandelas, asegurando que coinciden con las tuercas cautivas de
los soportes. Aún no ajustes estos tornillos.
Compruebe que todo está firme y que puede realizar la acción de girar con absoluta libertad, si es así
ha completado el montaje!
11
12

1. Prima di iniziare occorre spazio per lavorare adeguatamente. Rimuovete le due viti Torx T30 che
assicurano la struttura del faro alla piastra di supporto inferiore della forcella e rimuovete il faro.
Poggiatelo sul parafango usando un panno come protezione.
2. Rimuovete con attenzione il tubo raccogli cavi posizionato sulla parte anteriore del tubo della
forcella.
3. Rimuovete le quattro viti T25 che fissano il supporto plastico della strumentazione alla piastra
superiore della forcella. La vite sinistra ha un altro tubo raccogli cavi. Quest’ultimo non è necessario
per cui tenetelo in un posto sicuro insieme al primo.
4. Inserite i quattro dadi nella parte inferiore del supporto della strumentazione. Gli anelli filettati
dovrebbero andare ad incastrarsi nei fori sul supporto di plastica. I due dadi più lunghi vanno inseriti
nei fori centrali, mentre quelli più corti vanno sulla parte esterna.
5. Fatto questo posizionate il supporto del cupolino al di sotto di quello della strumentazione e teneteli
uniti insieme come in un sandwich. Ponete i due pezzi così assemblati nella giusta posizione al di
sotto della piastra superiore della forcella.
6. Mantenete i due pezzi uniti insieme e inserite una delle due viti M5 X 30 mm della coppia centrale
nel supporto da sotto e avvitatela alla piastra superiore. Fatto questo inserite l’altra vite.
7. Controllate che tutto sia posizionato correttamente e inserite le due viti rimanenti. Iniziate prima a
stringerle, in modo uniforme, manualmente e poi serratele completamente con una brugola da 3mm.
8. Completata questa operazione la parte più difficile è terminata. Ora potete rimettere il faro.
9. Inserite gli occhielli di gomma nei fori del cupolino. È più facile effettuare questa operazione dalla
parte posteriore del cupolino stesso.
10. Posizionate il cupolino nella corretta posizione e inserite, senza stringere, le due viti a testa
esagonale in basso, con le relative rondelle, assicurandosi che si aggancino ai dadi sui supporti.
Attendete prima di avvitarle completamente.
11. Fit the top two machine screws. Once everything is in position, gradually tighten all the screws
evenly until they are seated on the brackets.
12. Double check that everything is sufficiently tight and if so, fitting is now complete!
MAINTENANCE: No special maintenance is required. Do not use solvents to clean - just warm soapy water.
Many proprietary glass cleaners are suitable for polycarbonate - check the label before trying.
IMPORTANT NOTICE: Whilst the screen provides a good level of impact protection, it is not warranted
unbreakable. It is NOT a substitute for eye protection, which should be worn at all times while riding.
Designed and produced by Dart Flyscreens Ltd, Unit 10, Blackheath Business Centre, London SE10 8BA
e-mail: steve@dartflyscreens.com
ISTRUZIONI PER IL MONTAGGIO DEL
CUPOLINO - BMW RnineT
Grazie per avere acquistato un cupolino Dart.
Questo prodotto è stato progettato e realizzato con
cura, per adattarsi a uno specifico modello di
motocicletta. Seguendo le seguenti istruzioni non
dovreste avere alcun problema di installazione. Il
kit contiene quanto segue:
1 x cupolino in policarbonato Makrolon®
4 x anelli in gomma EPDM
1 x supporto di montaggio
4 x viti a testa esagonale M5x30mm
2 x boccole in alluminio (15mm)
2 x boccole in alluminio (12mm)
4 x viti esagonali in acciaio
4 x rondelle

FLYSCREEN FITTING INSTRUCTIONS -
BMW RnineT
Thank you for purchasing a Dart flyscreen.
It has been carefully designed and
manufactured to suit a specific
motorcycle model and by following
these instructions you should
encounter no problems with fitting.
The kit should comprise the
following:
1 x Makrolon® polycarbonate
screen
4 x EPDM rubber grommets
1 x screen mounting bracket
4 x M5 x 30mm stainless hex
head machine screws
2 x aluminium bushes (15mm)
2 x aluminium bushes (12mm)
4 x stainless hex head machine screws
4 x washers
1. Firstly, you’ll need some space to work. Remove the two
Torx T30 screws which secure the headlight assembly to the
bottom yoke, and remove the headlight. We rest it on the mudguard, using a cloth for protection.
2. Remove the wire cable tidy on the front of the headtube.
3. Remove the four T25 screws which hold the plastic instrument bracket to the top yoke. The left
hand screw has another wire cable tidy. This won’t be needed, so keep it safe with the other one.
4. Fit the four bushes into the underside of the instrument bracket. The stepped rings should snap into
the holes in the plastic bracket. The two longer bushes need to be in the middle holes, with the two
shorter bushes on the outside.
5. Now position the screen bracket underneath the instrument bracket, and hold them together like a
sandwich. Guide the assembly into position under the top yoke.
6. Holding the assembly in position, feed one of the centre pair of M5 x 30mm screws in from below
the bracket, and screw into the top yoke. Then fit the second screw.
7. Check that everything is in position and fit the other two screws. Locate them by hand evenly, then
gradually tighten them fully with a 3mm Allen key.
8. That’s the difficult part done. Now refit the headlight.
9. Insert the grommets in the holes in the screen. This is best achieved from the back of the screen.
10. Hold the screen blade in position and loosely fit the bottom two hexagon head machine screws
with their washers, ensuring that they engage in the captive nuts on the brackets. Do not tighten
these yet.
11. Fit the top two machine screws. Once everything is in position, gradually tighten all the screws
evenly until they are seated on the brackets.
12. Ricontrollate che tutto sia perfettamente serrato: in questo caso il montaggio è terminato!
AVVISO IMPORTANTE: Sebbene il cupolino offra un buon livello di protezione dagli impatti, non è garantito
come infrangibile. Il cupolino NON sostituisce la protezione per gli occhi, che deve essere indossata in
qualsiasi momento durante la guida.
Progettato e prodotto da
Dart Flyscreens Ltd, Unit 10, Blackheath Business Centre, London SE10 8BA
e-mail: [email protected]
Table of contents
Languages: