DataComm Recessed Pro-Power Installation Kit Manual
Instruction
I Installation Sheet
DataComm Electronics 50-3323 Recessed Pro-Power Installation
Kit
DATA
innDv.tive
struc:t:ur-!!d
wiring
DataComm
Electronics,
Inc.
6349
Peachtree Street
Noraoss,
GA
30071-1725
888.223.7977
770.662.8205
www.datacornmeledronics.com
Parts
Included:
1.
Recessed Cable Plate with Power
2.
Recessed Cable Plate with Straight Blade Inlet
3.
6 Ft. Extension Cord
4. Two (2) Old Work Electrical Boxes
5.
8
Ft.
of
Non-Metallic Electrical Wire
6. Three (3) Wire Nuts
Tools
Needed
1.
Drywall saw
2.
6 Ft. tape measure
3.
Pencil
4. Screwdriver
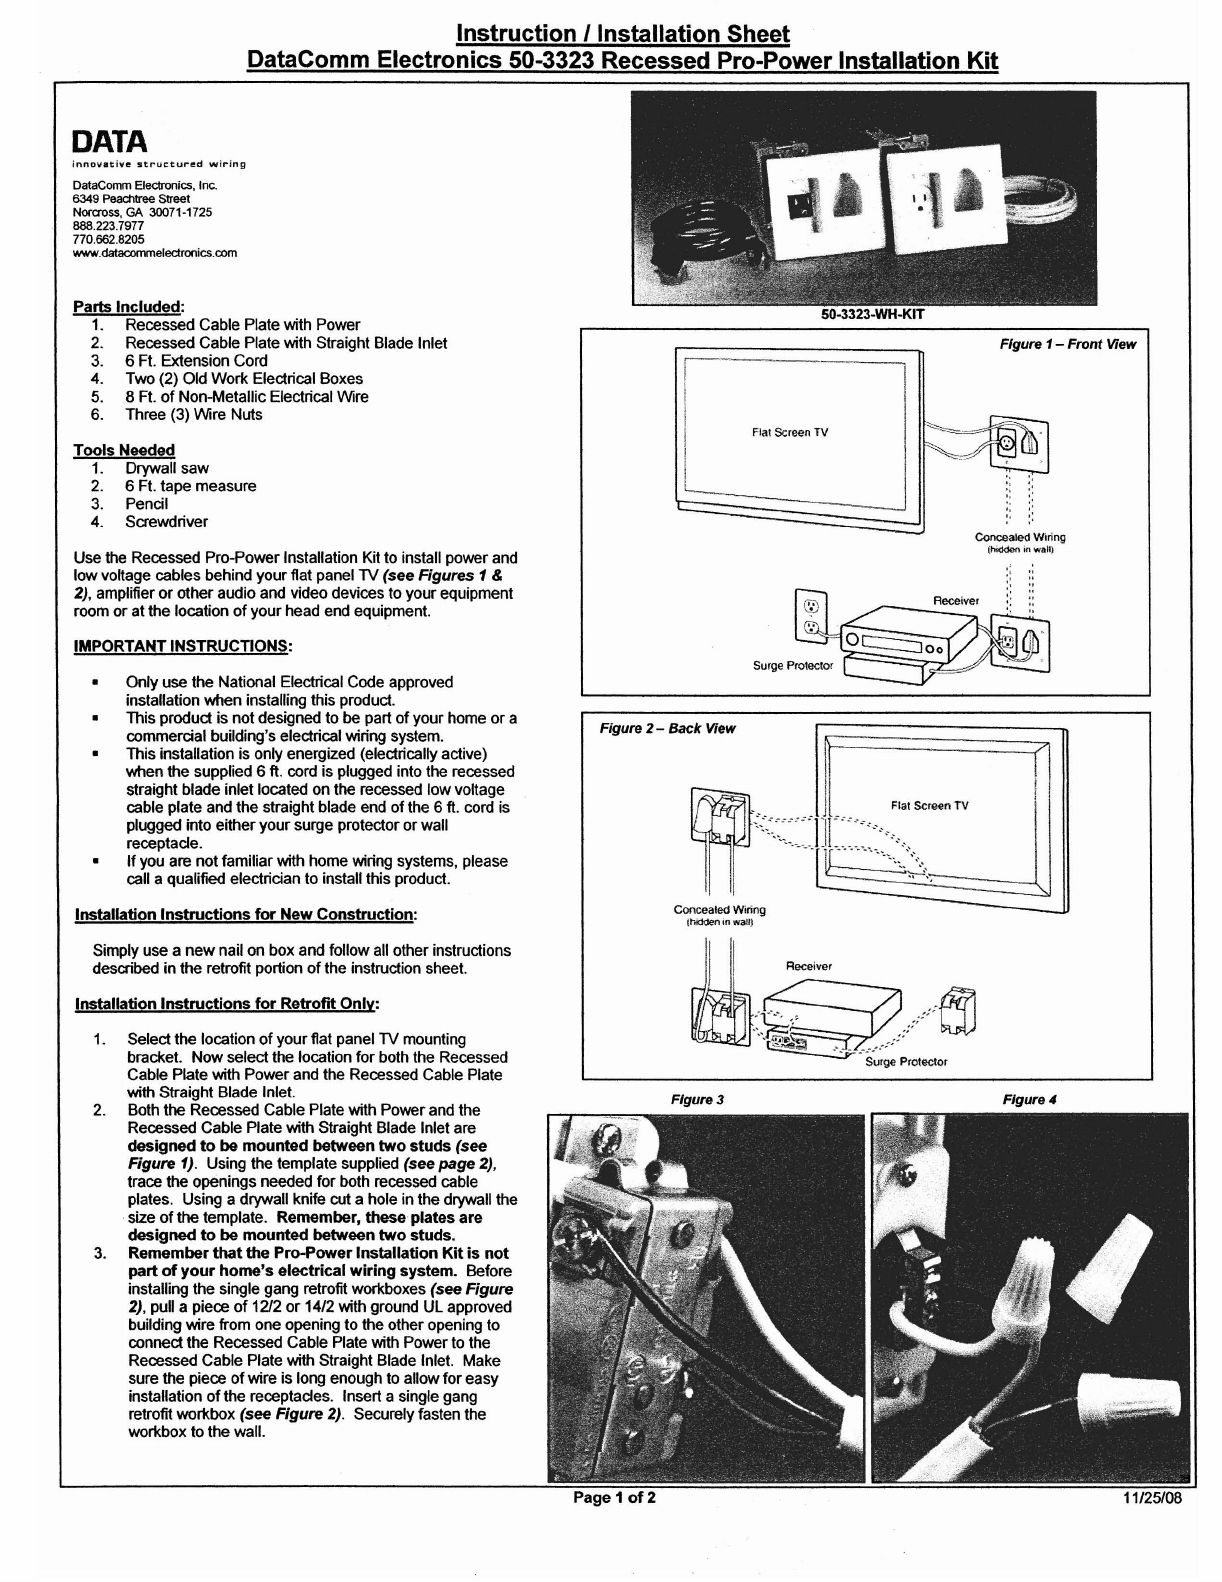
Use the Recessed Pro-Power Installation Kit to install power and
low voltage cables behind your flat panel TV (seeFigures 1&
2), amplifier
or
other audio and video devices to your equipment
room or at the location
of
yourhead end equipment.
IMPORTANTINSTRUCTIONS:
Only use the National Electrical Code approved
installation when installing this product.
• This product is not designed to be part
of
your home or a
commercial building's electrical wiring system.
This installation is only energized (electrically active)
when the supplied 6
ft.
cord is plugged into the recessed
straight blade inlet located on the recessed low voltage
cable plate and the straight blade end
of
the 6
ft.
cord is
plugged into either your surge protector or wall
receptade.
If
you are not familiar with home wiring systems, please
call a qualified electrician to install this product.
Installation
Instructions
for
New
Construction:
Simply use a
new
nail on box and follow all other instructions
described in the retrofit portion
of
the instruction sheet.
Installation
Instructions
for
Retrofit
Only:
1.
Select the location
of
yourflat panel TV mounting
bracket.
Now
select the location for both the Recessed
Cable Plate with Power and the Recessed Cable Plate
with Straight Blade Inlet.
2. Both the Recessed Cable Plate with Power and the
Recessed Cable Plate with Straight Blade Inlet are
designed
to
be
mounted
between
two
studs
(see
Figure 1). Using the template supplied (see page
2),
trace the openings needed for both recessed cable
plates. Using a drywall knife cut a hole in the drywall the
size
of
the template. Remember,
these
plates
are
designed
to
be
mounted
between
two
studs.
3.
Remember
that
the
Pro-Power
Installation
Kit
is
not
part
of
your
home's
electrical
wiring
system.
Before
installing the single gang retrofit workboxes (see Figure
2), pull a piece
of
12/2
or
14/2 with ground UL approved
building wire from one opening to the other opening to
connect the Recessed Cable Plate with Powerto the
Recessed Cable Plate with Straight Blade Inlet. Make
sure the piece
of
wire is long enough to allow for easy
installation
of
the receptades. Insert a single gang
retrofit worXbox (see Figure 2). Securely fasten the
workbox to the wall.
50-3323-WH-KIT
Figure
1-
Front View
Concealed Wrring
Ihfddon
in
wall)
Figure 2- Back View
~.I
,~-"~
!
I
<:~::-,:.
1'11-':
-"':'-'-"""
'---'-'U
r
"-"'"''''
.
""
I I
(.
""";:':-;-
Concealed Wiring -
thidden in walt)
Receiver
~
.-
--.'.
','
.:::-e!O
..
~
...
Surge Protector
Figure 3
Figure"

Installation
Instructions
for
Retrofit
Only
(continued):
4.
To connect the receptacle on the Recessed Cable Plate with
Recessed Power to the piece of 12/2 or 14/2 with ground UL
approved building wire that you pulled from one opening
in
the
drywall to the second opening
in
the drywall, strip off
approximately 3 inches
of
the outer jack
of
the UL approved
building wire. Be careful not to cut the jack
of
the inter wires.
Connect the hot line (black) wire to the brass colored terminal
screw and neutral (white) wire to the silver colored terminal
screw. Be sure to connect the grounding (green) or bare
grounding wire to the green colored terminal screw (see
Figure
3).
5.
Once you have wired the Recessed Cable Plate with Power
receptacle, begin by inserting the receptacle portion
of
the plate
into the retrofit work box. Once the entire recessed plate is flush
to the wall, using the two white screws supplied, screw the
receptacle portion
of
the plate to the work box. Next, screw
down the screws with wings. The wings will fasten tightly
against the back
of
the drywall. Plug all necessary video and
audio cables through the opening on the Recessed Cable Plate
with Power and inside the wall to the opening you cut out for the
Recessed Cable Plate with Straight Blade Inlet.
6.
To connect the Recessed Cable Plate with Straight Blade Inlet to
the piece
of
12/2 or 14/2 with ground UL approved building wire,
use the supplied three wire nuts. Connect the hot line (black)
wire to black wire, neutral (white) wire to white wire and
grounding (green) wire to the (green) or bare grounding wire
(see Figure 4). Make sure the three wire nuts are fastened
tightly. Plug all necessary video and audio cables through the
opening on the Recessed Cable Plate with Straight Blade Inlet.
Insert the straight blade inlet portion
of
the plate into the retrofit
work box. Once the entire recessed plate is flush to the wall,
using the two white screws supplied, screw the straight blade
inlet portion
of
the plate to the work box. Next, screw down the
screws with wings. The wings will fasten tightly against the back
of
the drywall. Make sure to keep your UL approved building
wire away from the video and audio cables (see Figure 2).
(
7.
For shock protection, both the UR, UL recognized receptacle
and inlet components must be properly grounded.
8.
Caution -use copper wire only with this receptacle and inlet.
9.
Install your flat panel
TV
mounting bracket per the flat panel
TV
bracket manufacturer's instructions. Make sure to read all
instructions.
10. The flat panel
TV
or TV/Projector plugs into the Recessed Cable
Plate with Recessed Power (see Figure 1). The supplied 6 ft.
cord will plug into the Recessed Cable Plate with Recessed
Straight Blade Inlet (see Figure 2) and into either your surge
protector or wall receptacle.
WARNING
OataComm
Electronics'
products
shall
be
installed
and
used
only
as indicated in OataComm
Electronics'
product
instruction
sheets.
Instruction
sheets are available
online
at
www.datacommelectronics.com.
CAUTION
For
shock
protection,
this
device
must
be
properly
grounded.
Use
copper
wire
only
with
this
device.
IMPORTANT INSTRUCTIONS
Read and
understand
all
instructions.
Follow
all
warning
and
instructions
marked on
the
product.
Do
not
use
this
product
nearwater,
for
example
near a bath
tub,
wash
bowl, kitchen sink,
or
laundry
tub,
in a
wet
basement,
or
neara
swimming
pool.
SAVE THESE INSTRUCTIONS.
ONLY LICENSED PROFESSIONALS SHOULD INSTALL THIS PRODUCT
4-11/16" )
TEMPLATE
Recessed Cable Plate with Power
&
Recessed Cable Plate
with Straight Blade Inlet
ACTUAL SIZE
CUT ALONG DOTTED LINE X
This
product
is
patent
protected
by
U.S. Patent
numbers
0553475, 0554475, 0568719, 11355553 and 7390964.
Multiple patents
pending.
~E'''~'
"eifeRM$
T'
O~l.l"'~~US
ULS1D
514C
3026001
C£RI1RED
TO
CAR/CSA
STO
022.2
NO.
42.1
Page 2
of
2 11/25/08
This manual suits for next models
1
Table of contents
Other DataComm Accessories manuals

Popular Accessories manuals by other brands


Telcoma Automations
Telcoma Automations ILB sincro installation instructions

Shadow Hunter
Shadow Hunter ARCHERY WINDOW installation instructions

PEHA
PEHA 940 RS Installation and operating instructions

UNIK Power
UNIK Power The Kase user guide

Philips
Philips SDW5004GN Specifications

GE
GE 19297 installation guide


