Daum electronic ergo_bike pedelec classic User manual
NOTE
You can prevent unauthorised persons from using
your ergo_bike pedelec by entering a lock code.
In order to create your own lock code (1 to 8 digits
numeric code) you need rst the "always valid"
master lock code for your bike.
If you forget your own lock code, enter instead of it
the "always valid" master lock code for your bike.
Therefore you should store this code in a safe
place!
The IMEI (International Mobile Station Equipment
Identity) is an univoque 15-digit serial number with
which each GSM device can be unequivocally iden-
tied - e.g. in case of theft.
classic model
For the serial number of your frame: ______________
the "always valid" master lock code: ______________
premium model
For the serial number of your frame: ______________
the "always valid" master lock code: ______________
IMEI serial number: ____________________________________

daum electronic gmbh
Flugplatzstr. 100 · D-90768 Fürth
Phone: +49 (0)911 97536-0 · Fax: +49 (0)911 753714
www.daum-electronic.de
no. 0630424e.0006 2010 05 31
Your daum electronic dealer
We develop and manufacture also training devices for sport, therapeutic and medical usage. More than 500,000
devices are in use by satised customers around the world. Visit our web page at www.daum-electronic.de to learn
more about our complete product range.

User Manual
ergo_bike pedelec classic
premium
Pedelec stands for Pedal Electric Cycling.
It designates a bike with electric assisted pedalling
having the following characteristics:
- Pedelecs combine a bike with an electric motor,
a rechargeable battery, control electronics, and
sensors for recognising crank movements.
- Pedelecs are considered as bikes and may be
used without driving licence and without auto-
mobile liability insurance.
- A helmet is not required but we do recommend
wearing a bicycle helmet.
- All pedelecs sold in the EU must comply with the
directive DIN EN 15194.
- While pedalling pedelecs are assisted by a motor
from 0 to 25 km/h.
We recommend that you carefully read this user
manual to quickly familiarise yourself with your
ergo_bike pedelec. Competent handling and regular
care and maintenance of the ergo_bike pedelec help
preserve its value.
Also for safety reasons take into consideration the
information about modifications, accessories, and
spare parts.
Please if you sell your ergo_bike pedelec give also
this user manual to the buyer.
PREFACE
daum electronic is permanently working to improve all
its models. Keep in mind that the delivery scope can
be modified any time. The modifications can cover
the form, equipment, and technology. Therefore no
complaint or claim can be made based on the illustra-
tions and descriptions contained in this user manual.
All texts, illustrations, and instructions contained in
this user manual are actual at the moment this user
manual is put to print. The data contained in this user
manual are valid at the moment of printing. Errors
and omissions excepted.
The illustrations show the Comfort model for the
extend that it does not differ from the Trekking mod-
el. The descriptions for the Trekking D (ladies) and
Trekking H (gentlemen) models are similar.
Reprinting, copying, or translating of this manual,
in complete or in parts, is not allowed without an
express authorisation. All the rights remain with
daum electronic according to the Copyright law.
Subject to modifications.
daum electronic gmbh
Used symbols
Notes important to your safety are especially iden-
tied. Take these notes into consideration to avoid
injuries to a person and damages to the bicycle.
WARNING
Warns you against hazards for your health and
indicates potential injury risks.
ATTENTION
Signals possible dangers for the bicycle or other
objects. Non-observance of these remarks can
lead to voiding the warranty.
NOTES
Highlight tips and information for you.
The keys
Two identical keys for the battery are provided
with your ergo_bike pedelec. Please keep the
spare key in a safe place.
Please read all the important information about the
SHIMANO gear shift, the suspended fork, and the
TRANZ X components in the included manufac-
turer’s manual.
ergo_bike pedelec

1
OPERATING classic and premium
Side view of the right side ............................................... 2
Handlebar functions and operation .................................. 3
Seating position ............................................................... 4
Adjusting the saddle ................................................... 4-5
Adjusting the handlebar ............................................... 6-7
Adjusting the suspension fork ......................................... 8
Safety hints for the battery charger ................................. 9
Battery charger operations ........................................... 10
Safety hints for the rechargeable battery ..................... 11
Handling the rechargeable battery and the charger ..... 12
Charging the rechargeable battery .......................... 13-15
Dashboard.......................................................................16
Menu diagram ............................................................... 17
Displays.......................................................................18-21
SD card ................................................................... 22-23
Software update ...................................................... 23-26
OPERATING premium series
Functions overview ....................................................... 27
GSM/GPRS.................................................................28-29
Displaying travelled tracks with Google Earth ......... 30-31
Displaying travelled tracks with GPSies .................. 32-33
Posting your own tracks on Internet ............................... 33
GPSmenu.........................................................................34
Biking through tracks from Internet .......................... 35-38
Maintenance and care plan ...................................... 57-58
Bike chain tension ......................................................... 59
Verifying chain wear ...................................................... 60
Pedal cranks, pedals ..................................................... 61
Steering bearing, spokes ............................................. 62
Adjusting the brakes ................................................. 63-65
Disassembling and assembling the front wheel ....... 66-67
Disassembling and assembling the rear wheel ....... 68-69
Hub gear ....................................................................... 69
Dismounting and mounting the tyres ............................. 70
Lighting system ............................................................. 71
Checking the fuse of the rechargeable .
battery and of the charger ............................................. 72
SPECIFICATIONS ............................................... 73-77
WARRANTY AND SERVICE
Warranty conditions ...................................................... 78
Wear parts list .......................................................... 79-80
Delivery list ................................................................... 81
EC DECLARATION OF CONFORMITY ............ 82
BIKEID CARD .......................................................83
Your own tracks / last tracks .......................................... 39
Querying the position ..................................................... 39
Sending the position ...................................................... 39
Determining the altitude ........................................... 39-40
BIKING
Starting up ..................................................................... 41
Assistance level ............................................................ 42
Pushing assistance .................................................. 42-43
Driving conditions ......................................................... 43
Hub gear ....................................................................... 44
Gear recommendation ................................................. 44
Braking..............................................................................45
Parking..............................................................................46
Safety hints .............................................................. 47-49
Transport.......................................................................... 50
Theft protection ............................................................ 50
Carrying loads ............................................................... 50
CARE
Bicycle care .............................................................. 51-52
Disposal of waste .......................................................... 53
Technical modications, spare parts .............................. 54
ACCESSORIES....................................................54-55
MAINTENTANCE AND CARE
Miscellaneous.................................................................56
TABLE OF CONTENTS
1
ergo_bike pedelec

1 Display
2 Handlebar
3 Handlebar stem
4 Serial number
5 Saddle clamp for saddle height
6 Rechargeable battery, lockable
7 V-Brake rear wheel
8 Side stand
9 Electric motor
10 Pedals
11 Hub dynamo
12 Quick release lever front wheel
13 V-Brake front wheel
OPERATING classic and premium
Side view of the right side
2
ergo_bike pedelec
3
2
7
1
8
5
4
6
10 9
11
13
12

3
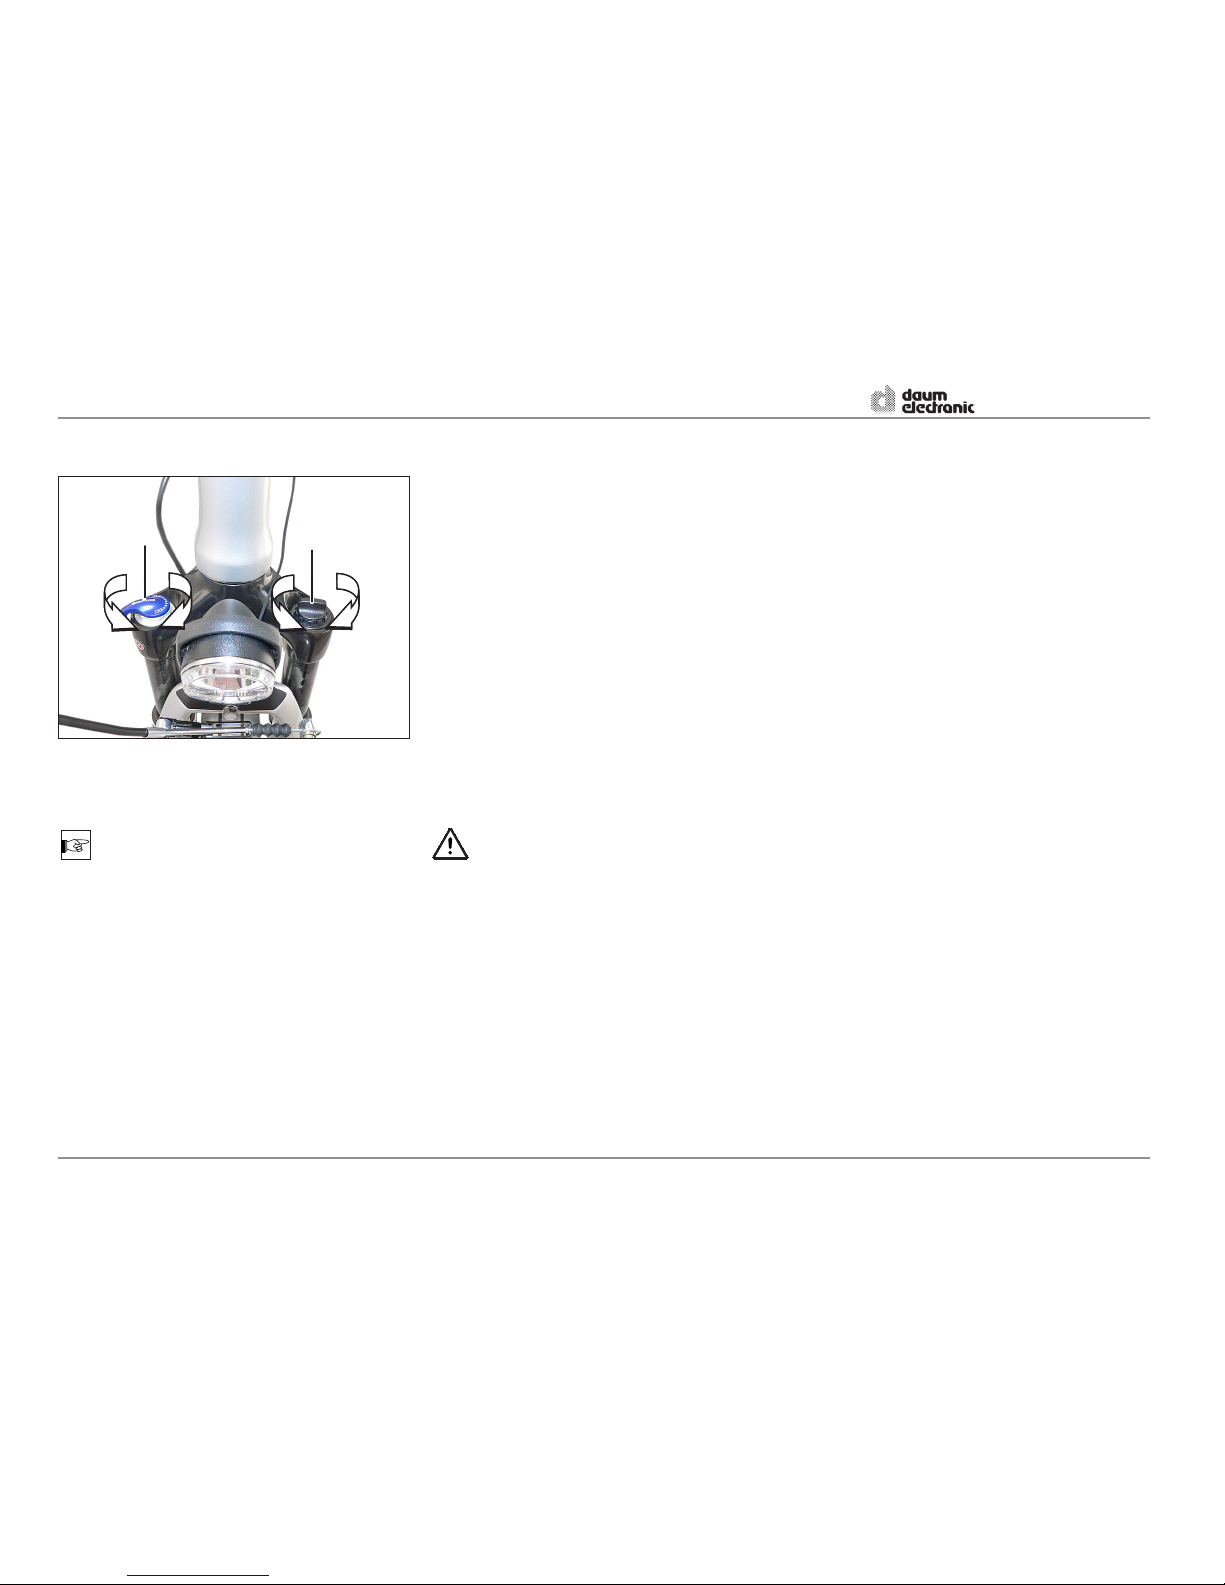
Handlebar functions and operation
1 Handle
2 Brake lever for the front wheel
3 Close control buttons
4 Dashboard with display
OPERATING classic and premium
Close control buttons
1 Decrease assistance level
2 Increase assistance level
3 Pushing assistance
4 Switching the display between standard view and:
- "Current data" (only with premium model)
- "Current tour"
- "Total values"
- "GPS data" (only with premium model)
5 Brake lever for the rear wheel
6 Handle
7 8-speed twist gear shifter
+: 1 x shift to the next higher speed
(8th speed = highest transmission ratio)
-: 1 x shift to the next lower speed
(1st speed = lowest transmission ratio)
8 Bell
3
ergo_bike pedelec
14
3
2
8
7
1
3
6
5
2
4

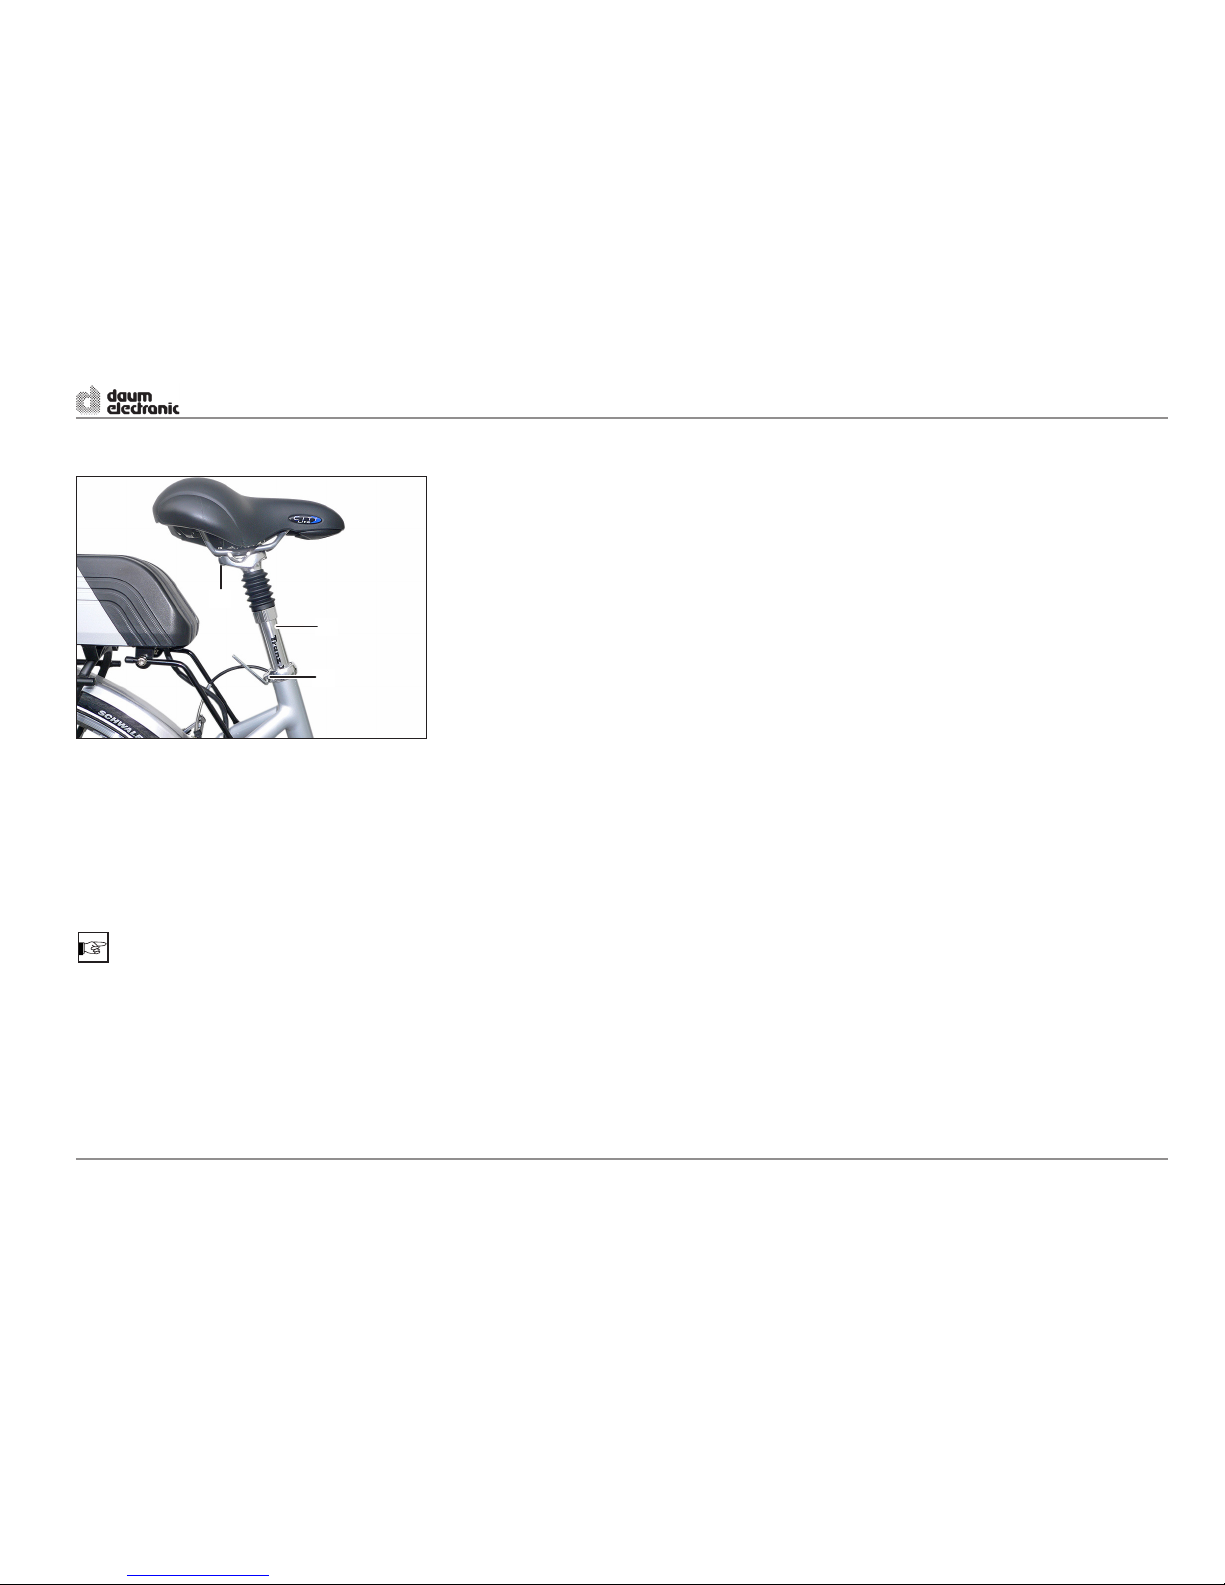
Seating position Setting the saddle height
WARNING
Please note that the saddle may be pulled
up at most to the marking (2) on the saddle tube.
- Loosen the saddle clamp (1) by means of an
Allen wrench SW4, adjust the saddle height and
retighten the screw.
Adjust the height of the saddle and handlebar to
adapt them to your body size in order to allow for a
comfortable, non tiring, and safe driving.
Sit on the saddle, put one pedal in the lowest position
and place your heel on the pedal. The saddle height
should be set so that your leg is almost straight in
the lowest pedal position.
The handlebar setting is correct when the handlebar
stem (1) is at the same level (3), or a little higher as
the upper edge (2) of the saddle.
3
12
2
1
OPERATING classic and premium
4
ergo_bike pedelec
5
The saddle can also be inclined and adjusted in the
longitudinal direction.
- Loosen screw (1).
- Position the saddle in the required horizontal
position or shift it to the front or to the rear and
tighten screw (1).
NOTE
To avoid sitting discomfort, the saddle should be set
as horizontal as possible.
Setting the spring suspension of the saddle pillar
The saddle pillar (2) equiped with a spring suspen-
sion can be set to be soft or hard.
The setting is done by means of an Allen wrench
SW6 on the lower end of the saddle pillar.
- To this end loosen the clamp (3) of the saddle
pillar and pull out the saddle.
Turn clockwise = harder
Turn counterclockwise = softer
- Insert the saddle pillar, adjust the saddle height,
and tighten the clamp (3) of the saddle pillar.
Adjusting the saddle
OPERATING classic and premium
5
ergo_bike pedelec
2
3
1
Adjusting the handlebar position on the
Comfort model
- Loosen the clamp screw (1) of the handlebar
stem (2) using an Allen wrench SW6.
Adjusting the handlebar height on the Comfort model
- Loosen the clamp screw (1) by means of anAllen
wrench SW6.
- Adjust the handlebar position by moving the
handlebar stem (2).
- Tighten the clamp screw (1).
NOTE
Pay attention to leave the sheated cables free run-
ning and avoid setting the handlebar to the extreme
high or low position.
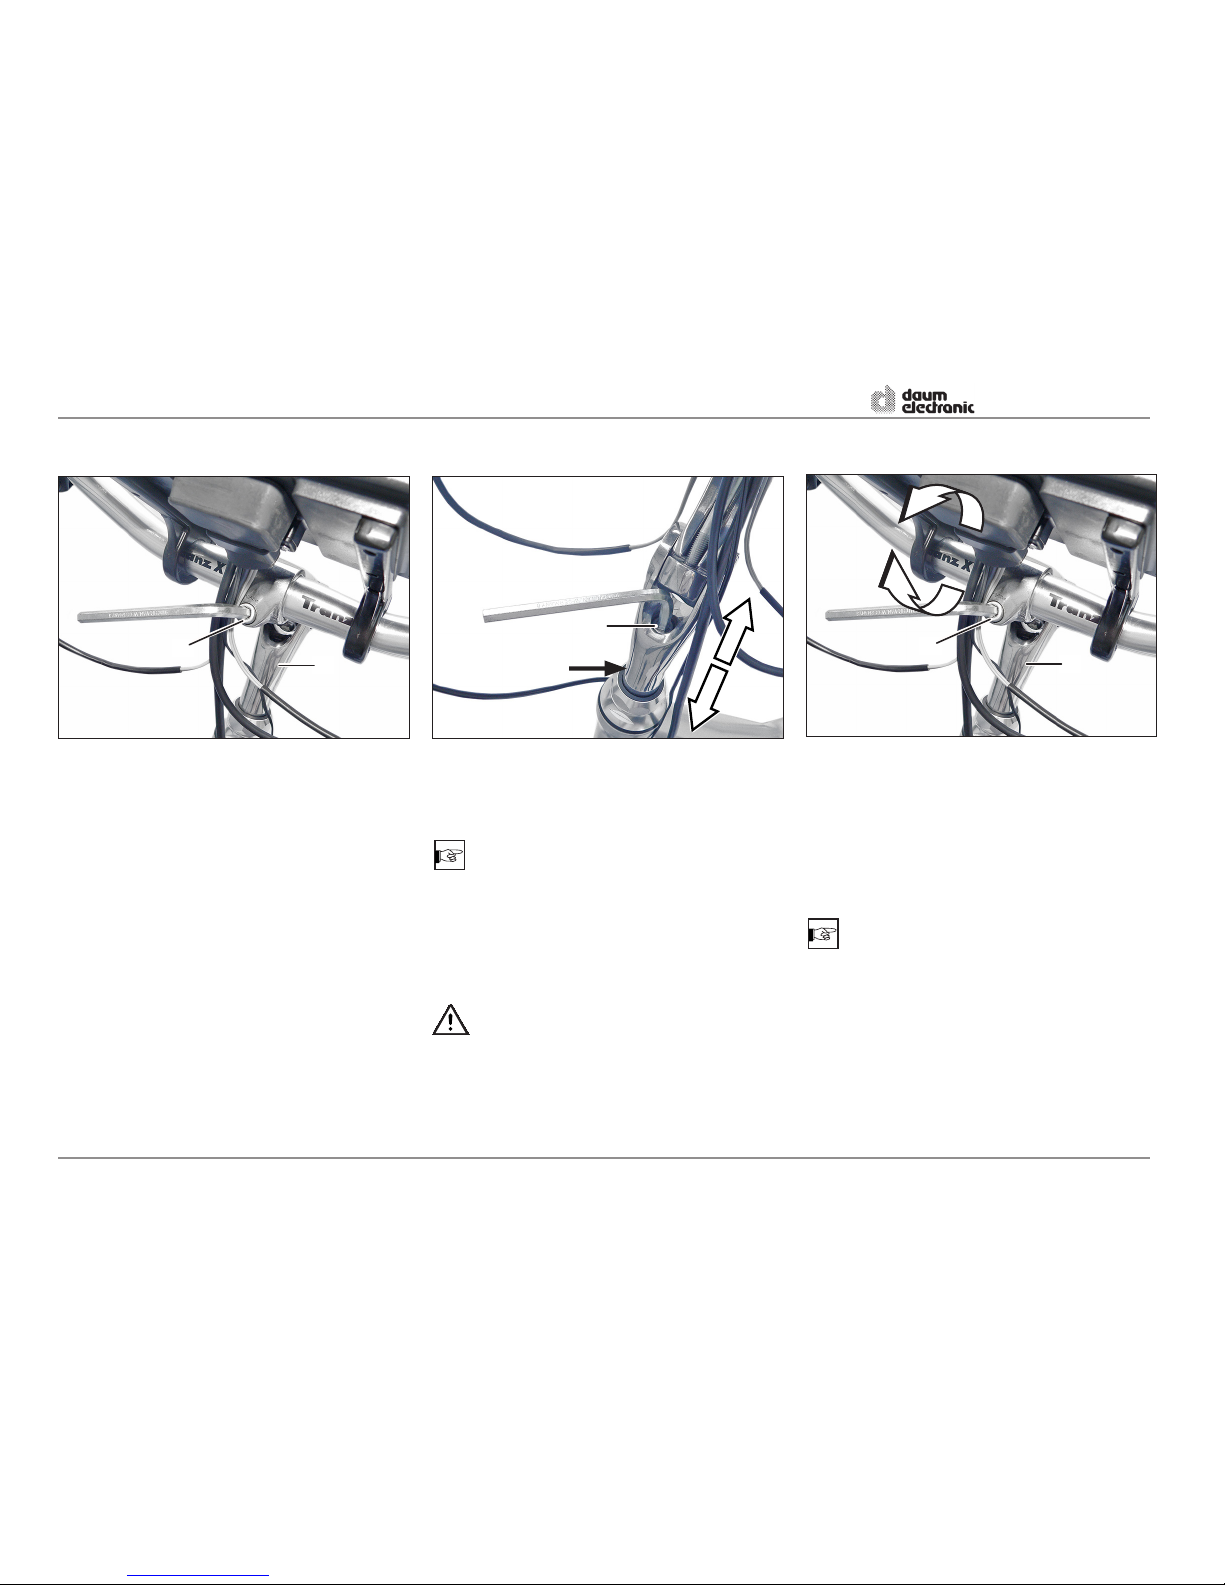
- Loosen the clamp screw (3) of the handlebar
stem using an Allen wrench SW6 by one to two
turns.
NOTE
The clamping is done by a conical body. It is therefore
enough to apply a rotary motion to the handlebar to
loosen the clamping.
- Adjust the handlebar height and tighten the clamp
screw (3).
WARNING
Please note that the handlebar stem may be
pulled up at most to the marking (4).
OPERATING classic and premium
6
ergo_bike pedelec
3
4
1212

7
- Loosen the clamp screw (1) of the handlebar
stem (2) by means of an Allen wrench SW6 and
adjust the position.
- Retighten the clamp screw (1).
Adjusting the handlebar stem on the Trek-
king model
Adjusting the handlebar position on the
Trekking model
- Loosen the four clamp screws (1) by means of
an Allen wrench SW6.
- Adjust the handlebar position by shifting the
handlebar (2).
- Retighten the clamp screws (1) alternatively
crossed.
NOTE
Pay attention to leave the sheated cables free run-
ning and avoid setting the handlebar to the extreme
high or low position.
OPERATING classic and premium
7
ergo_bike pedelec
1
2
1
1
2
Turn the setscrew (1) as desired:
+ =
- =
Lock function (option)
If required you can lock the suspension of the fork
by means of the lock lever (2).
LOCK = suspension locked
OPEN = suspension active
WARNING
Do not make any other modication to the sus-
pension fork.
Adjusting the initial tension of the suspension
fork
NOTE
The initial tension is used to adjust the response
characteristics of the suspension fork to adapt it to
the road conditions and user's weight. The higher
the initial tension is, the higher the pressure to apply
before the suspension fork reacts.
Adjusting the suspension fork
OPERATING classic and premium
Suspension hard:
Turn clockwise to increase the initial tension.
Suspension soft:
Turn counterclockwise to decrease the
initial tension.
8
ergo_bike pedelec
1
2

9
Important safety notes for the battery charger
Please read these safety notes before you start
using the battery charger.
WARNING
Keep the charger out of reach of children. To
prevent risks of injury you should only recharge
daumelectronic Lithium-Ion (Li-Ion)rechargeable
batteries. Other battery types may explode when
recharged.This cancause injuries topersons and
material damages.
Using accessories or rechargeable batteries that
we do not sell or recommend, introduces risks of
re, electrical shocks or injuries.
In any case avoid using the device in humid or
wet environment.
Avoid absolutely water infiltrations in the
device. If liquid inltration does occur: imme-
diately disconnect the charger from the power
supply and take it to your daum electronic dealer
for testing.
Please provide for a safe stand for the device on
a at level surface.
When not in use disconnect the power supply.
Do not pull on the cable to avoid damaging
the cable and prevent the risks of an electrical
shock.
After use, make sure that the power cable is
properly rolled up or fold up.
Do not use the charger with a damaged cable or
power plug. Have it immediately replaced by a
qualied technician.
Do not use the charger after it received a
strong shock, was dropped or anyhow damaged.
Do never disassemble the charger yourself. A
faulty assembly can lead to electrical shocks or
re hazards.
To prevent electrical shocks, disconnect the
charger from power supply before cleaning it.
Clean the device only with a dry cloth. Do
never use oil, water or solvents.
An extension cable should only be used
if absolutely necessary. Using an extension
cable that is not in perfect condition can lead to
re hazards or electrical shocks. If an extension
cable is used, you must make sure that:
- the pins of the cable power plug correspond
to those of the charger exactly in number, size
and shape,
- the extension cable is correctly wired and in
good electrical state,
- the cable section is large enough to support
the AC current load of the charger,
- the extension cable does not present any
visible damage,
- the drum is completely unwound when using
cable drums.
OPERATING classic and premium
9
ergo_bike pedelec

ATTENTION
To prevent overheating the charger, the ventila-
tor (2) may not be covered during the charging
process.
In case of troubles check if:
- the fuse (3) of the charger is defective?
- the power cable is properly plugged in?
- the contact pins of the charger and the re-
chargeable battery are clean and not damaged
or bent?
- the rechargeable battery is damaged or defec-
tive?
- the plug of the charger is rmly plugged in the
connector of the rechargeable battery?
Battery charger operations
The LEDs (1) on the battery charger give actual in-
formation about the operation of the battery charg-
er. You can check at a glance the charging status
and charging state of the rechargeable battery.
Charging cycle and LED displays on the charger
LED Mode
Red and yellow Charging
Red and green Charging completed
In the case that a proper battery charge cannot be
obtained:
- Verify that the power outlet is connected to power,
eventually plug in another device.
- Verify that the connecting plugs t in properly and
establish contact.
- If it is still not possible to recharge the battery,
then please have the charger and the re-
chargeable battery tested by your daum elec-
tronic dealer.
OPERATING classic and premium
10
ergo_bike pedelec
2
1
3

11
Important safety hints for the rechargeable battery
- Protect the rechargeable battery against shocks
and humidity.
- Before you plug the charger into a power outlet
please verify that the voltage supplied corre-
sponds to the voltage specied on the nameplate
of the charger.
- Rechargeable batteries will achieve their maxi-
mal usable life when recharged in an ambient
temperature of +10°C to a max. of +30°C.
- The rechargeable battery will get warm when
used heavily. Please wait for the rechargeable
battery to cool down to room temperature, or
about 30 minutes, before starting the recharging
process.
WARNING
-Keep the rechargeable battery out of reach
of children.
- Do not open or disassemble the rechargeable
battery yourself.
- Do not short-circuit the rechargeable battery
with metal objects.
- Do not immerse the rechargeable battery in
any liquid.
- A not usable rechargeable battery may not in
any case be incinerated or put to re! There
is risk of explosion!
CORROSION RISK
- Stop using the rechargeable battery in
the presence of leaks or loss of electrolyte.
FIRST AID
Rinse acid sprays in the eyes immediately with
clear water for a few minutes! Then consult a physi-
cian without delay.
Neutralize acid splash on skin or clothes immedi-
ately with acid neutralizer (soda) or soap suds and
rinse with plenty of water.
If acid is swallowed, consult a physician immediately.
NOTE
Used rechargeable batteries are subject to waste
disposal regulations. Rechargeable batteries con-
tain heavy metals and are therefore subject to toxic
(hazardous) waste control.
Your daum electronic dealer will take care of
battery disposal for you.
Before starting operating, we strongly recommend
you read the following important notes and comply
with them:
- A new ergo_bike pedelec rechargeable battery
is charged to about 80% capacity.
- The rechargeable battery develops its maxi-
mum capacity after about five discharge/
recharge cycles.
WARNING
- The rechargeable batteries of the ergo_bike
pedelec and the provided charger are tuned
to each other. Therefore you should always
recharge the battery with a charger of the
same model series.
OPERATING classic and premium
11
ergo_bike pedelec

Handling the rechargeable battery and the charger
ATTENTION
Ignoring the following directives can lead to a
deep discharge of the rechargeable battery.
A deep discharge of the rechargeable battery
voids the warranty.
In order to achieve the longest possible service
life of the rechargeable battery you should
follow the following directives:
- The charger will not operate when the tem-
perature of the rechargeable battery is below
0°C and higher than +60°C. Therefore you
should bring the rechargeable battery to
about room temperature before starting the
charging process.
- If the pedelec will be exposed to low tempera-
turesat itsstorage location,we recommendto
remove the rechargeable battery and store it
at room temperature.
- If the rechargeable battery is kept turned off
or removed for an extended period of time,
then it is expected that you will need to set
the date and time again!
- Recharge the battery at the soonest oppor-
tunity after use, regardless of the amount of
discharged energy.
- After the charging process is complete, the
rechargeable battery must be disconnected
from the charger, and it maynot be left con-
nected to a switched off charger (self dis-
charge).
- When not used for a prolonged period, the re-
chargeable battery may not be left connected
to the charger.
- When storing the bike (e.g. in winter) the
rechargeable battery must be stored fully
charged in a dry room at room temperature.
- Recharge every 3 months.
NOTE
About self discharge
The rechargeable battery will self discharge mainly
through chemical processes occurring in the gas-
tight cells. The discharge rate depends on the time,
charging level and environmental conditions (tem-
perature, air humidity).
This results in a correspondingly shorter range with
electric drive.
OPERATING classic and premium
12
ergo_bike pedelec
13
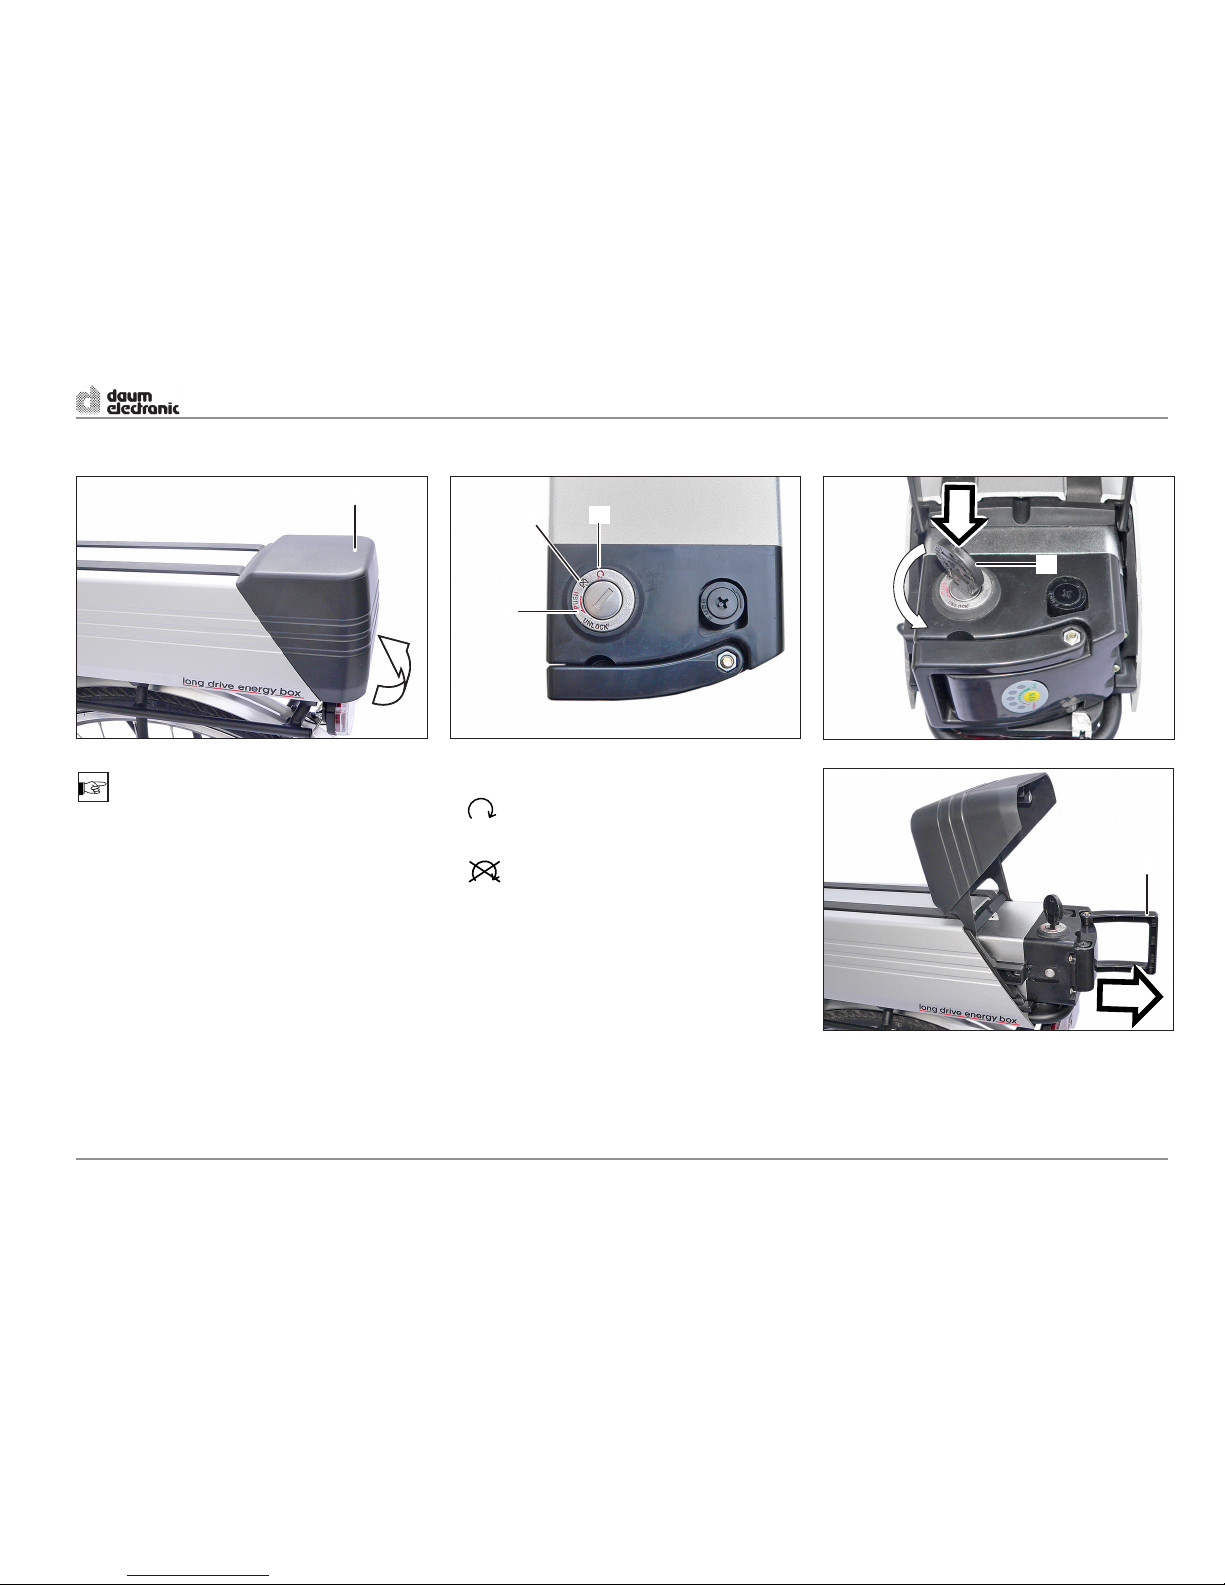
Removing the rechargeable battery to recharge it
NOTE
The rechargeable battery is locked by means of a
key-lock. The rechargeable battery must be removed
from the battery compartment to be recharged.
The charging time is about 3 hours for a discharged
rechargeable battery.
- Open the cover (1) of the battery compartment
upward.
Key positions on the rechargeable battery
1Operating position: the rechargeable
battery is switched ON.
2 The rechargeable battery is switched
OFF. The key can be removed.
3 PUSH The rechargeable battery is unlocked
UNLOCK and can be removed.
- Press the key (4) and turn it counterclockwise
to the PUSH UNLOCK position. The rechargeable
battery is unlocked. - Pull the rechargeable battery on the handle (5)
out of the battery compartment.
OPERATING classic and premium
13
ergo_bike pedelec
1
2
3
4
1
5

Charging the rechargeable battery
ATTENTION
The switch (4) on the charger may only be
switched ON after the connections to the re-
chargeable battery and to the power supply
have been established. Otherwise the charging
process will not start.
After the charging process is complete dis-
connect the rechargeable battery from the
charger.
- Connect the plug (1) to the connector (2) of the
rechargeable battery.
- Connect the power plug of the charger (3) to a
power outlet at 100-240V, 50-60Hz.
- Turn ON the switch (4) on the charger.
Checking the charge level of the rechargeable
battery
- The LEDs (7) (red + green) light up when you
press the ON key (8).
When the rechargeable battery is fully charged all 4
green LEDs and the red one will glow.
Charge status on the charger
The LEDs (5) on the charger indicate the charging
status.
Red + yellow The charging process is active and
the ventilator (6) is running.
Red + green The charging process is complete
and the ventilator is not running.
OPERATING classic and premium
14
ergo_bike pedelec
4
2
3
1
6
58
7
15
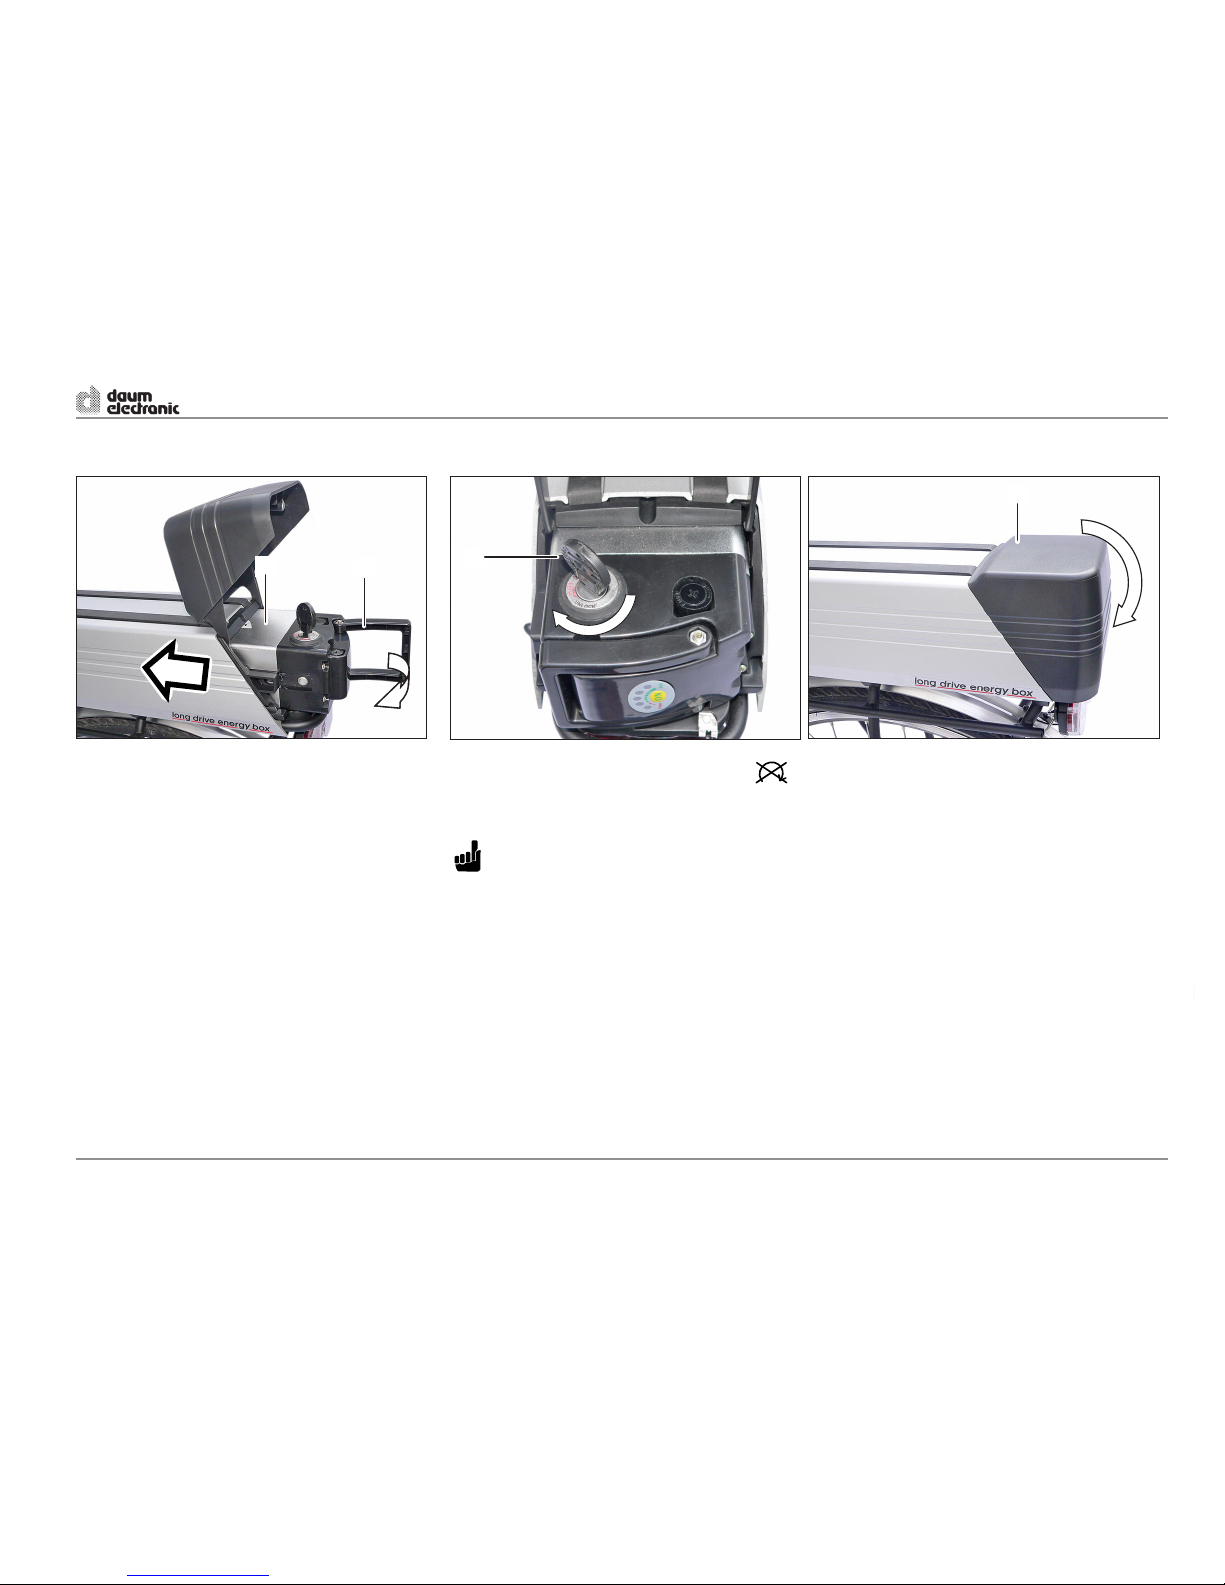
Installing the rechargeable battery
- Insert the rechargeable battery (1) in the battery
compartment until it stops and fold the handle
(2) back.
- Turn the key (3) to the right into position .
This will lock the rechargeable battery and turn it
OFF.
ATTENTION
- The rechargeable battery must be turned OFF
when not in use.
- Close the cover (4) of the battery compartment.
OPERATING classic and premium
15
ergo_bike pedelec
4
3
12
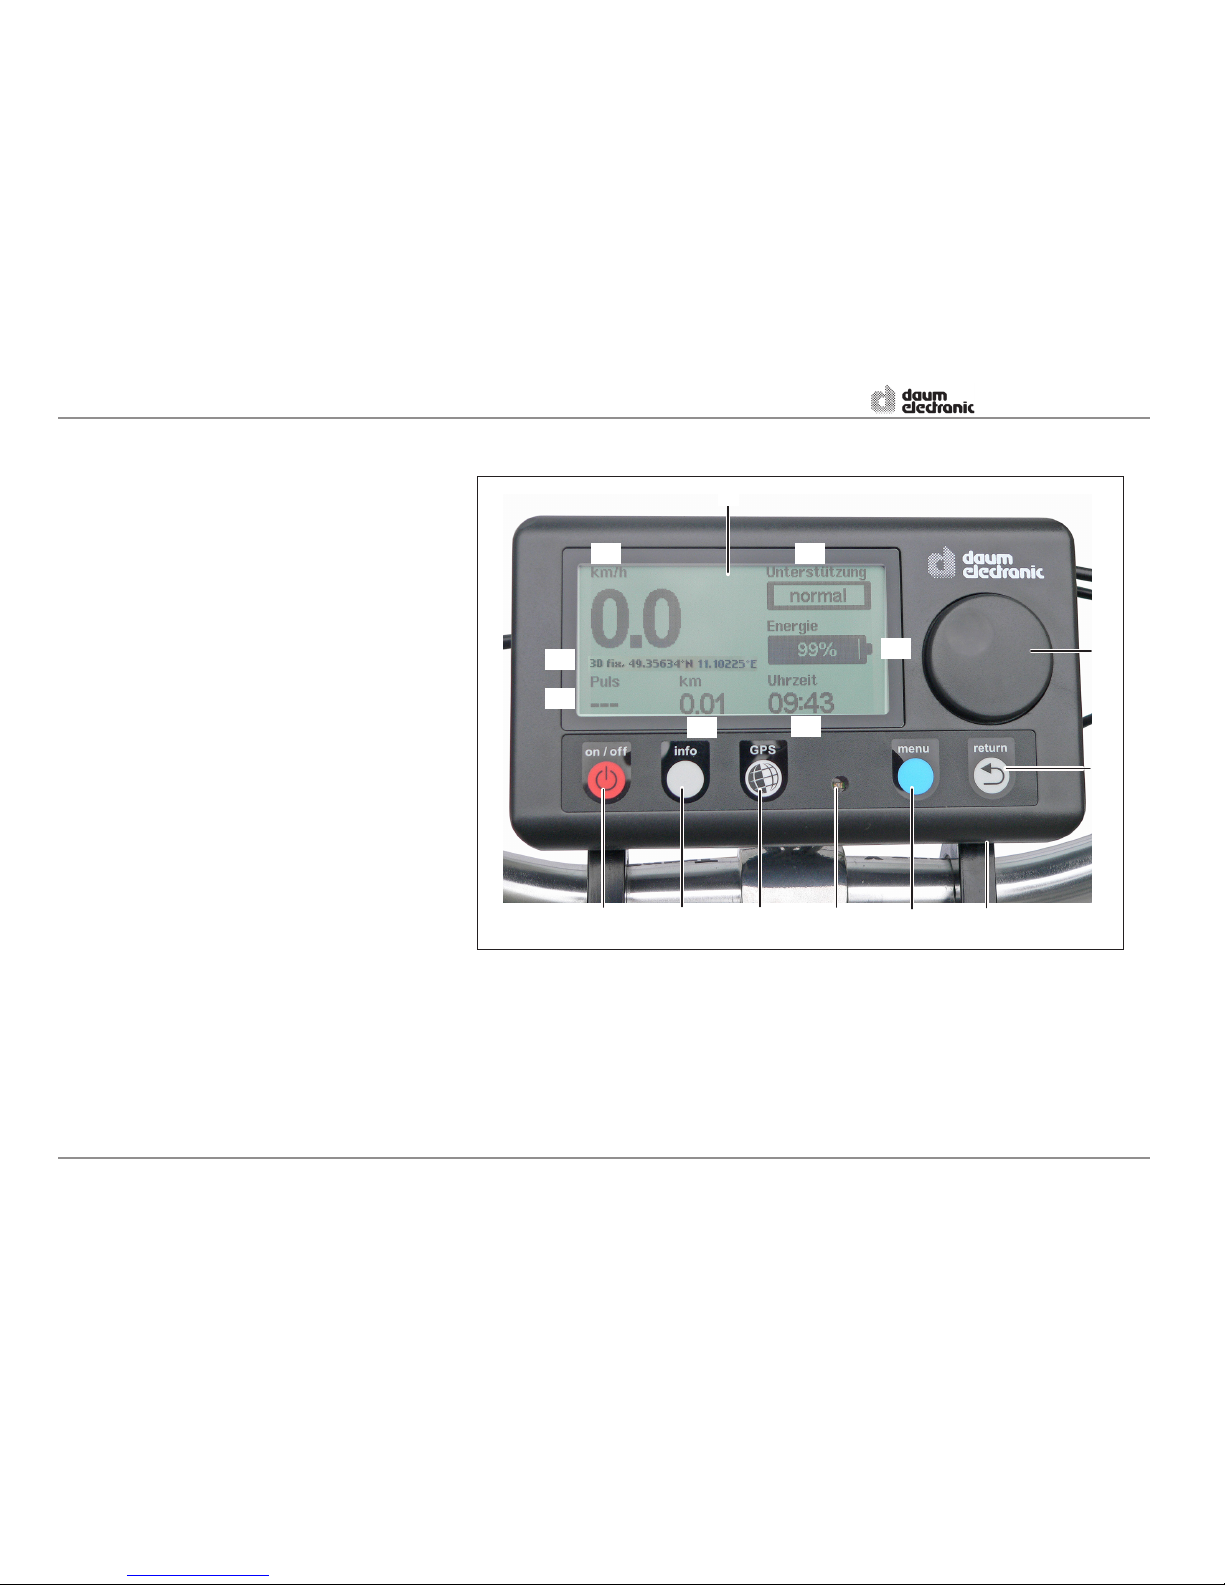
Dashboard functions and operation
1 Display
1.1 Speed in km/h
1.2 Assistance level / Energy consumption /
Pushing assistance
off (without motor assistance)
low (with motor assistance)
normal (with motor assistance)
high (with motor assistance)
Energy consumption (length of the bar)
Pushing assistance (up to 6 km/h)
1.3 Energy
Rechargeable battery charge level %
(length of the bar)
Remaining travel range in km based on
the energy consumption for the current
tour and the last 5 minutes
1.4 Time / Trip time
1.5 Tour kilometre
1.6 Heart rate (option) .
Measuring range of the heart rate 40
to 220 (The menu option to set the dis-
played value is available only on bikes of
the premium series)
1.7 GPS position
(only on bikes of the premium series)
5 Menu ON/OFF key
6 Display brightness sensor
7 GPS key (only on bikes of the premium series)
8 Info key
9 ON/OFF key dashboard and motor
2 Control button (turn and press)
Main menu - sub menus
3 Return key
Sub menu - main menu - normal display
4 SD card slot
OPERATING classic and premium
16
ergo_bike pedelec
98 7 65
3
4
2
1.1 1.2
1.3
1.4
1.5
1.6
1.7
1
This manual suits for next models
1
Table of contents
Other Daum electronic Bicycle manuals


