neomouv CRONOS User manual

USER MANUAL
CRONOS
THIS MANUAL CONTAINS IMPORTANT
SAFETY AND OPERATING INSTRUCTIONS
Model conforms to safety requirements
Product may differ from photos

CRONOS Manual
2
CONTENTS
1- PRESENTATION..............................................................................................................3
2- ADJUSTMENTS/ASSEMBLY:.............................................................................................4
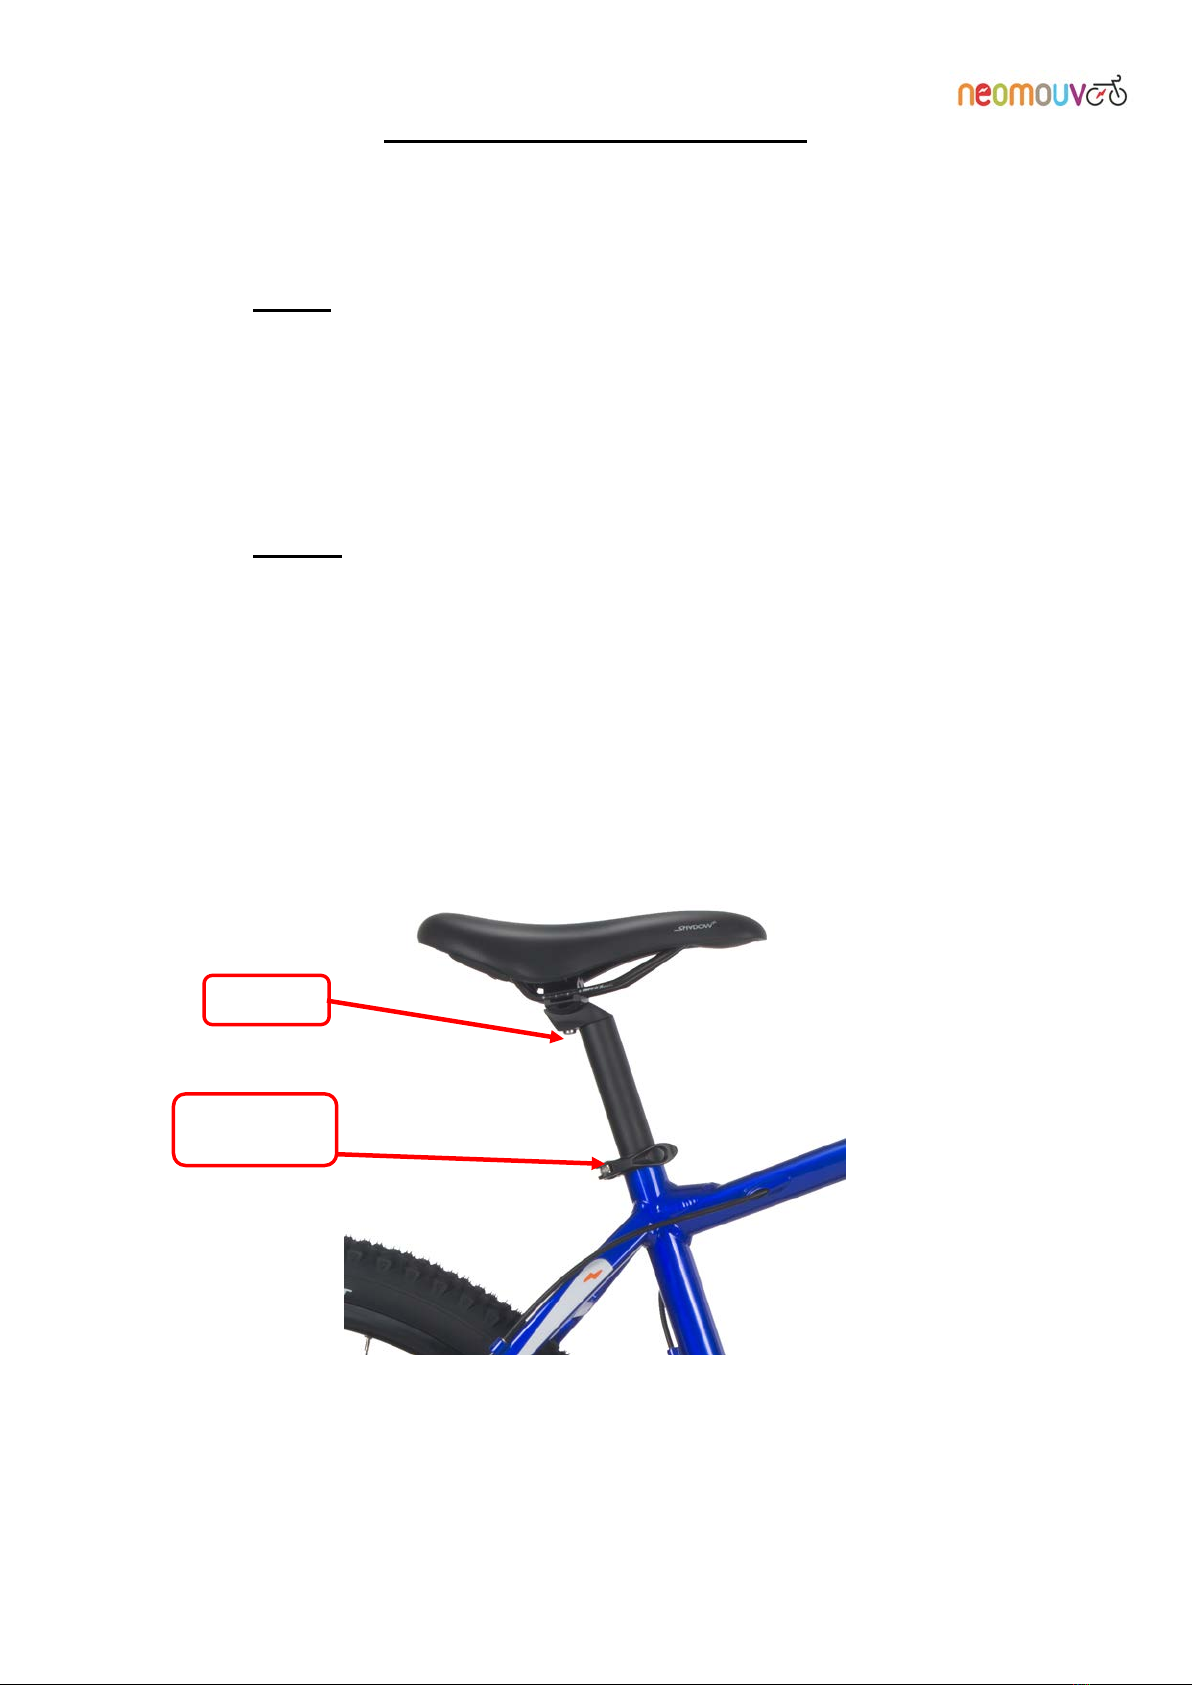
2.1 Saddle adjustment:.................................................................................................................................... 4
2.1.1 Angle:................................................................................................................................................. 4
2.1.2 Height:................................................................................................................................................ 4
2.2 Fork adjustment:....................................................................................................................................... 5
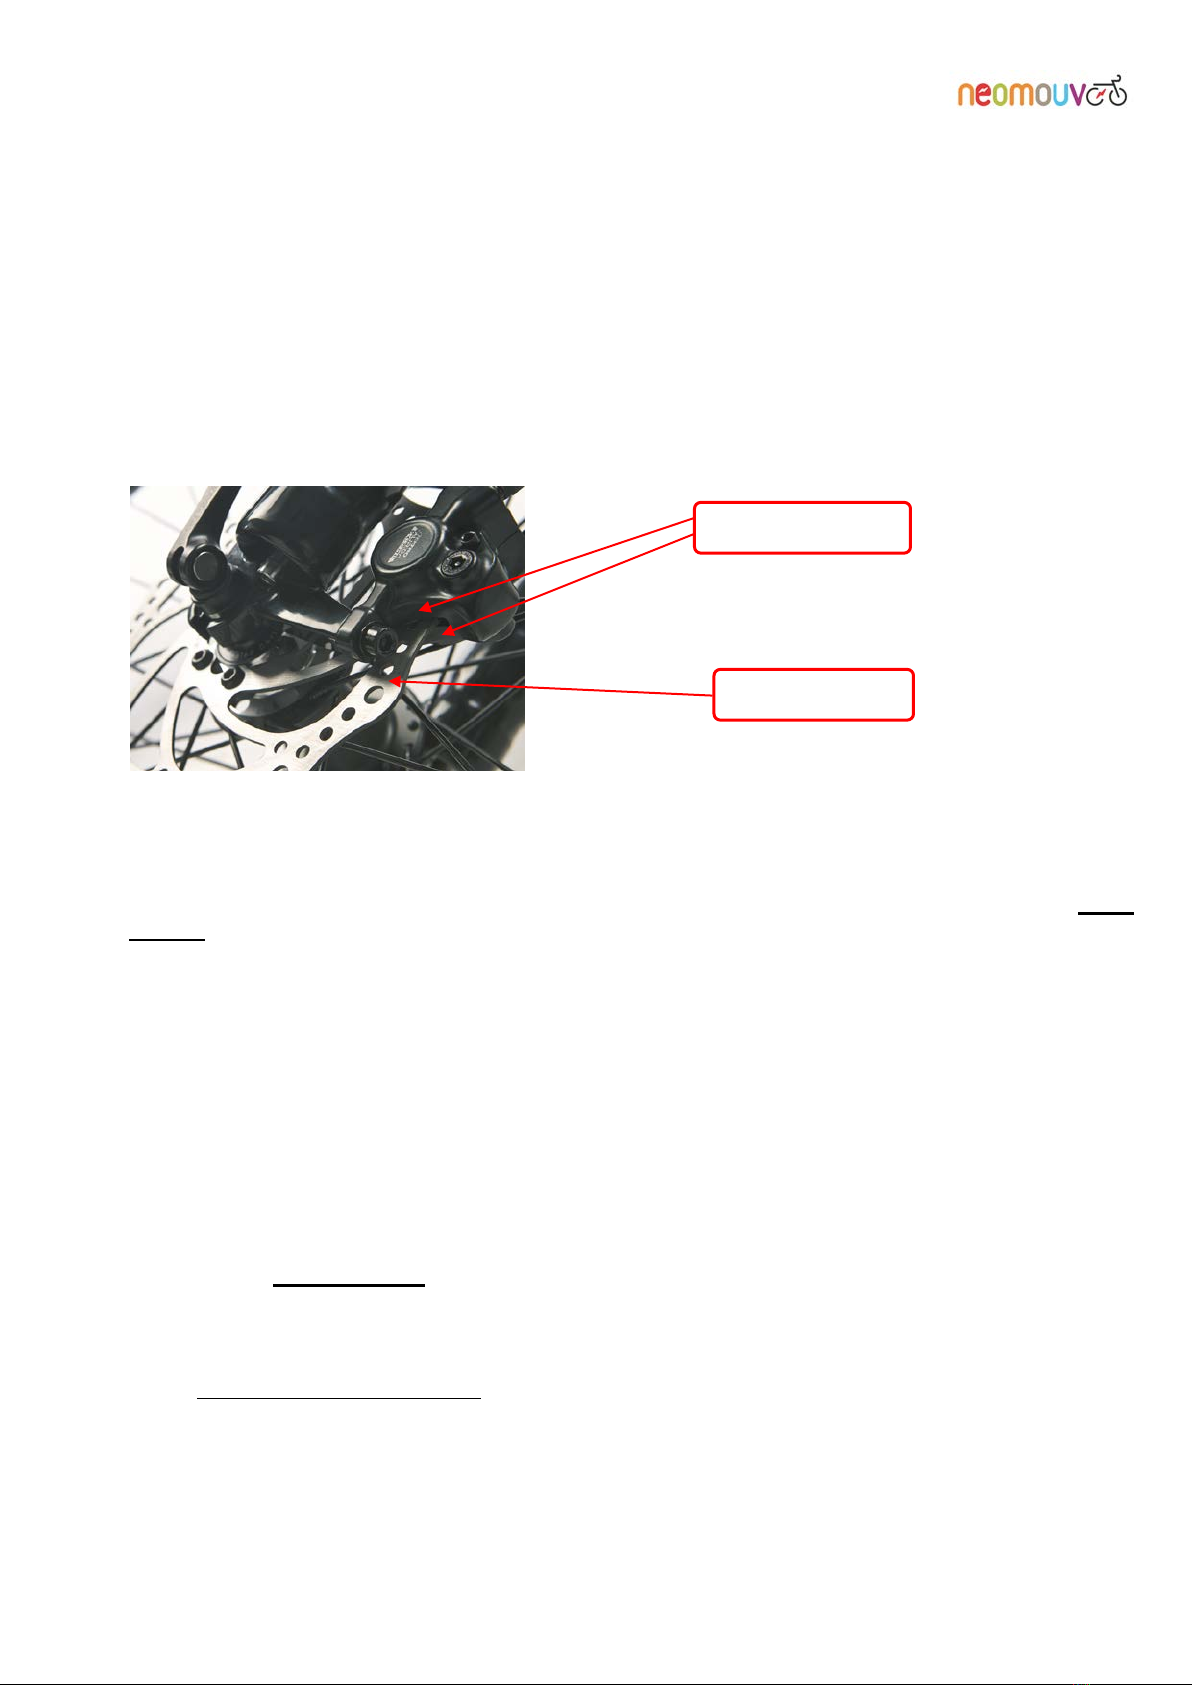
2.3 Adjusting the hydraulic disc brakes: ....................................................................................................... 6
2.4 Mounting and dismounting the wheels (rear wheels to be handled by a specialist):............................. 6
2.3.1 Front wheel:.................................................................................................................................... 6
2.3.2 Rear wheel:..................................................................................................................................... 7
2.4 Lights:...................................................................................................................................................... 8
3 - USING THE E-BIKE:.........................................................................................................9
3.1 Indexed gearshift:.................................................................................................................................... 9
3.2 Electronic gear shifting: .......................................................................................................................... 9
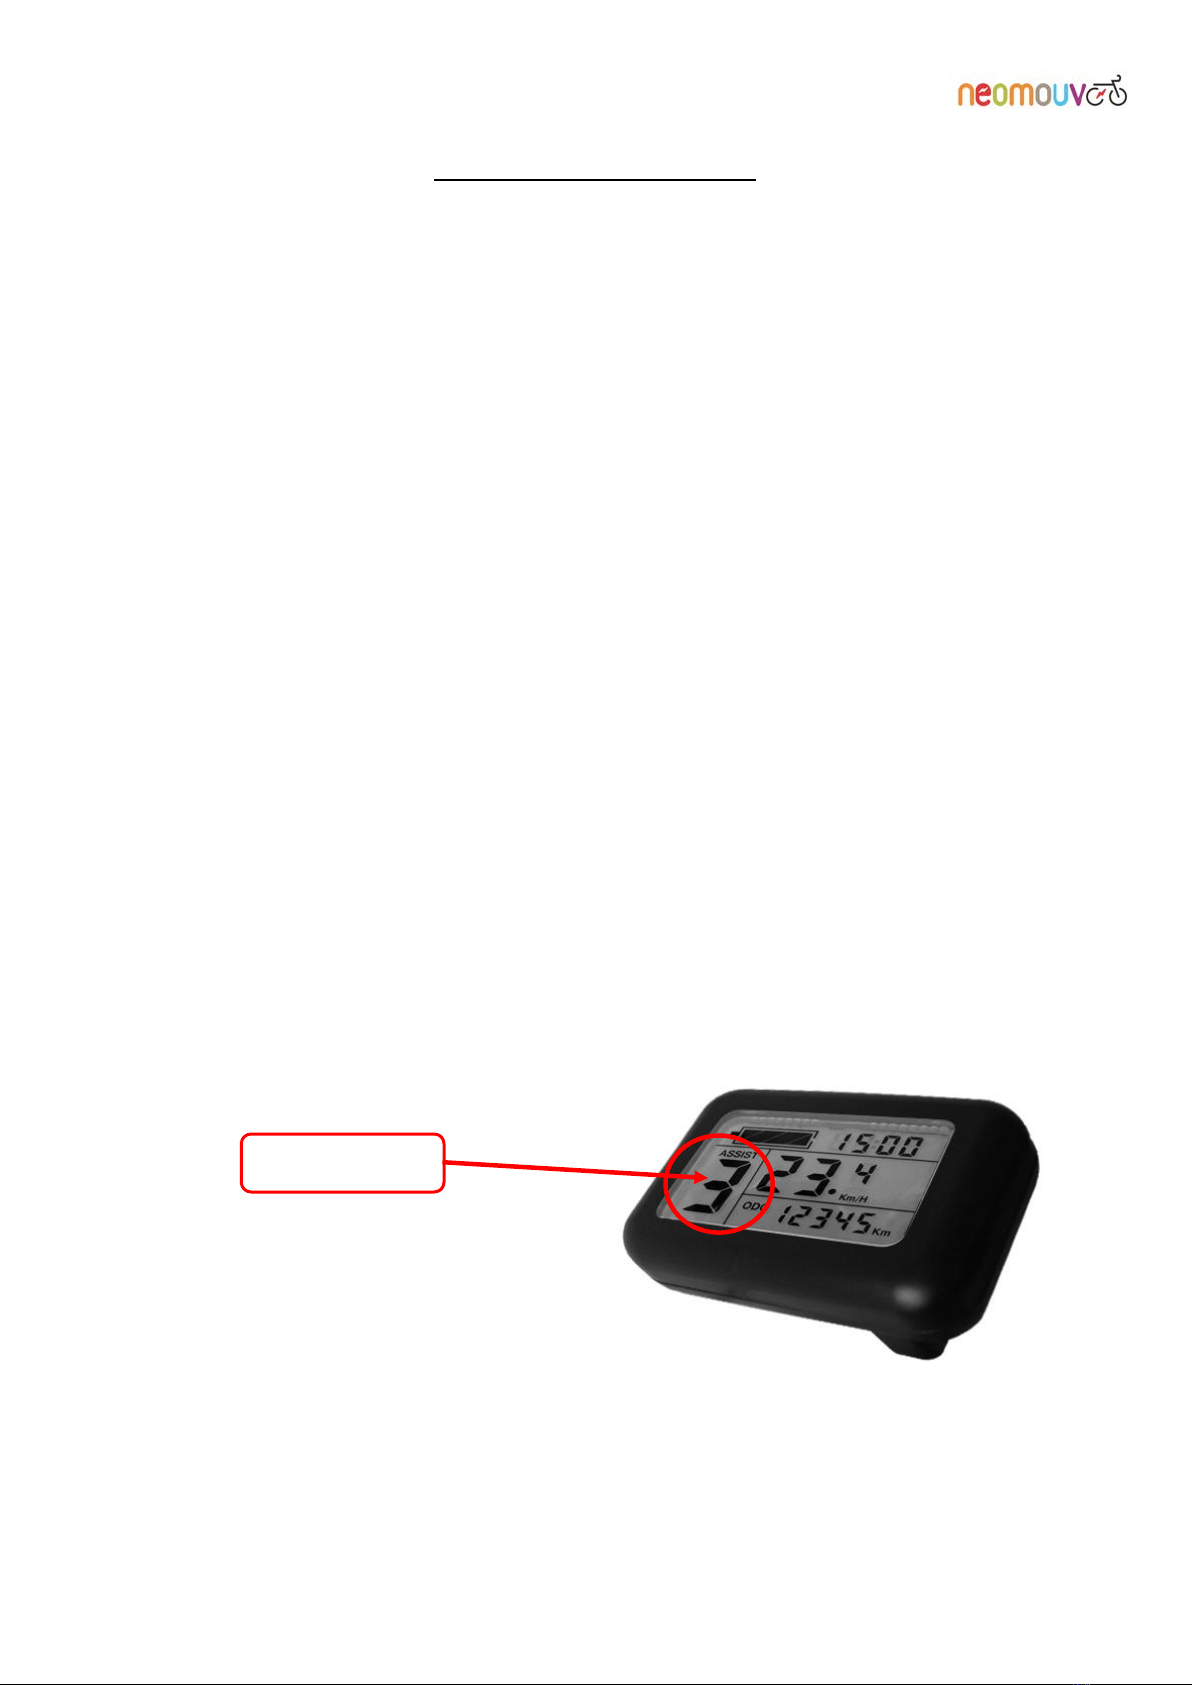
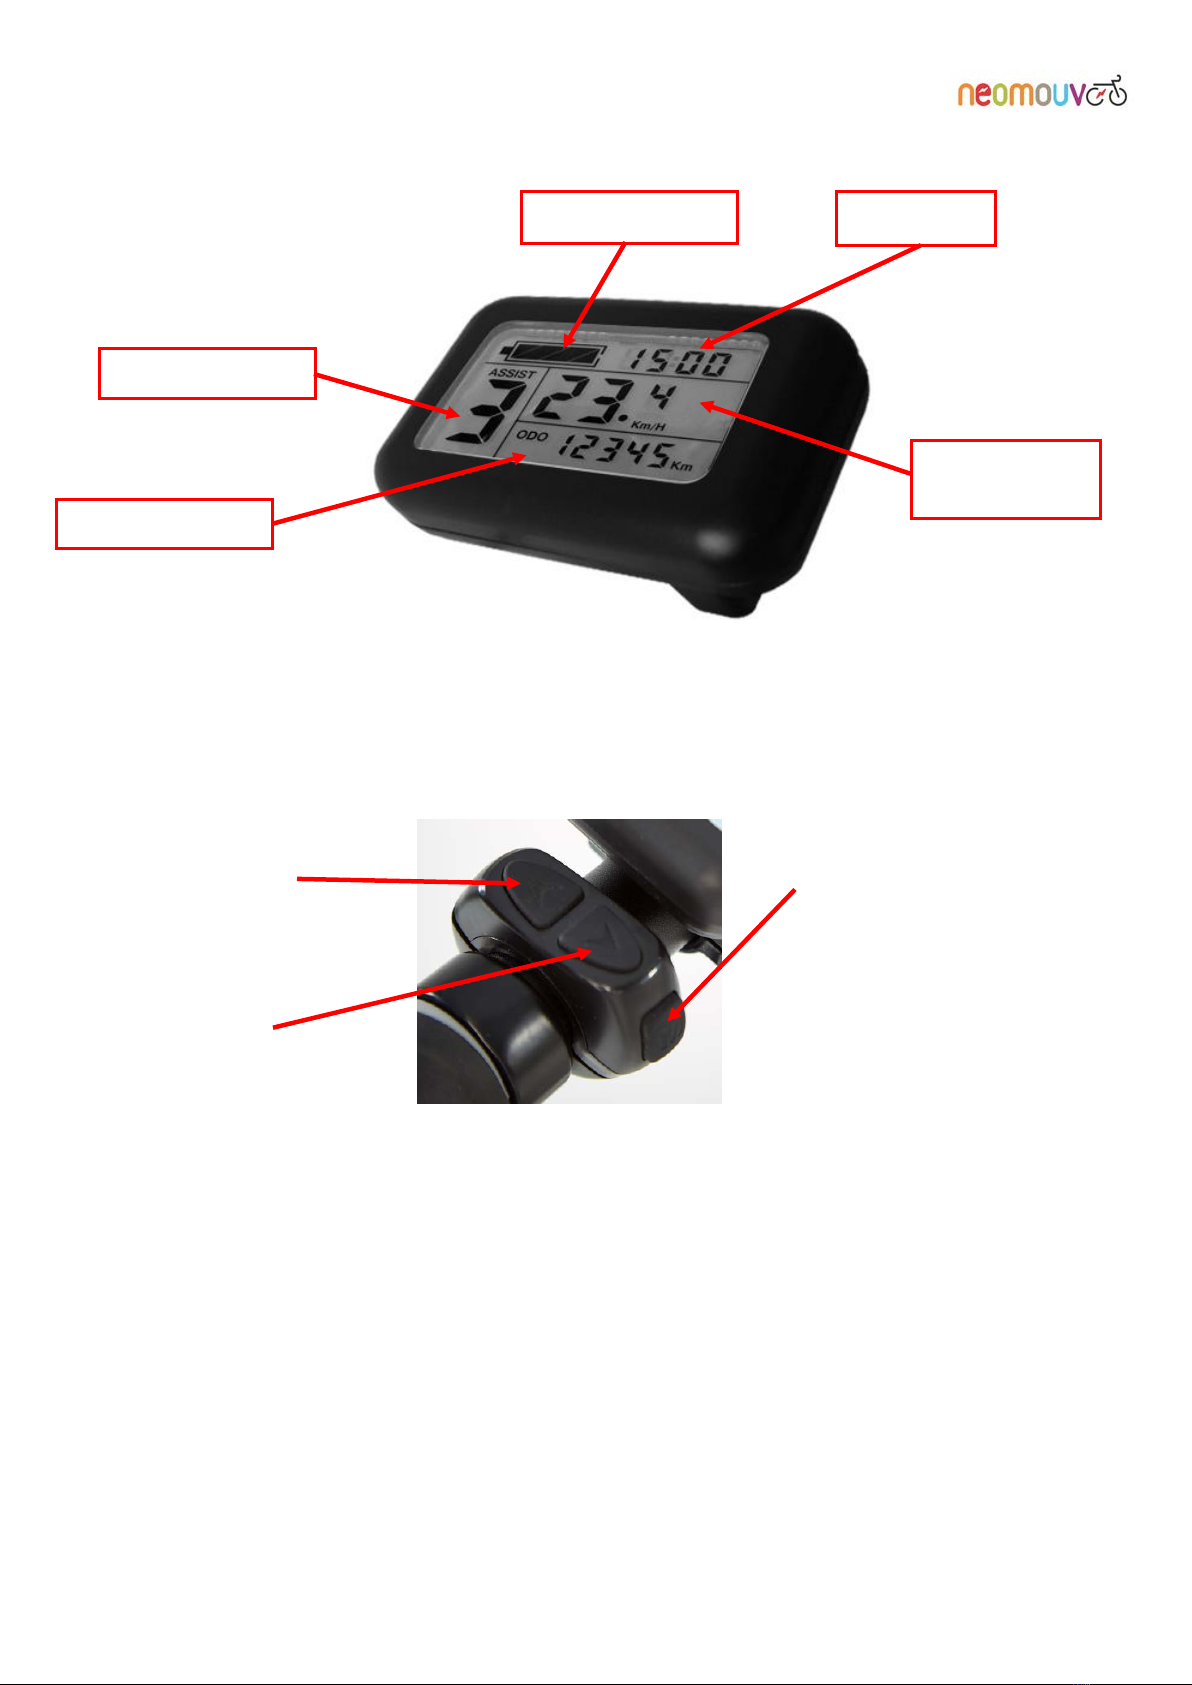
3.2 Display and controls:............................................................................................................................ 10
3.3 Electric assistance:................................................................................................................................. 11
3.3.1 Operation:..................................................................................................................................... 11
3.3.2 Performance:................................................................................................................................... 12
3.3.3 Technical specifications of the power-assistance system:............................................................ 13
3.3.4 The electric motor: ....................................................................................................................... 13
4 – CHARGING THE BATTERY:............................................................................................14
4.1 NEOMOUV Lithium Ion 48-volt charger.............................................................................................. 14
4.1.1 Precautions (safety instructions): ..................................................................................................... 15
4.1.2 Protecting the charger:...................................................................................................................... 15
4.2 Battery: ................................................................................................................................................... 16
Recommendations / precautions to take with your battery: ......................................................................... 17
5 - ADVICE FOR INCREASING BATTERY LIFE PER CHARGE:.............................................18
6 – UPKEEP AND MAINTENANCE OF YOUR CRONOS:........................................................19
6.1 Upkeep:................................................................................................................................................... 19
6.2 Lubrication: ............................................................................................................................................ 19
6.3 Maintenance: .......................................................................................................................................... 19
7 - SAFETY – RECOMMENDATIONS:...................................................................................20
8 - TECHNICAL DATA..........................................................................................................21
9 - DECLARATION OF CE CONFORMITY.............................................................................21
10 - CERTIFICATE OF CONFORMITYITY ............................................................................21
11 - TERMS OF WARRANTY................................................................................................22

CRONOS Manual
3
1-PRESENTATION:
Thank you for choosing a NEOMOUV Electric-Assisted Bicycle (E-Bike)
E-Bike Presentation:
Notes:
•The symbol indicates important advice or essential safety measures. Follow the various instructions.
•Some adjustment and assembly/disassembly operations require special tools and expertise; perform
these only if you have the skills to do so, otherwise consult your authorised dealer or a specialist.
•The symbol indicates the tools you will need to make adjustments.
• Your e-bike has a serial number engraved on the frame by the fork.
MAXIMUM LOAD:120 KG.FOR YOUR SAFETY,YOU SHOULD NOT EXCEED THE MAXIMUM LOAD WHEN
USING YOUR BICYCLE.
Electric motor
Rotation
sensor
Serial number
Battery
Display
t

CRONOS Manual
4
2- ADJUSTMENTS/ASSEMBLY:
2.1 Saddle adjustment:
6 mm Allen key
2.1.1 Angle:
Loosen the nut under the seat.
Adjust the angle of the seat to your most comfortable position. Tighten the nut, with a maximum tightening
torque of 13 Nm.
2.1.2 Height:
The power-assisted bicycle enables you to opt for a lower saddle position than on a classic bike. With power
assistance, you expend less effort and can be seated in a lower position for improved safety. The required
user (cyclist) height for optimal utilisation of the bike ranges from 1.65 to 1.90 m. Adjust your saddle height to
the optimal sitting position as follows:
Loosen the quick release clamp:
Nut
Quick release
clamp

CRONOS Manual
5
Wearing suitable cycling shoes, sit on the saddle, place one of the pedals in the lowest position, rest one heel
on the pedal, and your leg should rest normally on the pedal without being stretched. Raise or lower the
saddle to get the correct height. While pedalling backwards, you should not have to move your hips from side
to side.
To calculate the height, you can also use the SH (Seat Height) formula = 0.885 x IL (inside leg measurement).
To measure your inside leg, stand barefoot with your feet five centimetres apart. Without applying too much
pressure, place a pole or stick horizontally at groin height and then measure the height from the stick to the
ground. This will give you the IL (inside leg) measurement.
Tighten the quick release clamp.
THE SEAT POST SHOULD NOT BE EXTENDED BEYOND THE ENGRAVED SAFETY MARK (VERTICAL BARS).
The minimum height between the highest point of the saddle and the ground is 85 cm.
2.2 Fork adjustment:
The Cronos’s fork is adjustable and lockable. Locking is carried out by using the red thumbwheel at the top of
the fork. The firmness of the suspension is adjusted by using the thumbwheel on the other shoulder of the
fork.
Safety mark
Fork locking
thumbwheel

CRONOS Manual
6
2.3 Adjusting the hydraulic disc brakes:
Your e-bike is equipped with front and rear hydraulic disc brakes. The maintenance of this system must be
carried out by a specialist. However, here are a few recommendations:
-Periodically check the condition of the lining on the brake pads. It is important to avoid leaving this
until the last minute, because if the lining is damaged, the disc rubs against the metal of the pads
which damages them.
Here are 2 ways to monitor the wear and tear on your pads:
•By sound: the braking sound will be more metallic when the lining is worn.
•By sight: you can see the thickness of the lining when looking from the front of the calliper.
-Regularly check the condition of the discs to ensure they are clean and not too worn. Only use alcohol
or water to clean the discs.
-Completely avoid any contact with greasy substances on the disc and the pads. The pads must
always be changed should this occur (they are porous and will absorb the greasy substance).
AS A GENERAL RULE,THE HYDRAULIC DISC BRAKING SYSTEM SHOULD NOT BE ADJUSTED BY NON-EXPERTS.WE
RECOMMEND THAT YOU CALL A SPECIALIST SHOULD YOU HAVE ANY DOUBTS ABOUT WHAT TO DO.
2.4 Mounting and dismounting the wheels
(rear wheels to be handled by a specialist):
AS A GENERAL RULE,NEVER OPERATE THE BRAKE LEVERS WHEN A WHEEL IS OFF THE BIKE.THE WHEEL WILL BE
VERY DIFFICULT TO REMOUNT SHOULD THIS HAPPEN.
2.3.1 Front wheel:
14 mm open-ended spanner
Dismounting the front wheel:
-First, you must loosen the wheel’s fastenings.
-Once this has been done, slide the wheel forward to remove it.
-Insert a piece of plastic in the calliper (between the two pads).
Disc
Pad

CRONOS Manual
7
Mounting the front wheel:
-Carry out the dismounting operations in inverse order. Check the fastener tightness and alignment of
the wheel.
-Once the wheel is in place, operate the brake handle 3-4 times. This allows the pads to settle correctly.
-Check that the brake disc is properly centred and rotates without friction.
-Check that the wheel brakes are working properly.
2.3.2 Rear wheel:
THIS OPERATION SHOULD BE CARRIED OUT BY A PROFESSIONAL;HOWEVER,HERE IS THE PROCEDURE TO
FOLLOW
Tool required: 18 mm open-ended spanner.
Dismounting the rear wheel:
Disconnect the motor (the connector is situated on the right side of the e-bike on the lower horizontal section
of the frame}. Cut the Colson cable tie attaching the motor cable to the frame if necessary.
Remove the right and left wheel nut covers. Loosen the nuts. Remove the nuts and the wheel axle washers.
Move the wheel forward to remove it from the frame and remove the chain from the wheel axle.
Insert a piece of plastic in the calliper (between the two pads).
Mounting the rear wheel:
Remove the plastic piece from the calliper.
Take the wheel and place the chain on the small pinion on the right-hand side, then place the wheel between
the brake pads.
Moving backwards, insert the wheel axle into the housing on the left and right of the frame. Attach the
washers and the wheel nuts. Tighten the nuts by hand initially until they make contact with the frame.
Checking the wheel alignment:
-Centre the wheel in relation to the frame.
-Check the centring and positioning in line with the front wheel, as well as the positioning of the chain.
-Screw on the wheel nuts on both sides without tightening them.
-Check the positioning, centring, and position of the chain again.

CRONOS Manual
8
Checking the brake adjustment:
-Operate the brake handle 3-4 times. This allows the pads to settle correctly.
-Check that the brake disc is properly centred and rotates without friction.
-Check that the wheel brakes are working properly.
Alternately and progressively tighten the wheel nuts on each side (max. tightening torque 25 Nm).
Replace the nut covers.
Reconnect the motor and replace the Colson cable tie on the frame (if necessary).
2.4 Lights:
A fixed front light (2 x 2032 batteries) which is activated by a switch on the back of the light.
A battery-operated rear red light (2 x LR03 batteries) which is activated by a switch on the bottom
of the light.
ALWAYS KEEP YOUR LIGHTS CLEAN AND IN GOOD CONDITION.
LIGHTS ARE OBLIGATORY AT NIGHT.
Position the two
pins correctly to
reconnect the
motor plug

CRONOS Manual
9
3 - USING THE E-BIKE:
3.1 Indexed gearshift:
Your gearshift is composed of a derailleur and 9 sprockets.
3 sprockets with 11, 13, and 15 teeth (large development), which allow you to increase your speed
under easy conditions (slight descent, flat).
3 intermediate sprockets with 17, 19, and 21 teeth to use under normal conditions.
3 sprockets (small development) with 24, 28, and 32 teeth for difficult hills and starts.
There is also a derailleur and 3 front chainrings with 22, 35, and 42 teeth respectively.
The (indexed) speed selectors are located on the handlebars: on the right-hand side for the rear derailleur,
and on the left-hand side for the front derailleur.
3.2 Electronic gear shifting:
Your bike is equipped with 6 levels of electronic assistance:
1. Position 0 = No assistance.
2. Positions 1 and 2 = economic. In these positions, your e-bike will consume less energy, but the
power may not be enough to tackle an incline.
3. Positions 3 and 4 = medium assistance.
4. Position 5 = maximum power. On this position, your e-bike provides you with the most assistance
but also consumes the most energy.
To scroll through the assistance levels, press the UP and DOWN buttons.
The assistance selector is located close to the left handle on the handlebar.
Assistance level

CRONOS Manual
10
3.2 Display and controls:
Start-up aid 6 km/h: Pressing and holding the DOWN button (located under the control) will initiate a 6
km/h start-up, which enables the e-bike to start without pedalling up to the speed of 6 km/h.
Speed information: Pressing and holding the UP button allows you to select the desired speed
information: instantaneous, average (avg) or maximum (max).
Night mode: Pressing and holding the UP and MODE buttons simultaneously will switch the backlighting
on the display on and off.
DOWN Arrow
Decreases
assistance level
MODE Button
Turns system on and off
(Press for 3 secs)
UP Arrow
Increases assistance
level
Assistance level
Charge level
Clock
Speed
information
TIME or ODO

CRONOS Manual
11
Switching from ODO info to TIME info: One quick press on the MODE button allows you to switch
between the two. ODO shows the total number of kilometres travelled since the bike was first used. TRIP
shows the number of kilometres travelled on your current journey.
Setting the clock: After selecting the ODO mode,press and hold DOWN and MODE simultaneously
until you are able to access the clock settings.
Set the hour using the UP and DOWN buttons.
Press briefly on the MODE button to move to the minutes setting.
Set the minutes using the UP and DOWN buttons.
Press and hold the MODE button to accept your changes and return to normal mode.
Reset trip information (km travelled, average speed, maximum speed): After selecting the TIME mode,
press and hold DOWN and MODE simultaneously to reset the trip data to zero.
3.3 Electric assistance:
3.3.1 Operation:
Your Cronos is an electric-assisted bike: it is equipped with an electric motor located on the rear wheel. This
motor starts automatically (if the ignition is on and the battery is charged) when and only when you are
pedalling (with the exception of the 6 km/h button).
Power assistance is initiated by an electromagnetic detector, which cuts off the motor's power supply as soon
as you stop pedalling.
The motor also stops:
•When you use one of the two brakes;
•When you have reached the speed limit of 25 km/h.
This principle enables the motor to give you its full power when you need it and to save battery power when
you are descending or on flat ground.
This type of energy management gives you a longer battery life per charge. These functions and the energy
management are carried out by an electronic control unit or “controller”.
WE WOULD LIKE YOU TO NOTE THAT ACTIVATION OR DEACTIVATION OF POWER ASSISTANCE MAY LEAD TO
ABRUPT ACCELERATION OR DECELERATION.

CRONOS Manual
12
3.3.2 Performance:
The power-assisted speed of your e-bike is limited to 25 km/h. At this speed the motor's power supply is
automatically cut off.
The battery life per charge of your bike depends on several factors:
Weight transported:
The expected performance of your bike is based on an average load of 75 kg.
External temperature:
The expected performance of your bike is based on an external temperature of roughly 20°C.
Performance decreases below this temperature, but is only really discernible below 5°C.
Battery wear:
Your battery is designed to deliver stable performance for 750 charge/discharge cycles (or an average
use of 3 years). The battery will still be operational after those 750 cycles, but its performance and
therefore your range per charge will decrease proportionally.
But the battery life per charge mainly depends on how you use the bike:
The theoretical battery life per charge is based on almost continuous use of the motor over flat or
slightly undulating ground (10 to 20% slopes). If your travel is on flat ground and includes a number of
descents (even if slight), your battery life is increased. If you are ascending inclines of more than 5%
(the motor “struggles" above a grade of 8%), your battery life will diminish proportionally.

CRONOS Manual
13
3.3.3 Technical specifications of the power-assistance system:
Motor: Brushless type – 250 watts
Battery: 48 V lithium ion cell – 500 Wh or 680 Wh
Life cycle: 750 complete charge/discharge cycles under normal load conditions.
Battery life per charge:70 to 80 km and 100 to 120 km
(for a user weighing 75 kg at a speed of 18 km/h on a journey in Eco mode).
3.3.4 The electric motor:
Located in the hub of the rear wheel, it is a 250-watt BRUSHLESS electric motor. It requires no maintenance
on your part and has the benefit of a two-year manufacturer's warranty. After 3 years or 25,000 kilometres,
we advise you to get it checked by an authorised dealer or specialist. Although it is designed to resist water,
we do not recommend cleaning it with a high-pressure jet.
Electric motor

CRONOS Manual
14
4 – CHARGING THE BATTERY:
4.1 NEOMOUV Lithium Ion 48-volt charger
CHARGER FEATURES
48-volt model
JCLC109V55
Smart charger for a Lithium Ion battery
Voltage
AC100V-240V
Frequency
47-63 Hz
Charging voltage (load)
54.6 V
Output current
2.0 A
LED power indicator: red
Charging
LED charge indicator: green
Charged or disconnected from
the battery
Efficiency (at full load)
100 %
Operating temperature range
Between 10° C and 35° C
Humidity
<+ 90 %
Safety standard
EN60335 –1: 2012 + A11 + A13
Weight
300 g
The charger that comes with your bike is compliant with CE manufacturing standards, and with the IEC/EN
60335-1 environmental protection standards. It has been specially designed to recharge the battery of your
electric bike. It will fully recharge your battery in 4 to 6 hours dependent on the ambient temperature and
wear of the battery. This charging time, referred to as “slow”, is deliberate in order to preserve the life of your
battery.
It is easy to operate: plug the charger’s output jack into your battery’s socket, then plug it into the mains.
Your charger has an LED charging diode that shows the battery charge level. It is red when the battery is
charging and changes to green once the battery had been charged.

CRONOS Manual
15
4.1.1 Precautions (safety instructions):
•Do not connect the charger plug to the mains with wet hands (risk of electrocution).
•All charging must be carried out in a ventilated area.
•Always check that the charger is compatible with the local power supply.
•Do not place the apparatus in a damp environment or near a flammable or explosive substance while it
is charging (any charge that generates heat involves the risk of fire or explosion).
•Do not store the apparatus while it is hot.
•Do not charge a faulty or worn-out battery.
•Do not leave a plugged-in charger and its connections within the reach of children.
•Do not attempt to disassemble the charger.
4.1.2 Protecting the charger:
•Do not expose it to rain.
•Do not leave the charger disconnected from the power supply (220 volts) but plugged into the battery.
•Do not submerge the charger.
•Do not place any objects on the charger or cover it.
•Look after the charger’s input and output cables.
•To protect the charger after a long charging period (more than 24 hours), disconnect the electrical
connection and let the device rest in a dry and ventilated space.
•Avoid leaving the charger connected to the mains for more than 24 hours.
WARNING! FOR YOUR SAFETY,OPENING THE CHARGER IS PROHIBITED (RISK OF ELECTRIC SHOCK –HIGH
VOLTAGE). CONTACT YOUR DEALER SHOULD ANY FAULTS OCCUR WITH YOUR CHARGER.
FOR YOUR SAFETY,ALSO LOOK AT THE PICTOGRAMS ON THE BACK OF THE CHARGER.
1) Compliance with CR standards
2) Double insulation
3) Do not throw out with household waste
4) Comply with the polarity

CRONOS Manual
16
4.2 Battery:
Your battery has a serial number. This can be found underneath the battery.
Your battery is assembled in a special container. We strongly recommend that you do not attempt to open or
disassemble it. Any breaking of the warranty label will automatically render the warranty null and
void.
To remove the battery from its housing, you must open the lock using the key and push the battery to the
right of the bike.
To put the battery back, you must first position the base correctly and then rock the battery back into its
housing.
You can charge your battery while it is on the bike or remove it from its holder and then charge it, always
using the plug located at the back of it.
For safe charging, first connect the charger to the battery and then connect the charger's standard plug to the
mains (220V/50 Hz).
Check that the charger is working correctly (see section 4.1).
Battery lock

CRONOS Manual
17
Recommendations / precautions to take with your battery:
•Avoid any proximity to sources of heat.
•Avoid any short circuits on the motor’s charging and plug connections.
•Only use the battery for its intended purpose.
•Do not expose the battery to temperatures higher than 40°C and lower than –20° C.
•Never drop the battery; put it in a stable place.
•Warning! There is a risk of short circuiting and overheating in the event of any impact on batteries that
are particularly fragile.
•Always check that the charger is compatible with the local power supply.
•When charging is finished, it is recommended that you disconnect the charger from the battery.
•During periods when the bike is not in use, store the battery in a cool, dry place at a
temperature above 10° C and lower than 40° C.
•Never leave your battery completely discharged for longer than 3 days, as this may
damage it.
•In case of prolonged non-use, you must recharge the battery once every two months.
•Never leave the battery exposed to the sun for long periods of time.
•Never let a child play with or handle the battery.
•Never charge the battery in the rain or in damp surroundings.
•Never open the battery. Opening it may lead to a significant risk of electrocution and void the
warranty.
•Never spray the battery directly with water or any other liquid.
•Never submerge the battery.
•Only use the charger provided to charge your battery. Using any other charger that is not adapted for
the battery may result in an accident.
WARNING! IN CASE OF VERY INFREQUENT USE OF THE BATTERY (ONCE EVERY 2MONTHS ONLY), THE
BATTERY’S CAPACITY WILL DIMINISH MUCH MORE RAPIDLY THAN WITH REGULAR USE.THE BATTERY’S ENERGY
COMES FROM A CHEMICAL REACTION THAT REQUIRES SUFFICIENTLY REGULAR ACTIVATION TO MAINTAIN ITS
EFFECTIVENESS.
WARNING! YOU MUST NOT THROW YOUR BATTERY OR CHARGER OUT WITH YOUR HOUSEHOLD WASTE.A
SELECTIVE COLLECTION SYSTEM FOR THIS TYPE OF PRODUCT HAS BEEN SET UP IN MOST TOWNS;YOU CAN
CONTACT YOUR LOCAL COUNCIL FOR FURTHER INFORMATION.ELECTRICAL AND ELECTRONIC PRODUCTS CONTAIN
TOXIC SUBSTANCES THAT ARE HARMFUL TO THE ENVIRONMENT AND HUMAN HEALTH AND THEREFORE MUST BE
RECYCLED.
Your battery is recyclable after use.
Return it to your dealer.
Also read carefully the indications listed on the battery:
The battery provided with your e-bike conforms with:
•Standards EN61000-6-1 et EN61000-6-3;
•Directive UN38.3 on the transport of dangerous goods;
•Directive 2006/66/EC.

CRONOS Manual
18
5 - ADVICE FOR INCREASING BATTERY LIFE PER CHARGE:
Depending on the battery in your Cronos, the charged battery range is 70 to 80 km (500-Wh battery) or 100
to 120 km (680-Wh battery) for a user weighing 75 kg at a an average speed of 18 km/h on a journey in Eco
mode.
In order to conserve your battery's energy and thus increase the range of your bike, we would like to offer
you a few tips.
•At start-up: set power assistance to position 1 and choose a medium development on the derailleur.
If your route is uphill, position the derailleur on the small development and use the 6 km/h position.
•In traffic jams: set power assistance to position 1 and your derailleur to small or medium
development according to the frequency of the stops you will have to make.
•Hill start: before you stop, set your derailleur to small development, and set the power assistance
according to the incline.
•Climbing a tougher hill:if you are climbing a hill and the speed reduces too much, you can opt for
more powerful assistance. You will then feel the power assistance increase. If this is insufficient, set
your derailleur to the small development (your energy consumption will be greater and your battery
range will be reduced).
•Route without stops:if your route has no obstacles (no traffic lights, traffic jams or rough roads),
you can set your bike to cruising speed. Pick your assistance level and set the derailleur to the large
development. This will allow you to go faster while saving energy.
•Descending:you stop pedalling (freewheeling) or you pedal normally but without effort while
adapting your speed selection and you let yourself move steadily.
•To prolong battery power: start up in position 1. Once your bike has started, set your assistance
level and set the derailleur to the large development. Maintain a constant speed. Your battery charge
will last longer.

CRONOS Manual
19
6 – UPKEEP AND MAINTENANCE OF YOUR CRONOS:
6.1 Upkeep:
To keep your bike in good working order, maintain it regularly:
-Replace the brake pads as soon as they become worn.
-Clean your bike regularly with a sponge and soapy water.
-Do not use detergent or petrol, or a high-pressure jet spray.
-Clean and lubricate the bearings every 6 months.
When you are cleaning your bike, take particular care:
To clean, rinse, and dry the different parts of the bike, and wipe off any standing water to avoid
the risk of early corrosion.
6.2 Lubrication:
Lubricate lightly and regularly (about once a month):
-The chain
6.3 Maintenance:
Like any mechanical component, a bicycle is also subject to stress and wear. Different materials
and components may react differently to wear or erosion.
If the lifespan of a component has been exceeded, it may break suddenly, potentially causing injury to the
rider. Cracks, scratches, and discolouration in areas that are subjected to high stress indicate that the
component has exceeded its lifespan and should be replaced.
DO NOT USE LUBRICANTS ON THE SURFACE OF THE WHEEL RIMS OR ON THE TYRES,OR ON THE FRONT AND REAR
BRAKE SHOES.
CHECK THE CONDITION AND CORRECT FUNCTIONING OF THE SIGNALLING DEVICES (E.G., BULBS,ETC.), AND
CLEAN THEM IF NECESSARY WITH A DRY CLOTH.

CRONOS Manual
20
7 - SAFETY – RECOMMENDATIONS:
Regularly check the following:
•The tightness of the wheel nuts (25 Nm for the front, 25 Nm for the rear).
•Tyre wear (replace the tyre as soon as the wear indicator has been reached) and adjust the pressure to
between 60 and 65 psi (2.8 to 4.5 bars). Your bicycle’s tyres are compatible with the rim base, so no
modifications must be made to these. Only the appropriate spare parts (tyres, inner tubes, brake friction
elements, etc.) are to be used. Contact your dealer for more information.
•Check the tightness of the handlebars (6 Nm), pedals (20 Nm), and saddle (6 Nm).
Because of its weight and motor inertia, allow ample distance for braking your e-bike, especially in wet
weather.
Your e-bike is adapted for use in cities and on road trips.
On public roads, everybody who rides a bike must respect and apply the provisions of the highway code of the
country they are in as well as the legal requirements for this type of transport. (e.g., lights, signalling, wearing
a helmet (recommended), reflective devices, etc.).
For the safe use of your bike, we recommend periodically checking and inspecting: the brakes (wear on the
pads), the condition of the wheel rims and spokes (wear on the wheel rims and spokes), the condition of the
tyres, the steering (fastenings, tightness of the wheel nuts) and all other parts specific to your vehicle. The
wheel rims must be smooth, without any cracks, breakage, or deformities. If you notice any anomaly with the
wheel rims, please get them checked immediately.
WARNING! Like any mechanical component, a bicycle is also subject to high levels of stress and wear.
Different materials and components may react differently to wear or erosion. If the predicted lifespan of a
component has been exceeded, it may break suddenly, potentially causing injury to the rider. Cracks,
scratches, and discolouration in areas that are subjected to high stress indicate that the component has
exceeded its lifespan and should be replaced.
For your safety, it is equally important to replace any critical components that are showing signs of wear or
any other problem (e.g., tyres, wheel rims, etc.) with genuine parts. Contact your dealer.
DO NOT SIT ON THE BIKE WHEN IT IS ON ITS STAND,AS THERE IS A RISK THAT IT MAY BREAK AND YOU COULD
HAVE AN ABRUPT FALL.
Stay alert; do not spend too much time looking at the bike’s display while you are driving.
For your safety, it is recommended to routinely have the bike lights on.
We strongly recommend that you wear a helmet.
Wearing a high-visibility vest is mandatory when riding in traffic at night, or on days when the visibility is poor.
Table of contents
Other neomouv Bicycle manuals

neomouv
neomouv DRIVE User manual

neomouv
neomouv PLIMOA User manual

neomouv
neomouv Montana Brose User manual

neomouv
neomouv FURTIVOO User manual

neomouv
neomouv ENARA User manual

neomouv
neomouv PLIMOA User manual

neomouv
neomouv CARLINA User manual

neomouv
neomouv PLIMOA User manual

neomouv
neomouv Bricks User manual

neomouv
neomouv CROONY User manual