ErgoSynchron_Pantone662U_RZ.fhd 08.09.2005 18:28 Uhr Seite 13
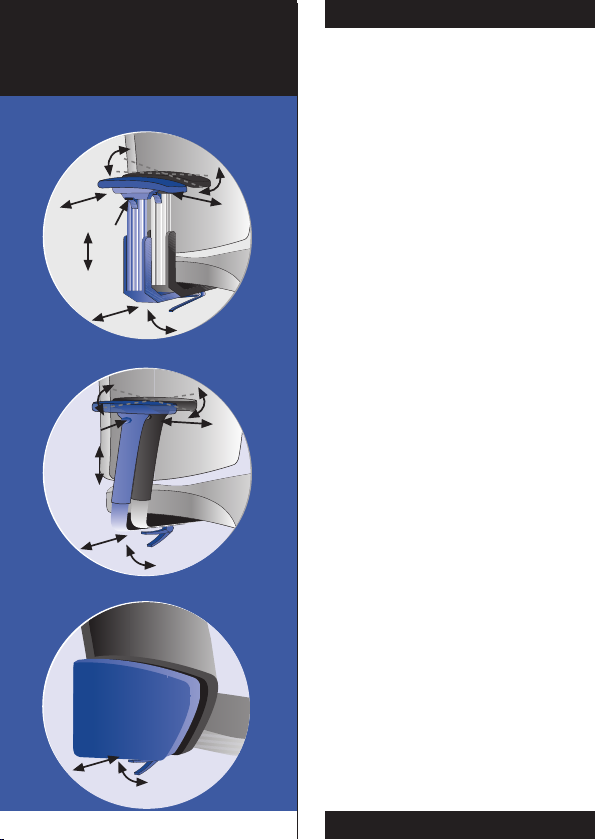
Stellen Sie die Breite der Armlehnen so ein,
dass die Ellbogen nicht am Körper anliegen. Die
Höhe der Armlehnen ist dann richtig, wenn die
Ellbogen aufliegen und die Schulter-und Nacken-
muskulatur entspannt ist.
Höhere Armlehne: Taste drücken, Armlehne für
die optimale Position anheben.
Niedrigere Armlehne: Taste drücken, Armlehne
in die optimale Position herunterführen.
Breitenverstellung: Exzenterverschluss nach
unten drücken, Armlehne in die gewünschte
Position verschieben, danach Exzenterverschluss
wieder schließen.
Zusätzliche Breitenverstellung Armlehne
315/312 mittels Armlehnenpad (2,5 cm):
Pad in die gewünschte Position schieben.
Tiefenverstellbare Armlehne: Pad in die
gewünschte Position schieben.
Schwenkbare Armlehne: Pad in die gewünschte
Position drehen.
Armlehnen
Armrests
Réglez la largeur des accoudoirs de manière
à ce que les coudes soient écartés du corps.
La hauteur des accoudoirs est correcte lorsque
les coudes reposent dessus et que les épaules
et les muscles du cou sont détendus.
Accoudoirs plus hauts : appuyer sur la touche,
relever les accoudoirs jusqu'à la position
optimale. Accoudoirs plus bas : appuyer sur
la touche, faire descendre les accoudoirs jusqu'à
la position optimale.
Réglage en largeur : débloquer le verrou à
excentrique, décaler l'accoudoir en position
souhaitée, puis refermerle verrou à excen-
trique.
Réglage en largeur supplémentaire des
accoudoirs 315/312 par manchette
d’accoudoir : décaler la manchette en
position souhaitée.
Accoudoir inclinable : tourner la manchette
en position souhaitée.
Regolate la larghezza dei braccioli in modo che
i gomiti non aderiscano al corpo. L'altezza dei
braccioli è corretta se vi si possono appoggiare
sopra i gomiti e la muscolatura delle spalle e
del collo non è sovraccaricata.
Bracciolo più alto: premete il tasto e sollevate
il bracciolo fino a raggiungere la posizione
ideale. Bracciolo più basso: premete il tasto e
abbassate il bracciolo fino a raggiungere la
posizione ideale. Regolazione della larghezza:
spingete il dispositivo di fermo ad eccentrico
verso il basso facendo scorrere il bracciolo fino
a raggiungere la posizione desiderata per poi
richiudere il dispositivo di fermo ad eccentrico.
Regolazione supplementare della larghezza
braccioli 315/312 mediante il pattino dei
braccioli (2,5 cm): fate scorrere il pattino nella
posizione desiderata. Bracciolo regolabile in
profondità: fate scorrere il pattino nella posizione
desiderata. Bracciolo orientabile: ruotate il
pattino fino a raggiungere la posizione desiderata.
Stel de breedte van de armleuningen zo in, dat
de ellebogen niet tegen het lichaam liggen. De
hoogte van de armleuningen is juist ingesteld,
als de ellebogen erop liggen en de schouder-
en nekspieren ontspannen zijn.
Hogere armleuningen: knop indrukken, armleu-
ningen in de optimale stand omhoogtrekken.
Lagere armleuningen: knop indrukken, armleu-
ningen in de optimale stand neerlaten.
Breedteverstelling: klepsluiting naar beneden
drukken, armleuning in de gewenste stand
verschuiven, daarna de klepsluiting weer sluiten.
Bijkomende breedteverstelling armleuning
315/312 d.m.v. armleuningpad (2,5 cm):
Pad in de gewenste stand schuiven.
Diepteverstelbare armleuning: pad in de ge-
wenste stand schuiven.
Zwenkbare armleuning: pad in de gewenste
stand draaien.
Regule la distancia entre los apoyabrazos de
modo que los codos no queden apoyados al
cuerpo. La altura de los apoyabrazos será la
correcta cuando los codos descansen
perfectamente y los músculos de los hombros
y del cuello estén relajados.
Para subir los apoyabrazos: Pulse el botón y
suba los apoyabrazos hasta colocarlos en la
posición perfecta. Para bajar los apoyabrazos:
Pulse el botón y baje los apoyabrazos hasta
colocarlos en la posición perfecta. Distancia
regulable de los apoyabrazos: Pulse hacia
abajo el seguro, posicione los apoyabrazos
como desee y luego vuelva a cerrar el seguro.
Regulación complementaria de la distancia
de los apoyabrazos 315/312 mediante las
almohadillas de los apoyabrazos (2,5 cm):
Empuje las almohadillas hacia la posición que
desee. Apoyabrazos regulables en profundidad:
Empuje las almohadillas hacia la posición que
desee. Apoyabrazos giratorio: Gire las
almohadillas hacia la posición que desee.
Adjust the width of the armrests so that the
elbows are not pressed against the body. The
armrests are at the correct height when the
elbows are resting on them and the shoulder
and neck muscles are relaxed.
Width adjustment: press the catch down,
move the armrest into the desired position
and then close the catch once again.
Additional width adjustment – armrest
315/312 using armrest pad (2.5 cm):
move the pad into the desired position.
Depth-adjustable armrest: move the pad
into the desired position.
Swivel armrest: rotate the pad into the
desired position.
Armlehnen
Armrests
Accoudoirs
Armleuningen
Braccioli
Apoyabrazos
10 cm
Armlehne • Armrest No. 315 / 312
26 27
2,5 cm
30°
30°
2,5 cm
6 cm
3,5 cm
10 cm 6 cm
30°30°
Armlehne • Armrest No. 375 / 376
Armlehne • Armrest No. 322
2,5 cm


