manuals.online logo
Brands
  1. Home
  2. •
  3. Brands
  4. •
  5. DaVinci
  6. •
  7. Indoor Furnishing
  8. •
  9. DaVinci Asher 13801 User manual

DaVinci Asher 13801 User manual

página 1
3 in 1 Crib (13801) - Assembly and Operation Manual
Cuna 3 en 1 (13801) - Manual de ensamblaje y operación
revisado 25MAR2015
Congratulations on purchasing an MDB Family product. This crib will provide many years of service if
you adhere to the following guidelines for assembly, maintenance and operation. This crib is for residen-
tial use only. Any institutional use is strictly prohibited.
Please be sure to follow the instructions for proper assembly. Use a Phillips head screwdriver for assem-
bling the crib in addition to the Allen wrench included in the hardware box. Do not use power screwdriv-
ers. All of our cribs are made from natural woods. Please understand that natural woods have color vari-
ations which are the result of nature and not defects in workmanship.
DO NOT SUBSTITUTE PARTS. ALL MODELS HAVE THE SAME QUANTITY OF PARTS AND HARD-
WARE. YOUR MODEL MAY LOOK DIFFERENT FROM THE ONE ILLUSTRATED DUE TO STYLISTIC
VARIATIONS.
Felicitaciones por comprar un producto de la Familia MDB. Esta cuna le brindará muchos años de servi-
cio si cumple con las siguientes pautas de montaje, mantenimiento y operación. Esta cuna es sólo para
uso residencial. Cualquier uso institucional está estrictamente prohibido.
* The crib can later be
converted into a toddler bed
. To convert to a toddler bed,
turn to page 13.
* La cuna se puede convertir
más tarde en una cama para
niños pequeños. Para
convertirlo en una cama
para niños pequeños, pase
a la página 13.
Asegúrese de seguir las instrucciones para el montaje correcto. Use un destornillador Phillips para
ensamblar la cuna además de la llave Allen incluida en la caja de hardware. No utilice destornilladores
eléctricos. Todas nuestras cunas están hechas de maderas naturales. Comprenda que las maderas
naturales tienen variaciones de color que son el resultado de la naturaleza y no defectos en la mano de
obra.
NO SUSTITUYA PARTES. TODOS LOS MODELOS TIENEN LA MISMA CANTIDAD DE PIEZAS Y
HERRAMIENTAS. SU MODELO PUEDE PARECER DIFERENTE A UNO ILUSTRADO DEBIDO A LAS
VARIACIONES ESTILISTAS.
página 2
Tools Needed
(not included)
Herramientas
(no incluidas)
Phillips
screwdriver
Desarmador
Phillips
PARTS • PIEZAS
F. Mattress Support IV
F. Soporte de colchón IV
C. Front/Back Panel (2)
C. Panel frontal / posterior (2)
A. Left Side Panel
A. Panel lateral izquierdo
B. Right Side Panel
B. Panel lateral derecho
D. Left Glide support
D. Soporte de
deslizamiento izquierdo
N-1. Left Side Glide Rail
N-1. Riel de desliz izquierdo
N-2. Right Side Glide Rail
N-2. Riel de desliz derecho
N-3. Right Drawer Glide Rail
N-3. Riel izquierdo de cajón
N-4. Left Drawer Glide Rail
N-4. Riel derecho de cajón
J. Drawer center
J. Central de cajón
I. Right drawer side
I. Lateral derecho de cajón
K. Drawer bottom (2)
K. Fondo de cajón (2)
M. Drawer Front
M. Frontal de cajón
L. Drawer Back
L. Posterior de cajón
E. Right Glide support
E. Soporte de
deslizamiento derecho
G. Toddler Bed Conversion Kit
G. Kit de conversión de cama
para niños pequeños
H. Left drawer side
H. Lateral izquierdo de cajón
página 3
HARDWARE • ACCESORIOS DE MONTAJE
H1. 2-1/4” Allen Head Bolt (8)
H1. Perno de cabeza Allen
de 2-1 / 4 "(8)
H13. Allen wrench
H13. Llave Allen
H10. Lock washer (16)
H10. Arandela de
bloqueo (16)
H2. 1-3/4” Allen Head Bolt (4)
H2. Perno de cabeza Allen
de 1-3 / 4 "(4)
H9. Washer (4)
H9. Rondana (4)
H8. Wood Dowel (4)
H8. Pasador de
Madera (4)
H3. 3/4” Allen Head Bolt (4)
H3. Perno de cabeza Allen
de 3/4 "(4)
H7. Cam lock (3)
H7. Cerradura de
leva (3)
H6. Cam bolt (3)
H6. Perno de leva (3)
H11. Knob (2)
H11. Agarradera (2)
H4. 1-1/4” Phillips
head screw (12)
H4. Tornillo de cabeza Phillips
de 1-1 / 4 "(12)
H5.1/2” Phillips
head screw (12)
H5. Tornillo de cabeza Phillips
de 1 / 2 ”(12)
H12. Knob Screw (4)
H12. Tornillo de agarradera (4)
página 4
A B
N-2
N-1
1
ASSEMBLY INSTRUCTIONS • INSTRUCCIONES DE MONTAJE
2
Do not overtighten.
No apriete demasiado.
Do not overtighten.
No apriete demasiado.
A
D
H4 H4 H4
B
E
H4 H4 H4
N-1
N-2
H5 H5 H5
H5 H5 H5
X2 A/B
H4
H4
H4
H8
H8
D/E
3
Do not overtighten the bolts.
No apriete demasiado los tornillos.
H1 H1
H10 H10
H1
H10
H1
H10
C
A B
* Make sure the mattress support
IV (F) is installed FLAT SIDE UP.
* Make sure the smattress support
IV (F) is level.
* Asegúrese de que el soporte del
colchón IV (F) esté instalado.
LADO PLANO HACIA ARRIBA.
* Asegúrese de que el soporte para
colchón IV (F) esté nivelado.
!
H1
H10
X4
4
F
H3
H10
H9
X4
X4
H3
H10
H10
H3
H10
H3
H10 H3
F
Do not overtighten the bolts.
No apriete demasiado los tornillos.
C
A B
página 5
5
Do not overtighten the bolts.
No apriete demasiado los tornillos.
H1
H10
H1
H10
H1
H10
H1
H10
H1
H10
X4
6a
DRAWER ASSEMBLY INSTRUCTIONS
INSTRUCCIONES DE MONTAJE DE CAJONES
K
H4
I
K
J
H
H4
H4 X3
Do not overtighten.
No apriete demasiado.
L
H4
H4
C
BA
H4
H4
H4
página 6
6b H6
H7
* Rotate clockwise
to secure
* Gire hacia la derecha
para asegurar
M
X3
H
I
J
H5
H5
H5 N-4
N-3
H5
H5
H5
H12
H12
H12
H12
H
I
L
J
H11
H11
M
6c
Do not overtighten.
No apriete demasiado.
página 7
MANTENGA ESTE MANUAL EN UN LUGAR
SEGURO PARA FUTURAS REFERENCIAS.
Vuelva a revisar todos los tornillos y pernos
para asegurarse de que estén bien sujetos.
No apriete demasiado.
Antes de usar su cuna, lea todas las declara-
ciones de precaución en la hoja de inserción.
KEEP THIS MANUAL IN A SAFE
PLACE FOR FUTURE REFERENCE.
Recheck all screws and bolts to be sure
they are fastened securely. Do not over-
tighten.
Before using your crib, please read all
cautionary statements on the insert sheet.
Finish
Terminado
7
página 8
CAUTION: ANY MATTRESS USED IN THIS CRIB MUST BE AT LEAST 27 1/4 INCHES (69CM)
BY 51 5/8 INCHES (131CM) WITH A THICKNESS NOT EXCEEDING 6 INCHES (15CM).
Please refer to the label (sample below) on the inside face
of the headboard. Record the model/ item number and serial
number of your crib, the name of the store where you made
the purchase, the date of purchase and the wood finish in
the box to the lower right.
WE WILL ASK YOU FOR YOUR SERIAL NUMBER FOR ALL
WARRANTY AND REPLACEMENT PART REQUESTS. PLEASE
REFER TO THE LAST PAGE OF THIS INSTRUCTION SHEET FOR
WARRANTY INFORMATION. KEEP THIS MANUAL FOR FUTURE
REFERENCE.
Please read the Caution and Warning
Statements insert before using your crib.
SAMPLE LABEL
THIS PRODUCT CONFORMS TO THE
APPLICABLE REGULATIONS OF THE
CONSUMER PRODUCTS SAFETY COMMISSION.
Número de
modelo/producto
Número
de serie
Fecha de
fabricación
Número de modelo:
Número de serie:
Tienda:
Fecha de compra:
Acabado de madera:
ETIQUETA DE EJEMPLO
www.themdbfamily.com
CAUTION: ANY MATTRESS USED IN THIS CRIB
MUST BE AT LEAST 27 1/4 INCHES (69CM) BY
51 5/8 INCHES (131CM) WITH A THICKNESS
NOT EXCEEDING 6 INCHES (15CM).
PRECAUCIÓN: CUALQUIER COLCHÓN UTILIZADO EN ESTA CUNA DEBE ESTAR AL
MENOS 27 1/4 PULGADAS (69 cm) POR 51 5/8 PULGADAS (131 cm) CON UN ESPESOR
QUE NO EXCEDA 6 PULGADAS (15 cm).
PRECAUCIÓN: CUALQUIER COLCHÓN UTILIZADO
EN ESTA CUNA DEBE ESTAR AL MENOS 27 1/4
PULGADAS (69 cm) POR 51 5/8 PULGADAS (131
cm) CON UN ESPESOR QUE NO EXCEDA 6
PULGADAS (15 cm).
Consulte la etiqueta (muestra a continuación) en la cara
interior de la cabecera. Registre el número de modelo /
artículo y el número de serie de su cuna, el nombre de la
tienda donde realizó la compra, la fecha de compra y el
acabado de madera en la casilla de la esquina inferior
derecha.
LE PEDIREMOS SU NÚMERO DE SERIE PARA TODAS LAS
GARANTÍAS Y SOLICITUDES DE PIEZAS DE REPUESTO. CON-
SULTE LA ÚLTIMA PÁGINA DE ESTA HOJA DE INSTRUCCIONES
PARA OBTENER INFORMACIÓN SOBRE LA GARANTÍA.
GUARDE ESTE MANUAL PARA FUTURAS REFERENCIAS.
ESTE PRODUCTO CUMPLE CON EL
REGLAMENTO EN VIGOR DE LA
COMISIÓN DE SEGURIDAD DE
PRODUCTOS DEL CONSUMIDOR.
Lea el folleto de Declaraciones de precau-
ción y advertencia antes de usar su cuna.
WARNING:
Failure to follow these warnings and
the assembly instructions could result
in serious injury or death.
READ ALL INSTRUCTIONS BEFORE ASSEMBLING
CRIB. KEEP THE MANUAL FOR FUTURE USE.
WARNING:
Infants can suffocate on soft bedding. Never add a pillow or comforter. Never
place additional padding under an infant.
•
To reduce the risk of SIDS, pediatricians recommend healthy infants be placed•
on their backs to sleep, unless otherwise advised by your physician.
Strangulation Hazard: Strings can cause strangulation! Do not place items with•
a string around a child’s neck, such as hood strings or pacifier cords. Do not
place cords, straps,or similar items that could become wound around the child’s
neck in or near this crib. Do not suspend strings over a crib or attach strings to
toys.
To help prevent strangulation tighten all fasteners. A child can trap parts of the•
body or clothing on loose fasteners.
DO NOT place a crib near a window where cords from blinds or drapes may•
strangle a child. Do not place this crib near a window or a patio door where a
child could reach the cord of a blind or curtain and be strangled.
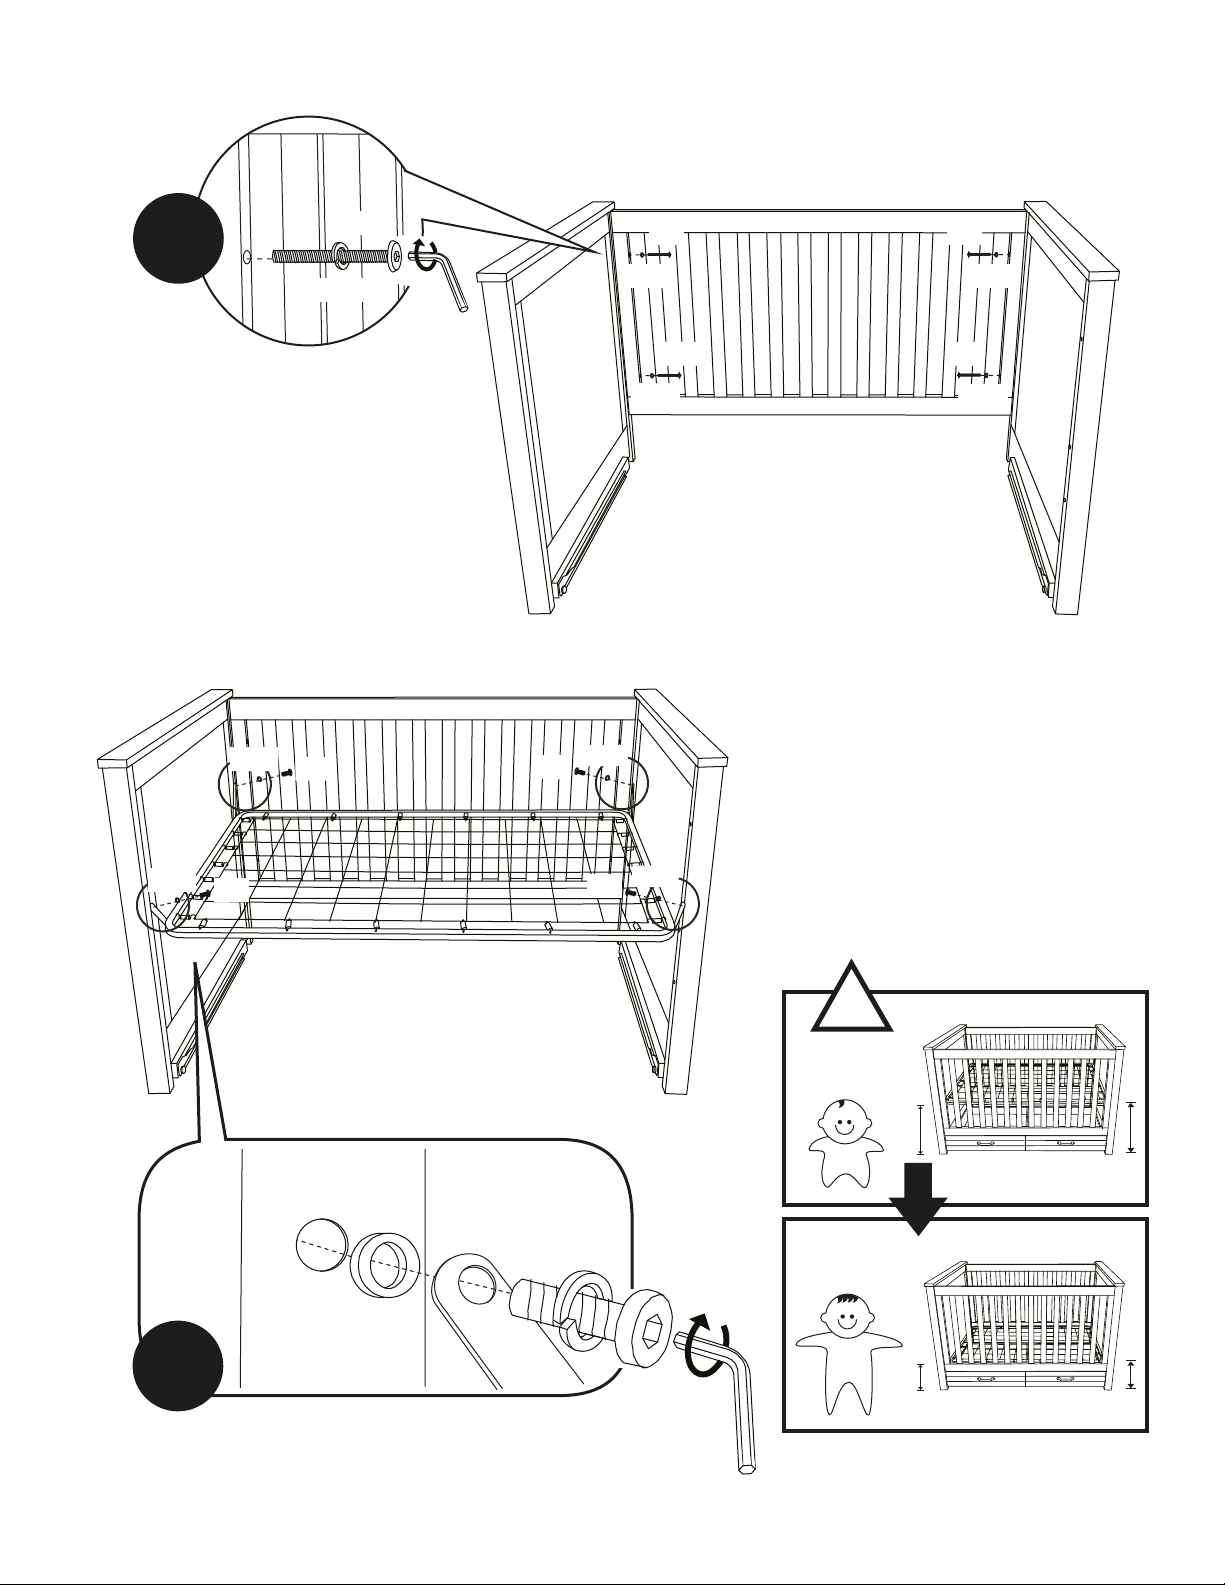
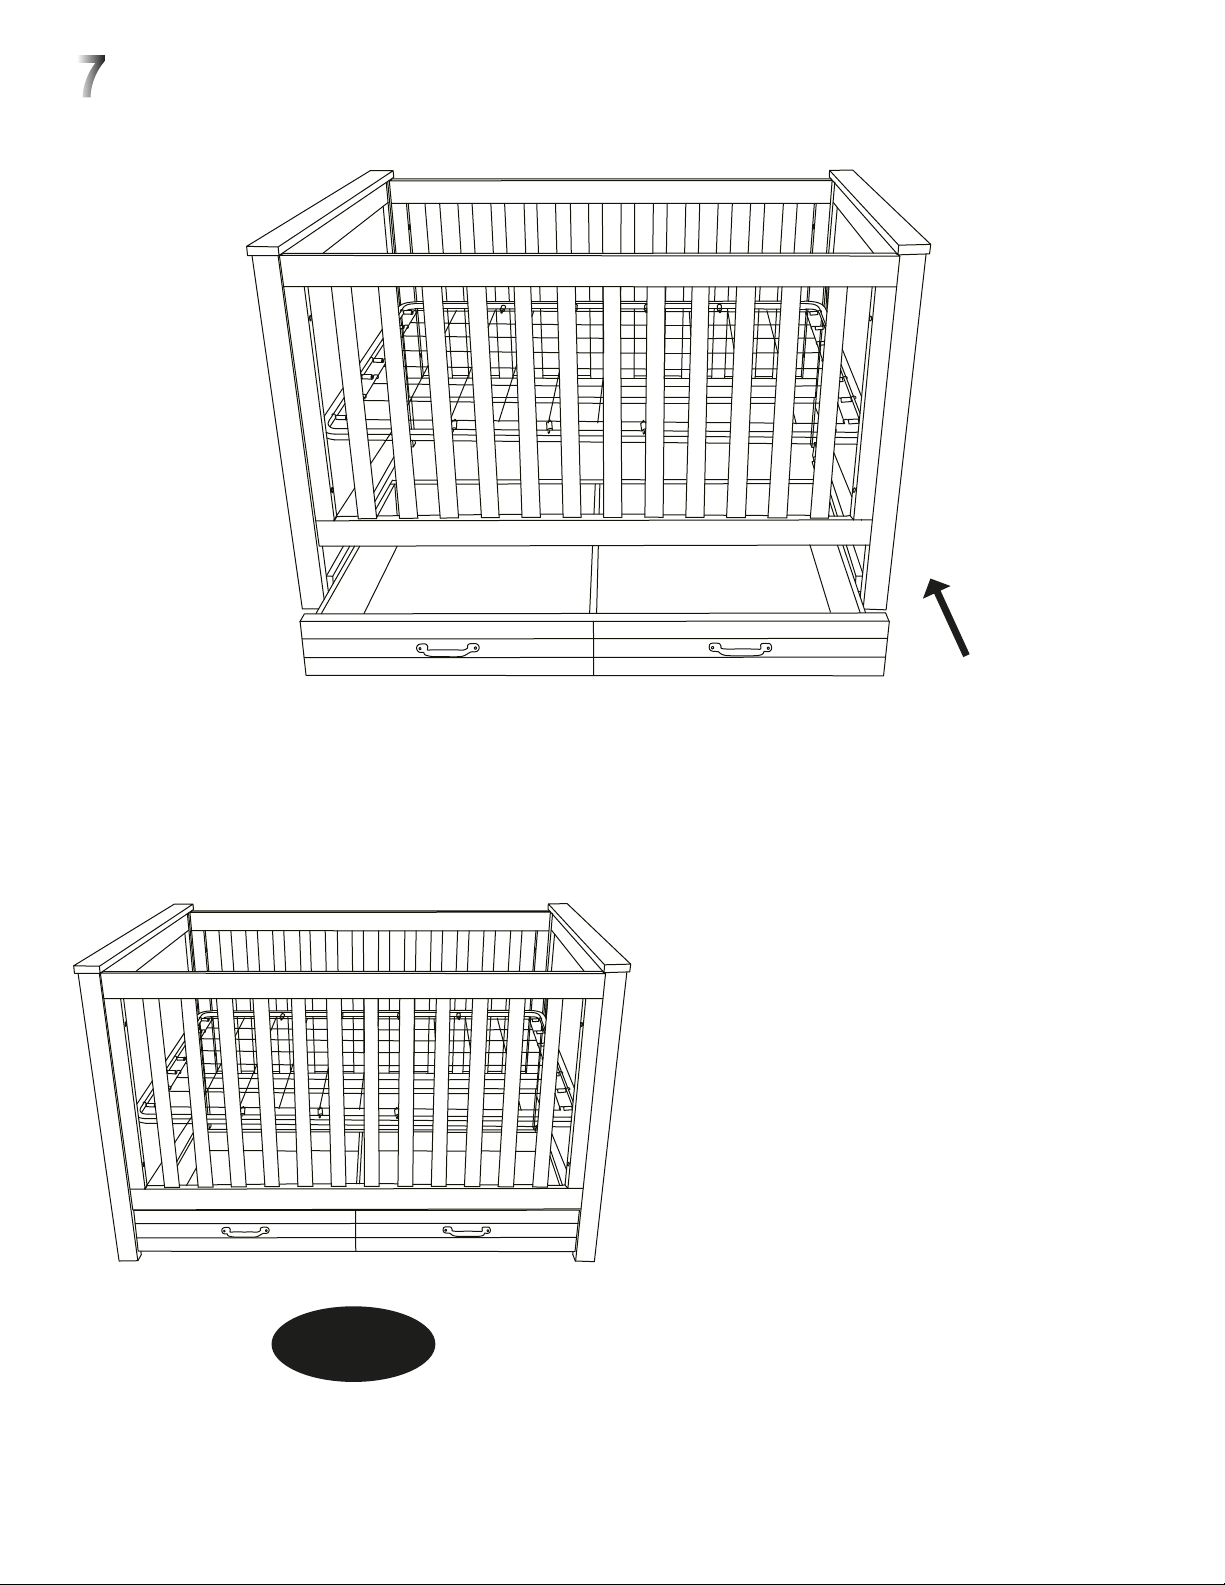
Fall Hazard: When a child is able to pull to a standing position, set the mattress•
to the lowest position and remove bumper pads, large toys and other objects
that could serve as steps for climbing out.
•
• Check this product for damaged hardware, loose joints, loose bolts or other
fasteners, missing parts or sharp edges before and after assembly and frequently
during use. Securely tighten loose bolts and other fasteners. DO NOT use crib if
any parts are missing, damaged or broken. DO NOT substitute parts. Contact
MDB FAMILY for replacement parts and instructional literature if needed.
DO NOT use a water mattress with this crib.•
Parents should ensure a safe environment for the
child by checking regularly, before placing the
child in the product, that every component is
properly and securely in place.
For cribs equipped with teething rails, replace teething rail if damaged, cracked•
If refinishing, use a non-toxic finish specified for children’s products.•
Never use plastic shipping bags or other plastic films as mattress covers•
because they can cause suffocation.
Infants can suffocate in gaps between crib sides when used with a mattress•
that is too small.
or loose.
Please do NOT remove any wood screws
in the normal disassembly of the crib.
WARNING:
Do not use this crib if the child is able to climb out unaided or is taller than
35 in. (89cm).
• Do not use this crib if you cannot exactly follow the accompanying instructions. • Follow warnings on all products in a crib.
• Ensure that the sides are properly latched or locked in
place when the crib is occupied.
• The mattress used with this crib should not be more
than 15cm thick and should be of such length with width
that the gap between the mattress and the sides of the
crib is no more than 3cm when the mattress is pushed
into the corner of the crib.
página 10
LEA TODAS LAS INSTRUCCIONES ANTES DE
ENSAMBLAR LA CUNA. GUARDE EL MANUAL
PARA USO FUTURO.
ADVERTENCIA:
Antes de colocar al niño en esta cama, los
padres deben asegurarse de que su entorno es
seguro al verificar regularmente que todos los
componentes estén bien asegurados.
NO retire ningún tornillo para madera
en el desmontaje normal de la cuna.
ADVERTENCIA:
ADVERTENCIA:
Si no se siguen estas advertencias y las instrucciones
de ensamblaje podrían producirse lesiones graves o la
muerte.
• NO use una cama de agua en esta cuna.
• Para cunas con barras de dentición, reemplace cualquier barra
de prótesis dañada, partida o suelta.
• Si es necesario rehacer el acabado de esta unidad, use un
acabado no tóxico diseñado para muebles de niños.
• Nunca utilice envases de plástico u otra envoltura de plástico
para cubrir el colchón, ya que existe riesgo de asfixia.
• Los bebés pueden ahogarse mientras se deslizan en el
espacio entre el colchón y los lados de la cama si el colchón es
demasiado pequeño.
• Siga las advertencias para todos los productos colocados en
una cuna.
• Asegúrese de que los lados estén correctamente bloqueados
cuando la cama esté ocupada.
• El colchón utilizado en esta cama no debe tener más de 15 cm
de grosor y su longitud y anchura no deben dejar un espacio de
más de 3 cm entre él y los lados cuando se empuja hacia una
esquina de la cama.
• No use esta cuna si no puede seguir las instrucciones que la acom-
pañan.
• Los bebés pueden ahogarse con los accesorios de la ropa de cama.
Nunca agregue una almohada o un edredón. Nunca coloque un cojín
adicional debajo de un bebé.
• Para reducir el riesgo de PMSD, los pediatras recomiendan colocar a
los bebés con buena salud sobre sus espaldas para dormir, a menos
que su médico indique lo contrario.
• Riesgo de estrangulamiento: ¡los cordones pueden causar estrangu-
lamiento! No coloque un objeto con una cuerda alrededor del cuello del
niño, como las cuerdas de una capucha o una paleta. No adhiera a la
cama ningún cordón, cinta o objeto similar que pueda envolver alrededor
del cuello del niño o cerca de la cama. No cuelgue cuerdas sobre la
cama ni las coloque en juguetes.
• Para evitar la estrangulación, compruebe la estanqueidad de las
piezas. Un niño puede pellizcar una parte de su cuerpo o ropa entre las
partes sueltas.
• NO coloque una cuna cerca de una ventana donde los cordones para
persianas o cortinas puedan estrangular al niño. No coloque esta cuna
cerca de una ventana o ventana francesa donde el niño pueda alcanzar
el cordón de persianas o cortinas y el estrangulador.
• Riesgo de caerse: cuando el niño pueda pararse, ajuste el colchón en
la posición más baja y retire las almohadillas de contorno, los juguetes
grandes o cualquier otra cosa que el niño pueda usar para levantarse de
la cama.
• No use esta cama si el niño puede salir sin ayuda o si tiene más de 89
cm (35 in).
• Asegúrese de que el producto no tenga piezas dañadas, juntas
sueltas, pernos, piezas sueltas, piezas faltantes o bordes afilados antes
y después del ensamblaje y con frecuencia durante el uso. Apriete
firmemente los pernos sueltos y otros sujetadores. NO use la cama si
faltan piezas, está dañada o rota. NO UTILICE PIEZAS DE
SUSTITUCIÓN. Póngase en contacto con MDB FAMILY para
obtener piezas de repuesto e instrucciones.
página 11
revisado29ENE2014
Registering your product is even easier than
before. You can register your product on our
website at : www.themdbfamily.com
IF YOU WOULD LIKE TO ORDER
REPLACEMENT OR MISSING PARTS
PLEASE VISIT US AT:
WWW.THEMDBFAMILY.COM
OR YOU CAN CONTACT US BY MAIL:
MDB FAMILY
855 WASHINGTON BLVD.
MONTEBELLO, CA 90640
Storage:
•
Pine woods exchange moisture with the air
adjusting to major changes in room temperature
and humidity. Therefore, it is best to place your
furniture away from heating or air-conditioning
vents.
•
Sunlight is not friendly to solid wood furniture and
prolonged direct exposure to harsh sunlight can
discolor the finish. Be careful not to place your
furniture in direct sunlight for extended periods of
time. As with all your fine furniture, blot up spills
immediately.
Care and Cleaning:
•
Do not scratch or chip the finish. Do not use
abrasive chemicals for cleaning. Clean with mild
soap on a soft rag. Rinse and dry thoroughly. If
you ever refinish this furniture, be sure to use only
a non-toxic finish specified for children’s products.
If you choose to refinish this furniture, the warranty
will be voided.
GARANTÍA LIMITADA DE UN AÑO:
Reemplazaremos cualquier pieza faltante en el
momento de la compra o cualquier artículo defec-
tuoso durante el período de garantía de un año a
partir de la fecha original de compra. Conserve su
recibo para el procesamiento de su reclamo de
garantía. Esta garantía solo cubre productos
nuevos con su embalaje original. Cubre solo a su
dueño original y no es transferible. No cubre
productos usados, usados o de demostración.
Esta garantía no cubre piezas dañadas o defectu-
osas debido a su instalación y ensamblaje, des-
gaste normal, abuso, negligencia, uso inadecua-
do o alteración del acabado, el estilo y los acceso-
rios de la cama. Los derechos específicos adjun-
tos a esta garantía pueden variar de una jurisdic-
ción a otra.
Algunas jurisdicciones no permiten la exclusión o
limitación de daños incidentales o consecuentes y
no limitan la duración de una garantía implícita.
ONE YEAR LIMITED WARRANTY:
We will replace any missing parts at the time
of purchase or any defective item within a
one year period from the date of original
purchase. Please keep your receipt so that
we may process your warranty request. This
warranty only covers new units with original
packaging and ownership, and is not trans-
ferable. It does not cover any used, second-
hand or demo models.
This warranty does not cover any damaged
or defective parts that result from installation
and assembly, normal wear and tear, abuse,
negligence, improper use or alteration to the
finish, design, and hardware of the crib. The
specific legal rights of this warranty may vary
from state to state. Some states do not allow
any exclusion or limitation of incidental dam-
ages. Some states do not allow limitation on
how long an implied warranty lasts.
Almacenamiento:
• La madera de pino intercambia la humedad con el aire,
adaptándose a los principales cambios de temperatura y
humedad. Por lo tanto, es mejor alejar estos muebles de
las rejillas de ventilación y del aire acondicionado.
• La luz solar no se mezcla con los muebles de madera
maciza y la exposición prolongada a la luz solar directa
puede decolorar el acabado. Tenga cuidado de no dejar
sus muebles directamente al sol durante mucho tiempo.
Al igual que con todos los muebles preciosos, inmediata-
mente escupe cualquier salpicadura.
Mantenimiento y limpieza:
• Evite rayar o escalar el acabado. No utilice limpiadores
abrasivos. Limpie el gabinete con jabón suave en un
paño no áspero. Enjuague y seque bien. Si necesita
rehacer este mueble, asegúrese de usar un acabado no
tóxico diseñado para muebles de niños. Si se comprom-
ete a pintar estos muebles, su garantía será cancelada.
Registrar tu producto es más fácil que nunca. Por
favor regístrese en nuestro sitio web en:
www.themdbfamily.com
PARA PEDIR REEMPLAZO O PIEZAS QUE
FALTAN, VISÍTENOS EN:
WWW.THEMDBFAMILY.COM
O CONTACTE CON NOSOTROS POR CORREO:
MDB FAMILY
855 WASHINGTON BLVD.
MONTEBELLO, CA 90640
página 12
ASSEMBLY INSTRUCTIONS • INSTRUCCIONES DE MONTAJE
* All of the parts and hardware you will need are supplied with the crib at the time of purchase.
* Las piezas de montaje y los accesorios que necesitará se suministran con la cama cuando se compran.
2
3 in 1 Crib (13801) - Toddler bed conversion assembly
Cuna 3 en 1 (13801) - Conversión a la cama para niños pequeños
1
!
F
Do not overtighten the bolts.
No apriete demasiado los pernos.
!
G
G
H2 H10
H10
G
H2 H10
H2
H10 H2
H10 H2
X4
página 13
WARNING : STRANGULATION HAZARD
Failure to follow these warnings and the assembly instructions could result in
serious injury or death from entrapment or strangulation.
Si no se siguen estas advertencias y las instrucciones de montaje, se pueden
producir lesiones graves o la muerte por atrapamiento o estrangulación.
Las aberturas en y entre las partes de la cama pueden atrapar la cabeza y el cuello de un niño pequeño.
NUNCA use la cama con niños menores de 15 meses. SIEMPRE siga las instrucciones de montaje. NUNCA
coloque la cama cerca de ventanas donde los cordones de persianas o cortinas puedan estrangular a un
niño. NUNCA coloque cuerdas sobre la cama. NUNCA coloque artículos con una cuerda, cordón o cinta,
como cuerdas de la capucha o cordones de chupete, alrededor del cuello del niño. Estos artículos pueden
engancharse en las partes de la cama.
ADVERTENCIA :
PELIGRO DE ESTRANGULACIÓN
Openings in and between bed parts can entrap head and neck of a small child. NEVER use bed with children
younger than 15 months. ALWAYS follow assembly instructions. NEVER place bed near windows where cords
from blinds or drapes may strangle a child. NEVER suspend strings over bed. NEVER place items with a
string, cord, or ribbon, such as hood strings or pacifier cords, around a child’s neck. These items may catch
on bed parts.
TO AVOID DANGEROUS GAPS, ANY MATTRESS USED IN THIS BED SHALL BE
A FULL-SIZE CRIB MATTRESS AT LEAST 51 5⁄8 IN. (131 CM) IN LENGTH, 27 1⁄4
IN. (69 CM) IN WIDTH, AND A MAX THICKNESS OF 6 IN. (15 CM).
THE INTENDED USER'S MINIMUM AGE MUST BE AT LEAST 15 MONTHS OLD
AND MAXIMUM WEIGHT MUST NOT EXCEED 50 LBS (22.7 KG).
PARA EVITAR LAS BRECHAS PELIGROSAS, CUALQUIER COLCHÓN UTILIZADO
EN ESTA CUNA DEBE SER DE TAMAÑO COMPLETO AL MENOS 51 5⁄8 IN. (131
cm) EN LONGITUD, 27 1⁄4 EN. (69 cm) EN ANCHO, Y UNA GRAN ESPESOR DE 6
EN. (15 cm).
LA EDAD MÍNIMA DE LOS USUARIOS PROPUESTOS DEBE TENER AL MENOS
15 MESES, Y EL PESO MÁXIMO NO DEBE EXCEDER 50 LBS (22.7 kg).
página 14

Other DaVinci Indoor Furnishing manuals

DaVinci Roxy Crib M5941 Installation and operating instructions

DaVinci

DaVinci Roxy Crib M5941 Installation and operating instructions

DaVinci 13823 Installation and operating instructions

DaVinci

DaVinci 13823 Installation and operating instructions

DaVinci 9723 Installation and operating instructions

DaVinci

DaVinci 9723 Installation and operating instructions

DaVinci Charlie M12823 User manual

DaVinci

DaVinci Charlie M12823 User manual

DaVinci Elizabeth II Convertible Toddler Bed 0810 User manual

DaVinci

DaVinci Elizabeth II Convertible Toddler Bed 0810 User manual

DaVinci 0934 User manual

DaVinci

DaVinci 0934 User manual

DaVinci 5998 Installation and operating instructions

DaVinci

DaVinci 5998 Installation and operating instructions

DaVinci 13594 User manual

DaVinci

DaVinci 13594 User manual

DaVinci Fairway 13516 User manual

DaVinci

DaVinci Fairway 13516 User manual

DaVinci Ryder M23511 User manual

DaVinci

DaVinci Ryder M23511 User manual

DaVinci 5926 User manual

DaVinci

DaVinci 5926 User manual

DaVinci Marley W4926 User manual

DaVinci

DaVinci Marley W4926 User manual

DaVinci Margot M24926 User manual

DaVinci

DaVinci Margot M24926 User manual

DaVinci Morgan 3 User manual

DaVinci

DaVinci Morgan 3 User manual

DaVinci M10687 Maintenance manual

DaVinci

DaVinci M10687 Maintenance manual

DaVinci GABBY M19787 Maintenance manual

DaVinci

DaVinci GABBY M19787 Maintenance manual

DaVinci 7323 User manual

DaVinci

DaVinci 7323 User manual

DaVinci carter's ARLO Maintenance manual

DaVinci

DaVinci carter's ARLO Maintenance manual

DaVinci CARTER'S MORGAN SIX DRAWER DRESSER User manual

DaVinci

DaVinci CARTER'S MORGAN SIX DRAWER DRESSER User manual

DaVinci Otto M22526 User manual

DaVinci

DaVinci Otto M22526 User manual

DaVinci 0598 Installation and operating instructions

DaVinci

DaVinci 0598 Installation and operating instructions

DaVinci Signature M4426 User manual

DaVinci

DaVinci Signature M4426 User manual

DaVinci Full Size Bed Conversion Kit User manual

DaVinci

DaVinci Full Size Bed Conversion Kit User manual

DaVinci Carter`s Colby F11923 User manual

DaVinci

DaVinci Carter`s Colby F11923 User manual

Popular Indoor Furnishing manuals by other brands

Costway JV10659 user manual

Costway

Costway JV10659 user manual

L.L.Bean ADIRONDACK quick start guide

L.L.Bean

L.L.Bean ADIRONDACK quick start guide

Bell'O ODL792-51-D915 user manual

Bell'O

Bell'O ODL792-51-D915 user manual

Twin-Star International Tresanti EC9740LC22 manual

Twin-Star International

Twin-Star International Tresanti EC9740LC22 manual

BLACK RED WHITE TIP-TOP TLAW 55/80 Assembly manual

BLACK RED WHITE

BLACK RED WHITE TIP-TOP TLAW 55/80 Assembly manual

Argos Vancouver II 643/8157 Assembly instructions

Argos

Argos Vancouver II 643/8157 Assembly instructions

Human Touch Perfect Chair PROZero PC8500 Use & care manual

Human Touch

Human Touch Perfect Chair PROZero PC8500 Use & care manual

BROSA 0110 operating manual

BROSA

BROSA 0110 operating manual

Northern Farg & Blanche Loud user manual

Northern

Northern Farg & Blanche Loud user manual

Argos Haversham 376/6066 Assembly instructions

Argos

Argos Haversham 376/6066 Assembly instructions

RiverRidge Madison Tall Cabinet 06-108 Assembly instructions

RiverRidge

RiverRidge Madison Tall Cabinet 06-108 Assembly instructions

emob ELIAS BC 70099G-S5V-P Assembly instruction

emob

emob ELIAS BC 70099G-S5V-P Assembly instruction

Mercado Medic REAL 9000 PLUS Series INSTRUCTIONS FOR ASSEMBLY, USE & CARE

Mercado Medic

Mercado Medic REAL 9000 PLUS Series INSTRUCTIONS FOR ASSEMBLY, USE & CARE

John Lewis Scandi Solution instruction manual

John Lewis

John Lewis Scandi Solution instruction manual

Argos 832/2292 Simple Assembly Instructions

Argos

Argos 832/2292 Simple Assembly Instructions

Furniture of America Auletta CM3417SC-2PK Assembly instructions

Furniture of America

Furniture of America Auletta CM3417SC-2PK Assembly instructions

Allsteel Park NA96RCF installation instructions

Allsteel

Allsteel Park NA96RCF installation instructions

Whittier Wood Furniture 1162RLNa Assembly instructions

Whittier Wood Furniture

Whittier Wood Furniture 1162RLNa Assembly instructions

manuals.online logo
manuals.online logoBrands
  • About & Mission
  • Contact us
  • Privacy Policy
  • Terms and Conditions

Copyright 2025 Manuals.Online. All Rights Reserved.