DCI Edge SERIES 4 User manual
SERIES 4 & SERIES 5
12 O’CLOCK CABINET
Instructions For Use

2
OVERVIEW
2
SERIES 4 & SERIES 5 12 O’CLOCK CABINET
Instructions For Use
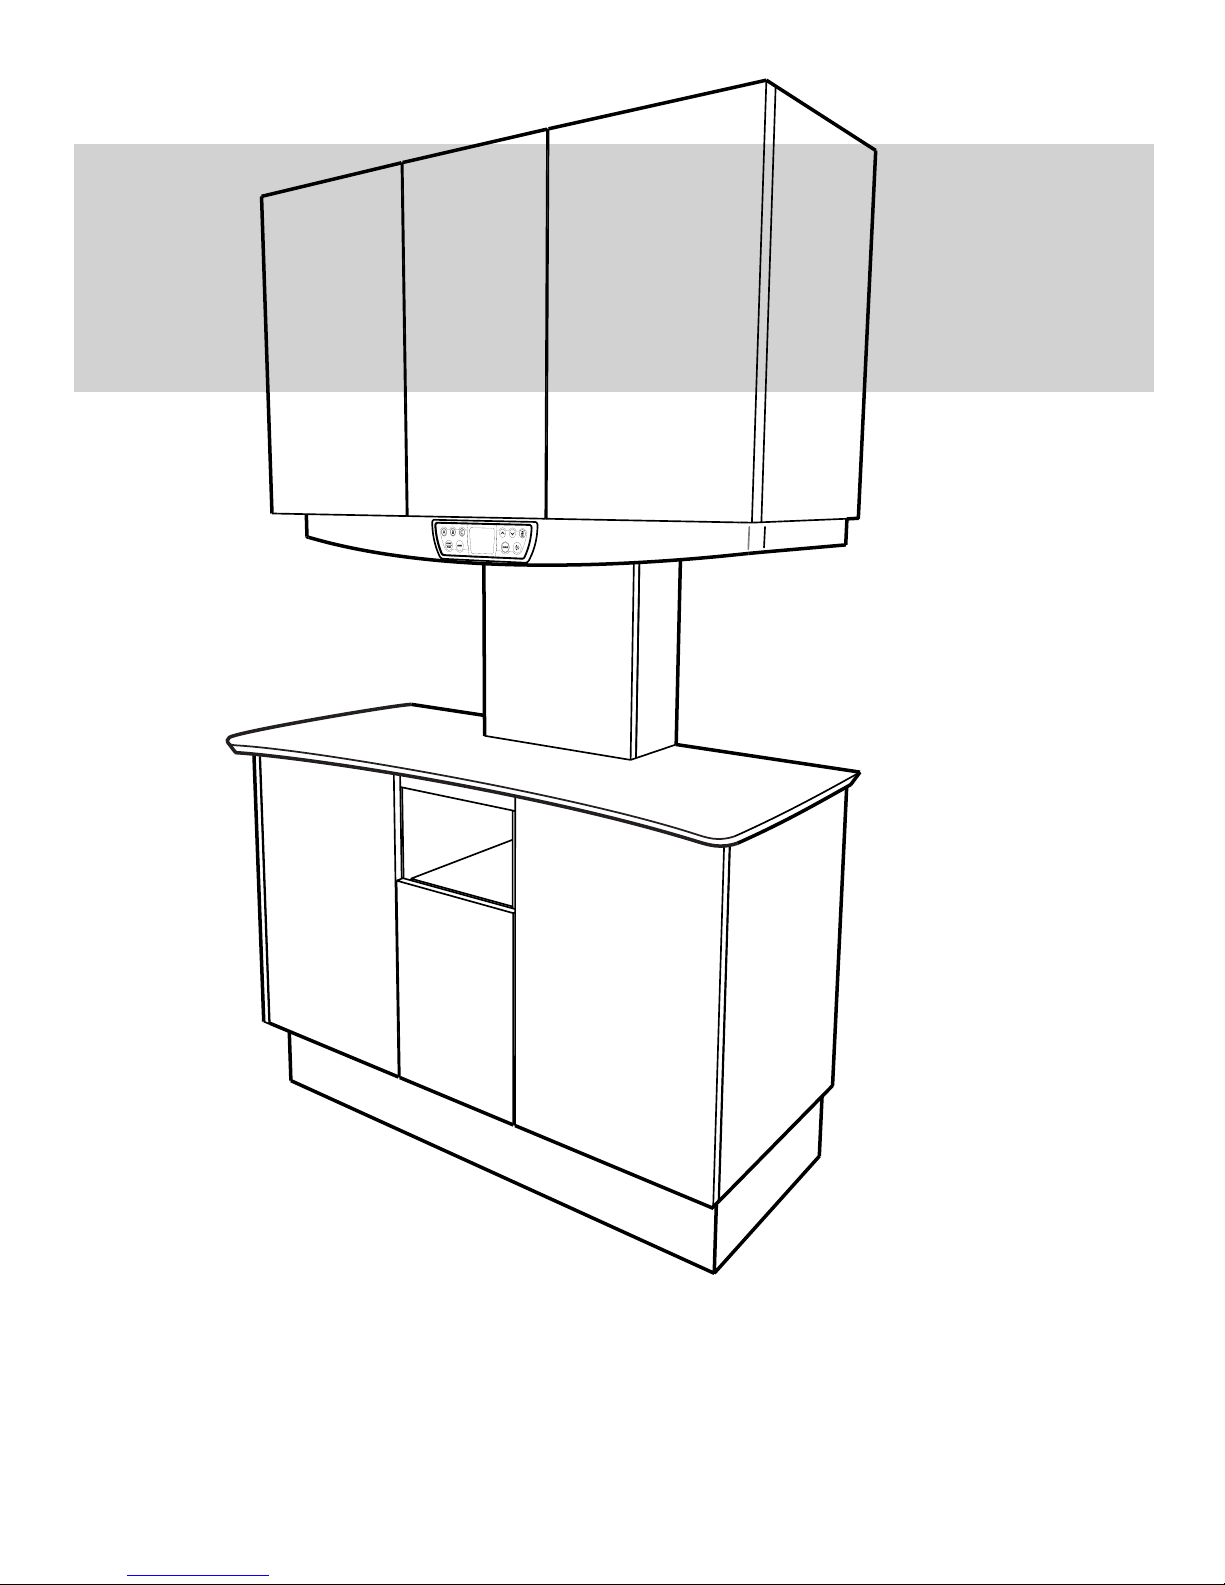
VALANCE
(varies by model)
ACCESSORIES PANEL
AND CABLE CHASE
COMPUTER
STORAGE
DELIVERY MOUNTING
NITROUS STORAGE
METAL SUB BASE
SOLID SURFACE
COUNTERTOP
(varies by model)
GFCI ELECTRICAL
OUTLETS / USB HUB
CLOCK MODULE
(Series 5 only)

3
INTRODUCTION
3
SERIES 4 & SERIES 5 12 O’CLOCK CABINET
Instructions For Use
System Overview
Introduction
General Information
General Safety
Operating Clock Timer & Lighting
Disinfection and Cleaning
SYMBOLS
The following symbols may be used throughout this product manual:
CAUTION: General Caution. Failure to carefully follow
the described procedure may result in damage to the
equipment.
ELECTRICAL HAZARD: Risk of electrical shock present.
Ensure that power is disconnected before attempting this
procedure.
TABLE OF CONTENTS
2
3
4
5
6
7
WARNING: Failure to carefully follow the described
procedure may result in damage to the equipment, the
operatory, and/or the operator.
NOTE: Take note of additional important information.
Not a warning or caution.
Manufacturer
Manufacturing date
Protective Earth (ground)
Waste Electrical and Electronic Equipment
Type B Equipment (Protected against electrical shock)
Alternating Current
Conforms to applicable European Directives
(Essential Requirements)
Electrical Testing Lab
Advisable to consult
accompanying documents
Refer to instruction
manual/booklet

4
GENERAL INFORMATION
PRODUCT IDENTIFICATION
The DCI Edge 12 O’Clock Cabinet can be identied by the label on the left-most interior panel. This label states the model number, serial number,
electrical specications, manufacturing date, and safety classications.
PREVENTATIVE INSPECTION
The performance of the equipment can be affected by use over time. Periodically inspect the water
and air lines for visible cracks or cuts, and inspect for loose ttings and fasteners which could lead to
leaks or other poor performance characteristics. Inspect joints and tensioning screws as a regular
maintenance item to ensure proper positioning of the device.
INTENDED APPLICATION AND USE
The DCI Edge 12 O’Clock Cabinet provides storage, work surfaces, and support for delivery units and accessory devices.
TECHNICAL DOCUMENTATION
The manufacturer will make available upon request circuit diagrams, component part lists,
descriptions, and calibration instructions to technical personnel responsible for the installation and
service of this equipment.
Operating Conditions:
Temperature: 67-76° F
Humidity: 20-60%
Altitude: <5,000 m
ENVIRONMENTAL CONDITIONS
INCOMPATIBLE DEVICES
For safety reasons, only DCI original devices and accessories approved for this product, or accessories from third parties released by DCI may be used.
PRODUCT DISPOSAL
Contact your local, authorized dealer for disposal of this device to ensure compliance with your local environmental regulations.
4
SERIES 4 & SERIES 5 12 O’CLOCK CABINET
Instructions For Use
Shipping conditions:
Temperature: -68 - 122° F
Humidity: 10-90%
ELECTRICAL OUTLETS
115VAC 15-20A 60 Hz
MN
SN
115 VAC 15A 60 Hz
CONFORMS TO IEC 60601-1 3rd EDITION
CERTIFIED TO CAN/CSA STD C22.2 NO 601.1
NEWBERG, OR 97132
02/01/18
305 N. SPRINGBROOK ROAD
5011557

5
GENERAL SAFETY
5
SERIES 4 & SERIES 5 12 O’CLOCK CABINET
Instructions For Use
IMPORTANT SAFETY INSTRUCTIONS
WARNING: This product must be
disinfected before use.
CAUTION: Only authorized service
technicians should attempt to service this
equipment. Use of other than authorized
technicians will void the warranty.
CAUTION: Product must be bolted to
the oor and support wall before use.
WARNING: To avoid risk of electric
shock, this equipment must be connected
only to supply mains with protective
earth.
WARNING: Modication of this
equipment is not allowed.
WARNING: Failure to disinfect this
device between patients could expose the
user and patient to cross contamination
and bioburden/biocontamination.
WARNING: Do not allow children
unsupervised access to this cabinet and
auxiliary equipment.
SAVE THESE INSTRUCTIONS
WARNING: Use this cabinet only for
its intended use as described in these
instructions. Do not use attachments not
recommended by the manufacturer.
WARNING: Do not use outdoors.
WARNING: Do not exceed the breaker
rating of the breakers for the circuits
dedicated to the outlets in the cabinets.
Consult your local electrician for more
information.
Other manuals for SERIES 4
3
This manual suits for next models
1
Table of contents
Other DCI Edge Dental Equipment manuals


