DDMWorks Slingshot Short Throw Shifter User manual

Rev A 2-3-15 ZPS
Slingshot Short Throw Shifter
119-A Hwy 183
Piedmont, SC 29673
Tech Support
(864) 907-6004
Tech@DDMWorks.com
This short throw shifter kit for the Slingshot
reduces the amount of forward and side to
side movement that is required to shift the
transmission into gears.
Installation time of the short throw shifter
depends on you and your mechanical skills. It
is suggested that you read through the
directions a few times to familiarize yourself
with the components of the kit, and your car.
If you are pretty handy with tools the shifter
can be installed in 30 minutes, however we
suggest that you schedule at least a couple of
hours for the installation.
If you have any questions during the installation you can call us at (864) 907-6004 or
email us at [email protected].
Page 1
TOOLS NEEDED
3/16” Allen key
Socket wrench
10mm socket
Socket extension
All purpose Grease
5mm Allen key
Paper Towels
Rev A 2-3-15 ZPS
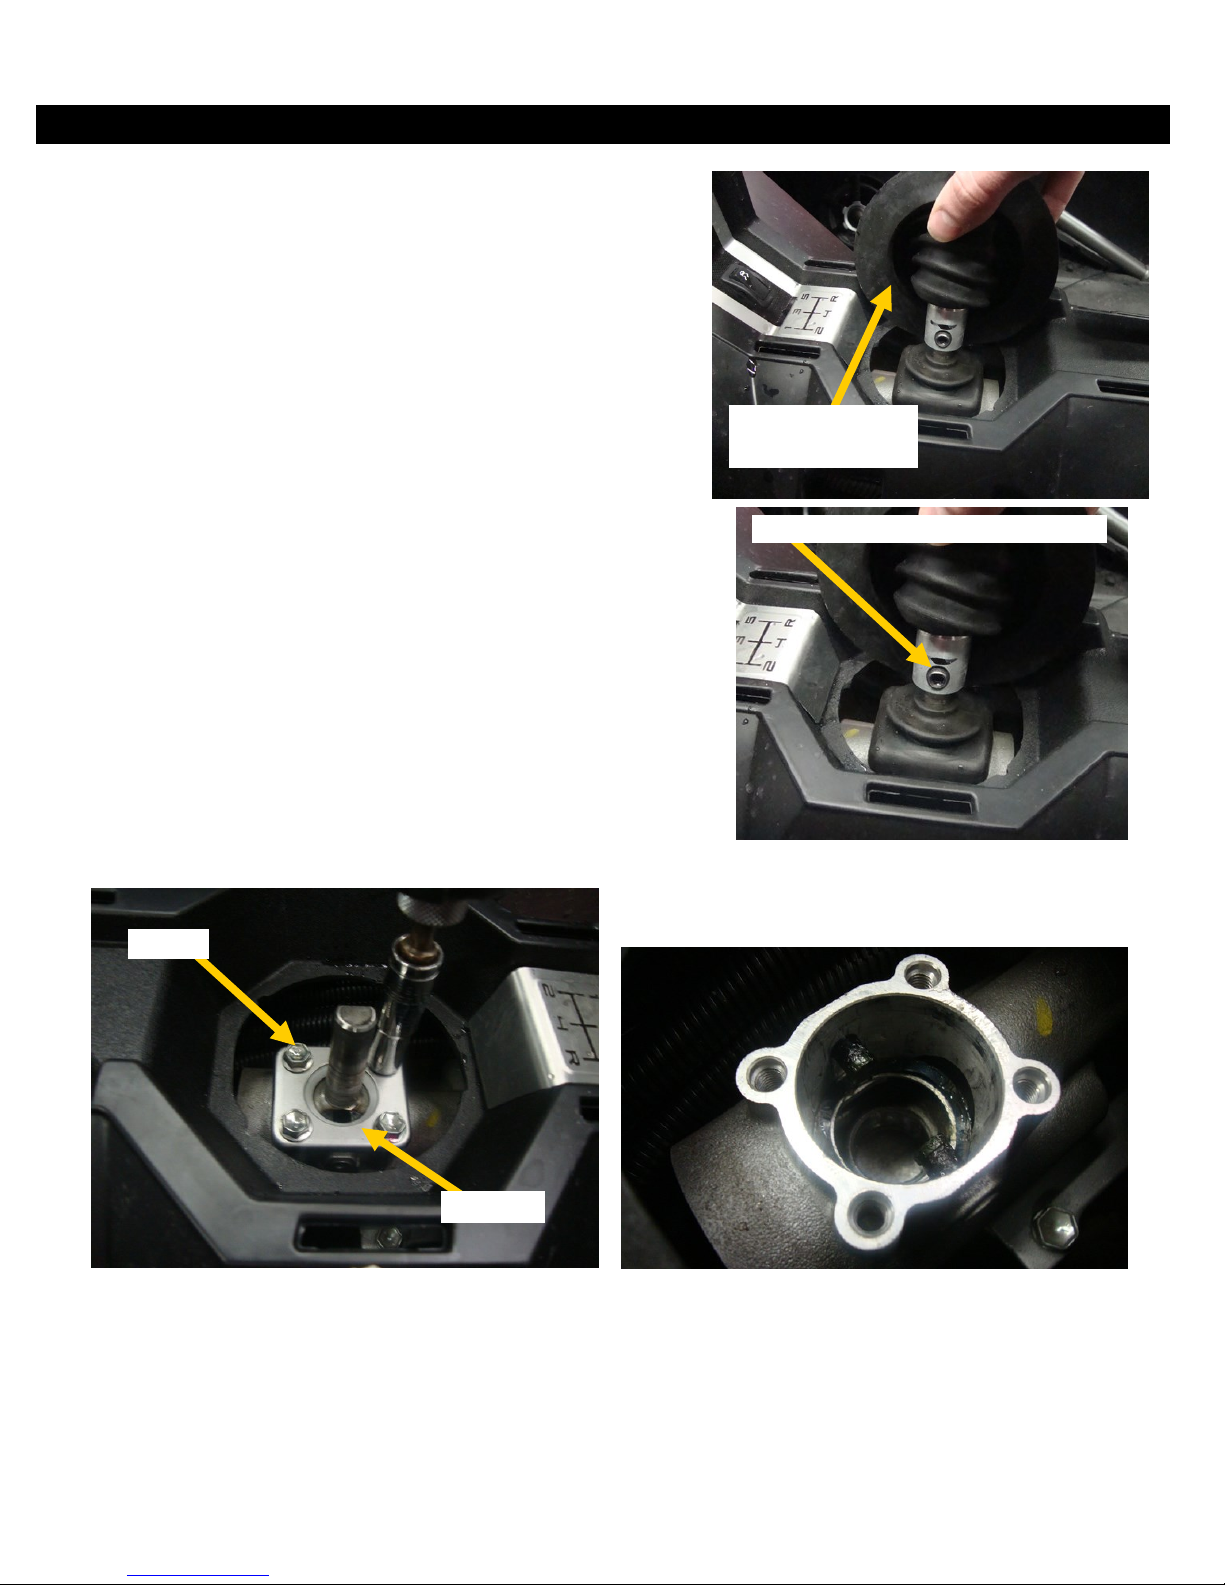
1. Make sure your Slingshot is in neutral and the parking
brake is on before starting installation.
2. The first step is to pull on the outer edge of the shift boot, in
order to gain access underneath it. To do this pull up and to-
wards the shifter to pull the boot up and off the plastic trim.
3. With the shift boot lifted up, the shift knob assembly needs to
be removed from the car. The shifter comes off of the stock
shifter mechanism by loosening one 5mm set screw at the
base of the shifter. Loosen that bolt until you can pull and lift
the shifter off of the stock mechanism.
4. With the upper part of the shifter off you can see a smaller
rubber boot that is around the stock shifter mechanism.
Reach in and with your finger start to pull it up. Once this
smaller rubber boot is pulled out it will expose 4 10mm head
bolts that hold the stock shifter mechanism in place. Using a
socket and extension, remove those 4 bolts.
5. With the 4 bolts removed, lift up the metal cap that was directly
underneath them and set it aside, it will be reused.
6. Now you can pull up on the stock shifter mechanism and it will
pull out of the car. Be careful since it will be covered with
grease and you will want to have some paper towels around to
set it on.
Removing the Stock Shifter Mechanism
Page 2
Pull around the edge
of the shift boot.
Loosen this bolt to get the stock shifter off
4 Bolts
Metal Cap
After removing the stock shifter mechanism, your car should
look like this, and it is time to start installing the new parts.

Rev A 2-3-15 ZPS
1. When you removed the stock shifter from the car, there
should be a small black spring that stayed in the bottom of
the cavity that the stock shifter is in, just make sure it is flat
to install the next piece. The first piece to install is the round
piece that has 2 slots machined into it. It installs with the slot
openings facing down, with the slots lined up to fit over the 2
pins in the cavity that the stock shifter came out of.
2. Next there are 2 parts that need to come off of the stock shift-
er and moved to the new shifter. On the stock shifter there is
a white plastic piece that fits over the larger ball portion.
You can pop this piece up and over the ball and it will come
off the stock shifter. Next, the smaller plastic piece on the
small ball at the end of the shifter needs to come off. This
one is held in place a little firmer. We have found the best
way to get it off is to use a wrench and a pair of needle nose
pliers like in the picture below:
3. Now take those 2 pieces and make sure to spread grease on
them, then install them on the same places on the new shifter.
Make sure that the small black spring is still on the top of the
white plastic piece that goes over the large ball. Also make
sure that the slots in the white plastic piece line up with the
slots in the shifter.
4. With the short shifter ready to install, we need to install the
other metal piece that came in the kit. It has 2 pins pressed
into it. This piece will set down into the cavity that the shifter
came out of with the
pins on the bottom.
The pins also need to be installed so that they are facing
the front and back of the car (not side to side like the
stock shifter). Roughly line up the 4 holes in this piece
with the 4 holes for the bolts in the transmission below.
Installing the DDMWorks short shifter
Page 3
New shifter ready to install
To get the plastic end off of
the stock shifter, place a
wrench against the big ball
on the stock shifter, then use
a pair of needle nose to pry
the piece off of the stock
shifter
These 2 pieces get transferred to the new shifter
Make sure that the slots in the white plastic line
up with the slots in the short shifter
First part is the round part installed
with the slots going over the pins
Pins are facing front and back, slot in new
shifter is lined up with the new pins when
it is slid into place.

Rev A 2-3-15 ZPS
1. With the short shifter rod ready to install, you will want to make
sure that the small plastic bushing at the end of the shifter is nice
and level, then slowly start lowering it into the cavity that the
stock shifter came out of. Since the car is in neutral, the hole that
the bushing needs to go into is straight down. If you have a
flashlight you can look down and see it. While lowering the
shifter into position if it touches anything, the small bushing will
kick to the side and not go into the transmission. It may take a
couple tries, but eventually the short shifter will drop into posi-
tion. When it is all the way down, it will sit pretty flush with the
piece that had the 2 pins in it that was just installed The small
black spring will sit a little higher and that is normal. Next find
the small plate that was removed from the stock shifter and it
will go on top of the shifter mechanism now.
2. The small plate can then be re-installed using the longer bolts
supplied in the kit, use the 5mm allen key and tighen down the 4
bolts to secure the new shifter in place.
3. Next, find the small rubber boot that was removed and place it
over the short shifter and over the small plate that was just in-
stalled.
4. Lastly, slide the shift knob assembly over the shifter and tighten
down the 5mm set screw to secure it in place.
5. Now you can push the stock shift boot between the shifter and
the plastic trim to get it back into place. Start on either the left
or right side and work your way around until it is all back in
place.
Installing the DDMWorks short shifter (continued)
Page 4
119-A Hwy 183
Piedmont, SC 29673
Tech Support
(864) 907-6004
This Product is Jake the Superdog
approved!
Congratulations! You have finished the install. All of us here at
DDMWorks thank you for your purchase and hope you enjoy your
new short shifter.
If you have any questions feel free to give us a call or text us at
864-907-6004. You can also email us at Tech@ddmworks.com.
Also, Follow us on Facebook for the latest product and information
releases!
The plate gets installed upside down from how
it was removed.
Small boot installed and ready to install the
shifter back on the car.
Other DDMWorks Automobile Accessories manuals

Popular Automobile Accessories manuals by other brands


ULTIMATE SPEED
ULTIMATE SPEED 279746 Assembly and Safety Advice

SSV Works
SSV Works DF-F65 manual

ULTIMATE SPEED
ULTIMATE SPEED CARBON Assembly and Safety Advice

Witter
Witter F174 Fitting instructions

WeatherTech
WeatherTech No-Drill installation instructions

TAUBENREUTHER
TAUBENREUTHER 1-336050 Installation instruction