DEDAKJ DE-1A User manual

Please read the instruction manual carefully before using the product.
Instruction Manual of Household
Oxygen Concentrator
Model: DE-1A/DE-1B/DE-1LW/DE-1BW

CONTENTS
Safety Precautions
Working Principle
Product Description
List of Accessories
Main Technical Indexes
Appearance Diagram
Steps of Use
Panel Display/Operating Instructions
Instructions for Use of Remote Control
Characteristic Function
Maintenance
Faults & Troubleshooting
02
03
04
04
05
06
08
11
13
14
16
19
01

02
Safety Precautions
WARNING
The device is not a medical device, so it is not considered for
life support or life extension!
▲The machine shall be placed in an indoor ventilated place and protect-
ed from direct sunlight, and the distance from it to walls and other objects
shall be more than 30CM/12In.
▲Please do not place any foreign matters or liquid containers on the
chassis.
▲It is forbidden to stack sundries at the side air inlet and the back air hole
of the machine, so as to prevent the high temperature caused by the
blockage of air inlet and exhaust, which may cause shutdown or decrease
of oxygen concentration.
▲To avoid interference of the machine by strong electromagnetic environ-
ment or interference of other electrical appliances, please keep a distance
of at least 3m/120In between the machine and other household applianc-
es.
▲It’s not allowed to place the machine upside down or horizontally.
▲If the power supply voltage is unstable and exceeds the normal voltage
range of 15V, please connect the voltage regulator before use.
▲Please select safe and acceptable socket and wiring board certified by
China Commission for Conformity Certification of Electric Equipment
(CCEE)
▲Oxygen is combustion-supporting gas. Do not smoke, and keep away
from the fire source to avoid fire hazard.
▲Do not start or stop the machine frequently, and please start the
machine 3~5min after shutdown, so as to avoid affecting the service life of
the compressor.
▲Do not apply oil or grease on any part of the oxygen machine.
▲Do not use the oxygen machine without air filter.
▲When using the oxygen machine, avoid bending the oxygen inhalation
tube, or water will overflow from the water tank.
▲Unauthorized personnel are not allowed to disassemble the cover.

03
Working Principle
Air enters the compressor after filtered by the air inlet filter and is
compressed into molecular sieve tower for separation of oxygen gas and
nitrogen gas. Then, oxygen gas passes through the molecular sieve tower
and enters the fine sieve tower smoothly, while nitrogen gas is discharged
into the atmosphere through the separating valve after adsorbed by the
molecular sieve. After the concentration of oxygen gas is further increased
in the fine sieve tower, the flow rate is controlled by the flow control valve,
and then oxygen gas is wet through the humidification water tank and
finally flows through the oxygen delivery pipe for supplementary oxygen
inhalation by users.
Schematic Diagram of Oxygen Machine
Air
Filter
Separating
Valve
Oil free air compressor
Humidification
Water Tank
Cooling System
Molecular Sieve
Tower
Oxygen Gas
Control
Valve

04
Product Description
List of Accessories
This product adopts AC 220V (110V) voltage as power source, air as raw
material, as well as pure copper oil-free compressor and imported
high-quality molecular sieve with original packaging, so as to produce
high-purity oxygen gas for supplementary oxygen for domestic use by a
new Pressure Swing Adsorption (PSA) method under normal temperature.
This product is designed as per the standard higher than that for house-
hold appliances and equipped with large and clear LED, intelligent chip
automatic control circuit and automatic fault alarm function. It is easy to
operate and provided with timing and overheat protection circuit. When
the working temperature of the compressor is too high, it will stop working
automatically to better protect the safety of the compressor and the whole
machine. Moreover, this product is light and handy and easy to move, and
it is suitable for not only household use but also vehicle-mounted use
through the automotive power supply. It is suitable for the majority of
supplementary oxygen and oxygen users.
Host machine
Remote control
Power line
Instruction Manual
Quality Certificate
(attached to the trailer page of the instruction manual)
Oxygen inhaler set
X1
X1
X1
X1
X1
X1
After unpacking, first check whether the appearance of the product is
intact, and then check the items in the package one by one according to
the Table above. For any missing items, please contact the dealer for
replacement in time.

05
Main Technical Indexes
Product name: Household Oxygen Concentrator
Model: DE-1A/DE-1B/DE-1LW/DE-1BW
Oxygen production method: PSA method
Rated voltage: AC220V/50Hz AC110V/60Hz
Input power: 120VA
Oxygen flow: 1-7L/min, adjustable
Oxygen concentration: 30-90%
Oxygen outlet pressure: 20-70kPa
Carbon dioxide: pass the test by the specified method
Carbon monoxide: pass the test by the specified method
pH value: pass the test by the specified method
Shape identification: colorless odorless gas, with combustion supporting
property
Atomizing rate: ≥0.2mL/min (limited to DE-1LW/DE-1BW)
Running noise: ≤45dB (A weighted)
Electrical classification: Class II
Product dimensions: 340x180x310mm
Net weight: 6.0Kg
Normal working conditions
Ambient temperature range: 5℃~40℃
Relative humidity range: ≤80%RH
Atmospheric pressure range: 86kPa-106kPa
※When the temperature is lower than 5℃, the equipment shall be placed
under normal working conditions for more than four hours before start-up
for use.
Transportation & storage conditions
Ambient temperature range: -20℃~60℃
Relative humidity range: ≤93%RH

06
Appearance Diagram
Portable handle
Oxygen outlet
Flow meter
Humidification
water tank
Portable handle
Oxygen outlet
Flow valve
Humidification
water tank
Timing +
Oxygen
production switch
Remote control
LED screen
Timing -
Sleep
Timing +
Oxygen
production switch
Remote control
LED screen
Timing -
Sleep
DE-1A Appearance Diagram
DE-1B Appearance Diagram

07
Portable handle
Portable handle
Oxygen outlet
Oxygen outlet
Atomizing port
Atomizing port
Humidification
water tank
Humidification
water tank
Flow valve
Timing +
Oxygen
production switch
Remote control
LED screen
Timing -
Sleep
Timing +
Oxygen
production switch
Remote control
LED screen
Timing -
Gear key
DE-1LW Appearance Diagram
DE-1BW Appearance Diagram

08
Steps of Use
①Drainage of water tank
Drain the water tank as shown in the
Figure on the left.
②Water injection
Open the rubber plug on the top of the water
tank and inject pure water (cold boiled water
or distilled water) to below the highest water
level, then install the rubber plug of water tank
back to its original position (remember to
install the rubber plug of water tank back to
the original position, so as to avoid no oxygen output from the oxygen
outlet during normal operation of the machine due to oxygen leakage from
the water filling port). Then, align the humidification water tank with the
Heat dissipation window
Power switch
Fuse
Power socket
Inlet cover/air filter (internal)
Inlet window
Highest water leve
Rubber plug of water tank

09
③Check "air filter"
Open the air inlet cover and check whether the
"air filter" is installed in place and clean.
Air inlet cover/air filter (internal)
④Connect the power line
As shown in the Figure on the left, insert the output end of
the power line into the power socket of the oxygen machine,
and then insert the other end of the power line into the
socket.
⑤Connect the oxygen inhalation tube
Insert the large-diameter end of the oxygen
inhalation tube into the "oxygen outlet" of the
host engine.
※If there are too many water drops in the
water collector during or after oxygen
inhalation, please open the water collector
and pour out water.
outlet of the oxygen machine water tank, align it with the bottom clamping
slot, and install the humidification water tank back to its original position.
※It should not be higher than the highest water level. Water injection is
not necessary, and it is only for humidifying oxygen gas. You may not
inject water if you don't think the oxygen is dry.
Oxygen inhalation tube

10
⑥Wear the oxygen inhaler
As shown in the Figure, when using
the ear hook type oxygen inhaler,
adjust the position of the oxygen outlet
and align it with the nostrils; when
using a snuffing oxygen inhaler,
please align the two outlets with the
nostrils and tighten the rubber ring.
⑦Start the oxygen machine
Turn on the "power switch" and touch the
"Start/Stop" key gently. Then, the machine will
start to produce oxygen, and the user can
inhale oxygen.
Ear hook type
oxygen inhaler
Snuffing type
oxygen inhaler
Please adjust the oxygen concentration to the corresponding gear
according to the practical situation. Recommended oxygen concentration:
70%~90% for special people (please do not inhale high-concentration
oxygen unless otherwise advised by the doctor) The oxygen concentra-
tion of 50%~70% is suitable for the elderly and pregnant women, and
30%~50% is suitable for office workers and students, or please consult a
physician.

11
Panel Display/Operating Instructions
1. Display description
Description of DE-1A/DE-1B/DE-1BW LED Screen
1、Sleep mode
2、Cooling fan state display
3、Timing time display
4、Cumulative time display
Description of DE-1LW LED Screen
1、Timing time display
2、Oxygen flow display
3、Oxygen concentration display
4、Cumulative time display
5、Cooling fan state display
6、Sleep mode display
7、Fault alarm display: fan alarm
4
3
2
1

12
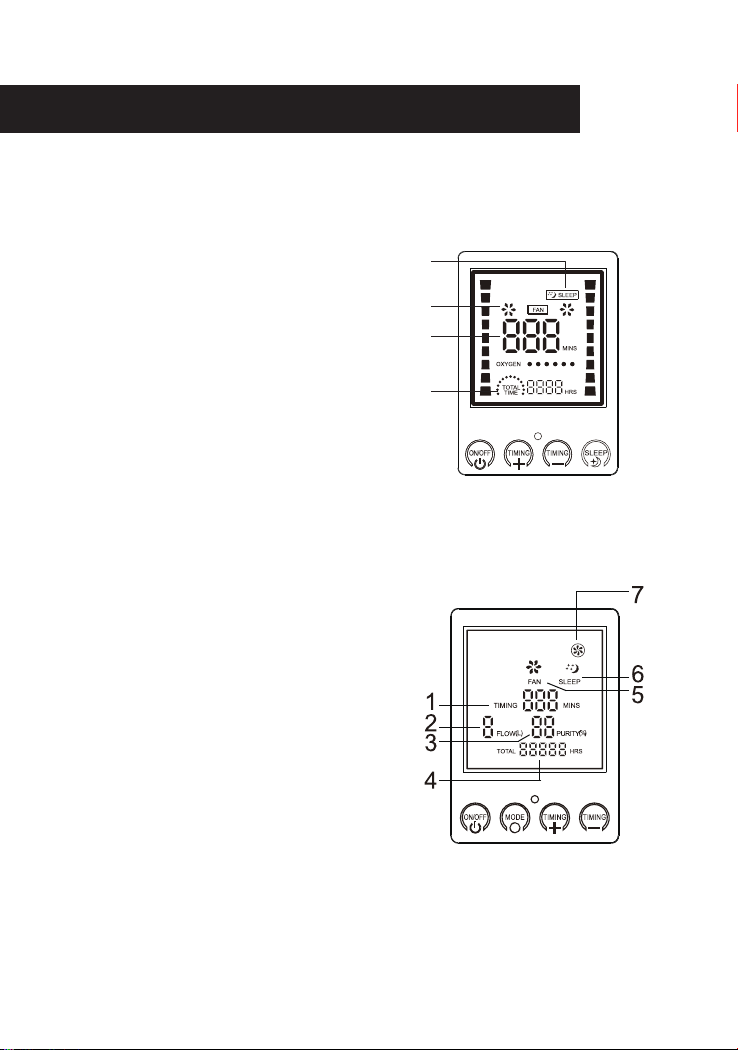
2. Operation of function keys
Turn on the power switch and the host machine will enter the ready mode.
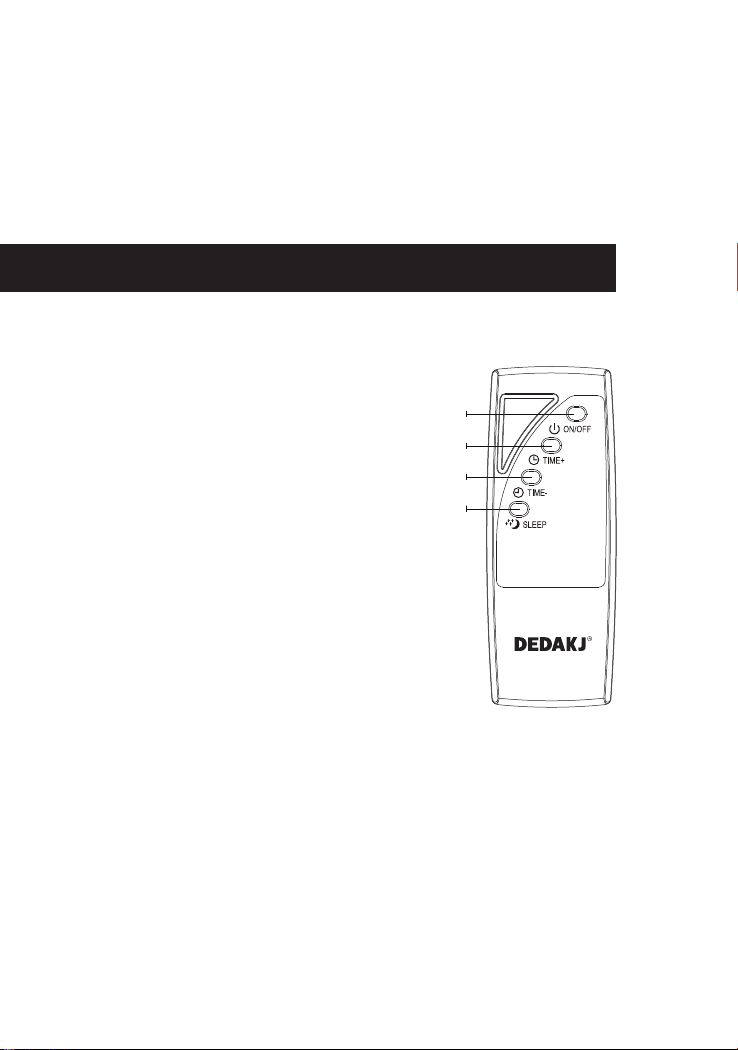
Start/Stop key
Gently touch the “Oxygen Production” key, the display screen is fully
bright, the machine enters into oxygen production state, with blue light
displayed for the water tank. At this time, the screen displays timing time
and cumulative time.
In the working state, gently touch the "Oxygen Production" key to enter
the ready mode, and the fan will be stopped 3 minutes later.
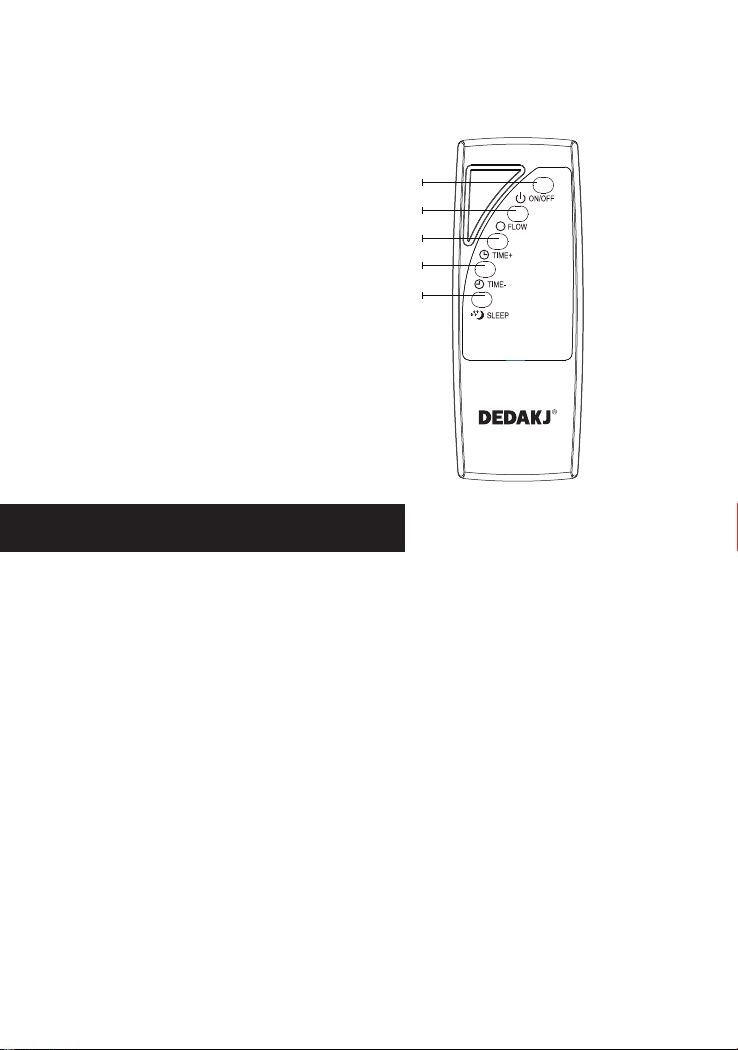
Flow gear adjustment
Gently touch the “Flow Gear” key to adjust the flow. The oxygen concen-
tration changes with the gear, and the greater the gas flow is, the smaller
the oxygen concentration will be. There are seven gears in total
(1-7L/min) to adjust the flow, which is 1L by default. When restarting the
machine from the ready mode, the flow gear value will be the set value
when the machine is shut down.
Note: DE-1A/DE-1B/DE-1BW flow regulation: in the working state, the
user can adjust the oxygen flow to 1-7L/min of flow meter (1A) or gear
knob (1B/1BW) as required.
Timing + key and Timing - key
Touch the timing "+" key gently to increase the timing by 15min, set it in
one-way circulation mode, and set the max. setting value to 180min; after
3 seconds of no operation, the countdown starts until automatic
shutdown. The operation of "Timing -" key is the same as "Timing +" key,
and "000" indicates no timing.
Warm tip: when operating the function key, if "000" is displayed, it
indicates no timing, and there will be different operations:
1、In the highlighted state, gently touch the function key to directly reflect
the operation result.
2、In power saving mode, gently touch the function key once to activate
the highlight mode, and gently touch it again to stop the operation.
Every time you touch any key, the buzzer will sound. It will enter the
power saving mode 1min later in case of no operation.

13
Instructions for Use of Remote Control
Warm tip: when operating the function key, if "000" is displayed, it
indicates no timing, and there will be different operations:
1、In the highlighted state, gently touch the function key to directly reflect
the operation result.
2、In power saving mode, gently touch the function key once to activate
Description of DE-1A/DE-1B/DE-1BW Remote Control Keys
1、On/Off key
2、Timing key
3、Timing- key
4、Sleep mode key
the highlight mode, and gently touch it again to stop the operation.
Every time you touch any key, the buzzer will sound. It will enter the
power saving mode 1min later in case of no operation.
1
2
3
4

14
Characteristic Function
Power saving mode
In the working state, the display screen will enter the power saving mode
after one minute without operation, and its brightness and the brightness
of the water tank light will decrease synchronously, which will make your
life more environmentally friendly.
Sleep mode
In working state, press the "Sleep" key on the remote control, the bright-
ness of the display screen of the host machine will be further reduced
than that in the power saving mode, and the water tank light will be off,
making the sleeping environment more comfortable for you.
Cumulative time function
This machine is designed with the function of accumulative use time. After
working time reaches one hour, the cumulative time will be increased by
"1".
Description of DE-1LW Remote Control Keys
1、Oxygen production on-off key
2、Flow key
3、Timing + key
4、Timing - key
5、Sleep mode key
1
2
3
4
5

15
Automatic fault testing function
This machine has the automatic fault detection function so that you can
understand the fault more clearly. Fault detection of cooling fan: in case of
a fault of the cooling fan during use, DE-1A/DE-1B DE-1BW LED screen
will display a fault code “E1”, and DE-1LW LED screen will display a red
fan icon, accompanied by a buzzer alarm sound.
Oxygen inhalation by two persons
As shown in the Figure, connect the oxygen inhalation tubes for two
persons, and then they can inhale oxygen at the same time.
Connected to Oxygen Outlet of Oxygen Machine
Tee Joint
Connection Diagram of Oxygen Inhalation Tubes for Two Persons
Atomizing purpose (applicable to DE-1BW/DE-1LW only)
1、Before start-up, screw down the nut of atomizing port anticlockwise.
2、Connect one end of the tube to the atomizing port. Please use it as
needed or under the guidance of a professional doctor, and wear the
atomizer as required.
3、For start-up, press the "Start/Stop" key. Please confirm that the gear is
set to 1L flow, and the oxygen machine will switch to atomizing purpose.
※ After atomization, please press the "Start/Stop" key to shut down the
machine, remove the atomizer connecting pipe, and re-install and tighten
the atomizing port nut.

16
Maintenance
Clean the housing
The housing surface shall be cleaned at least once a month. First, cut off
the power supply and wipe it with slightly wet clean and soft cloth soaked
with disinfectant, and prevent the liquid from seeping into the bottle of the
machine.
Clean the water tank
To keep the water tank clean, fill the water tank with pure water, distilled
water or cold boiled water, and try to replace it every day.
● The water tank shall be cleaned once a week. First, shake and wash it
with detergent, and then rinse it with clean water to ensure the hygiene
when using oxygen.
Clean or replace the filter and filter cotton
The "white air filter" behind the frame can reduce noise, isolate dust and
purify air. The cleaning and replacement of the filter is very important to
protect the compressor and molecular sieve and prolong the service life of
the oxygen generator, so please clean or replace it in time.
Do not operate the oxygen concentrator when the filter or filter cotton
is not installed or is wet, or it will damage the machine for a long time.
Filter: generally, clean or replace it every 100 hours.
Inlet Cover
Filter Cotton

17
Clean the oxygen inhaler and atomizing components
● Disassembly
It is located on the back of the machine; pull out the inlet cover outward
and take out the filter directly.The actual cleaning or replacement time of
filter and filter cotton shall be determined according to the actual service
time and environmental impact. If the filter is dirty and blocked, it shall be
cleaned or replaced immediately no matter how long it is used.
Note: as consumables, it is recommended to replace them regularly.
●Cleaning
clean it with light detergent, rinse it with clean water, and then install it on
the machine after it is fully dry.
They shall be cleaned once after each use. The nasal aspirator on the
snuffing oxygen inhaler shall be cleaned and disinfected after each use:
soak it in 5% potassium permanganate solution for 5min, and then clean it
with clean water or wipe it with alcohol. It is recommended to regularly
replace the oxygen inhalation tubes and atomizing components as
consumables.
Replace the fuse
After confirming that the power line plug is pulled out of the power socket,
pry the fuse cover with a slotted screwdriver (as shown in the appearance
diagram), take out the invalid glass fuse tube, install the new glass fuse
tube, and install the fuse cover back into the socket.
Prize up the fuse cover with
a small slotted screwdriver
Spare part
During use

18
Handling for idle for a long term
Remove the damaged fuse Install a good fuse (5A 220V)
Install the fuse cover into the socket
Please do the following work before keep the oxygen generator lying idle
for a long term.
1、Remove the humidification water tank, pour out the water in the water
tank, air-dry it, and install it back in place.
2、Cut off the power supply and retract the power line.
3、Do not store the oxygen generator in humid and dusty environment,
avoid direct sunlight and pollution, dry and store the oxygen inhalation
tube and oxygen inhaler at room temperature, do not bend the gas-guide
tube, and keep out of reach of infants. Please make the following prepara-
tions before reusing the oxygen generator which has been idle for a long
term.
⑴、Check whether the power line is damaged.
⑵、Clean the oxygen inhalation tube and oxygen inhaler, and check
whether any is blocked or bent.
⑶、Clean the humidification water tank.

19
Faults & Troubleshooting
NO.
1
Faults Cause Analysis Troubleshooting Method
Odor in air.
2Water flows out of
the oxygen outlet
3
4
5
The machine makes
a "puff" sound every
few seconds.
After start-up, the
machine runs
normally and the
flow is small.
After start-up, there
are bubbles in the
water tank while no
oxygen gas is
output from the
oxygen outlet.
At the beginning of the
machine use, the connecting
pipe and other plastic parts
will emit odor, which is a
normal phenomenon.
The water level of the
humidification water tank
exceeds the max. water level,
and the air flow presses the
bubbles into the suction pipe.
During long-term use of the
machine, the water vapor in
the air flow converges on the
pipe wall.
This is the sound generated during nitrogen emission when
the machine is normal, which is a sign of good operation of the
machine.
The flow is relatively smalllow.
The oxygen inhalation tube is
kinked or blocked.
The connecting pipe inside the
machine falls off or breaks.
The rubber plug of the
humidification water tank is not
properly inserted.
Turn up the flow gear.
Straighten out the inhalation
tube.
Disconnect the powercord and
contact professionals to repair
it.
Take down the humidification
water tank and insert it properly.
Check whether the humidifica-
tion water tank has not been
cleaned or replaced for a long
time, leading to unpleasant
odor in the water tank.
Clean the oxygen inhalation
tube and humidification water
tank.
Reduce the water in the
humidification tank to be below
the max. water level.
Pour out water in the water
tank, and then add water to the
water tank after no water flows
out from the oxygen outlet.
This is normal odor from
silicone tube and ABS plastic
parts. It is tested to be non-toxic
and harmless, and will
gradually disappear with the
use of the machine.
die Maschine normal funktioniert, aber am Sauerstoffauslass kein Sauer-
stoff austritt.). Richten Sie dann den Befeuchtungswassertank auf den
Luftauslass des Wassertanks des Sauerstoffkonzentrators und den
unteren Verriegelungsschlitz aus und dann bringen Sie den Befeuchtung-
swassertank wieder an.
※Der Wasserstand darf nicht höher als der höchste Wasserstand sein.
Die Wassereinfüllung ist nicht obligatorisch, nur um den Sauerstoff zu
befeuchten. Wenn Sie den Sauerstoff nicht trocken finden, können Sie
Wasser nicht einfüllen.
This manual suits for next models
3
Table of contents
Languages:
Other DEDAKJ Medical Equipment manuals
Popular Medical Equipment manuals by other brands

biodex
biodex 058-820 Instructions for use

Elixir
Elixir DESyne Novolimus Instructions for use

Interacoustics
Interacoustics Eclipse Instructions for use

Alpha Communications
Alpha Communications TekTone Tek-ENTRY Operation, installation and service manual

Roche
Roche CoaguChek XS System user manual

Johnson & Johnson
Johnson & Johnson DePuy Synthes GRYPHON manual