Dedenbear Thunder T1 User manual
R
S
E
T
M
O
D
E
B
A
C
K
P
/
F
T
B
R
K
P/F
PAGE 1
INSTALLATION
INSTRUCTIONS MODEL NUMBER
T1
THUNDER
Inst. Orig. 10/04 Rev. 8/16
THUNDER
INSTALLATION & OPERATION MANUAL
INDEX
Installation Instructions…………………
Pro/Full Feature…………………………
Button Use & Programming…………....
Types of Delay Boxes…………………..
Setting Transbrake Delay………………
Setting Parameters…………………….
General Info / Definitions…………..…..
Delay Box Theory & Operation………..
Transbrake Wiring………………………
Remote Display Wiring…………………
pg 1
pg 2
pg 2
pg 2
pg 3-4
pg 4
pg 5
pg 6
pg 7
pg 8
Using #8 screws through the rubber grommets in the base, mount the
THUNDER
away from heat, vibration and
the ignition system.
Make sure the driver can reach the buttons when strapped in and angle the unit, if needed, so the display can be
read straight on.
Wire the
THUNDER
as shown on page 7&8. Make sure the power lead comes straight from the master switch and
the ground goes to a solid chassis ground, not sheet metal panels.
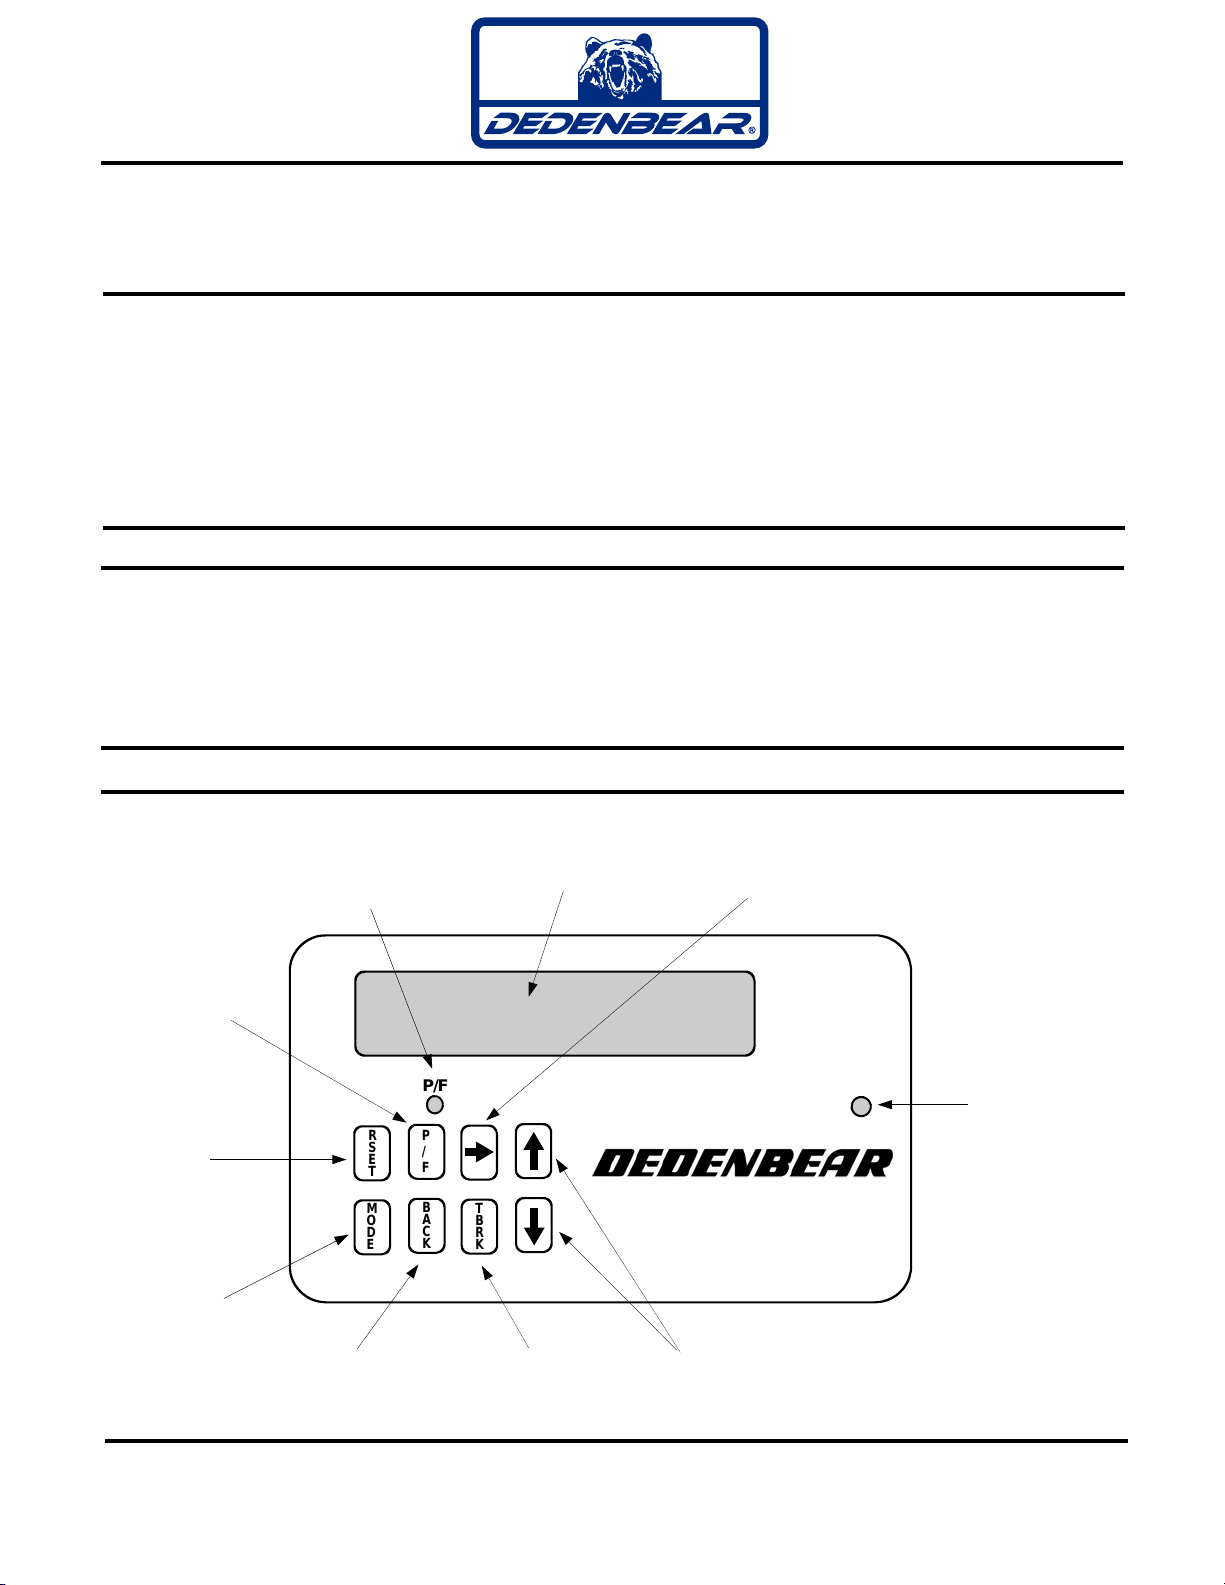
BUTTON QUICK REFERENCE
INSTALLATION
OUTPUT
INDICATOR
LED
BACKLIT
DISPLAY
PRO/FULL
BUTTON
SCROLL
ARROWS
PRO/FULL
INDICATOR
LED
TRANSBRAKE
SET-UP
BACK
BUTTON
MODE
SELECTION
RESET /
RECALL
THUNDER
TB
CURSOR
BUTTON
2650-1314-00 Rev. A

PAGE 2
The
THUNDER
has four different types of delay boxes built in. They are:
1. DELAY: A simple 4 digit delay box used for pro tree classes and leaving off your top amber for full tree
classes. The box simply delays for the time set and releases the transbrake.
2. CROSSOVER: Used in full tree bracket racing for launching off your opponent’s top bulb when you are the
faster car. The box calculates the handicap and adds it to your delay time.
3. INTERFACE: This is used the same as crossover except it allows you to take two hits at the tree. You leave
off the opponent’s top bulb, press the transbrake button again, then release off your own top bulb. The box
will release the transbrake on the quicker of the two releases. This means if your release on the opponent’s
top bulb gives you a .520 light and the release on your top bulb gives you a .505 light, the box will launch the
car on the .505 light. Remember, the interface always chooses the quicker light and will choose a .490 over
a .500.
4. CROSS TALK: Used for the cross talk bracket tree, this mode functions the same as the Interface mode ex-
cept it allows you to take two hits at your tree, one off your top amber, and one off your second amber. Like
the Interface, the box will choose the quickerof the two reaction times.
PROGRAMMING BUTTONS
Arrow (scroll) Buttons: These buttons are used for making small changes to your settings. You can add to
a setting by pressing the up arrow or subtract with the down. If you push and hold an arrow key, the set-
ting will continue to change faster and faster.
DELAY BOX MODES
The
THUNDER
’’s PRO/FULL feature allows you to switch between two complete setting groups for the de-
lay box and throttle stop features. This enables you to program the box for your “Super” class settings in
PRO, and then program your bracket race settings in FULL. Now when you switch between classes, you
no longer need to re-program the
THUNDER
, just push and hold the PRO/FULL button to switch between
groups of settings. The red LED indicator light to the left side of the keypad will indicate which setting
group you are in. When you are in the PROgroup, the PRO/FULL LED will turn on and stay on. When
you are in the FULL group,the LED will be off.
REMEMBER: It is extremely important when you change a setting that you are in the setting group
(PRO or FULL) in which you want the change to occur since each group has its own complete set
of settings.
MODEButton:Thisbutton selects which of the 4 delay box modes you wish to run. They are Delay,
Crossover, Interface and Cross Talk.
Reset/Recall Button: Thisbutton is used to cancel the transbrake lockout. It also recalls information about
the run after the pass has been made.
TBRK Button: Thisbutton accesses your Delay settings. Each time you press the TBRK button, different
set-up screens come up and allow you to make changes to your Delay, Delay 2, Your ET, Their ET, Bot-
tom Delay, Cross Comp, Skip Up/Down, TB Pause, &TB Lockout settings.
Cursor Button: This button allows you to change each digit individually. This makes large number changes
much quicker than just using the scroll. When you push the cursor button the first time, a cursor appears
under the left most digit. Each press of the cursor button thereafter moves the cursor one digit to the right.
Stop the cursor under the digit you wish to change and use the arrow (scroll) buttons to change that digit
up or down. Pressing the cursor button one more time after the cursor isunder the right most digit will re-
move the cursor from the screen and return the arrow buttons to regular scrolling action.
R
S
E
T
M
O
D
E
B
A
C
K
P
/
F
T
B
R
K
Back Button: This button is used if, when stepping through the set-up screens, you accidentally pass the
screen you want. Press the Back button to move back one set-up screen.
PAGE 3
YOUR ET: This is where you enter you own vehicle’s dial-in. Use the
scroll arrows or cursor button to make changes. If you run a Remote Dis-
play dial-in board, this is the setting that will be displayed upon return to
run mode.
SETTING TRANSBRAKE DELAY
RUN SCREEN: Thisis the screen the
THUNDER
will display when it is
“ready to run”. It will always display YOUR ET and your DELAY. When in
Crossover, Interface and Cross Talk modes it will also display THEIR ET.
NOTE: If you are not using the remote display dial-in board (part#
RD-1) the YOUR ET setting is not important when in the DELAY
mode. This setting will not effect your delay time.
To set your transbrake delay, you must first choose which delay box type you wish to run by pressing the MODE
button. The
THUNDER
will only ask for the settings required for that particular mode. Example: When you are in
RUN (DELAY) it will not ask you for THEIR ET setting since you are not crossing over. All of the shared settings
between these modes will transfer when you change to a different mode. Example: Your delay setting will transfer
over to all four different delay box modes along with your SKIP, TB PAUSE, and TB LOCK OUT settings.
10.00 9.00 1.000
RUN (INTERFACE)
THEIR ET YOUR ET DELAY
SETUP MODE
YOUR ET 09.00
SETUP MODE
THEIR ET 10.00
THEIR ET: This is the next screen that will appear in Interface, Cross-
over and Cross Talk modes (not needed in Delay mode). Use the scroll
arrows or cursor button to change this setting to your opponent’s dial-in.
Press the TBRK button to enter the transbrake adjust settings menu. Each time you press this button it
will advance to the next set-up screen. Once you have advanced through all of the screens, the box re-
turns back to run mode. When you are through making adjustments to the settings, the box will automati-
cally return to the run mode in 8 seconds.
SETUP MODE
DELAY 1.000
DELAY: When you first press the TBRK button, the delay setting will ap-
pear. Use the scroll arrows or the cursor button to change this setting. For
leaving off the top bulb on a full tree, this setting is typically around 1.000
second.
SETUP MODE
DELAY 2 .500
DELAY 2: This screen will appear next only in Cross Talk mode (not
needed in Delay, Crossover or Interface). Delay 2 is the amount of delay
used for taking a 2nd hit at the 2nd amber bulb on a Cross Talk bracket
tree. Typical 2nd amber delay setting is around .500 second. Use the
scroll arrows or cursor button to change thissetting.
SETUP MODE
BOT DELAY .100
BOT DELAY: Bottom bulb delay time is the amount of delay you need for
a bottom bulb release on a full tree when using the “Last Chance” feature
while in Interface and Cross Talk modes. Adjust with scroll or cursor but-
ton.
T
B
R
K

PAGE 4
SETTING TRANSBRAKE DELAY (continued)
SETUP MODE
TB LOCKOUT 03
SETUP MODE
TB PAUSE .100
SETUP MODE
SKIP DOWN -.015
SKIPDOWN or SKIP UP: This is the amount of time you want to add
(Skip UP) or subtract (Skip Down) from your delay time after you have
released the transbrake button. If you feel you “missed” the tree, every
time you push the skip button the box will add or subtract this amount
from your delay time. Use the scroll arrows to change this setting.
TB PAUSE: Thisis the amount of time the box pauses from when the
transbrake button is depressed until the transbrake sets. This prevents
transbrake application if the button is accidentally bumped or brushed
while driving down the return road or in the staging lanes.
TB LOCK OUT: This is the amount of time the box will lock out the trans-
brake so the driver cannot re-apply the transbrake during the pass. Use
the scroll arrows or cursor button to change the lock out in increments of
whole seconds.
SETUP MODE
CROSS COMP .015
CROSS COMP: Crossover compensation time is used to compensate
for late lights when crossing over. When you cross over and leave off
your opponent’s tree, you get an indirect view of his top bulb instead of a
direct view like on your side. This results in a reaction time that is
about .010 to .020 seconds slower. Crossover compensation automati-
cally subtracts this time from your delay setting whenever you cross-
over. Use the scroll arrows or cursor button to change this setting.
NOTE: Cross comp should be set for 0.000 when running in Cross-
over mode on a Cross Talk bracket tree.
FACTORY SETTINGS AND PARAMETERS
SETTING
DELAY
DELAY 2
THEIR E.T.
YOUR E.T.
BOTTOM DELAY
CROSS COMP
SKIP UP/ SKIP DOWN
TB PAUSE
TB LOCK OUT
RANGE
0.000 to 1.999 sec.
0.000 to 1.999 sec.
00.00 to 19.99 sec.
00.00 to 19.99 sec.
0.00 to .299 sec.
.000 to .099 sec.
+.050 to –.050 sec.
0.000 to 1.999 sec.
00 to 19 seconds
PRO
.010
.010
10.90
9.90
.010
.015
-.010
.010
01
FULL
1.000
.500
10.00
9.00
.100
.015
-.010
.010
03
FACTORY
SETTINGS
PRO-FULL SETTING PARAMETERS:
PRO MODE = P/F LIGHT ON
FULL MODE = P/F LIGHT OFF

PAGE 5
GENERAL INFORMATION AND DEFINITIONS OF FEATURES
Reset/Recall Button: Used to cancel the transbrake lockout and return the
THUNDER
to a ready to run condition.
If pressed after the run, the RSET button will recall the “How Late” information and how many times you “Skipped”.
ARP (Accidental Release Protection): Occasionally you may anticipate the lights and release the button too early.
ARP lets you recover from this situation. In Delay and Crossover modes, you simply press the transbrake button again
before the car launches and the
THUNDER
will instantly reset itself. In Interface and Cross Talk modes this does not
work because the
THUNDER
is expecting a second hit. To avoid a red light you can use the Last Chance feature.
Last Chance: This feature works only in Interface and Cross Talk modes. If you think either or both of your releases
were too quick, press the transbrake button down a third time to cancel the first two hits, then release the button off
your bottom bulb to launch the car. If your car red lights off the bottom bulb, add some time to the Bottom Bulb delay
and the Last Chance feature will use the delay from that setting.
How Late: In the Interface and Cross Talk modes where you can take two hits at the tree, the How Late feature tells
you which of the hits was faster and by how much. In Interface mode the How Late timer will display “THEIR TREE
BY: .XXX” or “YOUR TREE BY: .XXX” or “LAST CHANCE ACTIVATED”. As an example, if you were in Cross Talk
mode, the display might read “FIRST HIT BY: .023”. This means that you were quicker leaving off your top bulb than
your second bulb and that you were .023 seconds quicker. The
THUNDER
released the transbrake off the top bulb hit in
this example. If you had cancelled the first two hits by pressing the button a third time, the display would read “LAST
CHANCE ACTIVATED”. After a run is made, the How Late information is recalled by pressing and holding the RSET
button. The display will alternate between the How Late information and the number of Skips.
Skip Recall: Skip Recall tells you the number of times you pressed the Skip button during the delay box time out. By
checkingthe set up menu you can determine how much time each Skip was and whether it added or subtracted time to
the delay setting. By multiplying the Skip time by the number of Skips, you can calculate the total amount of time that
was added or subtracted from your delay time. The number of Skips used can be recalled after the run by pressing and
holding the RSET button. The display will alternate between the How Late information and the number of Skips.
Dial-ins Incorrect: If the Their E.T. setting is accidentally set lower than Your E.T. this message will be displayed. If
you make a pass without fixing the problem, the
THUNDER
will assume the handicap is zero and will only use the de-
lay setting.
Line Lock Output: The Line Lock Output is exactly the same as the Transbrake Output except that it is diode pro-
tected. This means that if wired in (see page 8) the delay box will operate the line lock on the starting line, but the line
lock will not back feed to the transbrake solenoid while doing a burnout.
Leaving Set Up Menus, Four Ways To Leave:
1) Do nothing and the unit will return to the run mode automatically after 8 seconds.
2) Press the Transbrake switch and the unit will instantly return to run mode.
3) Clock through the set up menu by repeatedly pushing the setting button until you get back to run mode.
4) Press the BACK button repeatedly to back out of the set up menu to the run screen.
Memory: The microprocessor in the
THUNDER
will remember all of your settings, even after turning off the power.
There are no internal batteries to die, so the unit will keep your last settings forever.
Battery Chargers: It is important to make sure to have your master disconnect switch off while hooking up your
charger between rounds. When the first contact is made between the charger and the battery there may be a voltage
spike that could damage electronics. After the charger is hooked up, the master switch can be turned back on to run
the water pump, fan, etc.
Temperature: If the
THUNDER
ever gets over 160 degrees, the display will get dark and unreadable. This does not
damage the unit, simply cool it off and the display will return to normal.
Welding: If any welding needs to be done to the car, disconnect all wiring fromthe
THUNDER
to prevent damage.

PAGE 6
OPERATION
Set the
THUNDER
with all your settings. Shallow stage the car. Press the transbrake button to set the transbrake.
Release the transbrake button at the flash of all three amber bulbs (pro tree) or at the flash of the top amber bulb
(full tree). The
THUNDER
will continue to hold the transbrake for the preset delay time. When the time expires, the
THUNDER
will release the transbrake solenoid, launching the car.
PRO TREE RACING
The
THUNDER
is used to keep a car from red lighting on a pro tree by delaying the release of the transbrake.
The delay type should be set to Run Delay. Typical delay settings on a pro tree range from 0.001 to 0.050. If your
car will not red light on a pro tree, set the
THUNDER
Delay Setting to 0.000.
FULL TREE RACING
By delaying the release of the transbrake it becomes possible to release the transbrake button on the top (first)
amber bulb of the christmas tree. Releasing off the top bulb is the preferred method because it is more consistent
than a bottom bulb release. The increased consistency comes from not anticipating the bottom bulb and being
able to just “hit” the top bulb as quick as possible allowing for a more natural human reaction. Top bulb release
also allows the driver to stage and release the button the same every pass. If the car is launching late or early,
changes to reaction times can now be made by adjusting the
THUNDER
instead of having the driver try to mentally
speed up or slow down.
Typical delay settings for launching off the top bulb are 0.950 to 0.990 for door cars and 1.020 to 1.080 for
dragsters and altereds. Delays as low as 0.850 for slower cars and as high as 1.100 for very hard launching cars
can be reached.
USING CROSSOVER
When racing a full bracket tree or a cross talk tree, if you are the faster car, your opponent will be leaving first.
This means his/her top amber bulb will light first on a bracket tree, or both top bulbs will light at the same time on
a cross talk tree. In this situation you need to cross over. Crossing over allows you to release the transbrake but-
ton on your opponent’s top amber (full tree) or your top amber (cross talk tree). Crossing over is done with the
THUNDER
by switching the delay type to Run Crossover and entering your dial-in and your opponent’s dial-in to the
delay settings. The
THUNDER
will automatically calculate the handicap and add it to your delay setting allowing you
to launch off your opponent’s top amber. For example your delay setting is 1.020 and you are dialed in at 8.50,
your opponent’s dialed in at 9.70. The
THUNDER
will subtract your dial from your opponent’s dial (9.70 - 8.50 =
1.20) then add it to your delay setting (1.20 + 1.020 = 2.220).
USING INTERFACE
When you are the faster car by a minimum of 1 second, the Interface mode can be used. This is used the same
as crossover except it allows you to take two hits at the tree. You leave off the opponent’s top bulb, press the
transbrake button again, then release off your own top bulb. The box will release the transbrake on the quickerof
the two releases. This means if your release on the opponent’s top bulb gives you a .520 light and the release on
your top bulb gives you a .505 light, the box will launch the car on the .505 light. Remember, the interface always
chooses the quicker light and will choose a .490 over a .500.
If you feel that one of the button releases was a red light, push the button down a third time to activate the Last
Chance feature so you can leave off the bottom bulb. This will cancel out the first two releases and allow for a sin-
gle shot at your bottom bulb.
If you only release the button once in Interface mode, the
THUNDER
will choose that release for the delay of the
transbrake.
USING CROSS TALK
This mode functions the same as the Interface mode except itallows you to take two hits at your tree,one off
your top amber, and one off your second amber. As in the Interface mode, the
THUNDER
will choose the quickerof
the two reaction times.
ADJUSTING FOR EARLY (RED) LIGHTS
When a car red lights, it has left too early. To compensate for this in the
THUNDER
, you must add time to the
delay setting. For example, if you had 0.980 in your delay setting and went –0.040 red, you would want to add at
least0.040 to your setting making it 1.020. In addition, a “cushion” of 0.010 is usually added on top to avoid cut-
ting another red light making the delay setting 1.030.
ADJUSTING FOR LATE (GREEN) LIGHTS
When a car green lights, it has left too late. To compensate for this in the
THUNDER
you must subtract time from
the delay setting. For example, if you had 0.980 in your delay setting and went +0.040 green, you would want to
subtract 0.040 from your setting making it 0.940. A “cushion” of 0.010 is usually added back to the delay setting to
avoid cutting a red light making the delay setting 0.950.
PAGE 7
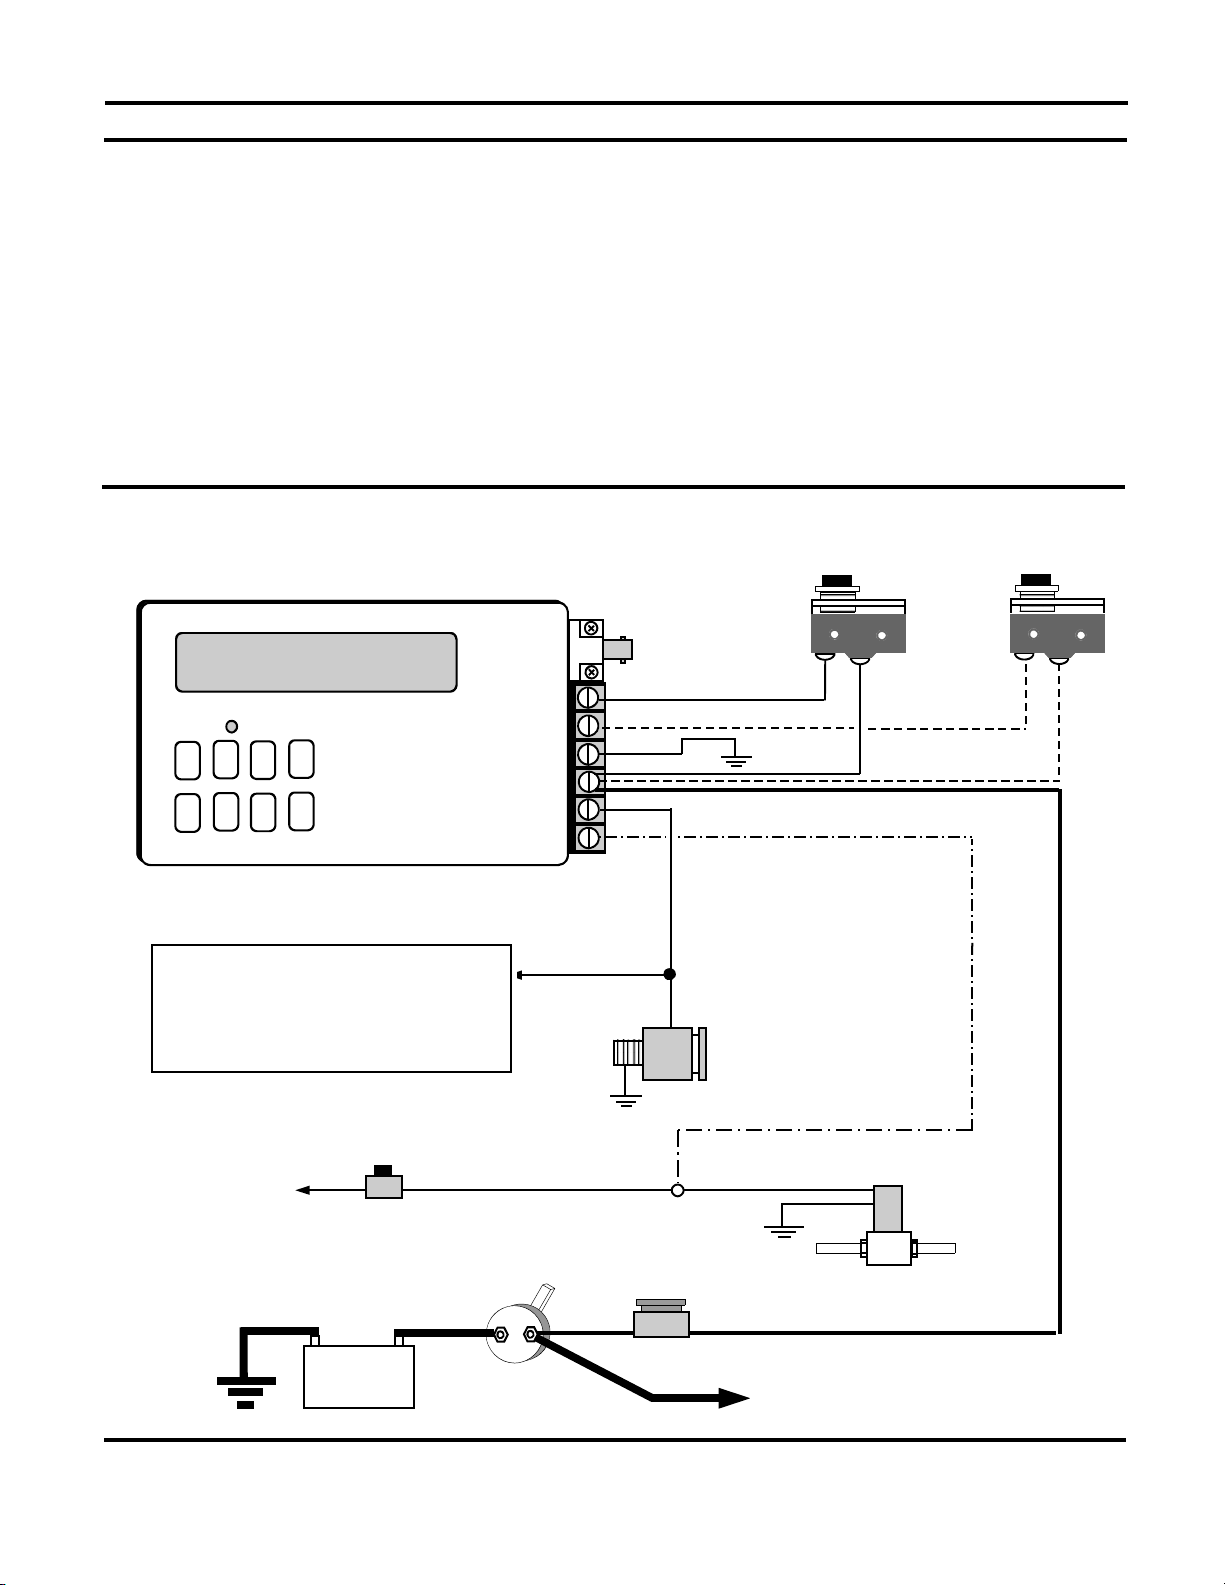
12 or 16 VOLT BATTERY
1. Wire the 12v power supply wire directly to the master on-off switch at the back of the car. Use at least 10 gauge wire. Do
not wire the power supply to the starter solenoid, Ford style solenoid, switch panels or existing fuse blocks. Install a 15
amp fuse or circuit breaker to protect the
THUNDER
from short circuits.
2. Install a 14 gauge wire from the ground terminal to a solid chassis ground, do not use the same ground that the ignition
box uses and do notuse aluminum or sheet metal panels as these are not reliable grounds.
3. Wire the transbrake solenoid directly to the Transbrake terminal using 14 gauge wire.
4. If you are going to use a rev limiter on the starting line, tie the rev limiter activation wire in with the transbrake wire.
5. Run a 14 gauge wire from the
THUNDER
’s +12 volt terminal to one side of the transbrake button used to launch the car.
Run the other side of the button back to the Trigger terminal on the
THUNDER
. If the button is mounted on the steering
wheel, make sure the stretch cord is at least 14 gauge wire.
6. If you wish to use the optional Skip button, supply power to one side of the button from the
THUNDER
’s +12 volt terminal
using 18 gauge wire. Run a wire from the other side of the skip button to the Skip terminal on the
THUNDER
using 18
gauge wire.
7. If you wish to use the optional line lock output on the
THUNDER
to simultaneously hold the line lock and transbrake on
the starting line, run a 14 gauge wire from the Line Lock terminal on the
THUNDER
to the line lock solenoid.
WIRING THE THUNDER
THUNDER
TRIG
SKIP
GND
+12V
TBRK
L L
TRANSBRAKE
SOLENOID
OPTIONAL
SKIP
BUTTON
TRANSBRAKE
BUTTON
14 GAUGE
14 GAUGE
TO +12 or 16 VOLTS
LINE LOCK
BUTTON
LINE LOCK
SOLENOID
OPTIONAL 14 GAUGE
OPTIONAL 18 GAUGE
- +
TO STARTER & SWITCH PANEL
FUSE: 15 AMP
MASTER SWITCH
10 GAUGE
OPTIONAL 18 GAUGE
14 GAUGE
18 GAUGE
To any accessories that require a transbrake
trigger signal. This includes starting line ignition
rev limiters (MSD 2 & 3 Steps), external throttle
stop controllers and shift timers (Dedenbear
TSC-2A,TSC-4 & ST-1), and some other timers,
RPM switches, data loggers, playback tachs, etc.

LIMITED 1 YEAR WARRANTY
DEDENBEAR Products, Inc. warrants to the consumer that all DEDENBEAR Products purchased from an Authorized DEDENBEAR Reseller
will be free from defects in material and workmanship for a period of twelve (12) months from date of the original purchase. Products that fail
within this 12 month warranty period will be repaired or replaced at DEDENBEAR’s option, when determined by DEDENBEAR that the product
failed due to defects in material or workmanship. This warranty is limited to the repair or replacement of parts in the DEDENBEAR Product and
the necessary labor done by DEDENBEAR to effect the repair or replacement of the DEDENBEAR product. In no event shall DEDENBEAR’s
cost to repairor replace a DEDENBEAR under this warranty exceed the original purchase price of the DEDENBEAR Product. Nor shall
DEDENBEAR Products, Inc. be responsible for special, incidental or consequential damages or costs incurred due to the failure of a
DEDENBEAR Product. This warranty applies only to the original purchaser of the DEDENBEAR Product and is non-transferable. This warranty
also applies only to DEDENBEAR Products purchased from an Authorized DEDENBEAR Reseller. All implied warranties shall be limited in
duration to the said 12 month warranty period. Breaking the instrument seal, improper use or installation, accident, water damage, abuse,
unauthorized repairs or alterations voids this warranty. DEDENBEAR disclaims any liability for consequential damages due to the breach
of any written or implied warranty on all products manufactured by DEDENBEAR Products, Inc.
THUNDER
TRIG
SKIP
GND
+12V
TBRK
L L
Wire the Remote Display unit as shown. Use at least 18 gauge wire connecting the black wire to a solid chassis
ground and the red to +12 volts. Use a 5 amp fuse in the red wire to protect the Remote Display from damage.
Connect the display to your
THUNDER
using the transmitting cable included with the display unit. Slip the connec-
tors into the jacks and turn the lock ring clockwise to lock in place.
The display unit needs no set up, just power both units up and the Remote Display will show whatever is dialed in
to “YOUR E.T.” setting of the
THUNDER
. When you make a change to “YOUR E.T.” setting in the
THUNDER
and
the box returns to the run mode, the Remote Display will change accordingly.
WIRING FOR REMOTE DISPLAY
LOCK RING
10.87
RED
BLACK
TRANSMITTING CABLE
CONNECTOR
FUSE 5 AMP
+ 12 or 16 Volts
© 2016 Dedenbear Products, Inc. 2650-1314-00 Rev. A 8/24/16
FOR SERVICE SEND TO: DEDENBEAR PRODUCTS, INC 413 W. Elm St. Sycamore, IL 60178 USA (866) 248-6357
Email: [email protected]
Table of contents
Popular Recording Equipment manuals by other brands

Total Audio Control
Total Audio Control 500 Series Assembly and user's manual

HMS Networks
HMS Networks Intesis INMBSPAN001R000 Safety instruction

Live Show Control
Live Show Control MediaStar Pro Hardware user's guide

Zoom
Zoom Studio 1202 Operation manual

LaunchPad
LaunchPad Pro MK3 User guide addendum

Mitsubishi Electric
Mitsubishi Electric DX-NT400E Installation and operation manual


