Dedoes Alliance User manual
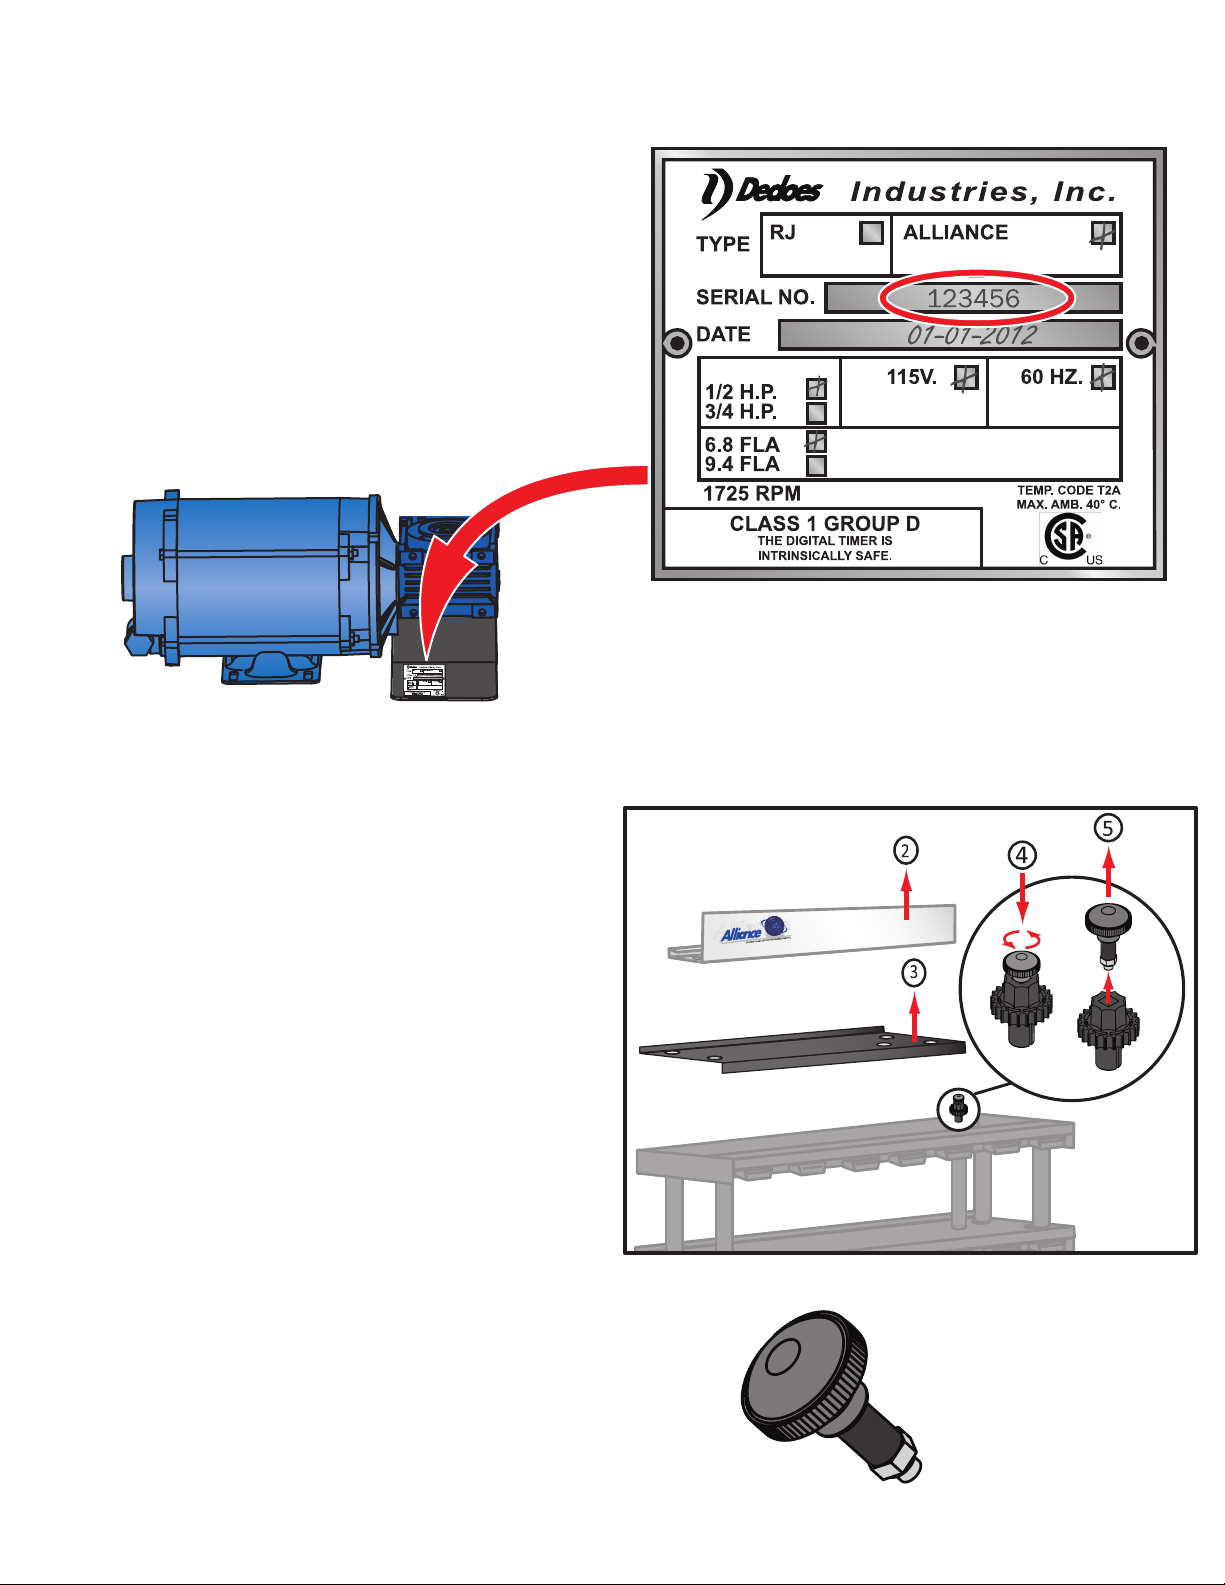
How to locate the serial number of your Alliance machine
When calling the Dedoes Customer Service Department
at 1-248-624-7710, we ask that you have your serial
number available so that we may research which style
machine you have and how old it is. This will help to
determine which parts you may need to repair or
replace on your machine.
Your serial number is a six digit number that will start
with a one or a two. It is located on a small aluminum
plate that is bolted to the black metal plaorm the
motor and gear reducer are mounted to.
The serial number and date can tell Dedoes if your
machine is sll under warranty.
How to remove the expanding bolt
The expanding bolt is installed in the drive gear in the
top mixing unit of your fully assembled Alliance
machine. It’s purpose is to hold all of the shas from
the lower mixing shelves in place so they will not move
during operaon.
To remove the expanding bolt:
1. Turn off the power to your Alliance mixing machine.
2. Remove the header from the top of your machine.
3. Remove the shelf cover from the top mixing shelf of
your machine.
4. Locate the expanding bolt on the right side and turn
it counter clockwise to loosen it. Do not loosen the
expanding bolt too much or the locknut may fall off.
5. Pull the loosened expanding bolt straight up to
remove it from the top drive gear.
This will allow you to remove the shas from the
machine for maintenance and repairs.
Note: If you need to replace the base drive sha of
your machine you will need to replace the expanding
bolt as well. Expanding Bolt
PN# 5900

How to repair the Alliance machine without disassembling it
If you need to access the interior of the mixing shelves
to replace a belt or repair some components, it is
possible to access any of the shelves without
disassembling the enre machine.
To do so:
1. Turn off the power to your Alliance mixing machine.
2. Remove the cans from the shelf you wish to access.
3. Remove the sha guard from around the drive sha.
4. Li the shelf cover straight up on both the le and
the right side.
5. Support the raised shelf with an object(s) to prevent
it from falling back into place.
You should now be able to access any of the internal
parts you need.
5
4
3
2
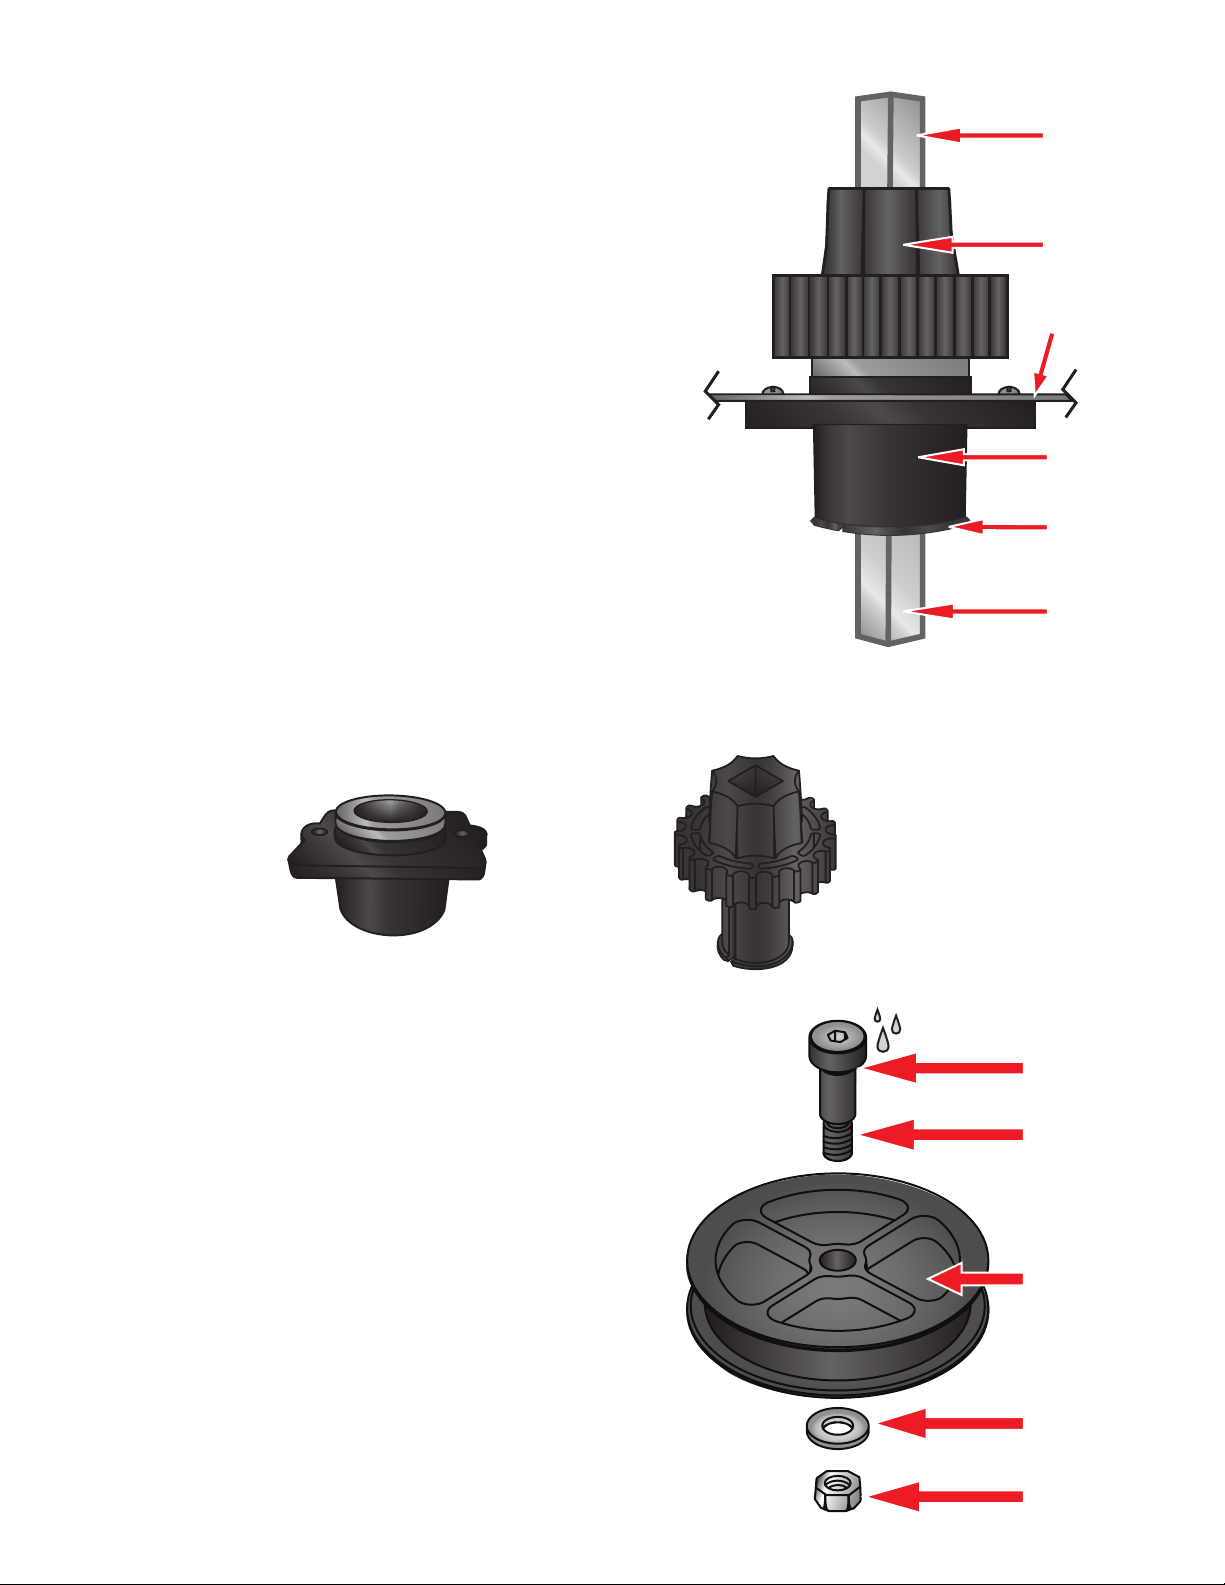
Gallon/4 Liter Drive Sha
(33.35 cm, 13 1/8")
Quart/1 Liter Drive Sha
(25.4 cm, 10")
Quart/1 Liter Motor Drive Sha
(13.5 cm, 5-1/4")
Gallon/4 Liter Motor Drive Sha
(21.45 cm, 8-1/2")
PN# 5996PLT
PN# 5995PLT
PN# P1243
PN# P1244
How to remove the drive shas
Once the expanding bolt has been removed (See “How to
remove the expanding bolt”) the drive shas can be removed.
1. Turn off the power to your Alliance mixing machine.
2. Pull the sha guards off of each sha.
3. Li the shas straight up and out beginning with the top sha.
4. To remove a sha, the one above it must be removed first.
5. It is good pracce to li the shas that you do not need to
repair or replace and let them stand aside on the shelves
below without fully removing them. This will prevent loss or
misplacement of the shas during reassembly.
Note: Depending on your choice for the boom shelf (Quart or
Gallon) you may need either the Quart or Gallon motor drive
sha. When replacing either of these two shas you will also
need to replace the expanding bolt.
How to replace a bushing or drive gear
During the life of your Alliance machine it may be necessary to
replace a bushing or drive gear within the mixing shelf.
To do so:
1. Turn off the power to your Alliance mixing machine.
2. Remove the expanding bolt and sha(s) necessary to access
the bushing or drive gear that needs to be replaced. It is
unnecessary to remove the belt.
(See How to repair the machine without disassembling it.)
3. The drive gear can be removed by squeezing the boom of
the gear together and liing it straight up out of the bushing.
4. Once the drive gear is removed, the bushing can be removed
by loosening the two screws used to secure it.
5. To replace the bushing, install the new bushing from the
boom of the shelf and screw it in from the top.
6. To replace the drive gear, gently press it into the bushing unl
it snaps into place. The boom lip of the drive gear should
snap and secure it in place against the boom of the bushing.
Note: It is good pracce to check that all of the other drive gears
are snapped into place and seated correctly before replacing all
of the shas. The drive gears may become dislodged while
moving the shas.
Drive Gear
PN# 5931
Bushing
PN# 5278E-M
Drive Gear
Drive Gear (Lip)
Bushing
Mix Shelf
Lower Shaft
Upper Shaft
Periodic lubricaon to the three pulley shoulder bolts
under each mixing shelf will help maintain quiet
operaon of the machine. A small drop of lubricant
under the head of the shoulder bolt should be all that is
required. Make sure the shoulder bolt is free of dirt
before lubricang. We suggest using Spray Gun Lube or a
lubricant that your paint manufacturer recommends.
The lubricant must be Silicone free.
Note: In extremely dirty environments is may be
necessary to remove the shoulder bolt from the pulley
assembly and clean off the dirt before lubricang.
Shoulder Bolt
PN# 5364
Pulley
PN# 5930
Washer
PN# 5804S
How to lubricate your Alliance machine
Locknut
PN# P0025
Lubricate here

How to replace a belt
During the life of your Alliance machine it may be necessary to replace the belt
in one of your mixing shelves. The Alliance machine ulizes only one belt per
shelf and the same size belt for each shelf. The Alliance belt is a white cog belt.
To determine which size belt you will need just count how many cans fit on one
shelf:
12 Quart cans/8 Gallon cans per shelf = PN# P1729 1.7M Alliance Belt
18 Quart cans/12 Gallon cans per shelf = PN# P1730 2.4M Alliance Belt
To replace the belt:
1. Turn off power to your Alliance mixing machine.
2. Remove any cans on the shelf that needs the new belt.
3. Remove the sha guard and li the shelf cover of that shelf to access the
drive system. (See How to repair the Alliance machine without
disassembling it”) It is unnecessary to remove the drive sha.
4. Loosen the shoulder bolt and locknut of the le pulley of the drive system to
loosen the tension on the belt.
5. Carefully remove the loosened belt from the drive system.
6. Clean the interior of the shelf from dirt and debris.
(This may be a good me to lubricate your mix shelf as well. See How to
lubricate your Alliance machine.)
7. Install the new belt with the cogs facing outward while following the belt
path illustrated to the right.
8. Slide the bolt and pulley in the sloed hole to the le unl the belt tension is
adjusted and ghten the locknut and bolt.
The Alliance machine drive belts do NOT require a lot of tension to operate
properly. The correct installaon of the belt SHOULD have some slack along the
back of the shelf.
Cauon: Do not over tension the belt. Excessive belt tension will cause noise or
problems with the operaon of the machine.
Shoulder Bolt and
End Pulley
Locknut
(Located on Boom
of the shelf)
Belt Path (Counter Clockwise)
Shoulder Bolt Shoulder Bolt Nut

How to run your Alliance machine in bypass
It may be necessary to run your Alliance machine in bypass mode to help
determine if you are having a motor or a mer issue. Bypass mode will bypass
the mer and allow the motor to operate without the use of the mer.
To operate your machine in bypass:
1. Turn off the power to your Alliance mixing machine.
2. While the mer remains plugged into the motor, remove it from the machine.
3. Disconnect the GREEN wire from the locaon labeled “GREEN”.
CAUTION: Use care when disconnecng the wires as the connecons are
very ght and damage to the wires or connectors may result.
4. Connect the GREEN wire into the locaon labeled “BYPASS (GREEN)”.
5. Turn power on to the machine.
Once you restore power to the machine the motor should begin to operate
without having to use the mer.
Note: The bypass operaon is for diagnosing motor or mer problems. It is not
intended to be used for normal operaon of the mixing machine. Running the
motor in bypass for extended periods will damage the motor.
If you are having trouble with your machine turning ON or OFF please contact
the Dedoes Customer Service Department at 1-248-624-7710 and we will be
happy to help you resolve your issue.
How to replace an Alliance interface
It may be necessary to replace an interface for your Alliance machine. The
interface is the locaon where your Alliance mixing lid will engage the drive
system of your Alliance mixing machine.
To remove an interface:
1. Turn off the power to your Alliance mixing machine.
2. Access the interior of the mixing shelf where the interface is located.
(See How to repair your machine without disassembling it)
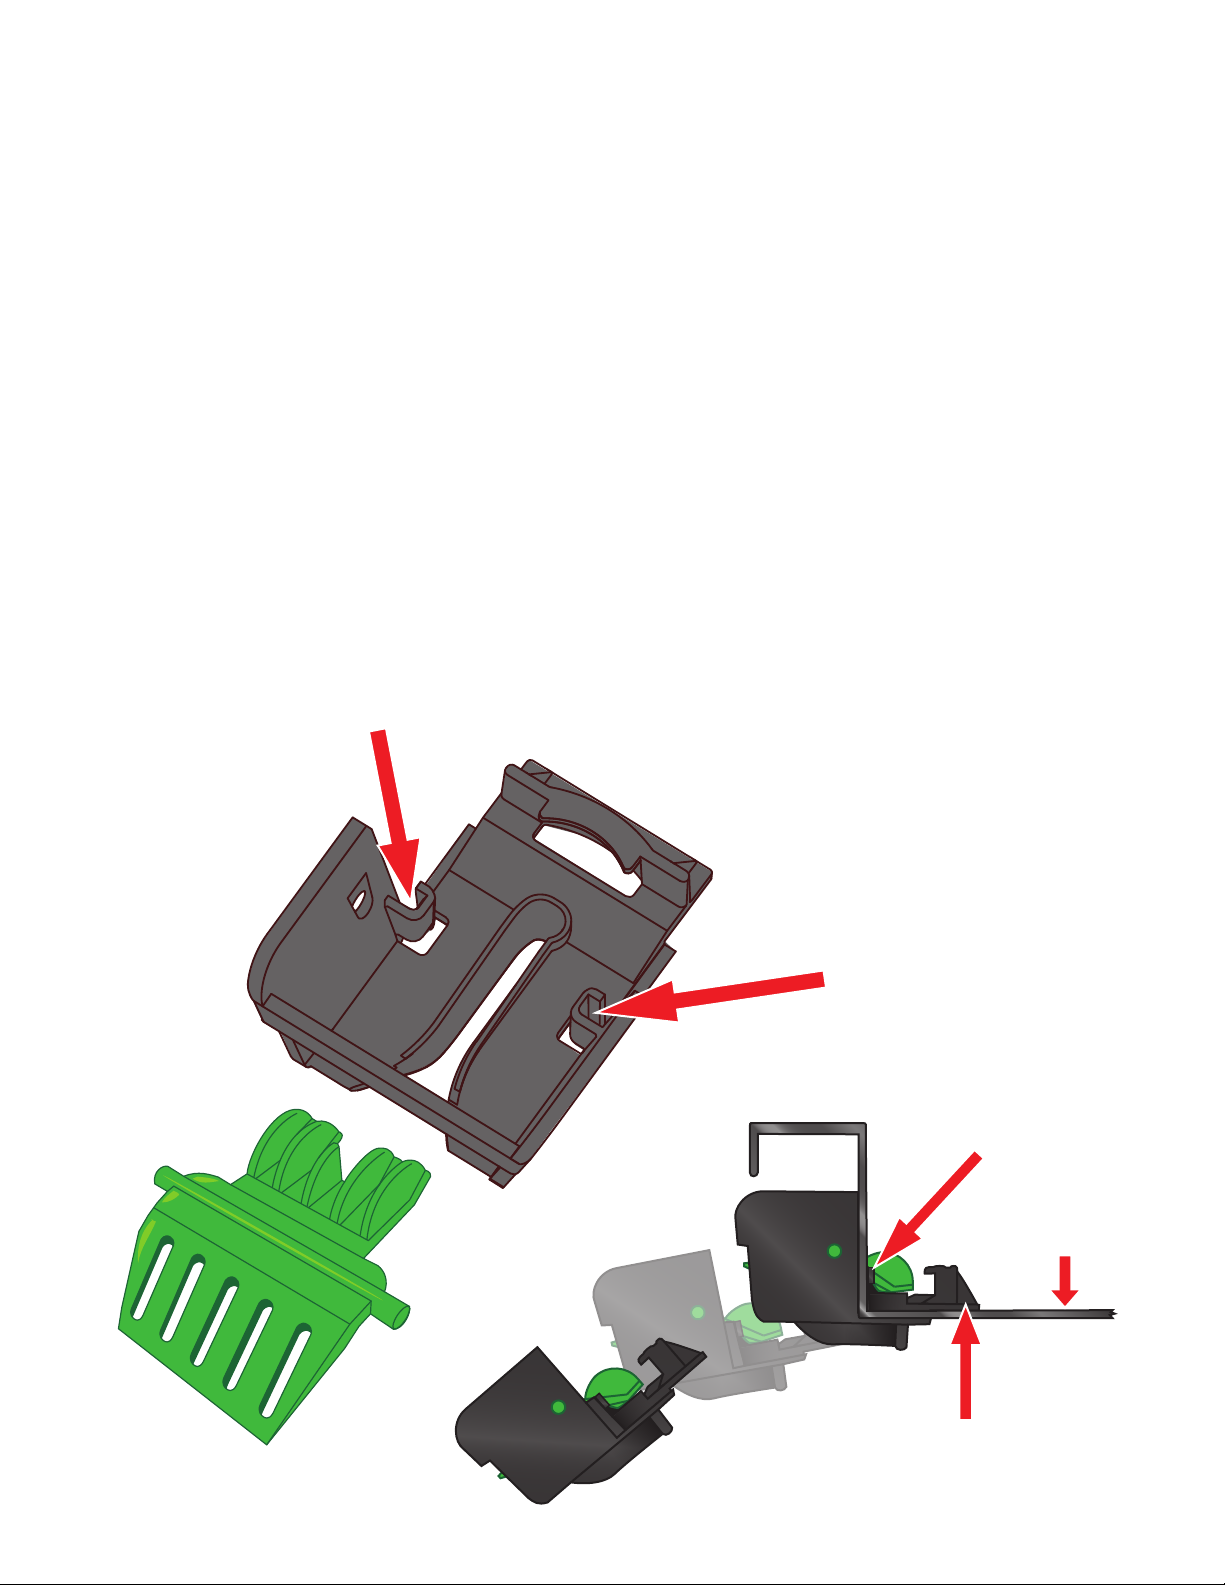
3. Using a flat screw driver push into the slots that secure the interface to the
mixing shelf on each side. (See Figure 1)
4. Pull the loosened interface down and away from the mixing shelf.
Note: The interface may break or crack during removal.
To install a new interface:
1. Place the back tab of the interface into the opening on the mixing shelf.
2. Push up on the front underside of the interface unl the two tabs are snapped
into place. (See figure 2)
Figure 1
Alliance Interface
PN# 5752B
Mix Shelf
Back Tab
Locking Tab
Figure 2

How to make you Alliance Machine square and level
During the inial installaon of your Alliance Machine it should have been placed on a level surface. Also,
the machine should have been made square and have the wall anchors installed to help retain the posion
of the machine.
Misalignment in the machine can lead to the shas not sing correctly, they will then begin to “wobble”, or
grind against the drive gears through out the machine. This leads to fricon, fricon causes heat, heat causes
expansion, and expansion causes damages and breakages. Misalignment in the machine is oen reflected in
the drive gear, the bushing, and the gear reducer.
We recommend that you check your machine for alignment every six to eight months of operaon.
We also suggest that aer compleng and repairs or part replacement on a machine that you check to
ensure alignment is correct as well.
The wall anchors that were supplied in the motor box of your machine are very important to help retain
alignment over me. They secure the top of the machine to the wall. This helps to prevent movement during
operaon. Wall anchors also provide a safety against the machine pping onto a user.
To adjust the alignment to your machine:
1 - Loosen the four thumb screws in the le and right feet.
2 - You can now push or pull the machine to the le or the right to guide it back to square.
3 - Re-ghten the four thumb screws.
4 - If need be ghten or reposion the wall anchors for more stability.
1
2
Wall Mount Brackets
4
Level Surface
Table of contents
Other Dedoes Industrial Equipment manuals


