DEEPMOTO D10 Series User manual

Motorcycle Dash-cam
D10 Series User Manual
Explore the world on two wheels with Deepmoto
Your trusted companion for all your motorcycle adventures
power
D
EE
P
M
O
TO
Fast & Furious

CONTENTS
Safety Instructions for Use ..................................................4
Dash-cam D10 Series Features............................................6
Accessories.........................................................................10
Installation Guide................................................................13
1. Pre-installation Preparation.................................................................... 13
2. Installation.............................................................................................. 13
Function Introduction.........................................................18
1. Dash-cam Buttons and Operation Introduction ...................................... 18
2. Dash-cam Interface Introduction ............................................................ 20
3. Menu Interface and Function Introduction.............................................. 23
Tire Pressure Installation And Function Introduction......27
1.Install the Tire Pressure Sensor .............................................................. 27
2.Tire Pressure Equipment Matching Function........................................... 28
App Function Introduction .................................................30
1. App Introduction ..................................................................................... 30
2. App Installation Method.......................................................................... 30
3. App WiFi Connection.............................................................................. 31
4. App Function Introduction ...................................................................... 32
5. System Upgrade .................................................................................... 36
FAQ Guide ...........................................................................37
1. Dash-cam Host-related Issues............................................................... 37
2. Camera and Video Related Issues......................................................... 37
3. Application and WiFi Related Issues ...................................................... 38
Product Parameters............................................................39

45
Safety Instructions for Use
The installation of this product requires a certain amount of hands-
on ability. If the customer is not good at installing it by himself, it is
recommended to go to the local car dealership and seek professional
guidance for installation.
Please turn off the power of the motorcycle before installation, and
restart the motorcycle after the installation is completed.
The motorcycle power box needs to be opened during installation,
please prepare the corresponding tools by yourself.
The installation process is not complicated, please check the installation
guide carefully and connect each accessory with the dash-cam.
Motorcycle models are different. Customers can choose a suitable
location to install the host, camera, remote, power source, and GPS
modules according to their own models. When installing, please pay
attention to the socket of the cable, and do not use too much force to
damage the interface. Please arrange the wiring reasonably, do not
squeeze or fold, so as not to damage the cable.
When installing GPS, try to avoid installing it in a place surrounded by
metal, which may aect GPS signal reception.
The camera is fully sealed and waterproof. Avoid using solvents such
as alcohol and asphalt cleaning agent to contact the lens, so as not to
damage the waterproof layer.
Do not wash the dash-cam with a high-pressure water gun for a long
time to prevent water from entering the host.
When the dash-cam is turned on, do not insert or remove the TF card
to avoid damage to the TF card.
1
2
3
4
5
6
7
8
9
Do not cut o the power when the system rmware is being upgraded
online.
The safety voltage of this dash-cam is 36V, which can be applied to all
motorcycle types (usually the voltage of the motorcycle battery is 12V).
However, for some electric motorcycles, the battery voltage is as high
as 60V or more, which has exceeded the voltage of the dash-cam, and
may burn out the dash-cam host. If it is to be installed and used on an
electric motorcycle, a voltage converter is required.
10
11
If you have any questions, please send email to us, we will answer you in time.
D10 Series

67
Dash-cam D10 Series Features
Cortex A7 Dual-core Intelligent Chip 6 Glass Optical Lens + IR Filter
Connect The ACC Power Supply
To Keep the Video Recording
Synchronization At All Times
Front and Rear Dual Cameras
F1.6 Large Aperture
150° Wide Angle
2GB High-capacity RAM Sony IMX307 Image Sensor
Support Up to 256GB TF Card
Full HD 1080P/30 Frames
Starlight Night Vision
EIS Electronic Image Stabilization
With stronger performance and lower power
consumption, brings you a more enjoyable
user experience.
Makes your device run more smoothly,
enabling you to enjoy an efficient user
experience.
Self-bandwidth dynamic technology, backlight
display is clearer.
Allowing you to record any content you want
and store more precious memories.
Chip
Camera
REC
Dash-cam D10 Series Features

89
Dash-cam Host
Special Features
1:10
All Metal Material Bending Warning
Vibration Sensor
Altitude Air Pressure Tire Pressure Monitoring
GPS Track Playback
Exclusive APP
3-inch IPS Full-view High-denition
Screen
Elegant design, black body, red logo, durable,
better heat dissipation, better quality.
Monitor the motorcycle's inclination angle,
speeding around the curve, and escort for
safety.
Monitor the vibration, automatically lock the
video when the collision occurs (automatic
operation of the machine).
Control eld information anytime, anywhere. Tire temperature and pressure monitoring,
real-time display.
(Only D10PLUS has this function)
Record every footprint and every moment of
your motorcycle trip.
Download videos, edit them easily, and share
them with one click.
The screen is more high-definition and the
picture quality is more delicate.
Easy To Install
Parking Guard
IP67 Deep Waterproof
Loop Recording
Suitable for all models, non-destructive
installation, two options are available (non-
rotatable and rotatable).
Intelligent monitoring, guarding your car
anytime, anywhere.
Protect you without fear of wind and rain.
Loop protection, never oine, always record
the wonderful moments of riding.
Dash-cam D10 Series Features Dash-cam D10 Series Features

10 11
Front Camera Rear Camera
Accessories
D10 Series
Dash-cam D10Plus
Power Supply GPS Modules
ACC Detection Wire Tire Pressure Installation Tool
Dash-cam Fixed Support
Dash-cam Fixed Support 1
Dash-cam Fixed Support 2
Rubber Pad
Fixed Support Screw
Anti-theft Nut
Only D10Plus comes with this tool kit.
Only D10Plus is equipped with this device.
Nut Wrench

12 13
Camera Bracket
Heat Shrink Tubing
Installation Tools
Camera Bracket
Screwdriver
Allen Wrench
Self Adhesive Cable Zip Tie Mounts
Cable tie
TF Card Position Screw
Camera Bracket Sticker
Camera Bracket Screw
Heat Shrink Tubing
Installation Guide
1. Pre-installation Preparation
2. Installation
Please carefully check each package to conrm that all accessories are
complete.
Before installation, please turn o the motorcycle power and then turn it
on after the installation is completed.
Prepare the necessary tools to disassemble the motorcycle.
Customers can choose a suitable location to install the main unit and
accessories based on their motorcycle model. If customers are not
skilled at installing the equipment themselves, they can consult with
professionals at local motorcycle shops for guidance on installation.
2.1 Install the Dash-cam
Take out the accessories of Dash-cam Fixed Support, choose one of
the Dash-cam Fixed Support place a Rubber Pad on it, and fix the
dash-cam in the appropriate position at the front of the motorcycle. Which
Dash-cam Fixed Support to use can be decided based on the desired
installation position.
D10 Series

14 15
2.2 Install the Front Camera and Rear Camera
Take out the Cameras, and take out the Installation Tools.
Front camera real picture display Rear camera real picture display
Camera
Camera Bracket
Insert the Front Camera (shorter wire) into the Camera Bracket, and install
it in the front of the motorcycle. The triangle symbol on the camera
represents the forward direction. The bottom of the camera bracket can be
xed with stickers.
If you are concerned about the stability of the bracket, screws can be
added on both sides of the bracket, but this may damage the appearance
of the motorcycle, so please choose carefully. It is recommended to use
stickers to x the bracket.
The installation method for the rear camera is the same as the front camera.
After installation, connect the wires of the front and rear cameras to the
Dash-cam.
Installation Diagram
2.3 Install the Dash-cam Power Supply
Take out the Dash-cam Power Supply. The power supply has an output
port and an input port.
The output port has two wires, the blue wire is connected to the GPS and
the red wire is connected to the dash-cam.
The input port has three wires, colored red (positive), black (negative), and
yellow (ACC). Connect the red and black wires to the positive and negative
terminals of the motorcycle, respectively. Connect the yellow wire to the
ACC in the motorcycle fuse box.
Customer can use the auxiliary tool ---- ACC Detection Wire
Take out the ACC detection wire, wrap the black wire around the
metal body of the motorcycle, and use the red wire to touch the metal
on top of the fuse.
After the motorcycle is powered on, if the LED light on the ACC
detection wire lights up, turn o the motorcycle. If the LED light goes
out, then the fuse you tested is the ACC wire for your motorcycle.
The heat shrink tubing in the accessory bag can be put on the
connection between the lens and the host. After heating, the heat-
shrinkable sleeve will shrink and stick to the joint, which can further
enhance the waterproof eect.
How to nd out which one is the ACC wire in the motorcycle fuse box?
Use heat shrink tubing to further enhance waterproong.
2.4 Install the GPS Modules
Take out the GPS Modules and connect it to the Dash-cam Power Supply.
After installation, start the motorcycle, and the Dash-cam will automatically
turn on and enter the recording interface.

16 17
Installation Guide Diagram
Dash-cam D10Plus
Motorcycle
Red Line Means Connection
Front Camera
Rear Camera
Dash-cam Power Supply
GPS
18 19
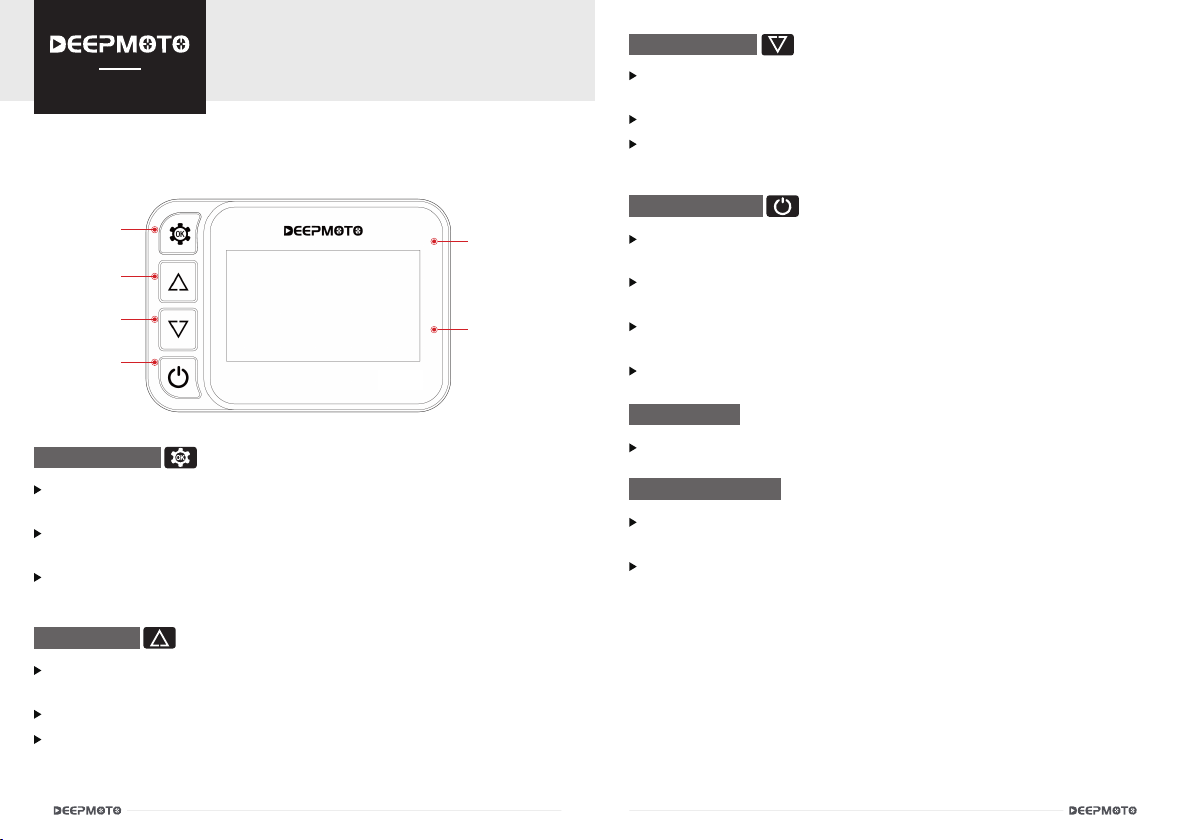
1. Dash-cam Buttons and Operation Introduction
1.1 Menu Key
1.2 UP Key
①Menu Key ⑤TYPE-C
⑥TF Card Slot
②UP Key
③Down Key
④Power Key
In the Recording Interface, short press is to enter the menu function
interface, and long press is to turn on/o WiFi.
In the Menu Function Interface, short press is to confirm, and long
press is to return to the recording interface.
In the Video Management Interface, short press is to play the video,
and long press is to return to the recording interface.
In the Recording Interface, short press is to switch the monitoring
screen of the front and rear camera.
In the Menu Function Interface, short press is to move up the option.
In the Video Management Interface, short press is to move up the
option, long press is to delete the video, (a deletion prompt box will pop
up for conrmation).
Function Introduction 1.3 Down Key
1.4 Power Key
1.5 TYPE-C
1.6 TF Card Slot
In the Recording Interface, short press to enter the video playback
interface.
In the Menu Function Interface, short press is to move down the option.
In the Video Management Interface, short press is to move down the
option, and long press is to lock/unlock the video le.
In the Recording Interface, short press is to enter the HUD interface,
and long press to shut down the dash-cam.
In the Menu Function Interface, short press is to switch the video
recording of the front camera/rear camera.
In the Video Management Interface, short press is to switch the video
recording of the front camera/rear camera.
In the HUD Interface, short press is to return to the recording interface.
This port is used by engineers for testing.
The video can be recorded normally only after inserting the TF card in
this position.
Customers need to purchase TF card by themselves, this product does
not include TF card.
D10Plus
D10 Series

20 21
Too High Tire Pressure
Tire Temperature Is Too High
WiFi
Speed
Longitude Latitude Barometric Pressure Altitude Tilt Angle
Recording Status Time GPS MIC
TF Card
Power
Compass
Video Lock / Unlock
Recording Interface Icon Introduction:
HUD Interface Icon Introduction:
2.2 HUD Interface
Short press to enter the menu setting interface, long press to turn on/o
the WiFi.
Short press to to switch the monitoring screen of the front and rear
camera.
Short press to enter the video management interface.
Short press to enter the HUD interface, long press to turn on/o the
dash-cam.
The HUD interface displays various values of the motorcycle, so that
customers can understand the status of the motorcycle more clearly.
In the recording interface, if there is no operation for 10 seconds (screen
saver time can be set), the screen will automatically enter the HUD
display interface.
The green tire pressure icon means the connection is successful, and the
gray means it is not connected.(Only D10Plus is equipped with tire pressure equipment)
Recording Interface button function:
2.1 Recording Interface (Video Monitoring Interface)
The recording interface is to display the monitoring screen captured
by the camera in real time. After the motorcycle is turned on, it will
automatically enter the recording interface.
When the WiFi and GPS are successfully connected, the color of the
icon will change from white to green.
2. Dash-cam Interface Introduction
Compass
Altitude Tilt AngleBarometric
Pressure
Speed
Latitue and
Longitude
Front Tire
Rear Tire
Time
Normal Tire Pressure
Low Tire Pressure
2.0 < Value < 3.0
Value < 2.0
Value>3.0
Value > 65°
White
Red
Red
Tire Temperature Color Red
When the tire pressure position on the HUD interface does not display
data for a long time, it may be that the battery of the tire pressure sensor
is low, please replace the battery of the tire pressure sensor. Battery
model: lithium battery CR1632.
Special Note:

22 23
2.3 Video Management Interface
Short press to play the video, long press to exit the interface to the
recording interface.
Short press to move up, long press to pop up a prompt box to delete
video les.
Short press to move down, long press to pop up a prompt box for
locking/unlocking video les.
Short press to switch the video recorded by the front camera/rear
camera, and long press to switch on and o.
The video management interface can delete, lock and unlock the captured
video.
Video Management Interface button function:
3. Menu Interface and Function Introduction
Recording Settings:
3.1 Parking Monitoring Sensitivity
The parking monitoring function is a function that after the motorcycle is
turned o, the dash-cam senses that the motorcycle is hit, and automatically
hides and starts recording for 15 seconds.
This function is o by default, and there are four options: high/middle/low/o.
High
Middle Middle Sensitive
Low Sensitive
High Sensitive
Middle Collide
Strong Collide
Slight Collide
Start Recording Automatically
Start Recording Automatically
Start Recording Automatically
Low
3.2 Safe Driving
This function is turned on by default. When it is turned on, a prompt box will pop
up after two hours of video recording: Please pay attention to fatigue driving.
3.3 Date Stamp
This option is enabled by default. After it is enabled, the time will be displayed
in the lower right corner of the video when the dash-cam is recording. It is
recommended to enable this feature.
24 25
3.4 Vibration Sensitivity
The D10Plus comes with a built-in vibration sensor that automatically
detects any vibration that the motorcycle experiences. When the
motorcycle is in motion, the vibration caused by the smoothness of the
road can also trigger the vibration sensor. The vibration sensor monitors
the intensity of the vibrations and automatically locks the recorded video,
preventing it from being overwritten.
Urban
Pavement
Comprehensive
Pavement Medium
Sensitive
Low Sensitive
High Sensitive
Medium
Vibration
Large Vibration
Small Vibration Lock video Automatically
Lock video Automatically
Lock video Automatically
Off-road
Pavement
3.5 Loop Recording
3.6 WiFi
3.7 Tilt Alarm
3.8 Mirror Preview
After inserting the TF card, the dashcam will automatically start loop
recording while the motorcycle is in the "on" state. The loop recording time
can be set to 1 minute, 2 minutes, 3 minutes, or turned o. The default
loop recording time is 1 minute.
You can turn the WiFi function on or off in the settings. By default, it is
turned off. When WiFi is turned on, the dash-cam will emit a wireless
signal named "Deepmote_XXXXX". Users can connect to the WiFi signal
on their mobile phones and manage video les through the mobile App.
This feature monitors the tilt angle of the motorcycle's tires and will trigger
an alert when the angle exceeds a certain value. By default, this feature is
turned o.
When this feature is turned on, the camera image will be mirrored. By
default, this feature is turned o.
Scooter (Title Angle >= 30°Alarm)
Model (Title Angle>= 40°Alarm)
Racing (Title Angle>= 45°Alarm)
PRO (Title Angle>= 50°Alarm)
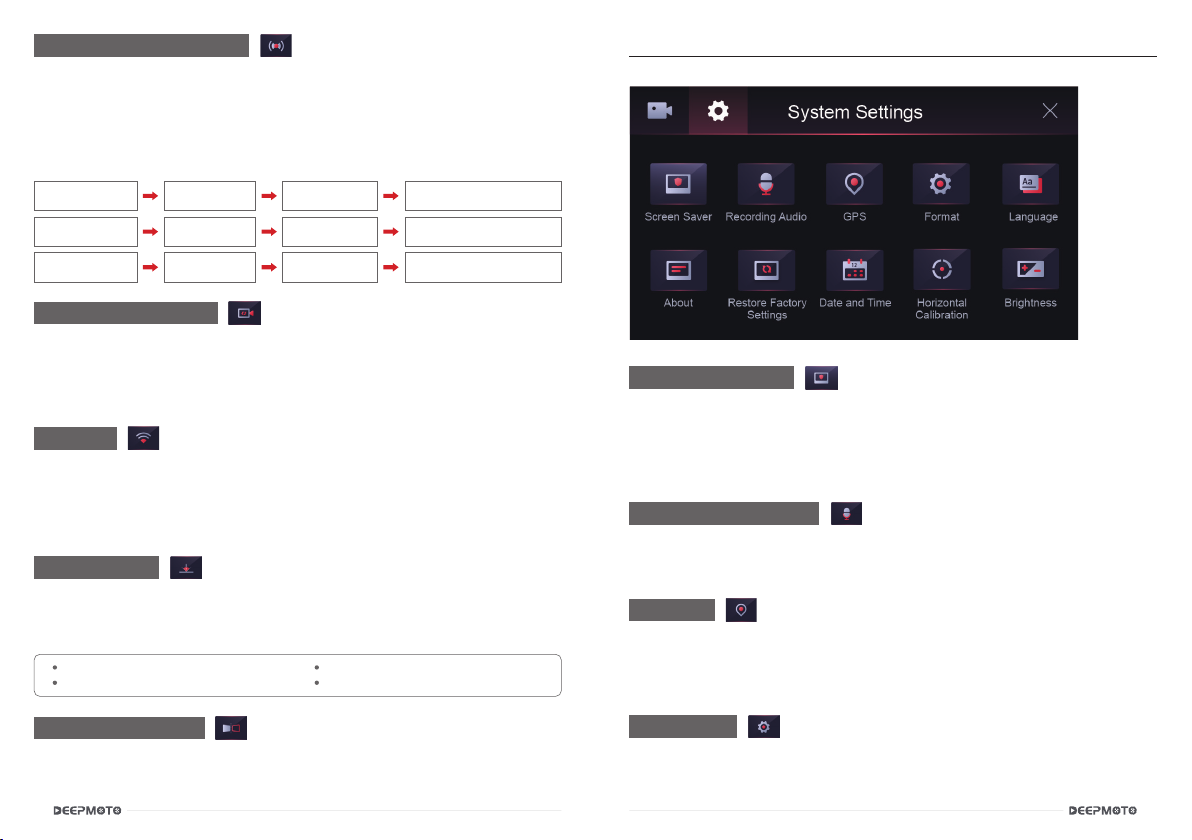
System Settings:
4.1 Screen Saver
Set the screen saver time: 10 seconds/30 seconds/1 minute/close, the
default is 30 seconds. When the driving recorder is in the recording
interface, without any operation, after 30 seconds, the screen will
automatically enter the HUD interface.
Press the power button to switch to the system setting menu.
Set the microphone to be turned on or o, and it is turned on by default.
When turned on, audio can be recorded during video recording.
4.3 GPS
4.4 Format
Set the GPS function to be on or off, and the default is on. Longitude,
latitude, altitude and other information will be displayed only when the
GPS is turned on. It is recommended to keep the GPS turned on.
The TF card can be formatted, after formatting, the TF card will be cleared,
please operate with caution.
4.2 Recording Audio
26 27
4.5 Language
4.6 About
4.7 Restore Factory Settings
4.8 Date and Time
Set the language: Simplified Chinese/Traditional Chinese/English/
Japanese/Korean.
Display the version information of the current machine software, WiFi
name, WiFi password, and MAC number, which is the unique identication
code of the machine.
Restore the settings of the dash-cam to the factory default settings.
To set the time of the device, short press the menu/OK key to enter the
time adjustment, short press the up key or down key to adjust the time,
after the adjustment is completed, short press the menu/OK key again to
conrm. After the setting is completed, long press the menu/OK key to exit
the time setting.
4.10 Brightness
Set the brightness of the background light, the default background light
brightness is high.
4.9 Horizontal Calibration
Calibrate the dash-cam horizontally. It is recommended to put the
motorcycle in a straight position when calibrating.
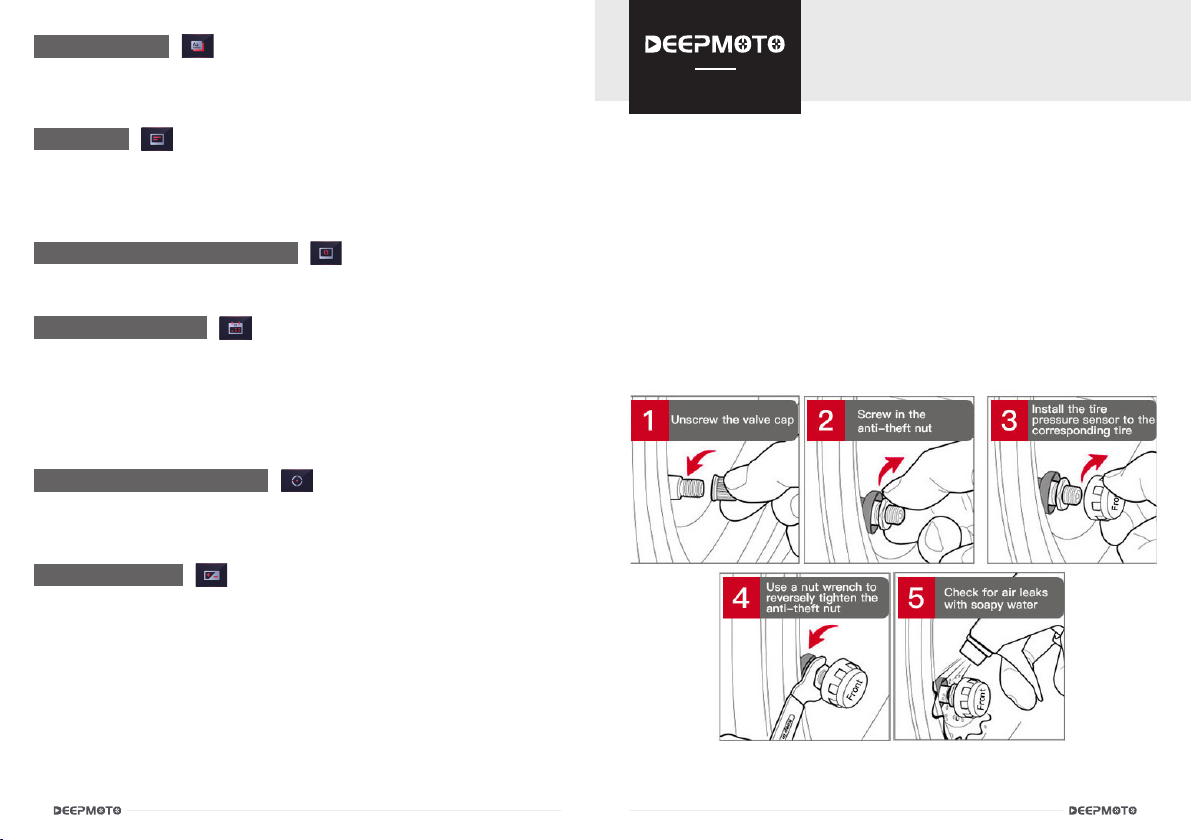
Tire Pressure Installation
And Function Introduction
1.Install the Tire Pressure Sensor
Open the Bag 11 tire pressure installation kit and take out the Anti-theft
Nuts. Install the Anti-theft Nuts at the ination ports of both the front and
rear wheels. Install the Tire Pressure Sensors on the wheels of the front
and rear wheels respectively. Use a Nut Wrench to tighten the anti-theft
nuts counterclockwise.
Start the motorcycle and wait a few minutes for the tire pressure and
temperature data to be displayed normally.
Only D10Plus is equipped with Tire Pressure Equipment.
D10 Series

28 29
2.Tire Pressure Equipment Matching Function
Each host will match the tire pressure before leaving the factory. If user
needs to re-pair, user needs to set it in the “Tire Pressure Device Matching”
interface: press and hold the "Up Key" and a prompt box will pop up,
prompting "Whether to clear the tire pressure device matching ", click OK.
open the cover on the tire pressure sensor and remove the button
battery. Then, enter the "Tire Pressure Device Matching" interface
on the host, wait for one minute, and insert the battery into the tire
pressure sensor. The front/rear device number will appear, indicating
that the pairing is successful.
Quickly re-match Tire Pressure Method
Tire Pressure Technical Parameter
Part Project Parameter
Tire Pressure Sensor
Working Frequency 433.9200MHz ± 0.1MHz
Operating Voltage 2.4 ~ +3.3V
Working Current
Static≤ 1uA
Working Current ≤ 15mA
Working Temperature -40°~+120°C
Monitoring Range
Temperature -40°~+130°C
Monitoring Range Air
Pressure 0bar~3.5bar
Temperature Accuracy ±2°C
Air Pressure Accuracy ±0.1bar
Sensor Lithium
Battery
Model CR1632
Working Temperature -30°C~80°C

30 31
App Function Introduction
1. App Introduction
2. App Installation Method
The video recorded by the dash-cam is saved in the TF card. Customers
can use the App to download the video from the TF card to the mobile
phone, which is convenient for editing and sharing the video.
Deepmoto's dash-cam has different models and functions, but there is
only one corresponding app, that is, the app is universal for all models.
The app has a mainland China version and an international version. The
app name of the mainland China version is "Deepmoto", and the app
name of the international version is "Philo Deepmoto". No matter whether
you download the mainland version or the international version, the
functions of the app are the same.
(1) Search for "Deepmoto" in any application store
of the mobile phone, nd the application, download
and install it.
(2) Download and install by scanning the QR code.
There are two ways to install the app in mainland China.
There are two ways to install the international version of the App.
(1) Search for "Philo Deepmoto" in the Google Play
application store, nd the application, download and
install it. It should be noted that the mobile phone
must rst install the Google Play application store.
(2) Download and install by scanning the QR code.
D10 Series
The "+" sign in the upper right corner of the App interface is also used to
connect to WiFi. It will list the product model of Deepmoto. Click the button
below the product model interface, the page will jump to the WiFi signal
page of mobile phone. It might to wait 3 to 5 seconds because the slow
system responding. It is recommended to connect directly on the mobile
phone WiFi signal page.
When connecting to WiFi for the first
time, a security prompt box will pop
up, please click to “Decline”, otherwise
the connection will fail and the App will
not be available. If the connection fails
due to wrong click, please try to restart
the dash-cam and restart the WiFi.
Note:
3. App WiFi Connection
After the dash-cam is turned on, search for the signal named "Deepmoto_
XXXX_XX" in the WiFi signal of the mobile phone and connect it.Enter
the password "12345678". After the connection is completed, return to the
App interface, and the name of the connected WiFi will be displayed at the
bottom of the interface.The WiFi signal of the example diagram is version
D10A.

32 33
4.1 Album
4. App Function Introduction
Click the album in the lower left corner to view the videos and pictures
downloaded from the TF card, and click edit in the upper right corner to
edit and share the videos and pictures.
Click on the GPS to see the map and driving track. The Chinese interface
uses Baidu Maps, and the English interface uses Google Maps. Please
pay attention to the usage environment.
4.2 Video Monitoring
Click the WiFi name to enter the real-time video monitoring interface.
The ashing red light in the upper left corner of the video indicates that
the camera is recording.
Click the camera button to switch the recording screen of the front
camera/rear camera.
Click the recording button in the middle to stop/start recording.
Click the video le list button to view the pictures and videos saved in
the TF card.
Click “Disconnect” in the upper left corner to log out of the link.
4.3 Video Download
Enter the video le list to view the pictures saved in the TF card, loop videos
and emergency videos (Locked Videos), click "Select" in the upper right
corner to choose the desired videos and pictures to download or delete.
Video Monitoring: Video Download:
DEEPMOTO_D10Plus_...

34 35
4.4 Setting
In the video monitoring interface, click the setting in the upper right corner
to enter the setting interface. WiFi password can be modied in this interface.
Other functions are relatively simple and will not be described again.
DEEPMOTO_D10Plus_28
D10Plus-220909-V1.97
Before the rmware upgrade, it is recommended to format the TF
card once, and after the upgrade is completed, format it again.
For App software, it will not aect the use if it is not upgraded.
Precautions:
Host Firmware Upgrade
App Software Upgrade
There are two types of system upgrades, one is dash-cam host firmware
upgrade, and the other is App software upgrade.
It is mainly to upgrade the software system and operation of the dash-cam
host. Click "Host Firmware Upgrade" under the setting interface, and the host
will enter the rmware upgrade state. During the upgrade process, the power
cannot be cut o. Power failure may cause the host program to crash and
cannot be turned on.
It is mainly to upgrade the App application software interface and functions. To
upgrade the App software, customers need to update or reinstall the App in
the App Store.
5. System Upgrade

36 37
FAQ Guide
Dash-cam Host-related Issues
?
?
?
After the motorcycle is started, the dash-cam does not turn on / the
dash-cam always displays the logo and cannot be turned on normally.
Abnormal phenomena such as crash occurred in the dash-cam.
TF card does not recognize.
Check whether the line connection is normal, and rule out whether the ACC
contact is loose.
If there is no problem with the ACC contact, check whether the position of the
power cord connector is tightly inserted.
Pull out the power cable and check whether there is water in the connector.
If there is no problem, it may be that the power cord is abnormal and needs to
be replaced.
Long press the power button to shut down and restart the dash-cam.
Insert another TF card and try it. If there is no problem with the TF card, it is the
problem of the host, and the host needs to be replaced.
a.
b.
c.
d.
D10 Series
?
?
No GPS signal detected.
The HUD interface shows that other GPS information is normal, but the
speed is 0.
Check whether the GPS connection is normal, and there should be no
interference around the GPS. Drive the motorcycle outside and check again.
Try to update the software, download the latest APP version, and upgrade the
host rmware.
Camera and Video Related Issues
?Video has no sound.
Check if the microphone is o.
?
?
?
?
The dash-cam does not record after turning on.
The dash-cam video monitoring interface displays a black screen.
Video is blurry.
The video is locked during normal driving / the recorded video is all in
the emergency video.
Check whether the TF card is inserted.
Check whether the recorded videos are locked. After the capacity of the TF
card is used up, the loop recording cannot be performed.
Format the TF card, or try a new TF card.
Check whether the camera connection is normal, re-plug the camera, if the
problem still exists, replace a new camera.
Check the camera for dust, please wipe the camera.
Adjust the vibration sensing sensitivity, or turn o the vibration sensing function.
a.
b.
c.
?There will be stripe electromagnetic interference or purple stripe
electromagnetic interference in the video displayed and recorded by
the host.
Check whether there is any problem with the camera wiring.
When wiring, please run it smoothly, do not fold it and keep a certain margin.
When tying the wiring, please do not tie it too tightly or squeeze it too tightly
with the car shell.
a.
b.
c.
Application and WiFi Related Issues
?
?
The WiFi connection is not working properly.
App crashes.
Check whether the WiFi is turned on, and the status bar of the screen will display
(In) after it is turned on.
Check the APP version number, download the latest App, and upgrade the dash-
cam rmware.

38 39
Product Parameters
Model D10 Series
Dash-cam Material Metal material
Dash-cam Voltage 5V/3A, Power box step-down line input 9V-36V range
Dash-cam Size 105mm X 72mm X 55mm
Dash-cam Weight 250g
Package Weight
(including accessories) 1.05kg
Storage
C10 and above high-speed card
64G (can record for 6 hours) / 128G (can record
for 12 hours) / 256G (can record for 24 hours)
Screen Size 3-inch IPS high-denition LCD screen, 854*480
pixels
Camera 6G+IR lter, F1.6 large aperture
Image Sensor Sony IMX307
Air Pressure Sensor ST Semiconductor
Shock Sensor ST Semiconductor
Imaging Technology Built-in video wide dynamic WDR technology, can
backlight high-denition display image peripheral
Video Resolution Video Resolution 1920*1080 pixels / 1080P / 30F
Video Format TS format
GPS Function External GPS, support track playback, with air
pressure and altitude
WiFi signal 2.4G WiFi
Sound Input External Microphone
Waterproof Level IP67
D10 Series
Table of contents


