Degritter MARK II User manual

User guide
DEGRITTER automatic
record cleaning machine
MARK II - ENG 3.3

2
00 Warning
01 Features
02 Cleaning Eect
03 Machine overview
04 Getting aed
05 Turning on/o
06 Using the machine
07 Settings menu
Contents
5
6
8
12
14
16
18
24


4

5
00 Warning
Read before use
FAILURE TO HEED THESE
WARNINGS WILL VOID
WARRANTY!
Make sure that you have selected
the correct AC voltage range on the
back of the machine before plug-
ging it into your wall outlet. Failing to
do so will cause serious harm to the
machine.
The machine mu be electrically
grounded. Failing to do so can result
in serious electric shock or death.
Do not ick metallic objects into the
machine from any of its openings,
e.g. the ventilation slots on the sides.
Doing so may result in serious elec-
tric shock or death.
The machine mu be placed on
a level suace before operating.
Failing to do so may cause a spill
and damage the machine.
Do not cover the veical ventilation
slots on the sides of the machine.
Free ailow is needed to guaran-
tee the proper functioning of the
machine.
Do not operate the machine in a
tight closed environment such as a
cupboard or a closet.
Only use purified water with no
dissolved solids (we recommend
diilled or deionized
water). Limescale build up ruins the
machine.
Machine internals mu be cleaned
every 200 washing cycles (see
section 09 Cleaning the machine).
WARNING

6
01 Features
Ultrasonic Cleaning
Architecture
4 Transducer Layout
Power DriveTM 2.0
Pulse Mode
Frequency Sweep
300 Watts
Ultrasonic cleaning tank that’s in
Degritter is purpose built for vinyl
records. The tank has two ultrasonic
transducers on either side emitting
120 kHz ultrasonic vibrations, evenly
diributing the cleaning energy
across the record’s suace.
Pulse Mode cleaning is a feature
oered by the Power DriveTM 2.0
ultrasonic generator. During pulsing,
ultrasonic transducers rapidly
switch on and o at high power.
This gives enhanced cavitation in
water, but keeps the average power
consumption low.
The driving frequency of the Power
DriveTM ultrasonic generator sweeps
between 120-125 kHz. This evens the
cavitation energy diribution in the
water, minimizing losses and giving
an uniform cleaning action.
The average power output of all
the washing programs is 300 W. This
makes Degritter the mo poweul
ultrasonic record cleaner on the
market per liter of water. The higher
120 kHz driving frequency keeps your
records safe.
ultrasonic cleaning
architecture
clever features
designed for you

7
Clever features Designed For YouSmart Drying
Postwash Rinse Option
Active FilteringTM Distinctly Automatic
Simple Water
Management
Record Safe
Temperature Control
Records are dried by a flow of
filtered air. Both the drying time and
fan speed can be adjued to keep
noise levels in check and to prevent
atic electricity build up.
Degritter suppos rinsing records
during washing cycles with the help
of a separate water tank.
Cleaning water is pumped through
a replaceable filter during washing.
Continuous filtration
keeps removed di from ending
back up on the record.
The Degritter is fully automatic,
requiring no additional eo aer
the cleaning cycle has aed. Use
the free time for liening to records
inead of cleaning them.
The machine has a convenient
removable water tank for replacing
cleaning water.Degritter monitors water temper-
ature and prevents it from rising
to levels harmful for vinyl records.
High temperatures are managed by
automatic cooling cycles.
01 FEATURES
Perfect Touch Buttons
We have peected the feel and
function of the machine’s buttons.
The rotations and presses provide
mo satisfying feel you will be
unable to let go of.
8
02 Cleaning Eect
ULTRASONIC CLEANINGULTRASONIC CLEANING
Vinyl record
groove width
Ultrasonic cavitation
bubble size
Bristle width
of a carbon fiber
brush
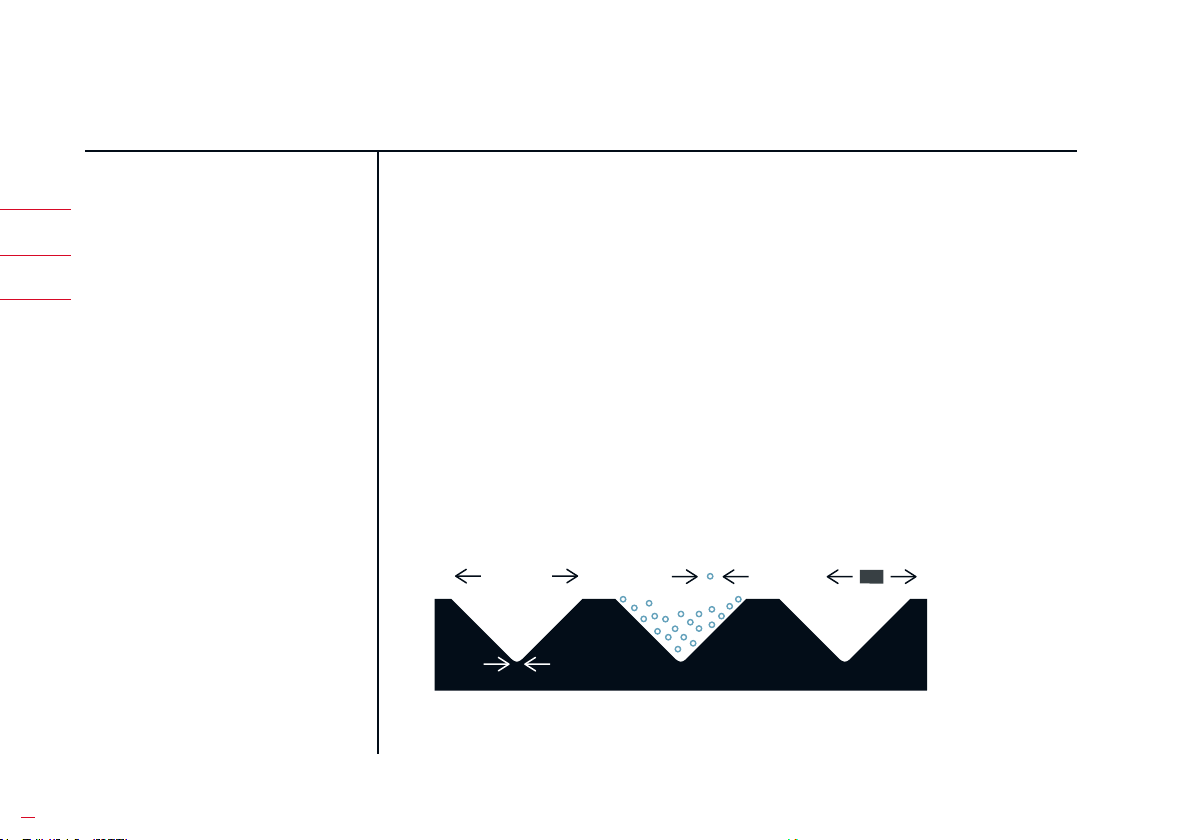
THE PRINCIPLE
CLEANING RECORDS
Ultrasonic cleaning has a unique
ability to remove di that is not
easily accessible by using other tra-
ditional means. Ultrasonic cleaners
are used to clean many types of
objects, including jewelry, optical
pas, dental and surgical inru-
ments and electronic equipment.
The smalle features in a vinyl
record groove are the size of a few
micrometers. Due to their minute
size, it is diicult for the briles of a
typical vinyl cleaning brush to clean
the entirety of the record groove.
5 μm
2,5 μm 10 μm
56 μm
9
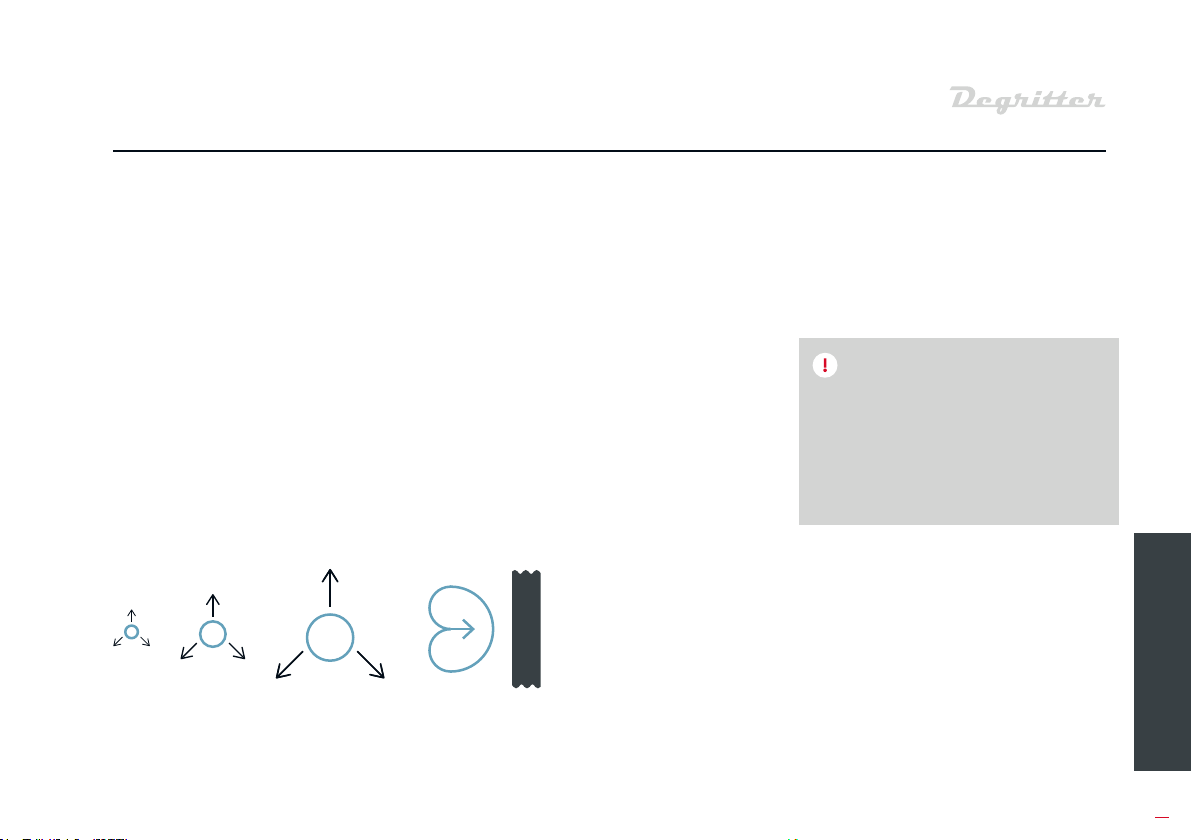
THE PRINCIPLE
Cavitational bubble
growing phase
Bubble implosion
with water jet
CLEANING RECORDS
NOTE
Ultrasonic cleaning works by agi-
tating the cleaning liquid with high
frequency acouic pressure waves.
This creates a large number of
microscopic vacuum bubbles in the
liquid, a phenomenon called cav-
itation. With every pressure wave,
countless small vacuum bubbles
are created and collapsed, releas-
ing heat and water jets towards the
record. This action will safely loosen
and remove di and contaminants
from the record.
Ultrasonic cleaning as used in
Degritter removes contaminants
from records layer by layer. The
cleaning is equally rong on the
top of the groove and inside the
groove.
However, when records are covered
with a thick layer of gunk, it can
take ultrasonic cleaning some time
before the deepe layer of di is
reached. We therefore recommend
to fir wipe heavy suace di
away with a microfibre cloth. This
will speed up the cleaning process
and will give better results faer.
Wiping the record with a microfiber
cloth wet in record cleaning fluid or
isopropyl alcohol will speed up the
cleaning process when cleaning
extremely diy records.
02 CLEANING EFFECT

10
03 Machine overview
CONTENTS OF THE PACKAGE
• Degritter machine
• Removable water tank with lid
• Replacement valve for
removable water tank
• AC power cable
• 100 ml cleaning fluid
• Fluid dosing pipette
• SD card for machine soware
• Water level measurement rip
• Pack of replacement filters
• Microfiber cloth
• Replacement valve kit for
water tank
• Replacement O-ring seal for
filter cap
CONTENTS OF THE PACKAGE
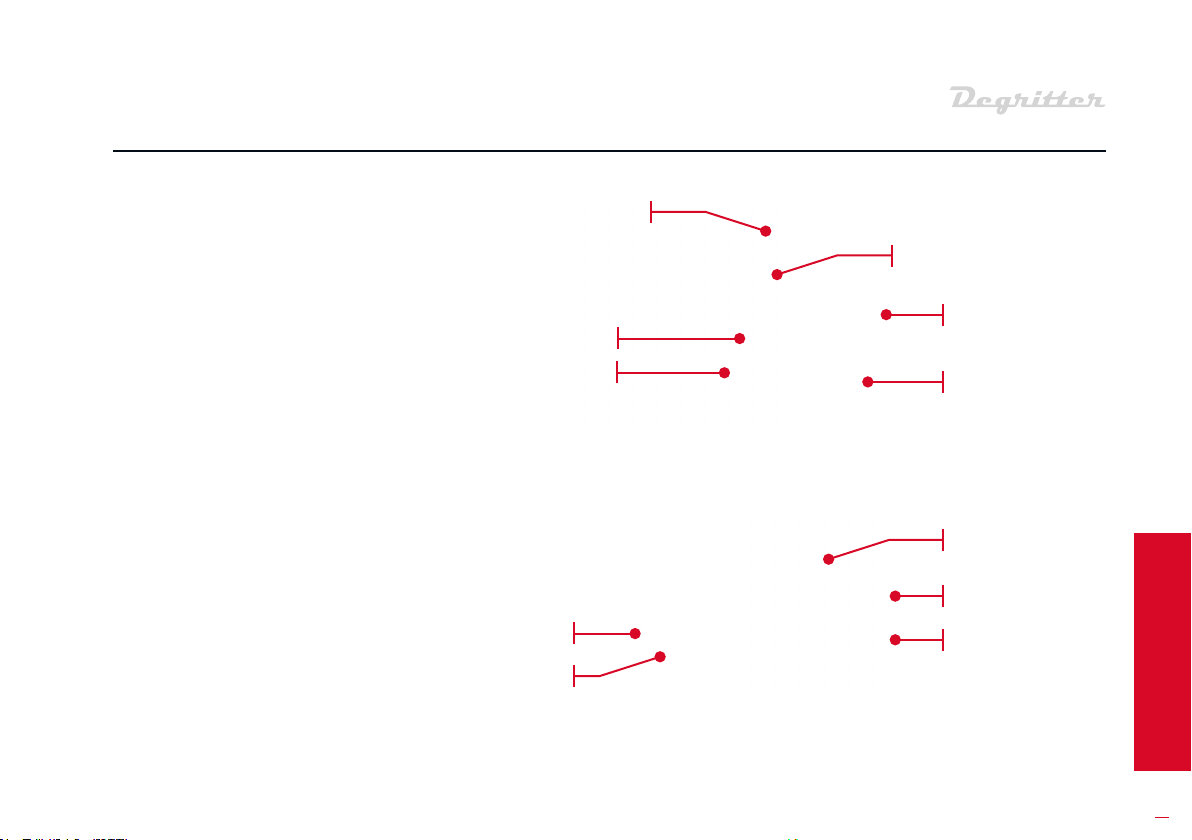
MACHINE REAR PANEL
BUTTONS AND SCREEN
REMOVABLE WATER TANK
PHYSICAL AND ELECTRICAL
SPECIFICATIONS
PHYSICAL AND ELECTRICAL SPECIFICATIONS
MACHINE FRONT
& SIDE PANELS
Weight 8.7 kg or 19.2 lb
Dimensions 37 × 28 × 21 cm or 14.6 x 11 x 8.3 in
Suggeed ambient operating
temperature
10 - 28 °C or 50 - 83 °F
Water tank capacity 1.3 L or 0.35 gal
Power input AC 100-240 V, 4 A, 50/60 Hz
Power usage ~ 310 W at full power, ~2 W in sleep mode
Fuse 4 A, slow, 20 x 5 mm, DIN 41.660
Noise level 70 db
Ultrasonic cleaning frequency 120 kHz with fine-band frequency sweep
11
The Degritter is controlled using the
buttons on the front of the machine.
Records are inseed into the slot on
top of the machine. The water tank
is accessible from the top of the
machine. There are veical ventila-
tion openings on both side panels.
The circular cap in the lower half of
the right side panel is the access
po to the water filter.
On the right side of the rear panel
are the AC cable input and the AC
on-o switch. The AC cable input
socket contains the fuse drawer. On
the le side are the AC select slide-
switch and the SD card input slot.
03 MACHINE OVERVIEW
MACHINE REAR PANEL
MACHINE FRONT
& SIDE PANELS WATER
TANK
SCREEN
BUTTONS
Record slot
WATER TANK
VENTILATION slots
AC SWITCH
AC INPUT
& FUSE
AC SELECT
SD card slot
Filter access

12
Quick
4:00
7:45
2
03 Machine overview
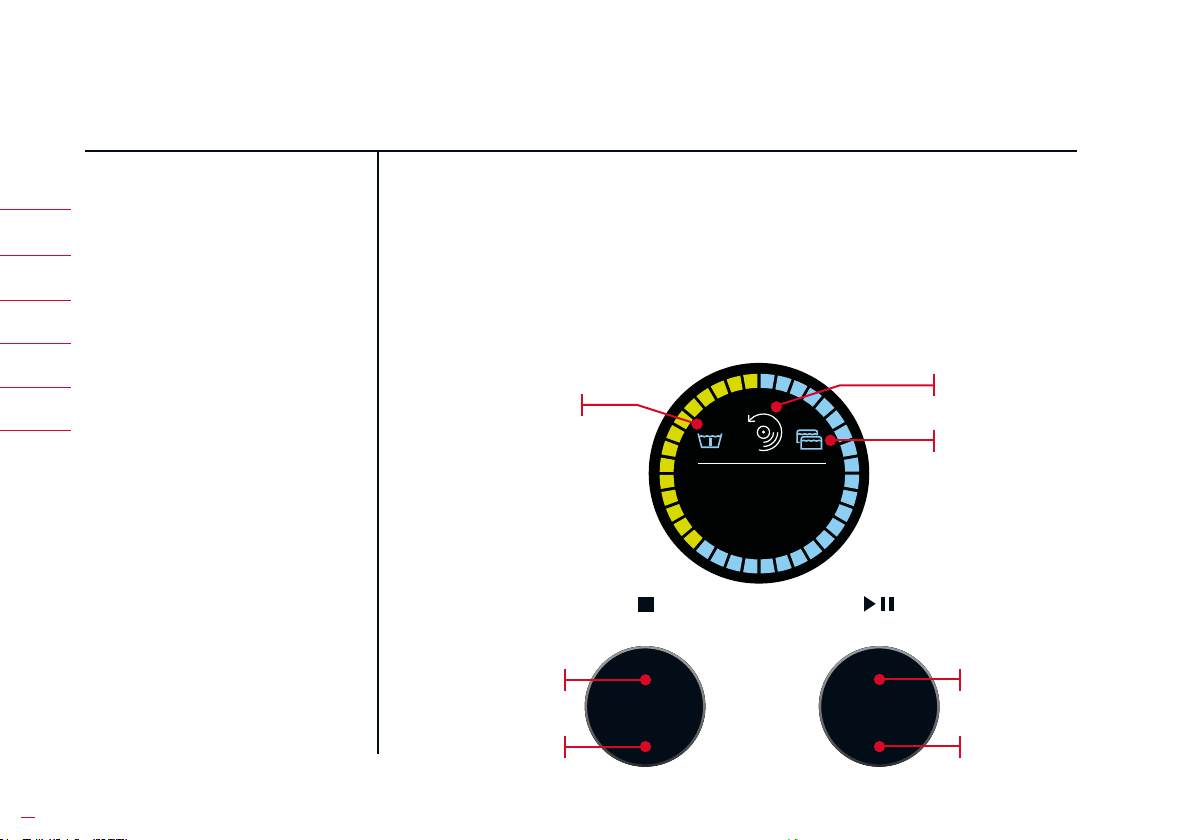
BUTTONS AND SCREEN
All Degritter functionalities can be
accessed using the two buttons
and the screen. Push and rotate the
buttons for dierent operations.
Rotate to
navigate menu
PRE-SOAK
TURNED ON
WASHING
REVOLUTIONS
Push to
START/PAUSE
TWO TANK
RINSE WASH
TURNED ON
Push to STOP
Rotate to alter
Drying time

13
REMOVABLE WATER TANK
The removable water tank is
located on the back of the machine.
There is a marking Min on the
outside of the water tank, indicating
the necessary minimum water level.
When filling the tank, it is recom-
mended to fill the tank with as much
water as one feels comfoable
carrying. The more water in the
removable tank, the better.
The tank is ethanol proof and can
be washed in a dishwasher at max
60 °C or 140 °F. It is not recommend-
ed to wash the tank with dishware
in a dishwasher.
NOTE
03 MACHINE OVERVIEW
14
04 Getting aed
01 SELECT PROPER AC VOLTAGE
Make sure the slide switch is in the
position indicating your wall output
voltage, either 230 V or 115 V. Use the
tip of a pen to slide the switch.
WARNING: An incorrect AC setting
will damage the product and is not
covered by the product warranty.
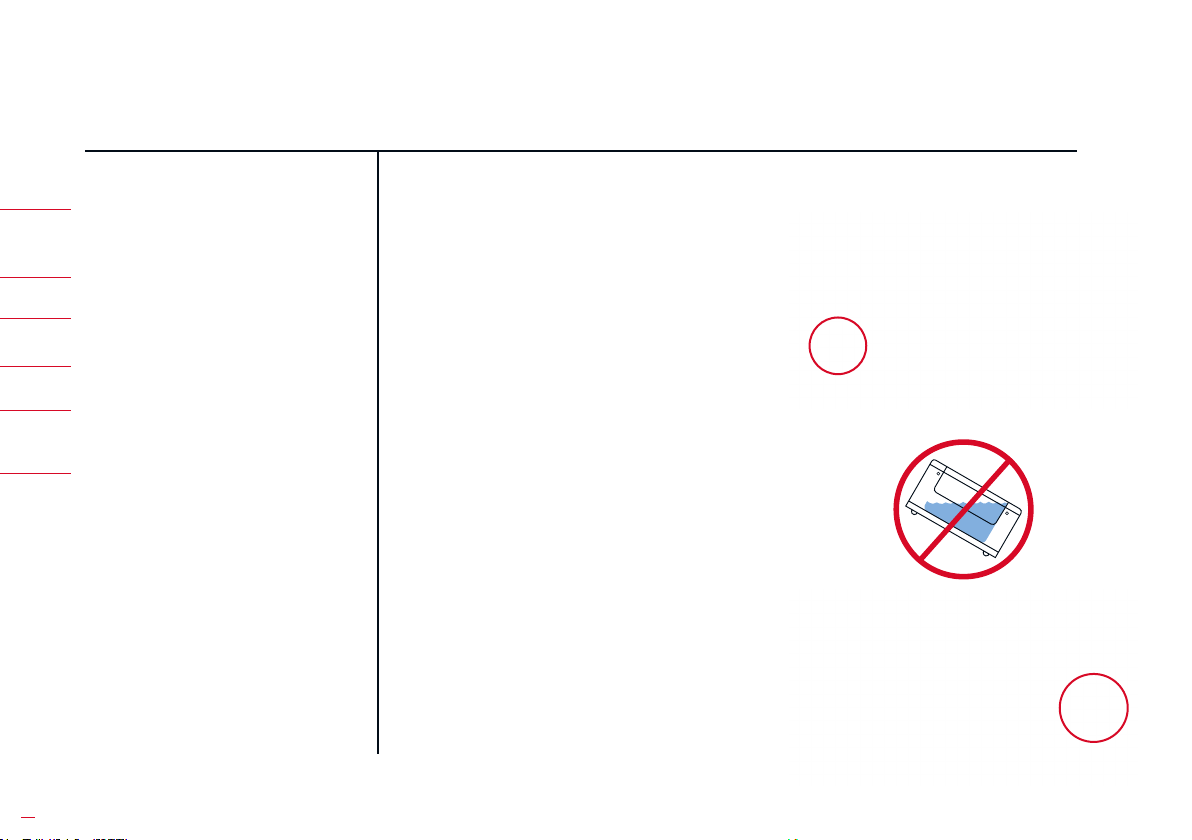
Degritter mu be placed on a level
suace for it to function properly.
Plug one end of the power cable
into the machine and the other end
into your wall outlet. Turn on the
machine from the AC switch at the
back.
01 SELECT PROPER
AC VOLTAGE
04 PUT WATER INTO THE TANK
05 INSERT THE RECORD
INTO THE MACHINE
06 PRESS START
02 PLACE ON LEVEL SURFACE
02 PLACE ON LEVEL SURFACE
03 TURN DEGRITTER ON
03 TURN DEGRITTER ON

15
Fill the water tank with diilled
water to a level exceeding the “Min”
marking. The more water in the
water tank, the better.
Sta the washing program by
pressing the button on the right.
Washing progress is tracked by the
countdown timer on the screen.
You will be aleed with three beeps
when the program finishes.
Inse the 12” record into the
machine as shown.
04 GETTING STARTED
05 INSERT THE RECORD INTO
THE MACHINE
04 PUT WATER INTO THE TANK 06 PRESS START
Quick
4:00
7:45
2
16
05 Turning on/o
AC ON-OFF SWITCH
The black switch on the back panel
turns o all power to the machine.
This is the be option if you are not
planning to use Degritter for a long
time or for transpoation.
Aer turning the machine on from
the AC switch you’ll fir see a
welcome text on the screen. Aer
this, the machine will prime its
pumps.
AC ON-OFF SWITCH
TIMED SHUTDOWN
LONG TERM STORAGE
POWERING ON
POWERING ON
SOFT SHUTDOWN
AND STARTUP
When the external tank is empty, a
“No Water” warning will be dis-
played. Once the tank is filled, press
any front panel button to resume.
NOTE

17
05 Turning on/off
For a so shutdown, hold down the
le button for 3 seconds. This is the
recommended method for turning
o Degritter. It cuts all power to the
machine except for a small current
to the processor and its power
supply.
Press any button to a the
machine again. You will be prompt-
ed with a welcoming screen.
When oring Degritter for a longer
time period:
• Remove the water tank and
pour away its contents;
• Inse the tank back into the
machine;
• Turn Degritter o from the AC
power switch;
• Remove the cord from the
power socket;
• Unscrew and remove the water
filter cap.
Degritter shuts down automatically
when le idle for 15 minutes. Press
any front panel button to a the
machine up again.
TIMED SHUTDOWN
LONG TERM STORAGE
SOFT SHUTDOWN
AND STARTUP
Goodbye
Welcome
18
06 Using the machine
MENU NAVIGATION
MENU NAVIGATION
PRE-SOAK INDICATOR
WATER TEMPERATURE
RUNNING PROGRAMS
COOLING WATER
ADJUSTING DRYING TIME
Turn the right button to move
between menu items. Push the right
button to activate the selected
program.
Quick
4:00
7:45
2
Rotate to
navigate menu
PRE-SOAK
TURNED ON
WASHING
REVOLUTIONS
Push to
START/PAUSE
TWO TANK
RINSE WASH
TURNED ON
Push to STOP
Rotate to alter
Drying time
19
06 Using the machine
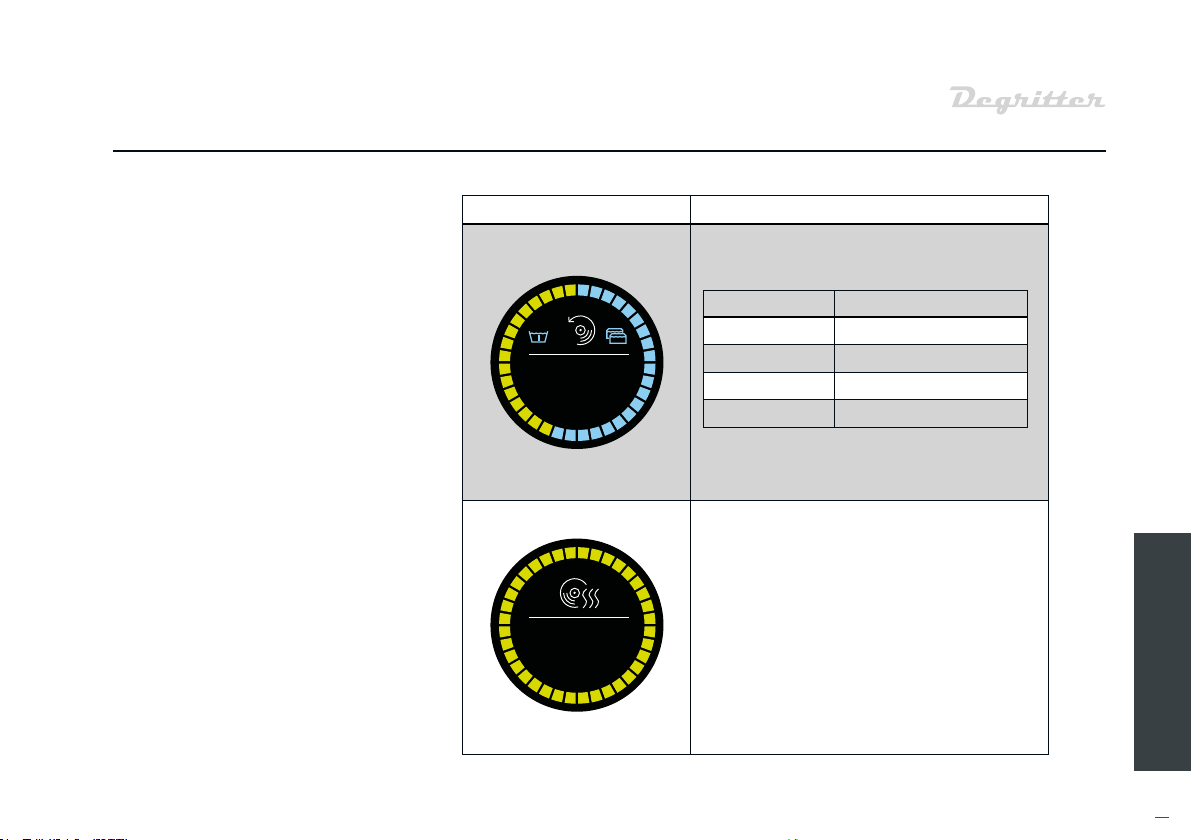
PROGRAM DESCRIPTION
Washing programs with 1-4 record revolu-
tions for washing and drying the record.
* Listed durations are without the pre-soak and
record rinse times from a second tank.
The Dry program allows you to run the
drying mode separately, without a
washing cycle. Increase or decrease the
drying time by rotating the button on
the le. You can also adju drying time
during a program when the record is
being dried.
RUNNING PROGRAMS
Select the desired program by
rotating the button on the right. To
a the selected program, press
the button on the right. To op the
program press the le button and
pause the program by pressing the
button on the right. You will be noti-
fied with three audible beeps when
the program has finished.
REVOLUTIONS WASHING DURATION
1 2 minutes 15 seconds*
2 3 minutes 45 seconds*
3 5 minutes 15 seconds*
4 6 minutes 45 seconds*
5:15
1
5:00

20
06 Using the machine
PROGRAM DESCRIPTION
The Degas program gets rid of excessive
gas in your diilled water. This improves
the ultrasonic cleaning process. Running
the Degas program is not mandatory, as
the fir cleaning program will have the
similar eect as the Degas. The Degas
program should be run aer adding
cleaning fluids to the water as this will mix
the fluid in the water.
Activate to enter the settings menu.
2:15
Table of contents


