manuals.online logo
Brands
  1. Home
  2. •
  3. Brands
  4. •
  5. Kuzma
  6. •
  7. Cleaning Equipment
  8. •
  9. Kuzma RD Kit User manual

Kuzma RD Kit User manual

Page | 1
Kuzma RD Kit for ultrasonic record cleaning
( ULTRASONIC CLEANER BAT IS NOT SUPPLIED WIT KIT)
INSTRUCTION MANUAL FOR RD KIT
.
2019-10
Page | 2
Contents:
Page:
General information and description: 1-4
RD kit parts and assembling 4-10
Preparing records 10-11
Preparing bat 11-13
Record cleaning 13
Record drying &wiping 13-14
Notes 15
General introduction:
Ultrasonic cleaning is used in industry for cleaning t e most precise and delicate parts suc as bearings for
t e aerospace industry or gold and silver jewellery. Ultrasonic ig frequency waves ( 40 kHz ) are
transmitted t roug water creating a process called cavitation. T is creates microscopically small bubbles
between t e surface of t e submerged parts and any small particles on surfaces, suc as dirt. T ese bubbles
burst and pus t e dirt away from surfaces. W en cleaning metal or plastic t e process must be optimised to
avoid damage to surfaces. To do t is it is necessary to control power, temperature and t e time of t e
cleaning process.
T is is ow all dirt in t e grooves of records, even in new pressings is removed. Sonic results are beyond
expectations!
To bring t e ultrasonic cleaning process to every record collector we decided to make t e RD kit's
( rotating and drying kit) purc ase price as low as possible, t us enabling t e customer to purc ase t e
ultrasonic cleaner bat locally (using our guidlines).
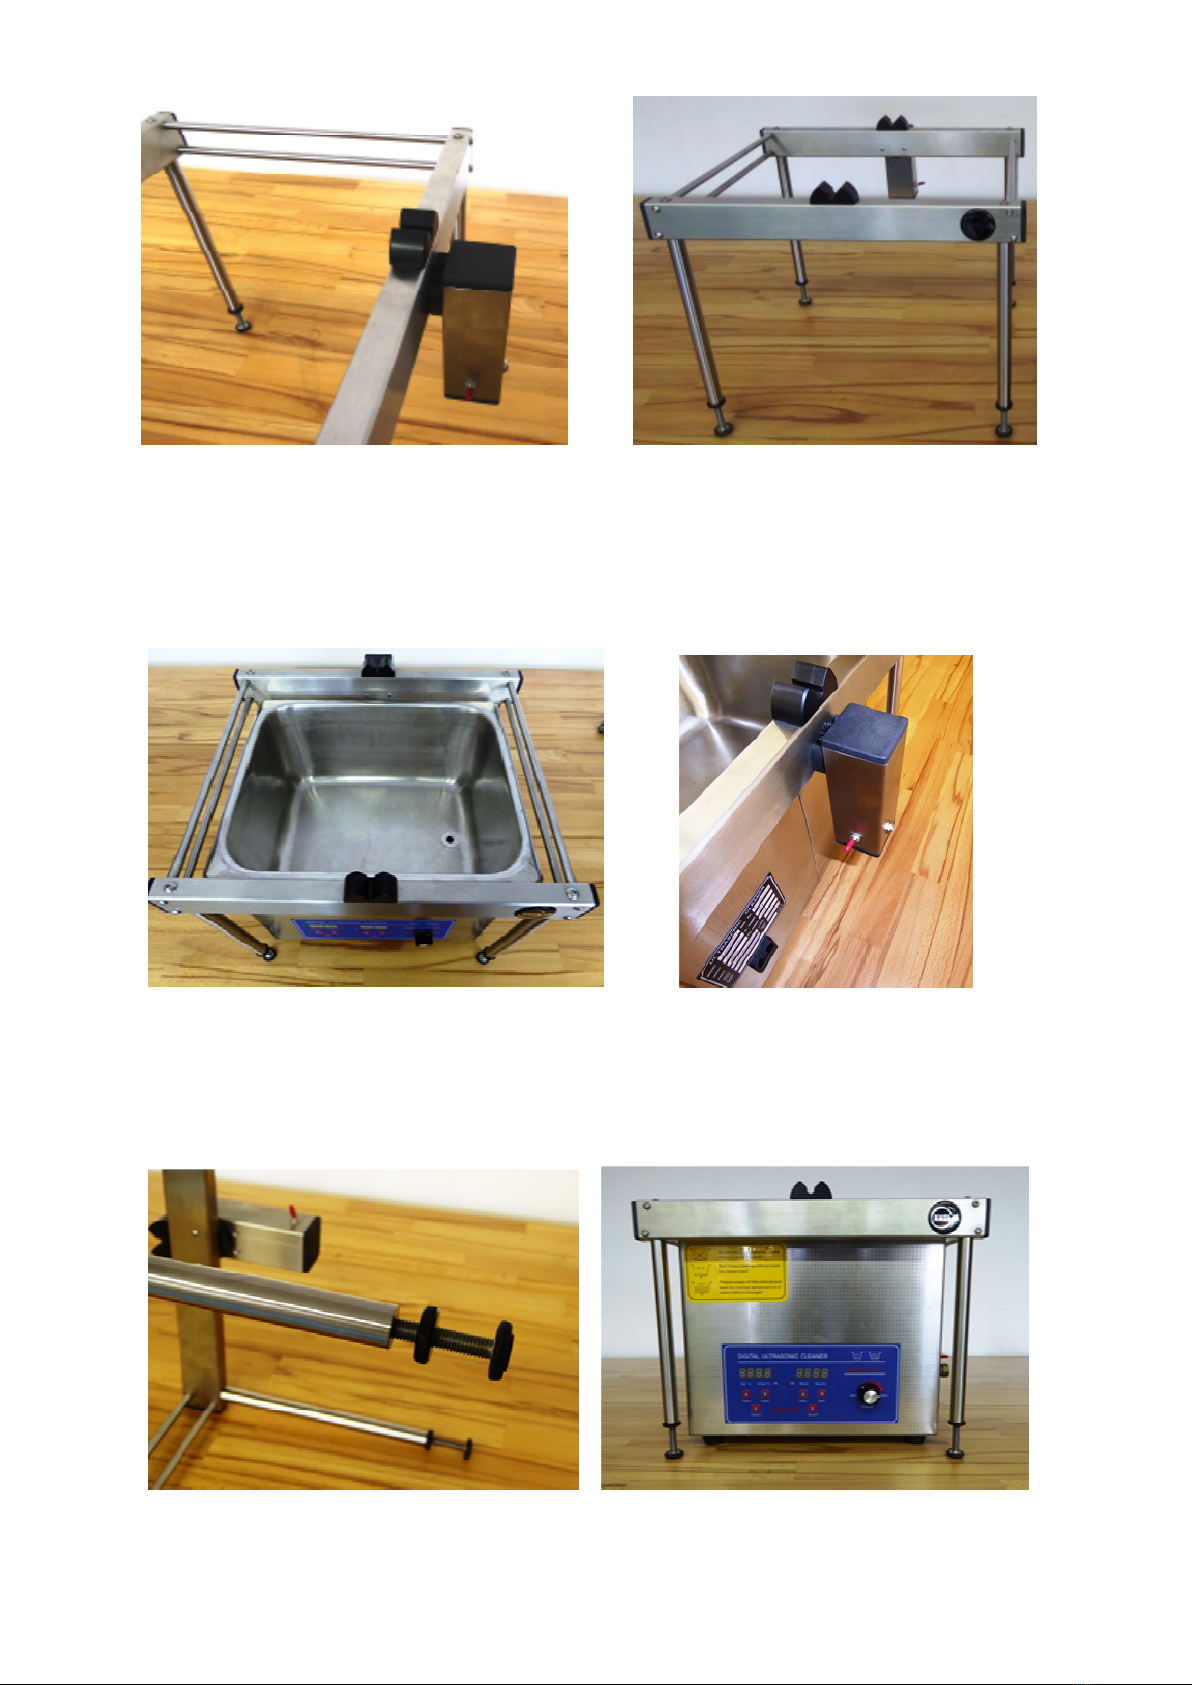
The Rotating and Drying record rack kit ( RD kit) will allow you to submerge records in t e ultrasonic
cleaning bat and position t em in a suitable drying position. For 45 EP look Notes on page 15.
It will allow you to clean 10 LPs in one our by t e ultrasonic process, giving you t e cleanest records
ever, free of static c arge.
Brief description of the ultrasonic cleaning process:
Records are positioned on t e spindle wit spacers on t e stand and t en submerged into t e ultrasonic
cleaner warm bat for a limited time. T e liquid is distilled water wit a few drops of isoproply alco ol
and wetting agent added. T e spindle rotates wit t e records, powered by a small motor w ile dipped into
t e liquid just below t e record labels. T e records rotate wit 0.4-0.6 rpm ( less t en one revolution per
minute).
If by any c ance t e record label gets wet no arm is done.
After ultrasonic cleaning t e spindle wit records is lifted out and positioned on t e stand to air dry. W en
dry, any particles on t e record surface are brus ed wit a carbon fibre brus ( records ave no static
electrical c arge ) and t e records are inserted if you wis into new sleeves.
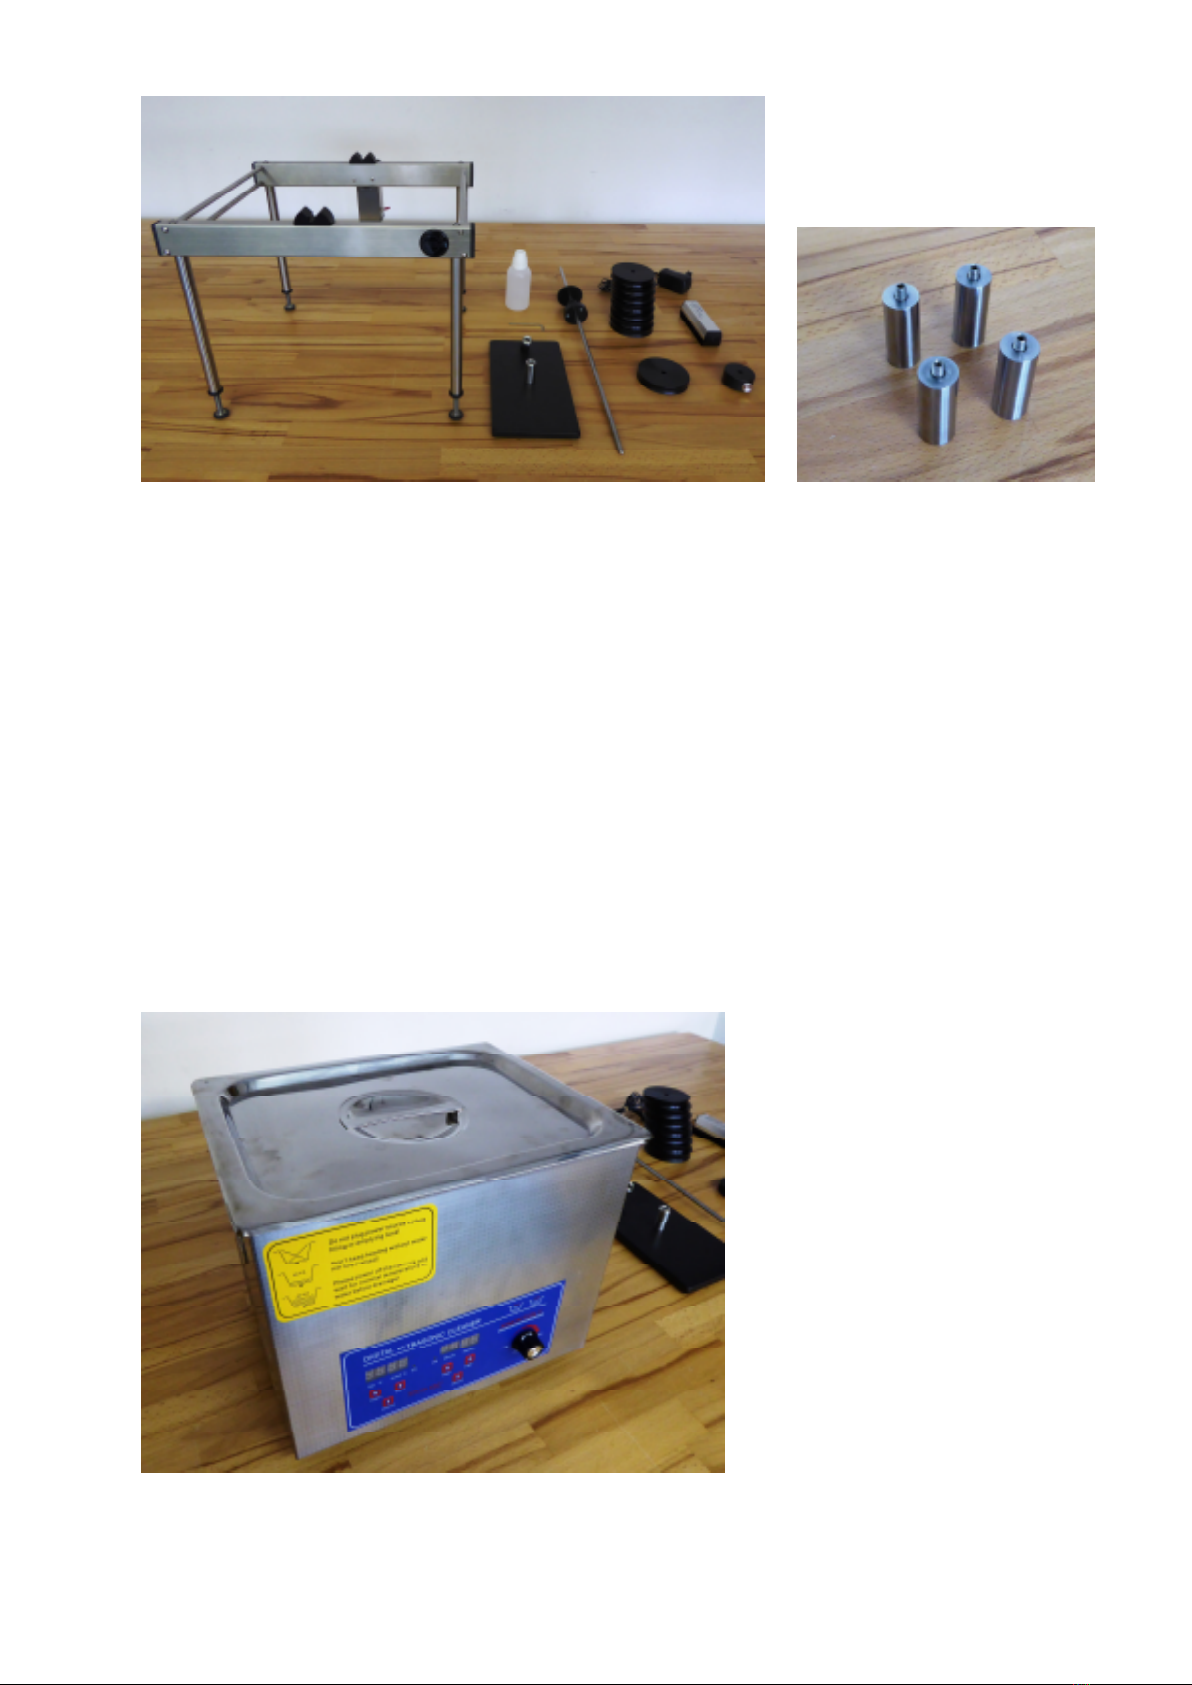
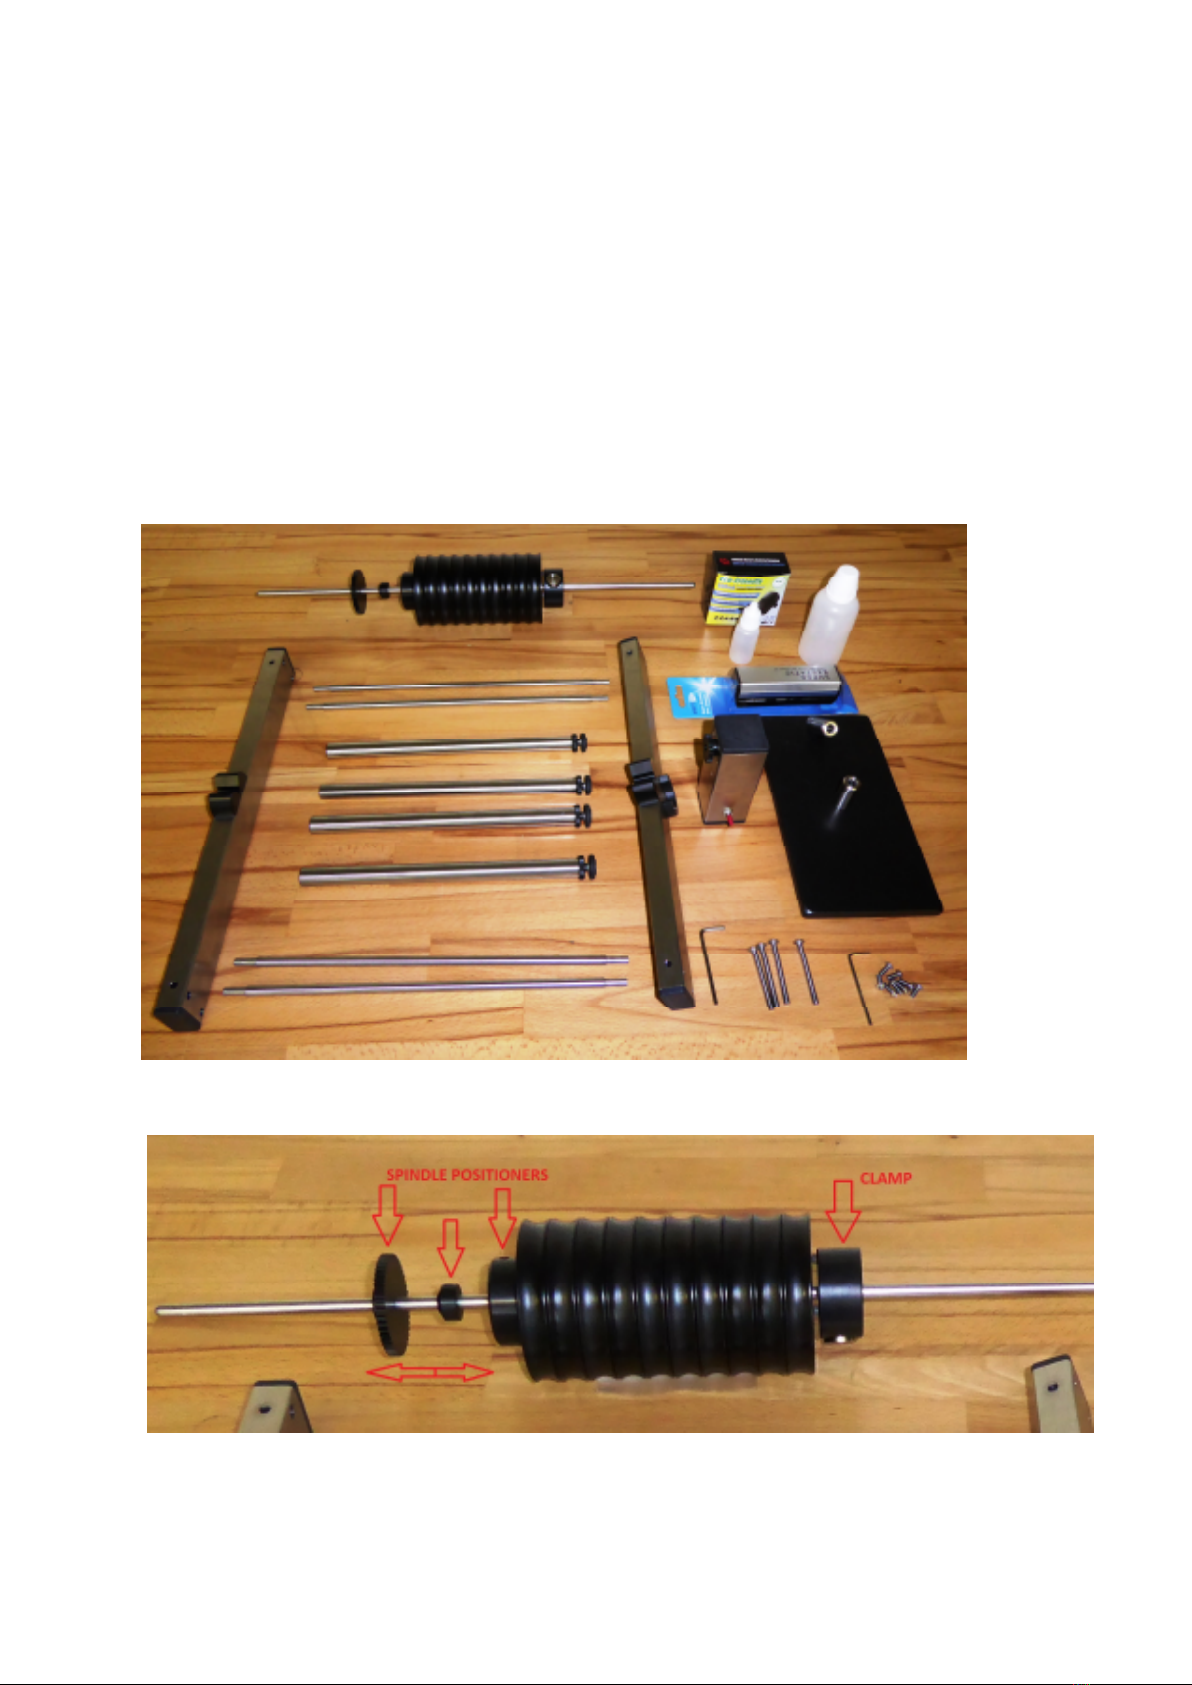
Description of RD kit: (kit does not include ultrasonic cleaner bat )
T e RD kit compromises frame wit motor , supporting legs, spindle for olding records, record spacers, a
clamp for fixing records on t e spindle and a stand for drying records. In t e kit small starter bottles of
isoproply alco ol and wetting agent are also included as well as a carbon fibre cleaning brus and DC
power supply for motor. Kit assembly requires only 10-15 minutes and a meduim size P ilips screwdriver.
Page | 3
RD kit ( rotating and drying) 8 pcs extension legs included
RD kit:
1x main frame wit motor ( DC 9V wit provided mains adaptor)
1x spindle ( record older)
1x drying stand
1x clamp ( grip lock)
8x extension legs( 40 mm- for ig er size cleaners)
10x PVC spacers
1x record carbon brus
1x PVC bottle wetting liquid- as for p otograp y ( for 5 bat fillings)
1x PVC bottle isopropyl alco ol ( for 2 bat fillings)
1x instruction manual
2x Allen keys for leg and rods fixing ( 3mm, 2,5 mm )
2x Allen keys for spindle positioners adjustment ( 2 mm, 1,5 mm)
For 45 EP look Notes on page 15.
To start cleaning your records you need to purchase :
1x ultrasonic cleaner bat
10 liters distilled water( for one filling: 300-400 LPs)
Ultrasonic cleaner bat - typical sample
Page | 4
T e main frame is positioned around t e ultrasonic cleaner bat . Records are placed wit spacers on t e
spindle fitted on t e stand. T e spindle olding t e records is t en positioned on top of t e frame w ere t e
motor slowly rotates t em in t e bat .
Frame is positioned over ultrasonic (US) cleaner bat
US cleaner must ave time, temperature and ultrasonic power control. After aprox 10-15 minutes t e
spindle wit t e records is lifted from t e bat and positioned back onto t e stand to air dry records. Once
records are dry , t e top surface of t e record is swept wit t e carbon brus to get rid of any possible dust
particles and t e records put in new record sleeves. As t e records are free of static c arge, t is process is
very easy.
Spindle wit records on frame in ultrasonic bat Spindle wit records in drying position
Technical requirements for ultrasonic cleaner bath:
T ere are various ultrasonic cleners on t e market. Simply look into t e tec nical data and if t ey meet t e
following criteria it will clean safely.
Bat inner size: min 297 x 220 x 135 (mm: Leng t x Widt x Dept )
max 305 x 240 x 150 (mm: L x W x D)
Cleaner outer size: min 325 x 265 x 270 (mm: Leng t x Widt x Heig t )
Max 365 x 278 x 395 (mm: L x W x H )
(special size frame can be made on request)
Volume: min 8-10 lit ( depends on t e bat size)
Ultrasonic frequency: 35-40 kHz
Temperature control: min 20-50 Celsius range ( suggested temperature is 30-33 C degrees)
Timer: min 5-20 minutes range (suggested cleaning time is 10-15 minutes)
Power control: 0-100% ( suggested cleaning power is 50-60 % of full power)
In case of doubt ask your dealer or us directly, sending us tec nical details about cleaner.
Ultrasonic record cleaning process with RD kit
Page | 5
Ultrasonic Bath:
Purc ase an ultrasonic cleaner bat (to our tec nical requirements) following our instructions and
familiarise yourself wit t e instruction manual. Find adequate space and a surface, w ic is not sensitive to
moisture, wit good lig t and a mains outlet. Purc ase at least 10 liters of distilled water.
Position t e ultrasonic cleaning bat on a solid flat surface. Level orizontally if necessary.
For more information ow to prepare t e liquid go to page 12. Once you get familiar wit cleaning process
everyt ing will be really simple. For 45 EP look Notes on page 15.
RD kit assembling and preparation:
Locate t e various RD kit parts. See Fig.1.0. T e only tool w ic is not provided in kit t e for assembling is
medium size P ilips screw driver. You need to assemble t e frame and stand.
Fig.1.0. RD kit- various parts
Fig. 1.1. Spindle wit 10x spacers & clamp ( you mig t need readjust spindle positioners-see page 12)
Page | 6
Fig. 1.2. Stand Fig. 1.3. Spacer, clamp
Fig. 1.4. Extension legs
Frame assembly: Fig. 2.0.
T e frame consists of two square stainless steel tubes fitted toget er wit 4 t in stainless steel rods and
screws. Fig. 2.0- 2.8.
Fit rods in t e larger oles on one side of t e square tube and fix screws in t e opposite side in t e smaller
oles wit allen key 2,5 mm.
Fig. 2.0. Parts for frame assembly Fig. 2.1. Frame parts: 2 square tubes wit 4 rods
Page | 7
Fig. 2.2. Fixing rod into square tube Fig. 2.3. Frame wit 4 rods nearly assembled
T en fit t e ot er end of rods into t e second square tube w ic as a black PVC ring fitted wit two
screws on t e same side as motor assembly. Secure all 8 screws wit moderate force.
Hold t e frame in a vertical position and fit one leg using t e long large screw and Allen key 3mm. T e
screw comes from t e side w ere t ere are two black bearing blocks. Fit remaining t ree legs. Fig. 2.4-2.8.
Fig. 2.4. Frame wit 4 legs Fig. 2.5. Fixing leg into frame wit allen key 3mm
Fig. 2.6. Legs wit extension legs Fig. 2.7. Min and max leg's eig t
Page | 8
Fig. 2.8. Legs assembled on frame
Frame height: Fig. 2.7.
Depending on t e eig t of t e ultrasonic cleaner, add or remove extension legs to t e c art below. Simply
screw t em on t e top as per Fig. 2.7. Measure eig t of cleaner from support to t e top edge of t e bat .
Cleaner height: 265-315 mm leg 250 mm ( remove one extension leg)
305-355 mm leg + 1 extension leg (total lengt 290 mm)
345-395 mm leg + 2 extension leg (total lengt 330 mm)
Fine adjust eig t wit feet eig t adjustment.
Mount motor: Fig. 3.0.
For assembling t e motor you will need a medium size P ilips screwdrive ( not supplied) using two two
screws already in position on t e square tube. Motor ousing s ould be positioned on t e outside of t e
frame. Fig. 3.0-3.3.
Fig. 3.0. Frame wit motor ready for mounting Fig. 3.1. Fix motor on frame
Page | 9
Fig. 3.2. Motor assembled Fig. 3.3. Frame assembled
Frame positioning: Fig. 4.0.
Position t e main frame over t e US cleaner bat in suc a way t at t e motor ousing wit t e switc is at
t e back. Be sure t at in t e process of buying US cleaner t e outer size and bat as suggested inner size.
Ot erwise t e main frame mig t not fit around t e bat .
Fig. 4.0. Frame over US bat Fig. 4.1. Rear of t e frame- motor wit switc
Adjust t e eig t of supporting legs to reac suggested eig t ( 50 mm available range) Fig.4.2.. If not ig
enoug you add extension legs or even ask for different lengt legs. Between t e top edge of frame to t e top
edge of bat t ere s ould be a eig t difference of appproximatelly 25- 28 mm. See Fig. 4.4. Fine level
frame to avoid wobbling by readjusting leg eig t and secure it wit black nut.
Fig. 4.2. Adjustable legs Fig.4.3. Level frame wit US cleaner bat
Page | 10
Fig. 4.4. Frame & bat -side view-observe eig t Fig. 4.5. Frame & bat - top view
Connecting motor and spindle position: Fig. 5.0.
Plug in DC voltage adaptor at t e back of motor ousing, plug into mains and switc on motor. Fit over t e
frame spindle in a suc way t at t e black toot w eel is on t e top of t e toot w eel in t e motor ousing.
You s ould notice slow rotation and ear a little rattling noise.
Fig. 5.0. Motor, switc , plug in DC supply Fig. 5.1. Spindle in t e rotating position
Spindle positions: Fig. 6.0.
Position t e eavy black metal stand about 0.5m away from t e frame. Insert spindle in t e central
vertical position of t e bus . T is is t e position for fitting or removing records. Fig. 6.0.- 6.1.
T e tilt position is t e drying position. See Fig. 10.2.
Page | 11
Fig. 6.0. Spindle in t e stand-vertical Fig. 6.1. Spindle wit first spacer
Record fitting on the spindle: Fig. 7.0.
For t e first time put on a single LP and fit it over t e frame to c eck eig t and position of t e frame over
US bat . C eck record position in t e bat and if need it reposition large spindle positioner along t e spindle
s aft by releasing ex screw wit Allen key 2 mm to suit your size bat . For 45 EP look Notes on page 15.
Find a few old records w ic are not important to ave a first test of t e ultrasonic cleaning process!
Fit 10 LPs ( start wit only few and c eck bat widt ) on t e spindle using black spacers and finally fix
records down wit t e clamp. Press and old button and pus it down t e spindle wit soft tips towards t e
records.
Fig. 7.0. One LP on spindle Fig. 7.1. Spacer on top of LP
Fig. 7.2. Spindle wit one LP- side view Fig. 7.3. Spindle fully loaded wit 10LPs
Page | 12
US cleaner bath filling: Fig.8.0.
For t e first time read bat preparation on page 5 again. Plug in mains connector to US bat after you fill in
liquid. As you know you should NOT switch on ultrasonics without water in the bath!
Preparation of liquid:
Pour distilled water into bat to about 50 mm below t e top edge. It will be topped up later. Add 100 ml
isopropy alco ol and 10-15 drops of wetting liquid ( agent). Precise quantities are not important.
Switc on ultrasonic cleaning for 15 minutes and set temperature at 30 deg Celsious ( C). T is will prepare
and mix liquid and more important minimise air bubbles in t e liquid itself for maximum cleaning effect.
Add or remove some liquid to get desired level of liquid. Fig. 8.0.
Fig. 8.0. US cleaner bat wit water Fig. 8.1. Drain tap in closed position
Power adjustment:
Full power will create big ripples on t e surface- t is will mix water and minimise air bubbles.
At some point reduce power for a s ort time so t at only small ripples are visible. Mark t at position! T is
is t e working US cleaning power for record cleaning. Wit more records in t e bat you mig t increase t e
power a little . It is important t at you keep t e power level in t is range but a bit more will be just fine.
Working conditions:
Temperature: 30-33 deg C ( you can experiment up to 40 deg C)
Time: 15 minutes ( but it is not critical if less)
Power: adjust it till ripples are very small on top surface ( about 50-70 % of full power)
Spindle positioning on frame over bath: Fig. 9.0.
We suggest t at for first time you use only few old unimportant records to familiarise yourself wit t e
cleaning process.
Carefully lower t e spindle wit records onto t e frame. Observe t e records eig t and water level ( around
25 mm t e top edge of t e bat ). Observe t e edges of bat to fit records in it. Position spindle wit toot
w eel on top of motor toot w eel. Spindle s ould neatly sit in t e two bearing support. Fig. 9.2. Wit some
cleaners you mig t need to reposition spindle positioners by using allen keys- see Fig. 1.1 &9.5.
Water level s ould be below record labels. But w en more records are submerged t e water level will rise a
little. Adjust water level accordingly by adding more water or removing it . Also try readjusting t e frame
eig t. Adjust liquid to raise 5-10 mm below record label. Wit use c eck liquid level and add some water
if need it.
Page | 13
Fig. 9.0. Holding spindle wit LPs Fig. 9.1. Lowering spindle in t e rotation position
Fig. 9.2. Spindle position in bat - side view 1 Fig. 9.3. Spindle position – side view 2
W en you are satisfied switc on rotation and ensure records rotate. T e water level s ould be below t e
black spacers or labels. If necessary retig ten records by pus ing t e clamp towards t e records.
W en you switc on t e ultrasonic power and you may notice bubbles forming inside t e bat or on t e
record surfaces. T e cleaner t e record, t e less bubbles will be seen. Do not forget t at t e main aim is
cleaning inside t e record grooves and t ese bubbles are NOT visible. You will see your records s inier
t en ever after t e cleaning process.
If t e water wets t e labels- do not worry as it will dry up wit out any damage.
Fig. 9.4. Water level below record label. Fig. 9.5. Gap between edge of bat and LPs
Page | 14
Spindle lifting and positioning in drying position: Fig.10.0.
W en t e time is nearly fins ed very slowly lift up t e spindle wit records and gently s ake it. Position
spindle wit records in tilted ole- keeping t e wetter part of t e records in t e lower position.
Less water is stuck on record surfaces if t e ultrasonic is still working w ile lifting records out of t e bat .*
Of course you can also lift records out of t e bat after ultrasonic is turned off. Drying takes about 30-40
minutes. You can s ake t e spindle.
Fig. 10.0. Lifting spindle wit LPs out of bat .
Fig. 10.1. Inserting spindle in t e stand Fig. 10.2. Spindle wit records drying in t e stand
Record wiping and storing: Fig. 11.0.
W en records are dry (c eck after 40-60 min.), position spindle back in t e vertical position on t e stand
and you are now ready to put your clean records back in t e sleeves.
Fig. 11.0. Spindle wit LPs in vertical position Fig. 11.1. Wiping LPs wit carbon brus
Page | 15
During t e cleaning process small particles of dust collect in t e bat or may ave fallen from your clot es
so w en t e records are dry you mig t see some of t ese particles on top of t e record surface.
Removing particles from t e record surface wit a carbon fibre brus is very easy due to t e lack of static
electricity.
Some ot er US cleaners dry records quicker but t is makes records statically c arged again.
Remove t e clamp by pressing t e button and wit fingers of one and old outer record edge, pus down
label and rotate record. Wit second and old brus and remove particles. Use good lig t. Fig. 11.1.
Lift up record, flip it over and repeat cleaning of t e second side. T en insert clean record into clean sleeves.
Remove all remaining records one at a time in t e same way.
Finishing cleaning:
W en not in use cover bat wit a lid. If you are not planning to use it for more t en 8 ours we suggest you
switc off t e bat .
Increasing production:
If you would like to clean more records in one session you s ould purc ase a spare spindle wit spacers and
stand. Two extra sets will allow you to clean 30 records in 60-70 minutes. You need to purc ase spare
stand wit spindle: Fig. 1.1& 1.2. To speed up drying process use slow blowing fan.
Notes:
-After you clean a few records you will get used to t e process and you will find it very easy to use.
-You may notice a fine black powder in t e water. Due to t e nature of t e cleaning process t is will not get
in t e grooves. We suggest you clean 300-400 records before replacing liquid.
- If your records are very dirty t en t e liquid will collect dirt . We suggest you clean very dirty records first
wit vacuum cleaning or clean very dirty records just before you are planning to replace water wit new.
-You mig t observe t at records will bend w en submerged in warm liquid ( over 35 deg C) but t ey will
flatten after a few revolution in bat .
-* If you ave time leave records rotating in bat after t e ultrasonic was for additional 15 minutes. In t is
way t e least particles will stay on top surface of t e record.
For 45 EP( singles) cleaning: ask for 45 adaptors to center records and fit t em as on p oto- but you mig t
need to erase liquid level in bat .
Fig 12. 45 rpm singles adaptor
Franc Kuzma
Kuzma Ltd

Popular Cleaning Equipment manuals by other brands

DIVERSITECH DrainKat MBK-6 instructions

DIVERSITECH

DIVERSITECH DrainKat MBK-6 instructions

Meiko TopCut H operating instructions

Meiko

Meiko TopCut H operating instructions

FLO-DYNAMICS BrakeMate Jr manual

FLO-DYNAMICS

FLO-DYNAMICS BrakeMate Jr manual

Kärcher 2.642 operating instructions

Kärcher

Kärcher 2.642 operating instructions

Costway OP70426 user manual

Costway

Costway OP70426 user manual

Siemens VZ103WD Instructions for use

Siemens

Siemens VZ103WD Instructions for use

Flowplant 320 Series Operation & maintenance manual

Flowplant

Flowplant 320 Series Operation & maintenance manual

COMAC INNOVA 60 B 2013 Use and maintenance manual

COMAC

COMAC INNOVA 60 B 2013 Use and maintenance manual

Becca SOLVENT SAVER instruction manual

Becca

Becca SOLVENT SAVER instruction manual

Blastrac BDC3140 instruction manual

Blastrac

Blastrac BDC3140 instruction manual

MICRO-AIR TM500 Installation and operation manual

MICRO-AIR

MICRO-AIR TM500 Installation and operation manual

Redexim Verti-Top Pulled User manual and parts book

Redexim

Redexim Verti-Top Pulled User manual and parts book

Oase SwimSkim 50 operating instructions

Oase

Oase SwimSkim 50 operating instructions

RIDGID 0095691373434 manual

RIDGID

RIDGID 0095691373434 manual

Euromate Twin Brush manual

Euromate

Euromate Twin Brush manual

BM2 BIEMMEDUE GEMINI PLUS Instructions for use and maintenance

BM2 BIEMMEDUE

BM2 BIEMMEDUE GEMINI PLUS Instructions for use and maintenance

PowerClean Liberty XT owner's manual

PowerClean

PowerClean Liberty XT owner's manual

Electric Eel D-5 Operator's manual

Electric Eel

Electric Eel D-5 Operator's manual

manuals.online logo
manuals.online logoBrands
  • About & Mission
  • Contact us
  • Privacy Policy
  • Terms and Conditions

Copyright 2025 Manuals.Online. All Rights Reserved.