Microdyn Nadir BIO-CEL BC50 User manual

ASSEMBLY INSTRUCTION
Version M_Diffusor_Tubes_V2_03e
Version M_Instruction Sample CFU_V1_00
BIO-CEL®
SET OF DIFFUSORS SPARE PART SET
BC50, BC100, BC416

MICRODYN-NADIR behält sich das Recht vor,
Angaben ohne vorherige Ankündigung anzu-
passen.
We reserve the right to change specifications
without prior notification.
MICRODYN-NADIR GmbH
Industriepark Kalle-Albert
Kasteler Straße 45
D-65203 Wiesbaden
Telefon: +49 (0) 611/962-6001
Telefax: +49 (0) 611/962-9237
E-Mail: info@microdyn-nadir.de
Internet: www.microdyn-nadir.de
M_Assembly of aerator tubes_V2_03e Page 2 of 12
Table of Contents
1. Introduction and Handling Rules for Diffusor Tubes..............................................................3
2. List of Spare Parts....................................................................................................................4
3. Work Flow.................................................................................................................................5
3.1. Disassembling of the Used Diffusor Tubes ...........................................................................5
3.2. Assembling of the New Diffusor Tubes.................................................................................8

MICRODYN-NADIR behält sich das Recht vor,
Angaben ohne vorherige Ankündigung anzu-
passen.
We reserve the right to change specifications
without prior notification.
MICRODYN-NADIR GmbH
Industriepark Kalle-Albert
Kasteler Straße 45
D-65203 Wiesbaden
Telefon: +49 (0) 611/962-6001
Telefax: +49 (0) 611/962-9237
E-Mail: info@microdyn-nadir.de
Internet: www.microdyn-nadir.de
M_Assembly of aerator tubes_V2_03e Page 3 of 12
1. Introduction and Handling Rules for Diffusor Tubes
When replacing the diffusor tubes MICRODYN-NADIR strongly recommends reading this
manual carefully and exactly following the instructions.
The diffusor tubes of the BIO-CEL®modules are developed and adjusted for the operation of the
modules. Therefore, in case of a necessary replacement of the diffusor tubes, the original diffusor
tubes supplied by MICRODYN-NADIR must be used. Other diffusor tubes may not ensure a proper
operation and can cause irreversible module damage.
Make sure that nothing can potentially cause damage to the diffusor tubes during assembly and
installation.
Please note that improper handling and installation of the diffusor tubes can cause incorrect aera-
tion of the BIO-CEL®modules, which can again lead to major damages of the whole module. In
case of any questions please contact your responsible sales engineer.
Please note our storage conditions in the BIO-CEL operation and maintenance manual. Additional-
ly the diffusors have to be protected against direct sunlight. After assembling immediately install the
membrane cassettes or cover the diffusor frame to protect against sunlight.
Module/cassette disassembling please note our assembling instruction document.
Cassette storage during the operation please note our recommendation for the preservation of
used modules (see our BIO-CEL®user manual, chapter “module maintenance”).

MICRODYN-NADIR behält sich das Recht vor,
Angaben ohne vorherige Ankündigung anzu-
passen.
We reserve the right to change specifications
without prior notification.
MICRODYN-NADIR GmbH
Industriepark Kalle-Albert
Kasteler Straße 45
D-65203 Wiesbaden
Telefon: +49 (0) 611/962-6001
Telefax: +49 (0) 611/962-9237
E-Mail: info@microdyn-nadir.de
Internet: www.microdyn-nadir.de
M_Assembly of aerator tubes_V2_03e Page 4 of 12
2. List of Spare Parts
Table 1 shows a comprehensive list of material needed for the exchange of the aerator tubes. Please
make sure that all of the required parts are present and in flawless condition prior to the beginning of
the assembly.
No.
Picture
BIO-CEL®
module
BC50
Pcs.
BC100
Pcs.
BC416
Pcs.
(1)
Diffusor tube
Length (L)
4
L = 645 mm
4
L = 1225 mm
7
L = 1225 mm
(2)
Connector for
diffusor tube
Ltotal = 127
mm
¾“ external
thread
4
4
7
(3)
Blind cap incl.
flat seal
4
4
7
(4)
Flat seal
4
4
7
(5)
Washer A 8,4
(from screw
set)
2
2
3
(6)
Hex nut
M10x25
Tuflok
(from screw
set)
2
2
3
(7)
Torque
wrench with
special socket
wrench
1
1
1

MICRODYN-NADIR behält sich das Recht vor,
Angaben ohne vorherige Ankündigung anzu-
passen.
We reserve the right to change specifications
without prior notification.
MICRODYN-NADIR GmbH
Industriepark Kalle-Albert
Kasteler Straße 45
D-65203 Wiesbaden
Telefon: +49 (0) 611/962-6001
Telefax: +49 (0) 611/962-9237
E-Mail: info@microdyn-nadir.de
Internet: www.microdyn-nadir.de
M_Assembly of aerator tubes_V2_03e Page 5 of 12
3. Work Flow
3.1. Disassembling of the Used Diffusor Tubes
Remove the cassettes from the frame (see Module assembly instruction) and turn the base frame on
its head end so that the feet are on the top.
Open the screws which fix the counter parts
of the diffusor tubes (tool size: 17).
Remove the screws from the
counterpart

MICRODYN-NADIR behält sich das Recht vor,
Angaben ohne vorherige Ankündigung anzu-
passen.
We reserve the right to change specifications
without prior notification.
MICRODYN-NADIR GmbH
Industriepark Kalle-Albert
Kasteler Straße 45
D-65203 Wiesbaden
Telefon: +49 (0) 611/962-6001
Telefax: +49 (0) 611/962-9237
E-Mail: info@microdyn-nadir.de
Internet: www.microdyn-nadir.de
M_Assembly of aerator tubes_V2_03e Page 6 of 12
Disassemble the counterpart with the end caps from the diffusor tubes.
Turn the frame on the rear end
Disassemble the blind cap with the special socket wrench. If there are round shaped blind caps (older sys-
tems) use a pipe wrench to remove it.
Remove the double threaded connector with the blind plug from the opposite side of the distributor

MICRODYN-NADIR behält sich das Recht vor,
Angaben ohne vorherige Ankündigung anzu-
passen.
We reserve the right to change specifications
without prior notification.
MICRODYN-NADIR GmbH
Industriepark Kalle-Albert
Kasteler Straße 45
D-65203 Wiesbaden
Telefon: +49 (0) 611/962-6001
Telefax: +49 (0) 611/962-9237
E-Mail: info@microdyn-nadir.de
Internet: www.microdyn-nadir.de
M_Assembly of aerator tubes_V2_03e Page 7 of 12
pipe.

MICRODYN-NADIR behält sich das Recht vor,
Angaben ohne vorherige Ankündigung anzu-
passen.
We reserve the right to change specifications
without prior notification.
MICRODYN-NADIR GmbH
Industriepark Kalle-Albert
Kasteler Straße 45
D-65203 Wiesbaden
Telefon: +49 (0) 611/962-6001
Telefax: +49 (0) 611/962-9237
E-Mail: info@microdyn-nadir.de
Internet: www.microdyn-nadir.de
M_Assembly of aerator tubes_V2_03e Page 8 of 12
3.2. Assembling of the New Diffusor Tubes
Check that the flat seal is on the blind plug (this
was already prepared for you during packing)
Adjust the flat seal on the diffusor tube
Screw the double threaded connector into
the diffusor tube
Before mounting the diffusor to the rectangular distributor pipe, please make sure that the surface of
the distributor pipe is absolutely even and free from caves or dents.
Before mounting the diffusor tubes please make sure that the surface and inside of the distributor pipe
is free of sludge and debris like stones, wood pieces, dust or chips.
flat seal: rough
side to the out-
side

MICRODYN-NADIR behält sich das Recht vor,
Angaben ohne vorherige Ankündigung anzu-
passen.
We reserve the right to change specifications
without prior notification.
MICRODYN-NADIR GmbH
Industriepark Kalle-Albert
Kasteler Straße 45
D-65203 Wiesbaden
Telefon: +49 (0) 611/962-6001
Telefax: +49 (0) 611/962-9237
E-Mail: info@microdyn-nadir.de
Internet: www.microdyn-nadir.de
M_Assembly of aerator tubes_V2_03e Page 9 of 12
Mount the diffusor tube into the bore hole from below. Make sure the diffusor is correctly plugged in
the bore hole and the sealing is pressed against the rectangular steel pipe.
In doing so, please hold the diffusor tube only at its very end.
Upon screwing do not grab around the perforated area of the diffusor
tube.
When screwing please hold only at the overlapping.
Insert the double threaded connector into the
opening on the opposite side of the distributor
pipe.
Screw the double threaded connector with the
blind cap hand-tight.
Make sure that you have added the flat seal

MICRODYN-NADIR behält sich das Recht vor,
Angaben ohne vorherige Ankündigung anzu-
passen.
We reserve the right to change specifications
without prior notification.
MICRODYN-NADIR GmbH
Industriepark Kalle-Albert
Kasteler Straße 45
D-65203 Wiesbaden
Telefon: +49 (0) 611/962-6001
Telefax: +49 (0) 611/962-9237
E-Mail: info@microdyn-nadir.de
Internet: www.microdyn-nadir.de
M_Assembly of aerator tubes_V2_03e Page 10 of 12
Adjust the diffusor tube in a way that the holes are at 6 & 12 o’clock before tightening with the torque
wrench.
Tighten at 30 Nm by means of a torque wrench.
Use the special socket wrench to assemble
the blind cap of the diffusor tube. Make sure
the diffusor tube did not turn and the holes are
still on the right position (6 & 12 o’clock).
Make sure that the flat seal is correctly adjusted
as illustrated below and that the flat seal is not
squeezing out
30 Nm

MICRODYN-NADIR behält sich das Recht vor,
Angaben ohne vorherige Ankündigung anzu-
passen.
We reserve the right to change specifications
without prior notification.
MICRODYN-NADIR GmbH
Industriepark Kalle-Albert
Kasteler Straße 45
D-65203 Wiesbaden
Telefon: +49 (0) 611/962-6001
Telefax: +49 (0) 611/962-9237
E-Mail: info@microdyn-nadir.de
Internet: www.microdyn-nadir.de
M_Assembly of aerator tubes_V2_03e Page 11 of 12
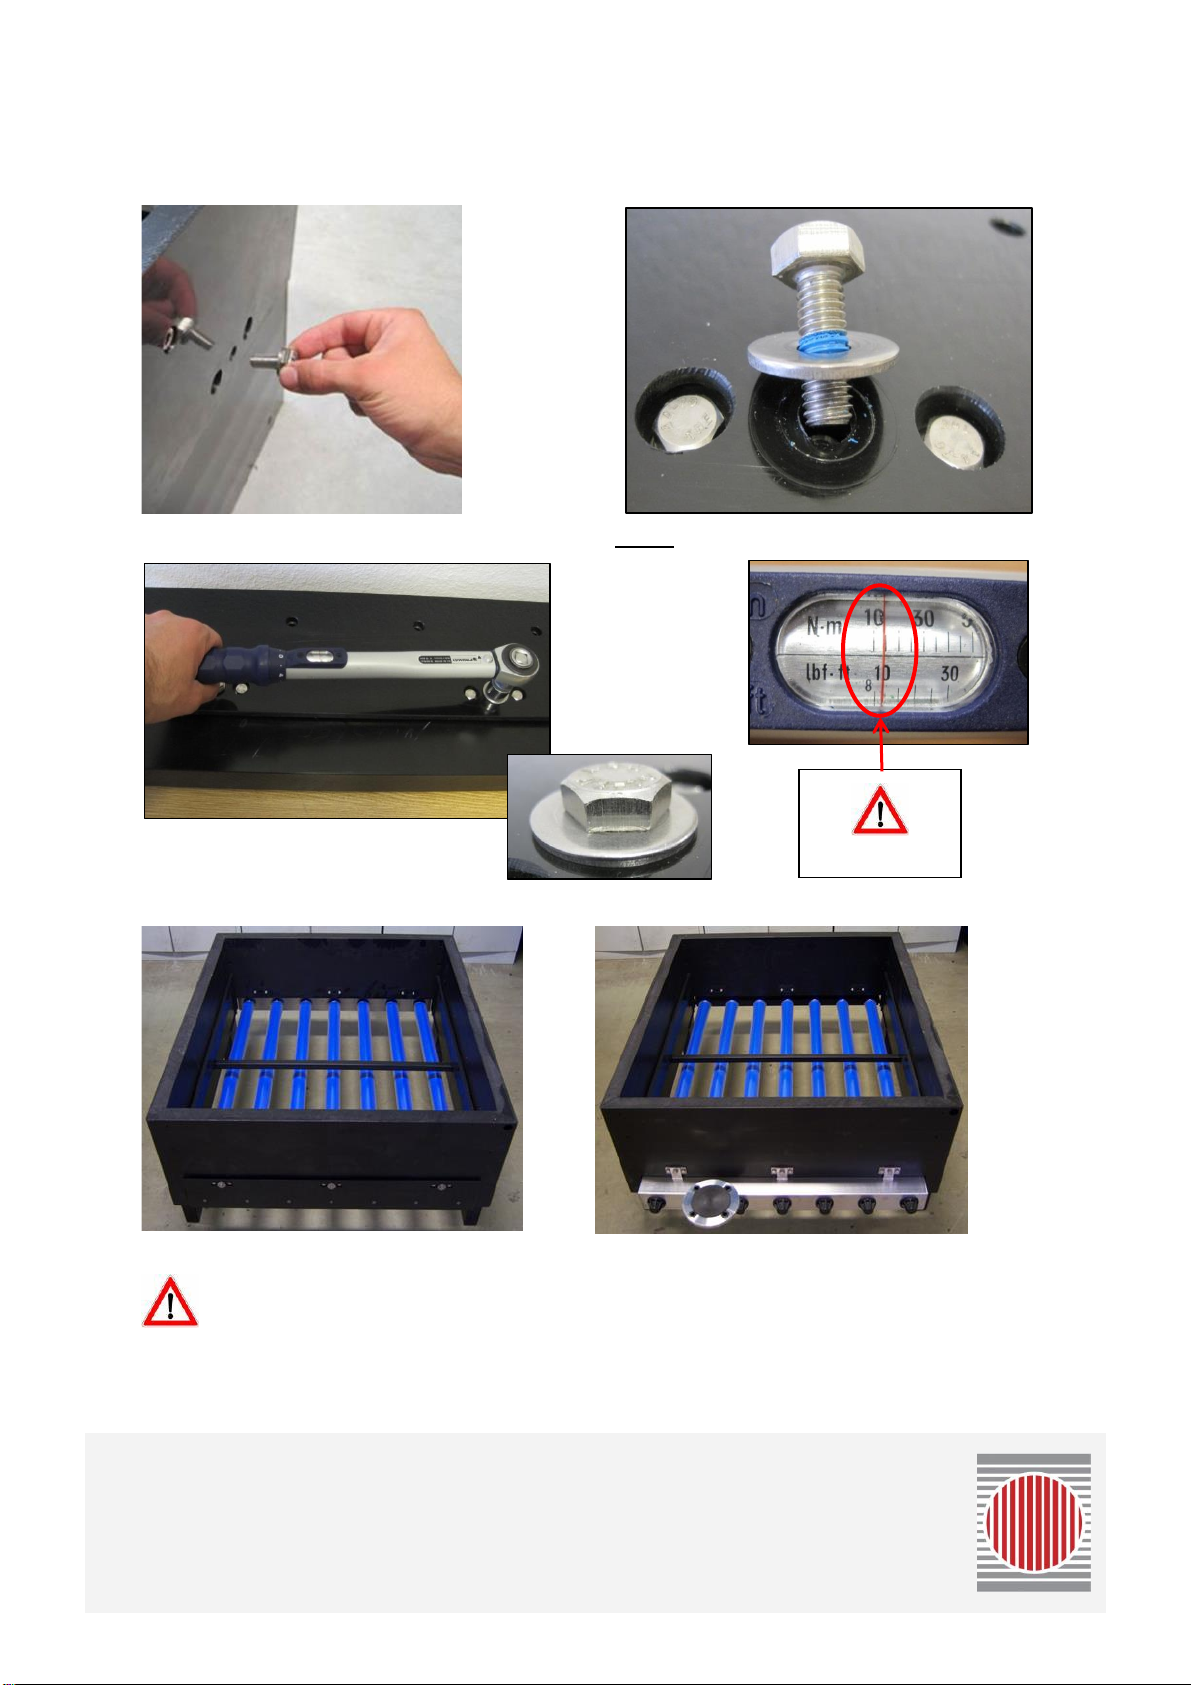
Insert the counterpart with the end caps into the diffusor tubes.
Implement the self-locking screws with flat washers.
Do only use the new Hex nut M10 X 25 Tuflok, which is a part of the delivered spare parts.
Don`t use the old one!
MICRODYN-NADIR behält sich das Recht vor,
Angaben ohne vorherige Ankündigung anzu-
passen.
We reserve the right to change specifications
without prior notification.
MICRODYN-NADIR GmbH
Industriepark Kalle-Albert
Kasteler Straße 45
D-65203 Wiesbaden
Telefon: +49 (0) 611/962-6001
Telefax: +49 (0) 611/962-9237
E-Mail: info@microdyn-nadir.de
Internet: www.microdyn-nadir.de
M_Assembly of aerator tubes_V2_03e Page 12 of 12
Insert the screws into the respective bore holes and screw them hand-tight into the threads of the
holding plate.
Fasten the screws by means of a torque wrench with 15 Nm (tool size: 17).
Put the base frame back on its feet.
Now the base frame is ready to reinstall the cassettes again.
The diffusors have to be protected against direct sunlight. After assembling immediately install
the membrane cassettes or cover the diffusor frame to protect against sunlight.
15 Nm
This manual suits for next models
2
Table of contents
Other Microdyn Nadir Cleaning Equipment manuals


