Degritter Automatic Record CleaningMachine User manual

USER GUIDE
for the automatic
record cleaning
machine.
USER GUIDE VERSION 2.1-ENG

Machine overview
Contents of the package
Physical and electrical specifications
Machine front panel
Machine rear panel
Buttons and screen
Removable water tank
6
6
7
7
8
9
Getting started
Select proper AC voltage
Place on level surface
Turn Degritter on
Put water into the tank
Insert the record into the machine
Press start
10
10
11
11
11
11
Software updates
Copy software onto the SD card
Insert the SD card
Wait for the upgrade to finish
Remove the card
Check the software version
22
22
23
23
23
Warranty
Limited Warranty Disclaimer
DISCLAIMER
32
33
Turning on/off
AC on-off switch
Powering on
Soft shutdown and startup
Timed shutdown
Long term storage
12
12
13
13
13
Using the machine
Menu navigation
Adjusting drying time
Running programs
Washing programs
Cooling water
Drying
Degas
Fan power
Water level
Info
14
15
16
16
17
17
17
18
18
19
Warning
Read before use 2
Water, Fluid, Filter
Use distilled water
Adding cleaning fluid
Maintaining the filter
20
20
21
Cleaning effect
Ultrasonic cleaning
The principle
Cleaning records
4
5
5
Troubleshooting
Troubleshooting guide
Error codes
Frequently Asked Questions
24
26
30

Make sure that you have selected the correct AC voltage range on the back of the machine before
plugging it into your wall outlet. Failing to do so will cause serious harm to the machine.
The machine must be properly grounded. Failing to do so can result in serious electric shock or death.
Do not stick metallic objects into the machine from any of its openings, eg. ventilation slots on its
sides. Doing so may result in serious electric shock or death.
The machine must be placed on a level surface before operating. Failing to do so can cause a spill and
damage the machine.
When washing the removable water tank in a dishwasher, do not exceed 60 °C or 140 °F.
It is not recommended to wash the tank together with foodware.
Do not cover the vertical ventilation slots on the sides of the machine. Free airflow is needed to
guarantee proper functioning of the machine.
Do not operate the machine in a tight closed environment such as a cupboard or a closet.
WARNING
Read before use
2 Warning
3 Warning

Cleaning
effect
1) ULTRASONIC CLEANING
3) CLEANING RECORDS
CLEANING EFFECT
Ultrasonic cleaning as used in Degritter removes contaminants
from records layer by layer. The cleaning occurs equally strongly on
the top of the groove and in the groove.
However, when records are covered with a thick layer of gunk, it
can take ultrasonic cleaning some time before the deepest dirt is
reached. We therefore recommend to first wipe heavy surface dirt
away with a microfibre cloth. This will speed up the cleaning
process and will give better results faster.
4 Cleaning effect
5 Cleaning effect
Ultrasonic cleaning has a unique ability to remove dirt that is not easily
accessible using other traditional means. Ultrasonic cleaners are used to
clean many different types of objects, including jewelry, optical parts,
dental and surgical instruments and electronic equipment.
The smallest features in a vinyl record groove are the size of a few micro-
meters. The bristles on a typical vinyl cleaning brush are unable to reach
the bottom of the groove as they are too large in size.
CAVITATIONAL BUBBLE GROWING PHASE BUBBLE IMPLOSION
WITH WATER JET
2) THE PRINCIPLE
Ultrasonic cleaning works by agitating the cleaning medium with high
frequency acoustic pressure waves. This creates a large number of
microscopic vacuum bubbles in the cleaning medium, a phenomenon
called cavitation. With every pressure wave, countless small vacuum
bubbles are created and collapsed, releasing heat and water jets towards
the record. This action will safely loosen and remove dirt and contami-
nants from the record.
60 μm
56 μm
5 μm
2.5 μm
ULTRASONIC CAVITATION
BUBBLE SIZE
VINYL RECORD
GROOVE WIDTH
BRISTLE WIDTH OF
A CARBON FIBER
BRUSH
Wiping the record with a microfiber cloth imbursed in a record
cleaning fluid or isopropyl alcohol will speed up the cleaning
process when cleaning very dirty records.
Ultrasonic cleaning
The principle
Cleaning records

Machine
overview
2) PHYSICAL AND ELECTRICAL SPECIFICATIONS
Weight: 8.7 kg or 19.2 lb
Dimensions: 37 × 28 × 21 cm or 14.6 x 11 x 8.3 in
Suggested ambient operating temperature: 10-28 °C or 50-83 °F
Water tank capacity: 1.3 L or 0.35 gal
Power input: AC 100-240 V, 4 A, 50/60 Hz
Power usage: ~ 320 W at full power, ~2 W in sleep mode
Fuse: 4 A, slow, 20 x 5 mm, DIN 41.660
Noise level: 70 db
Ultrasonic cleaning frequency: 120 kHz with fine-band frequency sweep
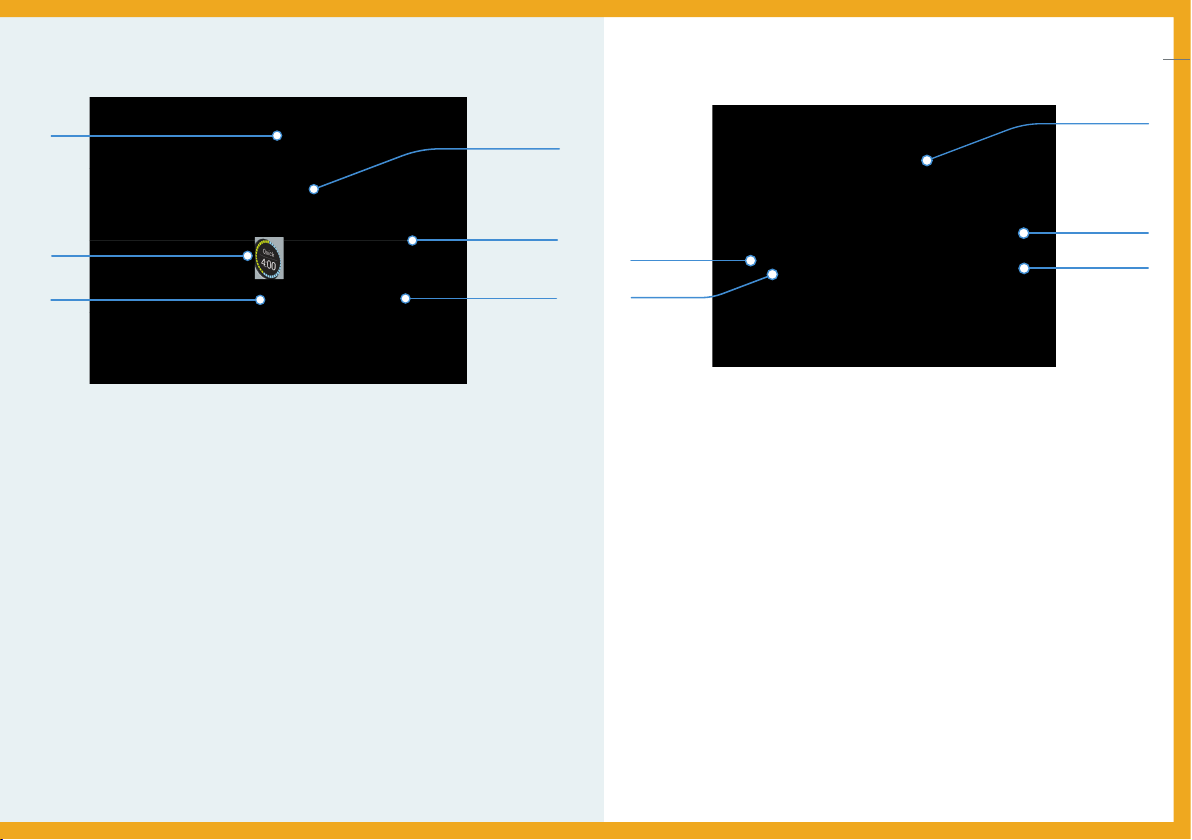
3) MACHINE FRONT & SIDE PANELS 4) MACHINE REAR PANEL
MACHINE OVERVIEW
Degritter is operated with two multifunctional buttons and a screen on the
front panel. Records are inserted into the slot on top of the machine. The
water tank is accessible from the top of the machine. There are vertical
ventilation openings on both side panels.
The circular cap in the lower half of the right side panel is the access port
to the water filter.
On the right side of the rear panel are the AC cable input and the AC
on-off switch. The AC cable input socket contains the fuse drawer.
On the left side are the AC select slide-switch and the SD card input
slot.
RECORD SLOT
VENTILATION SLOTS
FILTER ACCESS
BUTTONS
SCREEN
WATER TANK
WATER TANK
AC SWITCH
AC INPUT & FUSE
AC SELECT
SD CARD SLOT
1) CONTENTS OF
THE PACKAGE
Degritter machine
Removable water tank with lid
AC power cable
100 ml cleaning fluid
Fluid dosing pipette
Water level measurement strip
6 Machine overview
7 Machine overview
Machine
overview
2) PHYSICAL AND ELECTRICAL SPECIFICATIONS
Weight: 8.7 kg or 19.2 lb
Dimensions: 37 × 28 × 21 cm or 14.6 x 11 x 8.3 in
Suggested ambient operating temperature: 10-28 °C or 50-83 °F
Water tank capacity: 1.3 L or 0.35 gal
Power input: AC 100-240 V, 4 A, 50/60 Hz
Power usage: ~ 320 W at full power, ~2 W in sleep mode
Fuse: 4 A, slow, 20 x 5 mm, DIN 41.660
Noise level: 70 db
Ultrasonic cleaning frequency: 120 kHz with fine-band frequency sweep
3) MACHINE FRONT & SIDE PANELS 4) MACHINE REAR PANEL
MACHINE OVERVIEW
Degritter is operated with two multifunctional buttons and a screen on the
front panel. Records are inserted into the slot on top of the machine. The
water tank is accessible from the top of the machine. There are vertical
ventilation openings on both side panels.
The circular cap in the lower half of the right side panel is the access port
to the water filter.
On the right side of the rear panel are the AC cable input and the AC
on-off switch. The AC cable input socket contains the fuse drawer.
On the left side are the AC select slide-switch and the SD card input
slot.
RECORD SLOT
VENTILATION SLOTS
FILTER ACCESS
BUTTONS
SCREEN
WATER TANK
WATER TANK
AC SWITCH
AC INPUT & FUSE
AC SELECT
SD CARD SLOT
1) CONTENTS OF
THE PACKAGE
Degritter machine
Removable water tank with lid
AC power cable
100 ml cleaning fluid
Fluid dosing pipette
Water level measurement strip
6 Machine overview
7 Machine overview

5) BUTTONS AND SCREEN
Degritter is operated with two buttons on its front panel.
They are multifunctional and can both be pushed and rotated.
6) REMOVABLE WATER TANK
The removable water tank is located at the back of the machine. There are two markings on the outside of the tank, “Min” and “Max”. When
filling the tank, the “Max” lable can be ignored and it is recommended to fill the tank with as much water as one feels comfortable carrying.
The tank is ethanol proof and can be washed in a dishwasher at max 60 °C or 140 °F.
It is not recommended to wash the tank together with foodware in a dishwasher.
8 Machine overview
9 Machine overview
Quick
4:00
SELECTED PROGRAM
PUSH TO STOP
PUSH TO START/PAUSE
ROTATE TO ALTER
DRYING TIME
ROTATE TO
NAVIGATE MENU
TOTAL PROGRAM TIME
WASHING TIME RATIO
PROGRESS BAR
DRYING TIME PROGRAM
DRYING TIME RATIO

Getting
started
Select proper AC voltage
Place on level surface
Turn Degritter on
Put water into the tank
Insert the record into the machine
Press start
1) SELECT PROPER AC VOLTAGE
2) PLACE ON LEVEL SURFACE
3) TURN DEGRITTER ON
GETTING STARTED
Degritter must be placed on a level surface for it to function properly.
Plug one end of the power cable into the machine and the other end
into your wall output. Turn on the machine from the AC switch at the back.
5) INSERT THE RECORD INTO THE MACHINE
Insert the 12” record into the machine as shown.
6) PRESS START
Start the quick washing program by pressing the button on the right.
Washing progress is tracked by the countdown timers on the screen.
You will be alerted with three beeps when the program finishes.
4) PUT WATER INTO THE TANK
Fill the water tank with distilled water to a level exceeding the “Min”
marking. It is recommended to fill it past the "Max" marking.
Make sure that the slide switch is in the position indicating your wall
output voltage, either 230 V or 115 V. Use the tip of a pen to slide the switch.
Quick
4:00
PROGRAM
DRYING TIME
10 Getting started
11 Getting started
An incorrect AC setting will damage the product and is not covered
by the product warranty.

4) TIMED SHUTDOWN
Degritter shuts down automatically when left idle for 15 minutes.
Press any front panel button to start the machine up again.
5) LONG TERM STORAGE
When storing Degritter for a long time, do the following:
Turning
on/off
AC on-off switch
Powering on
Soft shutdown and startup
Timed shutdown
Long term storage
TURNING ON/OFF
1) AC ON-OFF SWITCH
2) POWERING ON
The black switch on the back
panel turns off all power to
the machine. This is the best
option if you are not planning
to use Degritter for a long
time or for transportation.
When the external tank is empty, a "No Water" warning will be displayed.
Once the tank is filled, press any front panel button to resume.
After turning the machine on from the AC
switch you’ll first see a welcome text on
the screen. After this, the machine will
prime its pumps.
3) SOFT SHUTDOWN AND STARTUP
For a soft shutdown, hold down the left button for 2 seconds.
This is the recommended method for turning off Degritter. It cuts
all power to the machine except for a small current to the processor
and its power supply.
Press any button to start the machine again.
You will be prompted with a welcoming screen.
Remove the water tank and pour away its contents;
Insert the tank back into the machine;
Turn Degritter off from the AC power switch;
Remove the cord from power socket.
Unscrew and remove water filter cap.
Welcome
Priming
Goodbye
PROGRAM
DRYING TIME
Welcome
PROGRAM
DRYING TIME
13 Turning on/off
12 Turning on/off

Using the
machine
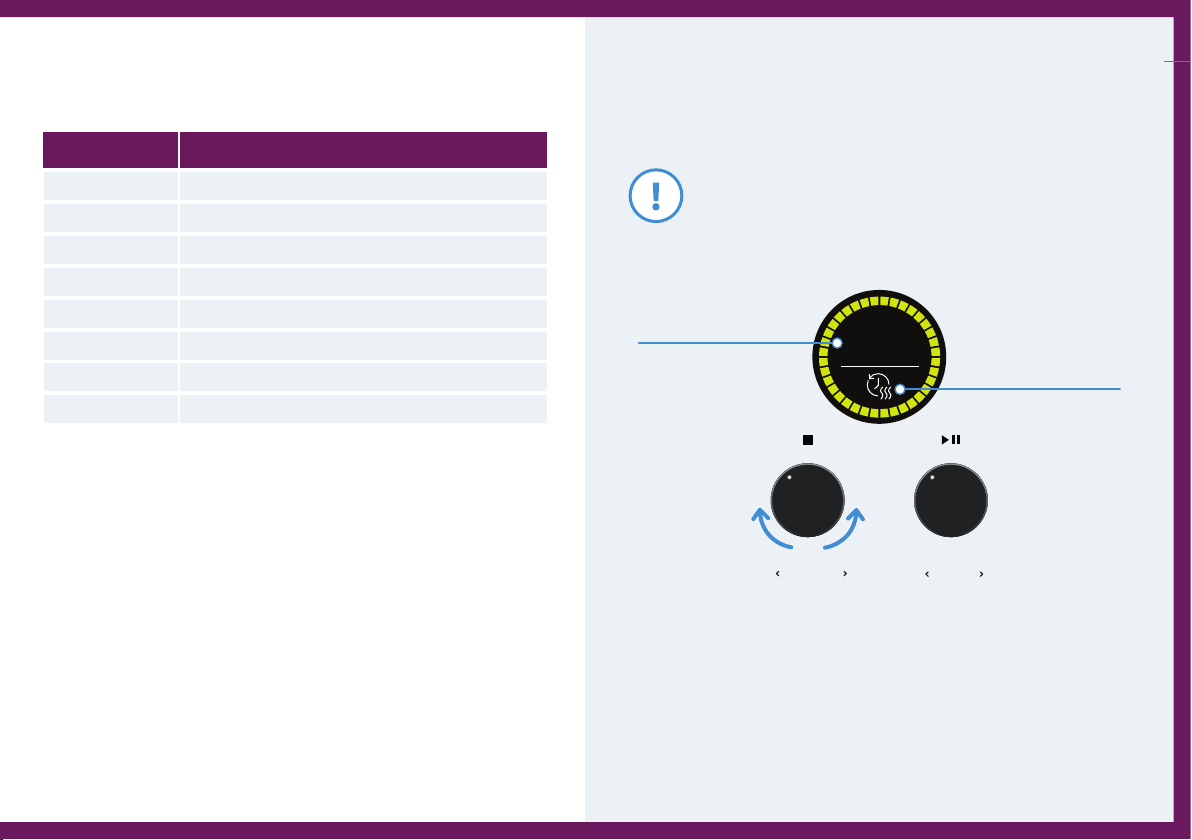
1) MENU NAVIGATION
2) ADJUSTING DRYING TIME
USING THE MACHINE
You can run record cleaning programs without the drying
cycle. To do so, you can set the drying time to zero.
Menu navigation
Adjusting drying time
Running programs
Washing programs
Quick
Medium
Heavy
Cooling water
Dry
Degas
Fan power
Water level
Info
The Degritter menu will appear when the right button is turned. Turn the
button to move between menu items. The machine will automatically
enter the highlighted menu item in 1 second or you can push the right
button to enter it promptly.
14 Using the machine
15 Using the machine
MENU ITEM DESCRIPTION
Quick
Medium
Heavy
Quick program for record cleaning
Medium program for record cleaning
Heavy program for record cleaning
Dry
Degas
Fan power
Program for drying the record without wash
Program for removing gas from new water
Fan power setting configuration
Water level
Info
Water level setting configuration
Information section about the machine
SELECTED MENU ITEM
LOCATION IN MENU
PROGRAM
DRYING TIME
Turn the left button to change drying time for all programs. Turn it left to
make the drying time shorter and turn it right to make the drying time
longer. Drying time will change the overall length of the program, but you
cannot change the washing cycle's length with it.
You can also adjust drying time during a cleaning program when the
record is being dried.
3:00
SELECTED DRYING TIME
DRYING TIME
ADJUSTMENT ICON
PROGRAM
DRYING TIME
Using the
machine
1) MENU NAVIGATION
2) ADJUSTING DRYING TIME
USING THE MACHINE
You can run record cleaning programs without the drying
cycle. To do so, you can set the drying time to zero.
Menu navigation
Adjusting drying time
Running programs
Washing programs
Quick
Medium
Heavy
Cooling water
Dry
Degas
Fan power
Water level
Info
The Degritter menu will appear when the right button is turned. Turn the
button to move between menu items. The machine will automatically
enter the highlighted menu item in 1 second or you can push the right
button to enter it promptly.
14 Using the machine
15 Using the machine
MENU ITEM DESCRIPTION
Quick
Medium
Heavy
Quick program for record cleaning
Medium program for record cleaning
Heavy program for record cleaning
Dry
Degas
Fan power
Program for drying the record without wash
Program for removing gas from new water
Fan power setting configuration
Water level
Info
Water level setting configuration
Information section about the machine
SELECTED MENU ITEM
LOCATION IN MENU
PROGRAM
DRYING TIME
Turn the left button to change drying time for all programs. Turn it left to
make the drying time shorter and turn it right to make the drying time
longer. Drying time will change the overall length of the program, but you
cannot change the washing cycle's length with it.
You can also adjust drying time during a cleaning program when the
record is being dried.
3:00
SELECTED DRYING TIME
DRYING TIME
ADJUSTMENT ICON
PROGRAM
DRYING TIME

3) RUNNING PROGRAMS
10) DEGAS
The degas program gets rid of excessive gas in your distilled water.
This improves the ultrasonic cleaning process.
16 Using the machine
17 Using the machine
PROGRAM NAME WASHING DURATION
Quick
Medium
Heavy
2 minutes 15 seconds
3 minutes 45 seconds
6 minutes 45 seconds
Quick
Medium
Heavy
Quick
4:00
PROGRAM
DRYING TIME
Select the desired program by rotating the button on the right. To
start the selected program, press the button on the right. You can
stop the program by pressing the button on the left or pause the
program by pressing the button on the right. You will be notified
with three audible beeps when the program has finished.
4) WASHING PROGRAMS
Degritter has three washing programs with fixed pre-defined washing
cycle lengths. The program washing durations above do not include
drying time that can be configured as needed.
5) QUICK
Quick program is suitable for mostly clean records that need rinsing or have
light dust on them.
6) MEDIUM
Medium program runs a thorough cleaning cycle that will clean most of
the records. This program is normally recommended.
7) HEAVY
Use the heavy program when the quick or medium programs have not
been sufficient to clean the record. Heavy program features an extra long
cleaning period.
Washing programs move the record back and forth.
This is normal and helps with the cleaning process.
9) DRY
The Dry program allows you to run the drying mode separately, without
a washing cycle. Increase or decrease the drying time by rotating the
button on the left.
You can also adjust drying time during a program when the record is
being dried.
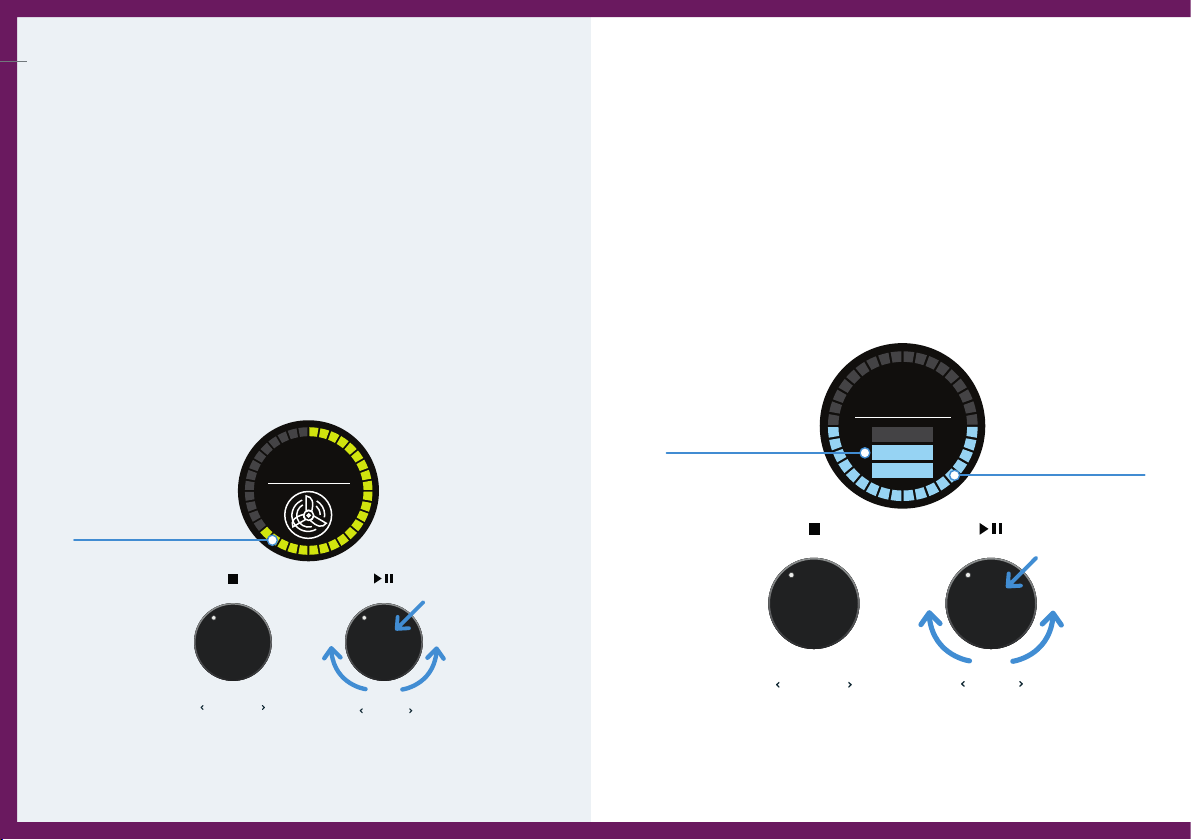
8) COOLING WATER
Energy emitted during ultrasonic cleaning will slowly increase the
cleaning water temperature. Excess heat is mitigated automatically to
protect records by adding 3 minutes of cooling to the washing time when
over-temperature is sensed (35 °C or 95 °F). The ultrasonic generator
stops working for this time and air is forced through the machine.
2:29
PROGRAM REMAINING TIME
PROGRESS BAR
WATER COOLING INDICATOR
CURRENT OPERATION
PROGRAM
DRYING TIME
It is recommended to run Degas program with every new tank of
distilled water before adding cleaning fluid.
Water cooling cycles can lengthen the washing program, but they will
not increase the total ultrasonic cleaning time that the record is
exposed to.

3) RUNNING PROGRAMS
10) DEGAS
The degas program gets rid of excessive gas in your distilled water.
This improves the ultrasonic cleaning process.
16 Using the machine
17 Using the machine
PROGRAM NAME WASHING DURATION
Quick
Medium
Heavy
2 minutes 15 seconds
3 minutes 45 seconds
6 minutes 45 seconds
Medium
Heavy
Quick
4:00
PROGRAM
DRYING TIME
Select the desired program by rotating the button on the right. To
start the selected program, press the button on the right. You can
stop the program by pressing the button on the left or pause the
program by pressing the button on the right. You will be notified
with three audible beeps when the program has finished.
4) WASHING PROGRAMS
Degritter has three washing programs with fixed pre-defined washing
cycle lengths. The program washing durations above do not include
drying time that can be configured as needed.
5) QUICK
Quick program is suitable for mostly clean records that need rinsing or have
light dust on them.
6) MEDIUM
Medium program runs a thorough cleaning cycle that will clean most of
the records. This program is normally recommended.
7) HEAVY
Use the heavy program when the quick or medium programs have not
been sufficient to clean the record. Heavy program features an extra long
cleaning period.
Washing programs move the record back and forth.
This is normal and helps with the cleaning process.
9) DRY
The Dry program allows you to run the drying mode separately, without
a washing cycle. Increase or decrease the drying time by rotating the
button on the left.
You can also adjust drying time during a program when the record is
being dried.
8) COOLING WATER
Energy emitted during ultrasonic cleaning will slowly increase the
cleaning water temperature. Excess heat is mitigated automatically to
protect records by adding 3 minutes of cooling to the washing time when
over-temperature is sensed (35 °C or 95 °F). The ultrasonic generator
stops working for this time and air is forced through the machine.
2:29
PROGRAM REMAINING TIME
PROGRESS BAR
WATER COOLING INDICATOR
CURRENT OPERATION
PROGRAM
DRYING TIME
It is recommended to run Degas program with every new tank of
distilled water before adding cleaning fluid.
Water cooling cycles can lengthen the washing program, but they will
not increase the total ultrasonic cleaning time that the record is
exposed to.
FOL D
LOW
MEDIUM
HIGH
11) FAN POWER
The fan power setting allows you to adjust the the drying fan
speed. Adjust fan power by pressing the button on the right, this
starts the fans. Now rotate the button on the left to adjust fan
power. Press on the button on the right again to save your desired
fan power value.
Less power means less audible noise, but also dictates a longer
drying time setting and vice versa.
12) WATER LEVEL
13) INFO
The water level setting allows you to change the water level in the
ultrasonic tank. Press on the button on the right to activate selection.
Rotate the button to choose between the three water level settings.
When cleaning 12" records it is recommended to start with Low
setting.
Info
Serial: d962ff11
Version: 2.1.7v8
Runs: 285
Temp: 24C 23C
18 Using the machine
19 Using the machine
WATER LEVEL
Low
Medium
High
DESCRIPTION
Recommended initial setting. Furthest from the label.
For 12" records with short lead out groove.
The closest to record label. For 7" records with adapter.
Degritter comes packaged with a color coded measurement strip. With it you
can measure the distance from the edge of your record to the desired water
level setting.
INFO ITEMS
Serial
Version
Runs
Temp
DESCRIPTION
The machine’s unique serial number
The current software version
on the machine
How many washing cycles the
machine has gone through
The temperature in the ultrasonic tank
PROGRAM
DRYING TIME
Fan power
PROGRAM
DRYING TIME
CURRENT FAN SPEED
Water level
MEDIUM
PROGRAM
DRYING TIME
CURRENT WATER LEVEL
WATER LEVEL INDICATION
HIGH
MEDIUM
LOW
Table of contents


