RIDGID POWER SPIN+ User manual

POWER SPIN+™
Drain Cleaner Operator’s Manual
99 Washington Street
Melrose, MA 02176
Phone 781-665-1400
Toll Free 1-800-517-8431
Visit us at www.TestEquipmentDepot.com

ii
POWER SPIN+™ Drain Cleaner
Table of Contents
Safety Symbols.....................................................................................................ii
Specific Safety Information
Drain Cleaner Safety .........................................................................................1
RIDGID Contact Information ...............................................................................1
Description ...........................................................................................................1
Specifications.......................................................................................................2
Pre- peration Inspection ....................................................................................2
Machine and Work Area Set-Up...........................................................................3
perating Instructions.........................................................................................4
Storage..................................................................................................................5
Maintenance Instructions....................................................................................5
Cleaning.............................................................................................................5
Installing Replacement Cable ............................................................................5
Troubleshooting..................................................................................................6
Lifetime Warranty.................................................................................Back Cover
Safety Symbols
In this operator’s manual and on the product, safety symbols and signal words are used to
communicate important safety information. This section is provided to improve under-
standing of these signal words and symbols.
This is the safety alert symbol. It is used to alert you to potential personal injury hazards. Obey
all safety messages that follow this symbol to avoid possible injury or death.
DAN ER indicates a hazardous situation which, if not avoided, will result in death or
serious injury.
WARNIN indicates a hazardous situation which, if not avoided, could result in
death or serious injury.
CAUTION indicates a hazardous situation which, if not avoided, could result in minor
or moderate injury.
NOTICE indicates information that relates to the protection of property.
This symbol means read the operator’s manual carefully before using the equipment. The op-
erator’s manual contains important information on the safe and proper operation of the equip-
ment.
This symbol means always wear safety glasses with side shields or goggles when handling
or using this equipment to reduce the risk of eye injury.
This symbol indicates th risk of hands, fingers or other body parts being caught, wrapped or
crushed in the drain cleaning cable.
NOTICE
DANGER
WARNING
CAUTION
This symbol means always wear leather work gloves when handling or using this equipment
to reduce the risk of infections, burns or other serious personal injury.

1
POWER SPIN+™ Drain Cleaner
•Do not wear loose clothing or jewelry.
Keep your hair and clothing away from
moving parts. Loose clothing, jewelry or
hair can be caught in moving parts.
•Do not operate this machine if operator
or machine is standing in water. Oper -
ating machine while in water increases the
risk of electrical shock.
•nly use drain cleaner to clean drains
of recommended sizes according to
these instructions. Other uses or modify-
ing the drain cleaning machine for other
applications may increase the risk of injury.
•Read and understand these instruc-
tions, the battery drill instructions and
the instructions for any other equip-
ment used with this tool before operat-
ing. Failure to follow all instructions may re-
sult in property damage and/or serious in-
jury.
The EC Declaration of conformity (890-011-
320.10) will accompany this manual as a sep-
arate booklet when required.
Description
The RID ID®POWER SPIN+™ Drain Cleaner
is used to clean drain lines such as bathroom
and kitchen sinks, bathtub and shower drains.
It features RID ID MAXCORE®Cable that is
positively retained in the drum to prevent cable
pullout. It is equipped with the AUTOFEED®
mechanism that advances and retrieves the
cable with just the pull of a trigger while the
drum is rotating. The POWER SPIN+Drain
Cleaner can be operated either manually or
driven with a battery powered drill.
The POWER SPIN+is not recommended for
use with toilets.
Specific Safety
Information
WARNING
This section contains important safety
information that is specific to this tool.
Read these precautions carefully before
usin the POWER SPIN+™™Drain
Cleaner to reduce the risk of electrical
shock or other serious personal injury.
SAVE ALL WARNINGS
AND INSTRUCTIONS FOR
FUTURE REFERENCE!
Keep this manual with machine for use by
the operator.
Drain Cleaner Safety
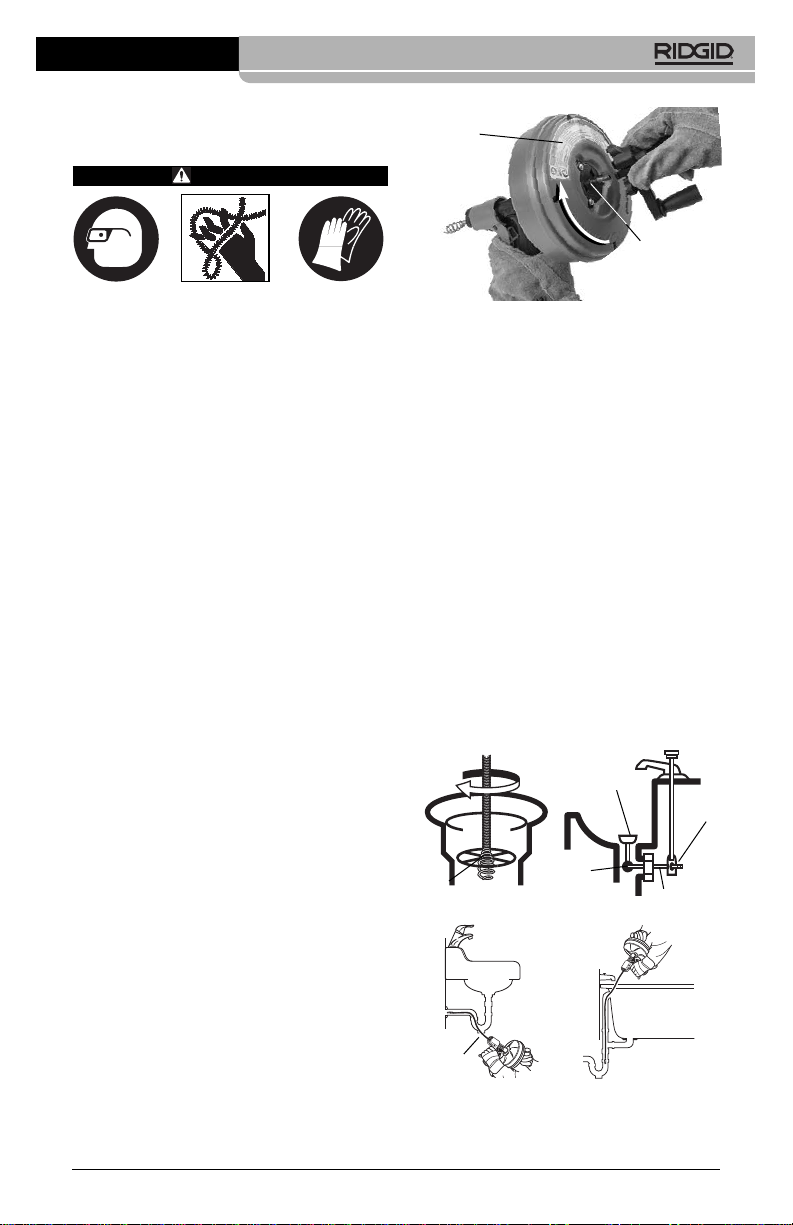
•Always use safety glasses and leather
work gloves in good condition while
handling or using. Use latex or rubber
gloves, face shields, protective clothing,
respirators or other appropriate protective
equipment when chemicals, bacteria or
other toxic or infectious substances are
suspected to be present to reduce the risk
of infections, burns or other serious per-
sonal injury. Wear latex gloves or rubber
gloves under leather gloves.
•Practice good hygiene. Use hot, soapy
water to wash hands and other body parts
exposed to drain contents after handling or
using drain cleaning equipment. Do not
eat or smoke while operating or handling
drain cleaning equipment. This will help
prevent contamination with toxic or infec-
tious material.
•Do not use with a corded drill. Operating
with a corded drill increases the risk of elec-
trical shock.
•Do not allow the end of cable to stop
turning while the machine is running.
This can overstress the cable and may
cause twisting, kinking or breaking of the
cable and may result in serious personal in-
jury.
•Position machine within 4" (10 cm) of
the drain inlet or properly support ex-
posed cable when the distance exceeds
4" (10 cm). reater distances can cause
control problems leading to twisting, kinking
or breaking of the cable. Twisting, kinking or
breaking cable may cause striking or crush -
ing injuries.
POWER SPIN is a registered trademark of RID ID, Inc. in the U.S.

2
POWER SPIN+™ Drain Cleaner
causes and prevent drain cleaner dam-
a e.
1. Clean any oil, grease or dirt from all
equipment, including handles and con-
trols. This aids inspection and helps pre-
vent the machine or control from slipping
from your grip. Clean any debris from
the cable and drum.
2. Inspect the drain cleaner for the following
items:
• Proper assembly and completeness.
• Broken, worn, missing, misaligned or
binding parts.
• Smooth and free movement of the trig-
ger and drum.
• Presence and readability of the warn-
ing label (see Figure 2.)
• Any condition which may prevent safe
and normal operation.
If any problems are found, do not use
the drain cleaner until the problems have
been repaired.
3. Clean any debris from the cable. Inspect
cable for wear and damage – Look for:
• Obvious flats worn into the outside of
the cable (cable is made from round
wire and profile should be round).
• Multiple or excessively large kinks (slight
kinks up to 15 degrees can be straight-
ened).
• Space between the cables indicating
the cable has been deformed by stretch -
ing, kinking or run in REVERSE.
• Excessive corrosion from storing wet
or exposure to drain chemicals.
All of these forms of wear and damage
weaken the cable and make cable twist-
ing, kinking or breaking more likely during
use. Replace worn and damaged cable
before using drain cleaner.
4. If using the POWER SPIN+Drain Cleaner
with a Battery Powered Drill, inspect the
drill per its instructions. Make sure that
the drill is in good operating condition
and the switch controls the drill opera-
tion. Confirm that the drill turns at less
than 500 rpm.
Figure 1 – P WER SPIN+Drain Cleaner
Specifications
Pipe Capacity........¾" to 1½" (20 to 40 mm)
Drum Capacity......25' (7.6 m) of 1/4" (6 mm)
Diameter MAXCORE®
Cable
Cable......................1/4" × 25' (6 mm × 7.6 m)
MAXCORE®Cable
Drum Speed ..........Maximum 500 RPM
Weight....................4 lbs. (1,8 kg)
Dimension..............14" × 9" × 7.3"
(356 × 229 × 185 mm)
This machine is made to clean drains.
If properly used it will not damage a drain that is
in good condition and properly designed, con-
structed and maintained. If the drain is in poor
condition, or has not been properly designed,
constructed and maintained, the drain clean-
ing process may not be effective or could cause
damage to the drain. The best way to deter-
mine the condition of a drain before cleaning is
through visual inspection with a camera. Im -
proper use of this drain cleaner can damage the
drain cleaner and the drain. This machine may
not clear all blockages.
Pre-Operation Inspection
WARNING
Before each use, inspect your drain
cleaner and correct any problems to re-
duce the risk of serious injury from elec-
tric shock, twisted or broken cables,
chemical burns, infections and other
NOTICE
Cable
Crank
Drum
Handle
Trigger
AUT FEED
Mechanism
Guide
Tube

POWER SPIN+™ Drain Cleaner
Figure 2 – Removing Crank Handle From P WER
SPIN+
8. If needed, take appropriate steps to ac-
cess the drain to be cleaned.
• For many drains, the cable can be
threaded through the cross hairs in
the drain (See Figure 3).
• For a sink with a pop up drain plug:
Remove lift rod and drain plug (See
Figure 4). Be sure to place a container
under the clean out or trap to catch
any water that may come out.
• For other sinks a clean out plug or
trap may need to be removed (See
Figure 5.) Be sure to place a container
under the clean out or trap to catch
any water that may come out.
• For bathtubs, never try to go through
the drain, this will damage the cable.
Remove the overflow plate and any
mechanism to access the drain (See
Fi gure 6).
9. Determine if the drain cleaner can be
held within 4" of the drain opening. reat -
Machine and Work Area
Set-Up
WARNING
Set up the drain cleanin machine and
work area accordin to these proce-
dures to reduce the risk of injury from
electric shock, twisted or broken ca-
bles, chemical burns, infections and
other causes, and prevent drain cleaner
dama e.
1. Check for an appropriate work area. Op -
erate in a clear level, stable, dry location
free. Do not use the machine while stand-
ing in water.
2. Inspect the drain to be cleaned. If possi-
ble, determine the access point(s) to the
drain, the size(s) and length(s) of the
drain, distance to mainlines, the nature of
the blockage, presence of drain clean-
ing chemicals or other chemicals, etc. If
chemicals are present in the drain, it is
important to understand the specific
safety measures required to work around
those chemicals. Contact the chemical
manufacturer for required information.
3. Confirm POWER SPIN+Drain Cleaner is
appropriate for the job (See Specifi ca -
tions). Using incorrect equipment for an
application can cause injury or damage
the tool.
4. Make sure machine has been properly in-
spected.
5. If needed, place protective covers in the
work area. The drain cleaning process
can be messy.
6. If using the POWER SPIN+by hand,
make sure that the crank is present and
firmly attached.
7. If using the POWER SPIN+with a battery
powered drill, remove the crank from the
back of the drum by pressing the tabs on
the either side (See Figure 2). Securely
attach the chuck of the drill to the drum
shaft.
Drain
Plug
Cap
Nut Lift Rod
Set
Screw
Figure 3
Figure 5
Figure 4
Cross
Hairs
Clean-out
Plug
Figure 6
Warning
Label
Drum Shaft
Test Equipment Depot - 800.517.8431 - TestEquipmentDepot.com

er distance from the drain access in-
creases the risk of the cable twisting or
kinking. If not, the drain opening will
need to be extended using similar size
pipe and fittings so that the drain cleaner
can be placed within 4" of the drain
opening (see Figure 7). Improper cable
support can allow the cable to kink and
twist and damage the cable/fixture or
injure the operator.
Figure 7 – Example of Extending Drain to Within
4" (100 mm) of Drain pening
Operatin Instructions
WARNING
Always use safety lasses and leather
work loves in ood condition while han-
dlin or usin . Use latex or rubber loves,
face shields, protective clothin , respira-
tors or other appropriate protective e -
quip ment when chemicals, bacteria or
other toxic or infectious substances are
suspected to be present to reduce the
risk of infections, burns or other serious
personal injury. Wear latex loves or rub-
ber loves under leather loves.
Follow operatin instructions to reduce
the risk of injury from twisted or bro-
ken cables, cable ends whippin around,
machine tippin , chemical burns, infec-
tions and other causes.
1. Make sure that machine and work area is
properly set-up and that the work area is
free of bystanders and other distractions.
2. Assume a proper operating position that
will allow
• ood balance and not require any over -
reaching.
• Control of the drain cleaner (and bat-
tery powered drill if used).
• Ability to maintain the unit 4" (100 mm)
or less from the drain opening.
This will help maintain control of the cable
and machine.
3. Pull cable out of the drum and push into
drain as far as it will go. At least one foot
of cable must be in the drain so that the
cable will not come out and whip around
when the cable starts turning.
4. If using a battery powered drill, confirm
set to low speed (less than 500 rpm) and
with dry hands insert the battery, but do
not place you finger on the drill switch yet.
5. Make sure that the drain cleaner is within
4" (100 mm) of the drain opening, and
maintain that distance throughout the
cleaning process. This helps to prevent
twisting and kinking of the cable.
6. Place one hand on the drain cleaner han-
dle/trigger and other hand on the drill
grip or the crank handle.
7. Turn the drum clockwise (as marked with
an arrow on the back of the drum, see
Figure 2) and squeeze the drain cleaner
trigger. Squeezing the trigger advances
the cable into the drain.
Cable can also be rapidly advanced/re-
tracted by feeding in and out of the drum
by hand.
Figure 8 – In perating Position
8. Continue to advance the cable until the re-
sistance is encountered. Carefully work
the cable through the blockage. Do not
force the cable – if the cable stops turning,
it is not cleaning the drain. It may be nec-
essary to spin the cable without advancing
it, or advancing the cable very slowly. This
will help to break up the blockage.
9. If the cable becomes stuck in the block-
age, do not continue turning the drum.
4
POWER SPIN+™ Drain Cleaner

Continuing to turn the drum may cause
the cable to twist and kink. It may be
necessary to back the cable out of the
blockage by turning the drum in reverse.
In some cases, it may be possible to pull
the cable and the blockage out of the
drain by hand. If this is done, be careful to
not damage the cable. Remove the block-
age from the cable, feed cable back into
the drum, and continue cleaning the drain
as detailed above.
10. Once the blockage is broken up and drain
is flowing, if possible, turn the water on to
flush any debris down the drain.
11. Continue to clean the rest of the drain.
Pay attention to how far the cable has
gone. Do not overrun the cable into a
larger drain. This can cause the cable to
knot up or cause other damage. The
cable includes an increase in diameter
that will not feed through the AUTOFEED
mechanism – this can be identified by
openings in the cable wind just outside
the drain cleaner (see Figure 9).
Figure 9 – penings in Cable Wind at the End
of Cable
12. Once the drain has been cleaned, turn
the drum counterclockwise while squeez-
ing the drain cleaner trigger to retract the
cable. Pay close attention, as the cable
may lodge in a blockage while being re-
tracted.
13. Release the trigger and stop turning the
drum when end of the cable nears drain
opening. Do not pull the cable end from
drain while it is rotating. The cable can
whip around and could cause serious in-
jury.
14. Several passes through a line are recom-
mended for complete cleaning. If needed,
repeat the above procedure.
5
POWER SPIN+™ Drain Cleaner
15. Pull any remaining cable from the line
by hand and push the cable into the
drum.
Stora e
The drain cleaner must be kept
dry and indoors or well covered if kept out-
doors. Store the machine in a locked area that
is out of reach of children and people unfa-
miliar with drain cleaners. This machine can
cause serious injury in the hands of untrained
users.
Maintenance
Instructions
WARNING
Drill should be removed from drain
cleaner before any maintenance is per-
formed.
Cleanin
Cable, drum and AUTOFEED mechanism
should be thoroughly flushed with water after
every use to prevent the damaging effects of
chemicals and sediment. Clean exterior as
needed with hot soapy water and/or disinfec-
tants. Drain drum by tipping forward after
every use and cleaning
Installin Replacement Cable
1. Press non-headed end of pivot pin through
the trigger and remove trigger from handle
(Figure 10). Do not lose the spring.
Figure 10 – Trigger Assembly
2. Pull cable out of drain cleaner until increase
in cable diameter is visible (Figure 9).
WARNING

6. Insert about 12 inches of cable through the
guide tube into the drum.
7. Place cable end as shown inside drum
(see Figure 11), and secure with cable
clamp screw.
8. Securely install drum back.
9. Feed cable into drum.
10. Install spring and trigger, securing with the
pivot pin (Figure 10).
3. Remove 4 screws from drum back and re-
move drum back.
4. Remove cable clamp screw. Remove exist-
ing cable (Figure 11).
Figure 11 – Securing Cable End
5. Replacement cable catalog #42163. To
make cable installation easier, completely
uncoil new cable. Use caution when re-
moving cable from the package. The cable
is under tension and could strike the user.
6
POWER SPIN+™ Drain Cleaner
PROBLEM POSSIBLE REASONS SOLUTION
Cable kinking or break-
ing.
Cable not advancing/ -
re tracting.
Troubleshootin
Cable is being forced.
Cable used in incorrect pipe diameter.
Drill motor switched to reverse.
Cable exposed to acid.
Cable worn out or damaged.
Cable not properly supported.
AUTOFEED mechanism/trigger clogged
or jammed.
Do Not Force Cable! Let the drain
cleaner do the work.
Do not use in lines over 11/ " (40 mm).
Use reverse only if cable gets caught in
pipe or to retract cable.
Clean cables routinely.
If cable is worn or damaged, replace it.
Support cable properly, see instructions.
Clean AUTOFEED mechanism.
2
Clamp
Screw

What is covered
IDGID®tools are warranted to be free of defects in workmanship and material.
Ho long coverage lasts
This warranty lasts for the lifetime of the IDGID®tool. Warranty coverage ends when the
product becomes unusable for reasons other than defects in workmanship or material.
Ho you can get service
To obtain the benefit of this warranty, deliver via prepaid transportation the complete prod-
uct to IDGE TOOL COMPANY, Elyria, Ohio, or any authorized IDGID®INDEPENDENT
SE VICE CENTE . Pipe wrenches and other hand tools should be returned to the place of pur-
chase.
What e ill do to correct problems
Warranted products will be repaired or replaced, at IDGE TOOL’S option, and returned at no
charge; or, if after three attempts to repair or replace during the warranty period the product
is still defective, you can elect to receive a full refund of your purchase price.
What is not covered
Failures due to misuse, abuse or normal wear and tear are not covered by this warranty. IDGE
TOOL shall not be responsible for any incidental or consequential damages.
Ho local la relates to the arranty
Some states do not allow the exclusion or limitation of incidental or consequential damages,
so the above limitation or exclusion may not apply to you. This warranty gives you specific
rights, and you may also have other rights, which vary, from state to state, province to
province, or country to country.
No other express arranty applies
This FULL LIFETIME WA ANTY is the sole and exclusive warranty for IDGID®prod-
ucts. No employee, agent, dealer, or other person is authorized to alter this warranty or make
any other warranty on behalf of the IDGE TOOL COMPANY.
Printed 9/17 999-999-438.10
EC42754 EV. A
©2017, IDGID, Inc.
The Emerson logo and IDGID logo are registered trademarks of Emerson Electric Co. or IDGID, Inc. in the U.S. and other countries.
All other trademarks belong to their respective holders.
Against Material Defects
FULL LIFETIME
WARRANTY
Test Equipment Depot - 800.517.8431
99 Washington Street, Melrose, MA 02176
TestEquipmentDepot.com
Table of contents
Other RIDGID Ultrasonic Jewelry Cleaner manuals

RIDGID
RIDGID K-60SP-SE User manual

RIDGID
RIDGID K-45AF User manual

RIDGID
RIDGID K-39 User manual

RIDGID
RIDGID K-40 User manual

RIDGID
RIDGID K-50 User manual

RIDGID
RIDGID K-5208 User manual

RIDGID
RIDGID 36033 User manual

RIDGID
RIDGID K-1500SP User manual

RIDGID
RIDGID 36023 User manual

RIDGID
RIDGID K-60SP User manual

RIDGID
RIDGID K-50 User manual

RIDGID
RIDGID K-750 User manual

RIDGID
RIDGID K-40 User manual

RIDGID
RIDGID K6200 User manual

RIDGID
RIDGID K-40 User manual

RIDGID
RIDGID PowerClear User manual

RIDGID
RIDGID K-1000 Rodder User manual

RIDGID
RIDGID K-45 User manual

RIDGID
RIDGID K-1500A User manual

RIDGID
RIDGID K-400 User manual