DEJELIN SLJ 100 User manual

SLOW JUICER SLJ 100
User Manual


Slow Juicer - 3
TABLE OF CONTENT
4 Important safety prescriptions
5 Safety warnings
6 Parts
7 Assembling the appliance
10 Instructions for use
13 Tips for ingredients
14 Prepare the ingredients for the juicer
18 Disassembling and maintenance of the appliance
19 Optional – Use of the ice cream accessory
20 Optional – Use of the smoothie accessory
22 FAQ
23 Technical data
READ ALL INSTRUCTIONS BEFORE USE

4 - Slow Juicer
Thank you for your purchase of the Dejelin Juicer. We hope you will appreciate, for a long time, healthy juices,
rich and nutritious thanks to this innovative product. This user manuals describes the safety prescriptions to be
taken when using the appliance in order to avoid injury, to yourself and to others, or damage to the appliance.
The content of this user manual applies not only to this product, but to all household appliances in general.
IMPORTANT SAFETY PRESCRIPTIONS
• C A 110~120V/50~60Hz (North America)
• C A 220~240V/50~60Hz (Europe - Asia)
• Important safety prescriptions
When using electrical appliances some elementary safety prescriptions must be observed, such as following:
1. Read all instructions.
2. Make sure the motor or the base don’t come into contact with water or any other liquid in order to avoid
electric shocks.
3. Strict supervision is needed when the appliance is used nearby or by children.
4. Unplug the appliance when the appliance is not in use, before (dis)assembling and before cleaning.
5. Avoid touching the moving parts.
6. Don’t use appliances with a damaged electrical cord or plug. Never use the appliance if it is damaged, has
fallen or shows a malfunction. In all these cases return the appliance to your sales point or recognized after
sales service for inspection, repair or mechanical adjustment.
7. The use of accessories which are not sold or recommended by the manufacturer, can cause re, electric
shocks and injuries.
8. Only use the appliance inside.
9. Don’t let the electrical cord of the appliance hang over the edge of the table or counter.
10. Make sure the lid of the juicer is always tightly closed before switching on the motor. Don’t open the clips when
the juicer is in use.
11. Make sure the switch is positioned on “OFF” after every use of the juicer and the motor has completely stopped
before disassembling the juicer.
12. Don’t put ngers or other objects in the openings of the juicer when it is in use. If some food is stuck in the
opening, you can use the tamper to push the food down. If this doesn’t help, switch off the appliance and
disassemble the juicer to remove the food.
13. Don’t use the appliance if the rotary sieve is damaged.
14. Don’t use the appliance without pulp jar if a separate pulp jar is provided.
15. Don’t alter the appliance in any way.
16. Only use the appliance for the functions as described in this manual.
17. The appliance is developed to be used for short periods of time.
18. If the electrical cord is damaged, it must be replaced by the manufacturer his after sales representative or
persons with comparable qualications.
19. This appliance is not suited to be used by persons (children included), with reduced physical, sensory or mental
capabilities or lack of experience and knowledge of the appliances, unless they are supervised and instructed
to use the appliance in a safe way and understand the hazards involved.
20. Children must be supervised and may not play with the appliance.
21. Stop the appliance and unplug the electrical cord before changing accessories or touching moving parts.
22. The appliance is only intended for household use and similar applications such as:
- staff kitchens in shops, ofces and other work environments;
- farms;
- clients in hotels, motels and other residential environments;
- bed & breakfast environments
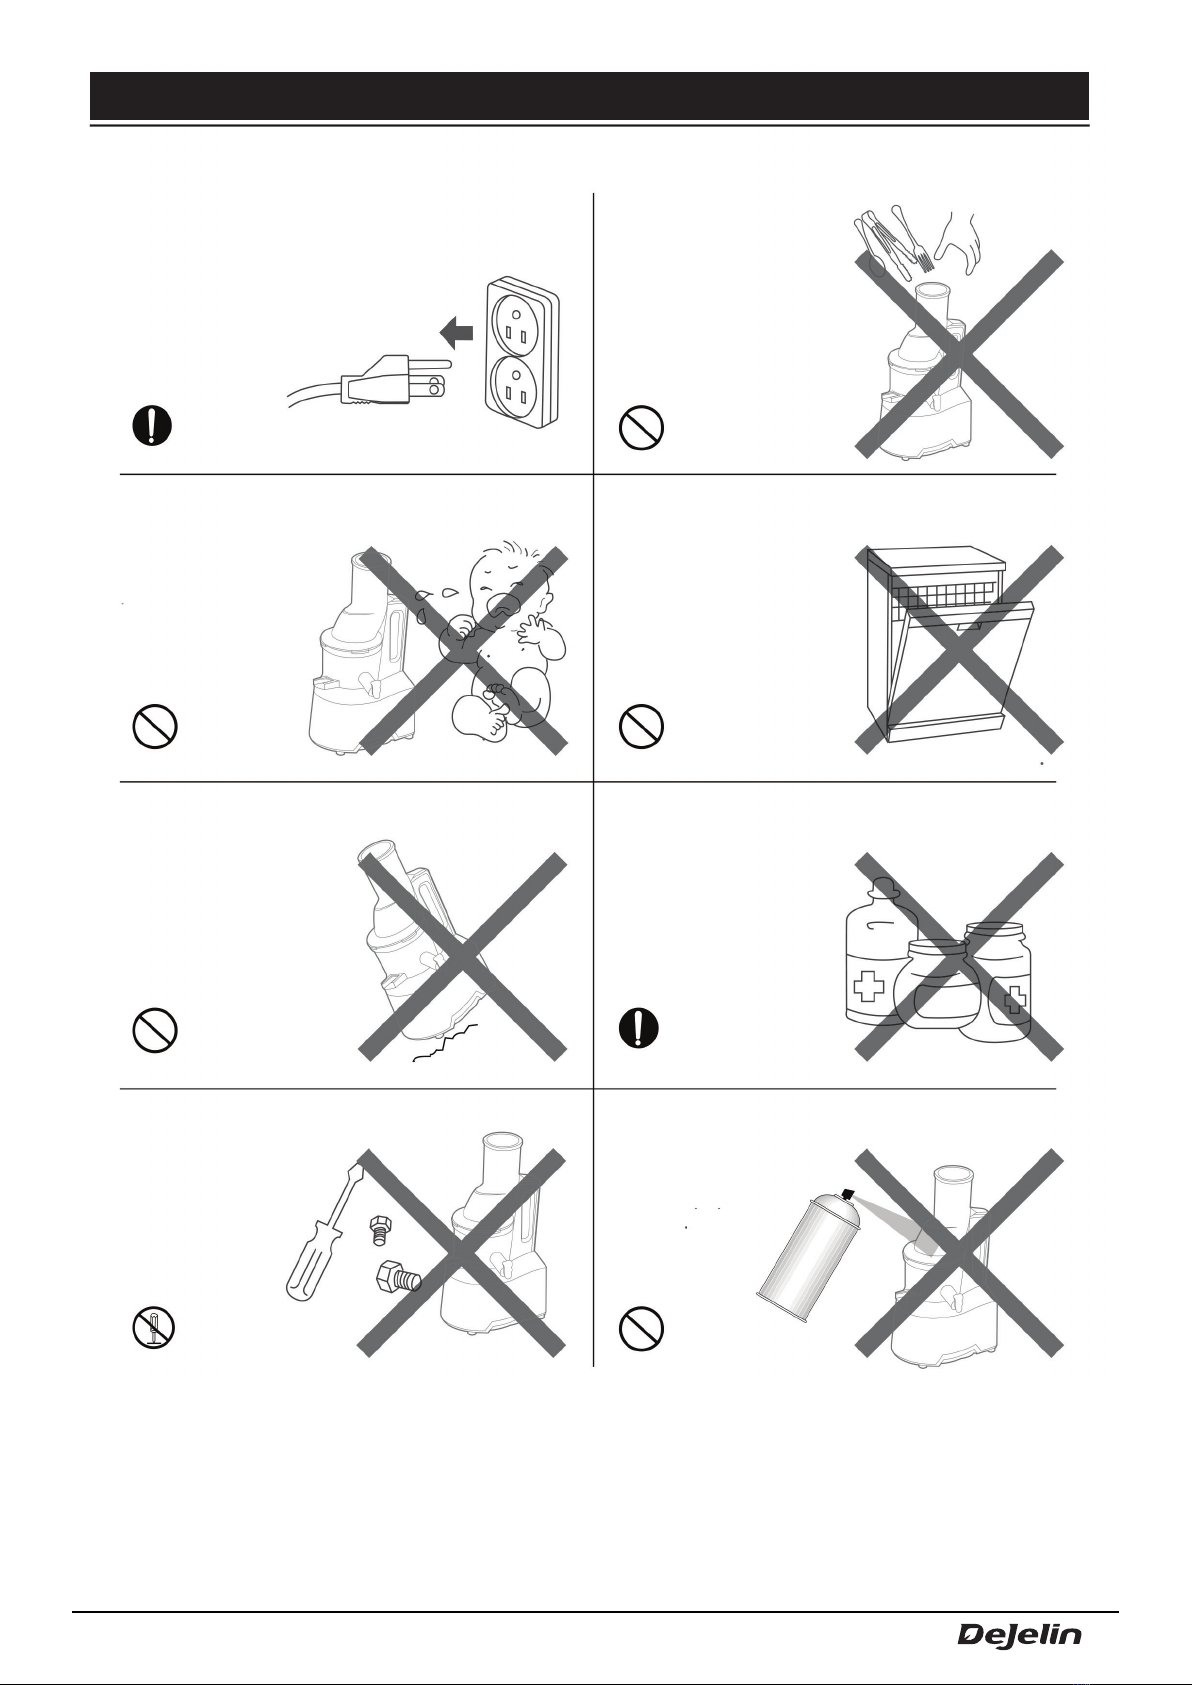
Slow Juicer - 5
Pull the plug out of the socket
when the appliance is not in use.
Do not insert ngers or other objects in the feeding
shaft while the appliance is
working.
* This may cause injuries
Don’t store or use the appliance nearby babies or
toddlers
* They could injure
themselves.
Don’t put the parts of the juicer in the dishwasher or
in extremely hot water.
* The parts will wear
out faster.
Don’t use the appliance on an uneven surface.
* The appliance can be
damaged if it tilts over.
Don’t repair or dismantle the base, and don’t make
any alterations.* It is possible that the
appliance doesn’t
function properly, what
could cause re,
electric shocks or
injuries.
Don’t use dangerous chemical products to clean the
appliance.
* This could alter the colour
of the appliance or
cause re.
Don’t spray water or inammable substances.
* This can cause an
explosion or electric
shock
SAFETY WARNINGS

6 - Slow Juicer
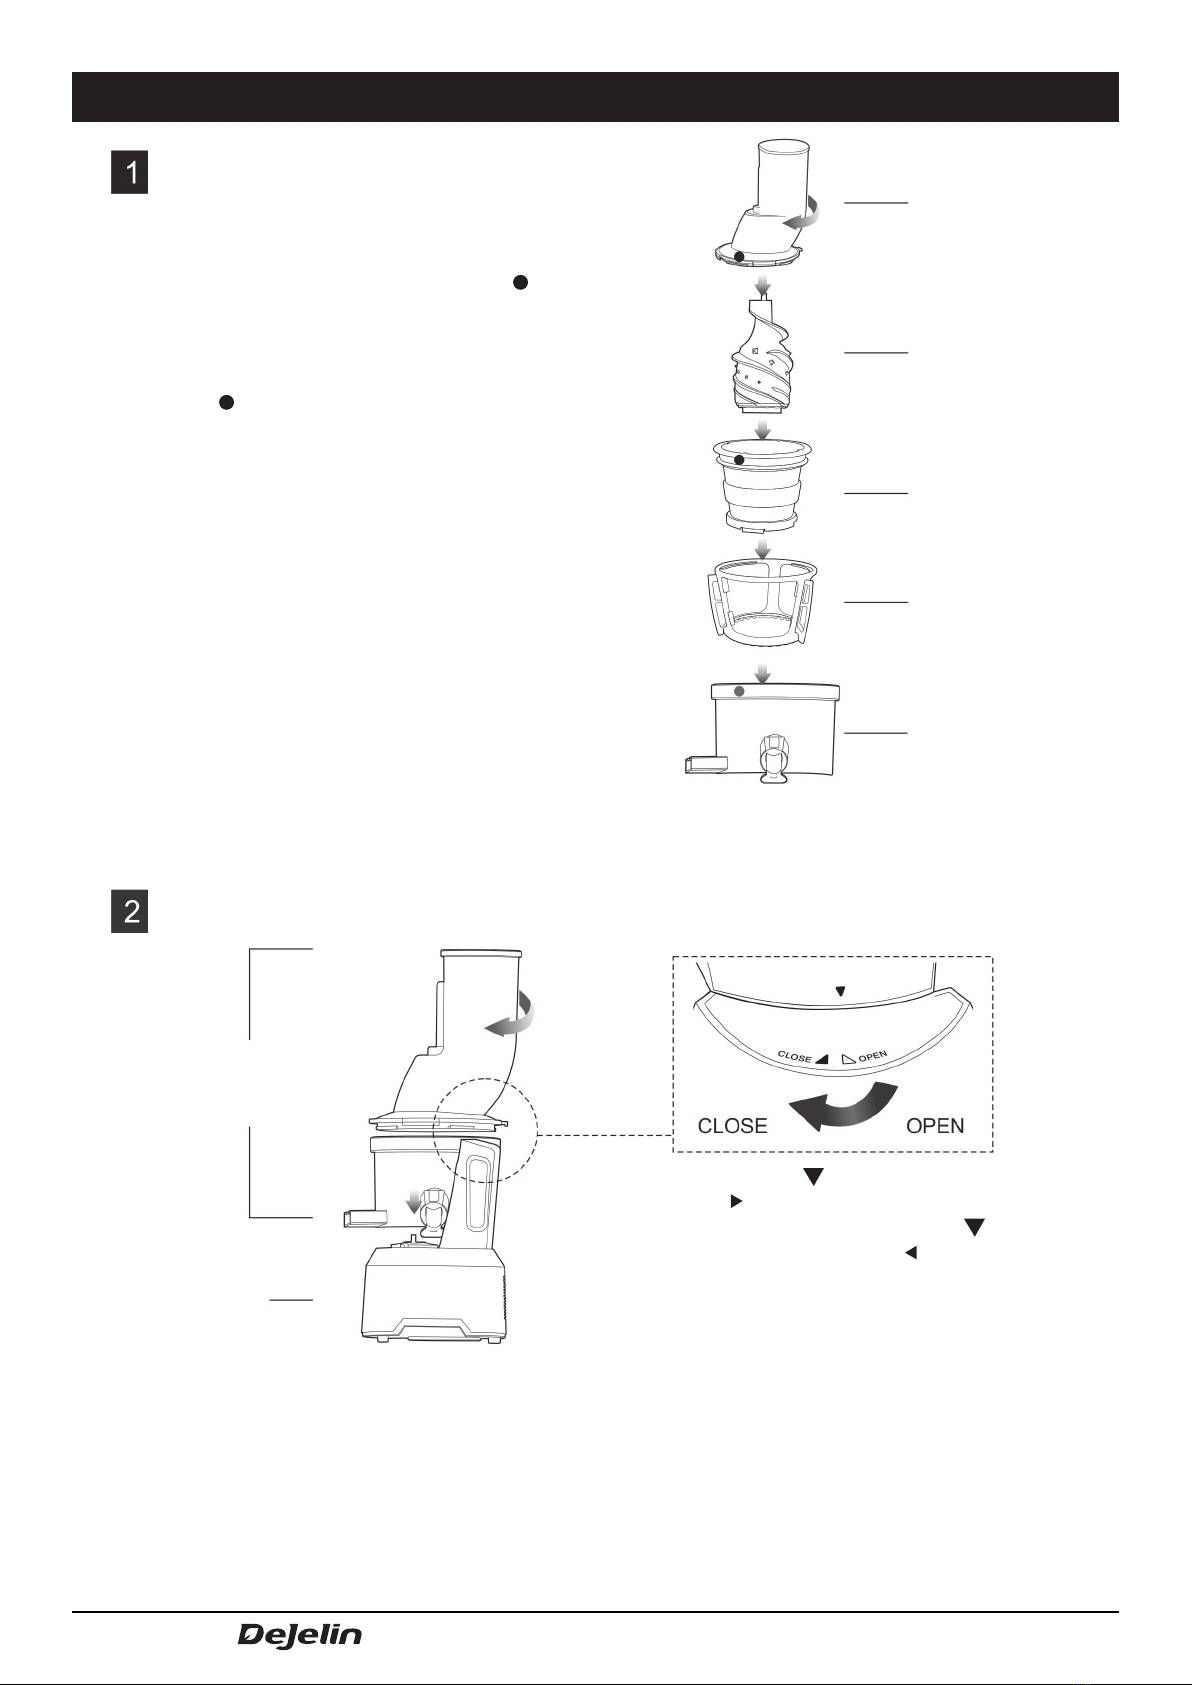
PARTS
1. Feeding shaft 5. Smart cap
detachable
6. Base
7. Juice container
2. Lid
3. Juice extraction bowl
4. Pulp container
8. Rotating scraper
11. Tamper 12. Cleaning brush
9. Sieve 10. Extraction screw
Slow Juicer - 7
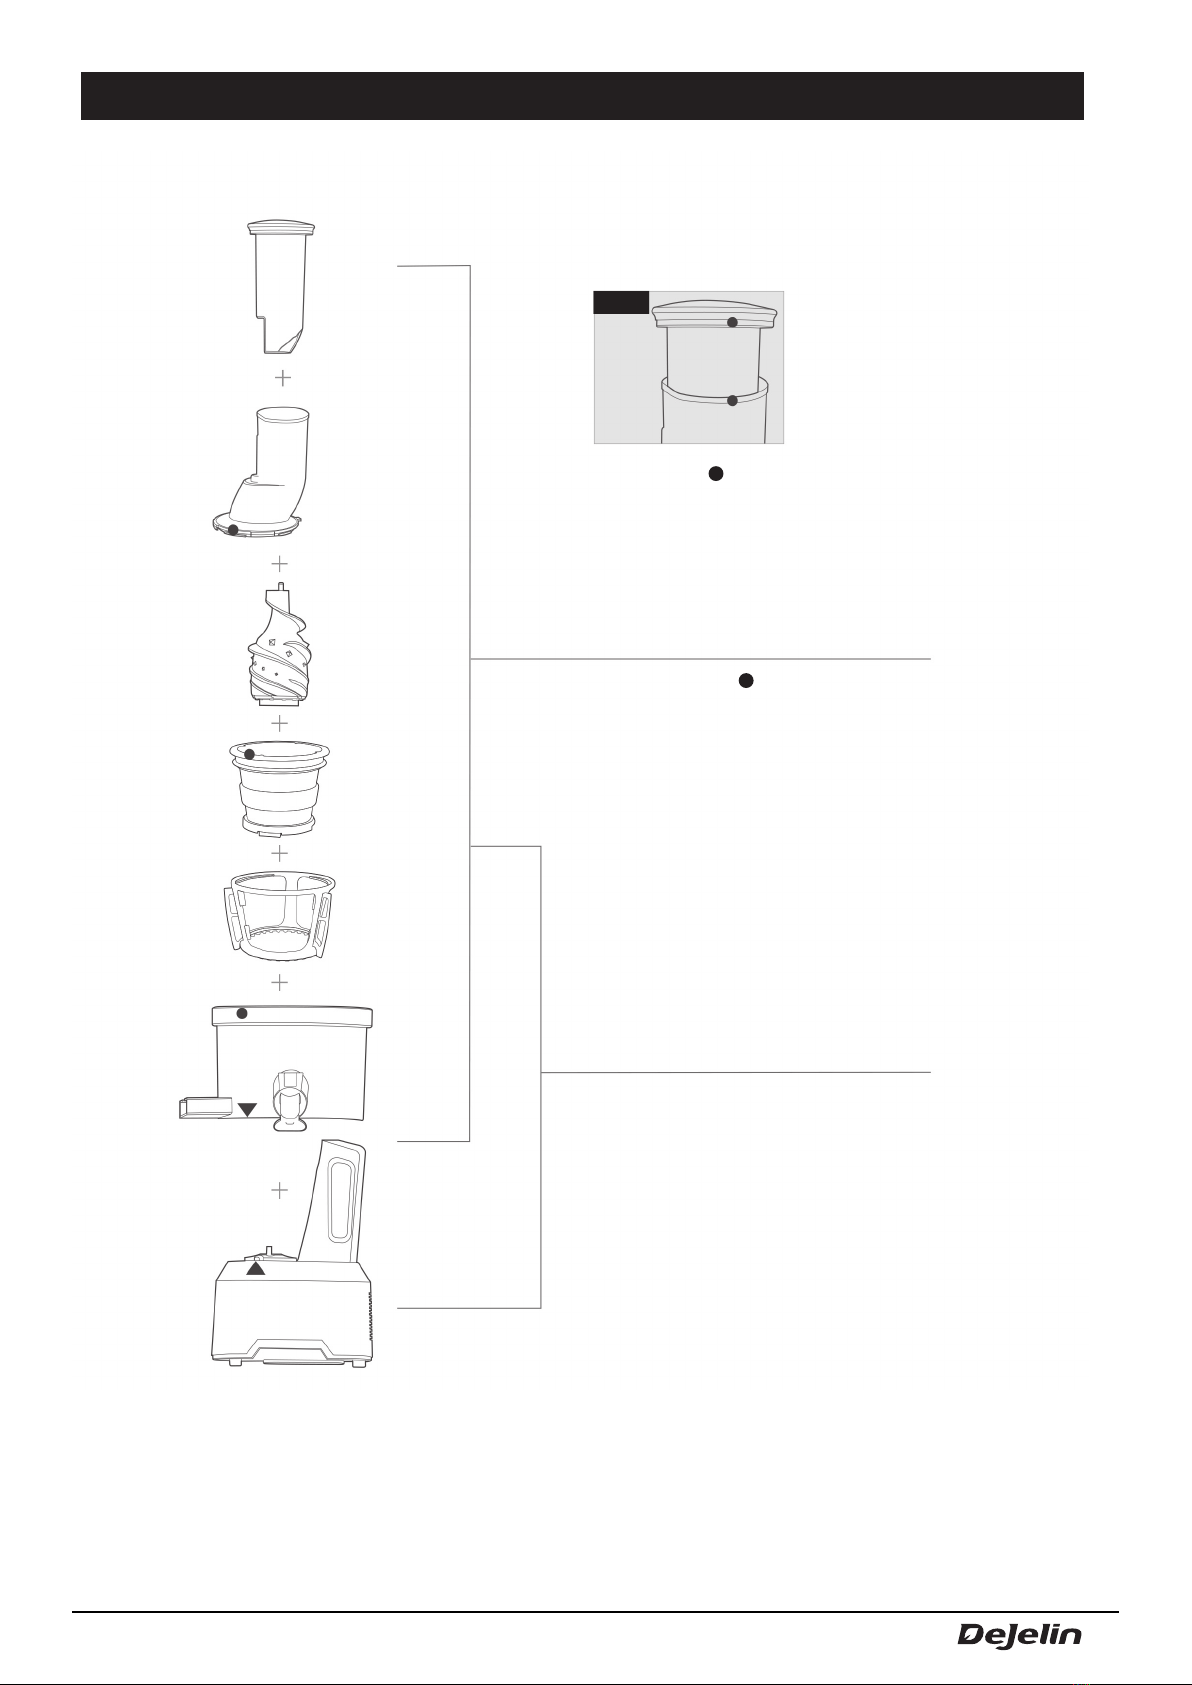
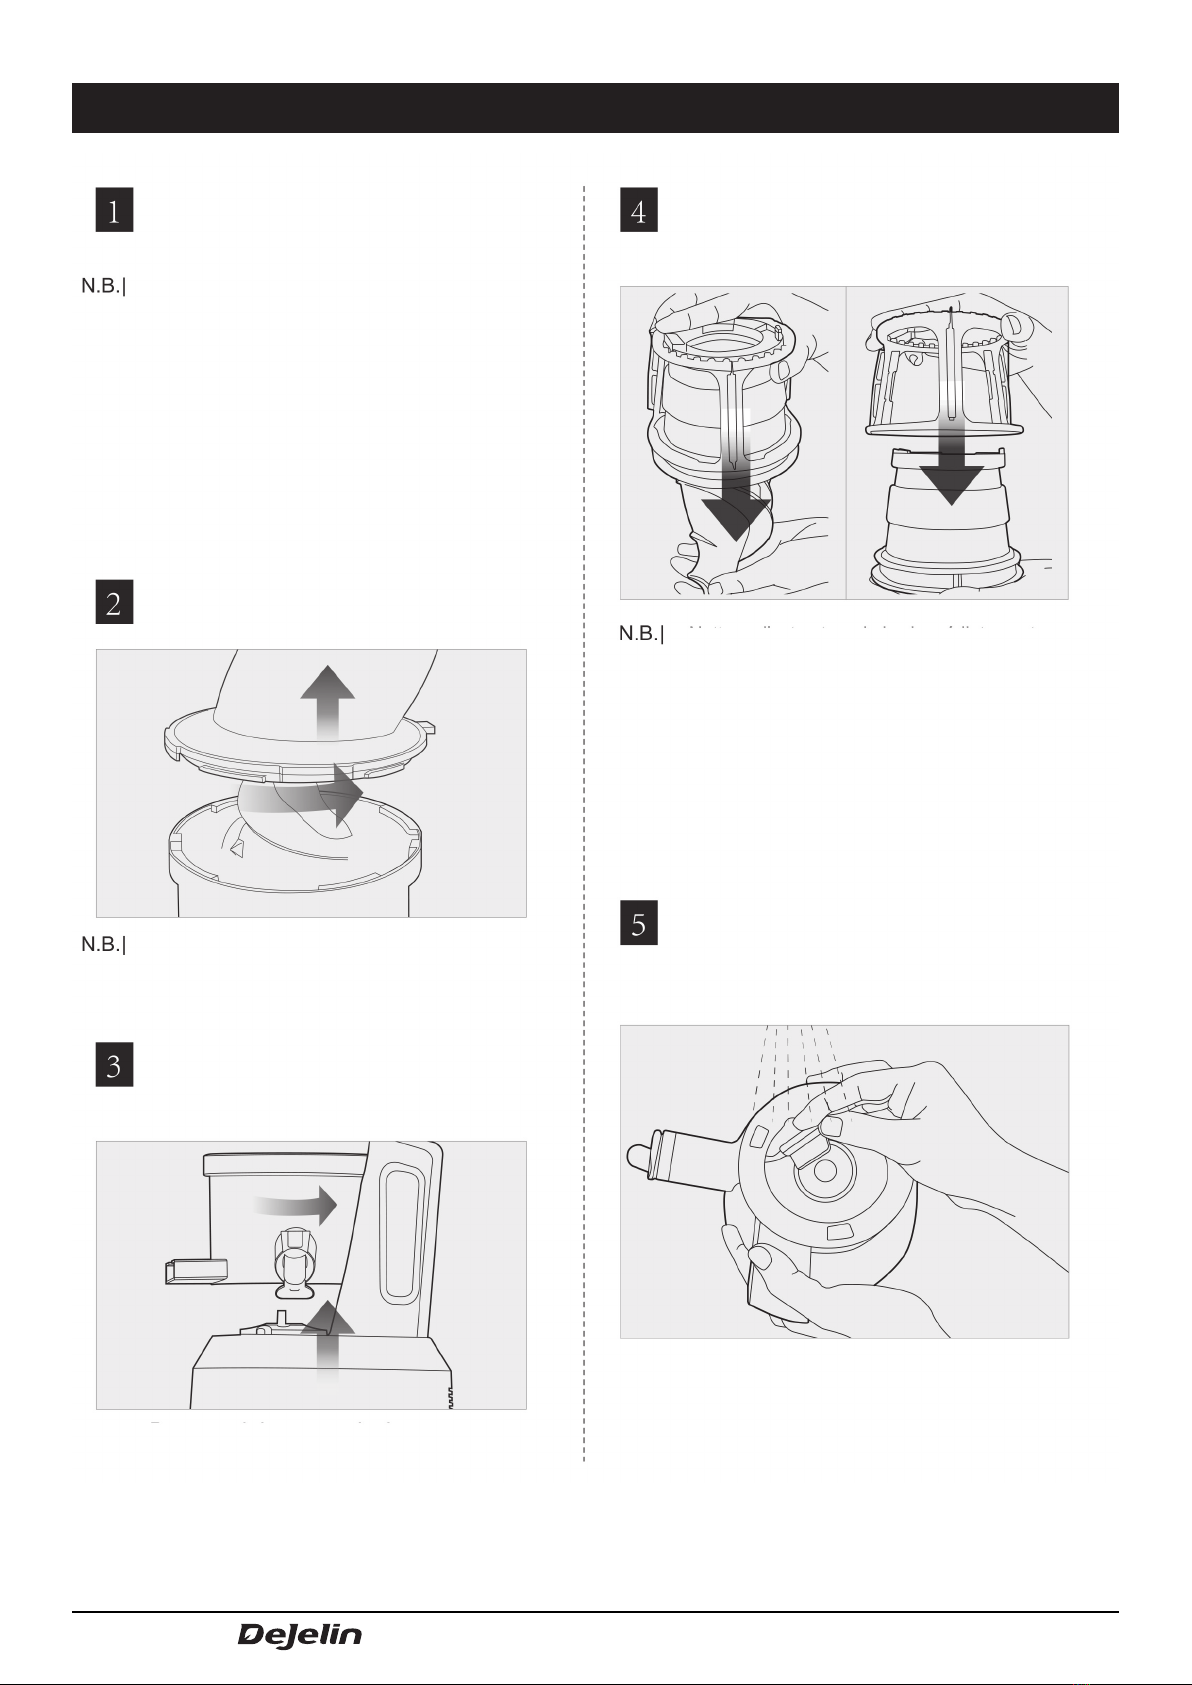
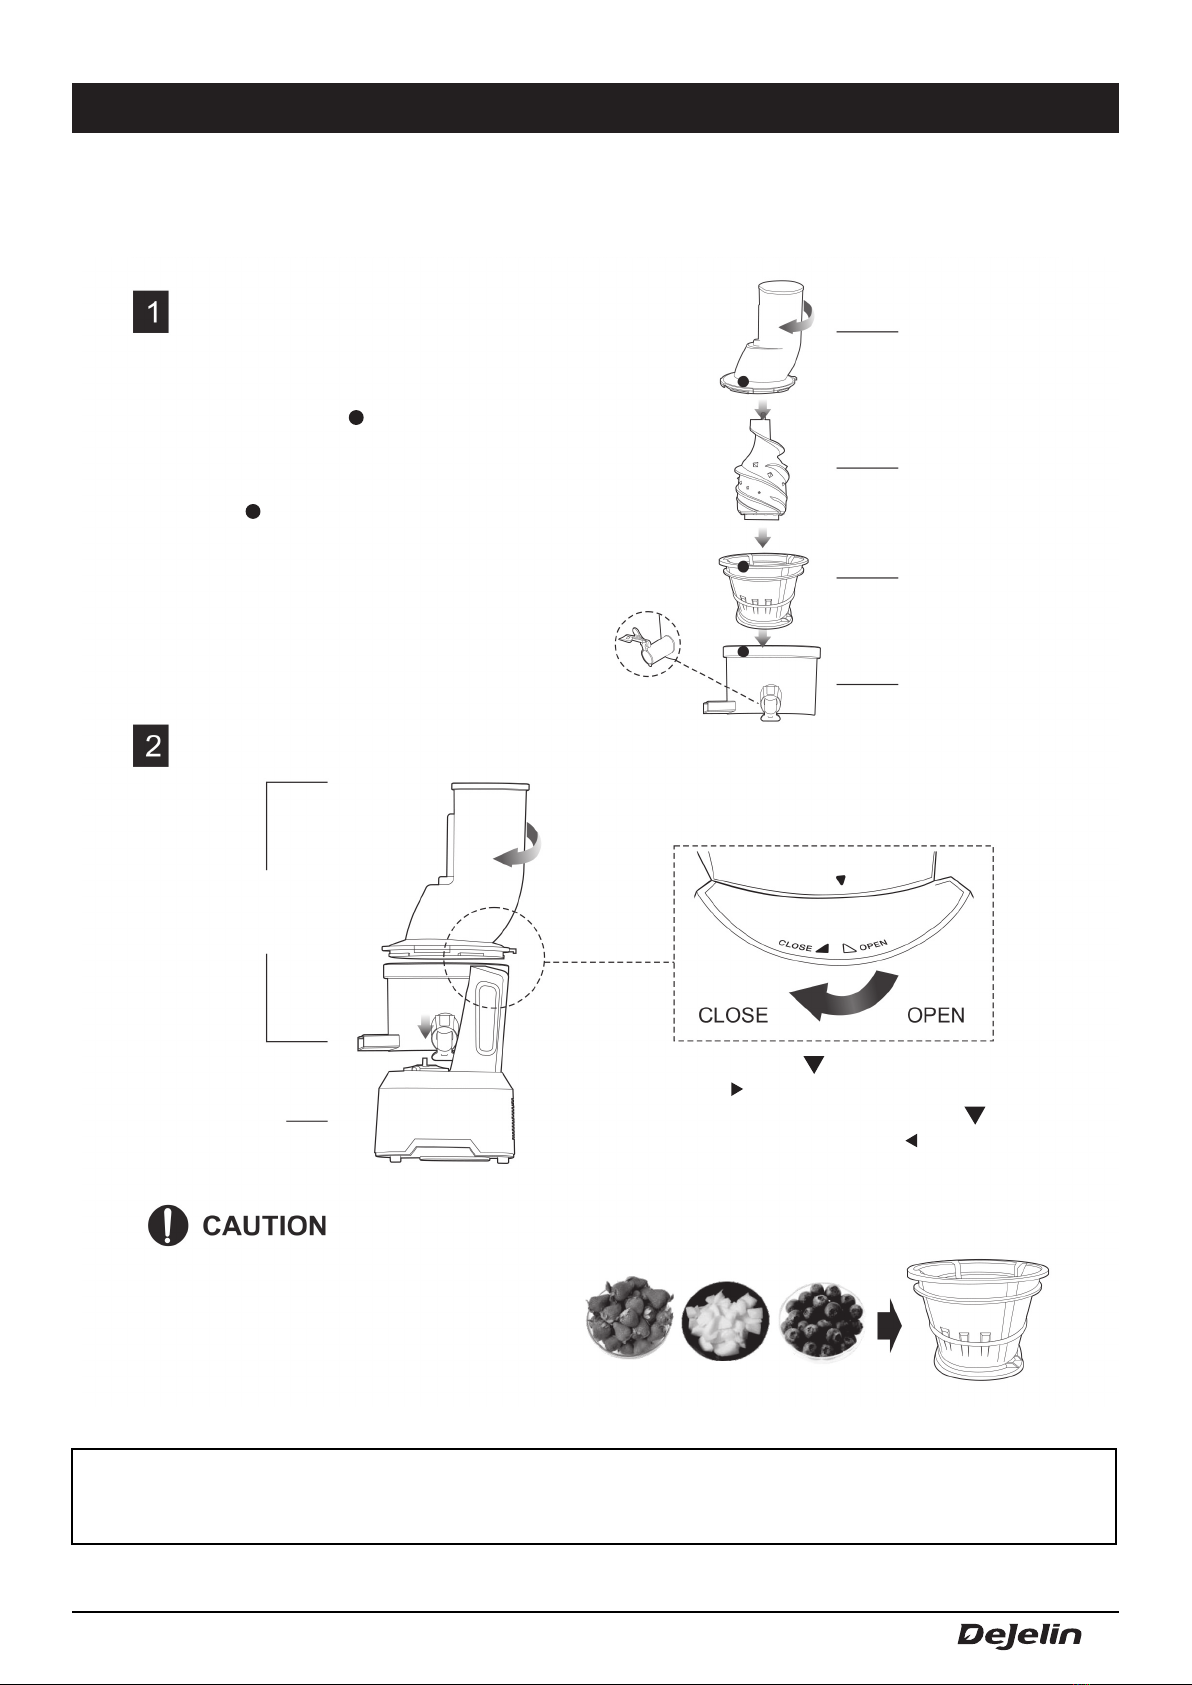
ASSEMBLING THE APPLIANCE
* Images and pictures in this manual can slightly differ from the delivered product
Tamper
Align the dots
Assembling upper part
Assembling upper part and base
Align the red dots on each part in the
order as shown here. Then turn the lid
clockwise to close.
Put the juice extraction bowl on the
base so that the grey arrow on the juice
extraction bowl aligns with the black arrow
on the base.
STEP 1
STEP 2
Align
8 - Slow Juicer
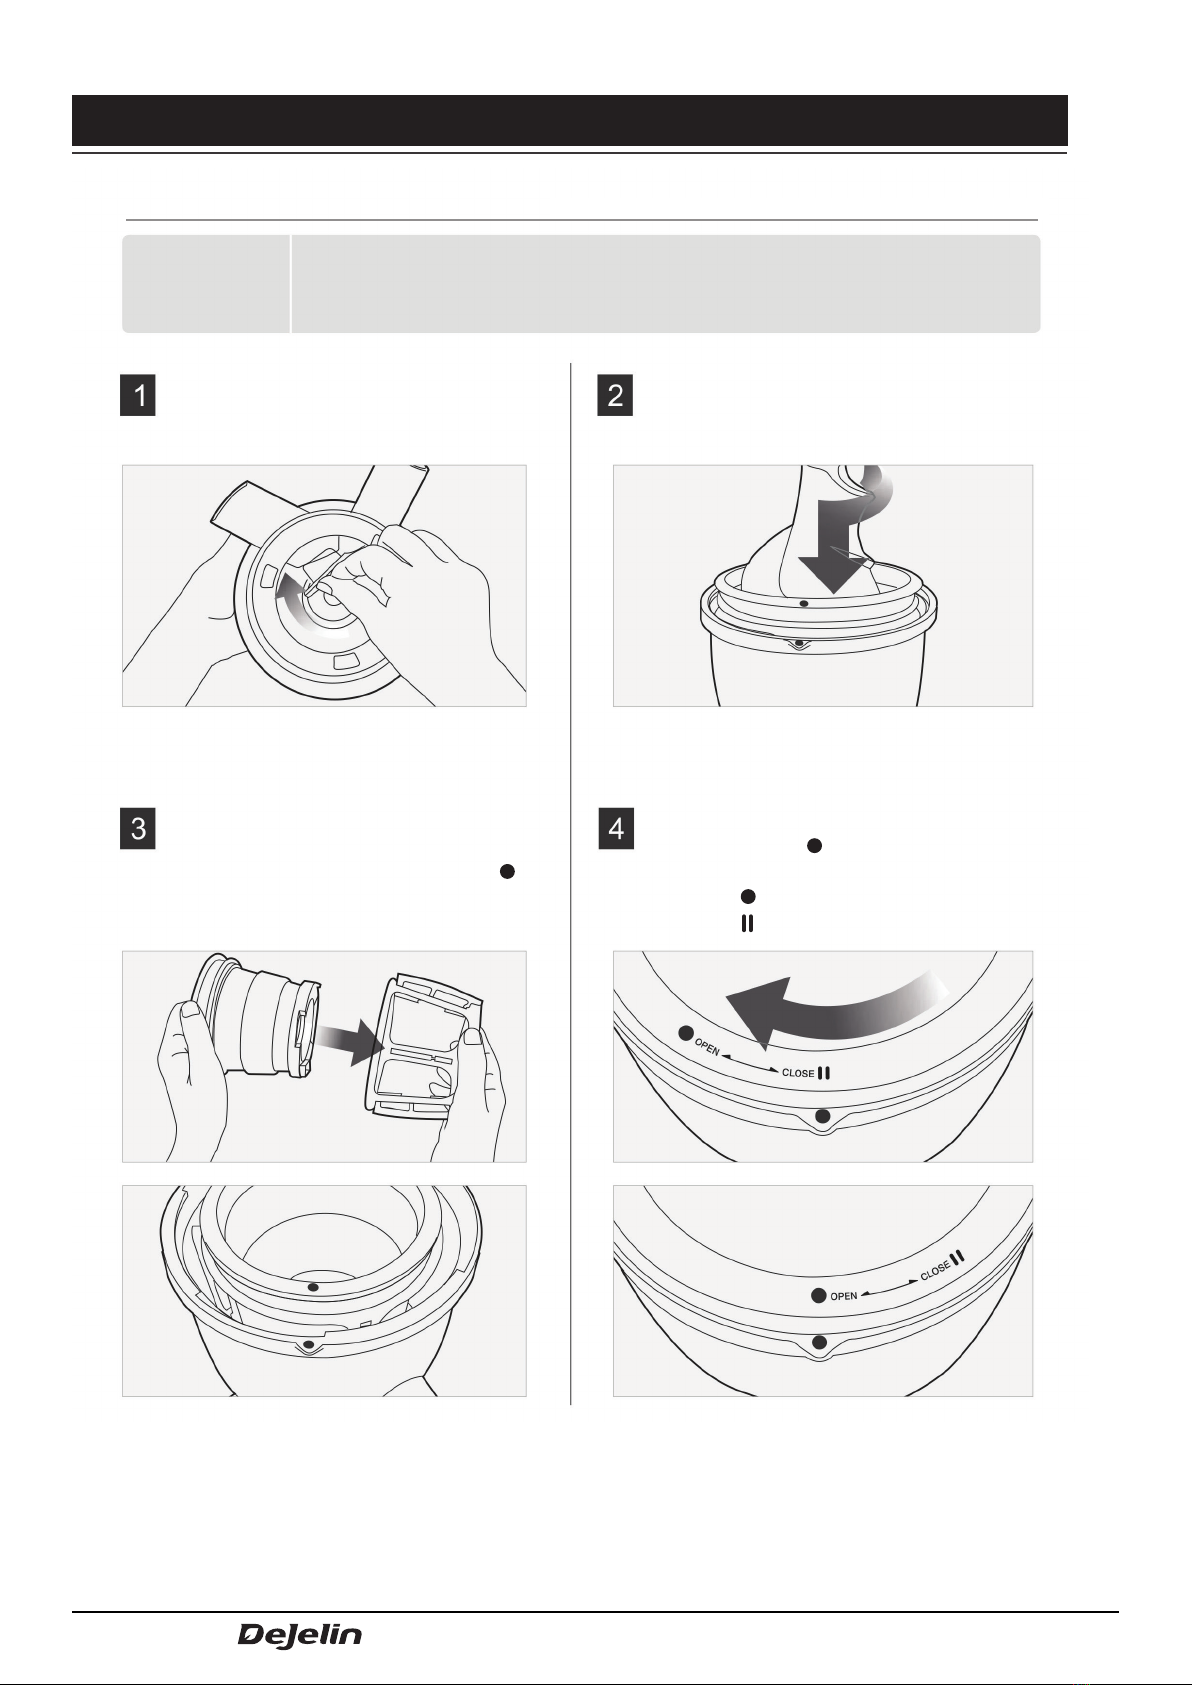
ASSEMBLING THE APPLIANCE
- clean the parts before rst use
- make sure the silicone tab and the silicone ring are properly installed.
Firmly push the silicone tab in the groove under
the pulp spout.
Place the sieve in the rotating scraper. Place
the rotating scraper with the sieve in the juice
extraction bowl while aligning the red dots
on both parts.
Place the lid on the juice extraction bowl while
aligning the red dot on the lid with the red dot
on the extraction bowl. Turn the lid clockwise until
the red dot of the extraction bowl aligns with
the (Close) symbol to close the juicer.
Warning! The juice can leak if the silicone tab is
not correctly installed.
Warning! The lid cannot be closed as long as the
extraction screw is not correctly clicked into place.
Place the extraction screw in the sieve.
Turn and push the screw downwards until it
clicks into place.
Check
before use
Assembling the upper part
STEP 1

Slow Juicer - 9
ASSEMBLING THE APPLIANCE
For an easy assembly: keep one hand on the
feeding shaft and one on the lid as shown below.
Marks OPEN/CLOSE on the upper part
Warning! If the parts are not correctly assembled
the juicer will not function.
Place the pulp container under the pulp spout
and the juice container under the juice spout
as depicted.
Place the extraction bowl on the base while the
grey arrow on the extraction bowl aligns with the
black arrow on the base.
Detachable
Assembling the upper part and the base
STEP 2
TIP
10 - Slow Juicer
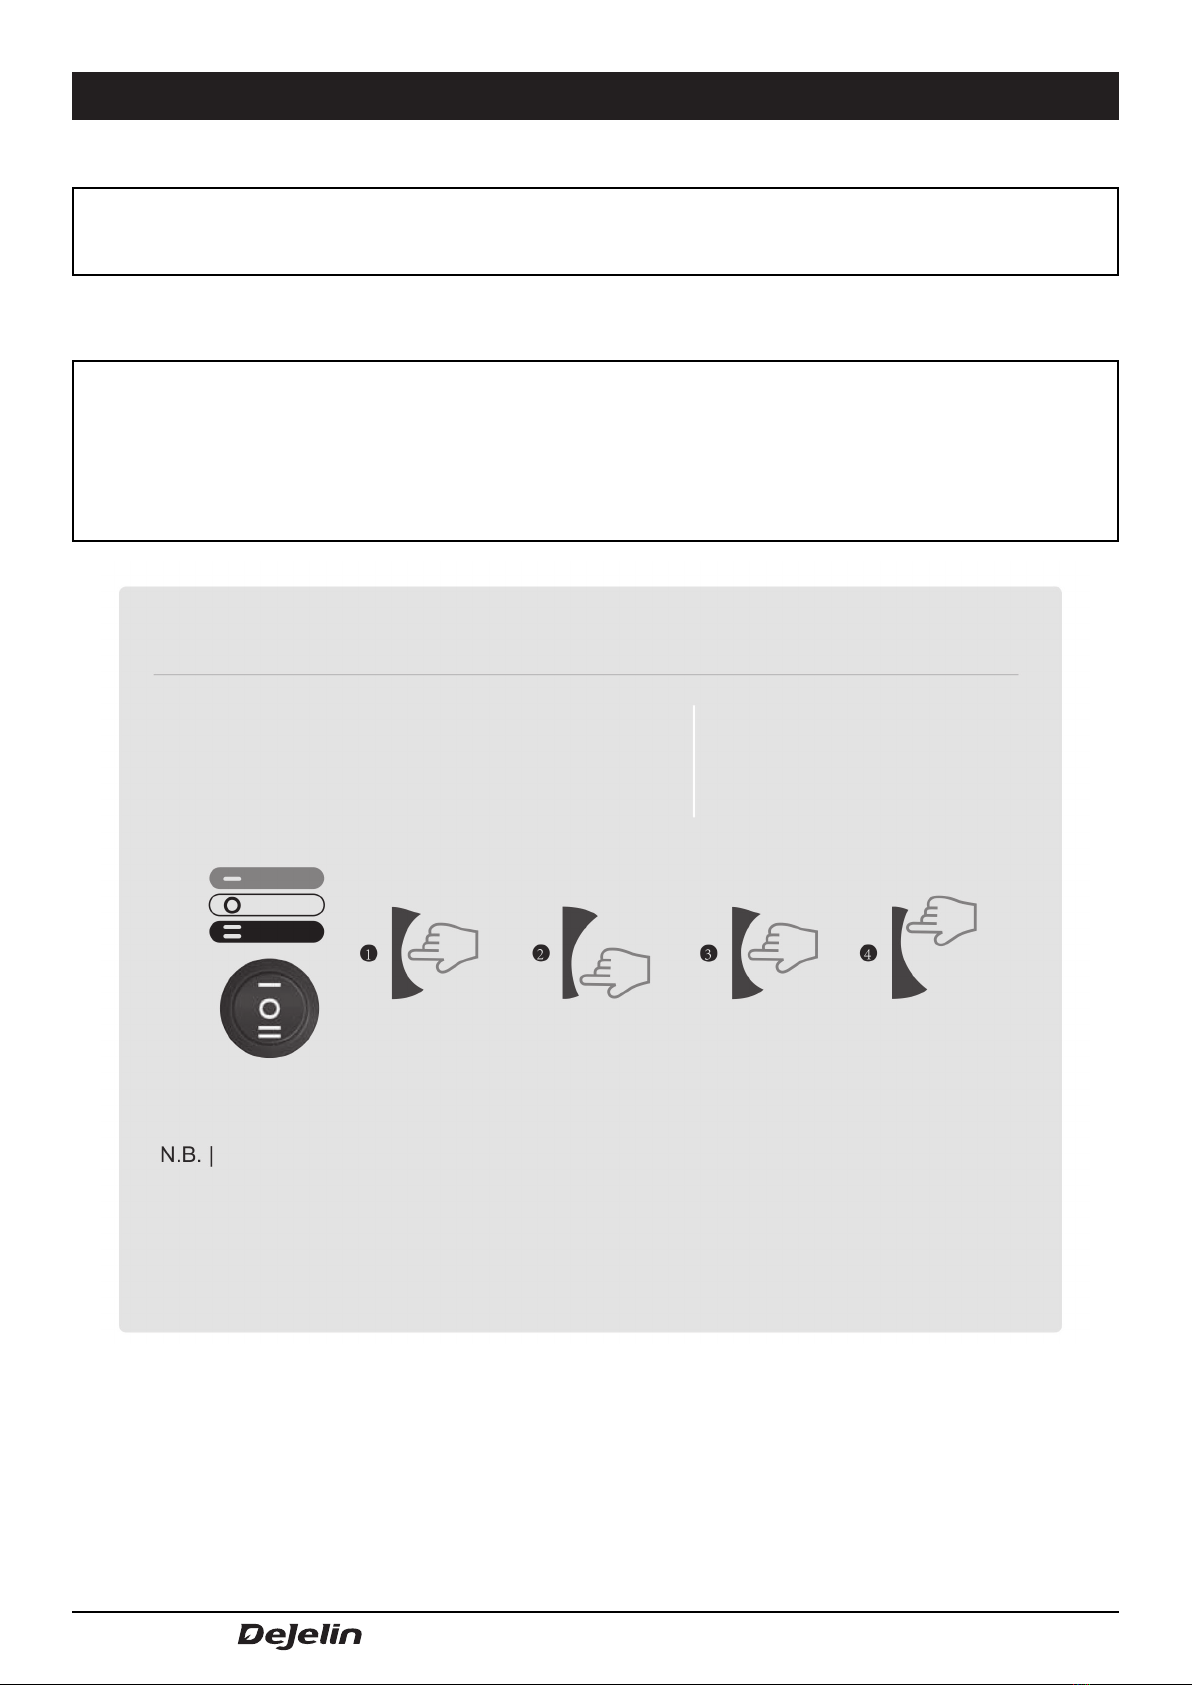
INSTRUCTIONS FOR USE
STEP 1 : Plug the plug into the socket when the ingredients are ready
• Don’t touch the electrical cord or the plug with wet hands. This can cause electric shocks, short circuit or re.
• Check the safety of the socket.
STEP 2 : Press the ‘FORWARD’ button to start
• The ‘FORWARD’ function pushes the ingredients down and slowly crushes them.
• The ‘REVERSE’ function pulls the ingredients back up when the appliance is jammed.
If the ingredients get stuck in the extraction screw and the lid doesn’t open, press the ‘OFF’ button.
Then keep the ‘REVERSE’ button pressed until the ingredients get unjammed. .
• Press the OFF button to make the juicer stop completely. Then press REVERSE. Keep
the REVERSE button pressed for 2-3 second. Repeat as much as needed. Stop the juicer
completely before pressing the REVERSE button to avoid defects.
• If the juicer doesn’t work after this process, disassemble it and clean the parts before using the
juicer again.
• REVERSE : pulls the ingredients back up to unjam them. The ‘REVERSE’ function works for
as long as the REVERSE button is pressed.
Put the button on OFF and then keep the REVERSE button
pressed until the ingredients get unjammed.
Repeat REVERSE – OFF – FORWARD us much as needed.
FORWARD : pushes the food down
OFF : stops the appliance
REVERSE : pulls the food back up
If the juicer stops while in use:
REVERSE
REVERSE FORWARD
FORWARD
OFF
OFF OFF
Slow Juicer - 11
INSTRUCTIONS FOR USE
STEP 3 : Insert the prepared ingredients one by one in the juicer
• Fibrous leafy vegetables (celery, kale, etc.) :
• Cut all stems and put them aside. Cut thick, hard stems in pieces of 10 cm or less.
• Bundle leaf vegetables before inserting them into the juicer. Alternate stems and leaves.
• Remove hard seeds and pits from the ingredients before juicing.
• Make sure that small seeds of frozen fruit are thawed before juicing.
• Insert the ingredients one by one in the juicer.
• As soon as the fruit is in the juicer you can use the tamper.
Excessive use of the tamper can affect the quality of the juice.
1. Use the tamper with intervals for soft ingredients such as tomatoes and apples. Constant use of the tamper
can affect the quality of the juice.
STEP 4: Use the smart cap to mix juices, to avoid dripping and to rinse between different juices
• If the smart cap is closed, the juice of different ingredients such as fruit, vegetables, milk, bananas, beans, etc.
will be mixed.
• Close the smart cap after juicing to avoid dripping, especially when the juice container is removed.
• If you make different juices, wash away all avours by pouring a glass of water in the extraction bowl and
switching on the appliance with a closed smart cap.
• Leave the smart cap open while juicing foaming ingredients (such as apples and celery for instance).
• Be careful when the smart cap is closed: the extraction bowl can overow when the quantity of juice exceeds
the indicated limit.
STEP 5:Turn off the appliance (‘OFF’) when all the juice is juiced and the pulp is removed
• The lid doesn’t open easily when some ingredients are not entirely juiced. Turn the appliance on for about 30
seconds to remove all the pulp from the ingredients after each juicing.
• When the lid is stuck, press two to three times on ‘REVERSE’-‘OFF’-FORWARD’ in this order, to unjam the
ingredients. Then rmly push the lid downwards and turn it counter clockwise to open it.
1. Depending on the ingredients, you can add water in the feeding shaft to rinse the inside or the extraction bowl
before removing the lid.

12 - Slow Juicer
INSTRUCTIONS FOR USE
1. The use of the juicer without ingredients could damage the extraction screw.
2. Don’t use the juicer longer than 30 minutes continuously,
this could damage the motor by overheating. Let the juicer cool during 30 minutes before using it again after
prolonged use.
3. Don’t insert any ngers or other objects in the feeding shaft. Always use the tamper if needed.
If other objects are put in the feeding shaft while the appliance is in use, those objects can get stuck and
damage the juicer and/or cause injuries.
4. Don’t insert dry or hard ingredients in the juicer, such as whole grains, fruit with a hard seeds or ice.
These ingredients could damage the parts of the juicer (such as the juice extraction bowl, the extraction screw
or the sieve).
• Beans and grains can be used if they have been cooked or soaked in water.
• Fruit with pits and hard seeds (such as nectarines, peaches, mangos and cherries) must be pitted before
juicing.
• Frozen fruit with small seeds such as grapes must be completely thawed before juicing.
5. Don’t use ingredients that are rich in vegetable oils or animal fat.
Don’t use the juicer to remove vegetable oil from ingredients either. If vegetable or animal fat gets on the
extraction screw, this could damage the part or affect the performance thereof.
6. Don’t insert pulp again in the feeding shaft. This could jam the juicer or the lid.
7. Carefully clean all crevices on the bottom of the extraction screw after juicing ingredients with seeds,
such as grapes.
Slow Juicer - 13
Damages on the juicer due to neglect by the user or failure to follow the instructions in this manual will not be
covered by the warranty.
NEVER INSERT THE INGREDIENTS BELOW IN THE JUICER:
CONSEILS D’UTILISATION
Make the best juice thanks to a good knowledge of the characteristics of the different ingredients
and knowing how you should best use them.
The slow juicer is an innovative product which juices efciently thanks to a patented technology where the
ingredients are crushed and juiced slowly. The juicer is developed for solid ingredients rich in water.
Mind the characteristics of the ingredients and prepare them correctly before juicing to get the best result.
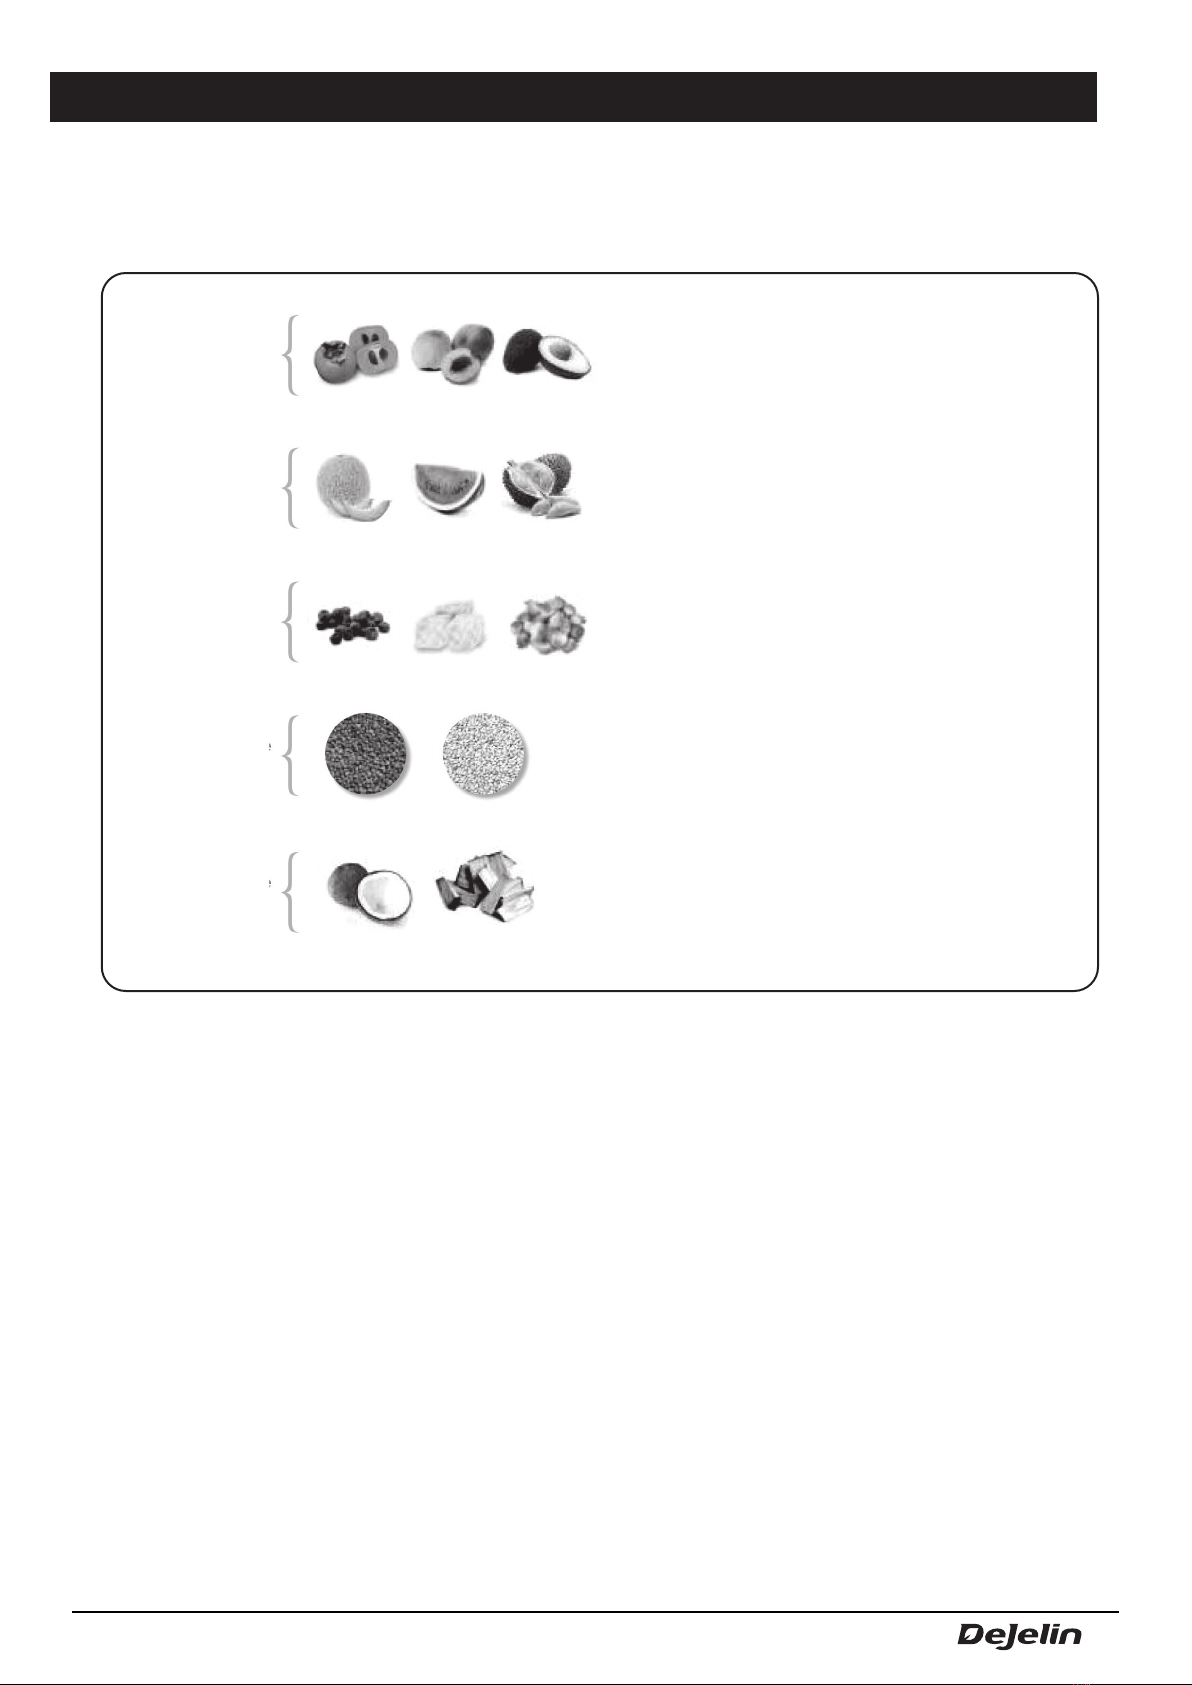
TIPS FOR INGREDIENTS
Hard pits:
Hard or
inedible skin:
Frozen fruit
or ice:
Hard vegetable
of animal fat:
Other:
peach, nectarine, apricot, plum, mango etc.
Remove the hard pits before juicing these
ingredients.
pineapple, melon, mango, orange etc.
Peel the ingredients before juicing.
frozen strawberries, blackberries, raspberries etc.
Completely thaw frozen fruit.
Don’t use ice.
sesame seeds, butter, margarine etc.
Don’t juice ingredients that are rich in vegetable oils
or animal fat. This can reduce the performance of the
juicer.
coconut, sugarcane, whole grains etc.
Don’t juice ingredients that don’t contain any water.

14 - Slow Juicer
BEFORE USE
• If the juicer is jammed or if the lid doesn’t open, press the ‘REVERSE’ button and keep it down until the ingredients
get unjammed. Repeat ‘REVERSE’-‘OFF-‘FORWARD’ as often as needed.
• Keep juicing until all ingredients are juiced out. The lid will be difcult to open if there is still a lot of pulp in the
juicer.
• Each ingredient has a different quantity of juice.
YIELD OF JUICE
• Follow these steps and cut the vegetables as explained here for an optimal juicing and a maximum yield of juice.
• Monitor the juice quantity when ingredients are added. The yield of juice will depend on the juicing speed.
SOFT FRUIT AND VEGETABLES (such as tomatoes and oranges)
TIPS FOR JUICING:
• Slowly insert prepared ingredients one by one in the feeding shaft.
• Use the tamper to push the ingredients in the feeding shaft. (The tamper also avoids that juice of watery
ingredients splashes out of the feeding shaft).
• Leave the smart cap open when juicing ingredients that foam heavily.
(The foam accumulates if the smart cap is closed)
• It is recommended to consume the juices within 48 hours after juicing. Depending on the density of the
ingredients, the juice could show layers.
• Sieve the juice if there is too much foam.
• When the extraction screw is turning, the juice of some ingredients might splash out of the feeding shaft.
Use the tamper to keep the juice in the juicer.
PREPARE THE INGREDIENTS FOR THE JUICER
TIPS TO PREPARE THE INGREDIENTS:
cut them in 1 to 4 pieces
Peel the oranges and remove the stem of apples and
tomatoes
• If the ingredients are bigger than the feeding shaft,
cut the ingredients in pieces that do t.
• Fruit with pits must be pitted before juicing.
Cut the fruit in 1 to 4 pieces and slowly insert them
in the feeding shaft.
1-4 pieces

Slow Juicer - 15
USE OF THE SMART CAP
• It is possible to mix the juices of different fruit, vegetables and uids when the smart cap is closed.
• Close the smart cap after juicing to avoid dripping, especially when the juice container is removed from the
appliance.
• If you juice different ingredients one after the other, wash away all avours by pouring a glass of water in the juice
extraction bowl and then switch of the appliance with a closed smart cap.
• Leave the smart cap open when juicing foaming ingredients (such as apples and celery).
• Be careful when the smart cap is closed: the juice extraction bowl can overow when the juice exceeds the
indicated limit.
ADAPT THE QUANTITY OF PULP IN THE JUICE
• Depending on the used ingredients, there can be more pulp in the juice with consecutive juicing.
• Disassemble the upper part and wash the parts regularly to limit the quantity of pulp.
HARD FRUIT AND VEGETABLES (such as carrots, potatoes, beets ans spinach):
TIPS TO PREPARE THE INGREDIENTS:
• Cut the ingredients 2,5cm thick or 2,5cm wide and 5 to 15 cm long.
• Soak hard ingredients such as ginger and carrot in cold water before juicing.
TIPS FOR JUICING:
• Slowly insert the prepared ingredients one by one in the feeding shaft.
• Adapt the speed to juice the ingredients completely.
• Juice watery vegetables and fruit to produce more juice.
PREPARE THE INGREDIENTS FOR THE JUICER
Hard fruit and
vegetables could
overload the motor and
consequently get it to
shut down.
Soak hard ingredients
in cold water before
juicing and cut them
into pieces of the
correct dimensions.
Juice watery
vegetables and fruit to
get more juice.

16 - Slow Juicer
INGREDIENTS WITH SMALL SEEDS (such as raspberries, pomegranates and grapes):
owly insert ingredients with small seeds in the juicer to avoid clogging the sieve.
TIPS TO PREPARE INGREDIENTS:
• Make sure frozen ingredients (such as raspberries and strawberries) are completely thawed before juicing.
• Always carefully wash ingredients such as grapes. Remove the grapes from the stem and throw the stem away.
• Peel the pomegranates and only press the esh of the pomegranate.
TIPS FOR JUICING:
• Depending on the size of the grapes: insert 3-5 grapes in the juicer and see how much juice they give.
• Add thawed ingredients such as raspberries and pomegranate by tablespoon (5g).
• Frozen ingredients usually lose a considerable amount of their liquid while thawing. Add milk or yogurt while
juicing to compensate.
CAREFUL
If the lid doesn’t open because of too many small seeds in the extraction bowl, make the juicer work for
30 seconds to remove the seeds. If the lid still doesn’t open, repeat the cycle REVERSE-OFF-FORWARD
until the ingredients detach. Then rmly push the lid downwards and turn it counter clockwise to open it.
(Depending on the ingredients, you can add some water in the feeding shaft to rinse the extraction bowl and
detach the seeds easier.)
PREPARE THE INGREDIENTS FOR THE JUICER
Slowly insert the ingredients in
the juicer to minimize the rests
of seeds in the sieve.
Juice watery vegetables and
fruit to produce more juice.

Slow Juicer - 17
FIBROUS AND/OR LEAFY VEGETABLES (such as celery, kale and pineapple) :
Fibrous ingredients such as celery and kale must be cut in short pieces before juicing.
When the pulp spout is jammed by brous ingredients, press the buttons REVERSE-OFF-FORWARD
in this order; repeat 2 to 3 times.
TIPS TO PREPARE INGREDIENTS:
• Soak brous ingredients for thirty minutes before cutting them into pieces.
• Remove all the stems and put them aside. Cut hard, thick stems in pieces of less than ten centimetres.
CONSEILS D’EXTRACTION:EXTRACTION
• Slowly insert the prepared ingredients one by one in the feeding shaft.
• Add more ingredients in the feeding shaft when the rst ingredients are completely juiced.
1. Roll leaves into a spiral before inserting them in the juicer.
2. First insert the leaf part of the ingredient in the juicer, then alternate leaves and stems.
3. For ingredients such as wheatgrass: take a handful, and insert them together in the juicer.
CAREFUL
• The bres of hard ingredients such as celery can wrap themselves round the extraction screw, which will
inuence the performance of the juicer. Cut hard, thick stems in pieces of less than ten centimetres.
• Peel brous ingredients such as pineapple and remove the brous centre. Cut the esh into small pieces.
• The recommended quantity per juicing is 500 grams. Wash the upper part after each juicing of 500 grams
ingredients.
PREPARE THE INGREDIENTS FOR THE JUICER
When juicing leafy vegetables
such as celery and kale, don’t
use more than 500 grams at
once. Disassemble the upper
part and wash the parts after
juicing leafy vegetables for the
best result.
If leafy vegetables
are stuck round the
extraction screw,
open the lid and
remove the bres
before continuing
juicing.
It is better to juice watery
ingredients such as car-
rots and apples.
The recommended ratio
between watery
ingredients and brous
ingredients is 9:1.
18 - Slow Juicer
DISASSEMBLING AND MAINTENANCE OF THE APPLIANCE
• Make sure the juicer removed all the pulp before
switching it OFF.
• Leave the juicer on for 30 seconds to make
cleaning easier.
• When the lid is jammed, repeat two to three times
the cycle REVERSE-OFF-FORWARD in this
order to detach the ingredients.
Then rmly push the lid down and turn it counter
clockwise to open.
Switch the appliance OFF
and unplug the appliance
Remove the extraction screw, the sieve and the
rotating scraper from the extraction bowl and clean
them with the supplied cleaning brush.
Hold the extraction bowl under running water and
remove the silicone tab to clean the pulp outlet.
TIP :
let the extraction bowl soak in warm water with a bit of soda
or a bit of bleach to remove excess of residue.
• Clean the juicer after each use. If the residues stay
in the juicer and dry, this might make cleaning
more difcult. The residues might also reduce the
performance of the juicer.
• Put the upper part in the sink and let some water
go through to make disassembling easier.
• Carefully dry the bottom of the extraction screw
(the part which is in contact with the metal
cylindrical shaft on the base).
Turn the lid counter clockwise to open it.
Place the extraction bowl on the base so that the
grey arrow aligns with the black arrow on the base.
Always hold the juicer by the base to move it.
Don’t lift the appliance by the feeding shaft.
To open the cover, turn it counterclockwise.
Slow Juicer - 19
WARNING
Make sure the silicone tab is correctly installed.
• Don’t use ice or products with vegetable oil or animal fat. This can cause damage.
• Remove pits and peel the ingredients before juicing.
Assemble the upper part by putting the extraction
screw and the ice cream sieve in the extraction bowl
and closing the lid.
1. Put the ice cream sieve in the extraction bowl and
align the red dots of both parts.
2. Place the extraction screw in the sieve.
3. Put the lid on the extraction bowl by aligning the red
dots of both parts. Then turn the lid clockwise until
it is tight.
* Always leave the smart cap open when the ice cream
sieve is used.
Place the assembled upper part on the base.
Lid
Extraction screw
Use the extraction screw which
was included with the slow juicer
White lter
Extraction bowl
Upper part
Only use the ice cream sieve with frozen
ingredients. Depending on the different
ingredients, they should be thawed
5 to 20 minutes before juicing.
Always juice small portions at the time.
Base
OPTIONAL I USE OF THE ICE CREAM ACCESSORY
Align the arrow of the lid with the
OPEN mark on the base and turn the
upper part clockwise until the arrow
of the lid aligns with CLOSE .
20 - Slow Juicer
OPTIONAL I USE OF THE SMOOTHIE ACCESSORY
Assemble the upper part by putting the extraction
screw and the smoothie sieve in the extraction bowl
and closing the lid.
1. Put the rotating scraper and the smoothie sieve in
the extraction bowl and align the red dots of both
parts.
2. Place the extraction screw in the smoothie sieve.
3. Put the lid on the extraction bowl by aligning the red
dots of both parts. Then turn the lid clockwise
until it is tight.
* For the best smoothie it is best to keep the smart
cap closed.
Lid
Extraction screw
Use the extraction screw which
was included with the slow juicer
Smoothie sieve
Rotating scraper
Extraction bowl
Align the arrow of the lid with the
OPEN mark on the base and turn the
upper part clockwise until the arrow
of the lid aligns with CLOSE .
Upper part
Base
Place the assembled upper part on the base.
Table of contents
Other DEJELIN Juicer manuals


