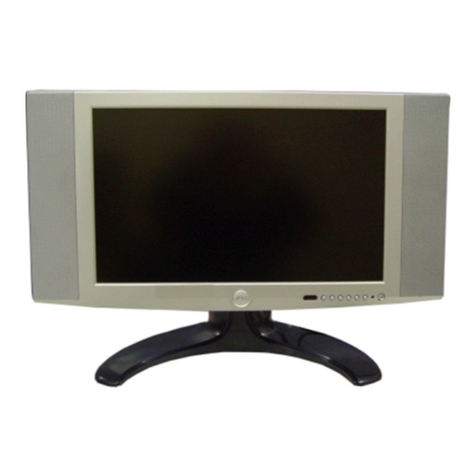
Dell W2306C User manual

Dell W2306C
S
SE
ER
RV
VI
IC
CE
E
M
MA
AN
NU
UA
AL
L
LCD TV MONITOR
W2306C
THESE DOCUMENTS ARE FOR REPAIR SERVICE INFORMATION ONLY. EVERY REASONABLE EFFORT HAS
BEEN MADE TO ENSURE THE ACCURACY OF THIS MANUAL; WE CANNOT GUARANTEE THE ACCURACY OF
THIS INFORMATION AFTER THE DATE OF PUBLICATION AND DISCLAIMS RELIABILITY FOR CHANGES,
ERRORS OR OMISSIONS.

Dell W2306C
1
Revision List
Version Release Date Revision Instructions TPV Model
A00 Sep-15-2005 Initial Release EDF5GGNKDEDMJMP
EDF5SGNKDEDBJMP
A01 Oct-24-2005
Second Version
(Remark: Add the <Item 2> Operation
Instructions and <Item 8> Repair Flow Chart)
A02 April-25-2006 Add “Max Brightness measurement” on Page 33

Dell W2306C
2
Table Of Contents
Revision List .............…………...............……..............................................………….......................... 1
Table Of Contents .............................................................................................………….......................... 2
1. General Specifications ................................................................................………….......................... 3
2. Operating Instructions ..................................................................................……………..………… 4
2.1 The Use Of Remote Control ..........................................................................................…………… 4
2.2 Panel Control Knobs and Ports ...................................................................................…………… 7
2.3 OSD Operating ............................................................................................................…………… 11
2.4 Connecting LCD TV Display ............................................................................................................ 17
3. Input /Output Specification ..........................................................................................…………… 22
3.1 Input Signal connector ............................................................................................................. 22
3.2 Factory Preset Display Modes ..................................................................................................... 23
4. ISP Program Instructions ........…………………………………………………………………………… 24
4.1 System Connection ............…………………………………………………………………………… 24
4.2 Install the software ............………………………………………………………………………… 25
4.3 Run the Program .......................………………………………………………………………………… 28
5. EDID Program Instructions ........………………………………………………………………………… 31
5.1 System Connection ............……………………………………………………………………………… 31
5.2 Run the DDC burn in
p
ro
g
ram ............…………………………………………………………………… 32
6. White Balance, Luminance Adjustment ………………………………………………………………… 33
7. Mechanical Instructions ........…………………………………………………………………………… 34
8. Repair Flow Chart .......................................................…………………………………………............ 42
9. BOM List ........................................................…………………………………………........................ 46
10. PCB Layout ........................………………………………………...........................………………...… 76
10.1 Main Board ......................…………………………......................…….............………………...… 76
10.2 Power Board ................……...................………..............……......……….........………………... 80
10.3 Tuner Board ...........................………........………………………………………………………….. 82
10.4 Key/IR Board ..........................………........………........………..............…….......……………….... 84
10.5 Side Board ...........................………........………........…………………………………………… 85
11. Block Diagram .........................................................................................…………………………... 86
11.1 Main Board ...........................………........……………………………………………………………... 86
11.2 Power Board ...................................………………………………………………………...………... 87
11.3 Exploded View ...........................……………………………………………………………………… 98
12. Schematic Diagram .............…………....................................................……………………………. 89
12.1 Main Board ......................……....................................................……………………………….. 89
12.2 Power Board ...................……....................................................……………………………….. 99
12.3 Tuner Board ...................…………..............................................……………………………….. 100
12.4 Key/IR Board ..........................…………........................................……………………………….. 101
12.5 Side Board .......................…………...............................................……………………………….. 102
12.6 Back Board .......................…………...............................................……………………………….. 103

Dell W2306C
3
1. General Specifications
Items Specification
LCD Panel
Screen Size 23” TFT LCD color Panel (LPL)
Image Aspect Ratio Wide Screen (16:9)
Resolution 1360 x 768@60HZ
Active Display
Area(H×V) 508.13mm×285.70mm
Pixel Pitch 0.372mm×0.372mm
Display colors 16.7 million
Contrast Ratio 550:1 (Typical)
Brightness 450 cd / m²(Typical)
Viewing Angle 170°(Horizontal) / 170°(Vertical)
Response Time 16 ms (Typical)
Lamp Lifetime 50,000 hr
Color Temperature Cool / Warm
TV Function
TV Tuning System USA: NTSC
Inputs
Video
Composite(CVBS)/S-Video One(side)
Component Two(bottom)
TV in(coaxial) One(bottom)
Audio(L+R) Four pairs
DVI (For use with a video device) One(bottom)
Computer
VGA (For use as computer monitor) One(bottom)
DVI (For use as computer monitor) One(bottom)
Audio (PC) One (bottom)
Outputs Video
Composite(CVBS) One(bottom)
Audio(L+R) One pair
Headphone One(side)
PC Input
Signal Input Analog: D-Sub 15 pin (detachable cable)
Digital: DVI-D 24 pin (detachable cable)
PnP compatibility DDC2B
Input frequency Analog: FH: 31 kHz to 64 KHz; FV: 56 Hz to 75 Hz
Input Audio F Headphone Mini-jack for stereo
Audio Output Audio Output: L / R
Speaker (built-in): Two 7(max) watt speakers
Headphone Mini-stereo jack (at side)
Effects: SRS TruSurround XT; Midnight Mode
Other Function V-chip, closed caption (only for USA model)
OSD language English/Spanish/French
Table Stand Included
Wall Mount VESA spec FDMI – 100 mm X 200mm hole spacing required
Power Power Supply AC 100V~240V, 50 ±3Hz, 60 ±3Hz
Power Consumption <120 W
Panel Tilt/ Swivel Tilt, Swivel -5 /+20 degrees, +/- 45 degrees.
Environment
Operating Temperature: +0°C ~ + 40°C
Humidity: 10% ~ 85%
Storage Temperature: -10°C ~ + 50°C
Humidity: 5% ~ 85%
Weight (with stand) 10 Kg
Accessories Remote Control, AAA Batteries (2), Power Cord, Composite Video Cable, Audio Cable,
Coaxial Cable, Documentation: Setup Guide, Product Information Guide, Owner’s Manual.

Dell W2306C
4
2. Operation Instructions
2.1 The Use Of Remote Control
Installing batteries
Before you use your remote control, install two-AAA batteries.
1. Slide open the battery cover.
2. Install the batteries, make sure that you match the + and – on the batteries with + and – symbols in the battery
compartment.
3. Replace the battery cover.

Dell W2306C
5

Dell W2306C
6
1 Power Button
Turns the LCD TV display on and off
2 Number Button
Press to select a channel
3 Enter Select a TV menu option, confirm a channel selection
4 Mute Press to turn the sound on and off
5 CH (up icon)
Push to view the next channel
In the TV menu, use the channel button to navigate through the menus in the
TV menu
6 Vol +
Increase the volume
In the TV menu, use the volume button to navigate through the menus
7 CH (down icon)
Push to view the previous channel
In the TV menu, use the channel button to navigate through the menus in the
TV menu
8 Pict Cycles through the preset options for the picture menu
9 INFO Display information about your TV display (for example, in TV mode displays
the channel you are watching)
10 SRS Toggle SRS surround on and off
11 Midnight Toggle midnight on and off
12 Wide Cycles through the size (aspect ratio) options from the picture menu
13 Sleep Turns on the sleep timer
14 CC Cycles through the Closed Caption menu
15 SAP Turns on the Second Audio Program (SAP)
16 ANT Selects TV turner as input source
17 DVI Selects DVI as input source
18 Audio Cycles through the preset Audio options
19 OK Select an TV menu option, confirms a channel selection
20 Vol -
Decrease the volume
In the TV menu, use the volume button to navigate through the menus
21 Menu Enters and exit the TV Menu main menu
22 Last Returns you to the previously viewed channel
23 Input Enters and exits the TV Input Select menu

Dell W2306C
7
2.2 Front Panel Control Knobs
Front View
1. IR receiver Senses the signal
2. Power indicator (LED)
The light is blue when the LCD TV is on and amber when the
LCD TV display is in power save mode.

Dell W2306C
8
Right Side View
1. Power button Push to turn the LCD TV display on and off, the power button is blue
when it is on and amber when it is in power saving mode
2. TV menu button Push to enable the TV menu
3. Volume button Push to decrease the volume
4. Volume button Push to increase the volume
5. Channel button Push to select the previous channel or navigate through the TV menu
6. Channel button Push to select the next channel or navigate through the TV menu
7. Input select button Push to display the input select menu

Dell W2306C
9
Left Side View
1. AV Side (S-Video 1) Connect devices such as a video game system or a VCR.
2. AV Side (Composite 1) Connect devices such as a VCR or DVD player
3. Composite audio connector Use the audio connector if you have connected a device
to connector
4. Headphone connect Connect headphones

Dell W2306C
10
Bottom View
1. Power Connector Connect your power cord
2. Composite out/audio out (L/R) Connect a VCR
3. Composite out/video out Connect a VCR
4. Composite video and audio
connectors (AV1) Connect devices such as a DVD player or cable TV box.
5. Composite video and audio
connectors (AV2) Connect devices such as a DVD player or cable TV box.
6. DVI audio connector (L/R) Use the DVI audio connector if you have connected a device
such as a DVD player to the DVI connector.
7. VGA Connect your computer
8. DVI connector Connect your computer or video devices such as a DVD player
9. Audio connector for VGA or DVI Connect the audio cable from your computer to the LCD TV
display.
10. ANT/Cable Connect cable TV box or an antenna.

Dell W2306C
11
2.3 OSD Operating
Using Remote Control With the TV Menu
1. To enter the TV menu, press the menu button. Seven icons appear along the bottom of the screen.
2. Move the left and right buttons (volume buttons) to move between the icons.
The icon appears highlighted as you move through the menu.
3. To select an option, push the OK button when the icon is highlighted.
4. A new menu appears for that selected option, use the up and down buttons (channel buttons) to move through
the various setting.
Note: A red arrow appears next to the setting as you navigate through the options. A check mark appears
next to the option that you have selected.
5. Use the left and right buttons (volume buttons) and the OK button to adjust or select setting.
Note: You can select EXIT at any time to return to the main menu.
6. After you have made your selections, select Exit to return to the main menu.
7. To exit the TV menu, select the EXIT icon and press OK.
Selecting your TV Menu Language
1. Press menu to enter the TV menu.
2. Select Setup.
3. In the Setup menu, select language and select the language that you want the TV menu to appear in.

Dell W2306C
12
Input Select TV Menu
The Input Select menu allows you toe select the proper source based on how you have you LCD TV display and
video equipment connected. Press Input on the remote to go directly to the Input Select menu.You can also press
menu and select Input select from the main menu.
VGA – Select when your LCD TV display is being used as a computer monitor and you have connected the
computer using a VGA cable.
DVI – Select when your LCD TV display is being used as a computer monitor and you have connected the computer
or when you have connected a device, such as a DVD player using the DVI cable.
TV – Select when you have your antenna or cable TV box connected to the ANT/Cable connect.
AV1(Component 1) – Select when you have a video device, such as a DVD player, connected to the component
connector.
AV2(Component 2) – Select when you have a video device, such as a DVD player, connected to the component
connector.
AV SIDE (Component 1) – Select when you have a video device, such as a video game system, connected to the
composite connector on the side of the LCD TV display.
AV SIDE (S-Video 1) – Select when you have a video device, such as a VCR, connected to the S-Video connector
on the side of the LCD TV display.
SHOW INPUTS – Show Inputs allows you to select active or all. Active searches for which connectors are being
used. The available input sources appear in white and input sources that are not available appear in grey. All shows
all the input sources and allows you to select all the input sources even if you do not have a device connected.

Dell W2306C
13
Picture TV Menu
The picture menu allows you to adjust the appearance of the image including color and brightness. If you select one
of the following preset image setting the individual setting are automatically updated.
●Movies
●Sports
●Weak Signal
●Multimedia
If you select personal, you can adjust the individual setting, such as brightness and color.
The color temperature presets are: Natural: 6500K
Normal: The native panel temperature: Blue: 9300K Red: 5700K
Audio
The audio menu allows you to set the audio to best fit the type of show you are watching.
SRS Trusurround XT – Delivers virtual surround sound over two speakers from any source, which creates a wider
sound with deep rich bass.
MIDNIGHT MODE – Evens out the large volume variations between voice and action scenes. If you select one of
the following preset Equalizer Mode settings, the individual audio levels are automatically updated:
●Music
●Theater
●Voice
If you select Personal, you can adjust the individual audio levels, such as Bass and Treble.
Use Program toe select Stereo, Mono, or SAP (Second Audio Program)

Dell W2306C
14
Size
Size allows you to adjust the appearance of the image. Use Horizontal shift to adjust the horizontal placement of the
image.
Use the following setting to adjust the aspect ratio:
STANDARD – Best selection for viewing digital HDTV, 16:9 or 22:9 DVD movies.
ZOOM – Best selection for viewing TV VCR or 4:3 DVD movie.
4:3 – Best selection for viewing digital HDTV, VCR or 4:3 DVD movies.
WIDE – Best selection for viewing digital HDTV, 16:9 or 22:9 DVD movies.
FULL SCREEN –Best selection for viewing digital HDTV, or 16:9 DVD movies.
Parental Control
Parental Control allows you to block certain channels or programs to child cannot view programs that are not age
appropriate.
To enter the Parental Control menu, you need an access code. The first time you enter access code 3355.
You can set the following options to block content:
●Channel Lock – Block selected channels
●Movie Rating –Block movie based on their rating (G, PG, PG-13, R, NC-17, and X)
●TV Rating – Block TV shows based on their rating.
●Block Options – Turns on or off all your parental control setting.
NOTE: You can use clear all to unblock the channels and programs that you have set.

Dell W2306C
15
Setting an access Code
After you enter the parental Control menu for the first time, you can set your own four-digit access code. If for any
reason you lose or forget you access code, you can use the default code.
1. In the parental control menu, select change code.
2. Using the number pad on the remote control, enter a new access code.
3.Select Exit.
TV Menu Setup
TV Menu Setup allows you to adjust the appearance of the TV menu, to change the language of the TV menu and to
restore factory setting.
Use the TV menu setting menu you can select TV Button lock to lock the TV menu and the side panel buttons, when
this option is enabled, only the power button functions. To unlock the TV menu and side panel buttons:
1. Press the menu button on the TV.A message appears stating that the TV is locked.
2. While the message is on the TV, press the channel up and volume increase button simultaneously.
Setting you cable channel
Your TV is set to automatically detect whether you are using an antenna or cable and then set the available channels,
some cable providers use an older cable standard that the TV can not automatically detect. If you have your TV
connected but can only view channels 5 and 6,complete the following steps:
1. Press the menu button, the remote control or TV and enter the TV menu.
2. Select setup and then select channel setup.
3. In channel setup, select Antenna/Cable, and then toggle to cable.
4. If selecting cable does not resolve the issue, repeat steps 1 through step 3 using each available channel setup
option (HRC, IRC, and Antenna) until you can view all channels.

Dell W2306C
16
Sleep Timer
Sleep Timer allows you to select an increment of time after which the LCD TV display turns off automatically. You
can select from 10 minutes to 3 hours
Closed Caption
In the Closed Caption menu, you can select on, off, or Mute. If you select Music automatically displays when you use
the mute button on the remote control.
You can choose from the following Caption modes.
●CC1 through CC4 and TXT1 through TXT4 (CC1, CC2, and CC4 offer standard Closed Captioning and CC3
provides closed captioning in a secondary language.)
●CC Mute (automatically turns CC on when you mute the TV volume)

Dell W2306C
17
2.4 Connecting LCD TV Display
The LCD TV display has four standard connectors that can be used to connect devices.
Note: Before you connect your LCD TV display, ensure you have all the proper cables. Some cables may come
with the device you are connecting.
Quality Cable and Connector When to use
Good
Coaxial (RF) carries the video
and audio from one cable. The
coaxial connector is labeled,
ANT/Cable on your LCD TV
display.
Good
Composite carriers the video
signal through a single pin. If you
are using a composite video
connector you also need to
connect composite audio
connectors.
Better
S-Video splits the video signal
into two signals, black-and-white
and color.
Best
Component splits the video signal
into three signals, two color and
one black-and-white

Dell W2306C
18
Connect LCD TV to computer
The LCD TV display has two standard connectors that can be used to connect your computer.
Note: The type of connector you use depends on the graphics card your computer supports. For additional
information about graphic cards, see your computer documentation.
Quality Cable and Connector When to use
Good
A standard graphic display
system for computers that uses
an analog signal and can support
resolutions up to 1360 x 768.
Better
A digital signal that can support
digital and convert analog to
digital. DVI can be used for high
resolutions display and can
support resolutions up to 1360 x
768.
Connect the audio cable from
your computer to the LCD TV
Display Audio connector for VGA
or DVI.

Dell W2306C
19
Use the ANT/Cable (Coaxial) Connector
1. Turn off the LCD TV display and unplug the power cord.
2. Connect the coaxial cable to the ANT/Cable connector of the LCD TV display.
3. Plug in the power cord for the LCD TV display and turn on the LCD TV display.
4. Enter the TV menu and select TV.
Using the Composite Connector
1. Turn off the LCD TV display and unplug the power cord.
2. Connect your device including the audio cables.
3. Plug in the power cords for the LCD TV display and device and turn them on.
4. Enter the TV menu and select the AV SIDE (Composite 1).
Other manuals for W2306C
4
Table of contents
Other Dell Monitor manuals

Dell
Dell U4021QW User manual

Dell
Dell 2009WFP User manual

Dell
Dell OptiPlex Gs Instruction Manual

Dell
Dell S2721H Installation instructions

Dell
Dell DR4300 User manual

Dell
Dell SX2210T User manual

Dell
Dell UltraSharp U2711 User manual

Dell
Dell UP2720QB Instructions for use

Dell
Dell SP190SFP User manual

Dell
Dell P1917S User manual

Dell
Dell P2722H Manual

Dell
Dell AW2720HF Installation instructions

Dell
Dell E2222H User manual

Dell
Dell U2720Q User manual

Dell
Dell S2421H Instructions for use

Dell
Dell P3221D User manual

Dell
Dell UltraSharp 2009W User manual

Dell
Dell UltraSharp 30 User manual

Dell
Dell E173FP - 17" LCD Monitor User manual

Dell
Dell S2722DGM Instructions for use