DELLA 0DH-DH30 User manual
1
NOTICE:
If your package is missing parts or you are having issues with assembly, please call Belleze Furniture directly at
(909)-595-5901. The Belleze Furniture customer service team will address any questions or concerns you may have.
Have this manual open and ready for reference.
CUSTOMER SERVICE:
909-595-5901
9:00AM - 6:00PM PST (Monday - Friday)
Model# 0DH-DH30 / 50 / 70
USER’S MANUAL
30 / 50 / 70 PINT DEHUMIDIFIER
⚠CAUTION! WARNING: Do not use this device before reading these instructions.
www.dellaproductsusa.com

2
Table of Contents
Warnings & Precautions ---------------------------------------------------------------------
Technical Specication ------------------------------------------------------------------------
Parts and Features ------------------------------------------------------------------------------
Installation guide ------------------------------------------------------------------------------
User Instruction -------------------------------------------------------------------------------
Troubleshooting -------------------------------------------------------------------------------
Error Code Chat ---------------------------------------------------------------------------------
Recommend Humidity Level -----------------------------------------------------------------
03
04
05
06
08
11
12
12

3
When using electrical appliances, basic safety precautions should always be followed including the following:
READ ALL INSTRUCTIONS BEFORE USE
1. To disconnect, turn o the unit and then unplug the power
cord.
2. Close supervision is necessary if the appliance is used by or
near children.
3. This appliance is not intended for use by person(s) (including
children) with reduced physical, sensory or mental capabilities,
or lack of experience and knowledge. Unless they have
been given supervision or instruction concerning use of the
appliance by a person responsible for their safety.
4. Do not store gasoline or other ammable vapor or liquid
near this unit.
5. Do not operate any appliance with a damaged cord or plug
or after the appliance malfunctions, or has been dropped
or damaged in any manner. See warranty to return for
examination, repair, or electrical or mechanical adjustment.
Appliance serviced only by authorized agent.
6. The use of accessory attachments (not recommended or sold
by the manufacturer) may cause re, electric shock or injury.
7. Do not use outdoors.
9. Do not use appliance for anything other than intended use.
10. Always place this unit on a solid and level surface.
11. Do not cover the air inlet or vents.
12. Do not use extension cord. This appliance is for household
use only.
13. This unit must be connected to a grounded power supply.
14. Keep at least 18 inches clearance space around the unit.
15. Do not use the unit near a bath, shower, or a swimming
pool.
POLARIZED PLUG INFORMATION This appliance has a polarized
plug (one blade is wider than the other). To reduce the risk
of electric shock, this plug is intended to t into a polarized
outlet only one way. If the plug does not t fully into the
outlet, reverse the plug. If it still does not t, contact a qualied
electrician. Do not attempt to modify the plug in any way. If the
plug ts loosely into the AC outlet or if the AC outlet feels warm
do not use that outlet.
SAVE THESE INSTRUCTIONS

4
Specications
Model Number 0DH-DH30 0DH-DH50 0DH-DH70
Dimensions (W x D x H) 13.38”x10.15”x19.48” 13.38”x10.15”x19.48” 14.96”x11.33”x24.80”
Net Weight 30.8lb 33.1lb 46.9lb
Gross Weight 35.2lb 37.5lb 49.9lb
Power Rating 300W 490W 685W
Voltage 115V 115V 115V
Frequency 60Hz 60Hz 60Hz
Capacity 30Pint/24hrs 50Pint/24hrs 70Pint/24hrs
High Side Pressure 530PSIG (3.65MPa) 530PSIG (3.65MPa) 530PSIG (3.65MPa)
Low Side Pressure 320PSIG (2.2MPa) 320PSIG (2.2MPa) 320PSIG (2.2MPa)
Refrigerant/Charge R410A/5.29oz (150g) R410A/6.17oz (175g) R410A/9.35oz (265g)
5
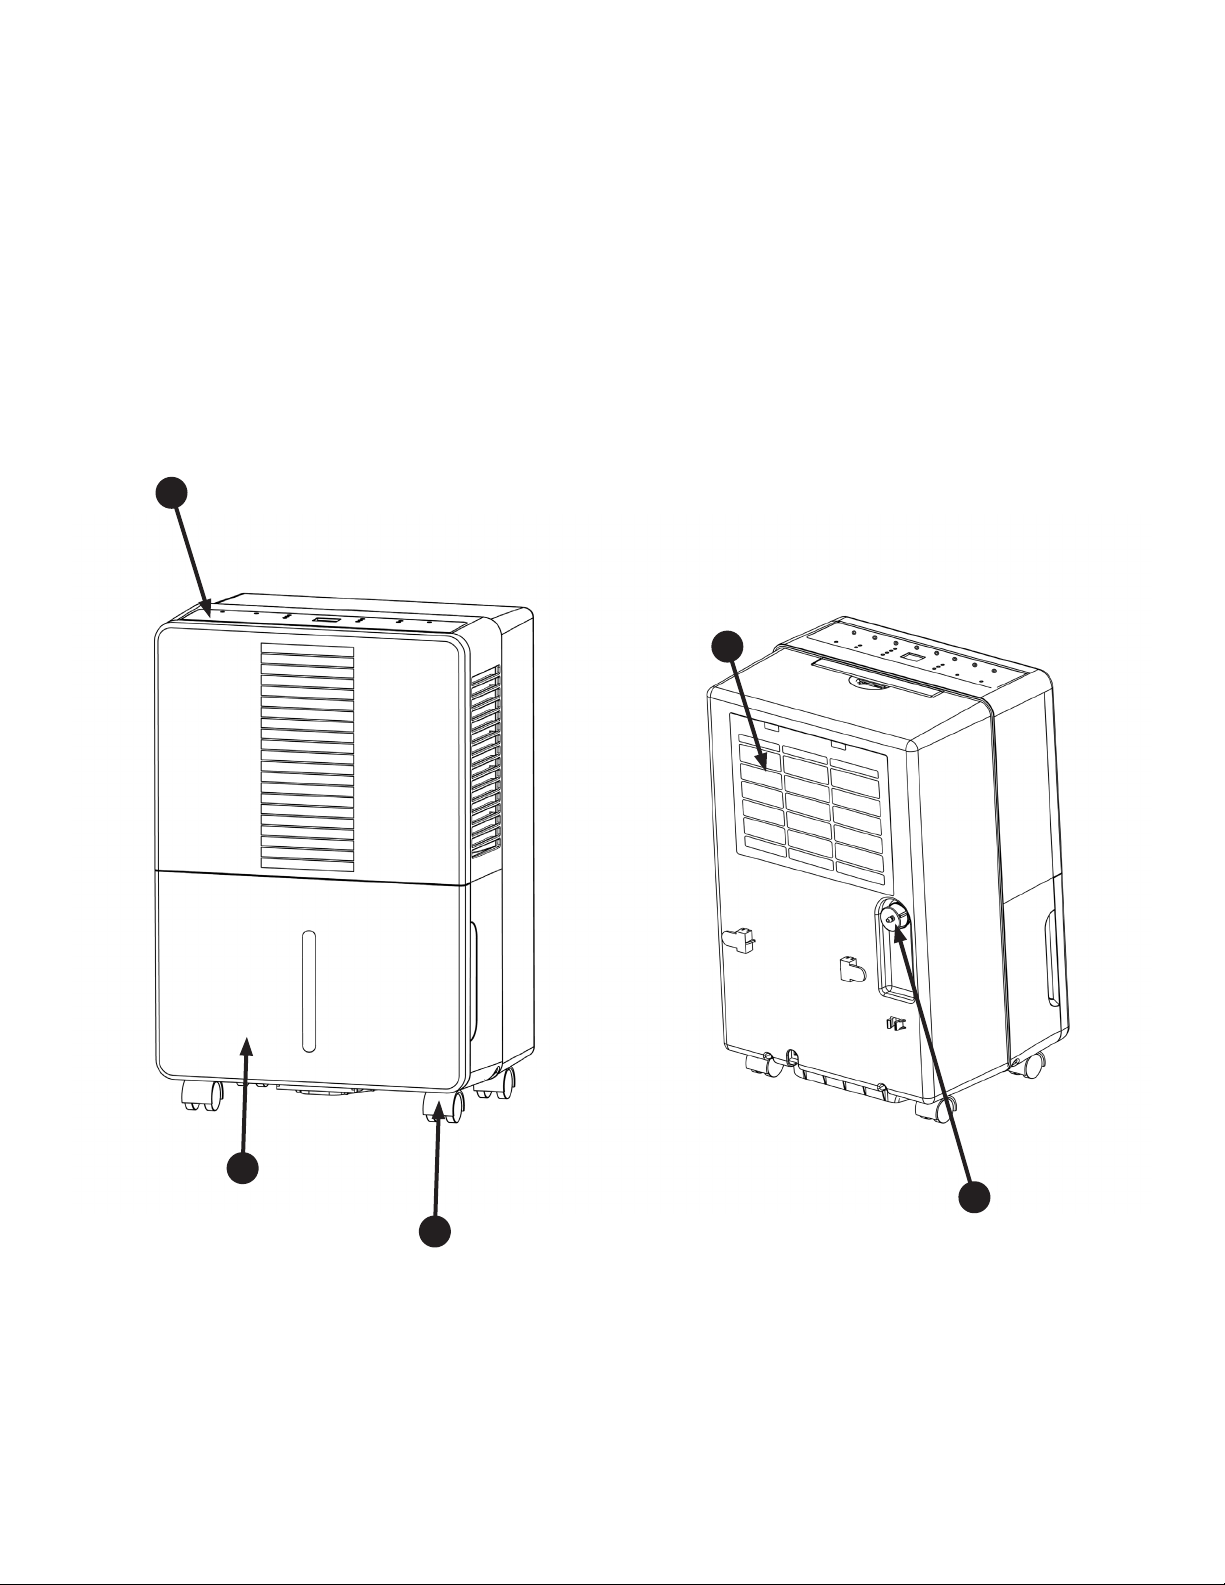
Parts & Features
A
B
C
D
E
A. Control Panel
B. Water Bucket
C. Caster
D. Filter
E. Drain Cap
6
Installation Guide
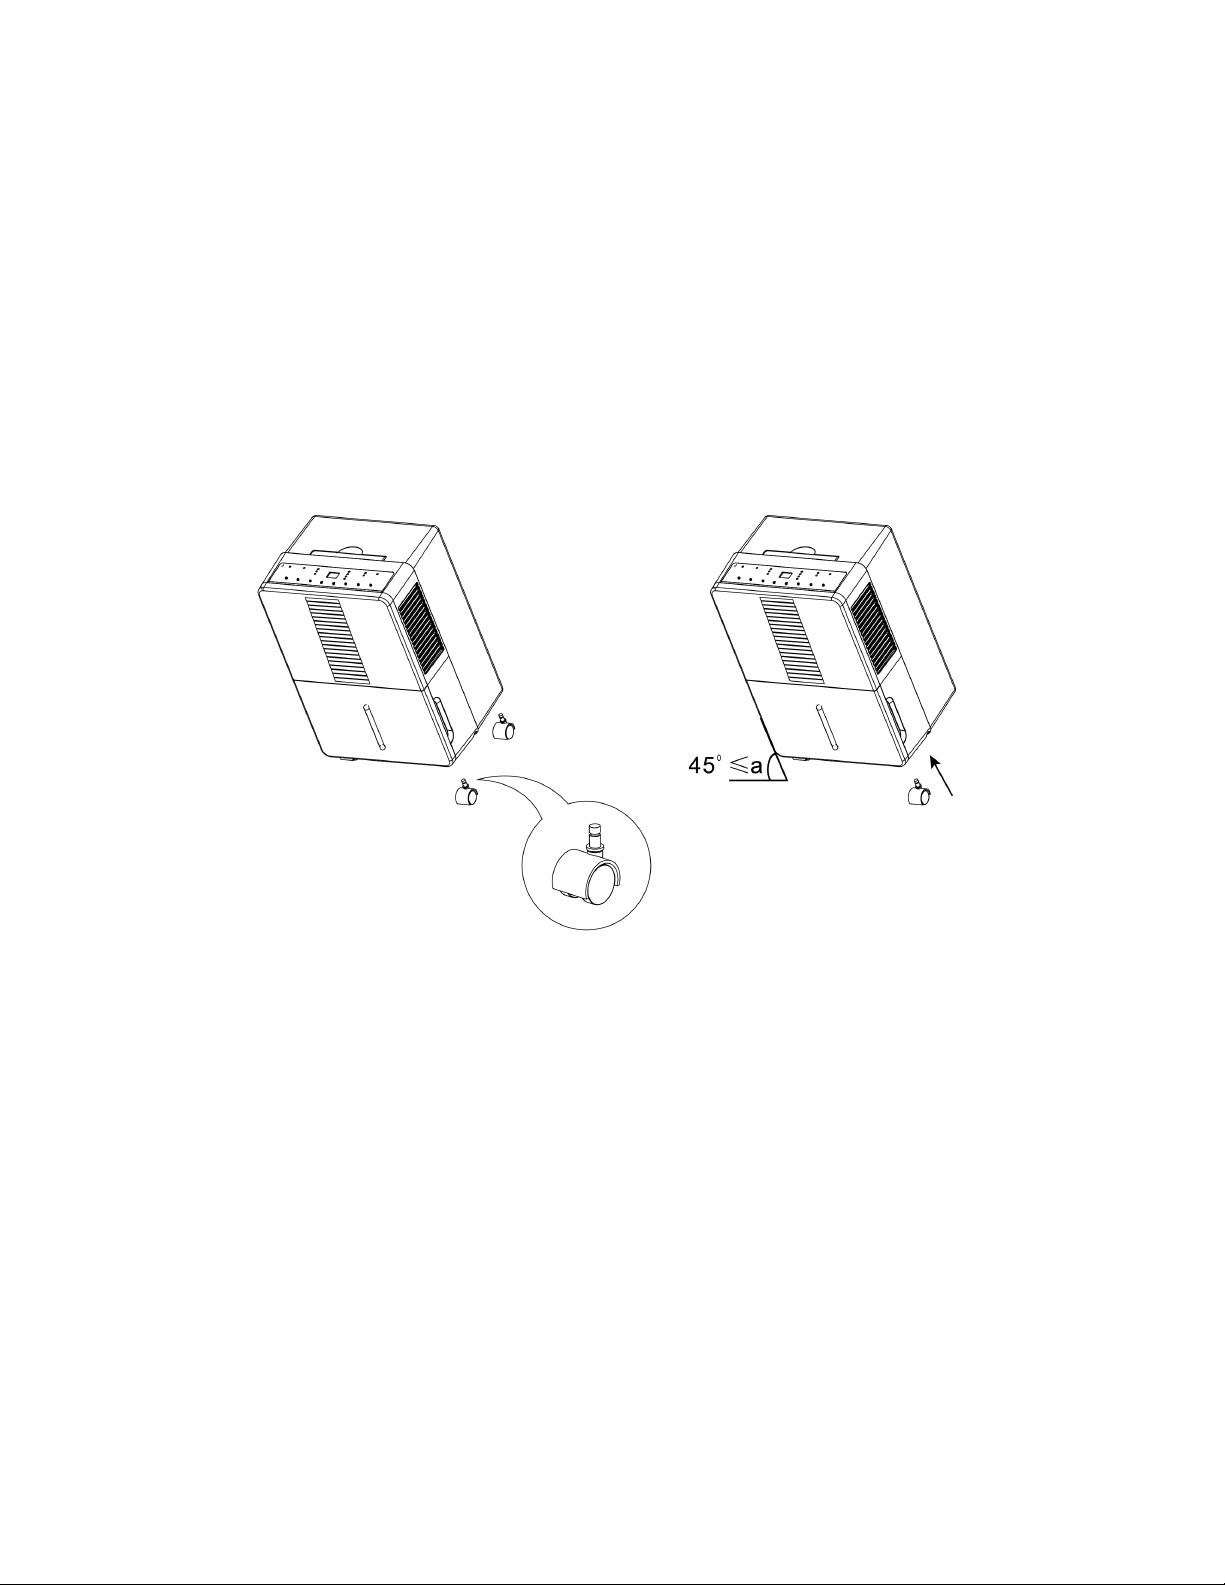
Casters Installation
Remove casters from the water bucket.
* They might be on the side / underneath the lid.
Insert the casters to the bottom of the dehumidier. Make sure the ring on the caster is ush against the
dehumidier.
⚠CAUTION! WARNING: Do not tilt the dehumidier more than 45°.
Placing the Dehumidier
Place the dehumidier in the room need to reduce and/or maintain humidity.
Place the dehumidier on smooth level surface.
Allow at least 18”(45cm) of clearance space around the unit.
Plug the unit to a grounded power socket.
NOTE:
The dehumidier is intended for indoor use only.
The dehumidier works best in enclosed area.
⚠CAUTION! WARNING: Do not place the unit in an area below the temperature of 41°F (5°C).
⚠CAUTION! WARNING: Keep the unit away from direct sunlight.

7
Installation Guide
Pump Drain Hose Kit Installation*
The internal pump allows the unit to operate without the need to empty water bucket.
To install the pump drain hose kit, remove the drain cap on the back of the unit.
Place the included gasket into the drain adapter. Connect the drain hose to the adapter and screw the
adapter on the back o the unit.
Lead the end of the drain hose to a nearby drain, sink, or a window up to 16” in height from the base of the
unit.
Turn on the unit and press PUMP button to enable the internal pump.
TIPS:
You may use plumber’s sealing tape (not included) for better sealing
*Only applicable to the pump model.
⚠CAUTION! WARNING: Make sure the drain hose does not tangle.
⚠CAUTION! WARNING: Placing the unit on uneven surface or improper hose installation may result in
water lling up the bucket and causing the unit the shut o.

8
User Instruction
Control Panel
FUNCTION:
Power ON/OFF:
Humidity Selection:
Fan Speed Control:
Timer Auto On:
Timer Auto O:
Mode:
Child-Lock:
Press the POWER button to turn on and o the unit
Press the or button to set the desired humidity in the room from
35% to 80% with a 5% interval.
Press the FAN button to rotate and select dierent fan speed: High, Medium,
Low.
To program the unit to automatically turn on, press TIMER button when the unit
is OFF. Press or to increase or decrease the timer in 30 mins interval
for the rst 10 hours, and 1 hour interval from 10 - 24 hours.
To program the unit to automatically turn o, press TIMER button when the unit
is ON. Press or to increase or decrease the timer in 30 W interval for
the rst 10 hours, and 1 hour interval from 10 - 24 hours.
Press MODE button to choose between Continuous operation, Basement mode,
or Bedroom mode.
Basement mode:
Preset mode for better performance in basement use.
Bedroom mode:
Preset mode for best comfort in bedroom use.
Continuous operation:
Disable the unit from cycling ON and OFF and allow the unit to operate
continuously.
Press and hold TIMER button for 3 seconds will enable child lock and prevent
someone from accidentally changing the setting. The lock indicator will me on.
Press and hold TIMER button for 3 seconds to disable child-lock.
9
User Instruction
Care and Maintenance
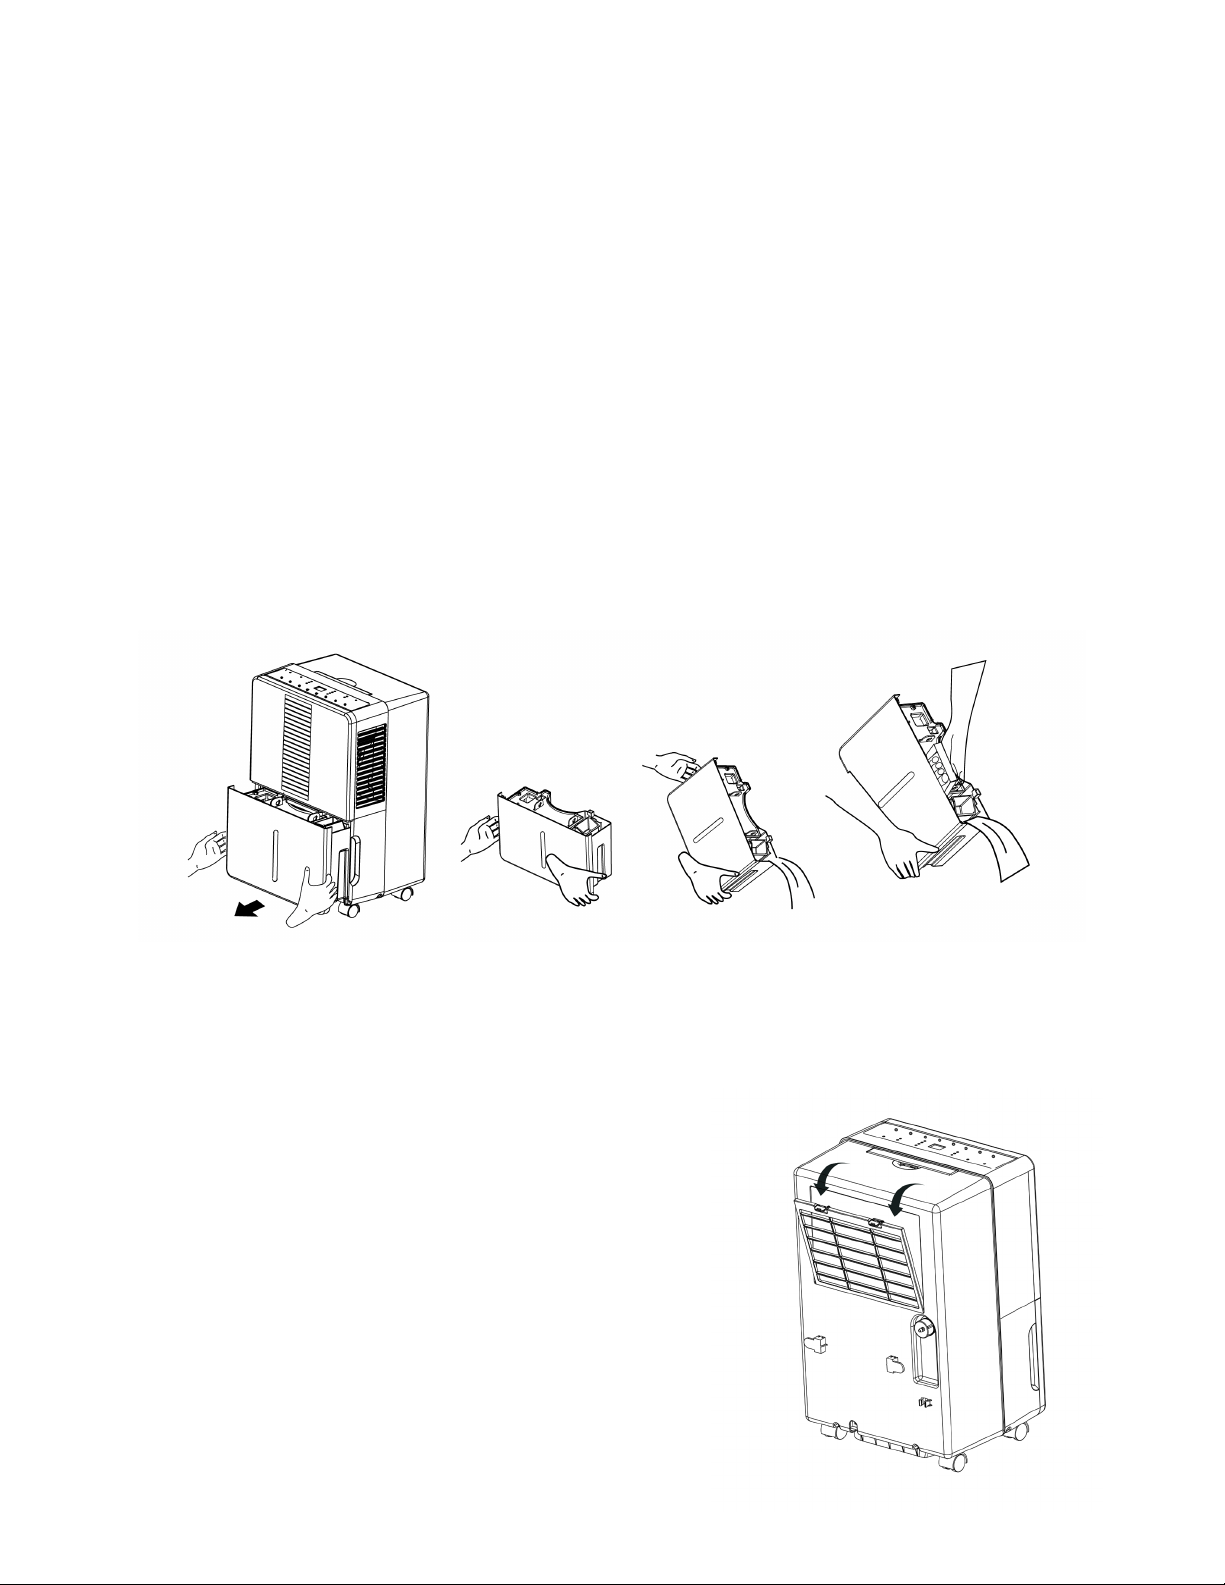
Clearing the water bucket:
The bucket full indicator will light up when the water bucket is full. The compressor will automatically turn
o and there will be a beeping sound.
• The unit will not function until the water bucket is empty and put back into the unit.
• The bucket should be cleaned every few weeks to prevent mold, mildew, and bacteria growth.
To remove the bucket from the unit, pull the bucket straight out.
⚠CAUTION! WARNING: When the bucket is full or removed from the machine, the compressor will turn
o, but the fan will continue to run for a few minutes.
⚠CAUTION! WARNING: Do not place a full bucket on the oor, the bottom of the bucket is uneven and
might cause spilling.
Clearing the lter:
The lter indicator will light up (after 250 hours of use) when the lter needed to be cleaned.
To remove the lter, press down the lter tabs directly above the lter and then gently pull the lter o the
unit.
Clean the lter in warm, soapy water.
Dry the lter throughly before replacing it into the unit.
Press the FILTER button to reset the indicator.

10
User Instruction
Clearing the unit housing:
Clean the surface with a damp cloth and dry it with a soft towel.
Storing or Transporting the unit:
Turn o the unit and unplug from the power source.
Empty the bucket / drain the pump system by unplug the drainage stopper*
Store the unit in a cool dry place
*Only applicable to pump model.

11
Trouble shooting
Problem Possible Reasons Solutions
Unit does not work
No Power Make sure the unit is plugged into
a grounded power socket
Electrical Protection Check the house fuse / circuit
breaker box.
Water bucket is not properly
installed
The water bucket must be in place
for the unit to operate.
Power Failure
A 3 mins protective time delay
may prevent the unit to operate
after a power failure.
Dehumidier does not dry the air
as it should
Not enough time for the unit to
remove moisture
Allow the unit to operate at least
24 hours
Airow is restricted Make sure nothing is blocking the
air inlet / exhaust vent
Dirty lter Clean the lter
The setting is too high Lower the desired humidity using
the control panel
Moist air getting into the room
Make sure clothes dryer is not
blowing moist air into the room
/ doors, windows, or other open-
ings are closed.
Room temperature is too low Low room temperature will re-
duce the moisture removal rate
Dehumidier runs too much
The room is too large Make sure the capacity of your
unit is adequate for the room size
Doors or windows are open Make sure to close all openings
Controls cannot be set Child-Lock mode on Press and hold “TIMER” button for
3 sec to unlock

12
Error Code Chat
Recommend Humidity Level
Error Code Description
EH Humidity Sensor Fault
E1
Temperature Sensor Fault
E2
E5* Water Pump Fault
Spring / Summer 30% - 50%
Fall / Winter 30% - 40%
* Only applicable to pump model

13

14

15

16
This manual suits for next models
2
Table of contents
Popular Dehumidifier manuals by other brands


emerio
emerio DH-122844 instruction manual

commercial cool
commercial cool CCD25JW manual

Mission Air
Mission Air OPTIDRY 25L instructions

Seresco
Seresco NV Series Operation and maintenance manual

Quest Engineering
Quest Engineering Dry 105 Installation, operation and maintenance instructions

Kenmore
Kenmore 580.54351 owner's manual


