dellonda DG159 User manual

Model No. DG159
Thank you for purchasing a Dellonda product. Manufactured to a high standard, this product will,
if used according to these instructions, and properly maintained, give you years of trouble free performance.
DG159 Issue:1 14/10/21
www.dellonda.co.uk
Dellonda Deluxe Kamado BBQ Grill/Oven/
Smoker, Stand, Wheels, Ceramic 22” (56cm)
with Cover

Important Information
Please read these instructions carefully. Note the safe operational requirements, warnings & cautions. Use the product correctly and with care
for the purpose for which it is intended. Failure to do so may cause damage and/or personal injury and will invalidate the warranty. Keep these
instructions safe for future use.
Refer to
instruction
manual
Wear
Gloves
Warning:
Hot
Surface
Specication
Model No ................................................................... DG159
Assembled Product Dimensions ............................. Ø56 x 82cm
Temperature Range .............................................. 105°C - 485°C
Cooking Grid Diameter ........................................ Ø47.5cm (19”)
About the Product
The Dellonda Kamado style barbecue is the perfect addition to your outdoor living area. Amaze your guests with an unforgettable al-fresco dining
experience. Caters for all parties with the option of cold smoking, searing, grilling, baking and slow cooking, our Kamado barbecue has something
for everyone! Ceramic outer shell and egg design provides excellent heat retention and cooking temperatures up to 900°F (485°C). Suitable for use
with charcoal and untreated wood chips. Ventilation at the top and bottom of the barbecue gives you complete control of your cooking and airow.
Supplied with a stand and castor wheels for easy manoeuvrability.
Safety Instructions
• GENERAL SAFETY
• WARNING! The warnings, cautions and instructions in this manual cannot cover all possible conditions and situations that may occur. It must
be understood by the operator that common sense and caution are factors which cannot be built into this product, but must be applied by the
operator.
• WARNING! Hazardous fire or explosion may result if instructions are ignored. Read instructions before use.
• WARNING! Accessible parts may be very hot. Keep young children and pets away. Take special care when children and elderly are present.
• WARNING! Any modification to this appliance may be dangerous and is absolutely not permitted.
• Read the instructions carefully before assembly and retain this manual for future reference.
• Use outdoors only, stand on a level surface, remember hot fat may drip out.
• Handle the hot grill with the help of oven gloves.
• Use oven gloves and sturdy long handled barbecue tools when cooking on the grill.
• Be prepared if an accident or fire should occur. Know where your first aid kit and fire extinguishers are and how to use them correctly.
• Ensure the appliance has completely cooled before storing.
• DO NOT use indoors! This grill is designed for outdoor use in a well-ventilated place, and is not intended as a heating device and should never be
used as such. When used indoors, toxic fumes accumulate which result in serious bodily injury or death.
• DO NOT use petrol, alcohol or other highly volatile substances to ignite the fuel.
• DO NOT add charcoal-igniting liquid or power-soaked charcoal to hot or warm charcoal.
• Keep the area around the grill free of flammable fumes and liquids such as petrol, alcohol, flammable materials, etc.
• Use the grill only after all parts have been assembled. This grill must be mounted correctly according to the assembly instructions. Incorrect
assembly can be dangerous.
• The use of alcohol, or medicines available with or without a prescription, may affect the user’s ability to position the grill properly or use it safely.
• Be careful when using the grill. During grilling or cleaning, the grill is hot, and should never be left unattended.
• WARNING! This barbecue gets very hot, don’t move it during use.
• WARNING! Do not use spirit, petrol or other flammable liquids to (re)ignite! Only use detonators that meet the EN 1860-3!
• DO NOT use the grill within 2 metres of flammable materials. Inflammable materials include, but are not limited to wood or to treated wooden
decks, patios and porches.
• Always keep the grill on a safe and flat surface, at a distance from flammable materials.
• DO NOT wear loose-sleeved clothing while lighting or using the grill.
• Never touch the grill or charcoal grid, ash or charcoal to make sure they are hot.
• After grilling, close all the vents and lid and allow the grill to extinguish naturally and cool.
• Use heat-resistant barbecue mittens or gloves while grilling, adjusting the vents (dampers), adding charcoal and using the thermometer or lid.
• Use the right tools with long, heat-resistant handles.
• Always place the charcoal on top of the (bottom) charcoal grid. Do not place charcoal directly at the bottom of the boiler.
• DO NOT lean on the table, or overload the end of it.
• Never throw away hot charcoal where it can be walked over or where it poses a fire hazard. Never discard the ash or charcoal until they are
completely extinguished and cool.
• DO NOT put the grill away or store it until the ash and charcoal are completely extinguished and cold.
• DO NOT remove the ash until all the charcoal is completely burnt out and completely extinguished and the grill has cooled down.
• Keep electrical wires and cords away from the hot surfaces of the grill and away from places with lots of foot traffic.
• WARNING! Do not use the barbecue in a confined space, for example in a house, tent, caravan, vehicle or small space. Risk of fatal accidents due
to carbon monoxide poisoning.
• DO NOT leave unattended, from being lit to fully cooled or position on a surface that may be damaged by hot fat or heat.
• DO NOT store petrol or other flammable vapours or liquids in the vicinity of use.
1
www.dellonda.co.uk
Contents
2
www.dellonda.co.uk
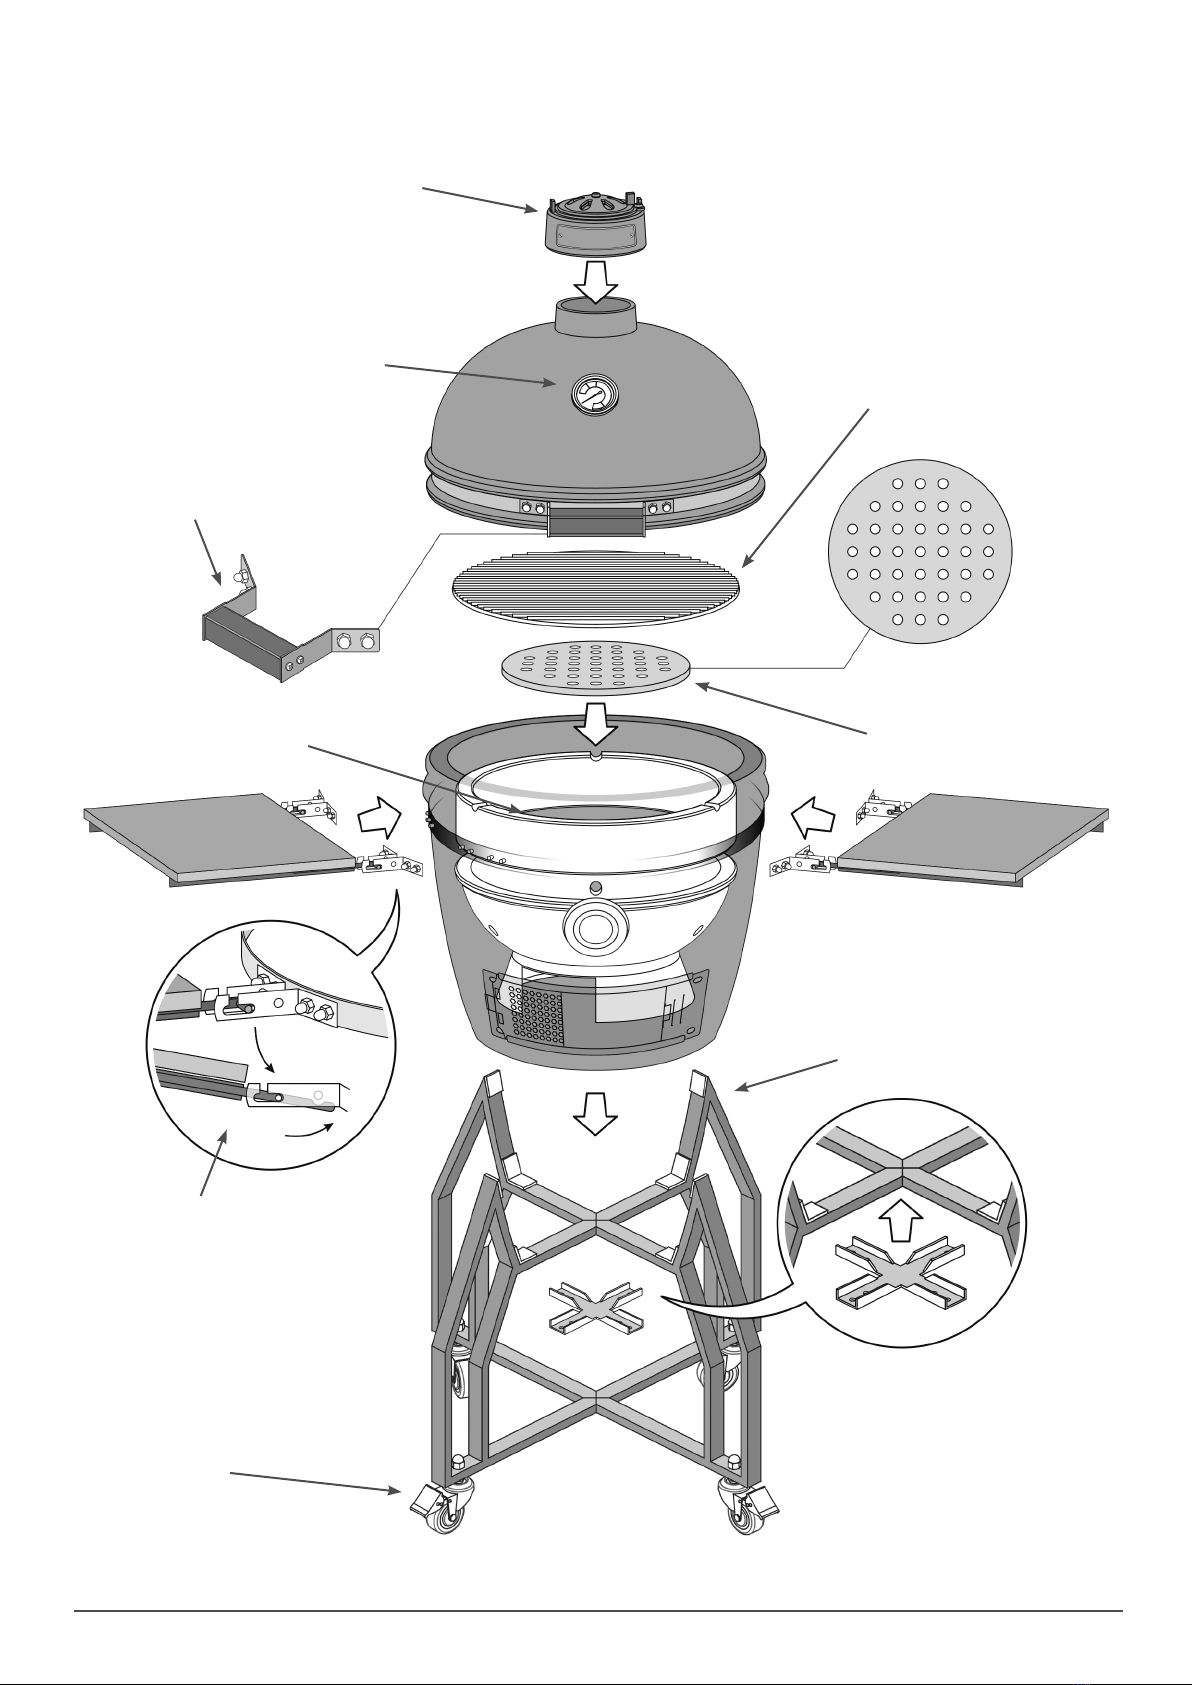
Chimney/Top regulator vent
Thermometer
Grill lid handle
Cooking grill
Charcoal plate
Ceramic re box
Stand frame
Braked castors
Grill shelves and
mounting brackets.
3
www.dellonda.co.uk
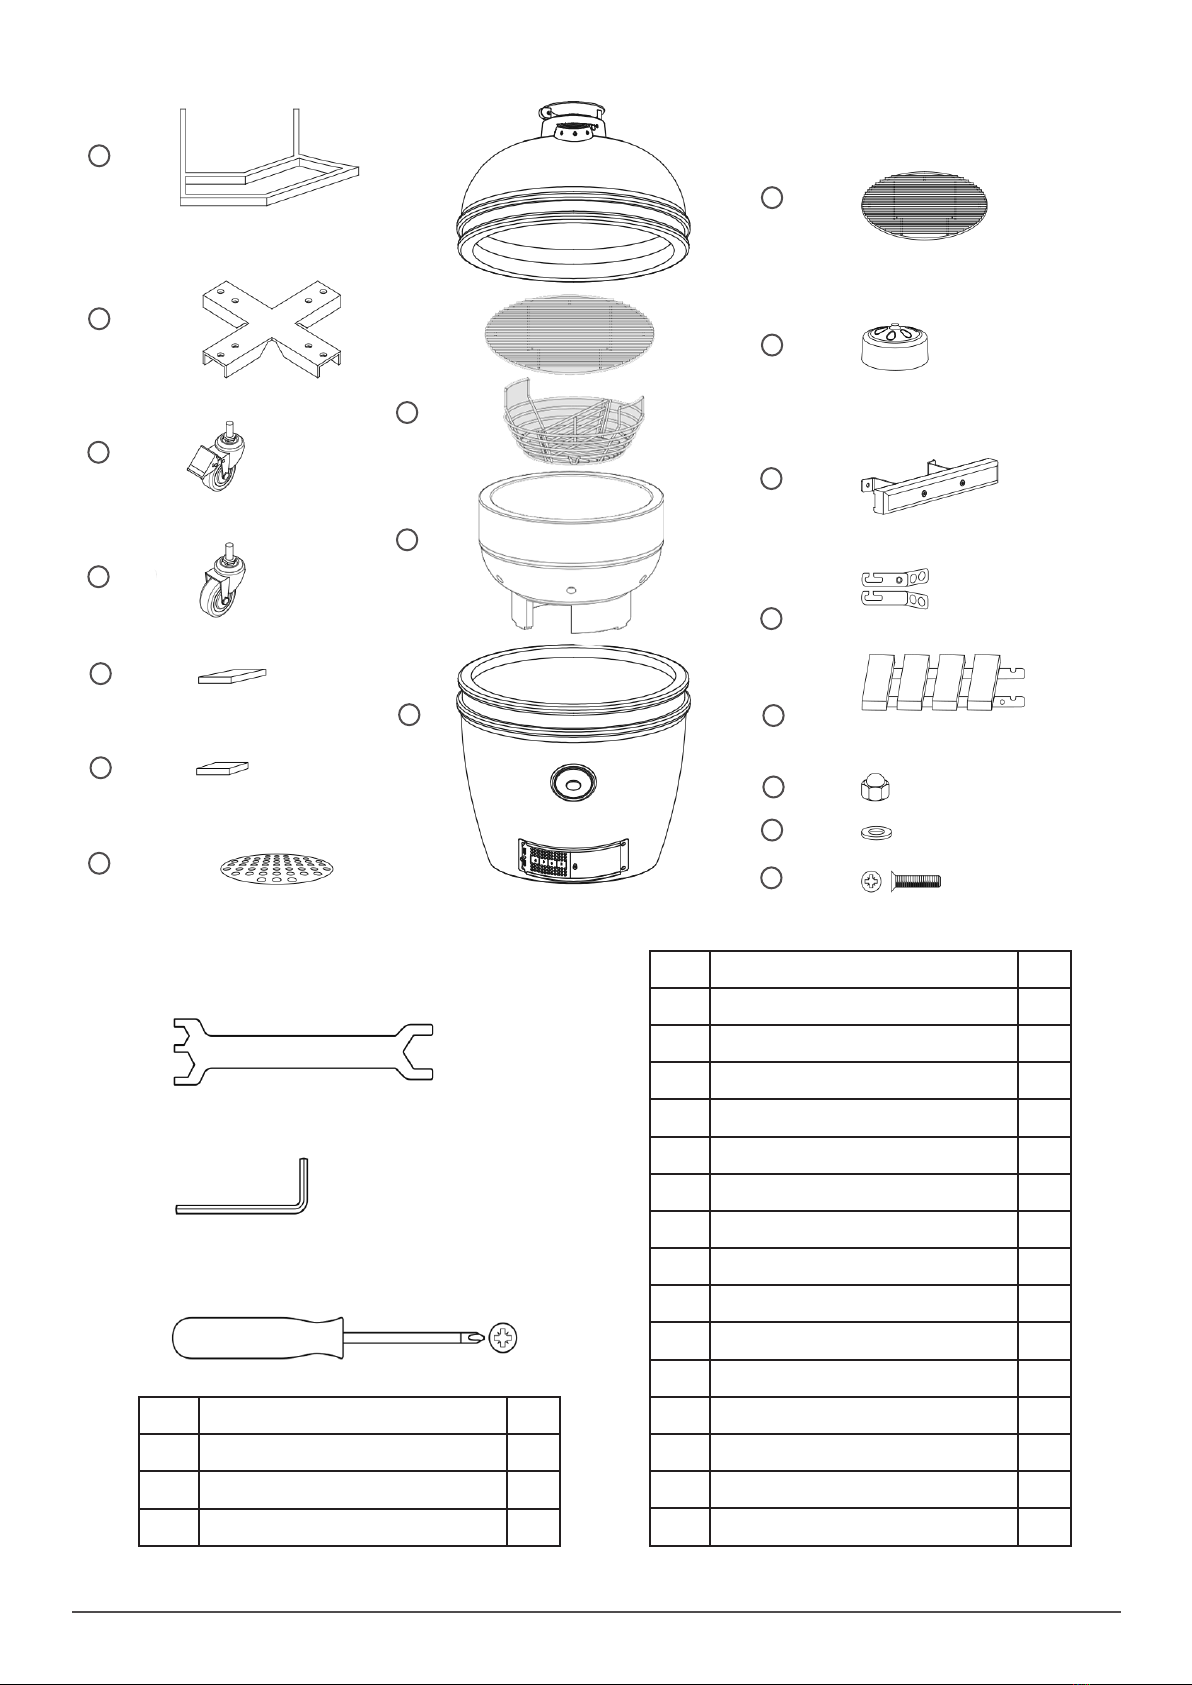
Item Description Qty
1 Kamado Grill leg 4
2 4 Way cross connector 2
3 Braked base castor 2
4 Unbraked base castor 2
5 Long sticky pad 4
6 Short sticky pad 4
7 Charcoal plate 1
8 Cooking grill 1
9 Chimney/Top regulator vent 1
10 Grill lid handle 1
11 Side shelf support brackets 2
12 Fold up side shelves 2
13 Charcoal/Fire basket 1
14 Multi section rebox 2
15 Main Grill and lid 1
1
2
5
3
4
7
6
8
9
12
10
11
B
A
C
Spanner
Hex key
Cross head screwdriver
Tools required for assembly
Item Description Qty
A M6 Dome nut 4
B M6 plain washer 4
C M6 x 16mm bolts 16
15
13
14

4
www.dellonda.co.uk
• Step 4.
• Carefully turn the assembled leg set over and place it onto it’s wheels.
• Step 5.
• Ensure the brakes are engaged (locking tab pressed down) and then carefully lift (two people are required) the empty main grill and lid section
and lower it gently into the frame, orientate the grill in the base frame (lift and turn) with the lower vent centred between the two front legs (also
decide at this stage where you want your braked wheels to sit). See Fig. 2.
• Step 6.
• Now assemble the ceramic re box into the base of the grill, add the charcoal basket and the cooking grill
Assembly
• Please read the assembly instructions carefully and follow the safety precautions. Allow sufcient time for assembly. Before starting assembly,
clear an area measuring approximately two to three square metres. Remove the items from the packaging and lay out all of the parts and any
necessary tools so that they are within easy reach.
• Only tighten all of the screw connections rmly when you have nished assembly or are instructed to within the manual. Otherwise this can result
in misalignment and tension in components.
• Step 1.
• Take the four legs and the long and short sticky cushion pads (5 and 6) and begin to apply to the frame legs (See Fig. 1). These will protect your
grill when you mount it in the assembled legs and prevent rubbing and damage. The longer of the two sticky pads sits in across the inside of the
oblique corner, ensure the centre of the pad is positioned as close as possible to the intersection of the corner.
• The shorter of the pads sits ush to the end of the frame as shown in Fig. 1.
• Step 2.
• Pass the threaded bolt on the top of the casters through the frame leg and secure in place with a plain washer and an M6 dome nut. See Fig. 1.
• Step 3.
• Insert the two cross connectors into the end of one of the completed legs, (with adhesive pads and castors attached) loosely screw into place
with two of the M6 x 16mm cross head bolts in each. In turn offer up all of the remaining 3 legs and repeat loosely bolting the legs in place.
• When you have the set of four loosely attached make a nal alignment check with the frame standing upside down on the oor (Castors facing
up) and tighten all of the bolts holding in the cross connectors.
Fig. 1 Apply the short and
long pads here.
5
6
2
1
3
4
or
A
Screw in bolts to secure
cross connectors.
Slide in the cross
connectors.
Secure castors with the
dome nut and washer.
Centre the vent
between the legs.
Fig. 2
Carefully lower
the grill into the
base frame
Fig. 3
Use M6 dome
nuts with washers
to attach the
handle.
Assembly
the internal
components into
the grill base

5
www.dellonda.co.uk
• Step 7.
• Loosely attach the two handed pairs of shelf brackets, ensure the slots to accept the shelves are facing upwards do the nuts up nger tight, set
the shelves in a level before nally tightening the nuts. See Fig. 4.
Using your grill for the rst time
• It is necessary to “cure” your grill when you use it for the rst time, curing your ceramic charcoal barbecue is important for its long-term operation
and care. Avoiding the curing procedure could lead to damage on the unit. If the rst “burns” are too hot, they could damage the felt gasket seal
before it has had the chance to mature with use.
• DO NOT remove the grey felt bead from the joining edging of the base and the lid, This gasket provides the air seal for the grill around the centre.
• It is advised to do a longer slower burn in the your grill the rst time you use it or before you rst cook with your grill, this will allow the seals to
cure and will help remove any smells or residues that may be in the grill following manufacture and transportation, it will ensure a better rst
cooking experience as well as prolonging the life of the materials in the grill. This process provides an excellent opportunity for you to see how
your Kamado grill burns and how to control the temperature, this exercise will also give you a good opportunity to see how to safely control your
grill.
• After the rst couple of times you use your grill when it is cool check all the xings and hardware and tighten where required, use a small amount
of light oil or WD40 to lubricate the hinge and hasp lock, this process should be repeated regularly to ensure the good working condition of your
grill.
• Warning! High temperature cooking - Get into the habit of opening your grill by 3-5cm and pausing for two or three seconds before
fully opening the grill, introducing a large amount of air quickly could cause the grill to dangerously are up this is more likely at higher
temperatures.
Lighting your grill
• Open the lid and remove the grill, open the bottom inlet vent fully and the top exhaust vent in the hinging top section also. Fill the inner ceramic
re bowl with a good quality charcoal to approximately 3-5cm above the ventilation holes. Using a natural solid re lighter block place into the
charcoal lumps and light.
• Leave the lid open for 5-10 minutes until the charcoal is well alight. It is recommended that the charcoal is not moved to stoked after it is well
alight, you will get a more even heat if left alone. Close the lid and set the vents as described in the section “Regulating the temperature”.
• DO NOT begin cooking with your grill until the charcoal pieces have a good coating of ash on them, only handle grill components with heat
resistant gloves.
• Close the lid to allow the temperature within the grill to rise, ensure the air vents top and bottom are initially open, you can now begin to regulate
the ow of air and temperature in the grill.
• Try not to add fuel to the grill during cooking as this will alter the temperature dramatically and affect the evenness and length of the cooking
process.
• For the best results we recommend you use natural charcoal or untreated wood for cooking and untreated wood chips for smoking for the best
possible avours.
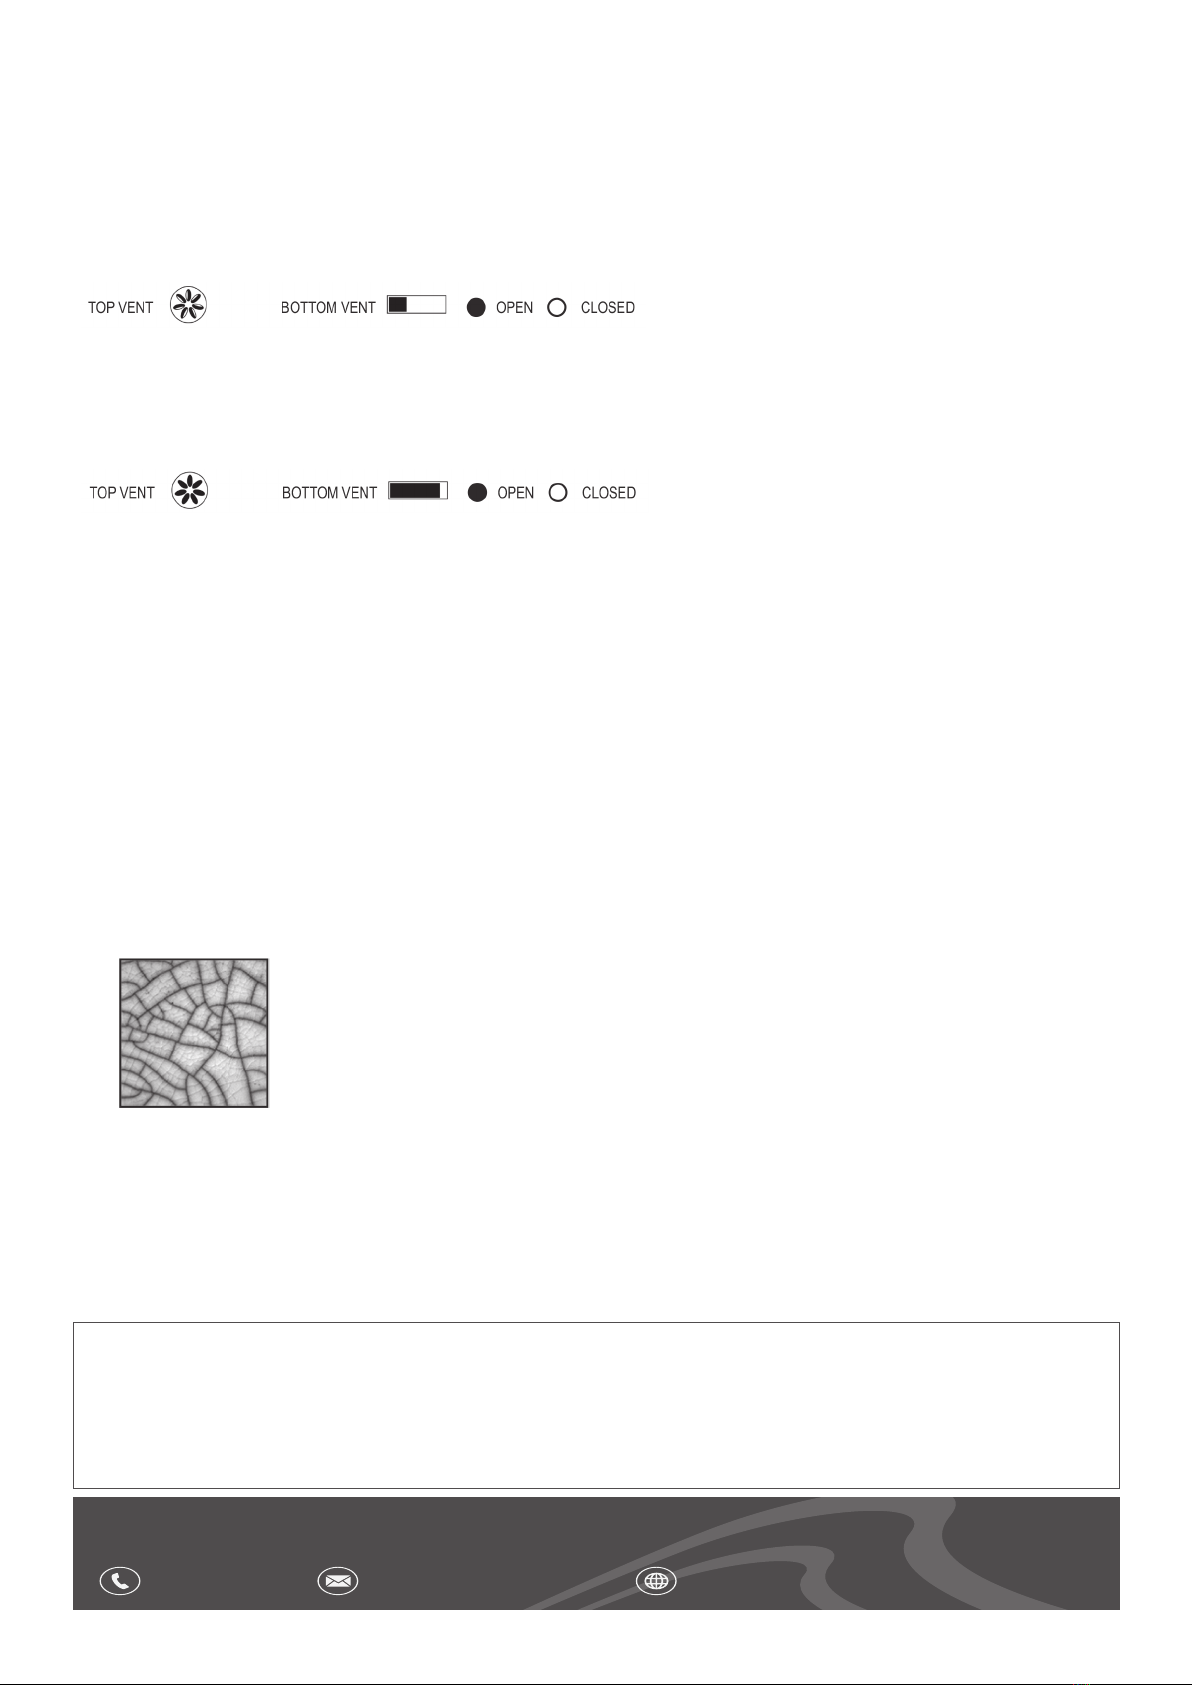
Regulating the temperature
• Open vents will allow a greater ow of air and create HIGHER temperatures.
• Nearly closed vents will allow less air through and result in LOWER temperatures.
• Closed vents will almost completely remove the ow and air and will slowly extinguish the grill.
• Once the grill begins to get up to your desired temperature (normally between 150ºC and 200ºC) reduce both the upper and lower vents down to a
minimal level, allowing the grill to stay alight but maintain temperature.
• Fine tune your temperature by adjusting from there, always try to keep the upper and lower vents in unison (both half open, both a quarter open
and so on).
• When the thermometer indicates the desired temperature, you can start grilling.
Fig. 4
Loosely attach
the shelf
brackets.
Align and level
the shelf and
tighten xings.

Extinguishing
• After you have nished cooking do not add any further fuel, close the lid and shut of the air vents to starve the re of oxygen and allow the grill to
die naturally and cool slowly.
• Never try to cool the re with water or any other articial means as this can damage the grill components and ceramic.
Storage
• When not in use, and if stored outside, cover the ceramic charcoal barbecue once completely cooled with a suitable rain cover.
• It is recommended the ceramic charcoal grill be stored under cover in a garage or shed when not being used for long periods of time.
Cleaning and Maintenance
• Charcoal can be reused if you have unspent fuel left in your grill from a previous use, although, always ensure the re bowl is cleaned of ash,
spent fuel and other debris which may restrict airow before relighting.
• Vents, grills and air holes should be cleaned before each use, this will maximise your Kamado’s efciency and give you the most control.
• Outside surfaces can be wiped down with a damp cloth or sponge using a mild non abrasive detergent, ensure the grill is dried well before use.
• The inner surfaces of the grill will self clean during the heating and cooling process, although food debris can be brushed down with a stiff non
abrasive brush.
• The ceramic surfaces can be wiped with a DRY soft cloth or brush. DO NOT use water or other uids, ceramics can be porous and if heated could
crack, ensure all components have cooled and are dry before being assembled back into the grill.
Basic cooking advice
• This Kamado grill offers you the opportunity to enhance your grilling skills with great control and temperature retention, you can enjoy the subtle
tastes and aromas of grilling and smoking over an open re to deliver wonderfully prepared foods.
• The oval shape of the Kamado causes the hot air to circulate, because of the design you have far more control over the supply of oxygen
yourself in a simple way, you are always in charge of the temperature in your grill. This makes it easy to sear and grill meats and then lower the
temperature and allow it to cook on at a lower temperature.
• Having great control over the air through your grill means you burn a lot less charcoal allowing for much longer lower temperature cooks.
• With the addition of wood chips you can ensure that not only meat and the sh but also pizza or bread you bake on the pizza stone get a smoky
aroma and taste. You can even make desserts. Think of grilled pineapple, or a creamy brownie.
General food safety
• Read and follow this advice when cooking on your ceramic charcoal grill:
• DO NOT begin cooking until the fuel has a coating of ash.
• Before cooking, ensure grill surfaces and tools are clean and free of old food residues.
• Always wash your hands before and after handling uncooked meat, and before eating.
• DO NOT use the same utensils to handle cooked and uncooked foods.
• Always keep raw meat away from cooked meat, and other foods.
• Ensure all meat is cooked thoroughly before eating.
Smoking
• Always follow the cooking temperature guide stated in this instruction manual.
• Always use heat-resistant gloves when handling hot ceramics or cooking surfaces.
• Light the lump charcoal according to the lighting instructions in this manual.
• DO NOT move or stoke the coals once lit.
• Open the bottom vent fully and leave the lid open for about 10 minutes to build a small bed of hot embers.
• Monitor the ceramic charcoal barbecue until it has risen to the desired temperature.
• Leave the bottom vent slightly open. Close the top vent and continue to check the temperature for a few more minutes.
• Using heat-resistant gloves, sprinkle the wood chips in a circle over the hot charcoal.
• You are now ready to use the ceramic charcoal barbecue to begin smoking food.
• Tip: Soak wood chips or cooking planks in water for 15 minutes to prolong the smoking process.
• LOW TEMPERATURE COOKING
• Light the lump charcoal according to the lighting instructions, do not move or stoke the coals once lit.
• Open the bottom vent fully and leave the lid open for about 10 minutes to build a small bed of hot embers.
• Always monitor the charcoal barbecue until it has risen to the desired temperature.
• Fully close the bottom vent to maintain the temperature, you are now ready to use the ceramic charcoal barbecue for cooking.
• HIGH TEMPERATURES
• Light the lump charcoal according to the lighting instructions, close the lid and fully open the top and bottom vents.
• Close the top vent halfway and continue to check the temperature for a few more minutes.
• You are now ready to use the ceramic charcoal grill for cooking.
• SLOW COOK / SMOKE (83 °C - 108 °C / 180 °F - 225 °F)
• Beef brisket: 4.5 hours per kg
• Pulled pork: 4.5 hours per kg
• Whole chicken: 3-4 hours
• Ribs: 3-5 hours
• Roasts: 9+ hours
6
www.dellonda.co.uk
• GRILL / ROAST / BAKE (163 °C - 191 °C / 325 °F - 375 °F)
• Seafood (crab, lobster, shrimp): until opaque & rm
• Seafood (clams, oysters): until shells open
• Fish: 15-20 minutes
• Pork tenderloin: 15-30 minutes
• Chicken pieces: 30-45 minutes
• Whole chicken: 1-1.5 hours
• Leg of lamb: 3-4 hours
• Turkey: 2-4 hours
• Ham: 2-5 hours
• SEAR (260 °C - 330 °C / 500 °F - 625 °F)
• Scallops: until opaque & rm
• Steak: 5-8 minutes
• Pork chops: 6-10 minutes
• Burgers: 6-10 minutes
• Sausages: 6-10 minutes
Accessories
A number of useful accessories are available for your Kamado grill to be purchased separately from Dellonda.
• Troubleshooting
• If you are having problems lighting the grill check to ensure there is a good ow of air though the unit, make sure the top and bottom vents are
fully open and there is nothing blocking the vents or air holes in the ceramic liner.
• Once the re is alight ensure the bottom vent and the lid are left open for at least 10 minutes to build a bed of hot embers.
• If the grill will not stay alight or won’t generate enough heat check to ensure you have lled the grill with enough fuel, if not add charcoal and begin
the process to build a bed of hot embers again.
• To prevent a back-draft or are ups that may cause injury, it is advised you only slightly open the lid and then pause for a few seconds to allow the
air to enter to body of the grill safely
• Changes or cracks to ceramic body.
• Spiders web pattern in the face of the ceramic is different to a crack in the ceramic. This crazing does not affect the performance of the grill and
is part of the curing process.
Environment Protection and Waste Protection and Electrical Equipment Regulations (WEEE)
Recycle unwanted packaging materials. When this product is no longer required, or has reached the end of it’s useful life, please dispose of it in
an environmentally friendly way. Drain any fluids (if applicable) into approved containers, in accordance with local waste regulations. Under the
Waste Batteries and Accumulators Regulations 2009, Dellonda would like to inform the user that this product contains one or more batteries. It
is our policy to continually improve products and we reserve the right to alter data, specifications and parts without prior notice. No liability is
accepted for incorrect use of this product. Guarantee is 12 months from purchase date, proof of which is required for any claim.
Dellonda Limited
Kempson Way, Suffolk Business Park, Bury St Edmunds, Suffolk. IP32 7AR
Table of contents
Other dellonda Grill manuals


