dellonda DG103 User manual
www.dellonda.co.uk DG103 Issue 1 09/02/21
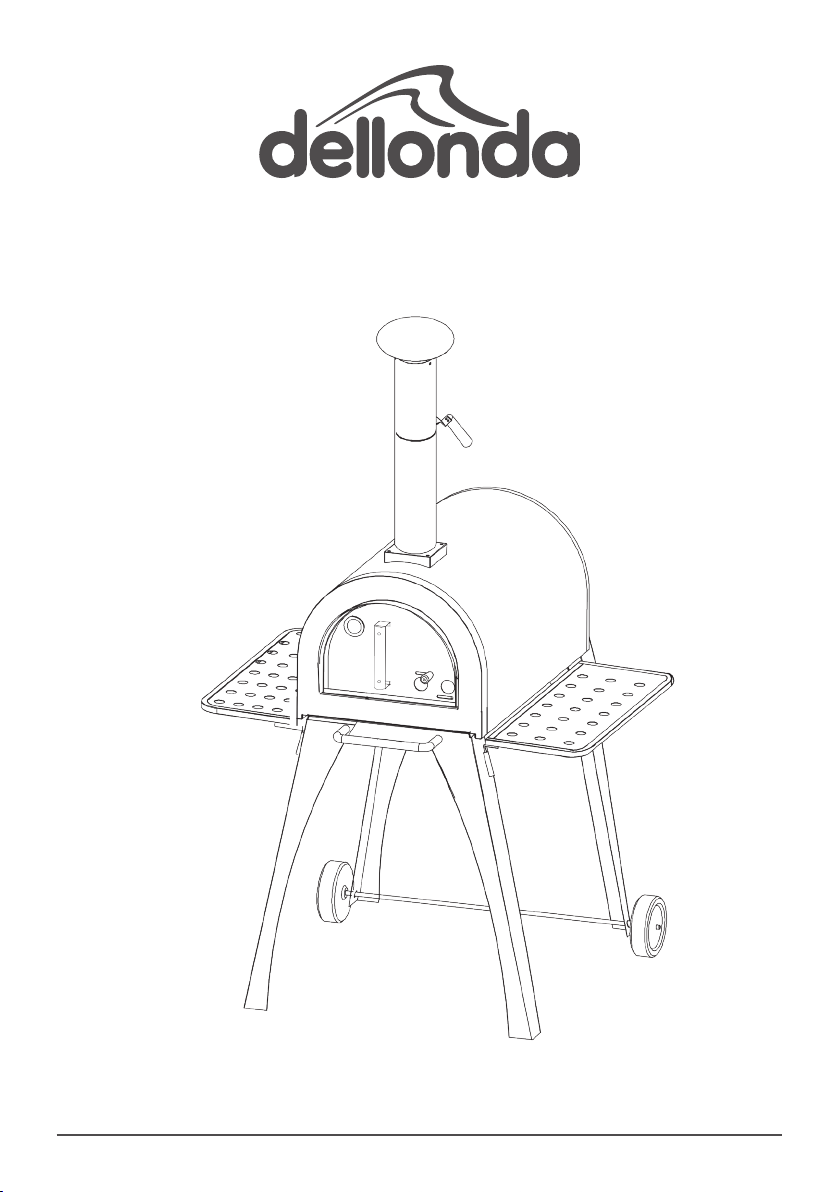
Dellonda Industrial Outdoor Garden Wood
Fired Pizza Oven & Smoker with Cover
Model No. DG103
Thank you for purchasing a Dellonda product. Manufactured to a high standard, this product will, if used
according to these instructions, and properly maintained, give you years of trouble-free performance.
www.dellonda.co.uk 2
Important Information
Please read these instructions carefully. Note the safe operational requirements, warnings & cautions.
Use the product correctly and with care for the purpose for which it is intended. Failure to do so
may cause damage and/or personal injury and will invalidate the warranty. Keep these instructions
safe for future use.
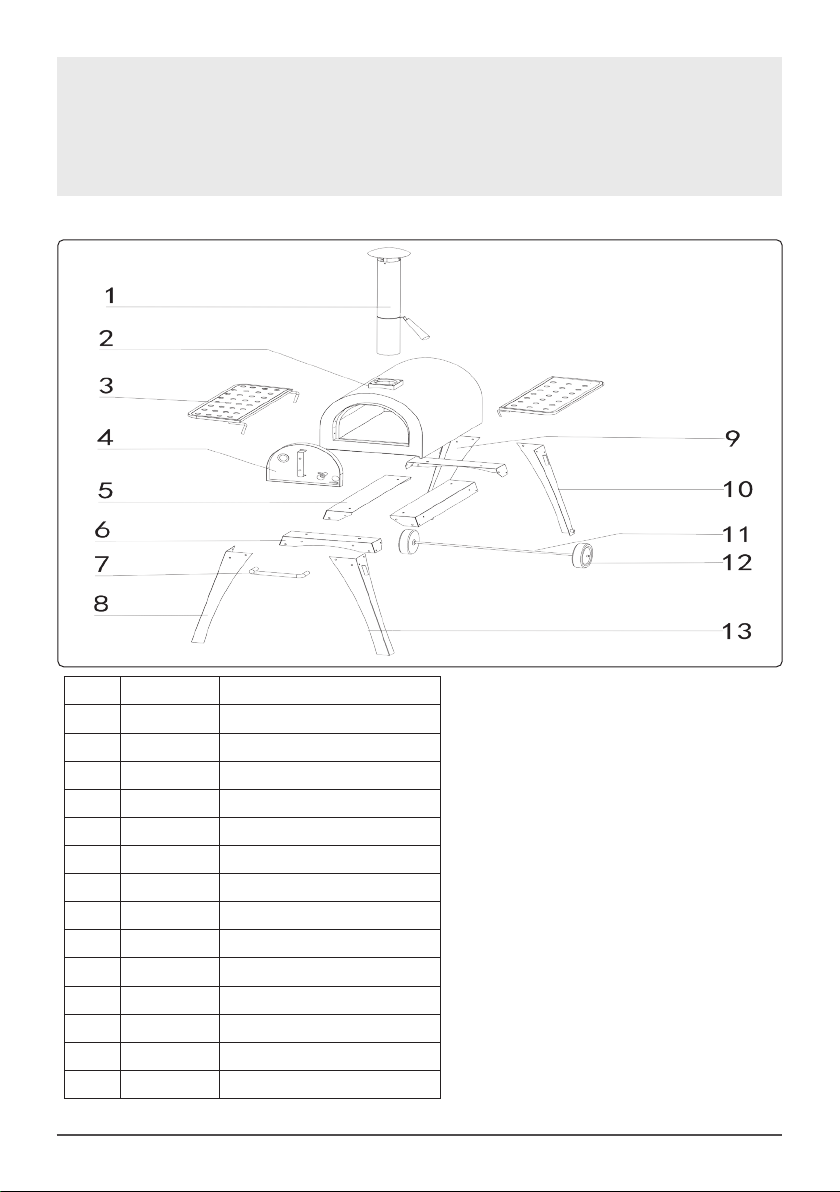
Parts Diagram
Part Model No. Description
1 DG10565 Chimney
2 DG10566 Oven Body
3 DG10567 Side Shelf
4 DG10568 Oven Door
5 DG10569 Long Bracket (Left or Right)
6 DG10570 Short Bracket (Front or Back)
7 DG10571 Handle
8 DG10572 Trolley Leg (Front Left)
9 DG10573 Trolley Leg (Back Left)
10 DG10574 Trolley Leg (Back Right)
11 DG10575 Wheel Axle
12 DG10576 Wheel
13 DG10577 Trolley Leg (Front Right)
‘ ‘ DG10578 Fixing Kit (Not Shown)

www.dellonda.co.uk 3
About the Product
Industrial wood-fired pizza oven and smoking
oven, ideal for cooking/smoking pizza, sh, meat,
vegetables and much more. Two side shelves
creates additional storage and preparation space.
Features two rear wheels for easy manoeuvrability.
Fuel Source: Untreated wood, logs or charcoal (not
included). Supplied with pizza paddle, cleaning
brush and water resistant cover. Not recommended
for use in strong winds.
Safety Instructions
• This product is intended for outdoor use only.
• DO NOT use indoors.
• Never leave a burning re unattended.
• DANGER of carbon monoxide poisoning.
• NEVER light this product or let it smoulder or
cool down in conned spaces.
• DO NOT use this product in a tent, caravan, car,
cellar, loft or on a boat.
• DO NOT use under awnings, parasols or
gazebos.
• DO NOT overload the unit with fuel.
• FIRE HAZARD - Hot embers may emit while
in use.
• WARNING - DO NOT use petrol, white spirit,
lighter uid, alcohol or other similar chemicals
for lighting or relighting.
• This product is ONLY suitable for use with
wood pellets, wood, logs or charcoal.
• DO NOT use this oven on any other ammable
surfaces.
• Ensure that the oven is positioned at least 2
metres away from ammable items.
• DO NOT use this oven as a furnace.
• DO NOT handle or move the oven whilst alight
as it will be hot.
• ALWAYS USE heat resistant gloves when in
use as the unit will be hot.
• Allow the unit to cool down completely before
moving or storing.
• ALWAYS keep children and pets at a safe
distance from the oven when in use.
• ALWAYS inspect the unit prior to use for
fatigue and damage.
• DO NOT use in high winds.
Assembly
Prior to assembly, read the instructions carefully.
Check all parts against the parts list. Only use
fasteners from the xing kit supplied with this
item. Carry out assembly on a soft surface to
avoid scratching the paint. Wear protective gloves
during assembly. Seek physical assistance during
assembly. Please retain this information for future
reference. For ease of assembly, only loosely
tighten bolts and then tighten fully when assembly
is complete.
IMPORTANT - Remove any packaging before use,
but retain the safety instructions and store them
with this product.
STEP 1 - Attach 1 x trolley legs (8) and (13) to 1 x
short bracket (6) and 2 x long brackets (5) using
6 x M8 bolts, 6 x Φ8 washers and 6 x M8 nuts.
Remember to align left front hole to connect with
handle. Note - The handle cannot be xed here until
the base is assembled.
STEP 2 - Attach 1 x short bracket (6) and 1 x trolley
legs (9 and 10) to STEP 1 half-completed base
using 8 x M8 bolts, 8 x Φ8 washers and 8 x M8
nuts. Fixed 1 x handle (7) to assembled base by
M8 bolts, 2 x Φ8 washers and 2 x M8 nuts.
STEP3 - Feed wheel axle (11) through holes in
wheel trolley section ( 9 and 10) and attach wheels
(12) securing with M12 nut and Φ12 washer per
wheel.
STEP 4 - Attach oven body (2) to assembled base
securing with 4 x Φ6 washer and 4 x M5 bolts.
STEP 5 - Attach chimney (1) to body (2).
STEP 6 - Attach side shelf (3) to left and right side
of well assembled base.
STEP 7 - Attach door (4) to oven body (2).
The oven is now ready to use, but please ensure
your have read these instructions thoroughly prior
to use.
STEP 8 - Once completed, fully tighten all xings
and ensure the oven is stable.
Positioning, Lighting, Usage &
Care Information
• Ensure the oven is positioned on a permanent,
at, level, heat resistant non-ammable
surface away from ammable items.
Refer to
instruction
manual
Wear
protective
gloves

www.dellonda.co.uk 4
• Ensure the oven has a minimum of 2m
overhead clearance and has a minimum 2m
clearance from other surrounding items.
• Place untreated wood into oven. DO NOT use
more fuel than 75% of fuel area capacity.
• Place rolled up newspaper and kindling in with
the fuel and using heat resistant gloves light
the fuel.
• Allow the fuel to heat up and be kept red
hot for at least 30 minutes prior to the rst
cooking on the oven or pizza stone.
• DO NOT cook before the fuel has a coating of
ash. If required, place the pizza stone in oven.
• Once the fuel has a coating of ash, place your
food onto brick oor or pizza stone in the
oven.
• If you wish to use as a smoker unit, add wood
chips to the fuel and restrict air ow to the
unit by closing the bafe plate on the door and
damper on the chimney.
• Air ow can be adjusted as required via the
bafe plate and damper on the chimney.
• Always use heat resistant gloves during the
handling process and when refueling.
• The pizza stone can be washed using a
mild detergent. They are not suitable for
dishwasher use. Allow to cool before washing.
• The pizza stone will develop soot on the
underside - this may be difcult to remove and
should be expected. It is not a fault and will
not affect use.
• The unit may be left outside all year if a
weatherproof cover is used to help protect it
from bad weather.
• The oven surface will age and develop surface
rust when placed outdoors and from rst use.
This is to be expected, it’s not a fault and will
not affect use.
Food Cooking Information
• Please read and follow this advice when
cooking.
• Always wash your hands before and after
handling uncooked meat and before eating.
• Always keep raw meat away from cooked
meat and other foods.
• Before cooking ensure brick surfaces and
tools are clean and free of old food residues.
• DO NOT use the same utensils to handle
cooked and uncooked foods.
• Ensure all meat is cooked thoroughly before
eating.
• CAUTION - eating raw or under cooked meat
can cause food poisoning (e.g. bacteria
strains such as E.coli.)
• To reduce the risk of under cooked meat cut
open to ensure it cooked all the way through.
• CAUTION - if meat has been cooked
sufciently the meat juices should be clear
and there should be no traces of pink/red juice
or meat colouring.
• Pre-cooking large pieces of meat and joints is
recommended before nally cooking in your
oven.
• After cooking always clean the cooking
surfaces and utensils.
• DO NOT cook until your fuel has a coating of
ash.
Cooking Pizzas
• Place the pizza stone into the oven and wait
whilst it reaches optimum temperature.
• Allow the oven to reach approximately 570 -
660 F (300-350 C).
• Ensure that the bafe on door is half open and
that the damper on chimney is open.
• Check your pizza occasionally as they can
cook quickly.
• Once it’s cooked to your taste, remove the
pizza carefully using the supplied paddle and
heat resistant gloves (not supplied).
Cooking Other Foods
• This oven can be used to cook various other
types of food, such as: sh, meat bread etc.
• Please fuel the oven as described under the
lighting section.
• Place aluminium foil under the food to prevent
it sticking to the oven oor.
• To keep meat moist, add a small amount of
water to a small foil tray. Separate the coals in
the lower fuel section and place the tray in the
middle of the fuel before lighting.
• Top up the liquid as necessary using heat
resistant gloves (not supplied).
Smoking
• If you wish to use as a smoker unit, add wood
chips to the fuel and restrict air ow to the unit
by closing the bafe plate on the door and the
damper on the chimney.
• To keep meat moist, add a small amount of
water to a small foil tray, separate the fuel in
the fuel section and place the tray between the

Environment Protection
Recycle unwanted materials instead of disposing of them as waste. All tools, accessories and
packaging should be sorted, taken to a recycling centre and disposed of in a manner which is
compatible with the environment. When the product becomes completely unserviceable and requires
disposal, drain any uids (if applicable) into approved containers and dispose of the product and
uids according to local regulations.
Dellonda Limited
Kempson Way, Suffolk Business Park, Bury St Edmunds, Suffolk. IP32 7AR
www.dellonda.co.uk 5
fuel prior to lighting.
• Top up liquid as necessary.
Extinguishing
• To extinguish - stop adding fuel and allow re
to die.
• DO NOT use water as this could only damage
the oven.
Storage
• When not in use cover with a waterproof cover
once cooled. If left outdoors the oven will start
to develop surface rust particularly after use.
To help prevent surface rust, the outside of the
oven needs to be regularly oiled. First clean
the surface with warm water and mild soap,
allow to dry, and then brush with vegetable oil
Table of contents
Other dellonda Kitchen Appliance manuals


